 Milkweed weevil on milkweed bud (Beatriz Moisset) CC BY-SA 4.0 Like many other gardeners, I have researched and planted native milkweed species for my region to help offset the habitat loss of monarch butterflies (Danaus plexippus). Unfortunately, milkweed plants (Asclepias syriaca) are the food of choice for more than just butterflies. Evil weevils Milkweed weevils are tiny black specks that damage milkweed plants, making them distasteful or even inedible to monarch larvae. There are tens of thousands of weevil species around the world. They all cause trouble. Boll weevils are estimated to have cost the cotton industry more than $100 billion over the past century, with inflation taken into account. On the other hand, some weevils are being employed to eradicate invasive plant species, so maybe they’re not all bad. And maybe the weevils consider monarchs to be pests. Milkweed weevil species There are two milkweed weevils: regular milkweed weevils (Rhyssomatus lineaticollis), which prefer the leaves of common milkweed, and stem milkweed weevils (R. annectans), prefer milkweed stems food and egg-laying. 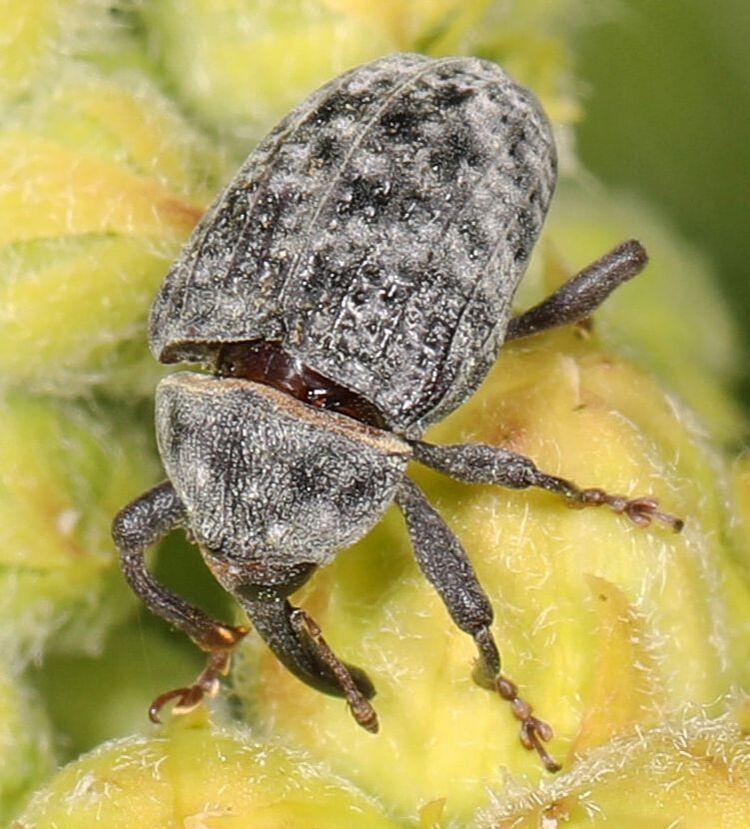 Milkweed stem weevil (Judy Gallagher) CC BY 2.0 Milkweed weevil description All weevils are small gray or black beetles. When I say small, I mean less than one-quarter of an inch. They may look like nothing more than specks. Get closer to see that they have long snouts called rostrums. Within those snouts are chewing mouthparts that take a significant bite out of buds, seeds, and stems. Like many other weevils, these evil twins have elbowed antennae with knobs on the ends, hard-scale bodies, and those snouts. Milkweed weevil larvae have tiny antennae, some scales, and no legs. Milkweed weevil behavior Milkweed weevils are nocturnal. They start eating tender new leaves and then move towards the buds and stems, where they lay eggs. They may also sever small petioles as they feed. When threatened, these pests play dead. Don’t be fooled. As soon as you turn your back, they’ll return to feeding and damaging your milkweed. Managing milkweed weevils The first step in any pest control problem is identifying the culprit. And milkweed plants are not without defenses of their own. As a milkweed weevil chews on a leaf, the plant starts oozing sticky, caustic latex. In some cases (pictured below), the plant can kill the pest without any help from gardeners. 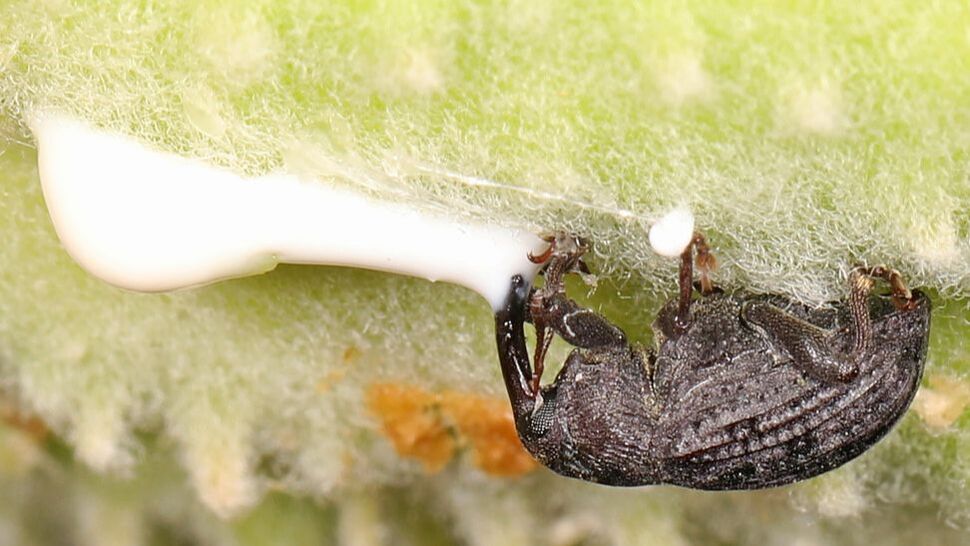 Milkweed stem weevil killed by latex from milkweed plant (Judy Gallagher) CC BY 2.0 Remember those boll weevils we mentioned above? Well, not too long ago, some researchers were trying to develop a pheromone trap for them when they discovered that milkweed weevils were more attracted to the traps than the intended victims. So, there are pheromone traps for milkweed weevils. You can also knock them into a container of soapy water. Some people say you can inject certain nematodes into the stems of plants infested with milkweed stem weevils if you’re into that sort of thing, but I couldn’t find any science to back up the claim, and they never mention which nematode. [There are more than 25,000 species.]
Check your milkweed plants regularly for those tiny black specks. And remember, if you are planting milkweed for monarch butterflies, be sure to plant native varieties, not tropical varieties. It matters a lot if you’re a monarch.  Monarch caterpillar feeding on common milkweed bud (Courtney Celley/USFWS) CC BY 2.0
6 Comments
These moths may be larger than many others, but they are not yellow. They are brown. And their larvae can be devastating to your garden. There are several types of yellow underwing. Whichever species you come across, these are airborne adult cutworms. Cutworms are destructive caterpillars that cut prized garden plants down at the soil level during the night. Native to Eurasia and North Africa, this invasive pest is now firmly established throughout North America.  Large yellow underwing (Dumi) CC BY-SA 3.0 Large yellow underwing description As far as moths go, large yellow underwings are sturdy. They have some heft to them. While many specimens are brown, other members of this family can range from tan to nearly black. Like other moths, they rest with their wings held flat, in tabletop fashion, over the body. [Butterflies tend to hold their wings upright when at rest.] Large yellow underwings have a wingspan of 2” to 2-1/2” across. The larvae start as tiny gray caterpillars but grow to 2” long. They can be green or gray-brown, with darkened heads. Brown cutworms have bands of gray or brown that run the length of the caterpillar. When disturbed, they curl up into a C-shape.  Large yellow underwing caterpillar (Ivar Leidus) CC BY 4.0 Large yellow underwing lifecycle
Adult moths generally fly from July to September, but those flight patterns have expanded in recent years. Females lay clusters of tiny, pearl-like eggs in the soil or on host plants. If you were to look closely, you would see that these eggs look ribbed or have a netting pattern. Eggs start white but soon turn grayish-pink. After they hatch, these tiny caterpillars may feed a little bit, but the real damage occurs as temperatures rise. Just when your tomato, spinach, and strawberry plants are coming to life, cutworms emerge at night, devouring young leaves and severing new stems. After eating their fill, they return to the soil. There, they surround themselves with hard, rust-colored oblong cases where they pupate. Adult moths emerge 2-3 weeks later, and the cycle begins again. Host plants Adult large yellow underwings are attracted to butterfly bush, ragwort, and red valerian. But it is larval feeding that causes all the damage. Larvae feed on the stems and leaves of young plants. The following plants (and other members of the same families) are commonly used as food by large yellow underwing larvae: • Beets (Beta) • Broccoli and cabbage (Brassica) • Carrots (Daucus) • Grapes (Vitis) • Lettuce (Lactuca) • Rhubarb • Spinach • Strawberries (Freesia) • Tomatoes and potatoes (Nightshade family) Carnations, chrysanthemums, dahlias, dandelions, freesia, gladiolas, sweet violet, and grasses are also vulnerable to cutworm feeding. But planting calendula in your garden will help to deter these pests. Controlling large yellow underwing moths These flying pests are attracted to lights at night. If you feel so inclined, you can sit on the porch with a butterfly net and put an end to their destructive ways with a container of soapy water or a garden shoe. Or, you can go out at night with a flashlight and handpick the buggers before too much damage is done. You might also use a garden claw to gently disturb the soil around affected plants. The larvae tend to stay near the surface, so you may be able to find and remove those pests that way. Drench tests can also flush cutworms out of the soil. A while back, lectins made their way into the media. They were held responsible for practically every illness known to man, thanks to Steven Gundry’s book, The Plant Paradox. He claimed that lectins were responsible for disease and obesity. He was wrong. There is no scientific evidence to support his claims. But lectins can hurt you. Let’s learn the truth about lectins and how they impact the plants in your garden (and your body).  Toxic lectin found in fava beans (Thamelry) Public Domain What are lectins? Lectins are protein molecules that bind to specific carbohydrates. The word lectin comes to us from the Latin word for choose, which is a good description of what scientists believe lectins do inside your plants. While more research is needed, lectins appear critical to cell recognition. Plants use lectins to facilitate interactions between pollen and the stigma during pollination. They also play a role in maintaining seed hull integrity. When a plant cell bumps into harmful bacteria, beneficial microorganisms, or fellow plant cells, lectins initiate the proper response. That response can be anything from toxic warfare, a welcome mat, or cell-to-cell communication.
Lectins as toxins
The toxic warfare response may be what triggered Mr. Gundry's belief that lectins cause human disease. Lectins are toxic in specific situations. They are the reason why beans and other legumes are difficult for us to digest. That’s why we cook them. The heat breaks down the lectins (among other things). Can lectins hurt me? Some plants contain enough lectin to cause illness or even death. Castor oil beans are one example - but who wants to eat those?
In most cases, we typically can not eat enough lectin-containing plants to hurt us. As always, take sensational media with a grain of salt. And cook your beans.
We’ve all heard more about pandemics in the past couple of years than anyone would care to know. But the plants in your garden are in a PAN-demic of their own. PAN is short for peroxyacetyl nitrate. [You can see why we call it PAN.]  Symptoms of air pollution damage (Mary Ann Hansen, VA Polytechnic Institute, Bugwood.org) CC BY 3.0 PAN is second only to ozone in its toxicity to plants. As a type of air pollution, it is hardest on small plants and young leaves. What is PAN? PAN occurs when sunlight hits car exhaust and industrial gases. We won’t get into the chemistry of it or the different types of PANs. It’s enough to say that hydrocarbons interact with nitrogen in the air, creating problems for plants. PANs occur in high-traffic areas and industrialized regions. Vulnerable plants Like other garden issues, not all plants are affected equally. Beets, cane fruits, celery, dill, endive, escarole, fennel, lettuces, melons, oats, peppers, pinto beans, potatoes, spinach, sunflowers, Swiss chard, and tomatoes are all vulnerable to PANs in the air. If you live in an area where PAN might be a problem, broccoli, cabbages, corn, cucumbers, lima beans, onions, radishes, sorghum, and wheat should perform better than more sensitive plants.  Air pollution damage to blackberry (Robert L. Anderson, USDA Forest Service, Bugwood.org) CC BY 3.0 Symptoms of PAN PAN causes the tissues that make up the underside of leaves to collapse. This damage may appear as bronzing, glazing, or silvering. These discolorations commonly appear in bands or blotches. When pinto beans and tomatoes are affected by PAN, the tissue collapse may affect the whole leaf. In grasses, like corn and millet, leaves affected by PAN look bleached. Chlorosis, early maturity, premature leaf drop, stunting, and weather flecking also occur. 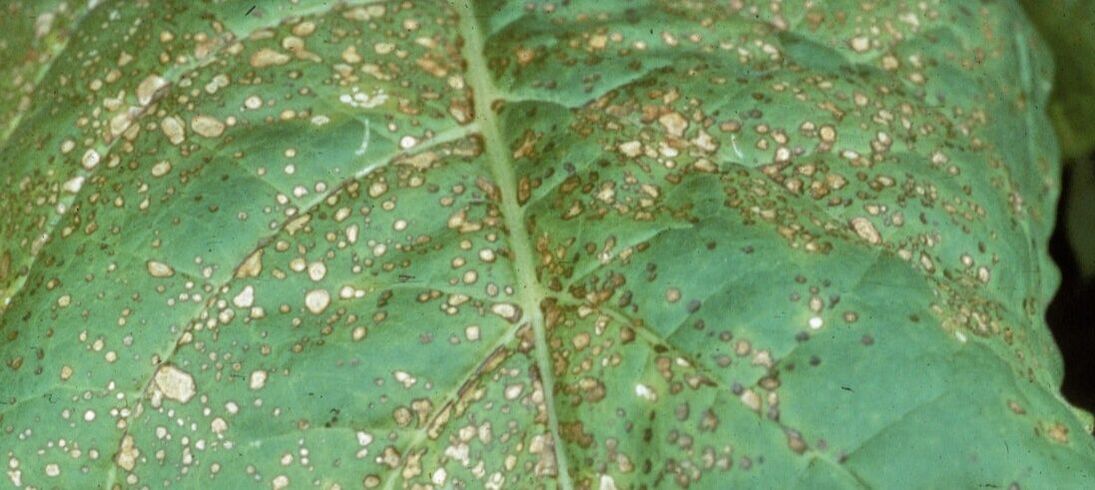 Air pollution causes weather flecking of tobacco (R.J. Reynolds Tobacco Company, Bugwood.org) CC BY 3.0 PAN can combine with ethylene to make matters worse. Healthy plants produce ethylene as part of the ripening process. But ethylene is also found in vehicle exhaust and industrial fumes, which means there is often too much of it available. Ethylene acts as a plant hormone. And we’ve all seen what happens when people take too many steroids.
Symptoms of PAN combined with ethylene include downward leaf and stem curling (epinasty), inward petal curling and the failure of buds to open (sleepiness), and stunting. Color breaking in blossoms and early petal drop may also occur. Bottom line: air pollution is harmful to all of us. A mosquito the size of an elephant?!!? Now that would be terrifying. _(22086368412).jpg) Close-up of elephant mosquito (Christopher Johnson) Public Domain Luckily for us, elephant mosquitos, and their siblings in crime, treehole mosquitos, are mosquito predators. This means they eat mosquito larvae. They eat a lot of mosquito larvae. Each one may consume 5,000 mosquito larvae before they reach adulthood. And you don’t need to start worrying about the adults either. Instead of blood, adults use sugar from nectar to produce their eggs.  Elephant mosquito (Judy Gallagher) CC BY 2.0 Predatory mosquito description Elephant mosquitos (Toxorhynchites rutilus septentrionalis) and treehole mosquitos (T. r. rutilus) are larger than blood-sucking varieties. The wingspan is similar to an American quarter. They are also more brightly colored than biting mosquitos. These predators have bright yellow markings with green or blue metallic bars. The larvae are also larger than their blood-sucking counterparts. 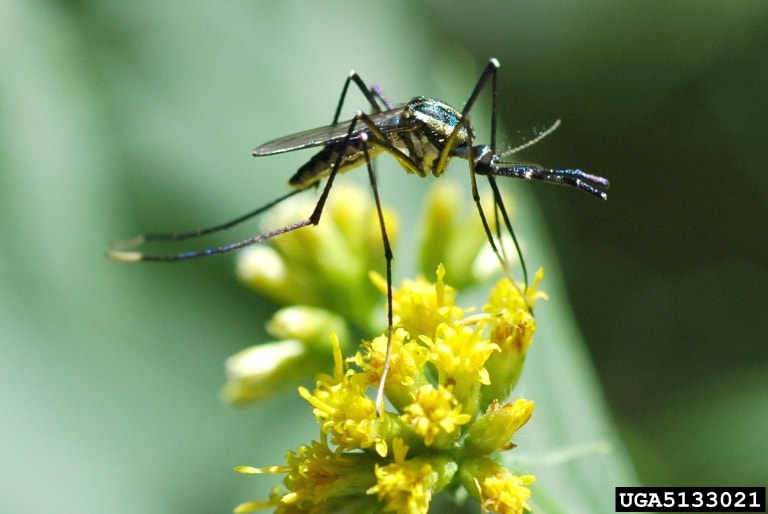 Treehole mosquito (PA Dept. of Conservation and Natural Resources - Forestry, Bugwood.org) CC BY 3.0 Predatory mosquito development
Predatory mosquitos start out like other mosquitos. White, football-shaped eggs are laid in tree cavities and other spaces that contain water. They also use all the other stagnant waters that pesky mosquitos use: flower pots, pet watering bowls, patio furniture, and tires. Mosquito eggs are the size of a grain of sand. The eggs hatch into larvae. Predatory mosquito larvae go through four growth stages or instars. As they grow, they feed on anything nearby that moves, including each other. And this presents a problem. The problem with predatory mosquitos is that you generally haven’t been able to buy them. Unlike our cheery ladybugs and voracious praying mantis, predatory mosquitos don’t take kindly to mass commercial breeding programs. They simply eat each other. Instead of hundreds of helpful predators, you’d end up with a handful of overfed gluttons. Scientists are working on this. For now, the best thing you can do is maintain a healthy environment with lots of biodiversity and use pesticides judiciously. While Bacillus thuringiensis (Bt) will kill biting mosquitos, it doesn’t seem to affect their predatory cousins. As someone who grew up in the San Fernando Valley of Los Angeles in the 1960s and 70s, I am no stranger to air pollution. I recall days when we had to stay indoors at school because the air quality was so bad. And, no, we did not have air conditioning. It was terrible. Luckily, I had a great 6th-grade teacher, Ms. Melching. She would dim the lights and read to us about blizzards. It helped. But the polluted air gave us headaches and respiratory problems.  Smog in Utah, 1950 (CDC) Public Domain Plants need clean air to grow and thrive too. But it can be hard to recognize the damage caused by air pollution. It often looks like a disease, heat stress, mite feeding, nutrient disorders, or water stress. If you can rule those problems out, consider air pollution. Types of air pollution Air pollution is estimated to cost US agriculture over one billion dollars annually. This damage can be chronic or acute. The smoky yellow skies from fires or fumes from a chemical spill fall are acute forms of air pollution. More likely, your plants are feeling the effects of long-term exposure to low levels of pollutants from industry, power generation, and vehicles. The most common pollutants include nitrogen oxides, ozone, peroxyacetyl nitrate (PAN), and sulfur dioxide. Ammonia, chlorides, chlorine, and fluorides may also be in the mix choking your plants.
 Ozone damage to maple (Robert L. Anderson, USDA Forest Service, Bugwood.org) CC BY 3.0  Tip burn after 4-hours of 6.5ppm of ozone (USDA Forest Service, Bugwood.org) CC BY 3.0 Protecting your plants
Healthy plants can protect themselves better, so keep them well-fed and watered. Also, the damage occurs most often during warm, humid days with no wind. Monitor air quality in your area and give your plants a light shower from the hose on days with poor air quality. You can also help your plants (and yourself) by learning about the industries currently or recently active in your area (or upwind). And think about how you spend your money. Are you supporting companies that protect the environment or opting for cheap stuff? We’ve all heard of collard greens, but what if you could grow these healthful leafy greens year-round? It ends up you can.  Tree collard growing in the Canary Islands (Sherwin Carlquist) CC BY-SA 3.0 There are several types of tree collards. The two most common are tree cabbage or tree kale (Brassica oleracea var. acephala) and Jersey cabbage (Brassica oleracea longata). These cousins of broccoli, Brussels sprouts, cabbage, cauliflower, kale, and kohlrabi are not annuals that must be replanted each spring. Instead, they are perennials. And they lack the oxalic acid that makes other members of this group taste bitter. Tree collards description Instead of shrub-like mounds of kale or collard greens, these tall stalks look something akin to a palm tree. They can grow 8–10’ tall, but most people trim them to half that height to keep them bushy and less likely to fall over. Tree collards grow as a single stalk with a crown of large, purplish-green, edible leaves. The more purple you see, the sweeter they taste. Stems often have a white, powdery coating that is said to reflect damaging summer sunlight. These shrubs can live for 20 years but are most productive when replaced after 4 or 5 years. Tree collards can withstand winter temperatures as low as 20°F (-7°C), but they grow best in USDA Hardiness Zones 8–11. How to grow tree collards Tree collards are best grown from certified pest- and disease-free rootstock, planted in either spring or autumn. These plants are sturdy and do not require special treatment once established. If you know someone who already has tree collards, ask for some cuttings. Cuttings should be 4–6” long and about twice the diameter of a pencil. This method requires daily light watering and can take 4–8 weeks, so don’t give up. Tree collards can also be grown from seeds. While tree collards prefer growing in the ground, you can also use a large container that is at least 15 gallons in size.  Jersey kale, as illustrated in The Farmer's Magazine, 1836. Public Domain Where to grow tree collards
Tree collards should be three feet apart. And they will readily cross-pollinate with other members of the cabbage family. Tree collards grow best in nutrient-rich, slightly alkaline soil. Tree collards thrive in dappled shade and prefer protection from afternoon sunlight. They do not grow well in full shade. Tree collards are relatively drought tolerant but perform best in well-aerated soil with regular mulching and top dressing. And they’ll grow bigger and better with regular irrigation in summer. It’s always a good idea to have your soil tested by a reputable lab before fertilizing. Adding too many nutrients can cause more problems than nutrient deficiencies. Tree collards pests and diseases These plants are relatively trouble-free. Imported cabbageworm butterflies are the primary pest of tree collards. Handpicking the caterpillars and extermigating the eggs are your best control methods. Snails and slugs are less of a problem than seen on their shorter cousins. And aphid infestations tend to be localized and short-lived. Let the ladybugs and other beneficial insects take care of those pests for you. Ladybugs won’t be able to do anything about the deer and other herbivores, though. Powdery mildew is a common problem for tree collards, so maintain good airflow and keep your plants healthy. To keep your tree collards attractive and productive, it’s a good idea to prune out stems as you harvest leaves. If you want your tree collards to reach full height, you may want to stake them upright. When growing naturally, they tend to fall over, creating an arching tangle similar to a blackberry bramble. We’ve all heard social networks help us to be healthy and successful. It ends up that trees have been networking quite intimately for a very long time. Tree networking takes two forms. They frequently share nutrients indirectly, using soil microorganisms as go-betweens. And they fuse their root systems in natural root grafts, called anastomoses. 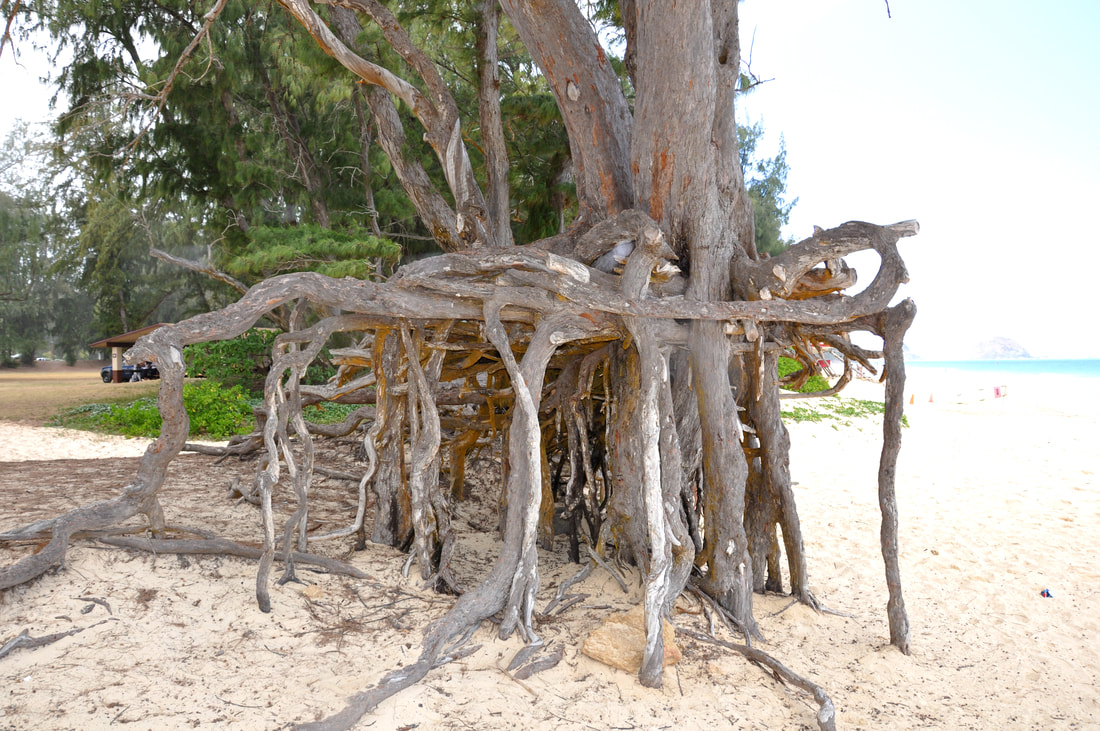 Exposed tree roots (Jennifer Boyer) CC BY 2.0 How do roots graft? Natural root grafts occur when relatively small roots of two different trees come into contact with each other. As they grow, they fuse, creating mutually accessible cambium layers and vascular bundles that allow them to share water, nutrients, and the products of photosynthesis. Why does this happen? More than 150 plant species exhibit natural root grafts, according to researchers. There is debate about whether this occurs due to overcrowding or if plants purposefully graft their roots onto neighboring roots. There is also debate whether this action is beneficial or verging on parasitism. Most researchers lean toward the mutually beneficial explanation. Potatoes and strawberries frequently graft their roots onto neighboring plants of the same species. Surprisingly, some natural root grafts are between different species.  Mature roots from two trees naturally grafted together to share water and nutrients (Wood Geek) CC BY-SA 4.0 Benefits of natural root grafting
Natural root grafting provides several benefits to all parties involved. Those benefits include improved stability and water and nutrient sharing. These benefits help keep neighboring trees healthy, making them more resistant to wind and herbivore damage. In one study, trees with natural root grafts were found better able to recover from a spruce budworm attack. Tree root grafting allows groups of trees to share water and nutrients. It also forces them to share soil-borne pests and diseases, such as Dutch elm disease and apple proliferation. For me, this is yet another example of the amazing processes going on underground. I was stunned to learn that plants can hear. I wonder what will be discovered next. Summer BBQs often involve a spilled beer or two, but did you know that might be helping your drought-impacted plants? Read on!  Beer bottle on lawn (PxHere) Public Domain Climate change and food production Climate change is having a growing impact on food production worldwide. [Sorry, I couldn’t resist.] Not all of our groceries grow well in these rising temperatures. And drought is reducing crop yields all over the place. Scientists estimate that corn and wheat crops will be seriously affected by 2030, so a lot of research is being done to see if bigger root systems or other modifications can help plants grow with less water and in higher temperatures. 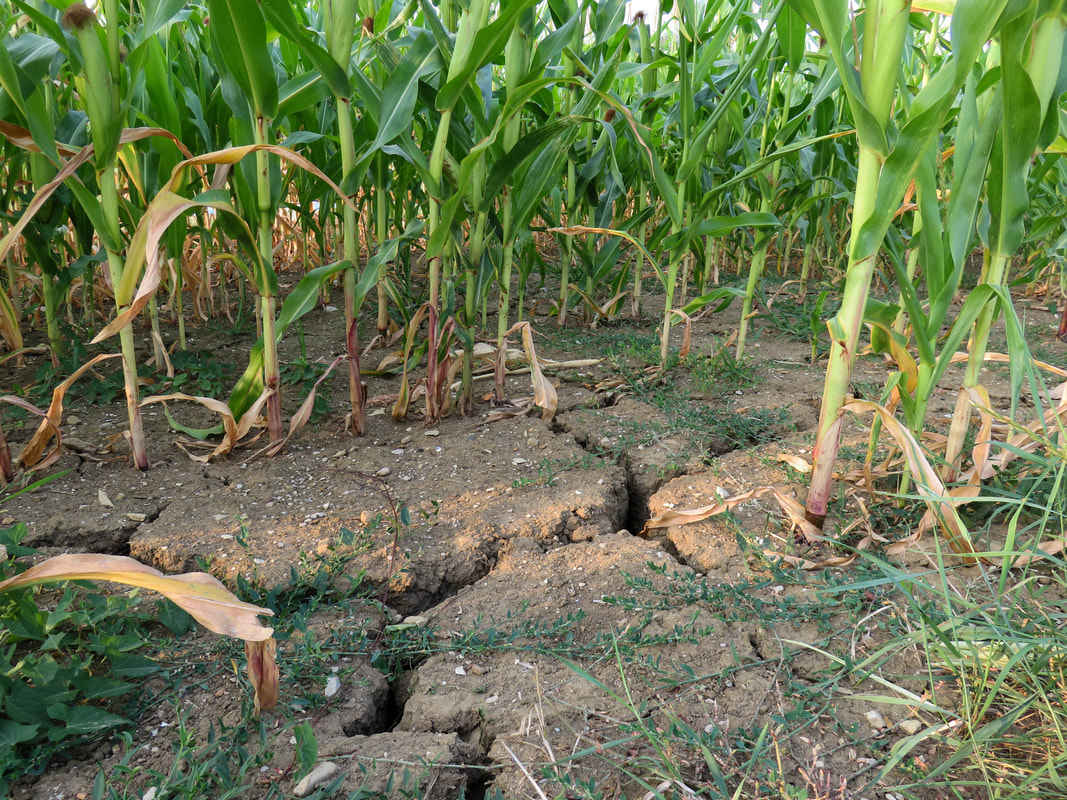 Corn growing in cracked, dry soil (PxHere) Public Domain Plants respond to heat
When plants are hot and dry, they protect themselves by closing pores found on the underside of leaves. These stomata control the rate of gas exchanges used by plants in photosynthesis. This respiration can be slowed by as much as 50% during periods of extreme heat. Unless your plants are drunk. Pints and plants Recent research has found that many plants can thrive during drought if they are given ethanol. Ethanol is alcohol. It ends up that plants produce alcohol when they don’t have enough water. This fact led some researchers at the RIKEN Centre for Sustainable Resources Science to wonder if the same processes could be used to protect plants. Alcohol is abundant and cheap to make. Did you know that U.S. bars mark up their alcohol by an average of 400-500%? But back to the plants. Researchers compared wheat and rice plants that had been treated with alcohol to those without. The plants were deprived of water for a couple of weeks in summer. Only 5% of the untreated plants recovered, while 75% of the alcohol-treated plants were able to resume growing once watered. Those are some significant numbers! The scientists radio-tagged the alcohol so that they could see where it went within the plants. Plants that were given alcohol started behaving like they were in a drought even before the water was cut off. This helped them to be better prepared than their teetotaling brethren. Not only did they make better use of the water they had, but they also used the alcohol to create sugars to provide themselves with energy and perform more photosynthesis, even though their stomata were closed. Now, this doesn’t mean you should go around giving your pumpkin plants shots of tequila. That would be a bad idea. What it does mean is that an occasional spilled beer might not be such a bad thing and we should all be on the lookout for more specific instructions as the research continues. Bacterial soft rot destroys more crops than any other bacterial disease. Commonly occurring in cruciferous, cucurbit, nightshade, and onion families, bacterial soft rot also causes severe pitting in carrots. 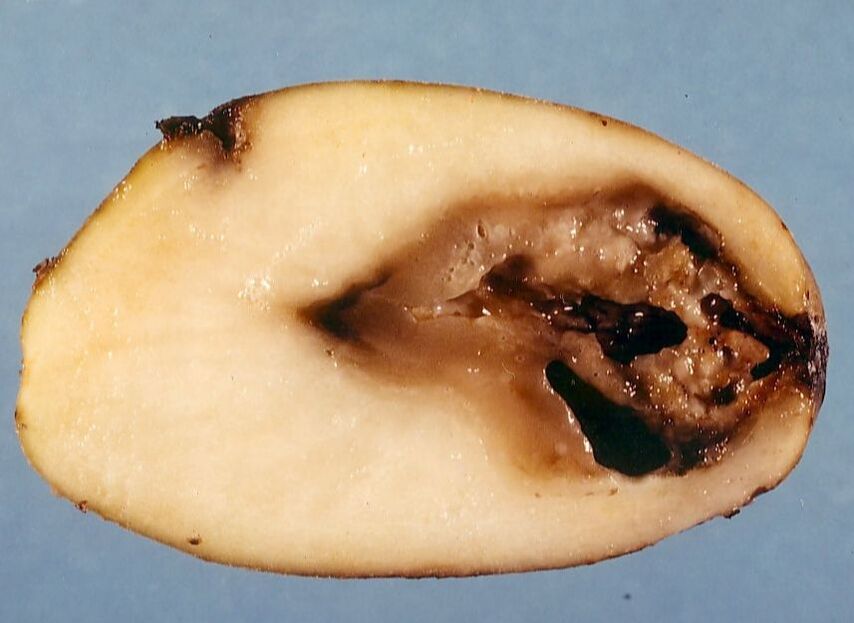 Potato with bacterial soft rot (Scot Nelson) Public Domain Rather than a single disease with a simple cause, bacterial soft rot refers to a collective of bacterial rots caused by Dickeya dadantii (previously known as Erwinia chrysanthemi), Pectobacterium carotovorum, and various Bacillus, Clostridium, and Pseudomonas bacteria. Whichever critter starts this problem, the soft tissues of buds, bulbs, corms, and the rest become liquified, turning your crop into a mushy mess.  Onion infected with bacterial soft rot (Scot Nelson) Public Domain Symptoms of bacterial soft rot
Like other bacterial diseases, bacterial soft rot is easy to miss in its early stages. As the disease progresses, water spots start to form. Unlike the whitish splash marks left on old wooden furniture, these spots expand, become soft, and sink. These damaged areas may ooze and change color. Discolorations can range from cream to black. And they smell bad. Bacterial soft rot management Poor drainage, waterlogged soil, and insufficient airflow can all set the stage for bacterial soft rot. Infected plants must be destroyed and removed. Prevention is worth the effort. The following good cultural practices can significantly reduce the likelihood of bacterial soft rot affecting your plants:
If bacterial soft rot continues to be a problem in specific areas of your garden, use that space for plants that are generally not susceptible. That list includes beets, corn, and snap beans. It’s a wonder I haven’t written about aloe vera before. It’s such a useful and easy plant to have around. It took the gift of an aloe plant from a dear friend that sparked this post. [Thank you, Sandy!] 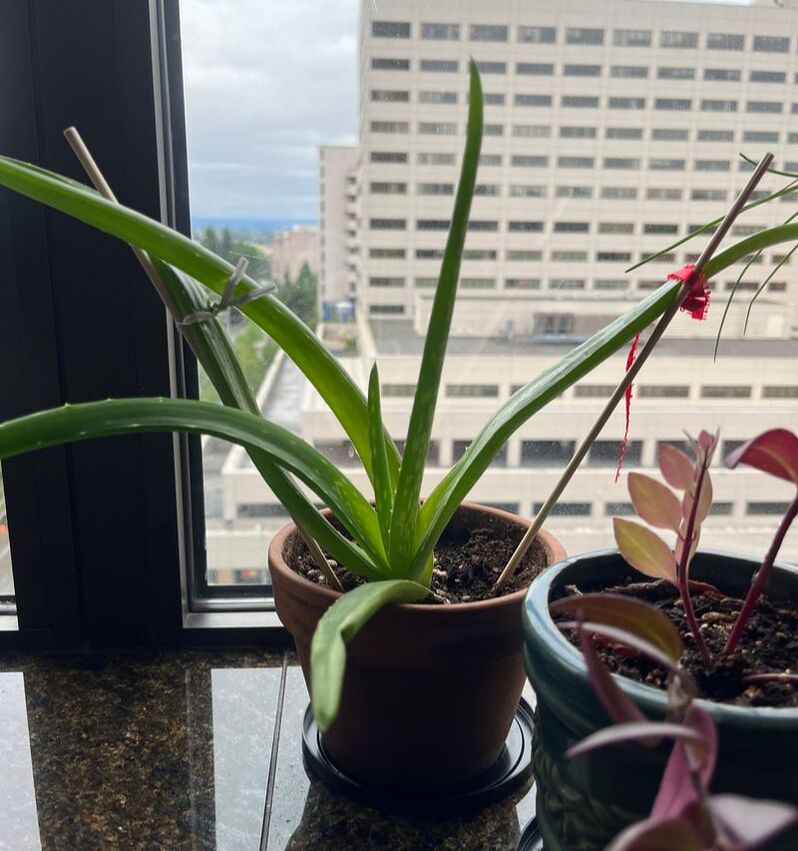 Sandy's aloe vera and Brad's lipstick plant (Kate Russell) Aloe vera (Aloe barbadensis miller) is the cousin of over 500 flowering succulent plants. It has been used medicinally for countless centuries. Cuts and burns heal much faster when gel from the aloe vera plant is applied, making it an excellent plant to have around the kitchen. Native to Africa, the Arabian Peninsula, Jordan, and Madagascar, aloe vera thrives in hot, dry climates and on window sills. Aloe vera description Aloe vera plants have triangular, fleshy, often spiked leaves that grow from a central rosette. They vary in color from bright green to nearly gray and can be mottled or striped. The flowers are yellow to orangish-red and tubular. Oblong fruits contain many seeds. These perennial evergreens can hold their own in hot, dry landscapes without any help from homeowners.
Aloe vera as medicine
There are more claims about the medicinal uses for aloe vera than I have room to list. As is usually the case, most of those claims are false. While we would all love simple answers to common problems, life rarely works that way. Claims that sound too good to be true generally end up being false. The compounds found in aloe vera provide conflicting results. For example, one compound found in aloe vera, alprogen, reduces inflammation and allergic responses, while another component, acemannan, does the opposite. In 2002 aloe vera sap was banned as an OTC laxative by the US FDA. However, reports from the U.S. Department of Health and Human Services tell us that topical applications of aloe vera do provide the following benefits:
As for all the other claims, research is still ongoing. We will have to wait. While we wait, there’s no reason we can’t grow and enjoy these lovely burn treatments. How to grow aloe vera Aloe vera plants are easily grown from leaves taken from parent plants. Just pull off a leaf and stick it in moist soil. These plants take well to containers. Just be sure to allow the soil to dry out between waterings. Overwatering can kill an aloe vera. It can also attract fungus gnats. If you start seeing gnats, sprinkle crumbled mosquito dunk on top of the soil and water it in. The Bacillus thuringiensis bacteria found in these dunks kill fungus gnat larvae, along with mosquitoes. Aside from the numerous false claims about what aloe vera can do, overwatering and poor drainage can result in several diseases, including aloe rust, anthracnose, bacterial soft rot, basal stem rot, fungal stem rot, leaf rot, and root rot. As always, aphids can turn up in your aloe plants. Even though aloe vera can’t do all the things claimed in popular media, they are still attractive, useful, and easy plants. Every home should have one. And once you do, you can start taking leaves off and creating gifts for family and friends. Papaya trees are some odd critters. Besides being delicious, they have three genders.  Papaya (Ivar Leidus) CC BY-SA 4.0 In a complex reproductive arrangement similar to avocados, papaya flowers can be male, female, or hermaphroditic. Male flowers only produce pollen. Female flowers always produce fruit, but it’s only edible if the flower was pollinated. Most commercially grown papayas are from hermaphroditic trees. What’s in a name? Also known as pawpaws, there’s more to papaya than the fruits seen in grocery stores. Those are tropical papayas. There are also mountain papayas and Eastern North American pawpaws. Each of these plants comes from a completely different family. Tropical and mountain papayas are distantly related to Brussels sprouts and they grow best in USDA Hardiness Zones 9–11. North American pawpaws are cousins to the cherimoya. Let’s see what each has to offer the home gardener.
Mountain papayas Mountain papayas (Vasconcellea pubescens, aka Carica pubescens) are native to the Andes. They love higher elevations. These evergreen shrubs rarely grow more than 15 feet tall, though they can reach twice that height. These shrubs grow so quickly that they are considered invasive in some areas. Fall armyworms can be a problem for mountain papayas.
Eastern North American papayas Eastern North American pawpaws (Asimina triloba), also known as wild bananas, tolerate colder temperatures than their fruity cousins. They occur naturally in USDA Hardiness Zones 5–9. But you don’t see them in stores because they start to ferment as soon as they ripen.  Pawpaw tree and fruit (USDA) Public Domain These clonal understory trees produce fruits with a custard-like flavor said to be something like a tropical milkshake. The beautiful purple flowers are perfect, which means they are both male and female. They are imperfect because they stink. More on that in a minute. And you will need two trees to get a good harvest.  Pawpaw flowers begin female (left), then turn male and produce pollen (right). (Cbarlow) CC BY-SA 4.0
The fruit is a botanical berry and can become heavy enough to break branches, so supporting poles may be needed. The bark, leaves, and twigs of pawpaws contain natural insecticides (acetogenins) that keep most pests away. Fruit flies and whiteflies may still show up. Zebra swallowtail caterpillars love to feed on these trees, but this is generally not a problem for the trees or the caterpillars, and the toxins consumed provide natural protection against predators for the adult butterflies.
Caring for a papaya tree Common diseases associated with papaya trees include anthracnose, black leafspot, papaya mosaic virus, phytophthora blight, and powdery mildew, along with the dreaded papaya ringspot virus. Before you start working with a papaya tree, you need to know that the latex from unripe fruits can be extremely irritating. Many people learn the hard way that they are allergic. Sadly for those individuals, this latex is commonly used as a meat tenderizer. Did you know that you can use papaya seeds as a pepper replacement? Now you know. Apple proliferation might sound like a bumper crop of Granny Smiths, but it’s far more sinister than that. Sadly, I couldn’t find any images I could use.
Apple proliferation (AP) is a devastating plant disease that can result in crop losses of up to 80%. It is spread by apple proliferation phytoplasmas (Candidatus Phytoplasma mali). There are quarantines for this pest in Canada and the U.S. While AP mainly attacks apple trees, it also occurs on Asian and European pear, hazelnut, and plum trees, along with dahlias, hawthorns, magnolias, and roses. What are phytoplasmas? Phytoplasmas are a type of bacteria known as mollicutes. Mollicutes are unique in that they do not have cell walls. Instead, they have a multi-layered membrane. Phytoplasmas were discovered in 1967. Most phytoplasmas contain a single mysterious protein. Studying these 1 μm life forms has been difficult since no one has been able to grow them in a lab to date. For reference, the plastic wrap in your kitchen drawer is probably 10 μm thick. How the disease spreads Phloem-feeding insects such as cherry leafhoppers, planthoppers, and psyllids are responsible for spreading apple proliferation. AP can also spread through natural root grafting. Natural root grafting occurs when the roots of different trees end up pressed against each other. Over time, the vascular tissues of both root systems come into contact with each other and begin sharing nutrients. There is debate about whether or not this is a survival mechanism. We may explore that another time. For this discussion, those natural root grafts can spread disease. Research has also demonstrated that infected trees emit unusually high amounts of a chemical that actively attracts psyllids, increasing the spread of disease to neighboring trees and shrubs. Apple proliferation symptoms Symptoms of apple proliferation change with the seasons because the phytoplasmas migrate within the tree. In the winter, they head south into the root system. As temperatures rise and the sap moves upward into twigs and leaves, so do the phytoplasmas. Symptoms also vary depending on the species infected and how long the infection has been present. This condition may appear in only some branches. It may disappear altogether for a couple of years before returning. No one knows why, but it may be related to the fact that there are more and less virulent strains of this particular phytoplasma. The most common symptoms of apple proliferation are small tasteless fruits with longer stems, witches’ broom, leaf rosettes, enlarged leaf stipules, shortened petioles, and dwarfism. Other, less common symptoms include increased suckering around the tree base, chlorosis, and downward leaf cupping. Leaves may also be smaller than normal and brittle. In autumn, the leaves of infected apple trees will turn red rather than yellow. AP Management There is no known cure for apple proliferation, so prevention is the only option. Infected trees must be removed and destroyed. Luckily, there are APP-resistant rootstocks, so look for that when tree shopping. And if apple proliferation is occurring in your region, do your best to control those psyllids and leafhoppers. The adventure never ends. Living in a Seattle high rise, I’ve been delighted at how well my balcony strawberries are growing. But we’re moving again, so I brought all my plants inside as a form of quarantine. There’s no sense bringing pests with me to a new location, is there? Especially when there is no balcony at the new location and all of my plants will be indoors. Good thing, too, because aphids had found my strawberries. How they found us on the 7th floor, I’ll never know. 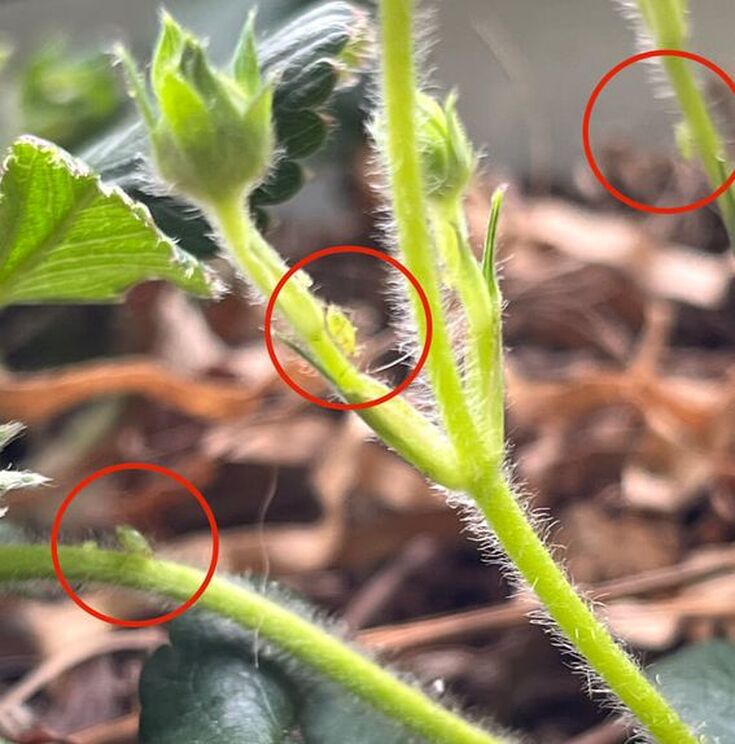 Aphids on strawberry stems (Kate Russell) Aphids are insidious sapsuckers and extremely prolific. I’ve been squishing them as soon as I see them, but there always seems to be more. While out walking my dogs, I kept an eye out for ladybugs, but no luck. What surprised me was to see that something was helping me kill off the aphids. I’m still not sure what it is. What I can see are white aphid husks, dried-up little mummies. These are aphids drained of all their bodily fluids by parasites. 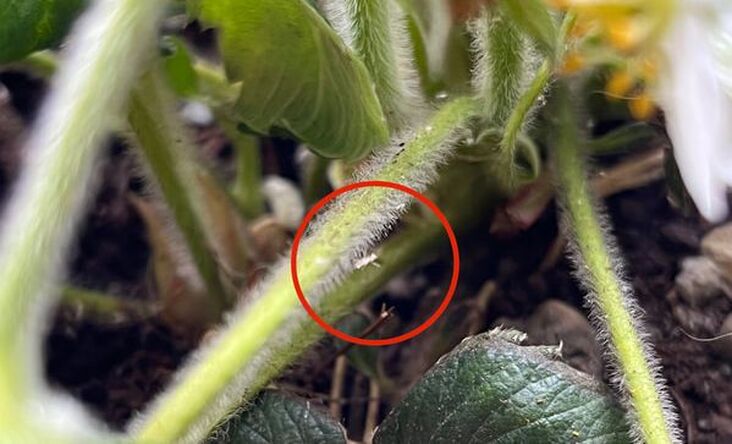 Aphid mummy on strawberry stem (Kate Russell) Parasitism refers to one-sided relationships in which one organism lives on or in a host, inflicting harm. In his book The Meaning of Human Existence, Edward Wilson describes parasitism as “predators that eat prey in units of less than one.” Parasitism isn’t the same thing as the benign hitchhikers of phoresy. Parasites are like vampires. They cause damage. In the case of my strawberries, the aphids are bad parasites. Whatever is killing the aphids are good parasites. Once again, it depends on how you look at things. Types of parasitism Ectoparasites occur on the outside of their hosts. Endoparasites are found inside. Parasites don’t kill their host outright, with parasitoids being the exception, but they sure can make your plants less productive. The difference between parasites and parasitoids is that parasitoids kill their hosts while parasites just keep draining theirs. Parasites can be insects, fungi, nematodes, or bacteria. Insect parasites Most sap-sucking insects qualify as parasites. This large group includes aphids, cicadas, leafhoppers, mealybugs, planthoppers, psyllids, scale insects, squash bugs, stink bugs, tarnished plant bugs, and whiteflies. As these pests suck sap from your beloved garden plants, they may also spread diseases, making them pathogens and well as parasites. At the same time, several parasitoid insects kill our plant pests. Braconid wasps, chalcid wasps, Goniozus navel orangeworm wasps, ichneumon wasps, and tachinid flies are all happy to suck the life from more bothersome visitors.
Fungal parasites It is estimated that fungi cause 85% of all plant diseases. Parasitic fungi attack living organisms. Their more peaceable relatives, the saprotrophic fungi, feed on dead and decaying plant materials. Parasitic fungi are responsible for apple scab, black spot, blights, brown rot, downy mildews, powdery mildew, rusts, smuts, and wilts. These microscopic predators travel on the wind, landing on damp leaves and stems. Each spore produces a germ cell that burrows into the plant and starts feeding and reproducing. On the other hand, some fungal parasites prefer feeding on scale insects.  Soybean cyst nematode and egg (Agricultural Research Service) Public Domain Nematodes as parasites Nematodes cause an estimated $100 billion in economic losses each year. Some nematodes are root grazers, but others are parasites. Parasitic nematodes burrow into root systems to access a continuous food supply. These pests can also carry diseases. Or, they may be beneficial nematodes that feed on cutworms and corn earworm larvae. I know, it gets confusing.  Plant cell containing multiple Rhizobacteria (Louisa Howard, Dartmouth) Public Domain Bacterial parasites Splashing water from rain, sprinklers, and irrigation is how bacteria get around. Luckily, most bacterial parasites are beneficial to their plant hosts. These are the nitrogen-fixing Rhizobacteria of the legume world. Rhizobacteria live in and around the roots, converting atmospheric nitrogen into a form usable by plants, making them part of the Nitrogen Cycle. These beneficial parasites also help plants fight diseases. Then again, there are bacterial parasites that cause problems. These are known as deleterious rhizobacteria (DRB). DRBs can reduce beet crops by 48%.
Anemophily [ani-MA-filly] describes plants that are pollinated by wind. Most plants are pollinated by bees, butterflies, and wasps, along with occasional bats, beetles, and birds. These pollinators are responsible for the lion’s share of our harvests by carrying sticky pollen from one flower to another. In one out of ten cases, the wind carries pollen from plant to plant. 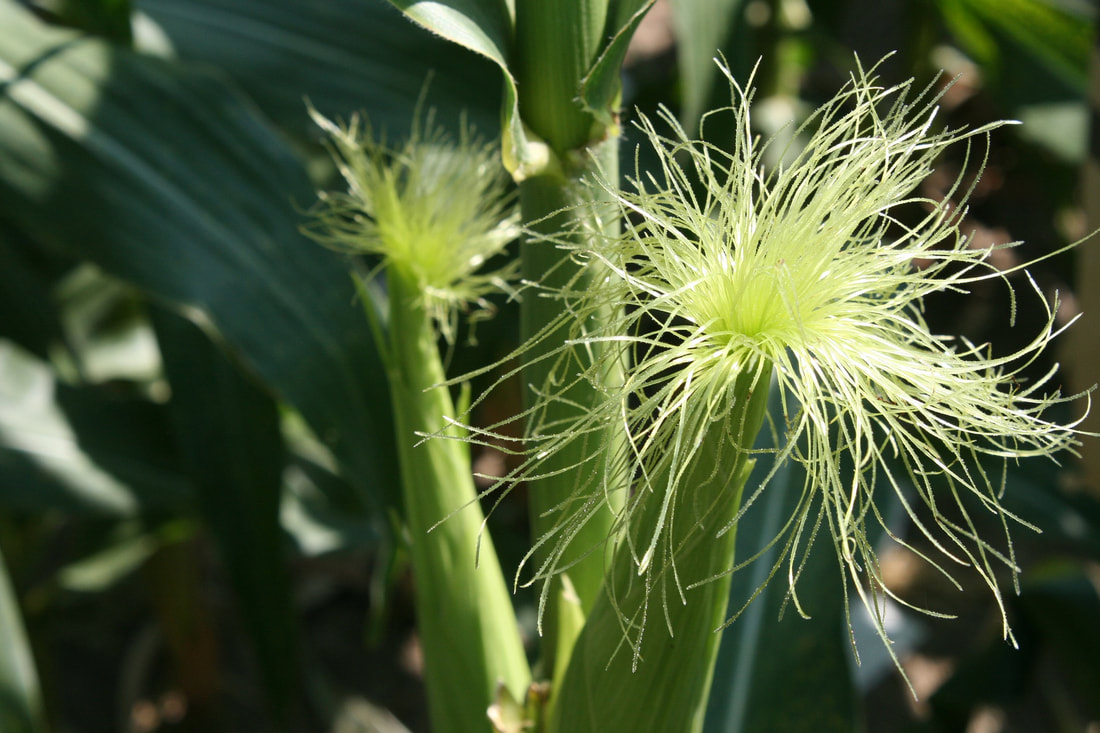 Corn tassels send pollen flying (lglglglg75) Pixabay Very often, wind pollination augments pollination by pollinators. This is important information if you grow any of these anemophilous plants and want a harvest. Or if you have allergies.
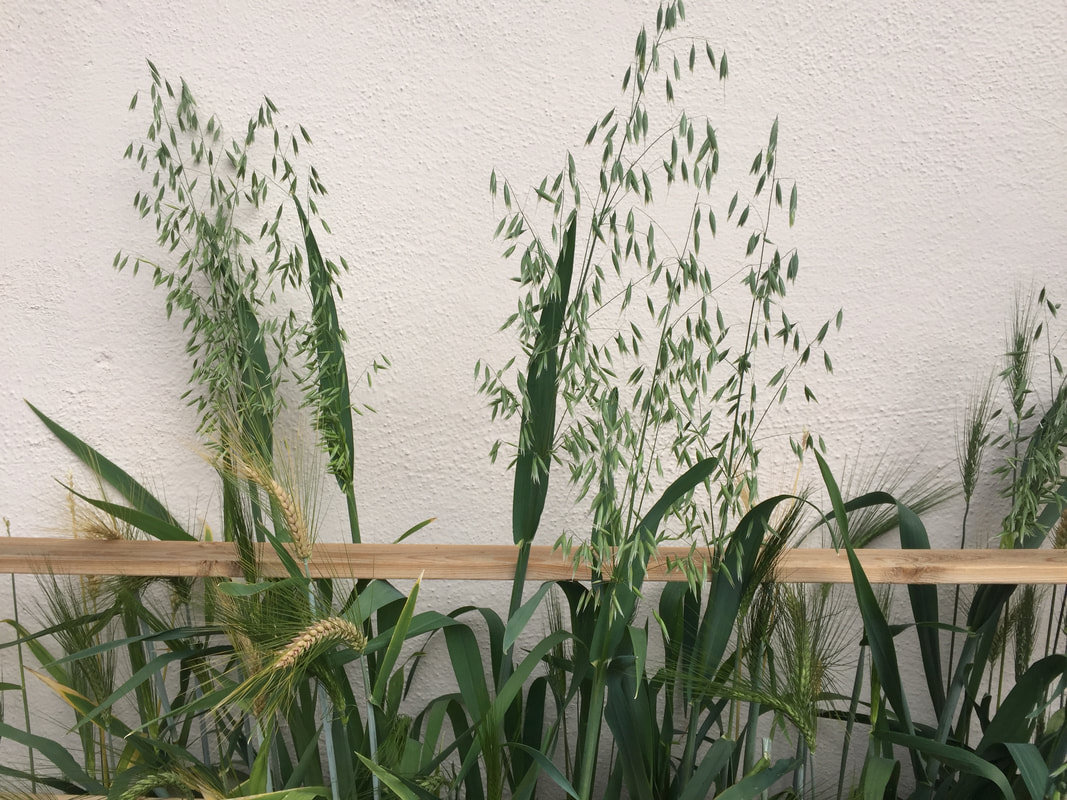 Oats and wheat are wind-pollinated (Kate Russell) Characteristics of wind-pollinated plants
This is one of those cases where you don’t know what you have until it’s gone. Most plants invest a lot of energy and resources into attracting pollinators. They produce chemicals with enticing aromas, construct flashy, intricate flowers, and crank out sugary nectar. Anemophilous plants don’t need to go to all that trouble. Even the size and stickiness of pollen grains are reduced in wind-pollinated plants. The pollen of these plants is so small that it can be captured by a bee’s electrostatic field. [There’s a lot of it flying around at certain times of the year.] That is why honey can contain ragweed pollen even though honey bees generally do not visit ragweed flowers. Bees do visit corn tassels and other grains. Structurally, these plants tend to have long, exposed stamens and feathery stigmas. These are used to dispense and collect pollen, respectively. If you are allergic to pollen, it’s most likely pollen from anemophilous plants. Researching yesterday’s post on bacterial blight, I was astounded at the number of diseases caused by Pseudomonas. Pseudomonas [soo-doh-MO-nas] is a genus of bacteria that most of us gardeners end up fighting. These bacteria are commonly found in plant debris, soil, and water. They also hide out in many dicot seeds. But don’t worry, Pseudomonas only infects plants with leaves and stems. The rest of your garden is safe. *wink*  Tomato leaf infected with bacterial speck (Alan Collmer, Cornell University) Public Domain Pseudomonas plant pathogens To date, more than 500 strains of Pseudomonas have been sequenced. Here is a list of the most common bacterial diseases caused by Pseudomonas:
Small dark spots appear and expand into odd-shaped dead areas in nearly all these diseases. It’s all downhill from there.  Bacterial leaf spot on a beet leaf (Howard F. Schwartz, Colorado State University, Bugwood.org) CC BY 3.0 US Managing Pseudomonas These are some tough SOBs. These bacteria have evolved to survive rugged conditions. Their cell walls are equipped with pumps that eject antibiotics and other unwanted materials before they can do anything, so chemicals are often ineffective. Because of this, prevention is your best management tool. Most importantly, space plants far enough apart so they can dry off rapidly. And avoid overhead watering.  Bean leaves with bacterial brown spot (Nancy Gregory, University of Delaware, Bugwood.org) CC BY 3.0 US Pseudomonas isn’t all bad
As handy as it would be to say that all Pseudomonas are evil, it ends up that some of these soil bacteria help plants stay healthy. In fact, they practically make life possible on Earth. Life sure can be messy, eh? Some Pseudomonas protect plant roots against disease-causing Fusarium fungi and Pythium oomycetes. They also protect against plant-eating nematodes. And other strains help activate disease resistance within wheat and other cereal crops. Some Pseudomonas can metabolize pollutants and are used in bioremediation. Finally, Pseudomonas helps form most snowflakes and raindrops that fall on Earth. Now you know. If you grow apples, cherries, kiwifruit, mulberries, nectarines, peaches, pears, plums, or walnuts, you need to know about bacterial blight. 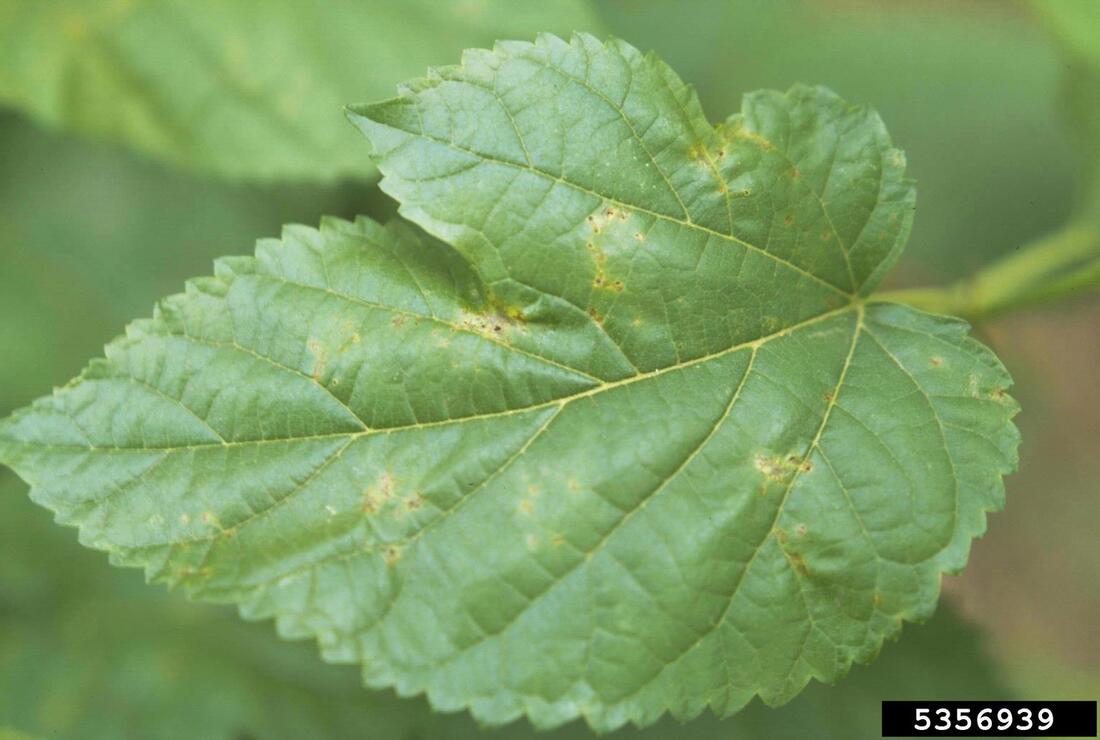 Early symptoms of bacterial blight on mulberry leaf (William M. Brown Jr., Bugwood.org) CC BY 3.0 US Bacterial blight is not the same thing as common bacterial blight, which attacks legumes. To make matters worse, many people call another bean variety of blight ‘bacterial blight’. I know, it gets confusing. Let’s see if we can clarify some of this.
The cause of bacterial blight Bacterial blight, also known as blossom blight or shoot blight, is caused by a bacterium called Pseudomonas syringae. There are over 50 different strains of this bacteria that cause plant disease. Common examples include bacterial canker, bacterial speck, citrus blast, and halo blight. Pseudomonas syringae is commonly found on the exterior surfaces of healthy plants. It is only when bacteria get inside, through wounds or natural openings, that the trouble starts. Bacterial blight symptoms Like the other diseases caused by this pathogen, the first symptom is water-soaked areas on leaves. These areas turn brown and mushy and often have yellow halos. If these spots occur early in a leaf’s development, leaf curling and twisting may also occur. Leaves may also start dying from the outer edge, with the infection moving inward toward the center. Twigs may exhibit black streaks, and it is common for infected blossoms, branch tips, and leaves to die. If infected twigs develop a shepherd’s crook shape, it’s probably fireblight. Managing bacterial blight Pseudomonas syringae is most commonly spread by wind and rain. Insects and your garden tools can also be part of the problem. You have to assume that the disease is present. These bacteria can survive in diseased plants, infected plant debris, and soil. Once a plant is infected, you can try to save it by trimming 10 to 12 inches below infected areas, making sure to disinfect your pruners between each cut. You can dip them in a 10% bleach solution for 30 seconds, though bleach is hard on tools. You can also use bathroom cleaner or other spray disinfectants that contain at least 70% alcohol. Just be sure to give it a few minutes to work before making another cut. Infected plant material should be bagged and thrown in the trash right away. Prevention is easier. To prevent bacterial blight from taking hold in your landscape, use these tips:
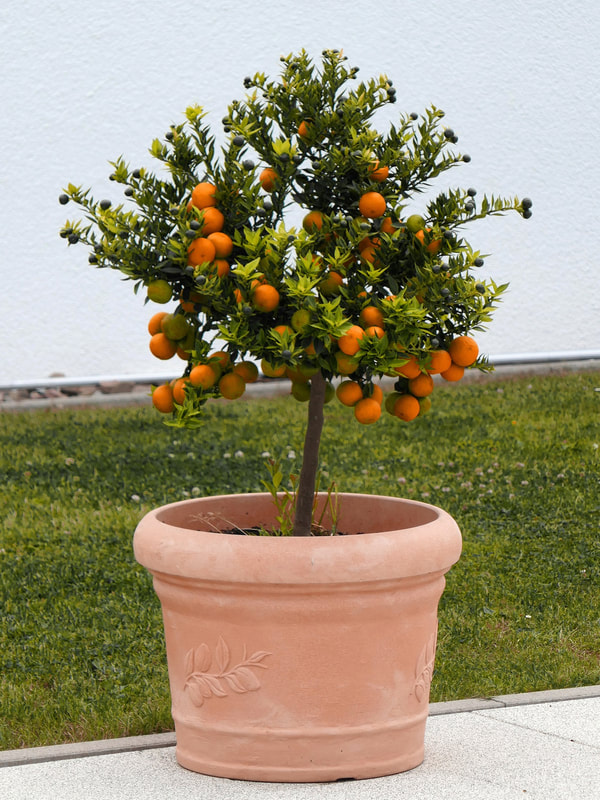
Fixed copper sprays may also help. Now that I live in an apartment, I find myself missing the fresh figs and nectarines, abundant almonds, and deluge of citrus from my old trees. And that got me thinking about putting a small fruit tree on my balcony. It ends up that you can grow a surprising number of fruit and nut trees in containers.  Even this bonsai Chinese quince can produce fruit! (Sage Ross) CC BY-SA 3.0 Following the same advice I gave in my post on container gardening, we’ll need to select a food-safe container with good drainage, fill the container with potting soil, and make sure the tree gets enough sunlight. But which trees can be grown in containers? And how big do the containers need to be? Let’s find out. Tree containers and soil Back in California, I had a friend who was growing an orange tree in a two-foot wooden planter box. The tree was 20 years old, less than three feet tall, and very productive. It can be done. The most important things to keep in mind when selecting a container for your tree are drainage, durability, and food safety. Too many planters out there are made of toxic materials. Make sure your tree’s home is made of food-grade materials and that there are drainage holes in the bottom of the pot. You’ll need a 10- to 15-gallon pot. Tree roots can be surprisingly strong. I’m sure you’ve seen sidewalks that can attest to that. Your tree’s container needs to be durable enough to withstand tree roots and temperature extremes. Lightweight plastic may be easier to move around, but it probably won’t last as long as your tree. Once you have a container, you’ll want to fill it with potting soil, not planting soil or topsoil. Topsoil may contain pests or diseases that may cause years of headaches and it won’t drain properly in a container. Planting soil is meant for the ground and doesn’t drain the way your potted tree will need. Potting soil is specifically engineered to help plants thrive in containers. And please don’t put rocks in the bottom of planting containers. All they do is take up space better allocated to soil and roots. When you fill your container with potting soil, create a mound in the center of the pot. You will arrange the roots of your tree over that mound and then cover them with soil. Do not tamp down the soil. Instead, mud in your new tree to prevent damaging tender roots, making sure that the graft union is visible above the soil line. Remember that improper tree planting depth is one of the worst things you can do to your tree. Be sure to install a tree support until your baby tree has had a chance to send out supporting roots, then remove the support. Which trees can be grown in pots? Preparing for my trek across Spain, I saw this olive tree in Paris. Based on the trunk, I’d say it was a very old tree living in a rather small container. But it looks healthy, so you can certainly put olives on your list of possibilities. 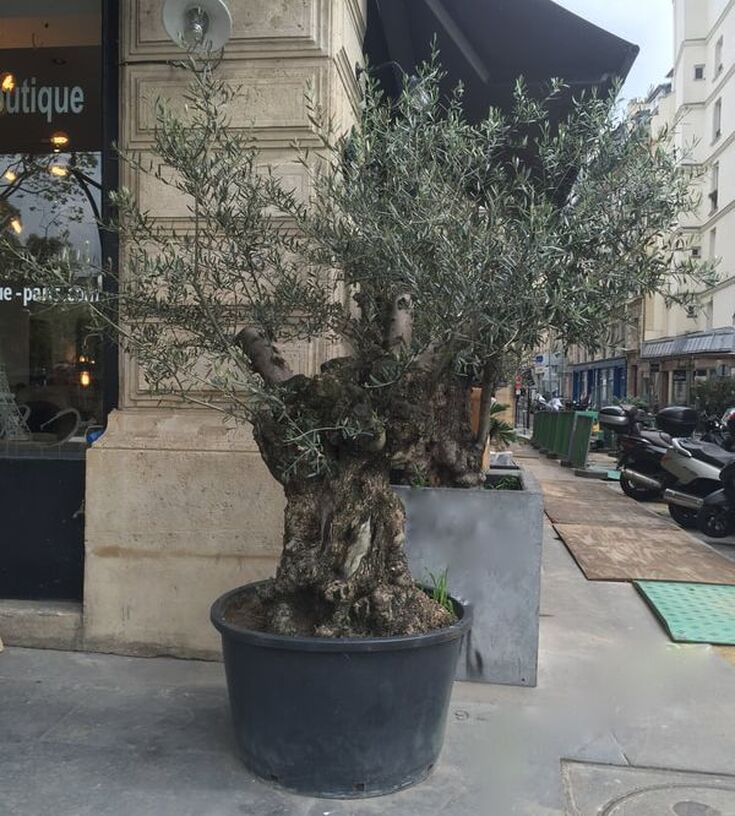 Olive tree growing in Paris (Kate Russell) Generally speaking, you will want to choose a dwarf variety tree. These are trees grafted onto M-9, M-26, M-27, or P-22 rootstock. Larger varieties will be okay in a container for a while, but they will need to go into the ground eventually. And transplanting a tree is no small feat. Which reminds me, containerized trees can live for 20 years or more. Because of this, it’s a good idea to have a plan in place for up-potting your tree, should that ever become necessary. Personally, I’m going to start with a full-sized container so that I can avoid that Herculean task.
To get the most out of your containerized fruit tree, you may want to get a fruit cocktail tree. These are trees that have different types of fruit grafted onto the branches. For example, a fruit cocktail stone fruit tree can produce apricots, nectarines, and peaches on the same tree. Or, you may select a 4-in-1 cherry tree with four different varieties of cherries growing on the same tree. It really helps make the most out of small spaces.
When shopping for rootstock, look for self-fruiting varieties, or you’ll need more than one tree to get fruit. Whichever tree you select, make sure that it is suited to your USDA Hardiness Zone. If you absolutely must have that dwarf lime (Zones 9-10) and you live in Grand Rapids, Minnesota (Zone 3a), you’ll have to bring it indoors for the winter, so make sure you have a plant stand with sturdy wheels. Or, you can keep it indoors and hand-pollinate. In either case, your potted fruit or nut tree will need at least 6 hours of sunlight each day. Other factors to consider when selecting your potted tree are chill hours and local pests and diseases. One of the first things I noticed about Seattle when I arrived last summer was the number of plants affected by powdery mildew. And the few plants I put on my balcony were soon populated with stink bugs. (And I’m on the 7th floor!). Fruiting trees need a certain number of chill hours each winter to trigger fruit production in spring. As always, be sure to buy certified pest- and disease-free rootstock. Caring for potted trees Containerized plants need to be monitored regularly to make sure they don’t dry out too much in summer. You can encourage root growth by watering your potted tree from the bottom, rather than the top. Simply add water to the tray under your pot. The soil will absorb the water and the tree roots will extend downward to access that water. You will also need to feed your tree regularly. So which tree am I going to get? My balcony faces north and I live in Hardiness Zone 8b. Luckily, my balcony gets lots of sunlight and Seattle usually gets 3,000 chill hours each winter. My next step is to figure out which tree is least likely to attract or be affected by powdery mildew or stink bugs. I found a website dedicated to thwarting invasive brown marmorated stink bugs (Stop BMSB) and learned that these pests love almond, apple, apricot, black walnut, cherry, fig, hazelnut, olive, peach, pear, pecan, and pistachio trees. They also feed on beans, cabbage, cayenne peppers, collards, cucumbers, horseradish, persimmons, soybeans, summer squash, sunflowers, and Swiss chard. Darn! It looks like my balcony garden is going to have a stink bug problem no matter what I grow! Luckily, fruit trees are mostly resistant to powdery mildew. Based on where I live, the amount of sun exposure available, and all the rest, I think I am going to opt for a dwarf multi-variety cherry or plum tree for my balcony. Now if I could only find one that isn’t already sold out! Which tree are you going to plant? Planthoppers are not leafhoppers, though they have much in common. Most important, both spread disease as they siphon sap from plants.  Green coneheaded planthopper (xpda) CC BY-SA 4.0 Planthoppers as disease vectors Planthoppers are responsible for transmitting several diseases, especially those caused by phytoplasmas and viruses. One planthopper species nearly wiped out Jamaican Tall coconuts by infecting trees with lethal yellowing. Planthoppers often transmit X disease to cherries and other stone fruits. They are also responsible for spreading cereal tillering disease, maize mosaic, and several other diseases. Planthopper description There are more than 12,500 planthopper species (Fulgoroidea), and they occur worldwide. With so many species, it’s no surprise that they come in several shapes, sizes, and colors. Spotted lanternflies and buffalo treehoppers are types of planthoppers. Snowy planthoppers look like whiteflies.
As their name indicates, these insects can launch themselves from one place to another. They do this the same way grasshoppers do. More often, however, they walk very slowly. But that’s not what makes them so hard to see. Planthoppers often look like leaves or other plant parts. You can look right at one and not see it. Generally speaking, planthoppers hold their wings vertically, like butterflies, and their bodies are flattened. Nymphs produce a waxy substance that protects them from water and predators. Adult females also produce this wax and use it to protect their eggs.  Planthopper larvae (Richard Bartz) CC BY-SA 2.5 Planthopper diet
Planthoppers are sap suckers. As they feed on practically all of your garden plants, they produce a sugary poop called honeydew. Sooty mold thrives on honeydew. So do ants. In fact, ants are known to tend planthopper larvae, protecting them from predators. The larvae of some planthopper species live underground and feed on plant roots or fungi. Planthopper management Planthoppers can be difficult to control because of their mobility. Many people recommend spraying them with a blast from the hose. I imagine this would take care of the nymphs who would be unable to return to their food supply, but I can’t imagine it would be very effective against adults. I could be wrong. Luckily, they are attracted to yellow sticky sheets. And predatory stink bugs feed on planthopper larvae. Did you know that some planthopper species communicate with their neighbors through vibrations in plant stems? I didn’t either. Also known as cherry X disease, peach X disease, and cherry buckskin disease, X disease makes fruit small, pale, and bitter. It can affect stone fruits, such as apricots and cherries. Once a tree is infected with X disease, it must be removed to prevent the infection from spreading to other trees.  Cherries on the left infected with X disease (Plantpathfinder) CC BY-SA 3.0 What causes X disease? X disease is caused by phytoplasma. Phytoplasmas are microscopic, one-celled bacteria that have no cell walls or nuclei. To me, that’s just weird. Animal and plant cells and most bacteria have clearly defined cell walls that hold their insides in, where they belong, and a central nucleus that runs the show. I have a hard time wrapping my brain around these phytoplasmas. Maybe they are like parasitic amoebas, even though amoebas are animals. But I digress. So how does a cell with no wings, legs, feet, or brain find its way to our fruit trees? The answer is phoresy. Phoresy describes the relationship between two organisms in which one player is a hitchhiker but not a parasite. There are some pretty bizarre examples of phoresy. You may want to check it out. Phytoplasmas catch rides inside sap-sucking leafhoppers, planthoppers, and psyllids without harming their hosts. When a cherry leafhopper feeds on an infected plant, the phytoplasma responsible for X disease is sucked into the insect’s gut with the sugary sap. When that vector moves to an uninfected plant and begins feeding, the pathogen is transferred to the new plant, causing infection. What does X disease look like? This disease can take up to 9 months to appear after infection occurs. Eventually, trees infected with X disease produce pale fruit that is small and leathery. Symptoms are commonly seen on only one branch at first. The leaves on infected branches may appear bronzed and small. Older leaves tend to fall off. Beyond that, symptoms can vary, depending on the tree species.  Cherry tree infected with X disease (H.J. Larsen, Bugwood.org) CC BY 3.0 US X disease is often mistaken for root rot. To figure out which it is, look closely at the graft union. That’s where the rootstock was grafted onto the fruiting stock. Pits and grooves are visible near the graft union if it is X disease. Cut into the wood and see brown areas in the phloem. These other symptoms of X disease are also common:
The fruit from infected trees tends to be pale, pointed, small, and nasty. X disease hosts There are two types of X disease hosts: those that don’t mind the infection (reservoir hosts) and those who succumb to the disease (non-reservoir hosts). Reservoir hosts are a problem because they look perfectly healthy but provide a source of infection to many important fruit and nut trees in our landscapes. Almond trees, chokecherries, sweet and sour cherries, Japanese plums, clovers, and dandelions are all reservoir hosts. [Dandelions?!!? Yes, dandelions.] Nectarines and peaches can also become infected with X disease but are non-reservoir hosts. This means that they can catch the disease but not spread it. Scientists don’t yet understand how that happens, but they’re working on it. X disease management Since scientists have been unable to reproduce the phytoplasmas responsible for this disease in the lab, there are currently no treatments for this fatal disease. To reduce the likelihood of X disease occurring in your landscape, do your best to manage the insect pests responsible for carrying the pathogen. The insects that spread X disease are often found on beets, burclover, ceanothus, curly dock, hawthorn, and pyracantha. Because of this, it is a good idea to maintain some distance between these plants and vulnerable trees. If you suspect X disease has infected one of your trees, get help. Contact your local Master Gardeners or the Department of Agriculture for verification. They can also help you figure out the safe removal and disposal of infected trees. |
Welcome!You can grow a surprising amount of food in your own yard. Ask me how! To help The Daily Garden grow, you may see affiliate ads sprouting up in various places.
You can also get my book, Stop Wasting Your Yard!  Index
All
Archives
April 2024
|


.jpg)
,fr(wh,TS)_Naivasha-Gilgil(Rift_Valley_Prov.),KE_tue13sep2011-1230h.jpg)


 RSS Feed