|
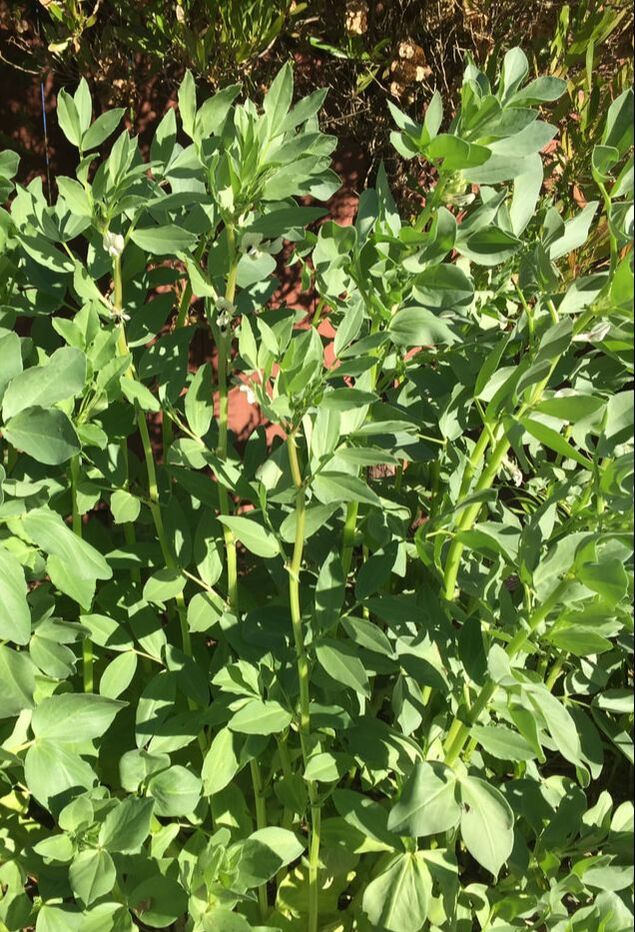
Most of us think of spring when it comes to actually putting seeds into the soil. Summers are dedicated to weeding and watering. Planter pots have all been washed and stored away for next spring, along with any leftover potting soil and maybe a bag of vermiculite. But planting season isn’t necessarily over, just because it’s summer. 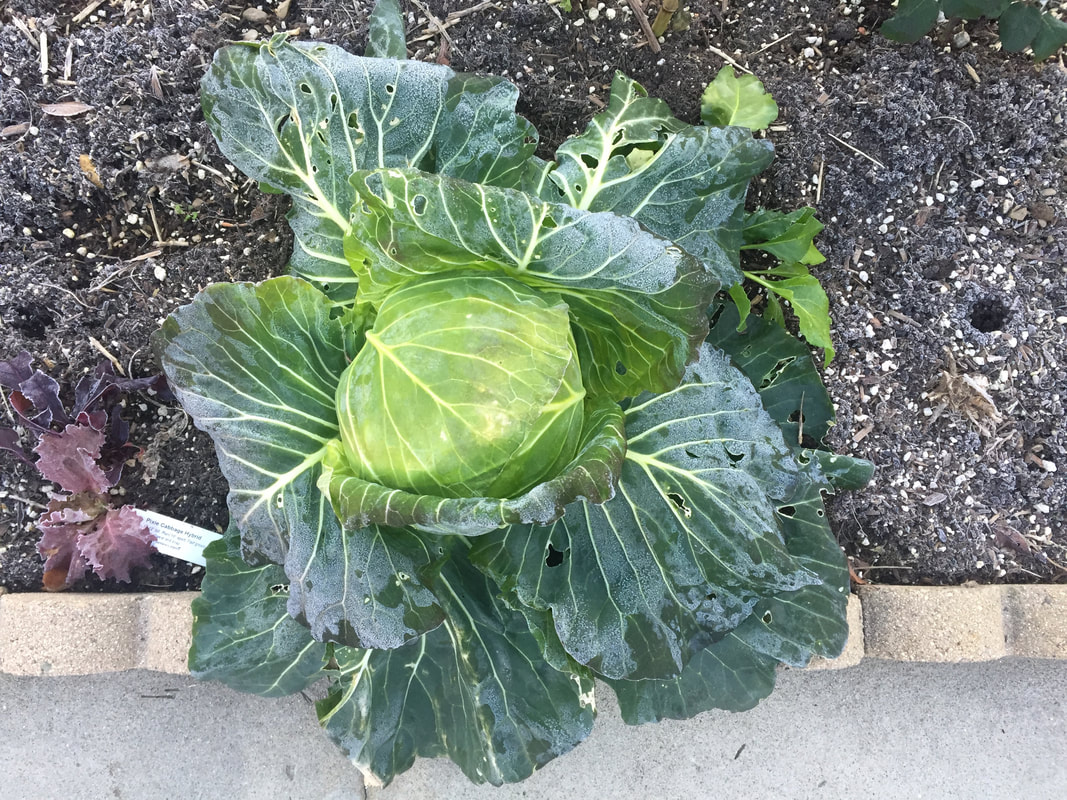 Cabbage (Kate Russell) How much time is left to grow? The first thing you have to ask yourself before planting in summer is how long of a growing season you have left. If snow falls where you are by mid-October, you will have to pick some pretty fast growing plants before tucking your garden away for the winter. Here, in San Jose, California, we can plant crops year-round, but the list of plants is very different from one season to the next. Check your Hardiness Zone for first and last frost dates and then check seed packets for days-to-maturity or days-to-harvest information. There’s no sense watering and weeding a plant, only to have it killed by frost or snow before it can produce a harvest. Cool season crops In mild regions, summer is the best time to start thinking about cool season crops. Many winter crops take significantly longer than tomatoes and peppers to mature. Giving them a head start in summer means bigger harvests later in the year. Look at your garden and try to imagine what it will look like in one month, in two months, in mid-winter. As spring crops peak and then fade, you can introduce winter crops under the protective care of your summer garden. In some cases, summer plantings can even give your spring garden a boost. 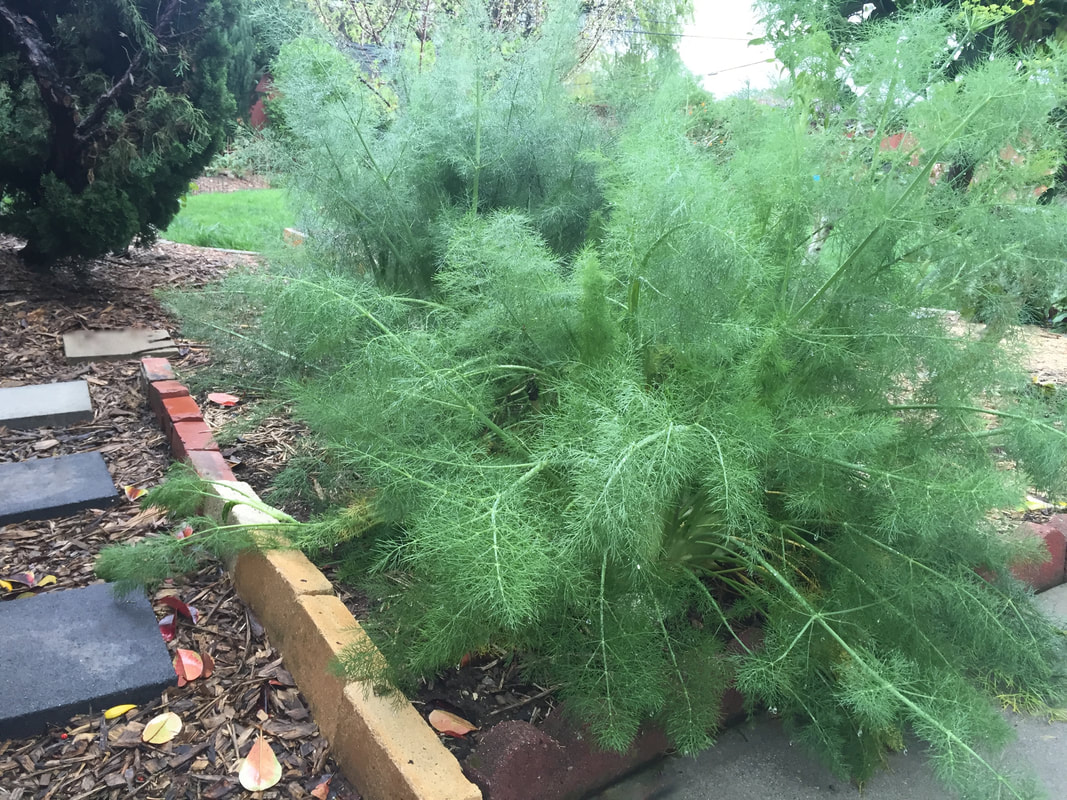 Fennel (Kate Russell) Beneficial beans Most gardeners know that beans and other legumes are able to fix atmospheric nitrogen in nodules on their roots, with the help of certain soil bacteria. Once these plants start flowering, that nitrogen is no longer available. Up to that point, any neighboring plants will benefit from the extra nitrogen, giving them extra nutrients as they near the end of their productive lives. If you live in Zone 9b, or tend to have mild winters, July is your last chance to plant beans for the year. Find space for one more planting. These beans will be ready to harvest long after any spring planted beans will have worn themselves out. They will also provide nitrogen to whatever is growing nearby.
The same is true for cabbages, Napa cabbage, leeks, and okra. Chayote fruit can be planted any time during the summer.  Endive makes a lovely border (Kate Russell) By planting year-round, you are providing for the soil microorganisms that help your plants grow. You will also be providing your family with fresh, healthful food without ever leaving your yard.
0 Comments
Without sunlight, most plants can’t grow. Plant labels may tell you how much sun exposure a plant needs, but the terms can be confusing. You’ve seen the words, but what do partial sun and partial shade mean? Are they the same thing? No. Let's find out why.  Sunlight through leaf canopy onto small white flowers (Pexels) Full Sun Full sun means 6 to 8 hours of direct sunlight every day. Full sun is usually found on the south side of your house (assuming you live in the northern hemisphere). Plants that thrive in full sun are your go-getters. Most summer crops prefer full sun. Artichokes, fruit and nut trees, herbs, melon and tomato family members need 8 to 10 hours of direct sunlight during the growing season. Plants with silver or gray foliage also prefer full sun. 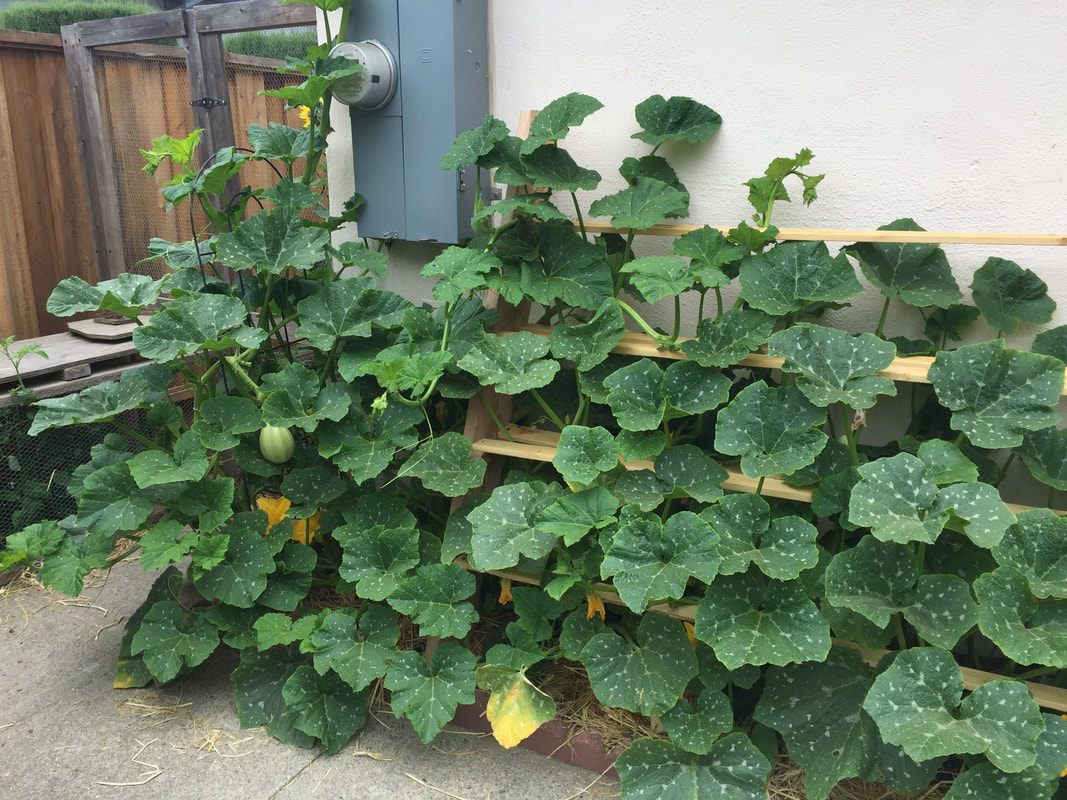 A south-facing wall and a ladder support give pumpkins plenty of sunlight (Kate Russell) Partial Sun Partial sun means 3 to 6 hours of sunlight in the afternoon, usually found on the west side of your house. We can call these the late sleepers of the plant world. They need time to wake up and may not be ready to deal with sunlight until later. Alliums, blackberries, peas, and root crops can be grown in partial sun.  Wax beans prefer partial sun (Kate Russell) Partial Shade Partial shade means 3 to 6 hours of morning sun with protection from more intense midday and afternoon sun. These are your early risers. Leafy greens, raspberries, and Swiss chard grow well in partial shade. 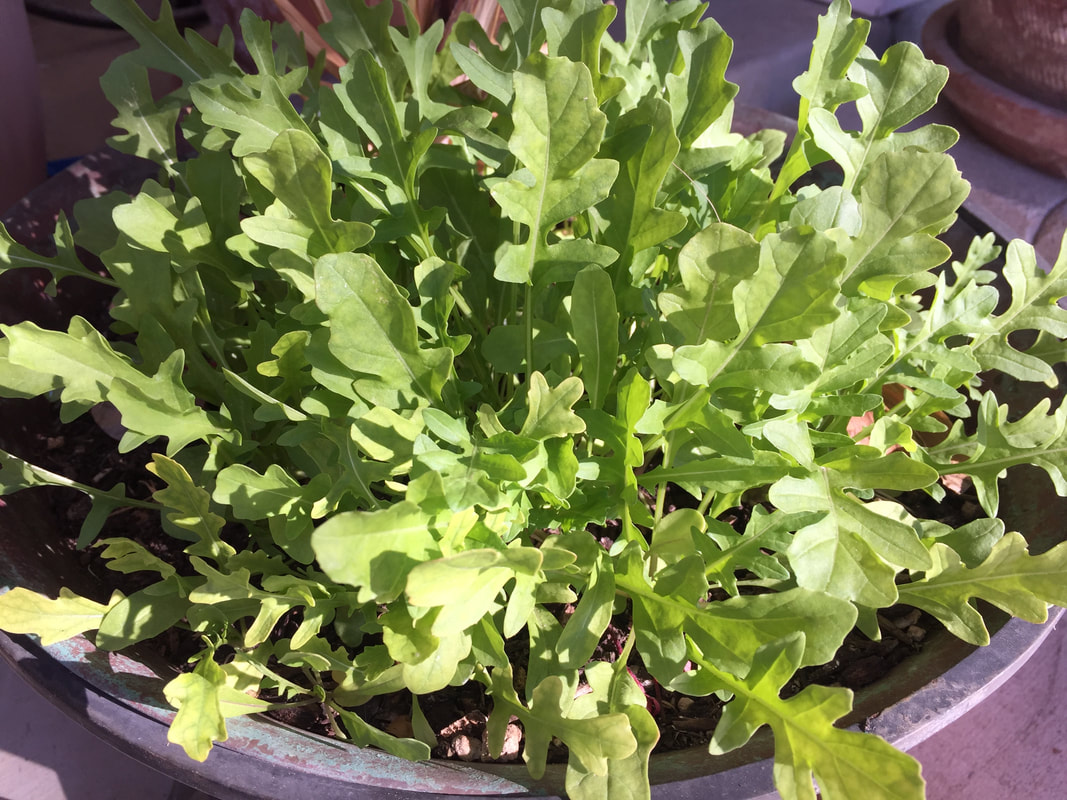 Containerized arugula grows well on a patio protected with a pergola (Kate Russell)
How much sun does your yard get?
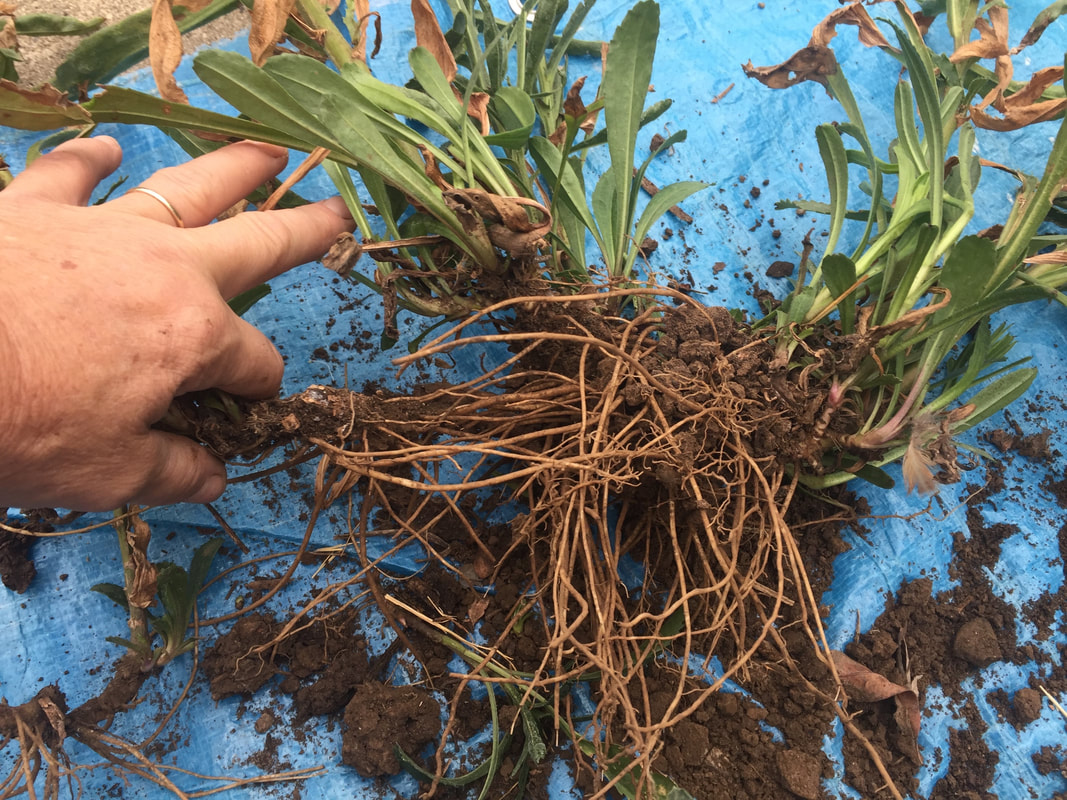
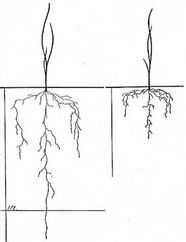
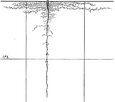
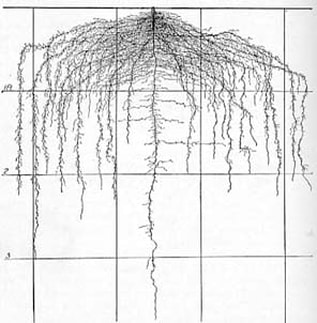
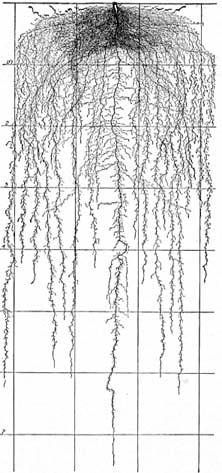
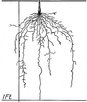
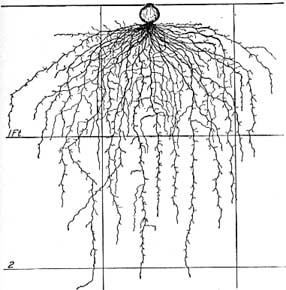
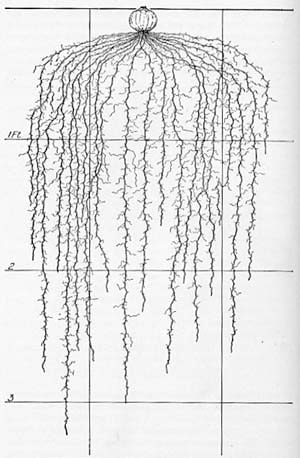
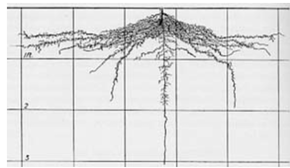
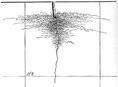
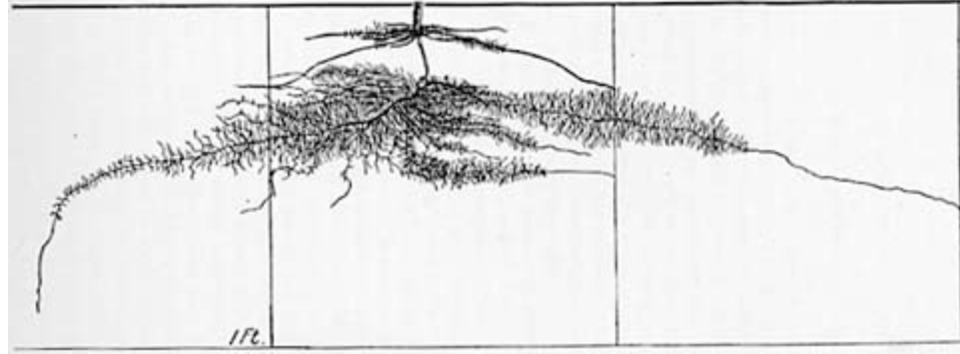
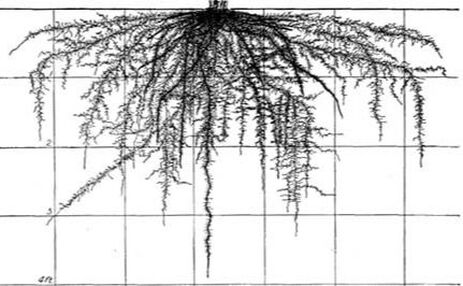
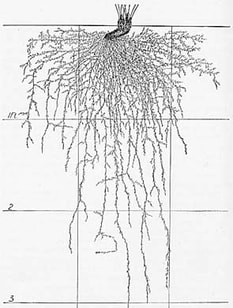
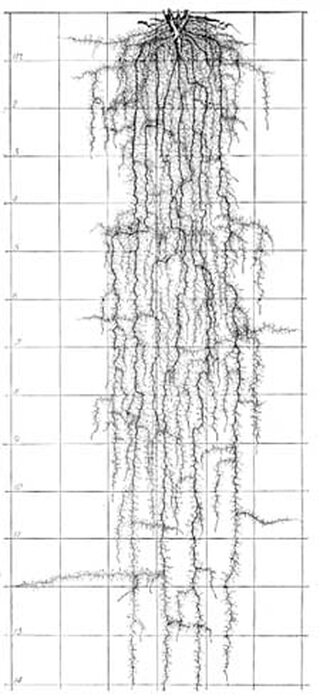
Knowing how much sunlight an area gets can help you select the right plants for that space. Before planting, create a sun map of your yard. A sun map will tell you how much sunlight each area gets. And remember, those areas change with the seasons. Plants can create shade for other plants, too. For example, you can grow chives under artichoke plants. This companion planting or intercropping takes advantage of the shade produced by larger perennials to protect less sun-tolerant plants. If you garden using traditional rows, your plants will get the most sun exposure if those rows run north to south and your tallest plants are at the northern end of your garden plot. How deep do roots go? Rooting depth is dependent on a lot of different conditions. After reading this post, you may never look at your garden plants the same way again. I know I don't!  Tree growing out of rock (Jean Beaufort) needpix.com Thrive or survive? We’ve all seen examples of tenacious, wind-battered trees growing impossibly out of rocks, but we want life for our garden plants to be better than that, don't we? We don’t want our plants to simply survive, we want them to thrive! This is where rooting depth becomes so important. Plants will make do with whatever they have available to them. By providing enough loose, healthy soil, our plants will be more productive and less likely to get sick. How deep plant roots go depends on several variables: species, soil structure, soil health, soil moisture levels, and probably a thousand other things. Roots will go where they need to to find water and nutrients. Imagine carefully digging up specimens of your garden plants to see what their root systems really look like. Ends up, it’s already been done. Back in 1927, a couple of researchers, Weaver and Bruner, dug up a bunch of vegetable plants to examine rooting depth and structure. We can use what they learned to make sure we put our plants where they will grow best. And that lawn, its root system is pitiful compared to native plants. 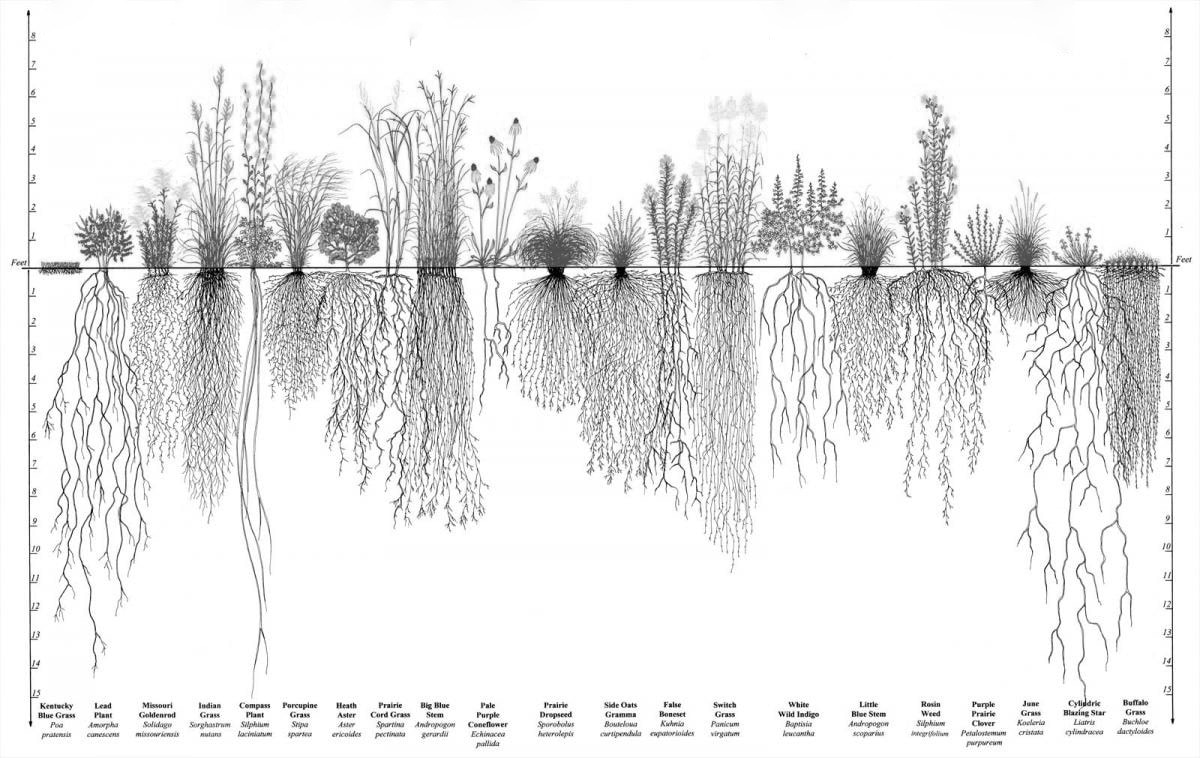 Rooting depth of common lawn grass (far left) compared to Wisconsin's native prairie plants (Lake Ripley Management District)
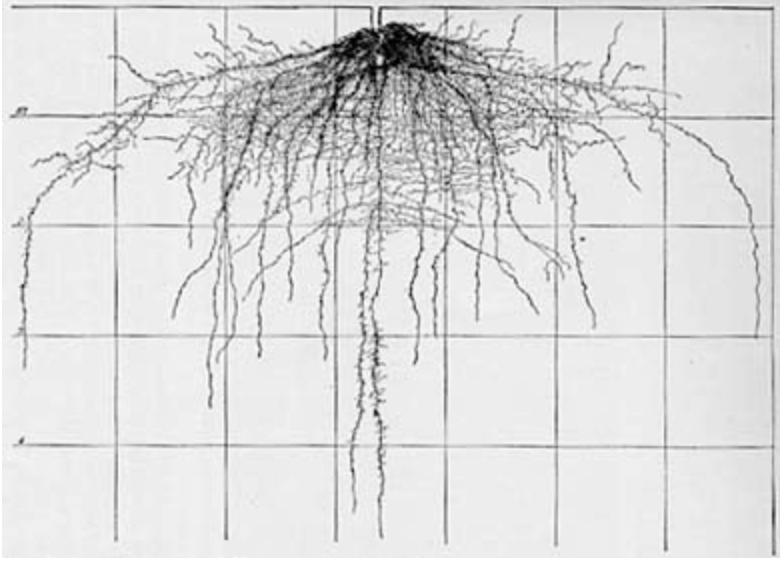
In my case, I have to assume that plants installed directly in the ground are going to have a tougher time moving around in the soil, for at least another year or two. Because of this, I try to remember to install shallow-rooted plants in those places. I generally use my 12” deep raised beds for plants with moderately deep roots and my 24” deep bed for the plants with deeper roots, though not always. Because my raised beds are open to the native soil at the bottom, rooting will get progressively deeper as the preexisting soil improves. Strawberries are classified as shallow-rooted, but my deep bed has newly built netted panels that keep birds away, so that’s where my strawberries live. [As you read this post, you will learn that strawberries are not nearly as shallow-rooted as many, myself included, once believed.] 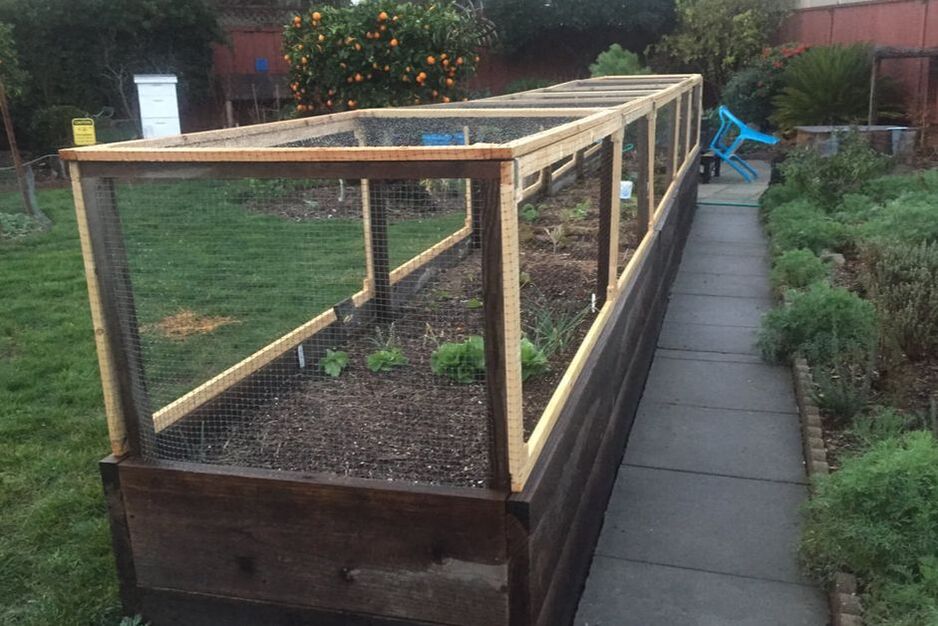 Netted panels protect crops grown in raised beds from birds (Kate Russell) Listed below are categories of minimum rooting depths, under ideal conditions, for many common home gardening plants. Remember, these numbers are bare minimums, assuming nutrient-rich, loose soil. Your results may vary. Shallow rooted plants These plants are your best choices for containers, towers, and compacted soil. Basil, chives, cilantro, endive, escarole, ginger, lettuce, oregano, parsley, radish, scallions, spinach, summer savory, tarragon, and thyme can all be grown in less than 12” of soil. Of course, more is generally better. In one study, biologists found that “doubling plant pot size makes plants grow over 40 percent larger.” And look what happens to a lettuce plant, given its freedom to grow! [By the way, the squares in all of these illustrations are one foot by one foot.]
Slightly deeper growing plants, arugula, bok choy, celery, fennel, garlic, Jerusalem artichokes, mint, onions, rosemary, shallots, strawberries, and Swiss chard need at least 12” of soil but perform better in 18” or more soil.
Moderately deep rooted plants Your cabbage, carrots, chiles, okra, peas, beans, beets, blueberries, broccoli, collards, Brussels sprouts, cauliflower, cucumbers, eggplant, horseradish, kale, leeks, kohlrabi, mustard greens, Napa cabbage, peppers, potatoes, rutabagas, sweet potatoes, and turnips need at least 18" of soil to grow properly.
Artichokes, cantaloupe, cardoon, cereal grains, citrus, figs, lima beans, melons, parsnips, peaches, pumpkins, sage, squash, tomatoes, and watermelon need 24" of loose, nutrient-rich soil.
Deep rooted plants Your asparagus, cherries, fava beans, hops, olives, pears, prunes, rhubarb, and spring wheat will ultimately go down 3 feet or more. Alfalfa, almonds, apricot, and corn may have roots that are 4 feet long, while walnut trees and winter wheat may reach 5 feet. The roots under your grape vines may be 20 feet long.
Remember what I said earlier about strawberries? Well, if you are like me, strawberry pots have never seemed to work out. Believe me, I’ve tried! Experts all say strawberry plants have a minimum rooting depth of 12”. What they don’t tell you is that mature plant roots might go down 3 feet! And what about that containerized horseradish? A 10-year old horseradish plant may have roots as deep as 14 feet!
Rooting depth depends on species, soil, and several other variables. Knowing more about rooting depth can help you select plants suited to your soil, container size, or planting beds.
Why do some fruits continue ripening after being harvested, while others do not? It all depends on whether or not they are climacteric. 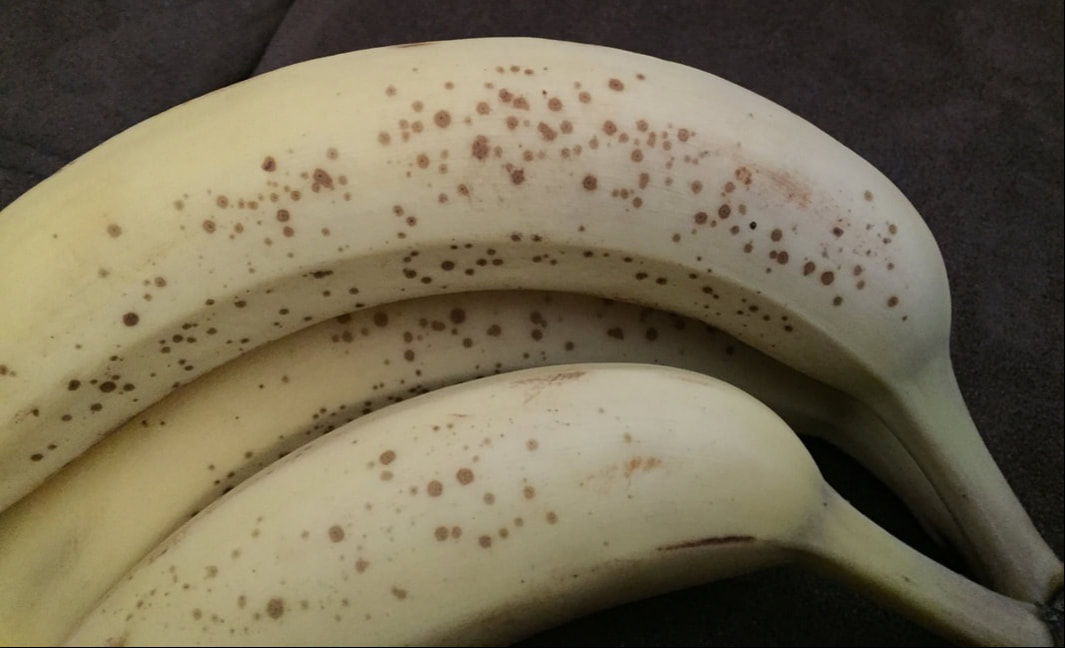 Ripening banana (Kate Russell) Ripening Ripening is a highly complex developmental process. It is largely dictated by plant genetics and partially affected by climate. As fruits ripen, distasteful flavors are broken down, sugar levels and other pleasant flavors increase, pectins soften, acid and carbohydrate levels change, colors change, and a lovely aroma is released. One of the most important players in the ripening process is ethylene gas. Ethylene gas Ethylene gas is a plant hormone produced by nearly all fruits. It is used in response to injury and to ripen some fruits. Climacteric fruits have very sensitive ethylene gas receptors. It doesn’t matter whose ethylene gas it is. Once these receptors are triggered, a domino effect of ripening is activated: respiration and ethylene gas production spike, whether or not they are still attached to the parent plant. Increased respiration and ethylene gas drive the ripening process in climacteric fruits. 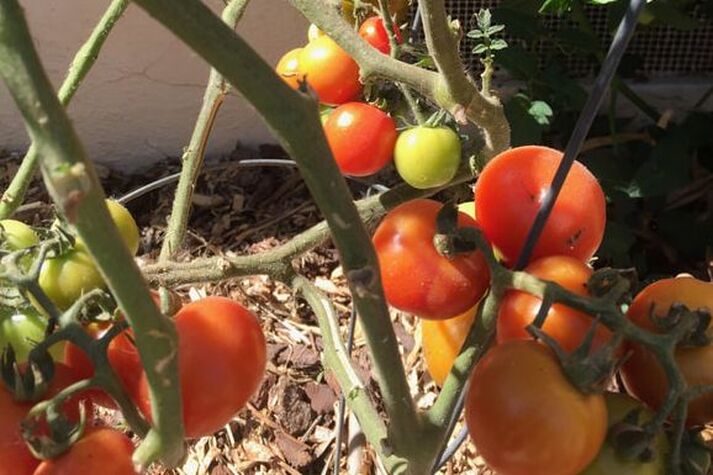 End of season tomatoes at various stages of ripeness Ethylene gas is the reason why bananas or apples stored near other climacteric fruits will cause them to ripen faster. It is also why bananas are now sold with plastic or wax over the stem ends - to reduce ethylene gas emissions. Non-climacteric fruits also produce ethylene gas, but at much smaller rates. These fruits rely on other methods of ripening. This is a new area of study and very little is known at this time except that auxins and abscisic acid are believed to play critical roles. 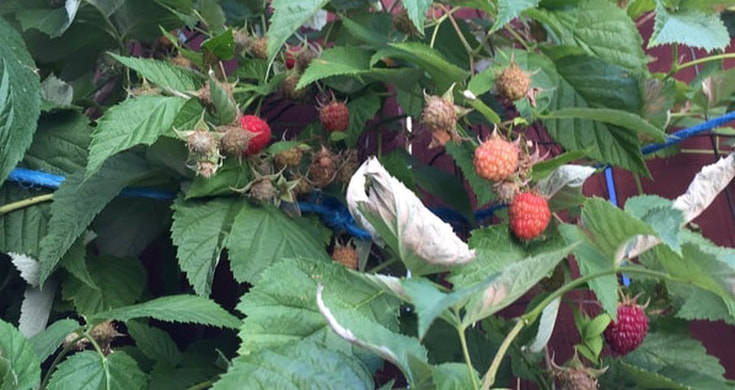 Ripe and unripe raspberries Which fruits are climacteric? Apples, apricots, avocados, bananas, blueberries, cantaloupes, figs, kiwifruit, mangos, nectarines, papayas, peaches, pears, pineapple guava, plums, tomatoes, and some hot peppers are climacteric. This means they can be removed from their parent plant and will continue to ripen. 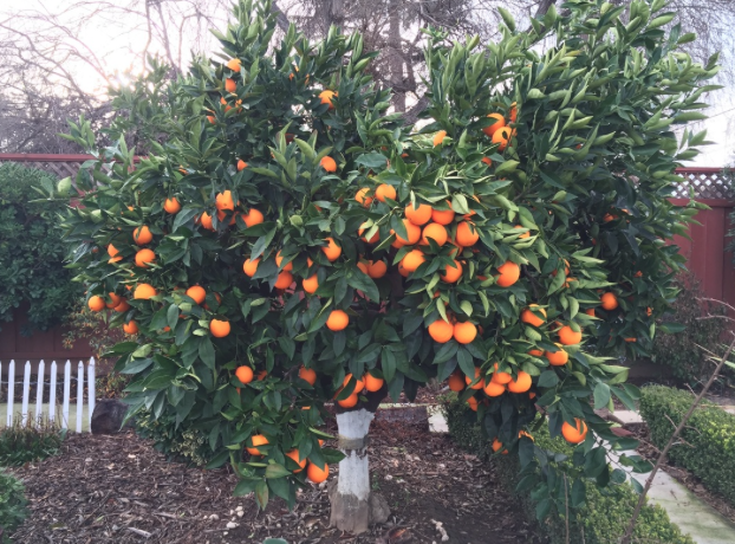 Ripe and unripe oranges Blackberries and raspberries, cherries, citrus, cucumbers, eggplants, grapes, melons, peppers, pineapples, pomegranates, pumpkins, squashes, strawberries, and watermelons are not climacteric and must be left where they are until they have ripened fully. If these fruits are harvested before they are ripe, put them in the compost pile or feed them to your chickens because they will never ripen. There are some non-climacteric apricots and melons, while some varieties of grapes and strawberries, while not climacteric, do have active ethylene gas receptors.
 Division of Shasta daisies Very often, you can propagate new plants from old ones by taking a piece of the parent plant and giving it a warm, moist place to grow. This works because plants have undifferentiated cells that can become any part of the plant. Given the right conditions, meristem tissue that was going to become stem or leaf can develop into roots instead. Vegetative propagation can take several forms.
Many bulbs and perennial plants benefit from being divided every few years. This happens because the root system can become overcrowded. Artichokes, chrysanthemum, germander, saffron crocus, and yarrow often benefit from being divided. If you dig up one of these plants, you can pull or cut them into smaller portions and replant elsewhere. Division is normally done in autumn, unless it is an autumn-blooming plant, such as saffron crocus, in which case division is performed in spring. Autumn temperatures give plants time to recover and develop new root systems.
Suckers, also known as basal shoots, and root sprouts can be removed from mature plants and encouraged to take root elsewhere. To do this, you will need to carefully remove them from the parent plant and place them in moist soil.
What about GMOs? Propagation generally refers to breeding or reproducing plants by natural processes from parent stock. How you define natural processes may alter how you feel about genetic modification. Before digging in your heels, you need to know that plants, bacteria, and fungi have been modifying genetic material [their own and that of other living things] long before we got started in the lab. For better or worse, genetic modification has a role in modern plant propagation. For one thing, without genetic modification, there would be no seedless watermelons. Seedless watermelons happen because plant breeders do two things:
Rather than going to the store to buy new plants, you can often propagate your own for free using these methods. Root sprouts appear to be random baby trees or shrubs that keep popping up in your landscape. Getting rid of them can be difficult.  Poplar root sprouts emerging along the root of a originating tree (not visible). Photo by Lamiot. CC BY-SA 3.0 Plant reproduction Many plants pass on their genetic information through seeds. Seeds are spread by birds, the wind, people, and herbivores. Plants can also propagate themselves vegetatively using suckers, adventitious shoots and root sprouts. These growths emerge from adventitious buds, which occur close to the vascular bundle, where they will have easy access to water and nutrients. The different names refer to where they occur. Suckers, also known as basal shoots, occur at the base of a tree or shrub. Adventitious shoots can form on stem internodes, leaves, roots, or callus. Root sprouts emerge from the root system. Root sprout growth Root sprouts often grow out of adventitious buds found on a tree’s extensive root system. Root sprouts are clones of the parent plant.They can be found a significant distance from the parent tree. Root sprouts can also grow from the roots of a tree that has fallen or been cut down. Apple, cherry, and guava are especially prone to root sprouts. If a plant produces root sprouts, it is said to be surculose. Root sprouts can be used to propagate new plants. They also use up a plant’s energy stores and can make a mess of your lawn or landscape. They are also responsible for one of the world’s biggest and oldest life forms. #/media/File:FallPando02.jpg) Pando aspen grove at Fishlake National Forest (J Zapell, Public Domain) The world’s largest life form
Tree roots spread. Then they can send up new root sprouts, which then create more roots and more root shoots. Given enough time and space, this process can create something really HUGE! In fact, root shoots are responsible for one of the world’s largest and probably oldest life forms: the singular root system of a grove of male quaking aspen found in Utah. Known as Pando, this root system covers 106 acres, weighs approximately 13 million tons, and is believed to be 80,000 years old. Sadly, Pando, is dying. Pando’s decline is believed to be a combined result of drought, grazing, and fire suppression. The U.S. Forest Service and private groups are trying to save it, but repeatedly killing off the root shoots with grazing (or hand pruners) does take its toll. Why do trees produce root sprouts? Some trees are more likely than others to produce root sprouts. In some cases, it is simply the tree’s normal method of propagation. Root sprouts can also be a sign that a tree or shrub is stressed. That stress can take many forms:
What can you do about root sprouts? First, keep your tree as healthy as possible. Water it, feed it, protect it from lawn competition, weedwackers, and car doors. Mulch around but not touching the tree. Do a little research to find out what type of tree you are dealing with and what its needs are, and provide for those needs. This will reduce the tree’s drive to reproduce in this way. If you spray herbicides on a root sprout, you will be poisoning the parent plant as well. Instead, you can kill the individual buds by tearing the new growth off, as close to the root as possible. Of course, this may require some soil removal. If you can tear the root sprout off of the root, you are likely to damage or kill that particular bud. If there is a section of root that continually puts out unwanted root sprouts, you can dig up the offending root and severe it from the tree or shrub. If all of that sounds like more work than it is worth, simply snip them off at soil level each time you see them. There are also products available that you can spray on root sprouts, but I do not use them. Reviews appear to be highly mixed and applying just a little bit too much can seriously damage the tree or shrub those root sprouts came from. Other people swear by them. It's your call. If you are really sick of all the root sprouts in your lawn, contact a licensed arborist. They can safely apply a growth inhibitor. All living things (as far as we know) contain carbon. Your body is 18% carbon. A plant is 50% carbon. The carbon cycle is a series of events that make life possible for us and our garden plants.  Movement of carbon between land, atmosphere, and ocean in billions of tons per year. Yellow numbers are natural fluxes, red are human contributions, white are stored carbon. The effects of volcanic and tectonic activity are not included. (US DOE, Public Domain) What is carbon? Carbon (C) is an element. For the most part, the amount of carbon in Earth’s sphere of existence is relatively constant. But carbon can take several forms. The graphite in your pencil is an example of carbon. Apply enough heat and pressure and that pencil lead can and will turn into a diamond. In most cases, carbon pairs up with other elements to form new materials, such as amino acids, fats, and carbohydrates. It can also form potassium bicarbonate, a material used to neutralize acidic soil. Very often, carbon pairs with oxygen to form carbon dioxide  Carbon, in both graphite and diamond form (Robert Lavinsky) CC BY-SA 3.0 Carbon cycle components
Carbon can be found everywhere on, in, and around the Earth. The way carbon moves from place to place, and from form to form, is what makes up the carbon cycle. The components of the carbon cycle are:
Carbon moves through these changes because of biological, chemical, geological, and physical processes. The carbon cycle in your garden The same processes occur in your garden, with similar results. Start with your soil. Soil is a living, breathing complex of minerals, organic matter, insects, microorganisms, worms, and more. Microorganisms break down complex molecules into smaller bits, separating carbon from whatever it happens to be bound to and making it and other minerals available to plant roots as food. You plant a seed and water it. The seed coat softens, a first root, or radicle, emerges and starts absorbing carbon and other minerals. The carbon then becomes part of the plant. The plant matures and produces fruit or other edible parts, which we harvest and eat. The carbon in those parts then becomes part of us. The parts we don’t eat are added to the compost pile, where the carbon attaches itself to other minerals or is released into the atmosphere as carbon dioxide. The sun shines down on Earth’s oceans, waterways, and soil causing evaporation. That moisture condenses and rain occurs, converting any carbon dioxide in the atmosphere into carbonic acid. This form of carbon falls to Earth, enters the soil, and hydrates any unharvested plants. Excess rainwater leaches into ground water where it ultimately makes its way to oceans. The sun’s heat causes more evaporation, water rises into the atmosphere, more rain, and so on. How do plants use carbon? You may have heard that plants take carbon dioxide in and release oxygen during the day, and that that process switches at night. The truth is, carbon dioxide is only taken in, and oxygen is only released back into the environment, while photosynthesis is actively taking place. The act of photosynthesis spilts the carbon dioxide molecule into oxygen and carbon. The carbon is used as a building material, much the way our bodies use carbohydrates. [Carbohydrates are made out of carbon, hydrogen, and oxygen.] Plants also absorb carbon from the soil, but there has to be the right balance of nitrogen available for plants to use the carbon they need. Nitrogen is the steak and salad equivalent of the human diet. This balance is called the carbon-to-nitrogen, or C:N, ratio. Microorganisms that break down minerals and organic matter into plant-sized bites prefer a C:N ratio of 24:1 to 30:1. If there is too much, or not enough, carbon or nitrogen in the soil, plants will suffer. Carbon cycling and tap water Most soils contain a variety of carbon compounds and this can be a problem if your tap/irrigation water is highly alkaline. The chemical reactions that occur between carbonate and bicarbonate ions and alkaline water can make calcium and magnesium less soluble, and harder for plants to absorb. These chemical transformation between these molecules also tends to leave salts behind. Whenever possible, irrigate your garden with rain water. Carbon sequestering As we burn fossil fuels and seal the Earth’s surface with concrete, we release an awful lot of carbon into the atmosphere and make it harder for carbon to be absorbed into the soil. Carbon in the atmosphere joins with oxygen to form carbon dioxide. Carbon dioxide (and methane) absorb heat and bounce it back to Earth. This can help prevent another Ice Age and it can lead to global warming, more destructive storms, desertification, rising sea levels, and a harder time for us and our plants. Removing carbon from the atmosphere is called carbon sequestering. Naturally, carbon is held in plants and soil. When plants are composted or decompose, some of the carbon they contain is returned to the atmosphere and some enters the biosphere, oceans, and geosphere. As we disturb the Earth’s surface, we break the bonds that hold carbon in place. Instead of plowing or rototilling, you can reduce the amount of carbon released into the atmosphere by practicing no-dig gardening. [It’s easier on your back, too.] Carbon is sequestered into the soil by plant roots. Plant roots secrete carbon in something called exudates. Root exudates feed beneficial bacteria and fungi in the soil which then help feed your plants. These root exudates also promote soil health and reduce erosion. There are many ways that you can reduce the amount of carbon in the atmosphere:
Finally, growing your own food is one of the easiest ways to reduce the amount of carbon released into the atmosphere. Not only does it reduce the demand for highly tilled fields around the globe, it reduces the number of trucks, ships, farming machinery, and storage facilities needed to fill your larder. Just go outside and pick what you need! Winter is when many fruit and nut trees and cane fruits enter dormancy. This is an excellent time to prune and train trees and canes. It is also a good time to apply anti-pest and anti-disease treatments. But some of those treatments should be applied when a plant is in full dormancy while others should be applied during the delayed dormant period. Let’s find out more about these two time frames and how to make the most of them.
Life in the year of a tree Summer is a riot of leaf, flower, and fruit development. Ample warmth and moisture combine to allow trees and canes to invest all their resources into procreation. As days begin to shorten and temperatures start to drop, deciduous trees, grape vines, and bramble fruits pull resources from leaves, as seen by the changing colors and ultimate leaf drop. During the coldest part of winter [December and January if you live in San Jose, California], most fruit and nut trees are in full dormancy. Sometime around February, things start moving again. Sap starts flowing. Buds start swelling. This is called the delayed-dormant period and it continues until spring, when the tips of the buds start to turn green. Timing tree treatments Horticultural oils, fixed copper, Bordeaux mixture and fungicides can be used to suffocate pest eggs, thwart fungal diseases, and break many other disease triangles. But the timing of those treatments is critical for them to work properly. Spray too soon and rain will wash it away before it ever comes into contact with a pest or pathogen. Too late is, well, too late. Also, coverage must be complete to the point of it dripping from every surface. Generally speaking, these treatments need to be done before buds start to swell. Applying horticultural oils during summer, for example, when trees are more likely to be water-stressed, can lead to severe leaf loss and sunburn damage, reducing crop size and making trees susceptible a number of other pests and diseases. Applying treatments during freezing weather can be just as bad. Ideally, tree treatments should be applied on cool (50°F - 70°F), slightly overcast days, when rain, fog, and wind are not expected for at least 24 hours. Different species have different ideal “windows” of treatment opportunities:
Timing also depends on the specific pest or disease. Full dormancy is the best time to treat for San Jose scale and peach leaf curl. Either full dormancy or the delayed dormant period can be used to treat for aphid eggs, European fruit lecanium nymphs, fruittree leafrollers, peach silver mites, and peach twig borer larvae. You can also wait until blossoms appear to use Bt to treat for peach twig borers. The delayed dormant period is the best time to apply treatments for these specific problems:
Overlapping treatments In some cases, your tree, vine, or canes will need more than one type of treatment. Dormant oil may be needed to combat certain pests, followed by a sulfur treatment to prevent fungal disease. It is very important that at least 30 days separate those two treatments. Also, sulfur should not be applied on days when temperatures will go above 75°F. Keep in mind that treatments should not be given as a matter of habit. They should only be used when they are needed, as evidenced by infestations of infectious the previous year. Use a hand lens or magnifying glass to inspect buds for signs of aphid or other insect eggs. If your trees do not need treating, don’t do it. This is especially true for fixed copper treatments, as copper can build up in the soil to reach levels that are toxic to valuable microorganisms. Whichever treatments you decide to use, ALWAYS apply them exactly as package instructions state and wear protective clothing and goggles. Using these products incorrectly can harm you, your trees, and groundwater supplies. Other actions you can take to ensure the health of your fruit and nut trees during delayed dormancy include:
February may seem like a quiet time for gardeners, but it is the perfect time to get outside and take a closer look at stems, twigs, bark, buds and spurs. Identifying potential pest and disease problems ahead of time, and treating your trees at the ideal time to combat those problems can make the rest of your year that much easier and your trees more productive. When installing new bare root trees, or doing dormant season pruning, look for orange bulges on stems or branches. It might be burr knots.  Burr knot on apple tree (Ondrej Spanel) CC BY-SA 3.0 Once considered a disease, burr knots start as smooth orange bulges on stems or branches that develop into adventitious roots. These tumor-like bulges are masses of tiny roots that somehow ended up in the aboveground portion of a tree. This condition can be mistaken for crown gall.
Grafted trees Remember, most fruit and nut trees purchased these days are two trees grafted together. The upper portions produce more fruit and have good pest and disease resistance. Rootstocks establish themselves quickly and make the best use of soil resources. Trees susceptible to burr knots This condition is most common in apple trees. It occurs on scion cultivars, particularly 'Gala' and 'Empire', and dwarf and semi-dwarf tree rootstocks. Specifically, semi-dwarf trees grown from M.7, M.26, MM106, or MM.111 and dwarf trees with M.9 rootstock are likely to develop burr knots. Scion cultivars tend to develop burr knots on the underside of limbs, while grafted trees develop burr knots at nodes. Nodes are where leaves and stems emerge. Instead of developing normally, these primordial root cells grow, creating a tumor-like bulge. Conditions that encourage burr knots Too much shade can increase the likelihood of burr knots occurring. High humidity and temperatures ranging from 68°F to 95°F during the first year also encourage the development of tiny growths, called root initials, during its second year. These root initials can break through the bark of a tree, making room for more roots to form, increasing the bulge. Problems associated with burr knots As roots push through the bark, they create entry points for pests, such as plum borers, apple clearwing moths, wooly apple aphids, and diseases. These diseases include fireblight and wood-rotting fungi. Limbs can become structurally weak and more likely to break. Several burr knots on the same tree can also interfere with the nutrient movement through the phloem, causing stunting. These weakened areas are more prone to frost damage winter. Preventing burr knots These tips can help your tree stay healthy and free of burr knots:
Gymnosperms are plants that produce naked seeds. We say they are naked because the seeds are not surrounded by an ovary. When seeds are enclosed by an ovary, which we generally refer to as fruit, the plant is classified as an angiosperm.  Various gymnosperms (Public Domain) Angio- or gymno-?
There are several differences between angiosperm and gymnosperm:
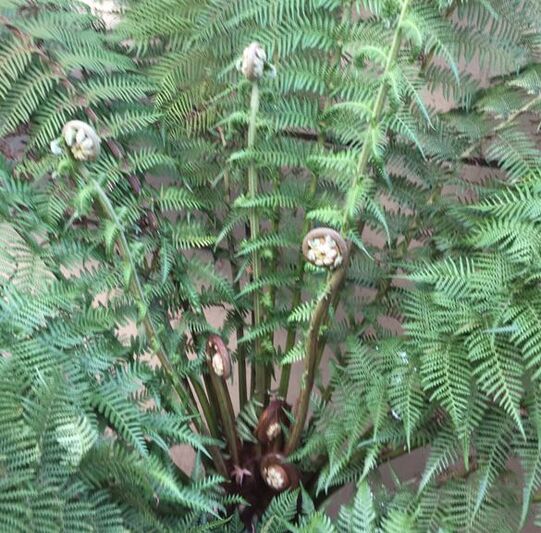
Another difference between angiosperm and gymnosperm is the idea of softwood versus hardwood. Those terms don’t exclusively refer to the density of the wood. It actually points out that they are two entirely different types of plants. Hardwoods are angiosperms, while softwoods are gymnosperms. Types of gymnosperm Gymnosperm seeds, unlike angiosperm, develop on top of leaves or scales. Those scales often turn into cones. There are four existing types of gymnosperm: Nutty gymnosperms You may have heard of pine nuts and gingko nuts, but neither one is actually a nut. True nuts are hard-shelled, inedible pods that hold both the fruit and the seed of a plant. The pod, or shell, of a nut is made from the ovary wall, which hardens over time. Hazelnuts, chestnuts, and acorns are true nuts. So are kola nuts. A nut is not a nut when it is a fruit seed. Pine nuts and ginkgo nuts are not true nuts. While most of the plants in your garden are probably angiosperms, you just might have a gymnosperm or two in the mix! 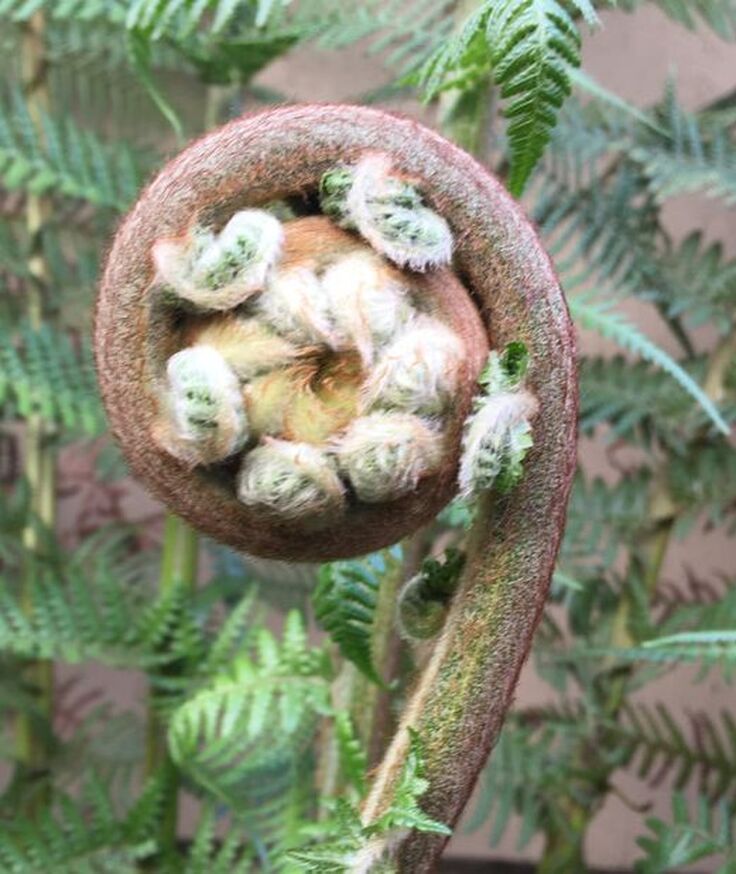 Fern fiddlehead (Kate Russell) These plants have been around for over 350 million years, long before flowering plants, or angiosperms, made their appearance. Or dinosaurs, for that matter! Ferns are vascular plants that do not produce flowers or seeds. Instead, they reproduce using spores, similar to mushrooms and other fungi. There are over 10,000 known fern species of fern [so far] and some species can live for 100 years. While some ferns are nearly microscopic, others can reach 80 feet in height. 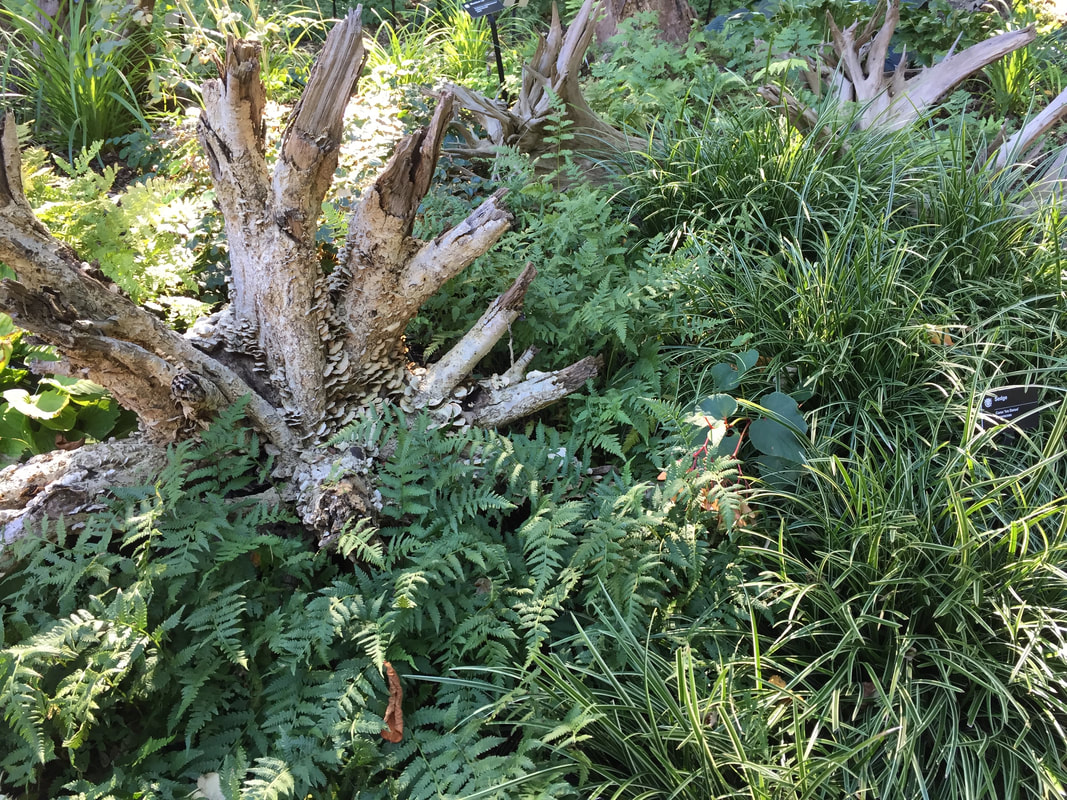 Ferns in a stumpery (Kate Russell) There is a group of ferns (Azolla) found predominantly in water and they do not look like any ferns you might see on land. One in particular, the mosquito fern, is able to fix atmospheric nitrogen the same way land-dwelling legumes do before going to seed. Fern anatomy Ferns have three basic parts: rhizome, fronds, and sporangia. Fern rhizomes come in three forms: erect, lateral, and vertical. Erect rhizomes provide the solid base from which leafy fronds unfurl. Laterally growing, creeping rhizomes move above and below ground and may even climb trees. Vertical rhizomes often look more like the trunk of a tree. Fronds are a fern’s leaves. The leaf stem, called a petiole when referring to other types of plants, is called a fern’s stipe. The flat blade of the frond is called a lamina. The lamina is often segmented into pinnae by short stems called rachides. When a frond first appears, it is tightly curled and called a fiddlehead or koru. Fronds perform photosynthesis and they provide support for a fern’s reproductive sporangia. Black, brown, or orange sporangia are the reproductive structures of ferns. If there are no sporangia present, the fern is sterile. Normally found on the underside of the fronds, spores are formed in the sporangia. A cluster of sporangia is called a sorus. In some cases, a flap of tissue, called the indusium, may cover the sori until the spores are mature.  Tree fern spores (Anca Mosoiu) CC BY-SA 3.0 Fern reproduction
Ferns are unique in their method of reproduction and they are the only plants with two distinct living stages. As each spore matures, it becomes a sporophyte. Sporophytes that land in hospitable environments grow into very tiny, short-lived plants called gametophytes. Gametophytes have two sets of reproductive organs: a female archegonia and a male antheridia. Fertilization can take place within the same plant or between two neighboring plants. This fertilization produces a new sporophyte that grows into an adult fern. Edible ferns While most ferns are not considered edible, they also tend to not be poisonous. There are some varieties of fern that are edible, such as:
As always, do not eat anything you are not sure to be safe. Fern pests and diseases Ferns are naturally resistant to most plant-eating insects. One edible fern in particular, Tectaria macrodonta, has a gene that was transferred to cotton plants, providing resistance against whiteflies! Foliar nematodes (Aphelenchoides fragariae) and soil borne nematodes (Pratylenchus) can sometimes be a problem. Ferns are susceptible to diseases such as bacterial blight (Pseudomonas cichorii or P. gladioli), Pythium root rot, and Rhizoctonia blight. Infected plants should be discarded. Environmental problems, such as drought, which causes graying, and over-fertilization, which results in frond lobing and leaf tip burn, can be avoided with good cultural practices. This means investing in disease-free plants, using only as much fertilizer as recommended for each fern species, and avoiding overhead watering. If you have a moist, shady crevice in your garden, ferns might be just what you've been looking for! Plants grow in response to their environment. When the direction they grow is determined by the location of the stimulus, it is called tropism. 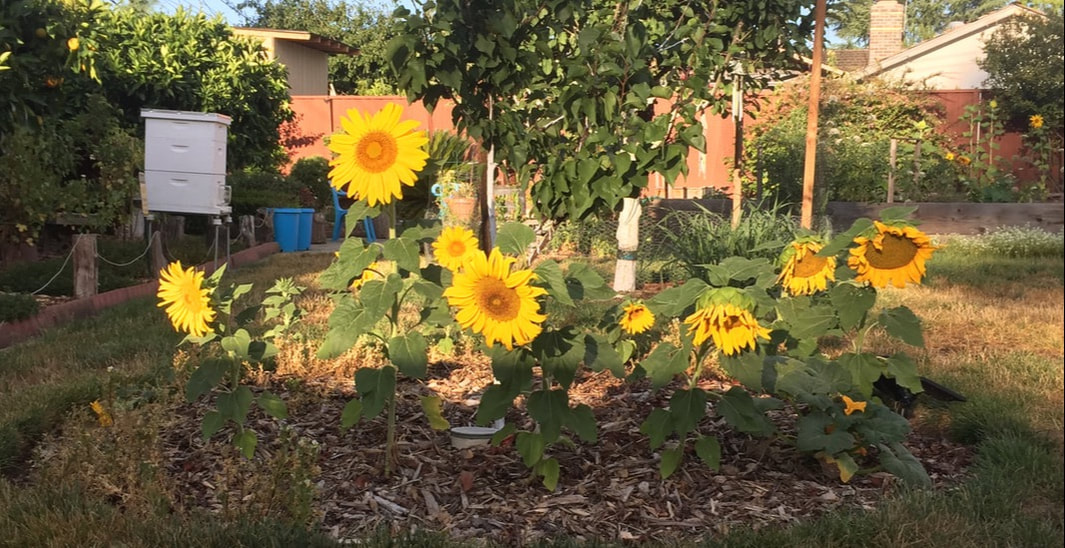 Heliotropism in sunflowers Types of tropism Tropisms can be positive or negative. Positive tropisms attract the plant toward the trigger, while negative tropisms push the plant away. Sunlight is generally a positive tropism, causing plants to lean, turn, and pivot to follow its rays. In some cases, particularly darkened jungle floors, sunlight is a negative tropism, initially, driving vines to seek trees which they will later climb. 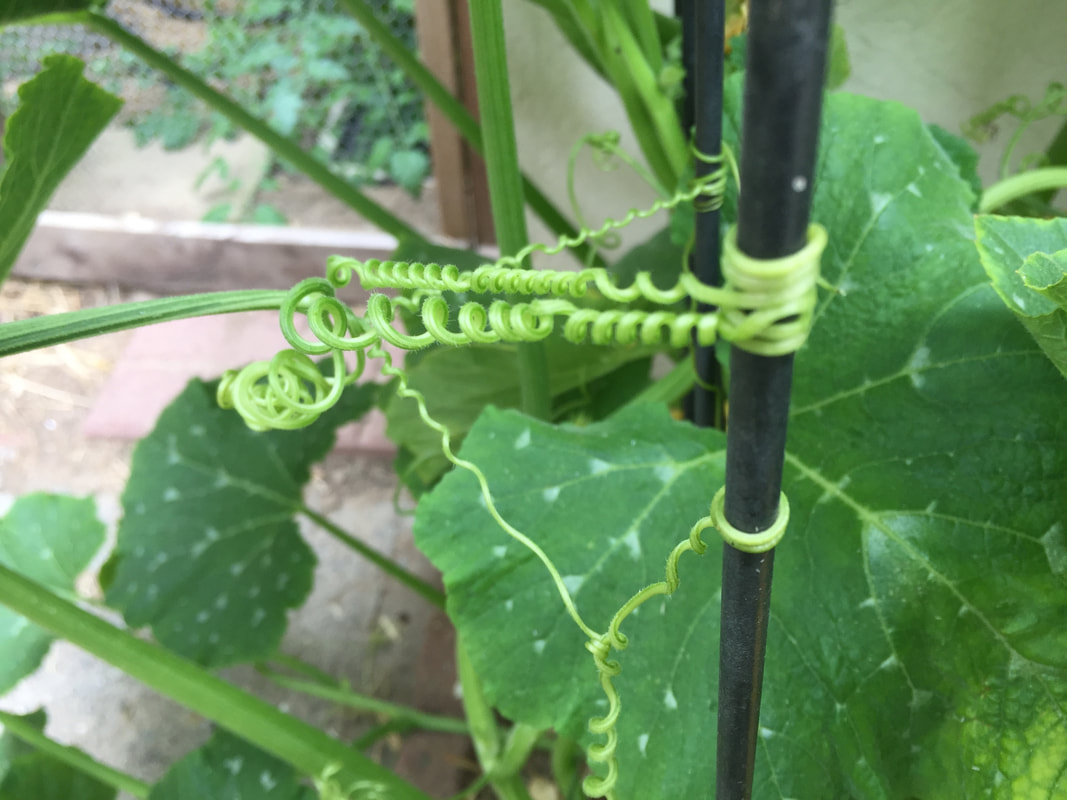 Thigmotropism of pumpkin Tropisms are generally named for the stimuli:
Plants also respond to chemicals (chemotropism), electric fields (electrotropism), magnetic fields (magnetotropism), oxygen levels (aerotropism), and temperatures (thermotropism) The opposite of tropism When a plant responds in a direction that is not determined by the position of the stimulus, it is called a nastic movement. Common nastic movement triggers include being touched or the way a flower opens and closes each day (nyctinasty). When being touched causes flowers or leaves to suddenly close themselves up in a specific and regular pattern, rather than the thigmotropism seen in climbing tendrils, it is a nastic movement. The location of the finger has nothing to do with the way the flower closes. In the latter case, the sun going down may trigger the flower to close, but the direction of that closing is not related to the sun’s position. Plants may not be able to get up and walk around, but they have a unique arsenal of movement-related responses they can use to help themselves grow and thrive. Which tropisms do you see in your garden? Cavitation is the sound of water breaking. While we don’t normally think of water being able to “break”, the columns of water that move upward through a tree’s veins can be broken, allowing air bubbles to form or simply severing a pathway for life-giving water. 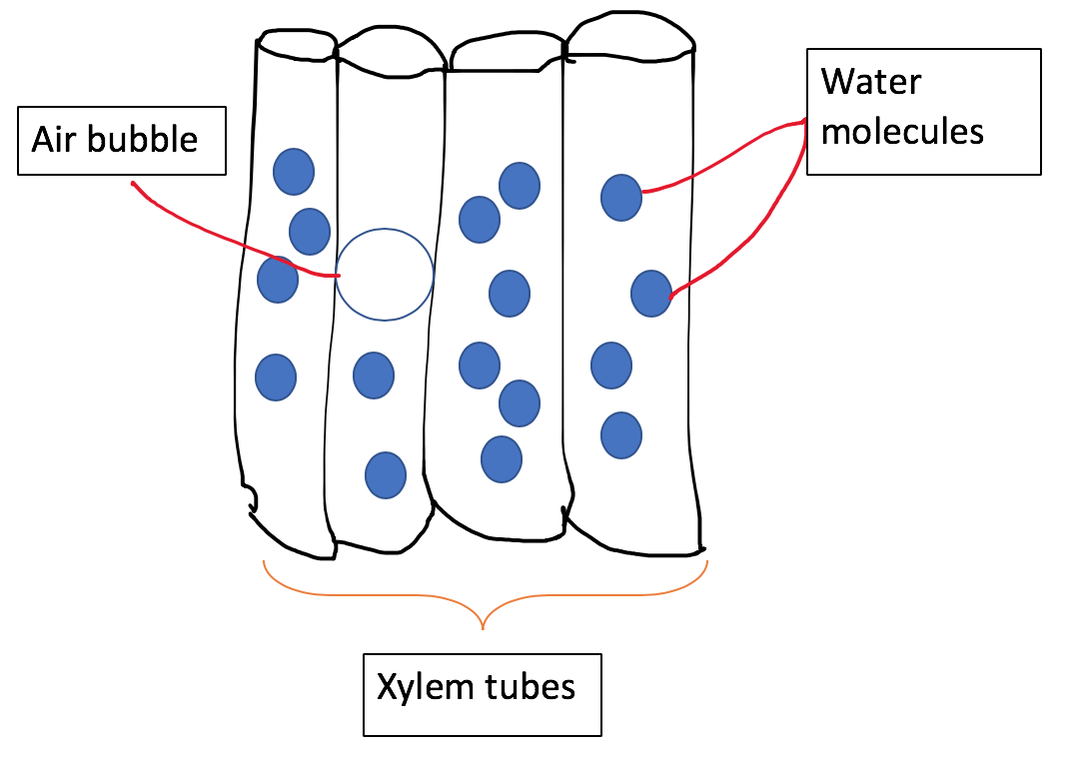 Cavitation infographic by Kate Russell Trees use a lot of water
The general rule of thumb for how much water a tree needs each week of summer is 10 gallons of water for every inch of trunk diameter, as measured at knee height. This means a large, mature tree, with a trunk diameter of 18”, will need 180 gallons of water every week at the peak of summer, on average. The flow of that water is critical to a tree’s health. Transpiration In healthy trees, water is absorbed through the roots and pulled upward through tubes called xylem. There are thousands of xylem in a mature tree. Picture the xylem as straws that run the vertical length of a tree. Water moves through xylem in a process called transpiration. Transpiration refers to the way negative pressure is created within xylem as water evaporates from the surface of the leaves. This occurs because of surface tension, or the tendency of water molecules to stick together. When one water molecule leaves the plant through evaporation, lower water molecules are pulled upward. Bubbles can be bad Bubbles might be fun to play with, but bubbles in veins are bad. Just as air bubbles in an IV tube can kill you, so, too, can bubbles block the flow of life-giving water for a tree. Rapid transpiration can cause air bubbles to form in xylem. If too many air bubbles remain in place, it can kill a tree. Cavitation is much like an embolism for trees. Small, infrequent bubbles are not a serious problem. Large, fixed bubbles are deadly. During periods of drought, the rate of evaporation on the surface of the leaves is so great that xylem can collapse and break, like a rope pulled too tautly. These breaks halt the flow of water completely, also killing a tree. Cavitation also occurs in response to thawing after water within a tree has frozen. The sound of silence If you could hear higher frequencies, it would sound similar to popcorn popping. In most cases, the frequency of this sound is too high for us to hear, but it can, occasionally, be heard. [It might be fun to try using a stethoscope on a tree…] I can only imagine that our peaceful summer walks in the woods sound more like a riot of trees screaming for water to our dogs… Bottom line: make sure you irrigate your trees properly to keep them healthy, especially during summer. Juicy, sweet kernels of corn transform, overnight, into hideous, purple-gray, tumors. And these tumorous galls are delicious! Introducing, corn smut.  Corn smut (Kembangraps) Public Domain Now, corn has many pests and diseases: corn earworms, European corn borers, seed-corn maggots, soft rot, seed rot, fusarium root and ear rot, maize dwarf mosaic, pythium stalk rot, and damping off disease, just to name a few. If you are an American corn farmer, corn smut is not what you want to see in your field. A lot of money and effort have gone into eradicating corn smut in North America.
Corn smut in your garden is something else entirely. While this distant cousin of mushrooms reduces crop size and makes ears of corn unmarketable for July picnics and canning purposes, it is edible and delicious. Unlike other corn problems, corn smut is said to taste like truffles, with a sweet, earthy, inky flavor. If it appears in your garden and you don’t want it, your local chef would love to hear from you! To my way of thinking, if life gives you lemons, make lemonade. Or, if you are given corn smut, make quesadillas! Corn smut can be eaten raw, or added to many dishes, such as omelets, soups, sauces, meat dishes, or even desserts! As an extra bonus, corn smut is high in lysine. This means eating it with corn, or any other seed, provides a complete dietary protein. Corn smut description Also known as devil’s corn, common smut, boil smut, Mexican truffles, or huitlacoche [pronounced weet-la-COH-cheh], corn smut is a parasitic fungus that can occur on any aboveground portion of a corn plant as purplish blobs covered with papery greenish-white tissue. These fungi prefer meristem tissue and the galls are mostly seen on the ears of corn. Ear galls are significantly larger than those which form elsewhere on the corn plant. Corn smut gets its purple color from pigments called anthocyanins. These are the same pigments found in blueberries, raspberries, and purple cauliflower. When you cook with corn smut, don’t be surprised to see the purple color change to black, because it will. Purple pigments generally don’t hold up well to heat. Corn smut lifecycle The corn smut fungus (Ustilago maydis) infects plant ovaries, causing kernels to swell up into large purple galls that are filled with fungal threads, called hyphae, and spores. Corn smut spores are already in the soil and can be carried on the slightest breeze or splashed water from rain or irrigation. Dry conditions and temperatures between 78°F and 93°F are all that corn smut needs to get started. Adding nitrogen or applying manure increases the chance of corn smut developing on your corn plants. Plant injuries also increase infection rates. Corn plants try to defend themselves against corn smut by blasting the invaders with reactive oxygen (hydrogen peroxide). Sadly, from the corn plant’s perspective, this bubbling action simply spreads the smut spores. If smut appears on your corn, fear not! Instead, harvest the galls while they are young and have the texture of a foamy popcorn, kind of firm and spongy. These moist galls are ready for harvesting 2 or 3 weeks after infection appears. As the galls mature, they turn dry and are mostly filled with unappetizing dry, black fungal spores. Love it or hate it, corn smut is here to stay, so you may as well learn to cook with it (or sell it). Sometimes plants grow in ways you might not expect.  Flattened stem of fasciation in milkweed Instead of a nice round stem, you see a flattened ribbon shape. Rather than a regular flower, you get undulating folds. In flowers, it is called cockscomb or cresting. Wherever it happens, it is called fasciation. Fasciation is a relatively rare physiological disorder that can create some beautiful mutations. It can occur anywhere on a plant, but stems and flowers are the most commonly seen examples. How does fasciation occur? In normal plant development, growing tips (apical meristems) focus all their resources on a single point, creating straight or cylindrical stems and flowers. Fasciation elongates the apical meristem, creating a ribbon-like growth. The Latin fascia means band.  Normal milkweed (left) and fasciated milkweed (right) In some cases, these distortions can create unique bends, twists, odd angles, or unusual clusters of growth that look like a witch's broom. Flowers and leaves growing on these distorted stems may be smaller, more abundant, or have other unique characteristics.
One rare form of fasciation, ring fasciation, has a ring-shaped growing point that creates hollow tubes. What causes fasciation? Plant hormone imbalances, genetic mutations, environmental conditions, or disease can all result in fasciation. It can also occur for no apparent reason. Possible environmental factors include chemical overspray or exposure, mite or other insect infestation, and certain fungi. Exposure to cold and frost can also cause fasciation. Fasciation is not contagious unless caused by bacteria. Plants affected by fasciation Milkweed, nasturtiums, geraniums, dandelions, and ferns may all exhibit fasciation. It also occurs in fruits and vegetables, such as asparagus and broccoli. Some plants are prized and propagated simply because of their fasciation. You buy a seedling. You dig a hole. You place your fingers around the stem and gently flip the pot upside down, dislodging plant and soil. You carefully tip the leaves skyward and lower the cube of roots and soil into the hole, pulling surrounding soil into the empty space. Then you tamp down the soil with your hands, right? Wrong! 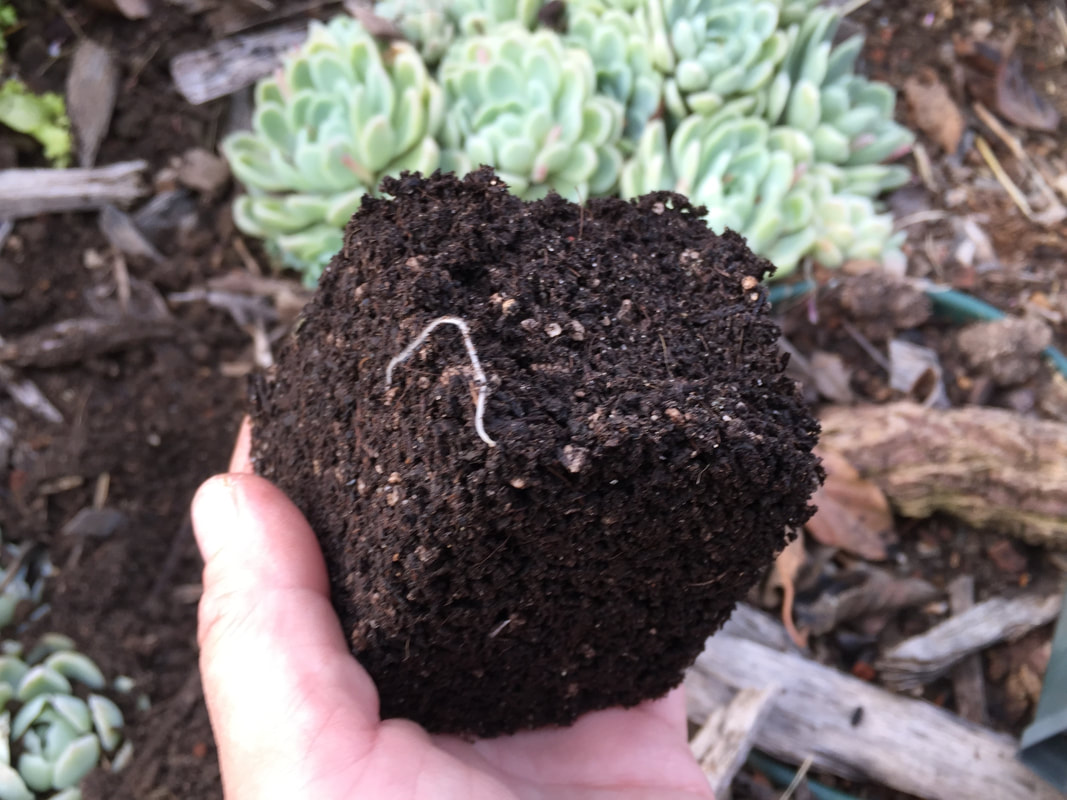 Unpotted seedling with exposed root We’ve been doing it forever but it’s the wrong thing to do and there are several reasons why. It all starts with the conditions under which seedlings are grown. The state of a seedling Commercially available seedlings start out life in as perfect an environment as possible. Protected by greenhouse walls or hoop shelters, temperatures, soil, moisture levels, nutrient availability, everything is working in its favor. Add sunlight and water and those seeds germinate and start growing like crazy. Then they get loaded into flats, which get loaded onto trucks. Those trucks are dark and bouncy. Roots and leaves get rattled around a bit, before being moved a few more times to end up in new lighting, new temperatures, and environments where people pick them up and put them down, repeatedly. Finally, they get in a car, go home, and [hopefully] spend some time in quarantine before being designated some garden real estate. Even seedlings started at home end up in a pot that they are about to outgrow, if they haven't become root bound already. 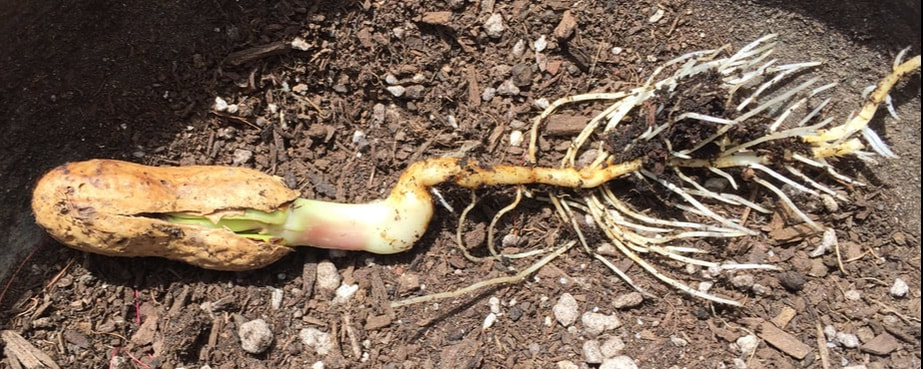 Peanut seedling As delicate root hairs reach the walls of their containerized world, they twist and turn, looking for more room. Eventually, all those twists and turns can get crowded and a little abrasive. Root hairs break off very easily. Root hairs At 1/10 the diameter of a human hair, root hairs start forming right after a seed germinates. These tiny growths profoundly increase the surface area of the root system, making the roots better at absorbing water and nutrients, anchoring the plant, and facilitating microbe interactions. When these delicate hairs break off, they can’t do their job. It is the damage done to root hairs during transplanting that causes most of the wilting associated with transplant shock. Water and gravity Instead of tamping down the soil and breaking off millions of valuable root hairs, let water and gravity do the job the way nature intended: disrupted soil gets rained on, rain drops collect and make soil heavier, drawing particles down into some air pockets while leaving important macropores and micropores, that allow air, water, and roots to move through the soil, intact. Your watering can or gentle garden hose spray do the same thing. No tamping down required. 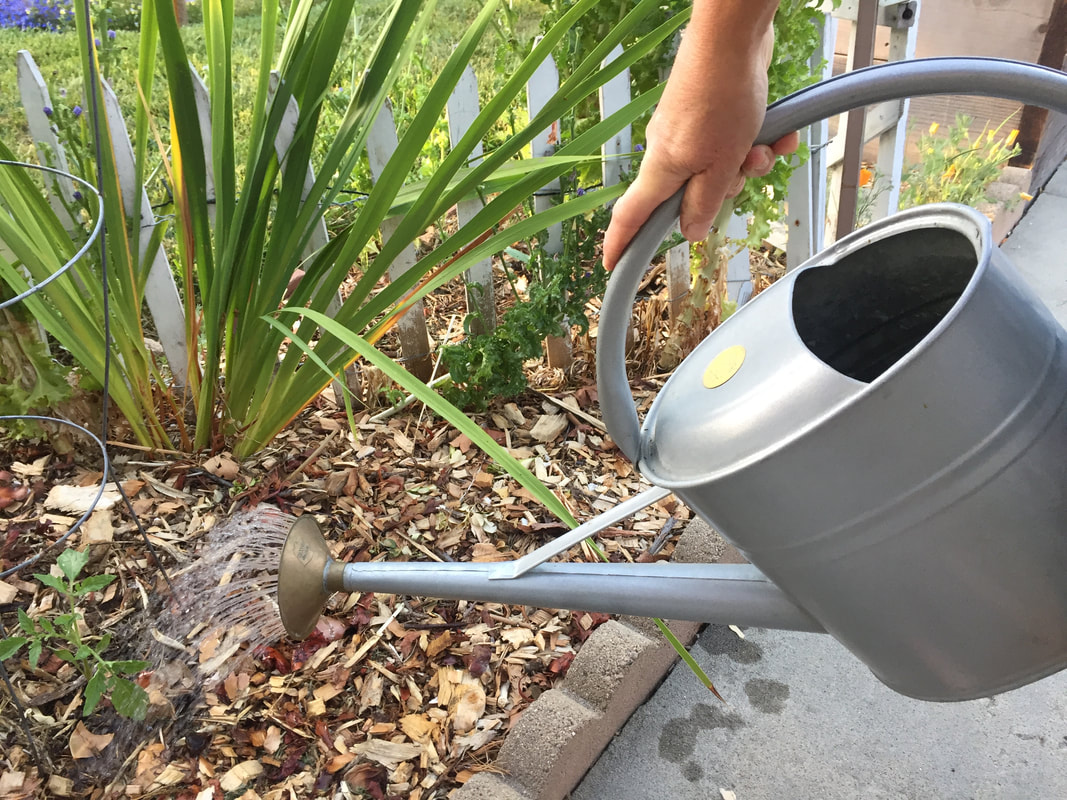 Water from a watering can gently eliminates air pockets in freshly disturbed soil As you add seedlings to your garden, resist the urge to crush those delicate root hairs and mud them in, instead. Then, tuck them in with a nice blanket of mulch, for good measure.
Some trees produce heavy crops each year. Other trees go back and forth between heavy bearing years and light bearing years. This is called alternate bearing.
Also known as biennial bearing, this tendency can explain why your fruit or nut tree doesn’t produce the same amount each year. It is not caused by pests or disease. It is simply the way some trees grow, mostly. Generally speaking, fruit and nuts are produced on long stems or on short, stubby stems called spurs. The spurs of alternate bearing trees tend to produce blossoms one year and leaves the next. This allows the tree to gather more of the sun’s energy, carrying it through its two year cycle of production. Therefore, it is not the tree, as a whole, that alternates production each year. Instead, it is the individual stems and spurs. Other causes of alternate bearing include weather conditions, such as a heavy frost that damages the blossoms, can result in a low production year. Since resources were not used to produce as much fruit that year, the following year will tend to be a heavy production year. Some trees may even take two years off after a particularly heavy year. In other cases, mineral deficiencies or excessive fertilization, especially nitrogen, can result in a cycle of alternate bearing to begin. Most perennial fruit crops start making fruiting buds during the previous season. If conditions are especially good or bad, those developing buds will become stronger or weaker, respectively. There is also some research that suggests the developing ovules of a heavy production year produce hormones that inhibit next year’s flower production. Scientists are still learning the details about what causes alternate bearing. Some commercial growers reduce the impact of alternate bearing trees by thinning blossoms and fruit on heavy production year. This is done to counteract the fact that fruit produced during heavy years tends to be smaller, while fruit produced during low production years tends to be of poor quality and more susceptible to pest and disease damage. Evening things out improves crop quality and tree health. Citrus, apple, pear, avocado, apricot, plum, mango, cranberry, blueberry, olives, pecan, and pistachio are common plants that exhibit alternate bearing behavior in the home garden. Grapes almost never do. You can reduce the negative impact of alternate bearing on your fruit and nut trees with proper pruning, irrigation, and feeding, along with regular fruit thinning, soil tests, and protective treatments against pests and diseases. Now you know. Plant a seed at the proper depth and it thrives. Plant it at the wrong depth and it dies. So, how is a gardener to know how deep to plant each seed?
The general rule of thumb for seed planting depth is to use twice the seed width or diameter. This means a seed that is 1/8” wide should be planted 1/4” deep. Too often, seed packets rely on a standard 1/4” or 1/2” planting depth, which is not always in a seed’s best interest. A seed’s life Once a seed reaches maturity, it is protected by a hard outer shell called its seed coat. This layer allows the seed to roll, float, fly, or pass through a digestive system unscathed and ready to germinate. Only when heat, light, and moisture levels reach the right combination can the seed coat allow moisture in, which triggers the growth of the embryo within. Hopefully, the seed is at the proper depth to grow into a healthy plant. Planting seeds too deeply Seeds planted too deeply are less likely to germinate or sprout. Even if they do get that far, those seedlings have to work harder to reach the soil surface. This uses up valuable energy resources that should have been available for producing leaves and stems. It also reduces their growing season. The very tiniest seeds should simply be sprinkled on the soil surface and only dusted with a covering of soil or vermiculite. And a few seeds, such as lettuce and dill, actually need light to germinate, so they should not be covered at all. Planting seeds too shallowly At the other end of the planting depth spectrum, seeds planted too shallowly end up with roots too close to the surface, causing them to wither and die. Even if they don’t die, shallow roots are less able to take up water and nutrients or to anchor plants in the soil. Seeds planted too shallowly are more susceptible to temperature and moisture level changes. These plants are also more likely to bolt, rather than producing a crop. Seed planting depth also depends on soil structure. Seeds planted in rich, loose loam or sandy soil can tolerate deeper planting than seeds planted in heavy, compaction-prone clay. Crops by seed depth Here is a list of some of the more popular garden plants and their proper planting depths:
Tools, such as a dibble, can help ensure that seeds are planted at the proper depth. Finally, do not press down on the soil once a seed is in place. This compacts the soil. Instead, the act of watering will tuck your seeds in nicely while still giving them a chance to grow and thrive. Each spring, pollen grains are normally moved from flower to flower by honey bees, beetles, butterflies and moths, and wind. When the pollen arrives at another flower, fertilization can occur and fruit can grow. Except, sometimes, the pollen needs a little help. That’s where hand pollination comes in. .jpg) Hand pollination of two gourd blossoms (Wikipedia) CC BY-SA 2.0 Plants being grown indoors, or in areas without enough bees and other pollinators, cannot set fruit without mechanical pollination. Some crops, such as cucumber, melon, pumpkin and other squash, can be coaxed into producing far more fruit if hand pollination its used, due to the timing issues related to male and female flowers occurring at different times. If you grow plants indoors, you will need to pollinate the flowers by hand to get fruit. Container plants that are at a distance from their fellows will also benefit from hand pollination. Loquats, kiwifruit, and mangos, in particular, often require hand pollination. [Due to heavy pesticide use in China, the lion's share of all their fruit crops are now pollinated by hand.] Hand-pollination is not difficult, but it is tedious. To better understand how hand pollination works, let’s have a quick review of flower anatomy and the pollination process. Flower anatomy For a more detailed description, I urge you to read my posts on flowers and pollination. In the most basic terms, flowers can be male, female, or both, but not necessarily at the same time. Male flowers have a stamen and female flowers have a pistil. The stamen consists of a pollen-producing anther at the end of a filament. Pollen tends to be yellow and sticky. The female pistil, also known as a carpel, is usually found in the center of a flower and it consists of the sticky stigma, which captures pollen, the style, a tube that leads to the ovary, and the ovary itself.  Parts of a flower (LadyofHats) Public Domain Pollination
As insects move around, collecting nectar and pollen for themselves, sticky pollen becomes attached to their legs and is carried from flower to flower. The pollen is captured by the stigma, enters the style, and moves toward the ovary, where fertilization occurs. If there are not enough pollinators, the pollen doesn’t get moved and we have no fruit. Unless you hand pollinate. By hand pollinating, you become the mechanism by which pollen is moved from the stamen of the male flower to the pistil of the female flower. How to hand pollinate There are two basic methods of hand pollination: removal of the anther, or transferring just the pollen. In most plants from the cucurbit family, the male anther is large and obvious. Without handling the part covered with pollen, simply snip off the anther, cut off or roll back the flower petals, and gently roll it around on the female pistil. On plants with smaller flowers, such as cucumber, tomatoes, and melons, you can use a small, natural bristle painter’s brush or a cotton swab to transfer pollen from one plant to the other. Timing is important Male flowers tend to emerge before female flowers. Also, most flowers are only receptive to pollen for one day. Transfer pollen to freshly opened flowers, preferably in the morning. Do this every day until fruit starts to form. Concerns about cross-pollination This comes up every year. People worry that all members of a group, such as the cucurbits, can cross-pollinate. They can’t. Melons, squashes, and cucumbers are too different from one another to pollinate each other. That being said, varieties within a species, such as white pumpkins, Jack O’ Lantern pumpkins, and Atlantic Giant pumpkins can cross-pollinate. Even if you have bees in your garden, you may want to try hand pollinating. Research has shown that manually applying pollen to female flowers results in larger fruit that is more likely to reach maturity. Also, the seeds within that fruit germinate faster and produce larger seedlings. This is called the xenia effect. Did you know that researchers at Harvard are creating miniature flying robots, called RoboBees, to be used as pollinators? Now you know. In many gardening catalogs, you can find trees that boast multiple types of fruit. This is done by grafting twigs from various trees onto a parent tree.  Apple tree grafting (Karelj) Public Domain A man named Sam Van Aken created a tree with 40 different types of fruit growing on it. His Tree of 40 includes almonds, cherries, nectarines, peaches, and many other stone fruits, all grafted onto a single tree. Grafting is an excellent way of making the most out of a small gardening space and it can look pretty amazing. Grafting is an old technique used to join two plants together. A newer version, called budding, does the same thing, but in a different way. How does grafting work? The top half of a graft is called the scion and the lower portion is called the rootstock. Grafting works because plant hormones, called auxins, allow the vascular cambium tissues of both the scion and rootstock to merge. This allows water and sap to continue moving through the xylem and phloem. Before you jump on the grafting bandwagon, however, keep in mind that grafting is tricky. It takes practice. You also need to know that, after a graft is completed, even though a protective callus has formed, and the vascular tissues have fused, the wood does not. This means that graft unions should always be considered structurally weak. You should also know that the fruit and nuts produced on grafted trees contain seeds that hold the genetic information for the scion wood only, and not that of the rootstock. Also, if you have a plant that is putting out suckers, keep in mind that these are from the root stock, and not the productive aboveground portion of your plant.
Advantages of grafting It is pretty safe to assume that nearly all fruit and nut trees available today are grafted combinations of hardy, pest- and disease-resistant rootstock and highly productive scions. Grafting speeds up production because young scions can be grafted onto older rootstock. This is called precocity and it allows growers to skip the 5- to 12-year juvenile phase, when trees are focusing on root system development, rather than fruit production. Grafted trees can also selected for size. Simply graft a scion from a full-sized tree onto dwarf rootstock and you get a dwarfed tree that produces more fruit. In many cases, grafting is used to imbue a tree with pest or disease resistance. This method is also used on watermelon, tomato, eggplant, cucumber, and other vegetative plants for the same reason. Grafting for the garden Let me say this up front - grafting requires skill. It easy to do incorrectly. There are several factors that contribute to successful grafts, and all of them are important:
Tools used in grafting Having your tools ready ahead of time will increase your odds of successful grafting. The last thing you want is for plant tissue to dry out before you are done. [Many gardeners hold scions in their mouth as they work, to keep the plant tissue moist.] You will need sharp, sanitized pruning clippers, stretchable, biodegradable grafting tape, a sharp grafting knife, and sanitizer. You may also want to have some tree sealant or grafting wax handy.
There are several different types of grafts:
In rare cases, graft hybrids, called chimera, will occur. This happens when rootstock tissues grow into the scion wood. This can lead to trees that produce flowers of both plants, plus strange combination flowers. Chimera are almost impossible to reproduce. Whichever method you decide to use, grafting or budding, be sure to seal the area completely, either with grafting tape, tree seal, or grafting wax. This will protect against desiccation, pests, and disease, while providing some structural support, as well. Problems associated with grafting Grafting can provide you with added control over plants, making them more suitable to your garden theme. It can also make your foodscape healthier and more productive. But grafting requires skill and is labor intensive. Also, it is important that the proper rootstock is selected for your scions. Incompatibility may not kill the tree until several years of watering, fertilizing, and pruning have passed. Check with your local County Extension Office or rare fruit growers club for more information on compatibility before you get started. When you first try your hand at grafting, don’t be surprised or discouraged when the alignment and pressure are insufficient, or the graft union dries out before the scion “takes” to the rootstock. This happens to beginners all the time. If your graft works, make sure you plant your new tree at the proper planting depth. This is critical to its health and longevity. Placing graft unions below soil level invites fungal diseases, such as crown rot. The interaction between rootstock and scion wood can be pretty amazing when it comes to plant hormones. Check out my post on photoperiodism. Assuming you have already collected, labeled, and kept scions cool and moist, you are now ready to begin. [If not, read my post on scions first.] Did you know that you can graft a tomato plant onto a potato plant and get food from both? Now you know. |
Welcome!You can grow a surprising amount of food in your own yard. Ask me how! To help The Daily Garden grow, you may see affiliate ads sprouting up in various places.
You can also get my book, Stop Wasting Your Yard!  Index
All
Archives
April 2024
|


#/media/File:Adventitious_roots_of_Magnolia_cutting.jpg)
.png)
_(cropped).JPG)


 RSS Feed