|
The more you know about the structure of your soil, the better you can help it support your plants.  Soil (Jing) Pixabay Soil doesn’t exist in isolation. Except for sand, soil is a combination of minerals, air, water, microbes, earthworms, and more. Soil structure refers to the particular arrangement of these combined particles. These clumps of different particles are called soil aggregates. Aggregates contain solids and spaces and are held together by organic matter in various stages of decomposition, earthworm and insect poop, chemical excretions of nearby plant roots, and a fungal coating called glomalin.
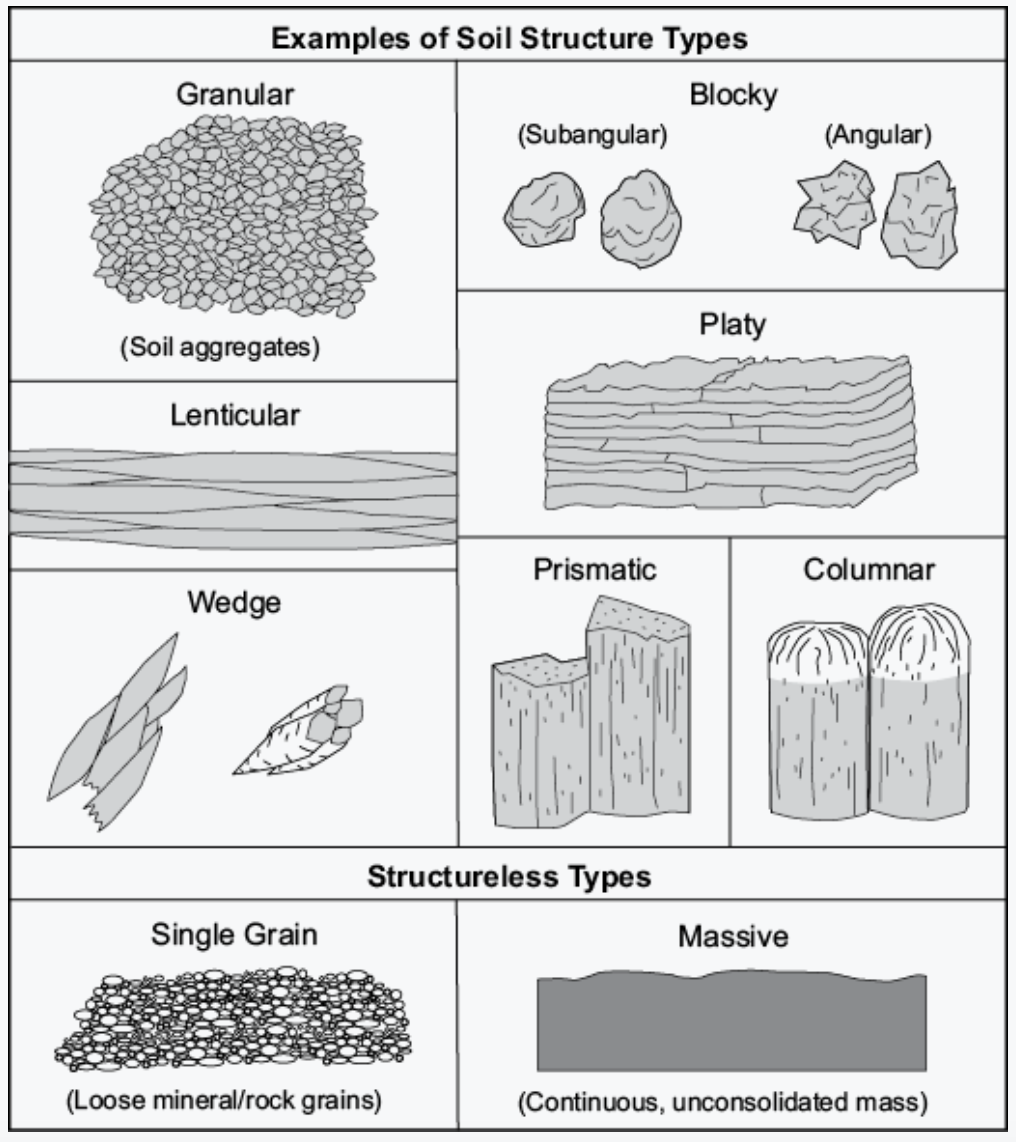
Soil texture describes the percentage of silt, clay, and sand present. Soil structure is about how everything is arranged into clumps, or aggregates. Soil structures are categorized by their size, shape, and stability:
Soil compaction The large and small spaces between soil aggregates, called macropores and micropores, respectively, determine soil porosity, permeability, and water-holding capacity. Soil structure can be damaged by digging, rainfall, and heavy traffic, which all destroy those important spaces, causing compaction. Instead of loose collections of many different sized aggregates, crusts form along cut edges or on top of the soil, blocking the flow of water, air, and nutrients, and making it difficult for seedling roots to take hold. It’s not very fun to work with, either. Good soil structure can help move water away from roots when over-watering occurs and it allows plant roots to go where they need to go for food and water. How to build good soil structure Nature has been making good soil for a really long time. Plants, insects, and animals die, decompose into nutrients, and water pulls them into the soil. Then microorganisms and soil-dwelling animals, insects and worms eat those nutrients and poop out stuff that holds soil particles into various sized aggregates. Because many of us live in homes where construction soil is common, we must recreate the natural cycles needed to maintain healthy soil structure. To maintain good spacing between aggregates, especially for clay soil, use these tips:
Healthy soil produces healthy plants that are better able to fight off pests and diseases on their own.
Erosion is one of the ways new soil is made from rocks. It is also a common way of losing valuable, nutrient-rich soil from your garden.  Erosion can be devastating (Katrina Charles/REACH) Public Domain Erosion occurs when wind, water, and other natural agents move soil, rock, or dissolved minerals from one place to another. In the garden, this commonly occurs when irrigation causes runoff, wind blows topsoil away, or when plants are grown on a slope and gravity pulls the topsoil downhill.
There are many problems associated with erosion in the garden:
You can prevent erosion in your yard with these tips:
Healthy soil is the stuff that allows us to grow lush fruits, crispy greens, and fragrant flowers and herbs. Without healthy soil, very little will grow. Soil is the Earth’s living skin.  Soil (snarlingbunny) Pixabay To call someone ‘dirty’ is usually an insult, and there are many other soil slurs that demonstrate our careless attitude toward something so important, but the Dust Bowl of the 1930s was a harsh lesson in the importance of caring for and protecting this valuable resource. Soil stores water and nutrients, filters water, helps break down toxic wastes, and is a critical player in carbon cycling, nitrogen cycling, and, let’s face it, life on Earth. So what is soil? Many people assume that soil is simply ground up rocks, but this is only partly true. Soil is made up of organic matter (1-5%), minerals (45-49%), water (25%) and air (25%). Organic matter (humus) includes living things and the remains of things that used to be alive. The water and air that make life possible are found in the spaces (macropores and micropores) between chunks of organic material and minerals, called soil aggregates. The minerals are normally the ground up bits of local bedrock. Depending on how small the pieces are, they are called sand, silt, or clay. Obviously, you can see a grain of sand with the naked eye. A particle of silt can be seen with a standard microscope, but a particle of clay, being smaller than most bacteria, can only be seen using an electron microscope - clay is that small! There are 12 types (orders) of soil, depending on color, texture, mineral content, and structure. Soil surface area The surface of soil particles is where the magic happens. This is where the chemical reactions needed to move nutrients from the soil into plant roots takes place. Clay has 100,000 times the amount of surface area as an equal weight of sand. Sand is chemically inactive when compared to clay. The spaces between the particles is important, too. Being physically larger, sand particles have fewer, bigger spaces, allowing nutrients and water to leach out. Being the smallest, clay particles have many more, very tiny spaces. These spaces hold up to six times more water and nutrients, but the water moves more slowly and is harder for plant roots to access. Loam is considered the ideal growth medium for most plants. Loam consists of 40% sand, 40% silt, and 20% clay. Types of soil Soil texture is a function of the proportion of sand, silt, and clay it contains. Use these steps to determine your soil texture:
Then, use the chart below to find where the three percentages meet to identify your soil type.  Soil texture triangle (USDA) Public Domain For example, a 10” jar has 1” sand (10%), 7” silt (70%) and 2” (20%) clay:
The way soil particles are held together into aggregates is called soil structure. Soil structure impacts porosity and permeability, water-holding capacity, and nutrient availability. Soil structure problems, such as compaction and crusting, can prevent roots from getting where they need to go. Good soil structure can help move water away from roots when over-watering occurs. Ideally, your soil should be made up of various sized bits that hold their shape under slight pressure. Follow these steps to determine your soil structure:
Soil color The color of your soil can tell you a lot about what it contains. Darker soil tends to hold more organic matter. Soils with red, yellow, or brown tints contain iron oxides. Yellow soil may also indicate a drainage problem. White soil contains gypsum, carbonates, and other salts. Blue-green and gray soils indicate continuous exposure to water, which can cause problems for most garden plants. Soil pH Soil texture and structure may be ideal, but if the soil pH is incorrect for the plants being grown, they will be unable to absorb the nutrients they need. Most plants prefer a pH of 6.0 to 6.5 to thrive. How to create healthy soil Healthy soil needs organic material to promote good structure, proper drainage, and nutrient and water flow. Soil creation is called pedogenesis. [Did you know that soil, water, air, and all living things make up the Earth’s pedosphere?] Use these tips to improve your soil:
Top dressing is the process of adding compost, soil mixture, or sand to the surface of your lawn or other landscape area to improve the soil.
Unlike rototilling, double-digging, and other intrusive (read backbreaking) methods, top dressing is relatively simple and easy. Ultimately, the top dressing is mixed into the existing soil through natural methods of worm and plant feeding, rain and irrigation, and foot traffic, but it is merely spread around on top. Nature does the rest of the work for you. Top dressing provides these benefits:
Materials to use when top dressing Selecting the right materials for top dressing your lawn may be as simple as spreading aged compost or it may be a scientifically researched analysis of existing nutrients and soil structure. A soil test is always a good idea because there is no sense adding nutrients that are already in abundance. At the same time, you generally can’t go wrong spreading aged compost over a lawn or other growing area. The most common mistake made selecting top dressing material is to use fine grain sand to reduce compaction. The grains of sand end up clogging the tiny spaces between soil aggregates that allow for the flow of air and water, creating concrete. These spaces are called the macropores and micropores. Also, thatch may create impenetrable barriers to roots if it is too thick before applying a top dressing. (Thatch is the layer of dead stems, stalks, and other plant material that can build up in a lawn.) A dethatching rake can break up this layer, making your top dressing more effective. A thin layer of thatch should not cause any problems as the top dressing and irrigation will help it to break down more quickly. How to apply top dressings Top dressing is handled differently, depending on the area being treated. To top dress an existing garden bed, the application of an inch or two of aged compost each year will significantly improve soil structure and fertility - just be sure to keep this mulch a few inches away from tree and shrub trunks to avoid crown rot. To successfully top dressing a lawn, follow these simple steps: Dethatch any areas where the thatch is more than 1/2 an inch thick.
Reliable soil tests are the only way to really know what is in your soil. Before adding fertilizer to a garden, it is really important to know what is already there. Whether you are growing grapes, tomatoes, or herbs, the nutrients and microbes in the soil dictate how well those plants will grow. As much as we would all love a convenient, reliable, over-the-counter soil test, it doesn’t (yet) exist.  Laboratory testing provides valuable soil information (Michal Jarmoluk) Pixabay Feeding the soil Plants use 17 elements to grow. Oxygen (O), hydrogen (H) and carbon (C) are taken from air and water. The other elements (minerals) are absorbed from the soil with the help of microorganisms. There are three primary nutrients: nitrogen (N), phosphorus (P) and potassium (K); three secondary nutrients: calcium (Ca), magnesium (Mg) and sulfur (S); and eight micronutrients: boron (B), chlorine (Cl), cobalt, (Co), copper (Cu), iron (Fe), manganese (Mn), molybdenum (Mo) and zinc (Zn). In the 1940’s and 50’s, the idea of “better living through chemistry” led to tons of chemicals being added to agricultural soil. Some of it worked and some of it backfired. The current view is “better living through biology”, which means learning about natural plant life cycles, identifying which nutrients are currently available to plants, and finding natural ways to add whatever is needed. Time soil tests for the best results The results obtained from a soil test are not written in stone. Conditions in March will be far different from those in July. Variables such as temperature, moisture, and the molecular exchanges (cation exchange capacity) that are occurring all the time underground can change which nutrients are available to your plants. This is especially true for nitrogen. Signs that a soil test is needed:
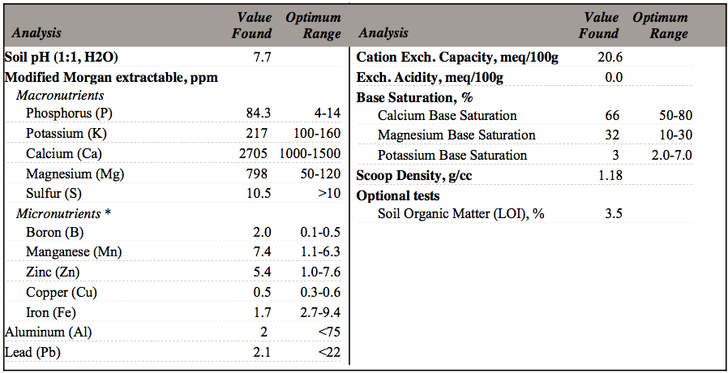 My 2015 soil test indicates the previous owner used far too much fertilizer How to red soil test results The funny thing about soil chemistry is that the absolute measurements are not nearly as important as the ratios between certain elements. For example, my soil test showed an abundance of every nutrient needed by plants except one: iron. Unfortunately, iron is needed by plants to help them absorb practically everything else. In effect, my plants were sitting at a banquet with their mouths taped shut! By spraying the leaves with foliar iron, which plants can absorb through their leaves, they then had the iron they needed to make everything else available. Laboratory soil test results will show two figures for each element reported. One figure is the recommended range and one is what is in your soil. Hopefully, they will be relatively close. If your garden has plenty of a nutrient, it is a waste of time and money to add more. In fact, adding more can compound ratio problems that make nutrients unavailable to plants. And don’t be surprised if your soil test lab does charge extra for nitrogen testing. Nitrogen is a very fickle, fleeting element that is here and gone before you know it. It is worth the extra cost to find out what current nitrogen levels are, but keep in mind that those figures are only relevant for a few days, since nitrogen responds quickly to changes in temperature and moisture. Nitrogen is the single most limiting factor in plant growth. Regularly adding aged compost and treating with blood meal, cottonseed meal, alfalfa meal, feather meal or fish emulsion can help maintain nitrogen levels. Do regional differences matter? Before sending a soil sample to the cheapest lab, keep in mind that regional differences may impact your results. As quoted from the University of Massachusetts: “The UMass Soil Lab accepts soils from all over the continental U.S. However, we use the Modified Morgan extracting solution for nutrient analysis. This extracting solution was developed for New England's sandy, acidic soils, and climate. Additionally, lime and fertilizer recommendations are intended for soil conditions and climate in New England. While useful information can be obtained by getting a soil test at UMass, differences in soil types and growing conditions need to be taken into account when interpreting test results and recommendations.” That being said, the UMass soil testing lab is highly respected. Simply use the results with a grain of salt, or find a local lab.
Rather than wasting time, money and effort by gardening blindly, a good soil test can help you give your plants what they really need, protect the environment and ground water supplies from excess chemicals and nutrients, and save you time and money. Soil solarization is an environmentally friendly method used to rid an area of pretty much everything: weeds, fungal and bacterial pathogens, and nematodes. Solarization is particularly effective against the pathogens that cause fusarium wilt, verticillium wilt, root rot, blight, tomato canker, and crown gall disease. It is also used to eliminate a lawn and prepare it for more drought-resistant varieties of plants.
To prepare an area for soil solarization, it must be smoothed flat and free of dirt clods and visible weeds. Solarization works far better on level areas than on hillsides, but sun exposure is critical for the process to be effective. Shady areas are not suitable. Basically, soil solarization covers an area with clear or white plastic and lets the sun cook everything to death. Now, when I say covered, I mean completely. No cracks, no bubbles, no loose edges. If gophers, ground squirrels, or birds are a problem in your area, this can be difficult. Here are the steps to use for effective soil solarization:
NOTE: Black or colored tarps should not be used unless you live in a cooler, coastal area. In this case, a black tarp will prevent weeds from growing during the early part of the process and the tarp will need to be left on longer than normal. When selecting the sheeting material, heavier is generally better:
Using a double layer of plastic, separated with plastic bottles or PVC pipe, can increase the effectiveness of solarization. This has been shown to increase temperatures by 2-10°F. If it is done properly, the heat of the sun should reach 140°F, killing pathogens and weed seeds, without the use of chemicals. Another benefit of soil solarization is that it speeds up the breakdown of organic matter, making all the nutrients bound up in various life forms available to new plantings. Plants grown on solarized soil tend to grow bigger and faster, as a result. Of course, this process also kills earthworms and beneficial soil microorganisms. Soil solarization can also be used on planting containers and in raised beds that have become infested with undesirables. In this case, use a double layer of plastic and place the container in the sunniest place you can. Once solarization is complete, carefully remove the plastic and put it in the trash or recycling, depending on your region. Disturb the ground as little as possible to avoid planting newly arrived weed seeds. Mulch can be anything placed on top of soil to cover and protect it. Naked soil is vulnerable to erosion, weed seeds, compaction, and water waste. Mulching provides many benefits:
 Perennial plants protected by a mulch of free wood trimmings So, what makes a good mulch?
A good mulch allows air and water to pass through easily, while blocking the sunlight needed by weed seeds for germination. Obviously, gravel fits that description, but do you really want to pick out all those rocks at planting time? Or, what about black plastic landscape cloth - doesn’t that do the same thing, without all the work? No, it doesn’t. Ultimately, the plastic will break down, allowing weeds easy access and adding chemicals to the soil. Instead, take advantage of natural processes and use plant-based mulches. They add nutrients and improve soil structure as they break down and they can often be found for free!
How to apply mulch Mulch should be applied 2"–6” thick, depending on particle size. Smaller pieces fit together more closely, so you don’t need as much as for larger bits. If weeds are a serious problem, or you are eliminating a lawn, it is a good idea to use a really thick layer of wood chips. Be sure to keep mulch several inches away from trunks and stems. If mulch is in constant contact, problems such as crown rot can occur. As worms, beetles, weather and microorganisms breakdown the mulch, you will need to add more mulch, usually every 3–5 years. Creating and applying compost is one of the very best things a gardener can do for their soil. 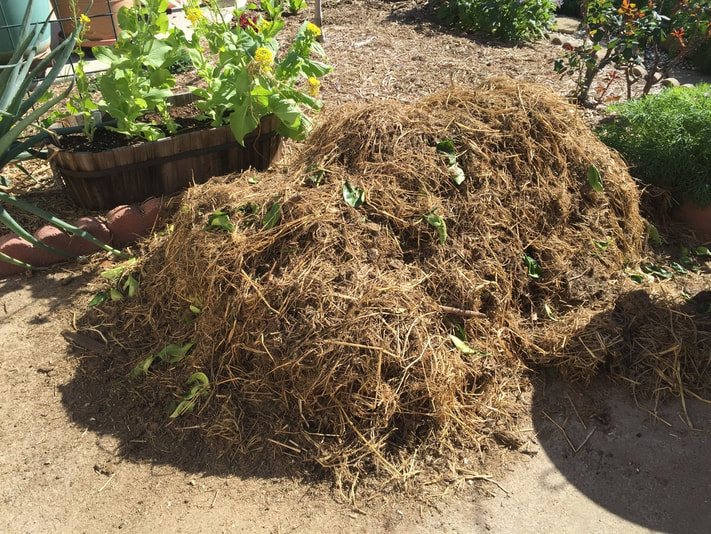 Compost pile on concrete Composting is the natural process by which organic materials are broken down, making them available to plants and microorganisms. It is a major component of pedogenesis, or soil creation. Without healthy soil, we begin to lose our food, water and air. Yeah, it’s kind of important. More benefits of composting include:
One of the nicest things about composting is that bacteria and fungi do most of the work for you! Other organisms, such as worms and insects, also pitch in to help. Now, it is possible to simply dump everything in a pile and wait for nature to takes its course. Eventually, there would probably be a nutrient rich soil amendment, but it might take years. Or it can turn into a stinky, rotten mess. Follow these tips for successful composting in a reasonable amount of time. Selecting a site for composting
 Composting bins (Antranias) Public Domain
Wire bins work well and are highly mobile. You simply move the wire away to flip the pile and pitch the material back in, watering as you go. If you look online or in your local library, there are many DIY compost bin instructions available for free and these simple structures do not require a contractor's license or skill set to build. For me, I find that simple piles work the best. I keep my regular compost pile near my chicken coop, for convenience. Occasionally, I move it to an exhausted bed for a season to supercharge it with nutrients and organic material. 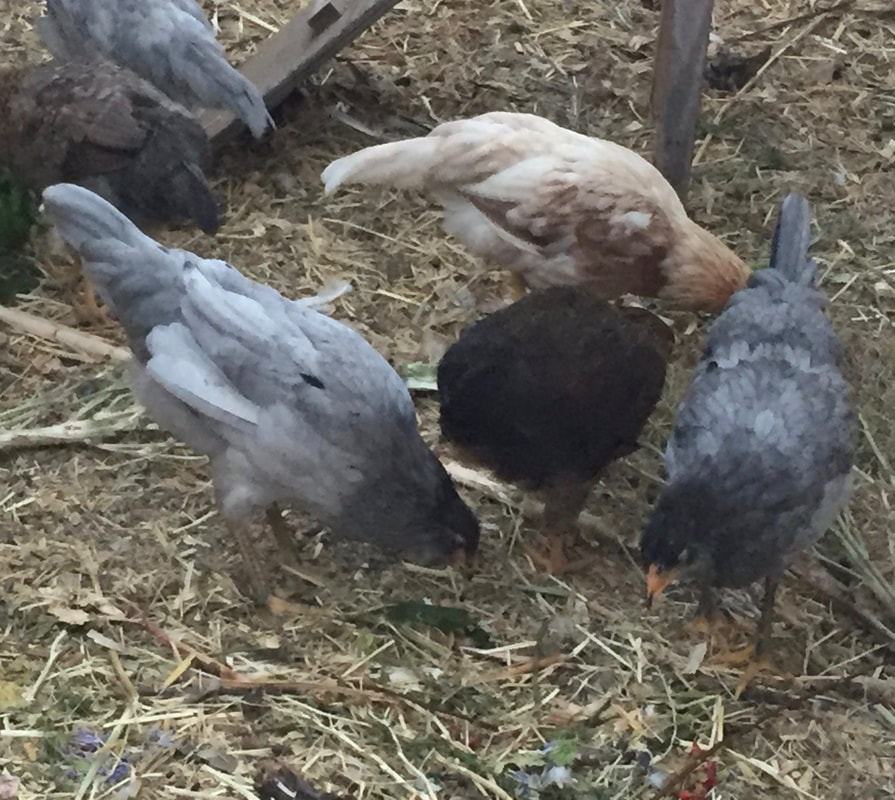 Chickens help produce some amazing compost - plus you get eggs! Understand the process: Organic matter + air + water = compost Organic matter consists of yard and kitchen waste that has been cut into 2” or smaller sized pieces. Smaller pieces compost faster because there is more surface area for decomposers to reach. Organic matter is considered either “green” or “brown”. Green matter includes cut grass, pulled weeds, kitchen scraps and manure, and it is rich in nitrogen. Brown matter is rich in carbon and includes dried leaves, straw, and shredded newspaper. The ratio of green to brown is a major factor in how long it takes a compost pile to breakdown. “Hot” piles work fastest and use a 30:1 carbon-to-nitrogen ratio, while slower piles can have a 2:1 carbon-to-nitrogen ratio. If material is continually added to a single pile, it will slow the process. A better choice is to have 2 or 3 piles, at various stages of decomposition. Meat and dairy in the compost pile? Most recommendations warn against using meat, dairy, and grease in compost piles. Other people have no problems with it. Personally, I use the majority of my kitchen “waste” to make soup stock. The solids are then fed to my chickens. Whatever they don’t eat (along with what they did eat) ends up in the compost pile, bones and all. I have had no problems and my plants seem to appreciate the calcium. Of course, my dogs do a very good job of keeping opossums, rats, and raccoons out of my yard. It's your call. One other method of decomposition that uses fermentation, rather than decomposition does allow you to add meat and bones without difficulty. This method is called bokashi. Decomposition Decomposition is an aerobic process, which means it needs air. Air helps breakdown organic matter and those tiny workers need it, too! Air enters a compost pile by turning it every few days. [Read: good exercise.] Water is needed for the same reasons as air: it aids in decomposition and it keeps microorganisms and other decomposers alive. Keep the compost as damp as a wrung out sponge and avoid simply watering the top, as this tends to cause runoff. Watering as the piles are turned works the best. If the pile gets too wet, spread it out and let it dry, or it will rot. Temperature is another composting factor. As materials break down, especially the green ones, energy is released in the form of heat. If you’ve ever watched a big pile of freshly cut grass, you know exactly what I mean. Under the right conditions, a pile of grass clippings can burst into flames! (And it stinks to high heaven). Ideally, the right conditions will generate temperatures between 122 - 131 degrees Fahrenheit. If temperatures remain above 140 for at least 10 days, weed seeds and pathogens will be killed. If temperatures stay above 160, however, decomposers will die and the process will stop. Because temperature is a factor, do not expect much out of a compost pile in winter. Material can still be added, or another pile started. In spring, the whole process will begin again. Also, if an area is especially hot or wet, cover the compost pile to maintain desirable moisture levels. Some people take composting very seriously and monitor temperature. I didn’t until I started composting the bedding from my chicken coop. Composting manure Animal bedding and manure are reasonably good sources of nitrogen and organic material, but they can make you sick. To be safe, manure must be composted for at least 45 days, 15 of which must be at temperatures between 131°F and 170°F, and turned at least 5 times. Assuming it hasn’t been recontaminated by air-dropped bird poop or other pathogens. Raw manure should never be applied to the soil while plants are growing. If it is, be sure that the manure does not touch the plants. Composted manure and bedding have significantly improved my soil health and helped to reduce compaction. Apparently, all those earthworms and burrowing beetles love the stuff! 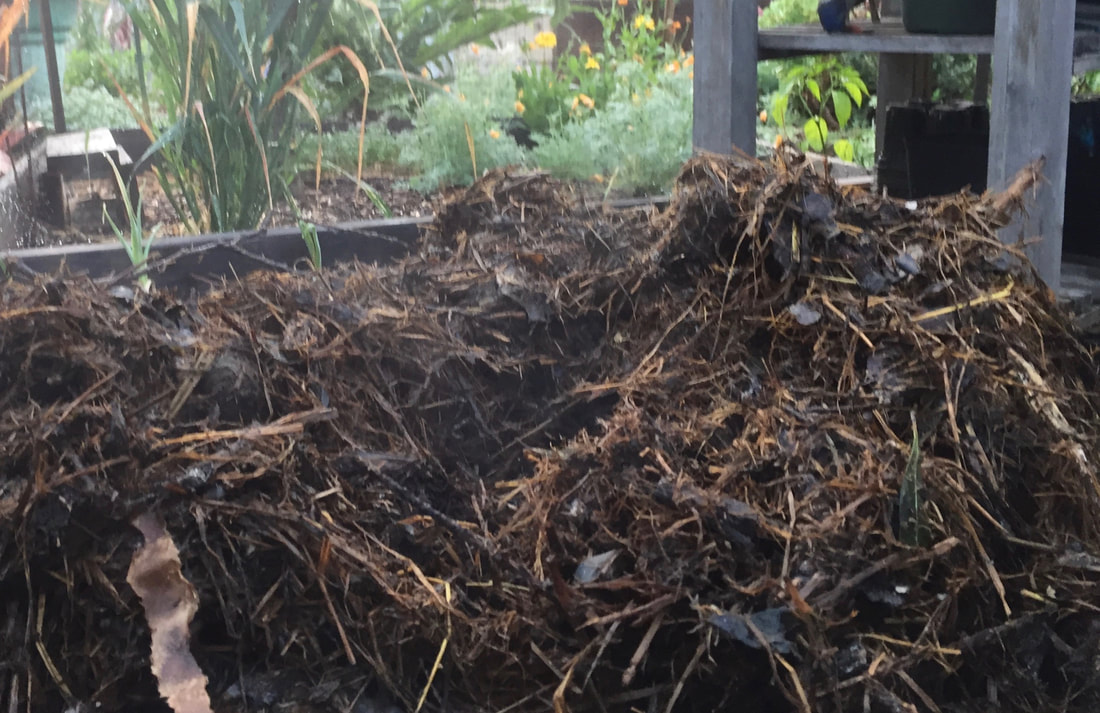 A steaming compost pile in the morning makes this gardener very happy! When is compost ready?
Compost is called “finished” when it is ready to use. There is simply no way to say how long finishing will take because of the factors already mentioned. Generally, speaking, under reasonably good conditions, a compost pile is ready for use within 45 to 60 days. Finished compost takes up 25-40% of the original occupied space, depending on its ingredients. Compost can be dug into beds before planting, a 2” layer can be applied over lawns as an amendment, or it can be used as mulch or top dressing. I like to add just a little compost to the bottom of potted plants before adding high quality potting soil and my plants seem to like it a lot. Composting with worms For those who do not have space for a compost pile, bin, or drum, try composting with worms! This is called vermiculture. Worm bins can compost an amazing amount of yard and kitchen scraps pretty quickly. Did you know that worms can eat their body weight in scraps every single day? Learn how to build worm bins and compost with worms at the UC Agriculture and Natural Resources page about worms. Remember, composting is easy and it provides a powerful boost to the garden. Start composting today! Ground cover refers to low-growing, spreading plants that help prevent erosion, weeds, and water loss. Bare dirt in the garden is not a good thing. Naked soil is vulnerable to wind and water erosion, compaction, and nutrient leaching. The Dust Bowl of the 1930’s is a perfect example of what happens when soil is not managed properly. Topsoil is a precious commodity and we all need to work to protect it. Ground cover is an excellent method that requires very little effort and improves biodiversity in the garden.  Unmowed yarrow Benefits of planting ground cover As the roots of ground cover plants work their way deeper into the soil, they help prevent erosion and the loss of nutrient rich topsoil and water. The leaves and stems shade the ground, stabilizing temperatures. Ground cover plants also reduce the chance that weeds will grow. Ground cover plant selection Ground covers are traditionally shorter plants, but they come in a variety of heights, colors, and textures. There are five basic types of ground cover:
Look at lists of your region's native plants for some low-maintenance ground cover plants. Keep in mind, when selecting ground cover, that many of these plants will spread and fill an area. Invasive plants, such as Algerian or English ivy, ice plant, periwinkle (Vinca major) and licorice plant should not be used. In theory, traditional sod lawns are a form of ground cover, but they are unsuitable for drought-prone areas, requiring unsustainable amounts of water. Yarrow (above) makes an excellent ground cover. It can grow as tall as 2’, but will maintain a low growth if it is mowed occasionally while still young. It grows well in difficult clay soil and its soft feathery texture feels wonderful on your feet! Oregano and other low-growing herbs smell wonderful as you walk on them, and curly endive is surprisingly durable. If you don’t mind some height, annual rye grass has been shown to put roots down as far as 40”, helping to break up compacted soil. Mustard can help, too. Ground cover vs. cover crop Cover crops are usually grown with the intention of cutting them off at soil level and leaving them on top to decompose, or digging them into the soil, to return all of the nutrients contained in the plants back to the soil. Ground covers are plants grown with the intention of leaving them to continue growing indefinitely. 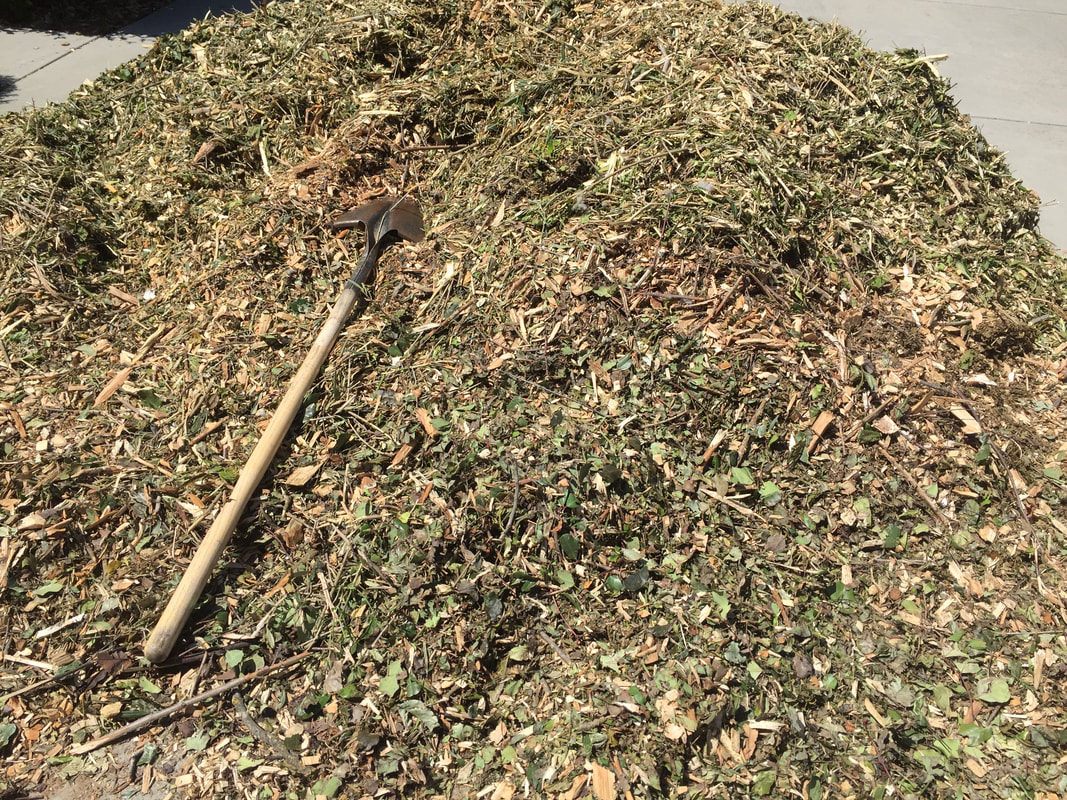 Truckload of free wood chips Plant-less ground covers?
Rather than exposing valuable topsoil to the elements, mulch is another option to ground cover plantings. Wood chips can be found for free from local tree trimming companies and it makes an excellent protective barrier. As the mulch breaks down, nutrients are added to the soil. Also, the mulch helps retain moisture and stabilize temperatures, providing a safe haven for earthworms and microorganisms that improve soil health. I don’t know about you, but my mornings nearly always start with coffee. I’ve been making and drinking coffee for a really long time. And all that coffee brewing ends up leaving behind a lot of coffee grounds. It is estimated that Americans drink 700 million cups of coffee a day, which translates into nearly 17 million pounds of coffee grounds per day!  Morning coffee at The Coop There are many claims made about coffee grounds in the garden. It is said that they repel cats and insect pests, prevent weeds, kill slugs, add nitrogen, aerate the soil, and attract earthworms. Until recently, however, there wasn’t much real scientific proof behind any of those claims.
Chemicals in coffee grounds We now know that coffee grounds contain 1-2% nitrogen after brewing. That’s not much in the way of plant nutrition. Coffee grounds also contain 0.3% phosphorus and 0.3% potassium, plus cellulose (carbohydrates), structural lignin (woody plant parts), triglycerides (oils), lipids (fats), protective phenolics (flavonoids/non-flavonoids), and essential oils. There may also be a small amount of caffeine remaining. Breaking down coffee grounds After adding coffee grounds to the garden, fungi and bacteria work to break them down. These bacteria, in turn, are believed to help suppress many common fungal diseases, such as fusarium wilt, cavity spot (Pythium), and white mold (Sclerotinia). The caffeine and nitrogen decompose quickly, while other ingredients take longer, as with any other organic matter. Earthworms tend to pull coffee grounds deeper into the soil. This action aerates the soil, improves soil structure, and provides nutrients to deeper roots. The slower to decompose ingredients in coffee grounds provide humic substances (a fancy way of saying humus - the organic components of soil). In this use, organic does not mean chemical-free. The word organic refers to the fact that it came from living things. As coffee grounds decompose, the carbon-to-nitrogen ratio changes from high (25:1) to the ideal (10:1). The carbon-to-nitrogen ratio is important because soil microorganisms need both carbon and nitrogen when they feed. If the ratio is high (with more carbon), they will pull nitrogen from the soil. If the ratio is lower, these microorganisms will leave nitrogen behind for the plants. Effects of coffee grounds in soil Coffee grounds help moderate soil temperature, the same as any other mulch. Research has shown that coffee grounds bind to pesticide residues and toxic heavy metals. This is a really good thing because it keeps those chemicals from entering your plants. I have seen claims stating that coffee grounds help make nitrogen, iron, phosphorus, and zinc more easily available to plant roots in areas with alkaline soil, but I haven't found any verifiable proof. Contrary to common belief, coffee grounds do not consistently acidify soil. The pH of decomposing coffee grounds is very unstable and can range from mildly acidic to mildly alkaline. Plus, those changes in pH only affect the immediate area and not the soil profile as a whole. How to get the most out of coffee grounds in the garden Coffee grounds can be applied to the soil surface as a mulch (no more than 1/2” thick) or composted as a soil amendment. Fresh coffee grounds can cause light sensitivity (phytotoxicity) to above-ground plant parts, so direct contact should be avoided. Here are a few more interesting facts about coffee grounds in the garden:
So, enjoy that cup of java and let your garden make the most of what's left behind! Recent heavy rains have brought much needed water to the drought stricken San Jose, California, but one of my fruit trees was not happy about it. Take a look at the photo below to see how water pooled around the tree. 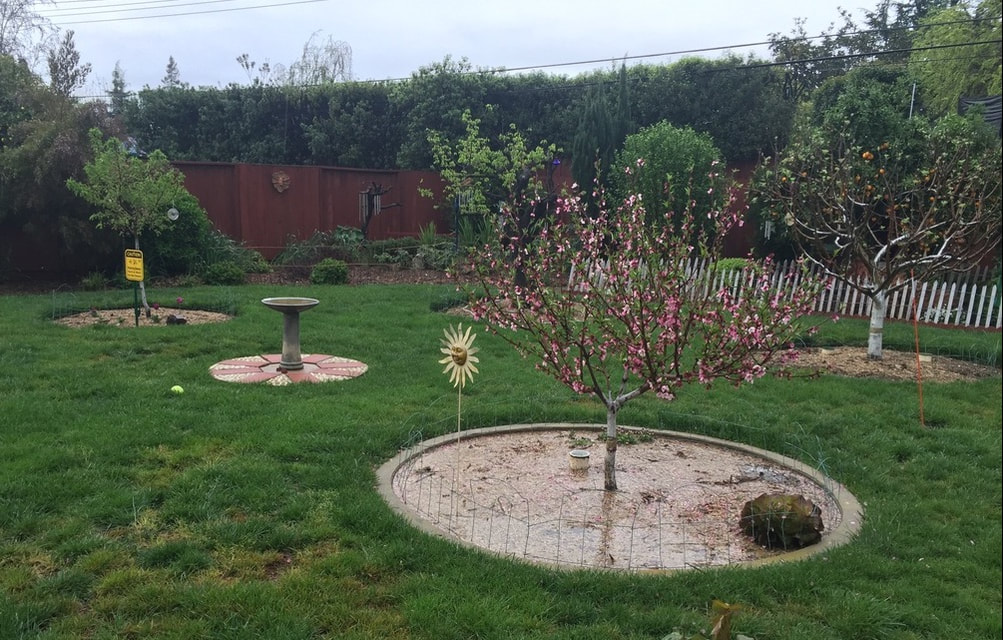 Standing water around nectarine tree The drainage around trees with irrigation rings was fine. I can only assume that it was the cement curb around the tree that was at least partially to blame for flooding my poor little nectarine tree. At the same time, the drainage pattern was so significantly different, that I will have to explore other possible causes and remedy them. Rainwater generally moves down, due to gravity, and sideways, toward drier areas. The curb prevents that sideways movement. All that standing water can lead to crown rot, root rot, and many other fungal diseases.
What is porosity? Porosity, or permeability, in the garden refers to the ability of air and water to move through tiny pockets in the soil. These tiny spaces are called macropores and micropores, depending on their size. Soil that is rich in organic material tends to have a variety of macropores and micropores that improve its porosity. Porous soil allows roots to reach out freely to find water and nutrients. In my yard, we tend to have heavy clay soil that is made up of very tiny particles that leave few spaces in between. Porosity is measured as a percentage of spaces compared to the soil around them. What happens when it rains? When rain starts to fall, or the sprinklers kick in, the soil is initially hydrophobic, causing runoff and urban drool. This is because the water is repelled, the same way a dry sponge allows water to run off the top, rather than being absorbed. Now, we all know that sponges are very porous. They have lots of holes that can hold water. That’s why we use them! Once the soil becomes damp, like a sponge, it can then hold a surprising amount of water. When all the pores are full, gravity then pulls the water downward into groundwater, where it is taken to creeks, lakes and oceans. That’s why it is so important to not overuse fertilizers, pesticides, fungicides or herbicides. All those chemicals leach into our water supply! Porosity and plant health As plants become saturated with water, tiny pores, called stoma, open wide and the plant starts panting in a process called evapotranspiration. Just as we can see steam when we breathe on chilly days, plants exhale moisture along with other gases. When there is no water to be found, and the plant risks the other side of water stress, the stoma close, to hang on to every bit of moisture possible. When the ground gets muddy, whether from too much rain or over-watering, roots cannot breathe and the plant can drown. In the case of my nectarine, I used plastic tubing to redirect the standing water away from the tree. That’s not something I want to do every time it rains, so I will use these methods to improve the porosity around the nectarine tree:
UPDATE (1/10/2017) After heavy rains, I was very happy to see that the soil around my nectarine tree is draining very nicely. It really is amazing how effective just a little mulch, compost, and cover crop treatment can change an area for the better! The rhizosphere is the area of soil that is directly impacted by root secretions and related soil microorganisms. Plants interact with the surrounding environment through chemical reactions, ion exchanges and complex trade agreements with soil microorganisms. The majority of these interactions occur below ground, in the rhizosphere. 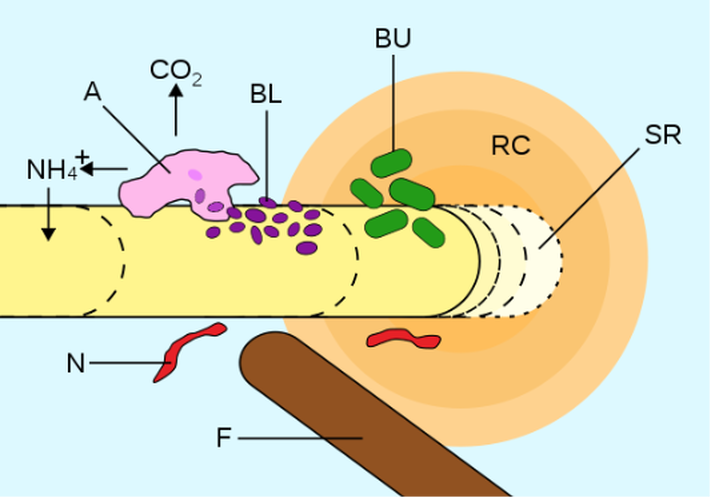 Rhizosphere illustration: A=amoeba consuming bacteria; BL/BU=bacteria; RC=Root derived carbon; SR=Sloughed root hair cells; F=Fungal hyphae; N=nematode (Smartse) CC BY-SA 3.0 Root secretions contain acids, sugars and amino acids. These secretions help plants obtain nutrients and protect against pathogens. They also stabilize soil aggregates.
The rhizosphere is broken down into three regions:
From the inside out Working from the inside and just around the roots of most plants, microscopic fungi (mycorrhizae) exchange water, hormones and mineral elements found within the soil for sugar created by the plant through photosynthesis. Rhizobium bacteria have a symbiotic relationship with members of the legume family. They detect flavonoids secreted by plant roots, which stimulates the bacteria to generate nod factors. These nod factors trigger the plant to form root nodules. The rhizobium bacteria then provide the plant with nitrogen from the atmosphere. There are other nitrogen fixing non-symbiotic bacteria within the rhizosphere that aid other plants in exchange for sugars and other nutrients. Some plants also produce allelochemicals within and beyond the rhizosphere that prohibit other plants from growing nearby. Just as we constantly lose skin cells, plants also shed cells. These cells fall to the ground (rhizodeposition) and are eaten by bacteria. The bacteria, in turn, are eaten by nematodes and protozoa. This process enriches the soil, making nutrients available to plants and improving soil health. There’s a fungus among us! The root systems of nearly all your plants (except those in the cabbage family) are infected with a tiny fungus called mycorrhizae. Now, before you panic, you need to understand that this is a good thing! 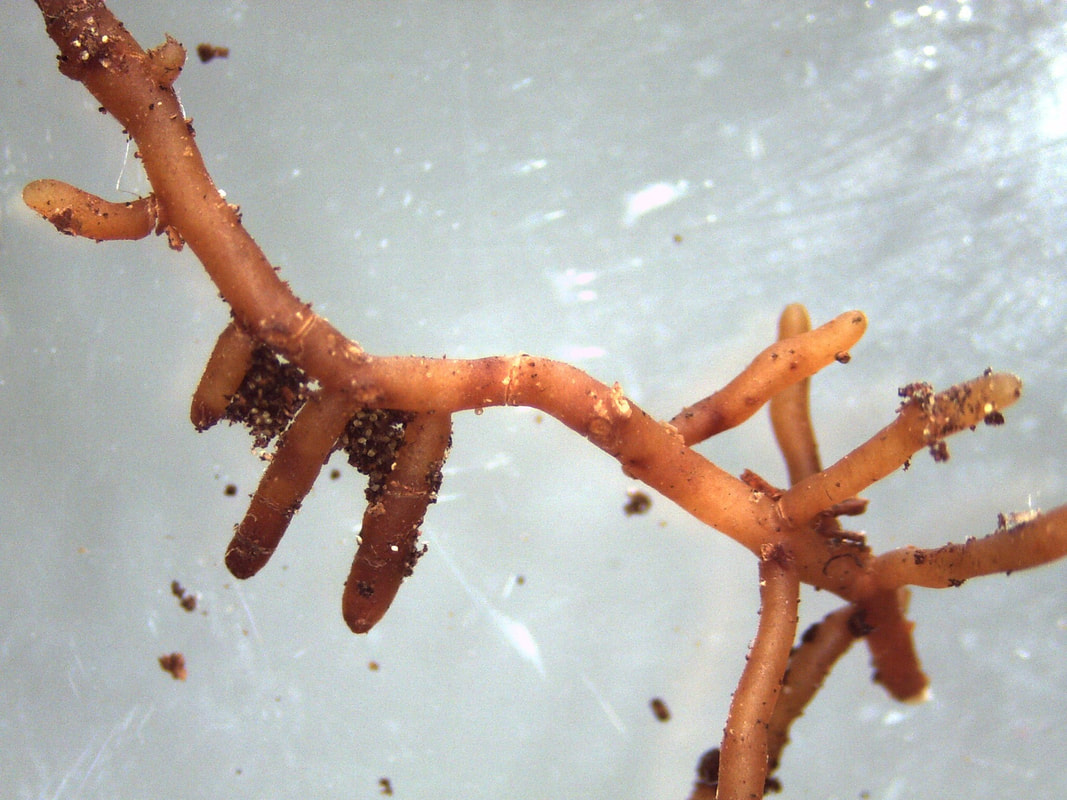 Beech tree root with mycorrhizae (Katrin Schulz) Pixabay Mycorrhizae means ‘root fungus’. These microorganisms have evolved in a symbiotic, or mutually beneficial, relationship with plant roots. Just as rhizobium bacteria help plants ‘fix’ atmospheric nitrogen into a form usable by plants, mycorrhizae are important part of the soil food web and critical to plant health. Mutually beneficial arrangements Tiny root hairs give the mycorrhizae sugars, created through photosynthesis, B vitamins, and other important resources in exchange for water, hormones and minerals found in the soil. This is how plants absorb soil nutrients. Without these critical elements, plants fail to thrive and they become susceptible to pests and diseases. Plants that host mycorrhizae have access to 50-100 times the nutrients than plants without. This is especially true when it comes to pulling phosphates from the soil. Types of mycorrhizae There are several types of mycorrhizae with two major players: those that live mostly on and occasionally inside roots (ectomycorrhizae) and those that “infect” the roots of nearly 80% of all plant species (ednomycorrhizae). These microscopic fungi extend thread-like appendages, called hyphae, into the soil. These are the white threads you see under decomposing wood chips, mulch, and compost. And they are worth their weight in gold! Mycorrhizae provide far more than a simple trade agreement with your plants. They also:
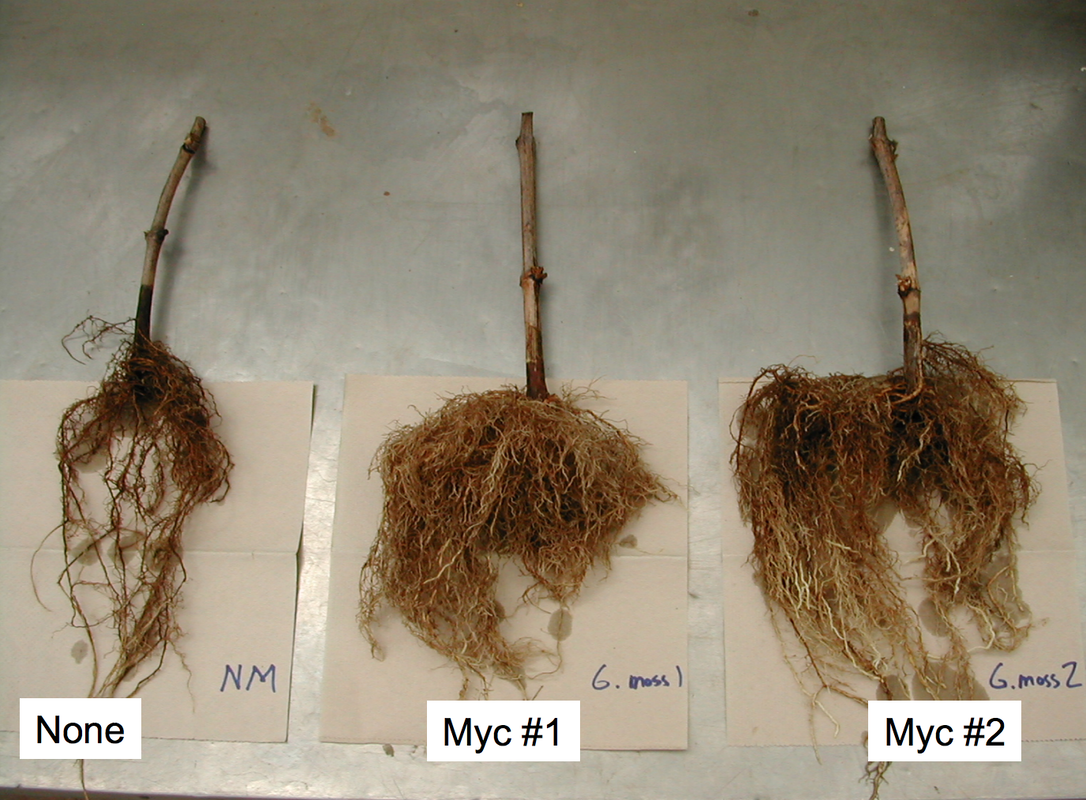 Mycorrhizae improve root growth significantly (USDA) Public Domain You can inoculate your soil with store bought mycorrhizae, but the conditions of temperature, moisture and soil must be exactly correct, or they will simply die off and be a waste of money. In most cases, repopulating soil with purchased mycorrhizae only works in the lab and not in the field. Instead, you can make your soil more hospitable to these mycorrhizae with these tips:
You can improve the health of containerized plants by tossing them a handful of soil from outside. That soil will contain beneficial mycorrhizae that will help your potted plants thrive. We may not need Noah just yet, but many areas are prone to winter and spring flooding. Years with El Nino events can bring severe rain and flash floods, wreaking havoc with homes, drainage, and the garden. After making sure that your family and home are safe, it is important to protect your landscape and garden from the negative effects of flooding. 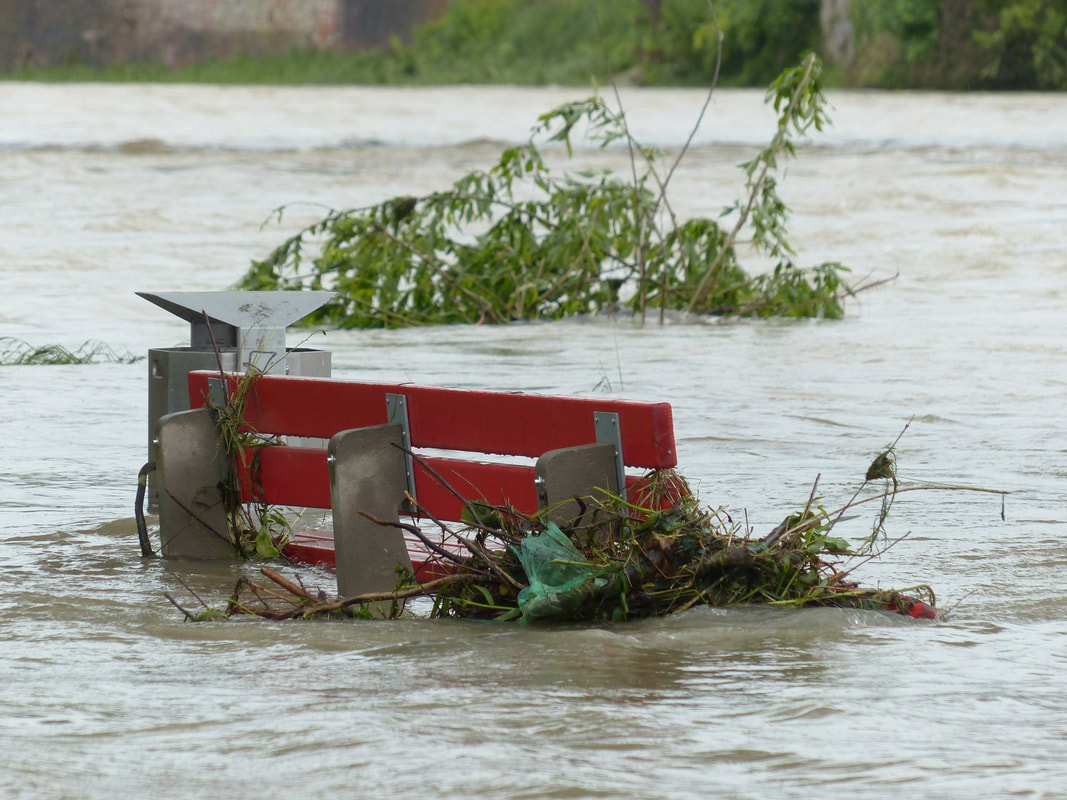 High water park bench (Hans Braxmeier) Pixabay Rain and soil
Too much rain at one time can cause mountain creeks and streams to overrun their boundaries, carrying debris, mud, and even more water crashing down into already soggy bottom lands. Soil is an amazing structure, but the bedrock that holds it in place also creates a water barrier that can lead to pooling, flooding and more mud than your landscape can handle. As we have discussed earlier, permeability refers to the ability of water to drain. Our heavy clay soil does not drain well, which makes it great at holding on to water during the dry months, but creates significant problems when rainfall rates overrun carrying capacity. Flooding and standing water can drown your plants. Roots need air space to breath and to conduct photosynthesis. Standing water and poor drainage also encourages the development of fungal infestations, mosquito breeding grounds, and disease-carrying pests such as fungus gnats. Just as over-watering causes leaching of nutrients, salts, and chemicals, flooding can wash away valuable topsoil and pollute local groundwater. When you notice standing water in your garden, it is time to take action. How to reduce the negative impact of flooding in the garden:
Floods can be devastating, but you can reduce the negative impact with these simple steps. Keep yourself and your garden healthy and safe!
Clay soil holds far more water than sandy soils, but every soil has a holding capacity. Once that limit is reached, gravity will pull the water downward into underground waterways where it will ultimately flow to lakes and oceans. As it flows away, the water carries nitrogen, salts, fertilizer, pesticides, fungicides and whatever else was in your soil with it - leading to a potentially dangerous chemical soup that can wreak environmental havoc. Leaching also moves valuable nutrients out of reach from your plants roots.
To avoid leaching, it is always a good idea to water only as much as is needed. You can see for yourself where your irrigation water is going simply by inserting a moisture meter next to the plants you intended to water (but not too close). Many people are surprised to discover that the water intended for their tomato plants actually went in another direction due to hardpan, sandy pockets, or poor soil structure. Improving soil structure with compost can improve drainage and help prevent leaching. If it has holes in it, water will find a way through it.  Water droplet (ju lrun) Pixabay This is true for your tent, your roof, and your garden. In fact, permeability is pretty much the name of the game when it comes to plants and soil.
The rate at which water flows through something else is called permeability. If you’ve ever tried buying a home, you were probably required to pay someone to conduct a perc test. Real estate percolation tests are done to make sure that your house won’t wash away when it rains and that your septic system won’t back up into the living room. A percolation test In the garden can help plants get the water and nutrients they need without drowning. Before we learn how to conduct a perf test, let’s find out why it’s important. Water in the soil In the garden, water and air flow in and out of soil, leaves, and even individual plant cells. For a plant, this is the Stuff of Life. The water and air that flow in and out of a plant’s cell walls carry sugars, minerals, oxygen, carbon dioxide, hormones, waste products, and chemicals that allow your plants to thrive or die. [If you’ve ever battled poison ivy or poison oak on your property, you can use a leaf spray that gets absorbed through the stoma (sort of like pores) and carried down to the roots through the phloem. The chemical kills the plant at the roots. This only happens because of the permeability of the leaves.] Now, too much of a good thing is a bad thing. Without adequate permeability, your plants will drown, suffocate, dehydrate, or starve. Not good. Healthy soil is made up of different size bits of sand, loam and clay. The spaces between these bits are called macropores and micropores, depending on their size. Air and nutrient-rich water pass through these spaces, feeding and nurturing your plants. If the spaces are too small (or absent), plant roots cannot get to the food and air they need to live. So, how can you, as a gardener, improve the permeability of your soil? • avoid overwatering • aerate compacted soil • apply mulch and compost • avoid walking on wet soil Signs of permeability problems: • mud • standing water • hydrophobic soil • chlorosis (loss of green color) How to conduct a percolation test for soil permeability:
Ideally, you will want the water to drain at a rate of one or two inches per hour. Of course, sandy soil will drain much faster, taking valuable nutrients with it. You can improve the holding capacity of sandy soils by adding aged manure or compost. If your soil contains more clay, like mine does, you can improve permeability by adding… you guessed it - aged manure or compost! Compost and aged manure add organic material to the soil, creating a wider variety of sizes of both soil and spaces. This variety allows for healthier growth and drainage. Paved areas can lead to drainage and permeability problems. Permeable paving materials solve this problem by creating a firm surface for walking and parking while still allowing water to seep through. Permeable paving materials are affordable and attractive. They can also eliminate weeds growing up between paving stones! Do your garden a favor by learning about permeability and composting! Mud pies may have been a blast in childhood, but your garden will appreciate it if you play elsewhere when the soil is wet. Soil, silt and clay, mixed with water, creates a slick, slimy ooze that has been used to make adobe bricks, functional pottery, facial masks and exterior stucco. Mud also provides a nutrient-rich habitat to snails, clams and frogs. When your garden soil is muddy, however, it is time for patience. Muddy soil is easily compacted, making life difficult for young (and not so young) plant roots. Too much of a good thing All plants need water, but heavy rains and flooding are another story. As soil becomes saturated with water, oxygen is forced out of the ground. Plants need oxygen to survive. Even after the soil dries out, some plants may be stunted and production may be lower. If the soil stays too wet for too long, plants can die. Extended periods of wetness can actually drown the soil, creating a black, stinky mess.
Unless you live in Florida, where sand is predominant, walking on muddy soil can crush those pockets, reducing drainage. Walking on muddy ground can also damage delicate plant roots. Compacted soil requires aeration. Once compaction occurs, you must wait until the soil dries out before repairing that damage.
Mud over time If there are places in your yard or garden that do not drain well, you can dig a shallow trench or install a rain garden nearby. In both cases, water is redirected away from plants. Then, try to determine the cause of your drainage problem. Is a slope causing water to converge on an area? Is more organic material needed? Is there a leaky pipe or sprinkler nearby? It may even be an overflowing septic system. In that case, your family's health could be at risk. Reduce potential mud problems In addition to creating a rain garden or swale, and eliminating water leaks, there are several other ways that gardeners can reduce the potential for problems caused by mud and poor drainage. Continue incorporating aged compost and other organic matter, once the soil is dry. Install moisture-loving trees, shrubs, and other plants in low areas. With all that moisture, slugs and snails will be out in force, carrying diseases and feeding, so putting in some extra time hand-picking these pests can keep plants healthier. Rather than damaging your soil and your plants' roots, take advantage of muddy days and do something else: sharpen your tools, clean planter pots, or, my favorite, peruse seed catalogs! Late autumn and early winter often leave gardens looking bare and unsightly. One way to improve both the appearance and the health of your garden is to use winter cover crops. Cover crops can provide a living barrier against the elements, or they can be grown as a green manure, to be cut back before they flower. Cover crops reduce erosion, suppress weeds, and improve soil health. Even before summer crops are harvested and the last, struggling tomato plant has succumbed to frost, you can plant your cover crops. Any rains that come will help speed their growth. 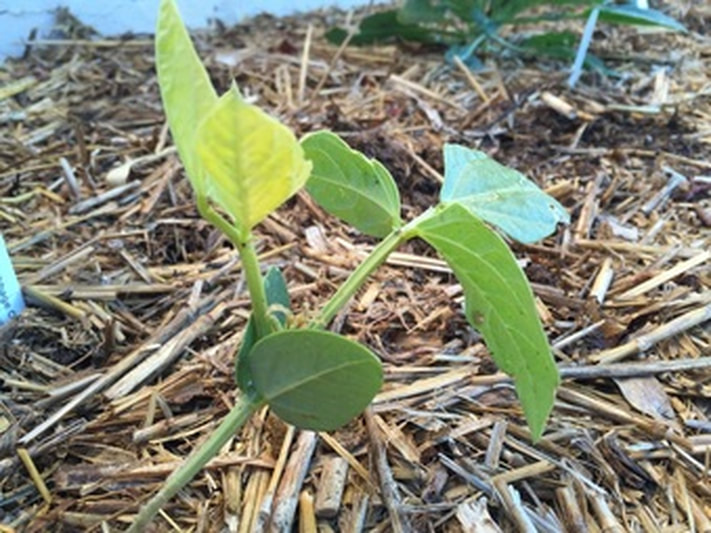 Black-eyed pea seedling
Cereal grains, such as rye, wheat, and barley, can also be grown as cover crops. As an added bonus, they help break up compacted soil as their roots grow deeper than your shovel or rototiller will ever go. Then, before they go to seed, these plants are cut off and left to lay where they fall, or where they are needed. 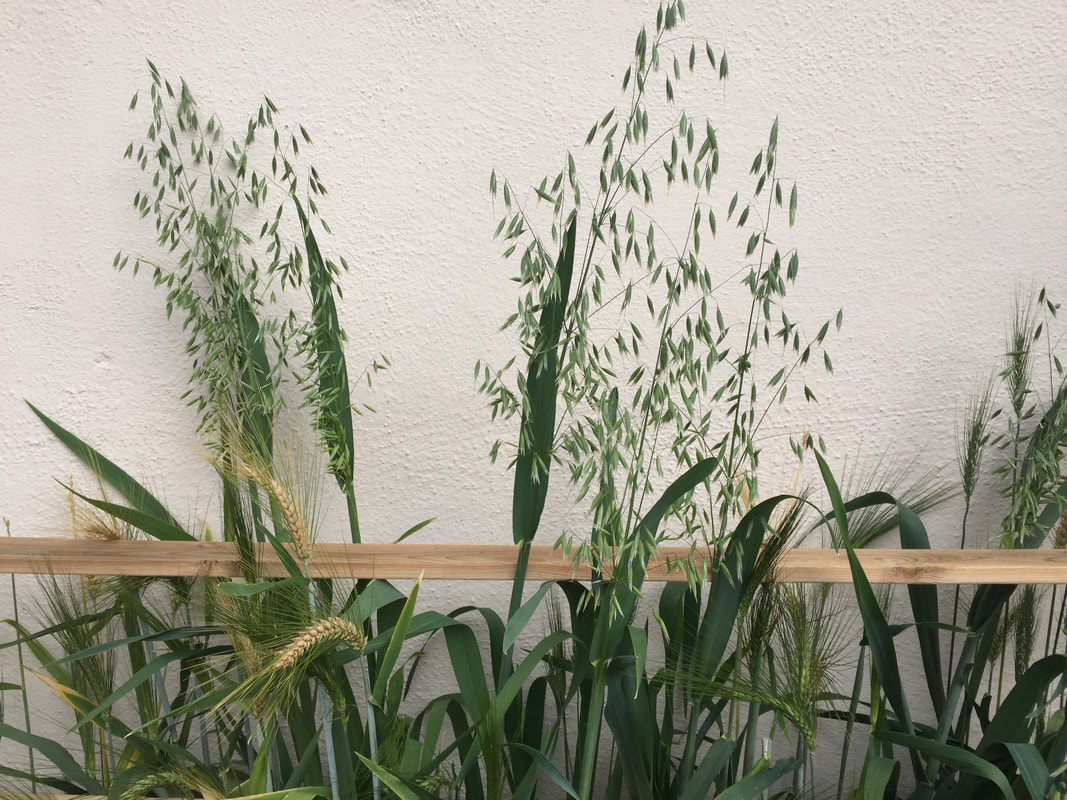 Wheat and oats Inexpensive and easy to grow, cover crops are a simple investment in your garden’s long term health. They look nice, too! If you want something that's even easier, simply cover your soil with a mulch of wood chips.
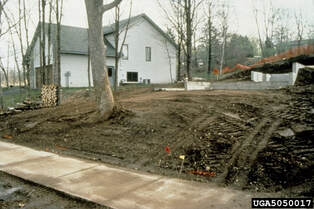
Good drainage is crucial to plants, both containerized or in the ground, to avoid things like root rot, fungus gnats and, well, drowning. 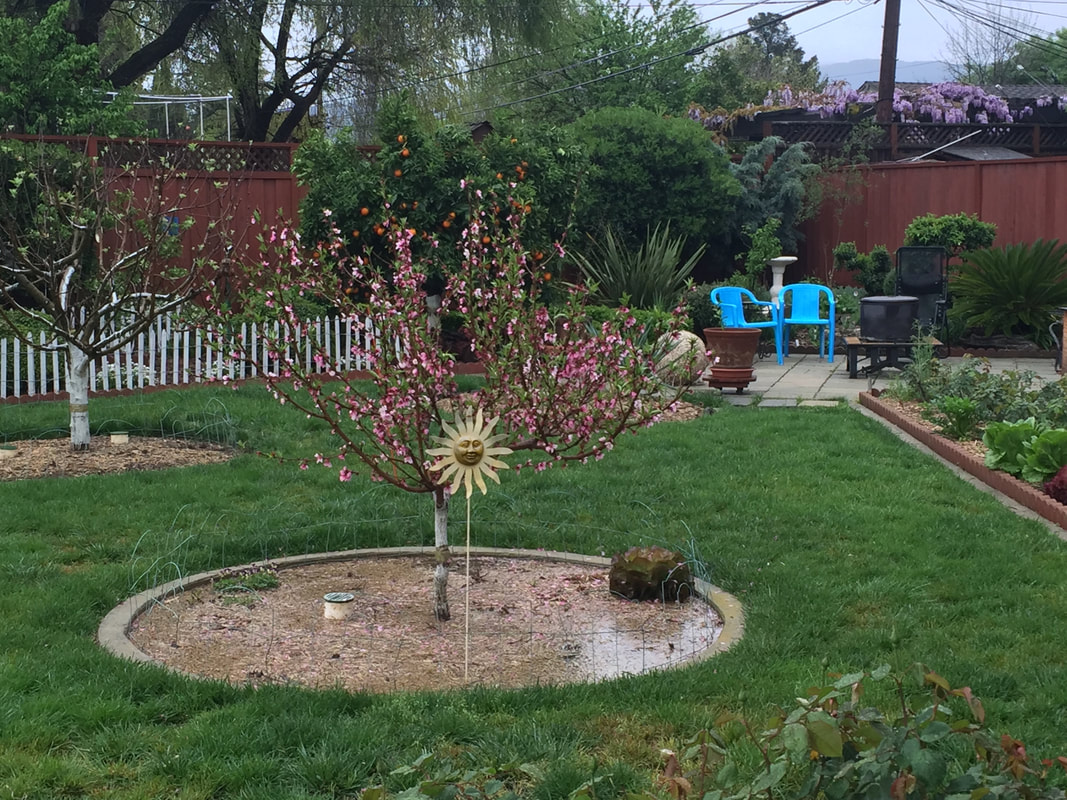 Nectarine tree with poor drainage So, how do you know if you have a drainage problem?
If you see pooling, puddling, or muddy spots, you may have a drainage problem. Water will either be held in the soil or it will go someplace else. Now, soil is pretty amazing. Picture the spaces between grains of sand. Water passes through those spaces easily. Loamy soil has medium-sized spaces that slow water movement a bit. Clay soil is made of really tiny bits that create lots and lots of tiny pockets for water to hang out in. If you have mostly clay soil, poor drainage can be a real threat to plant health. How can you correct a drainage problem? Adding organic material to your soil is the best way to improve drainage. Period. It doesn’t matter what type of soil you have. Adding compost improves soil structure, increases the level and variety of nutrients available to plant roots and, hey, it reduces the amount of stuff in landfills! As long as it isn’t diseased, you can compost just about any plant material and use it to improve your soil’s health and drainage. By adding compost to sandy soil, you provide smaller bits of stuff that help hold water and nutrients in place. Loamy soil is already rock star material, but adding compost just makes it even better. When you add compost to clay soil, you create bigger pockets that allow air and water to move more freely, keeping the soil and your plants healthier. Really big drainage problems can be resolved with swales, ditches, or French drains. Quite simply, you dig a trench that gets progressively deeper as you move away from the problem area. Gravity and surface tension pull the water away and deposit it in areas better able to handle that much water. Rain gardens are another option. One thing to keep in mind when considering drainage is what is in the water that is draining away. When water drains out of or away from your yard or garden, it’s not going out alone. Every drop of that water contains precious nutrients and microbes. When people use fertilizers, pesticides, herbicides or fungicides, those chemicals are also leached away. This nutrient soup is usually dumped into nearby creeks, rivers, lakes or oceans, disrupting the natural cycles of growth that take eons to evolve (and repair). Just sayin’… The first time I saw a lawn that had been aerated, I couldn’t help wondering how or why so many dogs had pooped on that particular yard. Of course, what I had seen was the hundreds of plugs of soil that had been pulled from the ground. So why is aeration a good thing? _09_-_Aerated_Grass.jpg) Aerated grass on a baseball field (Tdorante10) CC BY-SA 4.0 Aeration is a good way to reduce soil compaction. In compacted soil, the particles are too close together to allow water, air, nutrients, or roots to move through the soil.
Professional aeration removes hundreds of small plugs of soil and deposits them on the lawn surface. The plugs are generally 1/4-1/2” in diameter and 3-4” long. Ideally, a plug is taken every 6”, but this can be a bit much when doing the job by hand. Aeration machines are heavy, so the benefit is a mixed bag. Personally, I use my soil sampling tube, but that’s a very slow process. You should not use a screwdriver or aeration shoes as these simply poke a hole by compacting the surrounding soil even more. There are hand aerifiers that will make the job go much faster than my soil sampler but without the compaction of heavy machinery. Over time, these plugs break down into healthier soil. The holes also provide access for water and air to nearby roots. When you aerate your soil, it is best done a few days after watering, so that the soil is easier to work. Spring is the best time to aerate your soil. Summer is not a good time to aerate because the soil can dry out too much and damage root systems. Soil pH can make or break your plants' ability to absorb nutrients and thrive. What is pH? Everything is existence is either acidic, alkaline, or somewhere in the middle. The pH scale is a simplified version of an algorithmic equation that measures the number of hydrogen ions in a specific quantity of a material in solution. The scale ranges from 0 to 14, with lower numbers indicating acidity and higher numbers indicating alkalinity. In the middle; 7.0 indicates neutral. Testing soil pH Soil pH can be tested with an over-the-counter product found at all garden supply stores. Testing the soil will tell you if your soil is neutral (7.0), alkaline (greater than 7.0) or acidic (less than 7.0). While over-the-counter pH tests are accurate enough, other soil tests available from retail outlets are not. To get your soil tested, and I urge you to do so, use a local, reputable soil test lab. Nutrient availability and soil pH Plants grow best when they have access to all of the nutrients they use to grow and reproduce. At certain pH levels, some nutrients become unavailable. At the same time, soil microbes, which help plants absorb nutrients, are also restricted by certain pH extremes. Also, some plants, such as blueberries, prefer more acidic soil. Using the chart below, you can see that more nutrients are available, and there is greater microbe activity, when soil pH is between 6.0 and 6.5. Most plants can survive in soil pH from 5.2 to 7.8, but the narrower range allows plants to thrive.  Soil pH and nutrient availability (CoolKoon) CC BY 4.0 Altering soil pH
Soil pH is, for the most part, a function of your local bedrock material. This isn’t going to change any time soon. What you can do is integrate certain practices in to your normal gardening routine that will temporarily alter soil pH. East of the Rocky Mountains, soil tends to be more acidic; west of the Rockies, soil is more alkaline. Traditionally, acidic soil is treated with lime, to bring is closer to a neutral pH. If your soil pH is too high, you can acidify your soil with sulfur. Some people claim that adding peat moss or pine needles to the soil can increase its acidity, but research has not shown this to be true. Unfortunately, altering pH takes time and repetition to see any results. Also, it is more difficult to alter the pH of clay soils. Once you begin treating your soil, it is important to continue monitoring pH levels. In the long run, a soil pH of 6.0 to 7.0 will help your plants become healthier and more productive. No, hydrophobic does not refer to an unreasonable fear of water. Instead, hydrophobic describes the point where soil becomes so dry that it actually repels water (read: bad for your plants). Much like a dried out sponge, when water is applied to overly dry soil, it simply rolls off and is lost.  Water droplets on hydrophobic soil (Adrian Malec) Pixabay If your potted plants become hydrophobic, simply pouring water on them is not enough. Instead, you can revive your plants and thoroughly hydrate the soil by forcibly submerging the pot in a bucket of water until the pot no longer floats. Until the soil is saturated with water, the air pockets in the soil will make the pot float. It's pretty cool, watching all the air bubbles percolate up from your submerged pot!
Another method of rehydrating hydrophobic soil is to place the pot in a large container and pour water over the top. The water will run out of the soil but, over time, the water will eventually be absorbed. Larger planting areas can be relieved of their hydrophobic tendency with light sprinklings of water, followed by moderate watering. Just as a slightly damp sponge will hold on to the water it touches, so will your garden soil. Sheet mulching is touted as one of the easiest ways to reduce weeds in your yard or to get rid of a water-hungry lawn and replace it with something more drought-tolerant. (Solarization is a more extreme method that can rid an area of many fungal diseases, as well as weeds.)
To sheet mulch an area, trim any current plant growth to the lowest possible height, water the area (to provide for soil microbes) and then cover the area completely with a 4" layer of wood chips. We used to urge people to cover the area with layers of newspaper or cardboard, but then we learned that those materials attract voles and termites. Those layers also interfere with evaporation, percolation, and gas exchanges. Your local tree trimmer will be happy top give you a truckload of fresh wood chips, perfect for blocking weeds and protecting your soil. For free. Pedogenesis is the process of soil creation.  Crop land (Public Domain) People used to think that dirt was just made up of rocks. Now we know that soil is far more than that. Healthy soil is 25% water, 25% air, 45% minerals and 5% organic matter. Of the organic matter, 10% is plant roots, 10% is microorganisms that make nutrients available to the roots, and 80% is decomposing plant and animal material.
Twenty years ago, there were over 20,000 different types of soil arrangements (called "soil series"), with specific characteristics and symbiotic relationships that evolved over thousands of years. These soil series can be destroyed in a matter of seconds with a bulldozer. There are currently over 3,000 extinct soil series in the USA alone. Pedogenesis creates healthy soil that provides us with clean air, water, food and more, so start composting and mulching! Macropores and micropores are the spaces found between particles of soil, much like the holes seen in a sponge. Like a sponge, those holes can hang onto water, or they can be filled with air. They also provide habitat for important soil microorganisms.
Macropores and micropores are critical to the movement of air, water, and roots through the soil. While both micropores and macropores can hold air and water, their sizes play different roles in plant and soil health.
Being larger, and normally found between soil aggregates, macropores allow water to drain away through gravity and are often filled with air and soil microorganisms. Because of this, macropores determine a soil’s aeration and porosity. Insufficient macropores can mean compacted soil and drainage problems. Micropores, often found between and within soil aggregates, are so small that surface tension holds water in place. Instead of draining away, water moves through micropores only when suction is created by thirsty roots. This determines a soil’s water holding capacity. If you want to get really picky, there are also mesopores, ultramicropores, and cryptopores. Cryptopores are so small (<0.1 μm), most organisms cannot enter, preventing decomposition, and water is held too tightly for plants to use. Ultramicropores are 0.1-30 μm and tend to be populated by microorganisms. And mesospores are larger than macropores at 30 μm–75 μm. Mesospores are filled with easily accessible water at field capacity, providing plants with plenty of water. [Field capacity is the amount of water found in soil after the excess has drained away.] Most of us, however, don’t need to go into that much detail, so we will stick with macropores and micropores. Too many, or not enough? Sandy soil can have so many macropores and micropores that water and nutrients simply leach away. Heavy clay soil, at the opposite end of the spectrum, has more micropores, so water and nutrients are held tightly. Loamy soil, in the middle, provides a healthy balance of micropores and macropores within the soil structure. One common mistake people make, when trying to improve the structure of clay soil is to incorporate sand. It sounds right, but it’s not. The tiny clay particles fill the spaces between sand particles, creating an even denser soil, frequently referred to as concrete. To improve soil structure, the best methods are to regularly incorporate organic matter and to apply 3 to 4 inches of coarse wood chips as mulch to unplanted areas. The wood chips will, over 2 or 3 years, break down, adding organic material that helps create a range of aggregate sizes, with plenty of macropores and micropores. Thank you, Moshe and Robyn! I owe you both a pack of seeds! |
Welcome!You can grow a surprising amount of food in your own yard. Ask me how! To help The Daily Garden grow, you may see affiliate ads sprouting up in various places.
You can also get my book, Stop Wasting Your Yard!  Index
All
Archives
April 2024
|


 RSS Feed