|
Bokashi is advertised as a fast, convenient process that allows you to convert kitchen scraps into nutrient rich soil in record time, without the mess and smells associated with traditional composting. Sounds great, doesn’t it? What could be simpler than tossing everything into a bucket? Before you jump on that band wagon, however, let’s find out the truth about bokashi. 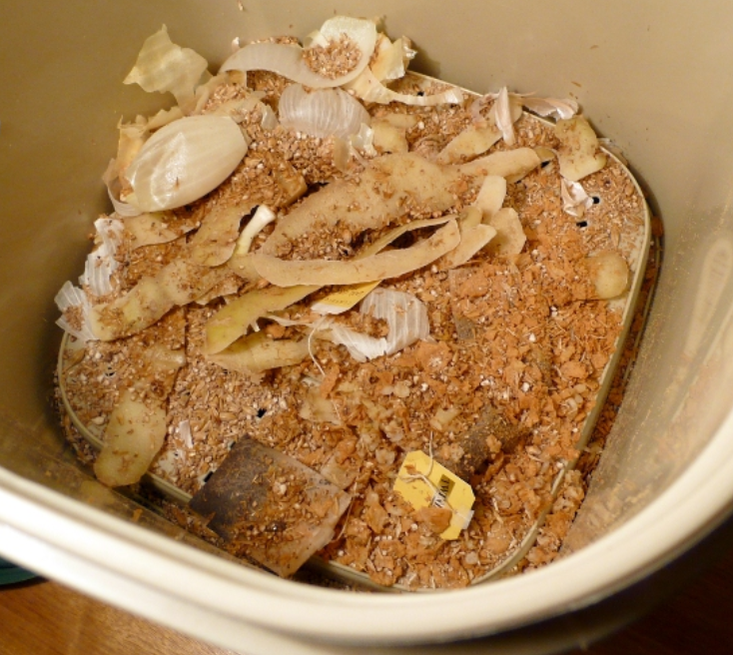 Recently started bokashi bin (WikiWand) CC BY-SA 4.0 Misleading claims First, bokashi does not produce soil. Soil is made up of minerals (sand, silt, and clay), organic matter (dead bugs and plants), and spaces (micropores and macropores) that fill with water and gases. The mixture that comes out of a bokashi bucket is not soil. It is fermented versions of whatever went in. This mixture can be added to soil, but it does not create soil. More accurately, it is a soil amendment. Secondly, bokashi is not composting. Traditional composting Traditional composting uses air, water, and microorganisms to decompose yard and kitchen waste. This makes composting an aerobic exercise. Traditional composting can be done in several different ways:
 Outdoor compost pile Many people feel that they do not have the space needed for composting. If you live in an apartment without a balcony, you’d be right. Otherwise, composting is nearly always an option. So, how is bokashi different from composting?
What is bokashi? While composting is aerobic, bokashi is an anaerobic (without air) process. Instead of relying on the microorganisms already in the soil and air to cause decomposition, wheat bran is treated with specific yeast, fungi, and bacteria that cause the contents of the bucket to ferment. Without them, everything in the bucket would simply rot. Yuck! But, because bokashi is a fermentation process, this method can be used to break down meat and dairy products, which is not recommended for traditional composting, though it can be done. How to bokashi First, you buy a bokashi bucket. This will cost you $45 to $150 in today’s dollars, depending on where and how you shop. You can also make one for much less. A bokashi bucket has a raised floor, a tight fitting lid, and a spigot. Bokashi kits come with a bag of inoculated bran, also known as Effective Microbes (EM). Replacement bags of bokashi bran currently run about $6 a pound. You can also collect and raise your own microorganisms, but that task is beyond the scope of this blog. To get started, sprinkle some of the bran on the floor of the bucket, add food scraps, sprinkle more bran, squish out as much air as possible, and put on the lid. Some people use a plastic bag on top of the mixture, to press the air out, while others use a plate. Advertisements claim that there are no smells, but that isn’t exactly true. Each time you open the bucket to add more material and sprinkle on more bran, you will smell it - a vinegary molasses bran smell. You continue this layering of waste and bran and pressing out air until the bucket is full. Then, you set the bucket aside for two or three weeks and let nature take its course. Because this is a fermentation process, liquids are produced. You need to remove those liquids every few days, using the spigot., to reduce the chances of it going sour and smelling bad.. I’m not sure what I would do with this liquid. The material I found on the subject suggested using it to combat slime in drains and septic systems. Other sources claimed it was perfectly usable as a fertilizer, but some sites said to use it full strength, while others said to dilute it to 1/100th strength. Sorry, but I love my plants. I’m not going to risk them, trying to figure out which claim is accurate. How to use bokashi mixture After the fermentation process is complete, much of what is in the bucket will look like a pickled version of what it was when it first went in. Proponents of bokashi call this resulting mixture “pre-compost”, which must then be added to your compost pile or dug into the soil. Just be sure there are no plants nearby for another couple of weeks. This initial mixture is very acidic, with an average soil pH of 4.0, which can burn plant roots. Before you think this will be a way to acidify your soil, you need to understand that soil pH is very difficult to alter and that it would take A LOT of bokashi mixture to make a lasting change. The fermented mixture can also be added to your worm bin, if you are practicing vermiculture. I don’t know if it is safe for worms (or if it gets them drunk) but, aside from the meat and dairy, you could have added the raw materials to the worm bin in the first place and skipped the whole fermentation process. If you haven’t guessed by now, I am not sold on the bokashi method. While it would be wonderful to simply drop all our trash in a bin that kicks out healthy soil, that mechanism does not yet exist. Making soil takes millions of years. You can certainly use bokashi to feed your soil, if you enjoy the process, but you can also raise worms, or just compost the old fashioned way. Did you know that soil has a wilting point? It’s not that soil wilts, instead, wilting point is reached when the water needed by a plant to stay upright has been used up.  A plant rooted in soil that is beyond the wilting point (Pewebe) CC BY-SA 3.0 Soil moisture
Water, plants, and soil perform an intricate dance. The soil has spaces, called macropores and micropores, that allow air, roots, and water to move through. The water molecules in the soil are strongly attracted to each other, using surface tension. This is how soil holds onto water, despite the pull of gravity. The amount of water a soil profile can hang onto is called its water holding capacity, or field capacity. When a soil is holding all the water it can, and becomes saturated, any additional water is pulled into the ground water by gravity, or runs off as urban drool, where it eventually is discharged into rivers, lakes, and oceans. At the opposite end of the soil moisture spectrum, a soil can be so dry that it becomes hydrophobic. Hydrophobic soil actively repels water. Sponges act the same way. If you have a completely dry sponge, water will tend to run across the top, rather than be absorbed. Once a little water is absorbed, a lot more is pulled into the spaces that make up the majority of a sponge. Finally, if even more water is added, it will simply flow through the sponge. Why the wilt? Plants wilt for several different reasons. Bacteria or fungi may be blocking the xylem, there may be too much salt in the soil, ice damage may have occurred, or because the soil has reached the wilting point. When plants do not contain enough water, plant cells cannot remain plumped up, or turgid. As water becomes less available, cells shrink and become floppy. [Tree trunks do not get floppy because they contain lignin. Unlike cellulose, which is a sugar-based material, lignin is alcohol-based, but we will discuss lignin another day.] The problem with wilting is that there is a point of no return. This is a soil’s permanent wilting point. Permanent wilting point Permanent wilting point is death for plants. If a soil moisture rating reaches or surpasses the permanent wilting point, it doesn’t matter how much water you add later, the plant will die. This occurs more often with containerized plants, but it can happen anywhere. Soil texture plays a big role in how much soil moisture is not enough to keep a plant alive. This is due to the soil’s ability to hold the water so tightly that plant roots cannot suck it in. The permanent wilting point occurs at 15 to 20% for clay soil, 10 to 15% in loamy soil, and at 5 to 10% in sandy soil. You can monitor soil moisture using an inexpensive moisture meter. Some soils can hold a lot of water and other soils hold very little. Since many plant nutrients are held in suspension (float around in water), and nearly all plants need water to stay upright and alive, the amount of water a soil can hold has a huge impact on plant health. The water holding capacity of a soil also has a big impact on how often you need to water and feed your plants. Let’s find out what your soil’s water holding capacity is, and how it impacts your garden. Water for plants Not all the water held by a soil can be reached by plants. Sometimes it is too deep. In other cases, the water may be protected by a layer of rock. The amount of water in the soil that plants can reach and use is called plant available water. If a plant cannot reach enough soil water, it will hit a wilting point. At the opposite end of the moisture spectrum, field capacity (or drained upper limit) refers to the total amount of water a soil profile can hold. Anything beyond that saturation amount leaches into groundwater, or runs off, as urban drool. 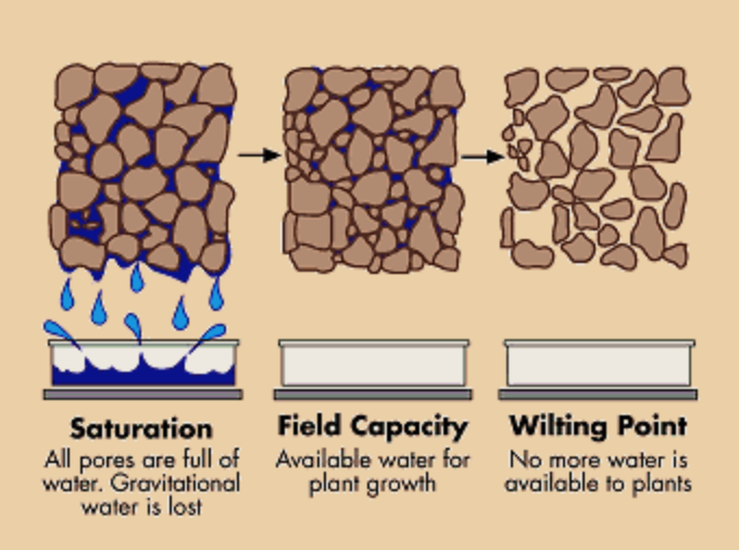 Stages of water holding (USDA Bulletin 462, 1960) Public Domain Soil texture
The first step to calculating your soil’s water holding capacity is to identify its texture. Soil texture refers to the percentage of sand, silt, and clay that makes up your soil. You may be surprised to learn that those words only refer to particle size, and not to any chemical properties. Very large particles (sand) have very large spaces, called macropores and micropores, between the particles, while clay particles have very tiny spaces. These spaces allow air, water, nutrients, and roots to move through the soil. In the case of sand, the large macropores and micropores allow water to slip away quickly, carrying nutrients, pesticides, and other materials away with it. Loam, having smaller macropores and micropores than sand, slows the leaching of water, which increases that soil’s water holding capacity. Clay, with the tiniest macropores and micropores of all, has the highest water holding capacity, being able to hold up to six times the amount of water held by sand, but that ability comes at a price. Roots, air, and nutrients also have a difficult time moving through clay soil. Soil structure The way the soil particles clump together into aggregates is called soil structure. There are eight types of soil structure, based on size, shape, and stability. Different soil structures can hold on to different quantities of water (inches per foot):
If you look closely at your soil with a hand lens or a simple microscope, you will be able to see these different shapes. The way the shapes create spaces within the soil impacts its water holding capacity. Soil structure also helps explain soil compaction. Some shapes and sizes, clay in particular, are far more likely to become compacted or have drainage issues What is your soil’s water holding capacity? You can conduct an experiment to see what your soil’s water holding capacity is, using simple household items. First, collect a soil sample from your garden. You may want to collect several different samples, for comparison. [Just be sure to label everything clearly!] Each sample should be the same size - 1/2 cup should work well. Then, place a paper coffee filter in a funnel, and put your sample in the coffee filter. Place the funnel into a large cup. Next, very, very slowly, pour 2 cups of water into the soil. Be sure to move the stream around, wetting all of the soil. Wait five minutes. Then, measure the water that flowed through the soil, into the cup. The difference between what you started with (2 cups) and what you ended up with will tell you how much water that amount of soil can hold. Improving water holding capacity Too much water and too little water are both bad for plants. Nutrient loss, leaching, and water pollution are also part of the equation. Adding aged compost to your soil improves its water holding capacity, along with its structure, texture, and microbe biodiversity. As organic material decomposes, a wide variety of spaces, minerals, and plant nutrients become available, allowing roots to reach the food and water they need, without struggling in a pit of mud. Soil texture determines how easy it is for plant roots to access the water and nutrients they need to survive and thrive. Soil texture also determines a soil’s ability to hold on to water and nutrients. 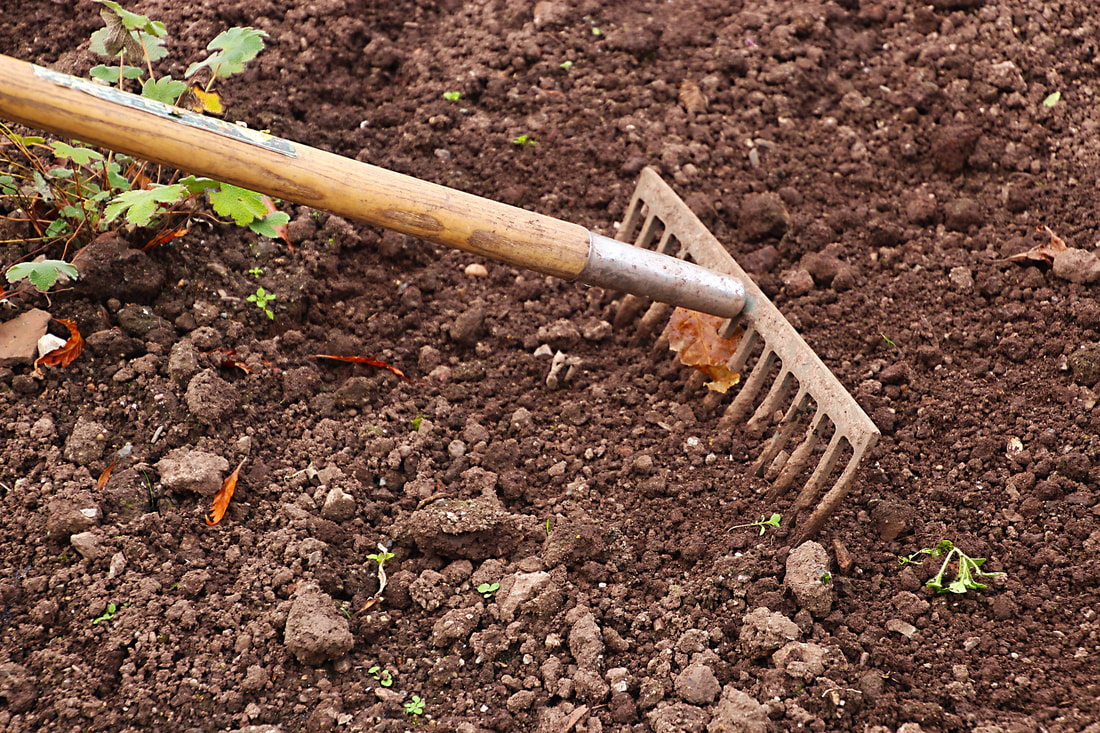 Raking garden soil (Dean Moriarty) Pixabay Soil texture is a measurement of the relative proportions of the sand, silt, and clay minerals found in a soil sample. Each of these words actually refers to the particle size of these soil separates, and not to any particular chemical property:
To put these numbers into perspective, imagine that a dime is a particle of clay. If that were true, silt would be about the size of a softball and a grain of sand would be the size of a bicycle wheel. Of course, there are no bicycle wheel sized grains of sand, but they can be seen with the naked eye. Silt particles can be seen with a standard, classroom microscope. To actually see clay particles, you would need to use an electron microscope, they are so small! Also, while most soil particles tend to be spherical, clay forms plates that generate up to 100,000 times more surface area. These means that there are many more potential points of attachment for nearby nutrients and water molecules. Soil texture classifications In the U.S., we use 12 different classifications to talk about soil texture. Each class has specific characteristics based on its feel, its tendency to crumble, and its likelihood of leaving a ‘stain’ behind on your fingers when handled:
You may also hear someone talk about soil that is fine textured or coarse textured. Finely textured soil contains more clay, while coarsely textured soil holds more sand. Soil texture is not the same thing as soil structure. Soil structure refers to the way minerals, air, water, microbes, and everything else is arranged into clumps, called aggregates. Soil texture and drainage The large and small spaces between these particles are called macropores and micropores, respectively. These spaces are what allow water, air, nutrients, and roots to move through the soil. In most cases, those spaces are similar in size to the particles they are around. Since water molecules tend to stick better to smaller particles, such as clay, and the micropores are smaller, clay has a far higher nutrient and water holding capacity than loam or sand. Clay is also more prone to drainage and compaction problems. Clay is also harder for roots (and shovels) to move through. The larger macropores and bigger particle size of sandy soils make leaching and nutrient loss more common problems. Erosion is another factor to consider when it comes to soil texture. Heavy sand and sticky clay are less likely to blow or wash away, while loam is more vulnerable to erosion. Soil texture and nutrient retention The nutrients used by plants are ions of specific elements. Ions are atoms or molecules that have either a positive or negative charge, due to the addition or loss of an electron. Cations, such as calcium and potassium, are positively charged and attracted to negatively charged soil particles. Anions, such as phosphorus and sulfur, are just the opposite. The ability of a soil to hold onto a positively charged mineral ion is known as its cation exchange capacity. Organic material and clay tend to have negative charges, while water and sand tend to be positively charged. How to identify your soil’s texture Use these steps to determine your soil’s texture:
 Soil texture triangle (USDA) Public Domain For example, a 10” sample has 1” sand (10%), 7” silt (70%) and 2” (20%) clay:
Creating better soil texture Ideally, your soil will be 50% macropores and micropores (containing 50% air and 50% water), 2 to 5% organic material (more is better), and 45 to 48% minerals. In a perfect growing medium, those minerals would be 40% sand, 40% silt, and 20% clay. Rather than trying potentially disastrous quick fixes* to improve your soil’s texture, adding small amounts of organic material, such as aged compost, over a long period of time, will improve your soil’s ability to retain water and nutrients, while still allowing air, water, and roots the spaces they need to move freely. * The most common quick fix for soil compaction, adding sand to clay, actually makes the problem worse, because the tiny clay particles fill the spaces between the sand particles. [Sand + clay = cement]
You may be surprised to learn that potting soil is not really soil at all. Potting soil, also known as potting mix and potting compost, has been used by gardeners since the 1800’s, and there are many good reasons for doing so. First, let’s find out what, exactly, is in potting soil. 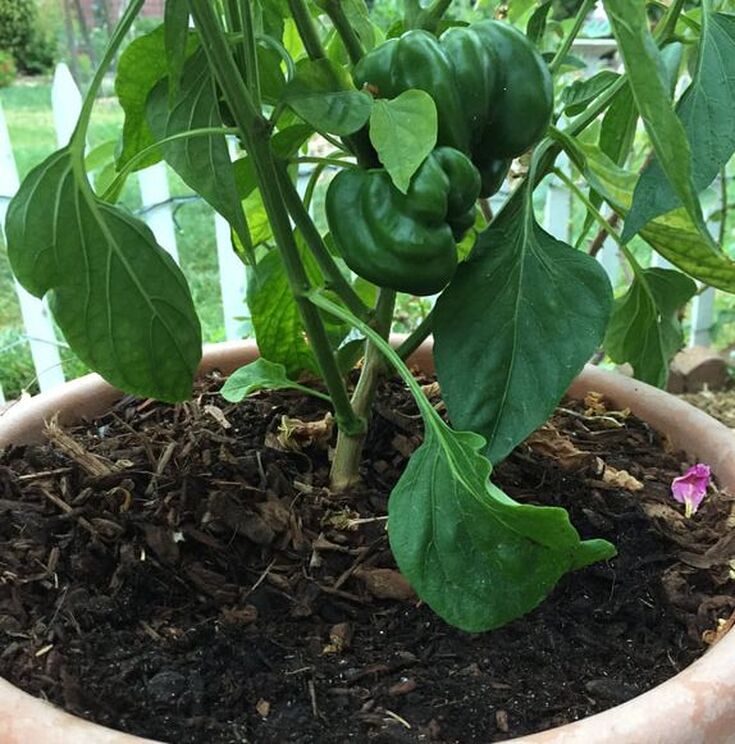 Peppers growing in potting soil Potting soil ingredients
Potting soil is a manmade recipe often made out of composted bark, sand, perlite, peat, recycled mushroom compost, and mineral nutrients. These mixes are treated to create the best pH for plant growth. Some potting mixes contain slow-release fertilizers. You can find potting soil that is rated ‘organic’ according to OMRI regulations, and you can find potting mix that includes ground up old car tires. It’s one of those cases where you really do get what you pay for. If you are committed to organic gardening, be sure to look for the OMRI label. Potting soil’s unique properties Potting soil is designed to retain moisture and nutrients. [Because of this ability, fungus gnats are often attracted to pots filled with potting soil - it’s the moisture.] Potting soil is also sterilized to kill off pathogens and weed seeds. This is what makes it so useful in container gardening. Some potting soil mixes are designed for specific plant species, such as African violets or cactus. Fresh potting soil is also what keeps your window sill garden and holiday plants healthy and productive. Stale potting soil… not so much. How to recondition potting soil Old potting soil may not actually contain anything useful to your plants. Like garden soil, nutrients are ultimately depleted and must be replaced. Also, potting soil, in particular, becomes hydrophobic as it ages. This means that it actively repels water, allowing it to quickly drain out of the bottom of the contain, leaching valuable nutrients as it goes. You can either dump it out and buy new potting soil, or you can recondition what you have. To recondition old potting soil, simply top dress it with aged compost and water it in. No digging or repotting needed. Also, you can apply an attractive mulch of wood chips on top of your potting soil to act as a slow release of organic material and some nutrients. Uses for potting soil Because of its ability to retain water and nutrients while providing ideal soil structure, potting soil is the best choice for seed starting, transplanting, and up-potting. The loose potting soil is gentle to traumatized root hairs and eases the transition. Potting soil is also the best choice for vertical gardening, tower gardening, and raised beds. Bogs are a type of wetland. There are three basic types of wetland: swamps, marches, and bogs.  Canadian sphagnum bog (Boréal) CC BY-SA 3.0 Swamps feature trees and other woody plants, while marshes are home to grasses and other herbaceous plants. Both swamps and marshes are common to warmer regions. Bogs occur in area with low soil nutrients and lots of acidic surface water. Bogs generally occur in areas with cool temperatures and frequent rain. This combination of conditions slows both growth and decomposition. Bogs are unique in that they are areas where dead plant material accumulates in layers called peat. This dead plant material is mostly made up of mosses, especially sphagnum moss. Peat can be several yards deep and it is traditionally used as a building material and as fuel for fires. Plants in the heather family are the most commonly found in bogs. This family (Ericaceae) includes blueberries, cranberries, and huckleberries, along with azaleas. Carnivorous plants are also found in bogs. Evergreens and sedges are also common.  Carnivorous pitcher plant (André de Saint-Paul) CC BY-SA 3.0 Types of bogs Bogs are classified by either nutrient content, or according to local weather and geography. When classified according to nutrient content, a bog can either be eutrophic, mesotrophic, or oligotrophic. This ranking goes from most to least nutrients present. When bogs are classified according to local weather and geography, these names are used:
 Estonian bog in October with morning mist (Amadvr) CC BY-SA 3.0 ee Bogs can be deadly, if something sinks below the surface. They can also be stunningly beautiful.
Sometimes the best thing to do is to do nothing. Allowing land (or a garden bed) to go fallow means giving it a period of rest. It sounds right, doesn’t it? Rather than digging, planting, irrigating, fertilizing, and harvesting, simply allow the soil a season to itself, to recover from the demands we place upon it every day. Like most things we discuss here at The Daily Garden, it really isn’t that simple.  Raised bed allowed to go fallow for a season The truth is, soil never rests Fallow soil does what soil has always done. It provides structural support to root systems, it sequesters carbon, mineral nutrients, gases, and water. It also plays host to gazillions of chemical reactions and microscopic life forms. And the countless, amazing processes that take place in soil never actually stop and rest. [Unless, that is, it reaches sub-zero temperatures, and, even then, there’s probably still stuff going on!] Worms, insects, arthropods, mollusks, bacteria, fungi, algae, oomycetes, and chemical reactions continue, whether you plant tomatoes or not. Allowing soil to go fallow does, however, have certain benefits. Benefits of fallow ground Fallow ground enjoys uninterrupted natural processes that have evolved over billions of years. We know a lot, but we don’t know everything about everything. I like to believe that allowing soil to go fallow every once in a while gives time to life processes that we are not yet aware of, or that we do not fully understand. There are benefits to allowing land to go fallow that we do understand:
Different ways of doing nothing There are different ways of allowing land to go fallow. First and easiest, you can completely leave it alone. Second, and my favorite, is to top dress the area with aged compost and then leave it alone. You can plant a cover crop that will be used as a green manure. This is called green fallow. You can till the soil (to control weeds) but plant nothing. This is called black fallow. [Doesn’t that sound like a movie title? Black Fallow Returns!] But I digress. Cover crops on fallow land Cover crops, such as fava beans, vetch, oats, barley, or rye can be grown on fallow land as a soil amendment, rather than a crop. These plants are left to their on devices and are treated as a green manure at the end of their normal life cycle. This returns all the nutrients to the soil, along with some excellent organic material that improves soil structure. This is especially beneficial if you have compacted soil or heavy clay. Cover crops have the added benefit of converting some nutrients into forms more usable by the next season’s crop. Having plants growing on fallow land also reduces erosion and provides food and shelter for beneficial insects. Although, ground-dwelling bees would really appreciate a small patch of bare ground, and chickens are always happy to do their part against the resident insect population! 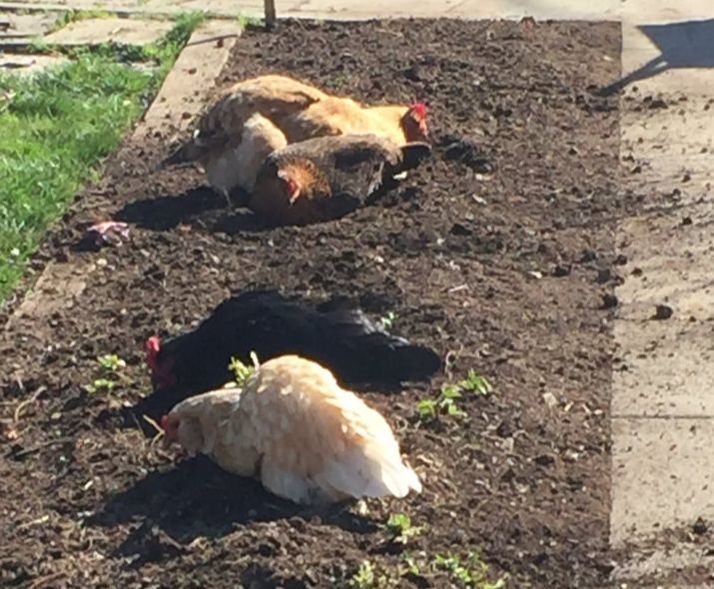 Hens dust bathing and hunting insects on fallow garden bed A form of crop rotation Allowing soil to go fallow should be part of your crop rotation or succession planting plan. Succession planting simply means sowing seeds in such a way as to constantly have something growing in a space, much the way plants grow naturally. Crop rotation allows you to keep a patch of ground as productive as possible, while switching up the crops being grown. This interrupts the lifecycle of certain soil pests, such as darkling beetles, nematodes, weevils, and wireworms. It also breaks the disease triangle for dieback, root rot, white rust, and other soil borne diseases. Incorporating a fallow year or season into the crop rotation cycle makes good sense for the health of your soil. This idea is not new “Six years you shall sow your land and gather in its produce, but the seventh year you shall let it rest and lie fallow, that the poor of your people may eat; and what they leave, the beasts of the field may eat. In like manner you shall do with your vineyard and your olive grove.” Exodus 23:11 Allowing something to grow naturally on your fallow ground is an excellent way to hand over some of your garden tasks to natural processes for a season. If you watch closely, you may be surprised to learn something new about the way things grow in your garden!
Clay soil is common in many different places, and it can feel like concrete on a hot day. In fact, clay particles have electrical charges that hold them tightly to their neighbors.  Electron microscopic view of clay (Wikipedia) Public Domain The science of clay Clay is just one type of soil. Soil is made up of varying combinations of sand, silt, clay, air, water, minerals, microbes, earthworms, and more. All those ingredients are arranged into soil structures called aggregates, which contain solids and spaces. [This is different from soil texture, which refers to the percentage of sand, silt, and clay found in a sample.] The particles of various minerals found in soil are measured in micrometers (μm), or microns [one micron equals one-millionth of a meter]: [For my Burner readers, playa dust can be 0.3 μm, or three-tenths of one one-millionth of a meter. That's why you will never get it out of your car or your tent.] The spaces between soil particles are called macropores and micropores. Macropores are greater than 0.08 mm and they hold air and water. Because the spaces are larger, water moves passively, pulled by gravity. Micropores are less than 0.08 mm and mostly hold air. Macropores are so small that the surface tension of water molecules means active suction must be used to pull the water out of these tiny spaces. Clay soil has far more micropores than macropores, so water and nutrients are held tightly, which means it is less porous. Porosity, or permeability, refers to the ability of air and water to move through soil. Soil that is rich in organic material tends to have better porosity. Porous soil allows roots to find water and nutrients, and allows for healthy gas exchanges. Being flat, clay particles lie on top of each other like a deck of cards. This is why clay soil is so susceptible to compaction. Clay and soil compaction Compacted soil can create a barrier to roots seeking water, nutrients, and stability. It can even alter nitrogen, making it unavailable to plants (denitrification). This is especially true next to streets, driveways, buildings, and other heat islands. [If your unimproved clay soil ever feels spongey, it may indicate a masked chafer infestation.] On the other hand, leaching of nutrients is far less common in clay soil. More often, we end up with a super abundance of certain nutrients that creates an imbalance for our plants. Clay soil and plant nutrients Clay is made up of many negatively charged secondary minerals. That negative charge loves to attract and hold on to cations, or positively charged particles, such as potassium, zinc, and nitrogen. [That’s why most San Jose soils have an abundance of potassium.] This attract-ability gives clay soil a high cation exchange capacity (CEC), which is a fancy ways of saying clay can hold onto 6 to 8 times more water and nutrients than sand. If you get a soil test (and I urge you to do so), you will also see a base saturation figure. To illustrate, CEC can be seen as the number of electrical outlets in your home, while base saturation is the number of those outlets currently being used. On average, sand has a CEC of 5-15, silt has a CEC of 8-30, and clay has a CEC of 25-50. In the same volume of soil, clay has 100,000 times more surface area than sand, so there are plenty of places for attachments to occur. You can improve your clay soil’s base saturation by monitoring and correcting soil pH. Alkaline soils may need acidification, while acidic soils may need the addition of lime to bring the pH into a range suitable for plant growth (6.0 to 7.0). A proper pH can make important nutrients, such as iron, available to your plants. Safety note: When planting trees around your home, keep in mind that root systems of plants growing in clay tend to be smaller, because so many more nutrients are available closer to the tree. This can result in a smaller in-ground support system for your tree, which makes it more likely to fall. Just sayin’… Clay and drainage When soil is extremely dry, it can’t absorb water because it becomes hydrophobic. Like a dry sponge, the water simply rolls off. Clay soil can act the same way. The rate at which water can enter soil is called its infiltration rate. Infiltration rates are given as millimeters of water absorbed per hour:
 Pooling water under nectarine tree indicates drainage problem in clay soil Because clay drains so slowly and can hold so much water, poor drainage can lead to fungal disease. This is particularly true for beans, stone fruits, and cucurbits. Proper irrigation of plants grown in clay soil means watering slowly and gently. Overwatering clay soil can drown your plants. Also, to avoid smooth dinnerware-like edges and compaction, avoid walking on or working wet clay soil or mud.
In areas prone to heavy rains, rain gardens can be used to offset the risk of flooding and fungal disease. Rain gardens divert excess water into sunken areas, away from buildings and vulnerable plants, filtering that water and allowing it to be absorbed slowly, without causing runoff or pollution. Transplants and bare root trees Because clay particles fit together so tightly, your soil can become as hard as a piece of pottery, making it difficult or impossible for transplants and bare root trees to get established. When installing stone fruit crops, such as nectarines, almonds, and apricots, you will need to be sure to rough up the edges of the planting hole to make it possible for new roots to work their way into the surrounding soil. In fact, roughing up these edges is a good idea for all your transplants. Plants that must have good drainage to avoid fungal problems, such as crown rot, are often planted in mounds. This added elevation keeps moisture away from the crown. This practice is common when installing avocados, olives, squash, and melons. Improving clay soil Mulching and composting are the best ways to improve the structure of heavy clay soil. As the organic materials break down, they increase the number of spaces between the clay particles. This allows air, water, and roots to move through the soil more easily. It also improves drainage and permeability. Other ways to improve soil structure include aeration, sprinkling coffee grounds on the soil, incorporating perlite, and cutting plants off at ground level, rather than removing them, roots and all. Those roots play host to millions of soil microbes that help maintain healthy soil. As you work to improve your clay’s structure, you can still garden using raised beds, vertical gardens, keyhole gardens, and containers. Whatever you do, do not add sand. The Sand-Clay Myth Our intuition tells us that we can lighten heavy clay soil by adding sand. It sounds right. Sand has plenty of spaces, right? Putting the two together should give us a nice, happy medium, right? Wrong. Instead, the tiny clay particles fill in all the spaces around the sand grains, creating a soil that is even heavier than before! Clay and plant choice While dandelions' taproots seems able to penetrate concrete, many plants have a difficult time getting established (ecesis) in compacted clay soil. Some plant families, such as the sunflower family, need a regular top dressing of aged compost to perform well in clay soil. These plants include artichoke, lettuce, and tarragon. Other plant families, such as the parsley family, simply cannot thrive in clay and are better grown in containers. This group includes carrots, celery, parsnips, and fennel. The allium family of onions, garlic, and chives can be grown in clay soil, but the addition of organic material will help them thrive. The same is true for lilacs, and members of the mint family, such as lavender and salvia. Beets and Swiss chard prefer loose soil, but can be grown in amended clay soil. Berries are shallow-rooted plants that really prefer loose soil. If you have clay soil and want to grow blackberries, raspberries, blueberries, or strawberries, you will want to work a lot of aged compost into the soil before planting. Some plants are so rugged that they can help break up compacted clay soil. These plants include cilantro, cowpeas, and fava beans. Other plants, such as germander, yarrow, and sage, seem to barely notice hard-packed clay soil, as long as they get a little water during the peak of summer, which makes them excellent ground covers. Olive and plum trees, like many herbs, seem to thrive in less than ideal soil. The “other” clay The finely textured clay used to make porcelain, called kaolin clay, can be used to protect many crops from damage by insect pests such as codling moth, stinkbugs, cucumber beetles, squash bugs, cabbage loopers, aphids, cutworms, and armyworms, just to name a few. Apparently, insects don’t like getting kaolin clay on their feet, so they go elsewhere. Your watermelons, apples, and peaches will thank you! Did you know that clay, sand, animal dung, and straw are used to plaster woven stick fences? It’s called pleaching! Dust. We see it every day. But what’s in it, and what does it do to your plants? We’ve all heard the claims of houseplants removing toxins from indoor air, but what about the plants themselves? What does all that toxic dust do to them? What is dust? Dust is tiny particles formed as things disintegrate. These particles are small and light enough to be carried on the wind. Dust used to be exclusively natural items, such as dead skin cells (dander), hair, soil, and plant and insect matter. Those days are long gone. 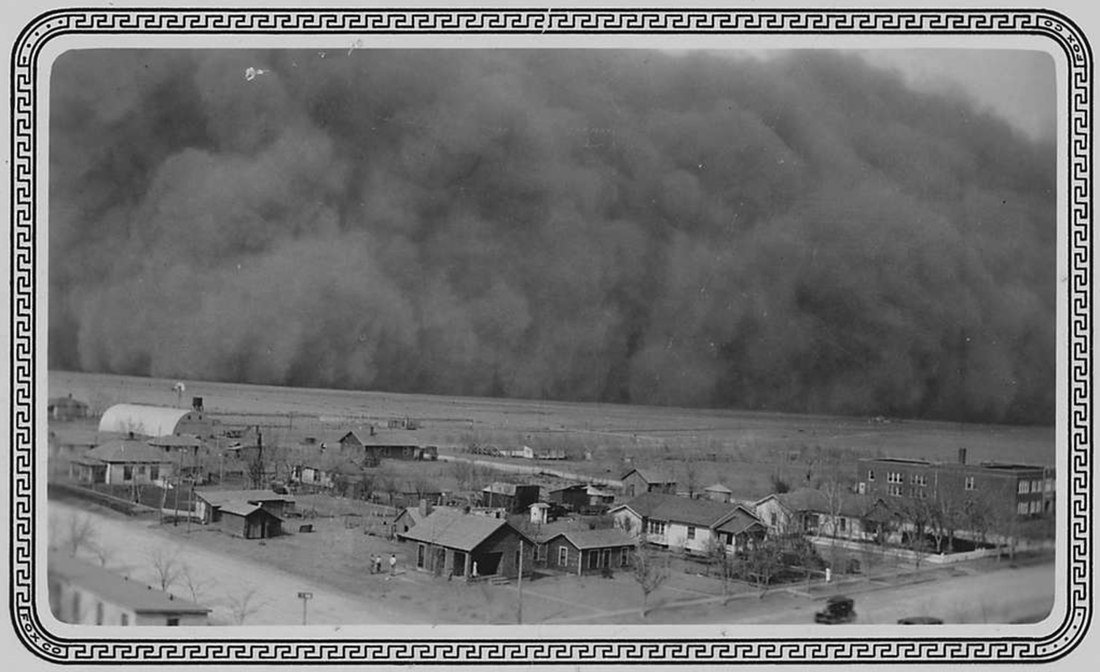 1935 Kansas dust storm (National Archives and Records Administration) Public Domain Indoor dust is generally made up of dead skin cells (dander), upholstery and carpet fibers, paper, and hair, but it also contains flame retardants, cleaning product particles, and chemicals from electronic equipment, insulation, sheet rock, paint, and flooring materials. Many of these chemicals are already known to be associated with cancer, reproductive problems, and hormone disruption in humans. They can also harm your plants. Along with soil, animal matter, and minerals, most outdoor dust particles today also contain car fumes, plastic particles, aerosols, emissions from mining and other industrial processes, salts from eroded soils, and chemicals from nearby farms or landscapes. Wind that blows over coal-fired power plants, petroleum plants, steel mills, and mining sites carries toxic dust with it. Dust particles can also increase erosion, adding a sandpaper effect to every breeze. In one case, the dust from California cement factories blew against nearby hillsides, sickening or killing entire stands of California sagebrush (Artemisia californica), brittle brush (Encelia farinosa), white sage (Salvia apiana), and black sage (Salvia mellifera). These plants were critical to local birds, animals, and insects. The dust also altered the chemical makeup of the soil. Dust as pollution Dust is one of the most common forms of air pollution. In 2008, it was estimated that 30 million tons of dust are kicked up into the atmosphere each year. Because of urban development and global industrialization, the amount of dust in the atmosphere is increasing each year. While 35,000 people die in car accidents each year, it is estimated that 53,000 Americans lose their lives to car emissions Many of these people live near freeways or other high traffic areas. What does that say about the dust particles faced by your plants? What does dust do to plants? As dust falls on a leaf, the leaf is smothered. If the leaf’s surface was wet, the dust turns into a mud that collects even more dust and then dries to form a hard barrier. The amount of dust on a plant is called its dust load. Very small dust particles can often be absorbed by plants. When this dust is simply pulverized soil or other naturally occurring materials, this isn’t a problem. Plants have evolved to handle these materials (up to a point). When this dust includes toxic chemicals, it can cause a host of other problems. Dust covered leaves also make it harder for trees to reflect sunlight, increasing the plant’s temperature. This makes them more susceptible to water stress and other negative effects of drought. Dust can have both physical and chemical effects on your plants. As dust is absorbed, it can alter cell wall exchange sites, interfering with nutrient uptake. Dust affects plants negatively in many other ways:
This means there is less energy, less water uptake, reduced gas exchange, and smaller crops. But things get worse, depending on what makes up that dust. Pathogenic dust Pathogens cause disease. They can be bacteria, viruses, or fungi. Many pathogens blow in on the wind, and become part of your plants’ dust load. These pathogens can cause diseases such as fireblight, cankers, powdery mildew, eutypa dieback, rust, spotted tomato wilt, cucumber mosaic and many others. [Of course, Mycobacterium vaccae is also part of that dust load - these are the microorganisms that help you feel happy!] Indoors and out, mites and mealybugs love dust. Whiteflies also have the advantage when your plants are dusty. Outdoors, mites, especially spider mites, thrive in areas with lots of dust. The dust mites in your home are a common cause of allergies and other respiratory problems. [Actually, it’s mite poop that causes the reaction…]
Reducing dust load
You can help your plants (and your family) thrive by reducing the amount of dust they have to deal with. There are several ways to reduce dust load:
Your plants and your lungs will thank you! Four-leaf clovers may bring good luck, but some clovers can be a real pain. The word clover actually refers to three different genera of plants: Trifolium, Medicago, and Melilotus. There are over 300 species of clover and they are found throughout the Northern Hemisphere and occasionally in South America and Africa. Depending on who you ask, clovers can be beneficial ground covers or pesky weeds.  White clover (Forest & Kim Starr) CC BY 3.0 Clover description Clovers are also called trefoils because they nearly always have leaves in groups of three. [A four-leafed clover is said to be quatrefoiled.] Clovers are legumes, along with peas, beans, and alfalfa. This means they have a symbiotic relationship with certain Rhizobium bacteria that allows them to fix atmospheric nitrogen and use it to grow. For the most part, clover seeds start to germinate in the fall, and continue until temperatures rise above 60°F. Clovers are classified as annual, sweet, or perennial.  Little hop clover (Wikipedia) CC BY-SA 3.0
Annual Clovers grow mostly in a prostrate manner from a single taproot. They feature tiny yellow flowers. CA burclover (Medicago polymorpha) and black medic (Medicago lupulina) are turfgrass weeds, while little hop clover, also known as lesser trefoil or shamrock clover (Trifolium dubium) is frequently added to turfgrass mixtures.  Yellow sweetclover (AnRo0002) Sweetclovers are upright annuals or biennials that grow from 2 to 5 feet tall. White sweet clover (Melilotus alba) and yellow sweetclover (Melilotus officinalis) often turn up in ornamental plantings. Perennial clovers are often planted on purpose to reduce the need for nitrogen fertilizers. White clover (Trifolium repent) and strawberry clover (Trifolium fragiferum) both have the compound flower heads common to these clovers.  Strawberry clover (Christian Fischer) CC BY-SA 3.0
Beneficial clover
Adding clover as a ground cover or a green manure can mean future plantings will thrive or, as the saying goes, “They will be as happy as a pig in clover.” Of course, bees love clover flowers, so be sure to plant your clover where you are less likely to step on a bee. Clover controls If clover is causing problems in your garden or landscape, the best control methods are hand-pulling, hoeing, and mulch. The mulch needs to be 4 to 6 inches deep to block clover. Clover seeds are very rugged, so composting and solarization are generally not effective controls. If you have bright green clover popping up in a yellow lawn, your soil is probably low on nitrogen. Did you know that a group of clovers is called a cluff? I didn’t either. We’ve all heard of cash crops, those garden plants grown as food, or to sell. But, what can you do with a growing area after a crop is harvested? Catch crops! Whether you grow your edibles in the ground, raised beds, or containers, there comes a time when the crop matures and the plants are harvested. What’s left? Usually, bare soil and a bunch of stems, cut off at ground level. It’s not attractive, it’s not good for your soil, and it’s bad for the environment. Post-harvest soil After a crop has completed its life cycle, the soil is probably a little depleted. The last thing it needs is exposure to eroding wind, sun, and rain. But that’s exactly what it gets. Without the supporting roots and shading leaves, nitrogen is exposed to the elements, which can cause it to simply blow or wash away. You’ve worked too hard and too long in the garden to lose all that valuable topsoil, so how can you protect it? 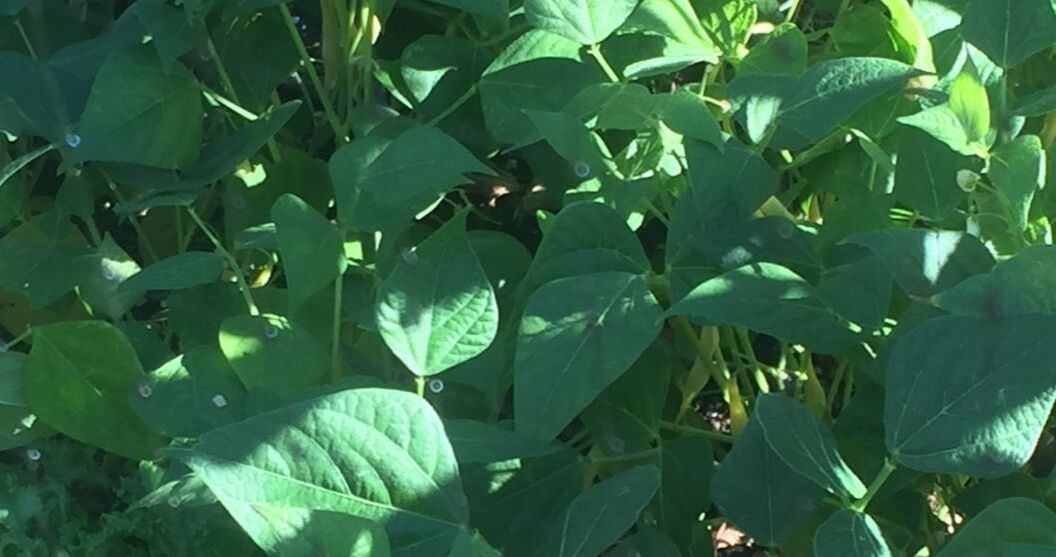 Wax beans make a productive catch crop Plant a catch crop Catch crops are a combination of cover crops and succession planting. Rather than leaving the soil exposed and the beneficial soil microorganisms to starve, cover crops are used to maintain the relationships between plants, soil, and mycorrhizae that produce nearly all the plants we eat. Catch crops are fast-growing plants that fill in the spaces left behind a harvested crop. In commercial agriculture, catch crops are planted after a field is harvested. In the home garden, you can plant your catch crop before the current crop is even done, providing your soil (and your view) with year round protection.
Which plants make good catch crops?
The best catch crops grow very quickly. Radishes, rye, arugula, mustard, lettuce, endive, sunflowers, buckwheat, beans, barley, and oats are generally the best choices for catch crops. Research has shown that these crops help retain nitrogen in the soil, improve soil structure, and prevent erosion when grown as catch crops. Other crops, such as sorghum hybrids, do not make good catch crops. One sorghum-sudangrass hybrid (Sudex) resulted in 50 to 75% mortality of tomato, broccoli, and lettuce crops. This type of chemical warfare is called allelopathy. Stick with the plants listed above. Your soil will be better off, plus you can harvest the beans, sunflower seeds, salad makings, and grain, assuming you do not use your catch crop as a green manure. [If the catch crop is cut and allowed to decompose in place, it becomes a green manure, feeding the soil and improving soil structure even more.] Benefits of planting a catch crop In addition to preventing erosion and keeping your garden attractive, catch crops prevent important minerals [plant food] from being washed away. This reduces ground water contamination. It also improves the size and quality of the crop that follows! Research has shown that crop yields increase by nearly 5%, simply by being grown after a cover crop. Using catch crops and cover crops also increases biodiversity. We are not simply talking about plants and animals here, either. Biodiversity is also occurring at the microscopic level. Soils that contain a wider range of microorganisms and other living things is healthier. Healthier soil grows better food for you and your family. Catch crops also help block sunlight to weeds, competing with them for water and sunlight. This makes it less likely that local weeds will survive long enough to produce seeds that grow into future competition. This reduces the need for herbicides (or the number of hours spent weeding each year). As your cash crops near the end of their normal lifecycle, be sure to plant catch crops! Cation exchange capacity (CEC) is a measure of soil fertility. The chemistry and science behind how and why a soil’s cation exchange capacity works the way is does is fascinating (and a little too complex for this venue). To put it simply, cation exchange capacity (CEC) is a measurement of how many positively charged minerals can be held by the surface of a soil particle. To learn how this affects the plants in your garden, we will need to touch up on some basic chemistry. Don’t panic - you can do this! Basic chemistry Everything is made up of atoms and molecules that are either positively charged (cations), negatively charged (anions), or neutral. Organic materials and clay tend to be negatively charged. This means these anions attract and hold cations, such as potassium, calcium, and iron, which are important plant nutrients. Many anions, such as phosphorus, sulfur, and boron are held in the water that is found in the spaces between soil particles. Soils with high CEC ratings generally hold onto more water, as well as nutrients. Below, you can see the electrical charge for each plant nutrient. 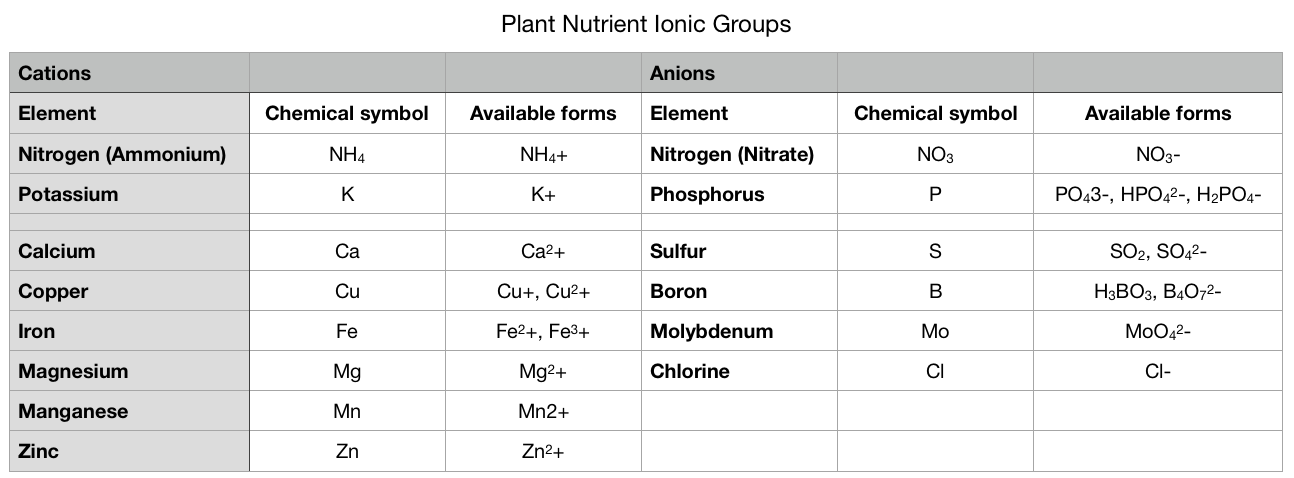 Soil science Plant food exists as atoms and molecules of minerals. Minerals make up 45 to 49% of a soil sample. These mineral particles come in a range of sizes, with sand being the largest and clay being the smallest. Here in San Jose, California, we have clay. Chemically, sand is relatively unreactive and neutral. The spaces between particles (macropores and micropores) tend to be large. These spaces, and the lack of an electrical charge, make it more likely that plant nutrients will be leached out, or washed away. This is why sand has a low CEC rating. Clay, on the other hand, is made up of many negatively charged secondary minerals that love to attract and hold cations. Also, the smaller particle size of clay means that it has 100,000 times more surface area than sand, in the same size sample, so there are plenty of places for attachments to occur. Soil test results When I had my soil tested, it came back with a CEC rating of 20.6, but what does that mean? A CEC rating of 20.6 is considered relatively high. One way to look at a CEC rating is to think of it as a power strip - just how many cords can be plugged in? CEC is measured using mEq/100g. We won’t get into it, but it basically means how many parts of something there are in a certain volume of soil. Different soil types have very different CEC ratings: My soil’s CEC rating of 20.6 means it can hold onto a significant amount of plant nutrients. Another, related figure found on a soil test is called base saturation. Base saturation is the percentage of available connections being used. You will normally see separate figures of base saturation for calcium, magnesium, and potassium. [You can think of them as different sized electrical plugs.] Below, you can see my base saturation results with “values found” (left) and “optimal ranges” (right). 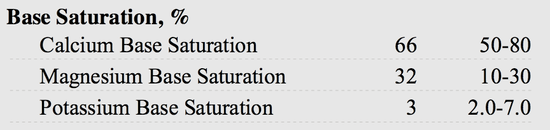 Soil test results CEC and pH Soil pH also plays a role in a soil’s ability to hold onto plant nutrients. This is because pH is a function of rogue hydrogen cations (H+) floating around in the soil. Soils with a higher, more alkaline pH, tend to have a higher CEC rating. Of course, too much of a good thing turns out to be a bad thing. If the soil becomes too alkaline, nothing can grow in it! This is true in other ways, as well. Too much ammonium (NH4+) in the soil can interfere with the uptake of potassium (K+), calcium (Ca2+), and magnesium (Mg2+). This is why soil tests are so important. Armed with the information they provide, you can look at fertilizer labels with a more informed idea of what your soil actually needs. Acidifying our local clay is one way to make more nutrients available to your plants. The opposite is true in areas with acidic soil. There is a happy medium, but soils with a higher CEC rating are more difficult to alter, when it comes to pH.  Effect of soil pH on cation-exchange capacity (Kyle MoJo & Kazem Zamanian) CC BY-SA 4.0 Bottom line, cation exchange capacity is a measure of your soil’s negative charge which, in turn, tells you just how many nutrients it can hold at any one time.
The carbon to nitrogen ratio (C:N) describes relative proportions of carbon and nitrogen in a substance. That substance can be soil, compost, or plants. Carbon is used as energy and a building material, much the way carbohydrates and sugars are used by us. Nitrogen is needed by to generate proteins, amino acids, and enzymes, making it the steak and salad portion of a garden diet. The energy contained in carbon can only be used if there is enough good health provided by the nitrogen. With the proper C:N ratio, plants can thrive, soil can support plant growth, and compost can decompose quickly. Improper C:N ratios can interfere with the soil microorganisms that make everything else in the garden possible. Soil microorganisms Soil microorganisms are responsible for the decomposition of dead plant and animal matter. They also break down minerals and chemicals found in the soil, turning them into plant food. Soil microorganisms prefer a C:N ratio of 24:1. This means they perform best in an environment that is 24 parts carbon and 1 part nitrogen. Since some carbons break down more slowly than others, the Golden Rule of C:N ratios is 30:1. Microorganisms have a C:N ratio of 8:1. When they consume carbon and nitrogen, 16 parts of the carbon is burned off as energy, while 8 parts are used for maintenance. If higher levels of carbon are available, such as right after applying straw as a mulch, the microorganisms will pull nitrogen from the soil to maintain the balance they need. This means there will be less nitrogen in the soil for your plants. This tying up of nitrogen is called immobilization because the nitrogen is unavailable until the microorganisms die and decompose. The latter half of this cycle is called mineralization, because minerals are returned to the soil. Materials added to the soil with a C:N ratio of less than 24:1 means there will be an abundance of nitrogen left over for your plants. What’s your soil’s C:N ratio? Complex lab tests are used to calculate C:N ratios for commercial agriculture. Since nitrogen doesn’t stick around for very long, you don’t need to go to the trouble or expense for an actual test. Instead, you can manipulate the C:N ratio with cover crops, crop rotation, mulch, and composting, If you have the correct C:N ratio, your plants will be able to eat and your compost will break down quickly, If the C:N ratio is out of whack, things won't be running as smoothly. Cover crops and C:N ratios Many cover crops, such as fava beans and other legumes, are grown to both protect the soil from erosion and compaction, and to add nutrients to the soil. You need to find a balance point between allowing the cover crop to grow, when to cut it, and what to replace it with as it decomposes in place. Cover crops are an excellent way to protect and feed the soil between regular crops. Depending on the plants used as a cover crop, you can ensure that your soil microorganisms and your plants have the nutrients they need.
Composting for a better C:N ratio As you add materials to your compost pile, keep in mind the ideal C:N ratio of 30:1. Now, not all materials break down at the same rate. Temperature, oxygen levels, and moisture content also play a role. This is not an exact science. To reach a point that is Perfect Enough, simply strive for 50% green and 50% brown. The ‘greens’ will all be higher in nitrogen, while the ‘browns’ will be higher in carbon. Also, stems contain more carbon, while leaves contain more nitrogen. For example, oat leaves have a C:N ratio of 12:1, while oat stems have a C:N ratio of 78:1. Below are some common materials and their C:N ratios:
If your compost has a C:N radio below 20:1, all of the carbon will be consumed, leaving nitrogen behind. This excess nitrogen is then converted into ammonia, which means it stinks and is lost to the atmosphere. If your compost pile smells bad, flip it, to add oxygen, and stir in more carbon.
Keep your garden healthy by maintaining a good ratio of carbon to nitrogen. The proper C:N ratio improves decomposition rates and nutrient cycling within the garden. Strive for a C:N ratio of 30:1 in your garden. Your soil microorganisms will thank you! Green manure probably isn’t what you think. Not a manure at all, green manure refers to certain fast growing cover crops. Green manure crops are grown to be cut down while they are still green or just after flowering. Traditionally, green manures were plowed into the soil, but it has been discovered that this damages networks of root fungi (mycorrhizae) that help plants absorb nutrients. Like animal manures, green manures provide many benefits to the soil. _%E3%83%99%E3%83%8B%E3%83%90%E3%83%8A%E3%83%84%E3%83%A1%E3%82%AF%E3%82%B5_DSCF0668.jpg) Crimson clover (松岡明芳) CC BY-SA 4.0 Nitrogen banking Some green manure crops are grown to add nitrogen to the soil. These plants include alfalfa, fava beans, cowpeas, sweet clover, Egyptian (or berseem) clover, crimson clover, lana (or woollypod) vetch, and hairy vetch. These plants are all members of the legume family. Legumes have a working relationship with certain soil bacteria (Rhizobia) that allow them to ‘fix’ atmospheric nitrogen and convert it into a form usable by other plants. Growing these plants as a green manure can increase the amount of nitrogen available to the next crop by 40 to 60%. That’s like dumping 40 to 200 pounds of nitrogen on an acre of land! Other nutrients In the same way as nitrogen banking, other nutrients are returned to the soil as green manure crops are broken down by soil microorganisms. These important nutrients include calcium (Ca), phosphorus (P), potassium (K), magnesium (Mg), and sulfur (S).  Hairy vetch (Kristian Peters) CC BY-SA 3.0 Acidifiers As green manures break down on (or in) the soil, they tend to lower soil pH. This is because acids are formed in the decomposition process. In San Jose, California, where we tend to have heavy, alkaline clay, this acidification can benefit many acid-soil loving crops, such as blueberries, raspberries, potatoes, and parsley. Soil structure As soil microbes, worms, and other critters go to work on a cut green manure crop, fungi and slime add their efforts at getting a portion of the banquet. As they all feed (and poop), the amount of organic matter, or biomass, increases and the soil is aerated, increasing the number of macropores and micropores that carry food, water and air. This also improves water infiltration and retention, and makes it easier for tender, young roots to reach the water and nutrients they need to thrive. Medic, berseem clover, and woollypod vetch are good choices for improving soil structure. Deep rooted green manure crops, such as mustard, drought-tolerant alfalfa (Medicago sativa), and alsike clover (Trifolium hybridum), can also help break up compacted soil and pull nutrients closer to the surface for your garden plants to enjoy in the next growing season. Attract pollinators and predators If a green manure crop is allowed to flower before being cut, those flowers can attract and feed a wide range of pollinating insects. Phacelia (Phacelia tanacetifolia) is particularly effective. Green manure crops can also provide habitat and protection for many beneficial predator insects. This can lead to a reduced need for insecticides and bigger harvests.  Alfalfa (Victor M. Vicente Selvas) Public Domain Weed suppression Since green manure crops tend to be fast growing, they often block common weeds from getting the sunlight, water, and nutrients they need to thrive and reach seed-producing status. Buckwheat (Fagopyrum esculentum), fenugreek (Trigonella foenum-graecum), sorghum, and sweet clover are especially good at blocking weeds. Erosion control Cover crops and green manures can be used to reduce erosion. Plant roots stabilize slopes and protect the top layer of soil from sun and wind damage. White clover, barley, rye, and ryegrass are especially good as erosion control. These crops can also help prevent runoff and urban drool. Pest management Sorghum, crimson clover (Trifolium incarnatum), and rye provide habitat and food for many beneficial insects. If nematodes are problem in your landscape, you can grow a green manure of white mustard (Sinapis alba) and radish (Raphanus sativus). Nematodes hatch and are attracted to the roots of these plants. After burrowing into the plants’ roots, the nematodes are unable to reproduce. Populations of beet cyst nematodes and Columbian root knot nematodes can be reduced by as much as 70 to 99% using this method. If you have citrus trees, planting bell beans, woollypod vetch, Austrian winter pea, or New Zealand white clover will attract a predator mite (Euseius tularensis) that attacks citrus thrips. Problems with green manures Like everything else in life, there are downsides to green manures. First, these crops must be cut before they start reproducing. Legumes stop adding nitrogen to the soil once they start their own reproductive cycle. If any green manure crops are allowed to go to seed, they may overtake an area. Also, all that green, shady moisture can attract slugs and snails. Another potential problem is the bacteria that cause clubroot in members of the brassica family (cabbages, broccoli, turnips, mustards, and cauliflower) may also be encouraged by the presence of green manures. A slightly trickier aspect of growing green manures is the carbon to nitrogen ratio. Carbon-nitrogen (C:N) ratio A healthy compost pile* will have a C:N ratio of 20:1 to 35:1. This means it contains a mass that is 20 to 35 parts of carbon to one part nitrogen. [Ratios greater than 35:1 will slow the composting process.] Farmers use a 24:1 ratio for simplicity sake. Healthy soil has a similar ratio. So do the microorganisms in soil that break down all that organic matter. These microbes maintain that ratio with the food they eat. If there is too much carbon available, say, if you mulch an area with straw, soil microbes will devour all that straw and then eat all the available nitrogen, leaving nothing for your plants! But don’t panic. When the microbes die, they return all that nitrogen to the soil, it just takes some time. *Generally speaking, carbon is in the brown stuff, while nitrogen is in the green stuff. That isn’t exactly accurate, but it will help you to understand how to maintain a healthy compost pile. Since plants are made up of both, aim to provide your compost pile with equal parts green and brown. Carbon content Non-legume plants have higher carbon contents than the legumes. Also, carbon content changes as a plant ages. You can avoid this problem by planting a mix of green manure crops at certain times of the year and ensuring that they are mowed or cut before they start producing seeds of their own. [For you science nerds, the average adult human body has a C:N ratio of 54:1.] Here is a list of C:N ratios for many green manure crops (animal manure tends to be 20:1): How to grow green manure crops
Cool season green manures are planted in late summer and allowed to grow through winter before cutting. Summer manure crops are best used for weed suppression and erosion control. To maintain a healthy C:N ratio, plant a mix of low carbon crops, such as clovers, fava beans, peas, mustard, canola, turnips, radish, with just a few high carbon crops. High carbon crops include alfalfa (Medicago sativa), sunflowers, winter rye (Secale cereale), and millet. You can plant green manure crops in rows, the same way you would for many other crops, or you can simply broadcast seeds over an area and rake them in. Just be sure to keep the area moist until the seeds germinate. Then, simply allow them to do what they do best, until they are just about to go to seed. That’s when you break out the lawn mower, weedwacker, or scythe, and chop your green manure crop down to the ground. Leave the plant material where it falls and allow it to return to the soil the way nature intended. As you can tell by the photos, these beneficial plants also add beauty to your landscape. Trying adding a few to yours today! Biochar is being touted as an environmentally friendly way to remove carbon dioxide from the environment, while amending your soil, but is it as friendly as proponents claim? What is biochar? Biochar is charcoal made from plant matter burned in a low oxygen environment. You know those big chunks left over in your fire pit? That’s pretty much biochar.  Biochar (K.salo.85) CC BY-SA 3.0 How does biochar act as a soil amendment?
Biochar is said to increase the fertility of acid soils (low pH). In areas where the soil is more alkaline (high pH) soil, biochar wouldn’t be a good idea whether it works or not. It is also claimed to act as habitat for many beneficial soil microorganisms. This may or may not be true. How many living things do you find in your fireplace? How is biochar supposed to help the environment? Enthusiasts claim that burning vegetation and burying the resulting biochar will sequester tons of carbon in the soil. Of, course, it’s not that simple. The initial burning, alone, releases carbon into the atmosphere. Bottom line: not enough research has been conducted to prove the claims being made about biochar. My suggestion: stick with mulch and compost, and drive less. We’ve all played with sand at some point. There were probably waves crashing in the distance, the smell of tanning lotion and sunscreen mixing with salty air. Sand gets everywhere and it can be used to make some amazing temporary castles and other works of art. It is also a component of soil.  Sand from Pismo Beach (Mark A. Wilson) Public Domain What makes soil? Soil is a combination of minerals, organic stuff (living and dead), liquids, and gases. The liquids and gasses, mostly air and water, move through large and small spaces called macropores and micropores, respectively. Soil can be mostly clay, mostly silt, mostly sand, or somewhere in between. Clay, silt, and sand classifications are more about particle size than actual material, but here’s the typical breakdown:
[Note: μm stands for micrometer, or micron. One micron equals one one-millionth of a meter.] Soil texture and nutrient availability
If you live in Florida, you know all too well how difficult it is to keep nutrients and water in your sandy soil. This is because the spaces between the grains of sand are so big. At the other end of the spectrum, clay is made up of flat plates that tend to stick together, holding tightly to water and nutrients and making it difficult for plant roots to move through it. It very few macropores and micropores, which means drainage and aeration are common problems. This is also why it makes such nice pottery. The Sand-Clay Myth What is a gardener to do? Our intuition tells us that we can lighten heavy clay soil by adding sand. It sounds right. Sand has plenty of spaces! Putting the two together should give us a nice, happy medium, right? Wrong. Instead, the tiny clay particles fill in all the spaces around the sand grains, creating a soil that is even heavier than before! Organic mulch to the rescue! When I say ‘organic mulch’, I am not necessarily saying organic in the OMRI sense, although that is what I use. Organic mulch refers to mulch composed of materials that were or are alive: plants, animals, bugs, manures, that sort of thing. It does not include ground up plastics or other manufactured materials. When you incorporate organic mulch into sandy soil, you provide materials that can bind nutrients and water to the planting bed. The macropores become partially filled with water- and nutrient-retaining compost. When you top dress heavy clay soil with an organic mulch, earthworms, microorganisms, irrigation, and other actions will slowly incorporate chunks of non-clay material below the soil line, creating macropores and micropores for air, water, and plant roots to move through. Top dressing means you just leave the material on top of the soil, rather than digging it in. Digging clay soil is generally not helpful because of the smooth surface left behind by the shovel. When that surface dries, it can be impenetrable. So, leave the sand at the beach or in your egg timer. If you have clay soil, organic mulch is what you want to use. You may be surprised to learn that sand is a non-renewable resource in high demand, due to our penchant for concrete. Apparently, creating sand take eons and we use a lot of it. Unless you’re using a syringe filled with syrup, you’ve never really fed or watered your plants. When you irrigate or fertilize your plants, what you are really doing is watering and feeding the soil. It is the soil that feeds and waters your garden and landscape plants. Creating healthy soil is the best way to grow healthy plants that need less protection from pests and diseases, produce more flowers and food, and require less work. So why is improving soil health one of the last things on our garden To-Do lists? Let’s learn more about growing great soil. What is great soil? Soil is a highly complex natural body that scientists call the pedosphere. Some call it the Earth’s living skin. Soil stores water and nutrients, filters our drinking water, helps break down toxic wastes, and is a critical player in carbon cycling, nitrogen cycling, and, let’s face it, life on Earth. Soil is made up of minerals, dead things, living things, gases, and liquids. Great soil has spaces between its bits. These spaces, called macropores and micropores, hold and allow water and gases to flow, carrying nutrients to your plants. Great soil is rich in organic matter. Organic matter is made up of living things, and things that used to be alive. Great soil also contains the 17 primary nutrients required for plant development. But before you can grow great soil, you need to know what you already have.  Healthy soil crumbles in your hand and smells rich What is in your soil?
The 17 primary plant nutrients are called macronutrients. Plants use the inorganic form of these mineral elements (read molecule-sized rocks). The only way to really know what is in your soil is with a soil test from a reputable local lab. By local, I mean on whichever side of the Rocky Mountains you reside ~ the tests used are different for each region. The Olson test is better for the West Coast, while the Brays test is better on East Coast. Now, when your results arrive, you may be little confused by the information. That’s to be expected. Most of us do not read lab results on a regular basis. When I lived in San Jose, California, we tended to have clay soil highly prone to compaction. Aeration was frequently needed. Clay soil tends to contain plenty of most of the necessary minerals, and too much salt and phosphorus. Iron and nitrogen deficiencies are common around here. Other areas and soil types have other strengths and weaknesses. Your soil test results should include percentage ratings for each of the major plant nutrients. It may also tell you how much organic matter is in your soil. Organic matter in soil Organic matter is critical to soil health, and it can range from 1 - 8%. As living things die and begin to breakdown, they add nutrients and improve soil structure. They also alter the electrical charge of soil. Quick chemistry review: molecules can be stable, with no charge, positively charged cations (cat-ions), or negatively charged anions (an-ions). Calcium, potassium, and many other plant nutrients are cations, while organic matter tends to be anions. Plants need both. Ensuring that there is enough organic matter in the soil also improves porosity, aeration, and biological activity. Soil structure Soil is usually described as being sand, silt, or clay. Sand is big. You can see individual particles. And water and nutrients can quickly leach away. Silt is made up of medium-sized particles that hold a good balance of gases, liquids, minerals and organic matter. Clay is made up of extremely tiny particles that can hold a lot of water and minerals. [It can also turn into concrete, especially if you add sand.] Organic particles surrounded by clay are protected from the microorganisms that break them down into nutrients that can be used by plants, creating an unattainable banquet. Identify your soil structure with the test found here. Each type of soil benefits from the following:
Do you see a theme here? Adding organic matter to soil is critical to plant health. A 1% increase in organic matter can make a profound difference in soil structure (aggregation) and chemistry. This helps plant roots get to and absorb nutrients. You can add organic matter to your soil by:
Nitrogen Once you’ve increased the amount of organic matter in your soil, you will want to add nitrogen. Nitrogen levels are the single most limiting factor in most gardens, and organic matter can help your plants access the nitrogen that is already present. Nitrogen is a highly mobile nutrient and it is easily lost. Most soils contain less than 1% nitrogen, while 2-5% is ideal. But it is not simply a matter of adding more nitrogen. Which form will you use? Inorganic nitrogen can be found as nitrites or ammonium. When roots take up nitrates, they increase the pH of the immediate area, making it more alkaline. The opposite is true when plants take up ammonium, making the soil more acidic. Organic sources of nitrogen include blood meal and cottonseed meal, both of which will acidify soil. Soil pH You can’t know which form of nitrogen is right for your soil until you know its pH. Soil with a low pH makes it harder for plants to access some macronutrients. Soil with a high pH does the same thing. Most plants prefer a pH of 6.0 to 6.5 to thrive. Growing great soil means identifying and managing your soil’s pH. Creating healthy soil Soil creation is called pedogenesis. You can create great soil in your garden and landscape when you:
Other ways you can improve your soil’s health is by growing cover crops, using crop rotation, installing foot paths to reduce compaction, and avoiding irrigation run-off and urban drool. What will you do for your soil today? Fir bark mulch is made from the chopped or shredded bark of conifers, such as redwood, pine, and fir. Fir bark mulch is just one of several different types of mulch you can use to reduce erosion, crusting, and soil compaction. Mulch also helps retain moisture, reduce weeds, and it stabilizes soil temperature. As it breaks down, it even adds nutrients to the soil. Mulch can be straw, grass clippings, compost, wood chips, or fir bark. Fir bark and wood chips last a lot longer than the other mulches. Which is better for your landscape: wood chips or fir bark?  Fir bark mulch (Apostoloff) GPL Fir bark v. wood chips Wood chips come from the interior of a tree. They can be hardwood, softwood, or a combination of the two. Generally speaking, large wood chip mulches will need to be replaced every 5 to 7 years, while smaller chip mulches need to be replaced every 2 to 3 years. Fir bark, because it is made from plant material that has evolved to provide protection against the elements, lasts 7 to 10 years. Besides durability, there are other factors to consider:
 Wood chips around raised bed Grades of fir bark mulch Fir bark mulch comes in a variety of sizes, or grades:
The larger the pieces are, the bigger the spaces between them will be. These spaces allow air and water to flow through. Tiny pieces of mulch will hold more water in the soil, but allow for less gas exchange. Yes, it is a balancing act. The biggest thing to consider with fir bark mulch is the likelihood of flowing water in the area. Fir bark has a waxy coating that prevents it from absorbing water, plus it is very light, so it will simply float away. Wood chips, on the other hand, will absorb the water and are more likely to stay where they are. Calculating coverage To determine the cost of using fir bark, you will first need to calculate the area to be covered, and then deicide the depth of coverage needed. Generally speaking, mulch should be 2” to 4” thick. Newly developed areas should be given 3” to 4” of mulch, while established areas can often do with less. One cubic yard (27 cubic feet) of medium sized fir bark will cover an area of 324 square feet to a depth of 1 inch. Let me say it again: ONE CUBIC YARD COVERS 324 SQ. FT. ONE INCH DEEP As an example, let's say you have two areas that are 40 feet long and 3 feet wide, and one area that is 30 feet long and 2 feet wide. Here are the initial calculations:
= [2 (areas) x 40 (feet long) x 3 (feet wide)] + [1 (area) x 30 (feet long) x 2 (feet wide)] = [2 x 40 x 3] + [30 x 2] = [80 x 3] + [30 x 2] = 240 + 60 = 300 square feet In our example, one cubic yard of medium fir bark would give us a little more than one inch covered, since we only need 300 square feet and cubic yard provides 324 square feet. If we decide to use a 2 inch layer, we would need a little less than two cubic yards of fir bark. If you are a number nerd, like me, you could calculate the exact amount needed for a 2 inch depth (1.85 cubic yards), but that really isn’t necessary because a little extra is fine, or you can use it to top off your container plants. Cost of fir bark mulch Currently, in the Bay Area, prices for fir bark mulch average $67 per cubic yard, plus an average delivery fee of $77. A few suppliers will offer free delivery if you buy more than 7 cubic yards, but that is more than most of us will ever use. Some suppliers will also let you pick up fir bark in bags or trucks, so you can save money that way. Of course, it also means you will be picking up all that mulch One More Time. (After moving a full dump truck load of wood chips from my driveway to the back yard using a wheelbarrow, back and forth over 100 times, I can tell you that it feels like an ordeal after a while!) Nitrogen loss (and gain) If you use freshly chipped wood mulch of either type, keep in mind that it will, for the first 6 to 8 weeks, pull nitrogen from the soil as is begins to break down. You may need to add a little extra nitrogen during this time. In the long term, as the wood continues to break down, it will add nitrogen to the soil. Fir bark provides an attractive, durable, and protective covering for your soil, but wood chips are free and less likely to give you splinters. Acidification is a process that lowers soil pH. Soil can be alkaline, acidic, or neutral. The pH scale ranges from 0 (acidic) to 14 (alkaline), with (neutral) 7 in the middle. Soil pH dictates the availability of many nutrients to your plants’ roots.  Soil pH and nutrient availability (CoolKoon) CC BY 4.0 Your soil can be packed full of important minerals, but the wrong pH can make it impossible for plants to reach that bounty. According to my 2015 soil test, my soil had a pH of 7.7 and very little iron. Plants need iron to absorb many other essential nutrients. By lowering the pH, or acidifying, my soil, I can make the iron more readily available. By 2019, the soil pH had a pH of 6.2, which makes many more nutrients available. If you live in an area with alkaline soil and want to grow acid-loving plants, you will need to acidify your soil.
Which edible plants prefer acidic soil? If all of your plants prefer your soil’s current pH, you are in luck. It’s really the easiest way to go. Most garden and landscape plants prefer a pH range of 6.2 to 7.3. Acid-loving plants include:
Moderately acid-loving plants that prefer a pH of 5.5 to 6.5 include apples, basil, carrots, cauliflower, corn, cucumber, dill, eggplant, garlic, melon, peppers, pumpkin, rhubarb, winter squash, tomato, and turnips. Factors of acidification There are three factors that determine the amount of acid needed to lower soil pH. Some of this stuff gets deep in the world of chemistry, but I think I have sorted it out well enough. [If you understand these things better than I have explained, please educate us all in the Comments section!]
How to acidify soil While using the above information will give you more accurate data, you can gently acidify your soil by applying elemental sulfur (S) in stages. As the sulfur oxidizes, it turns into sulfuric acid, acidifying the soil. Changing soil pH takes several months to accomplish and it tends to require regular monitoring and adjustments. Since soil pH is a function of geology and climate, it will be an ongoing process. Just be sure to read and follow the package directions. Fertilizers and acidification Nitrogen has a powerful impact on soil pH. The form of nitrogen you use makes a difference. To lower the pH of your soil, use ammonium-based fertilizers, rather than nitrate-based fertilizers. Your blueberry plants will thank you. What's the pH of your tap water? Clay soil is prone to compaction. Healthy soil is loose enough to allow roots and earthworms to move around freely, while still providing support and structure. Unlike sand (which has its own problems), compacted soil has too few macropores and micropores (larger and smaller spaces) between soil particles. These spaces are needed to hold air, water, and nutrients for plant roots.  Loose soil (left) has plenty of room for water (blue) and compacted soil (right) does not Compacted soil can prevent water from moving into the soil (infiltration), through the soil (permeability), and out of the soil (drainage). Standing water can drown plants and create mosquito habitat. It can also make life difficult for tender new seedlings trying to get a healthy start by reducing nutrient uptake and poorly anchoring plants to the ground. Soil compaction hurts mature plants, as well, by reducing nitrogen levels in the soil, as well as other nutrients. What causes soil compaction? Every step you take presses down on the soil beneath your foot. Healthy soil can spring back. Soil that is walked on too frequently loses that ability and it becomes compacted. Other common causes of soil compaction include:
 Stepping stones protect against soil compaction Plants that counteract compaction Deep taproots can help break up compacted soil. Put these plants to work for you, rather than compounding the problem with further digging. Adding these plants to your landscape can help reduce compaction and improve soil structure:
Other tips to reduce soil compaction
 Free arborist wood chips are a good treatment for compacted soil The very best thing you can do for compacted soil is cover it with a thick layer of aged mulch or some wood chips and leave it alone for a while.
Humus is the magical dark stuff of soil that helps plants grow. Or is it? We know that soil is made up of organic matter (1-5%), minerals (45-49%), water (25%) and air (25%). Organic matter includes living things and the remains of things that used to be alive.
When you add organic matter to the garden or compost pile, you are feeding the organisms that make nutrients available to your plants.
Infiltration rate is a measurement of how quickly water can enter soil. Infiltration rates are reported as the depth water (in millimeters) can reach within one hour. For example, an infiltration rate of 10 mm per hour means that a 10 mm layer of water on top of the soil will take one hour to soak in. Understanding the infiltration rate of your garden or landscape can mean the difference between irrigation and flooding. Soil types & infiltration When soil is extremely dry, it won’t absorb water at all because it becomes hydrophobic. Before that point is reached, water is absorbed quickly in what is called the initial infiltration rate. It happens quickly because the macropores in the soil contain only air, giving the water plenty of places to go. As the pores begin to fill, absorption slows down to a steady rate called the basic infiltration rate. According to the Food and Agriculture Organization of the United Nations (I never knew there was such a group until today!), different types of soil have different basic infiltration rates:
Clearly, taking an infiltration test can help you have a better understanding of what type of soil you have. It also helps you to select plants that are best suited to your soil. Benefits of better infiltration Understanding and amending the infiltration rate of your soil can provide many benefits:
How to conduct an infiltration field test Generally speaking, most of these tests are done with specialized equipment. You can, however, follow these steps to perform a modified version that will give you useful information: Another testing method you can try only requires a shovel and a watch:
If your soil is like mine, compacted heavy clay when we moved in, adding organic material is the best way to improve the infiltration rate. If you plan on installing a rain garden, checking the infiltration rate is critical. Standing water can drown even the healthiest plant, given enough time. Help your garden and your landscape with improved permeability and infiltration rates. Your plants will be healthier, more beautiful, and more productive.
Perlite has a distinctive feel, lightweight and crispy, but what is it and how do we use it in the garden? (This one's for you, Jim!)  Perlite is the featherweight white stone found in potting soil. Public Domain What is perlite?
Perlite is actually a form of obsidian. Obsidian is a dark volcanic glass that forms when lava cools quickly. Obsidian is very brittle and extremely sharp. It was commonly used to make cutting and hunting tools by primitive peoples. [Back in the early 80’s, I had an archeology professor at Seattle Central Community College. He loved to tell us how, when he needed chest surgery, he found a surgeon who was willing to use obsidian tools. Being sharper than surgical scalpels, the obsidian left a scar that was practically invisible!] How perlite is made Coming out of a volcano, obsidian is less than 1% water. As it comes into contact with rain and groundwater, it starts to absorb moisture. This hydrated obsidian is mined and then baked in a 3,000°F oven where it pops like kernels of popcorn, growing to twenty times its original size! These glassy kernels look more like a froth of bubbles, but the outer bubbles are broken, leaving jagged edges. How perlite is used Perlite has many industrial uses, including insulation, mortar, plaster, and ceiling tiles. The broken glass bubbles of horticultural perlite are used to aerate soil, increasing porosity. Perlite does this by increasing the number of macropores and micropores that carry and hold air and water for plant roots. Perlite can hold 3 to 4 times its weight in water. Perlite is also used in hydroponic garden systems as a filtration medium. (Did you know that perlite is used to filter beer?) Perlite is also found in many planting mixes. You will see them as small white chunks. Sometimes these white particles are pumice, like the volcanic foot scrubbing stone you buy at the drugstore. Sometimes those white bits are styrofoam. Both perlite and pumice improve soil structure, but styrofoam does not. If you are going to use perlite to improve heavy clay soil, don’t just pour it on top. You will need to dig it in a bit, otherwise you will simply end up with a layer of perlite on top of your clay. Perlite is an excellent soil additive for roof gardens, balcony plants, and extra large planting containers, because it is so lightweight. Perlite is sterile, inert, and incombustible. Mold and mildew won’t grow on it and pests won’t eat it. Adding perlite to your soil can lighten heavy clay and it can help sandy soils retain more water and nutrients. Poise and grace may carry us through difficult situations, but sometimes things just need to fall apart. Decomposition is one of those things for which falling apart is a good thing. 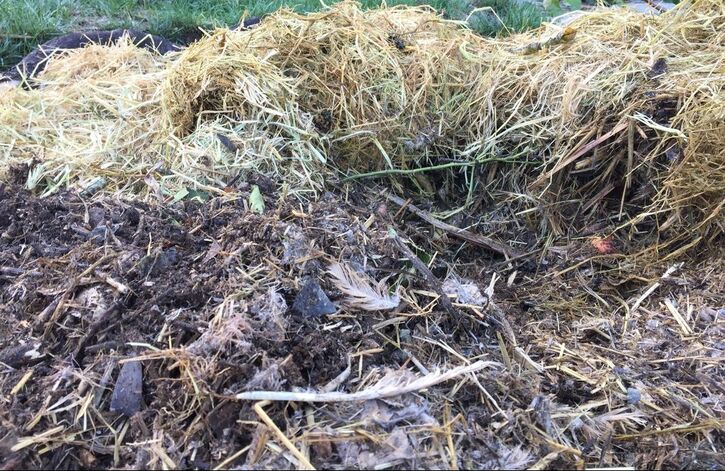 Decomposition in a compost pile is a beautiful thing Decomposition describes the way complex organic structures are broken down into simpler structures. When plants and animals die, all the processes that held them together and kept them functioning stop working and they become organic matter. The study of how things decompose is called taphonomy, from the Greek word for tomb.
Most of the mineral food enjoyed by your plants comes from organic matter created by breaking down dead plants and animals. You probably already knew that, but did you know that the living things that speed decomposition actually reduce the amount of nitrogen in your soil as they feed? Basically, there are two ways decomposition occurs: with the help of other living things (biotic decomposition) or through physical or chemical processes (abiotic decomposition). Now, you may think that this doesn’t apply to you as a gardener, but what about your compost pile? What is all that mulch actually doing to your soil as it breaks down? It’s really pretty amazing, so read on! There are three basic stages of decomposition:
This is why your compost pile works faster when you chop it up and flip it periodically. The cut edges provide points of entry for all those microscopic workers and the air helps the microbes breath. Warmer temperatures also speed up the process. Like us, those little helpers don’t move nearly as fast in winter! But, as they feed, they take the chemical elements that made up the plant and break them down into nutrients that are available to living plants. So what happens when I put straw mulch around my fruit trees? Air, sunlight, and water will add their two cents to the decomposition process, but straw is pretty tough, so it will take some time to decompose. Local birds may grab a few bits and the sowbugs are sure to start feeding, but it is the microbes who will do the lion’s share of the work. The plants and microorganisms that feed on dead or decaying plant matter are called saprophytes. As the saprophytes feed, they poop out simple minerals that plants use and gummy substances that hold bits of soil together into aggregates. These aggregates improve soil structure by creating plenty of macropores and micropores. This means that water and nutrients will move through the soil more easily. These soil aggregates also improve aeration, drainage, water-holding capacity, and water infiltration rates. As decomposition takes place, carbon dioxide is also released. This CO2 can end up in the atmosphere, or it may combine with water to form carbonic acid. Carbonic acid (H2CO3) works with other chemicals to break down rocks and pebbles in the soil, making those nutrients available to nearby plants. What about the net loss of nitrogen? It ends up that there is a delicate balance between the amount of nitrogen available to plants and the needs of the saprophytic bacteria and fungi that make those nutrients available. If you add a bunch of carbon (straw, leaves, shredded paper) to an area, the microbes will begin feeding and breeding like crazy. The only thing is, they also need nitrogen to live, so they will pull it from the soil, creating an initial nitrogen loss. Of course, over time, all of those nutrients will end up back in balance, supporting your garden, but that may take time that your seedlings simply do not have. This balancing act is called the carbon-to-nitrogen ratio. Ideally, you will want a 10:1 to 12:1 ratio of carbon to nitrogen. This means adding one pound of nitrogen for every ten pounds of carbon. If you are going to add a large amount of carbon to an area, it is a good idea to also add nitrogen. This keeps all the inputs for your soil microbes in balance as they improve your soil. Personally, I sprinkle blood meal (a good source of nitrogen) over an area, top that with aged compost (a good slow-release of many different nutrients), and then mulch with straw. The mulch keeps down weeds, stabilizes soil temperature, and, combined with the compost and blood meal, provides excellent nutrients and improved soil structure. It’s my way of tucking in my plants for our mild winters or when plants are stressed by too much California sun. If you have access to a microscope, check out the various stages of decomposition to see what’s really going on down there! Whether you are talking about rain, plant food, or political arguments, there comes a point where nothing else can be taken in. Saturation is one if those points of perfect, momentary balance between plenty and too much. 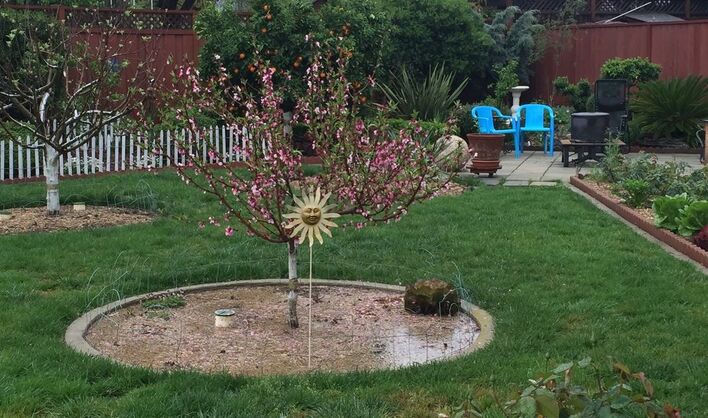 Nectarine tree saturated with water, setting the stage for peach leaf curl To the untrained eye, a garden looks tranquil. The quiet greenery is peaceful and calm. It’s like watching what appears to be a Perfect Family, with everything running smoothly - no conflicts, no stresses, no worries. Of course, in reality, it’s nothing like that. The chemistry and conflicts that occur in gardens and relationships are never as smooth as it looks from the outside.
Saturation tends to sneak up on me. The amount of water I use to irrigate the garden in one month doesn’t work as well in another. The daily 25 minutes of weeding in one week is enough to keep down the competition, but in other weeks, the weeds practically race across the yard. Recognizing the delicate balance between enough, plenty, and too much is part of what separates a successful garden from one that is struggling. Water is an obvious case of saturation. Whatever your soil structure and composition, there are only so many macropores and micropores that can hold onto water. Sand will have a lot more porosity and better drainage than an area with heavy clay. But even clay reaches a saturation point. That’s when gravity pulls the water down and away, preventing your plants from drowning, but also leaching away valuable nutrients. If it can't go anywhere, it pools around your plants, drowning them and creating mosquito breeding grounds. Just enough water for each plant can be difficult to determine. In dealing with California’s drought, our family has reduced the amount of water we use to only 25% of what we were using 3 years ago and guess what? All the plants are fine. In fact, they are better off than they were before. Oops. Fertilizer is another case of enough is great and too much can be deadly. Many fertilizers can burn plants once the point of saturation is reached. If you are up for a fun read, try Don Mitchell’s 'Moving Upcountry' series. He has a hysterical account of using too much nitrogen and destroying his tractor. Of course, there’s nothing funny about burning your garden crops with too much fertilizer, but it happens. More common, and frequently unseen, is the case of certain minerals saturating a soil and creating an imbalance. After sending soil samples to a lab for testing, I learned that my heavy clay soil has tons of every nutrient, except iron. Unfortunately for my plants, they need iron to be able to absorb everything else. Getting your soil tested by a local, professional lab is the only way to really know what’s in it. It’s a complex dance of chemistry and molecules going on every moment in the garden. A nutrient imbalance or troublesome saturation can change everything. Saturation can also refer to sunlight, garden design, and your pantry. Are your plants showing signs of sunburn? Are you saturated with tomatoes by autumn? Do you still have butternut squash left over from two years ago? Are you tired of looking at a monotonous sea of green? Avoiding saturation may mean nothing more than adding some color or a piece of art to the landscape. It may mean planting shade-loving plants under sun-loving plants. Or it may simply mean planting what you and your family (friends and neighbors) will be happy to eat. Have you ever over-planted something to the point where you never wanted to see it again? How has saturation impacted your garden? |
Welcome!You can grow a surprising amount of food in your own yard. Ask me how! To help The Daily Garden grow, you may see affiliate ads sprouting up in various places.
You can also get my book, Stop Wasting Your Yard!  Index
All
Archives
April 2024
|
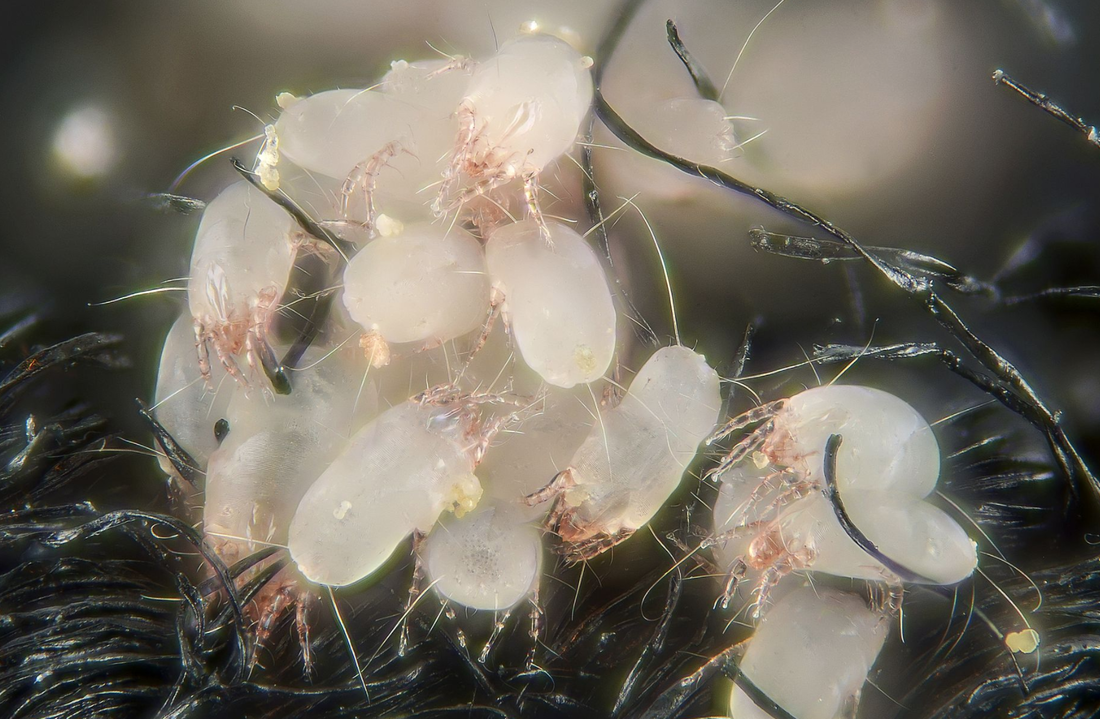


.jpg)

.png)
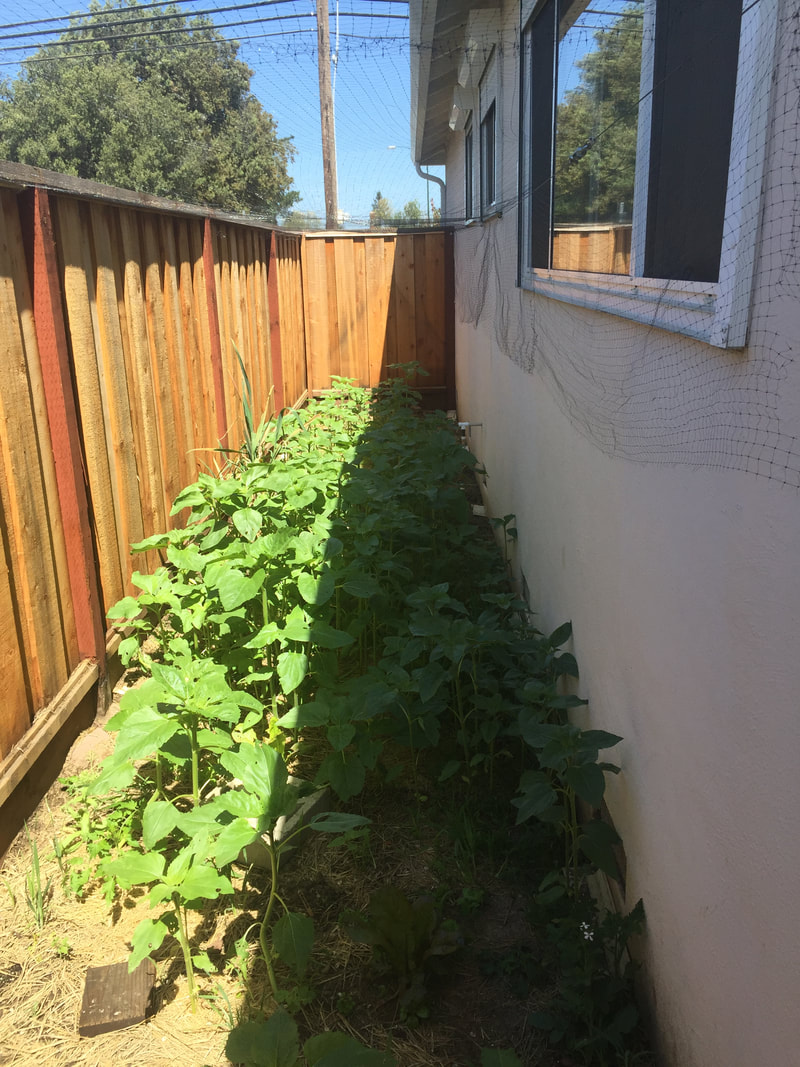
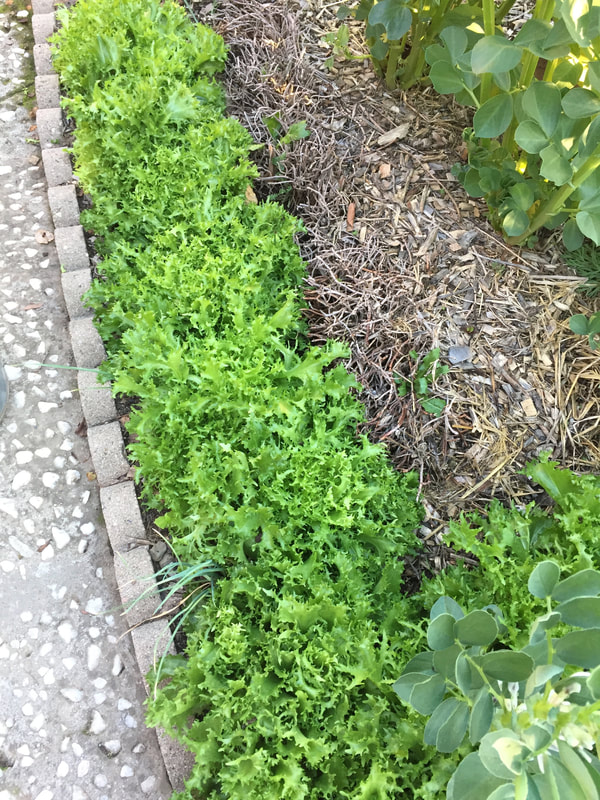
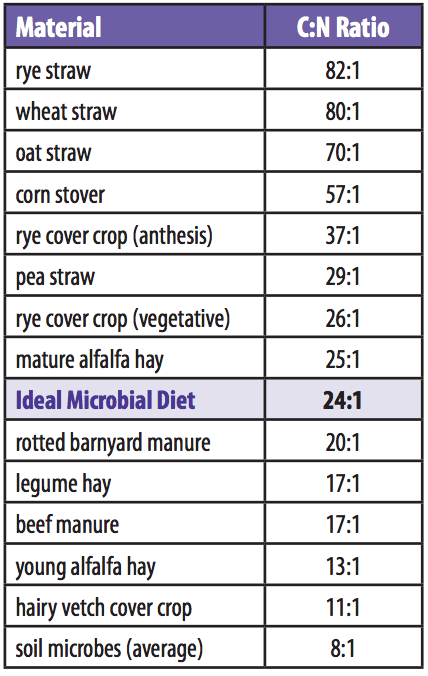
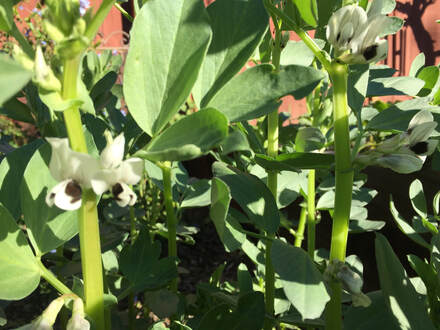


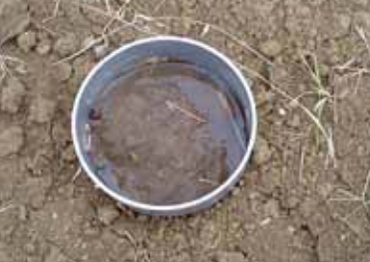
 RSS Feed