The Daily Garden
  • Home
  • Garden Word of the Day
  • Monthly Chores
  • DIY Chickens
  • Musings
  • Guest Gardeners

Day-to-day life in the garden

Failure to Thrive

11/3/2021

2 Comments

 
The plants you see on TV and in magazines always look amazing and perfect and it’s not real. Real plants rarely have perfectly rounded shapes or masses of fruit and flowers wherever you look. In real life, plants often have one side that looks and performs better. Things are uneven. The movie star plants, like their human counterparts, are often airbrushed and staged by professionals.


​Imperfections are perfectly normal in the plant (and human) world. Failing to thrive is something else altogether.

Picture
Improper conditions can really mess with your harvest (Kate Russell)
Failure to thrive is not a disease. It is a symptom. And most of us have seen it happen in our gardens or on our patios. Scraggly stems, too few leaves, little or no fruit or flowers, and overall weakness are all signs of failing to thrive. In many cases, you can correct the problem and help your plant return to good health. Failure to thrive can be caused by environmental conditions or biological characteristics.


Biological causes of failure to thrive

Some plants are born weak. This can be because the seed was old, or germination occurred too early in the season while temperatures were too cold. In both cases, the seedling had to put out more energy than it could afford early in its growth and may never recover fully. Other biologic causes of failure to thrive include bacterial, fungal, and viral diseases, girdling roots,
Picture
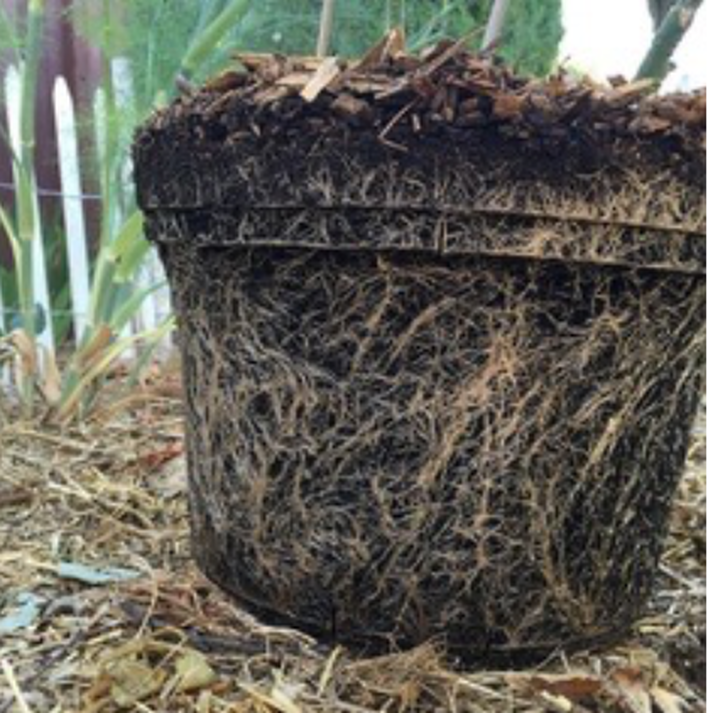
Being rootbound makes growing difficult (Kate Russell)
You can prevent many problems with these tips:

  • Use certified pest- and disease-free seeds and seedlings, and quarantine new plants.
  • Select plants suited to your microclimate.
  • Plant seeds after the soil has reached the proper temperature.
  • Inspect root systems of bare root trees, before planting, for signs of roots that may girdle the young tree.
  • Resist the urge to tamp down the soil when planting seeds and seedlings. Instead, mud them in with water.
  • Install plants with an eye to their mature size.
  • Send a soil sample to a lab for testing and only add what is needed and nothing more.
  • Avoid overhead watering, or water early in the day.
  • Prune plants for good airflow.
  • Keep your pruning tools sharp and sanitize them regularly.


Environmental causes behind failure to thrive

Plants cannot leave their environment, so they have to deal with wherever they are. There are several environmental conditions that keep plants from thriving:
  • Being planted in an unsuitable microclimate or USDA Hardiness Zone.
  • The wrong size container can choke a root system. A rootbound plant rarely grows well.
  • Too much or too little water is a common environmental problem that is easily corrected with an inexpensive moisture meter. Trees and shrubs, especially, need a lot of water when getting established.
  • Too much competition from nearby plants can make life hard for more timid, slow-growing plants. At the same time, plants rarely grow in isolation. You need to find a good balance between the two extremes.
  • The wrong timing, intensity, or duration of sun exposure can cause plants to falter.
  • Sap-sucking insects, such as aphids, mealybugs, and whiteflies, can starve plants into poor growth. Sticky sheets are an excellent control measure that doesn’t cost a lot or hurt the environment.
  • Poor plant nutrition in the form of too much, too little, or as imbalances, can wreak havoc on your plants’ health. Only a lab-based soil test can give you the information you need to know if your plants have access to a balanced diet. Luckily, those tests are affordable.
  • Mechanical damage from weedwackers, mowers, children, pets, birds, mice, rats, squirrels, and all the rest can tax a plant’s system to the point of no return.​
Picture
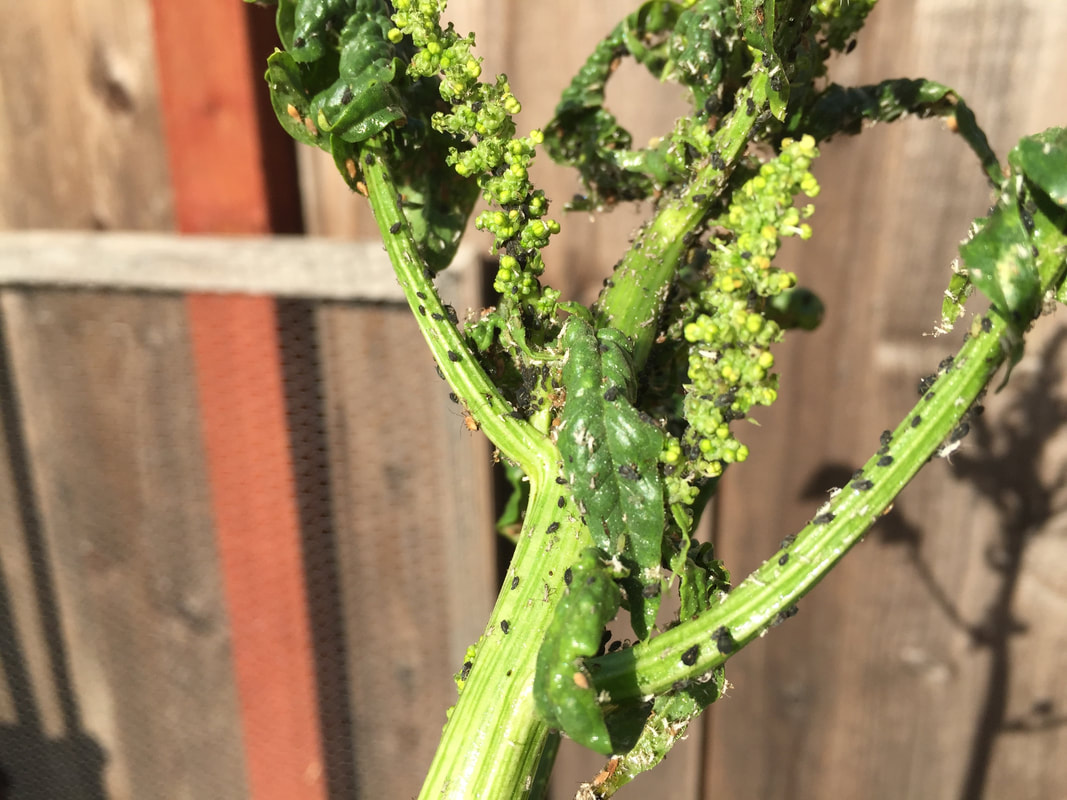
Black aphids on bolting spinach (Kate Russell)
Picture
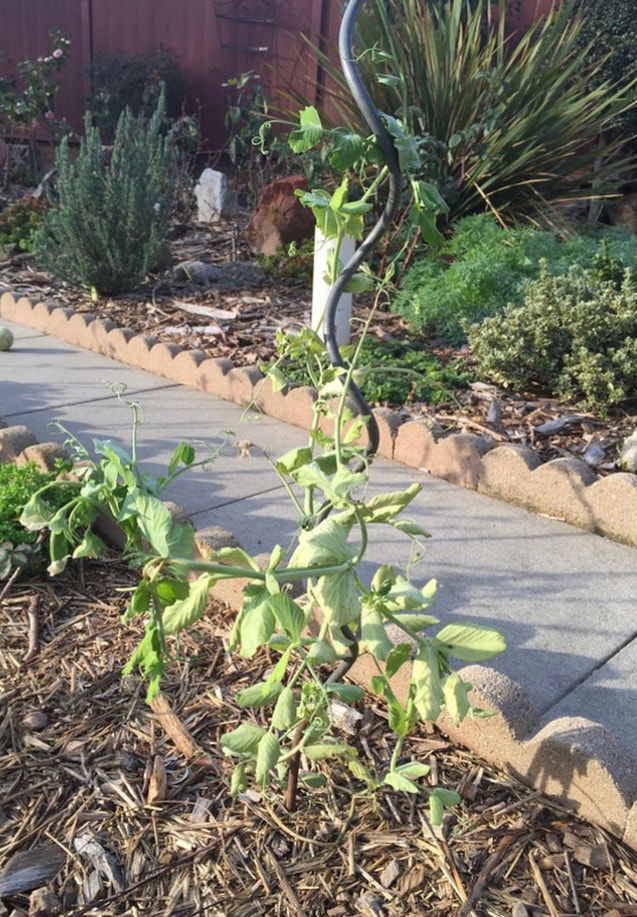
Pea plant infected with Fusarium wilt (Kate Russell)
Drastic measures

In some cases, drastic measures are called for. After all your other treatments and corrections have failed, it is time to dig up or unpot your plants and get to the root of the problem. You will want to work over a tarp or very large container. Either dig up your problem plant or remove it from its container. Then, shake the soil from the roots and wash them. Root washing is an excellent way to see what, exactly, has been going on underground. Prune out any damaged, mushy, broken, or infected roots. Set the root ball in a bucket of water and examine the soil. Look for signs of insect pupae, grubs, root maggots, root weevils, wireworms, cutworms, and other soil-dwelling pests.


Smell the soil. Does it smell rich and earthy? Or it smell funky, like old gym socks? Healthy soil contains earthworms and zillions of microorganisms and it smells like good earth. Less than ideal soil smells like something went bad. If that’s the case, toss it out and give your patient some fresh potting soil. Until your plant is thriving, if possible, it is best to keep it in a container during its recovery.

​
Do you have a plant that’s failing to thrive? Tell us about it in the comment and let’s see if we can help it get better!
2 Comments
Robert Lauriault
11/3/2021 03:40:26 pm

I planted a Rio Grande Avocado (Mexican Race) at my home in Cross Creek, Florida. Some years ago I was able to grow this cultivar in a nearby spot to about twenty feet before it was killed in a flood. I prepared the planting hole by mixing rich, organic soil with composted horse manure. I planted high at or above the surrounding soil level.
For the first month (end of our rainy season) it did well. When the rains stopped I occasionally watered it with a hose and then installed irrigation. Due to a valve leak water drizzeled onto the plant for about 24 hours before I discovered the problem. From then on, the plant's leaves hung limply from the stem, and now, three weeks afterward, leaves are starting to fall off leaving only the newest leaves at the top. We have had one heavy raiin in the past month, but the soil does not appear to be satuarated.
Should I dig up the plant and inspect it's roots? I paid $50 for this little tree and that is another reason I would hate to loose it.

Reply
Kate Russell
11/10/2021 07:35:13 am

That's a tough call. Are those leaves at the top newly forming or are they the only ones left? It sounds like you've done everything correctly. My sister lives in central Florida, so I know what those rains are like.

If more rains come before the soil dries out a bit, you may want to skirt the area around the tree with a tarp. That won't affect the groundwater situation, but it will redirect rain away from the roots. Just be sure to remove the tarp whenever it isn't raining so that the soil can dry.

I wouldn't dig up the tree, especially since you've given it such a good start. If it has drowned, it's already too late. If not, the tree should recover with a little TLC. If water accumulates around the tree, you may want to dig some shallow furrows that radiate away from the tree.

Please keep me posted.

Reply


Leave a Reply.

    Author

    Kate Russell, writer, gardener, and so much more.

    Archives

    August 2022
    May 2022
    March 2022
    February 2022
    January 2022
    December 2021
    November 2021
    October 2021
    September 2021
    August 2021
    April 2021
    February 2021
    December 2020
    November 2020
    October 2020
    September 2020
    June 2020
    May 2020
    April 2020
    March 2020
    February 2020

    Categories

    All

    RSS Feed

Proudly powered by Weebly
  • Home
  • Garden Word of the Day
  • Monthly Chores
  • DIY Chickens
  • Musings
  • Guest Gardeners