|
Avocado trees are fascinating. Unlike most fruiting trees, which can be either self-pollinating or not, avocado trees are both and neither. Confused? Read on!  Avocado fruit and foliage (B.navez) CC BY-SA 3.0 Avocado flowers Avocado trees flower with a behavior called synchronous dichogamy. Each flower is both male and female, but at different times. Also, there are two kinds of flowers: Type “A” and Type “B”. "A" avocados include Haas, Gwen, Lamb Haas, Pinkerton, Reed, GEM and Harvest varieties. Bacon, Ettinger, Fuerte, Sharwil, Sir Prize, Walter Hole, Zutano, Marvel and Nobel are "B" avocados. When an "A" avocado flower first opens in the morning, it is female for a few hours and then it closes. The next day, the same flower reopens in the afternoon, but this time it is male. When a "B" avocado flower opens for the first time, in the afternoon, it is female. Then it reopens the next morning as a male. Since a mature tree produces over one million flowers in a season and the flowers open on different days, there is no need for another tree for pollination to occur. How to grow an avocado tree Many of us have used toothpicks on an avocado pit with dreams of a productive tree. You can make that dream a reality with these tips (and a lot of patience).
When the seedling reaches a height of one foot, cut it back to 6 inches. This will promote the growth of fruit producing branches. It will take 5-13 years to start producing fruit.
Young trees need to be watered two or three times a week. Water heavily, but let the soil dry out between waterings. By the end of the first year, water once a week. A mature tree will use as much as 20 gallons of water a day during the peak of summer.
Avocado pests and diseases Common avocado diseases include avocado root rot, bacterial canker, dothiorella canker, leaf blight, phytophthora root and crown rot, stem blight, sunblotch, and verticillium wilt. Avocado lace bugs, latania scale, mealybugs, mites, nematodes, omnivorous loopers, orange tortrix moths, soft scales, thrips, and whiteflies will all be attracted to your avocado tree. Birds and squirrels will join in the feeding fray, so you may want to build a tree cage around part of your avocado tree. If you have the time and the space, growing an avocado tree in your yard can provide decades of the best guacamole ever! It is not uncommon to have a mosquito buzz by your face, hands or ankles while working in the garden.
Normally, we make half-hearted attempts at swatting them or just wave them away and continue gardening. Those days are over with the appearance of the Zika virus in California. Other countries have faced mosquito-borne diseases for thousands of years. Now it’s our turn. And before you dismiss the problem, understand that over 700,000,000 people get sick or die every year from mosquito borne diseases. That works out to one out of every seven people get sick or die because of mosquitos, making them the most dangerous living thing on our planet! Disease-carrying mosquitoes Mosquitoes are vectors of disease. A single mosquito bite can infect you with malaria, Chikungunya, dengue, yellow fever, West Nile virus, and now Zika. Our four-legged friends are not safe either. Mosquitos can carry dog heartworm (found in all 50 states) and encephalitis. Encephalitis takes many forms, depending on the virus being transmitted and the host. Encephalitis can infect horses, birds and people and may lead to seizures, coma and death. Mosquito borne disease are increasing exponentially in the United States. This is partly due to travel to and from infected areas. Once an infected individual returns home, all it takes is one mosquito bite to start spreading the disease. As gardeners, we spend more time outside than many other people, increasing our risk of exposure. Another reason for the increase is that mosquitoes are becoming pesticide resistant. So, what’s up with this Zika virus? Until 2015, Zika was only found in Africa. At the time of this writing, the Zika virus was found in 20 countries, including the U.S. Less than one year later (December 2016), that number had reached 78. The Zika virus causes fever, joint pain, a rash, and your eyes turn red. It can also lead to Guillain-Barre syndrome, which causes muscle weakness and paralysis. That’s if you’re lucky and not pregnant; an estimated 46% of all Zika virus infections of pregnant women has caused severe birth defects or fetal death. There is no vaccine for the Zika virus and the CDC expects the number of infections to escalate. Unlike most mosquitos, which tend to feed in the evening, mosquitos that carry the Zika virus are aggressive daytime feeders. They can be found indoors, too! The Asian tiger mosquito (Aedes albopictus) and the yellow fever mosquito (Aedes aegypti, above) have black-and-white stripes and are half the size of normal mosquitoes. Gardening in the presence of mosquitos requires some care. Use these tips to help prevent infection by the Zika virus and other mosquito-borne diseases:
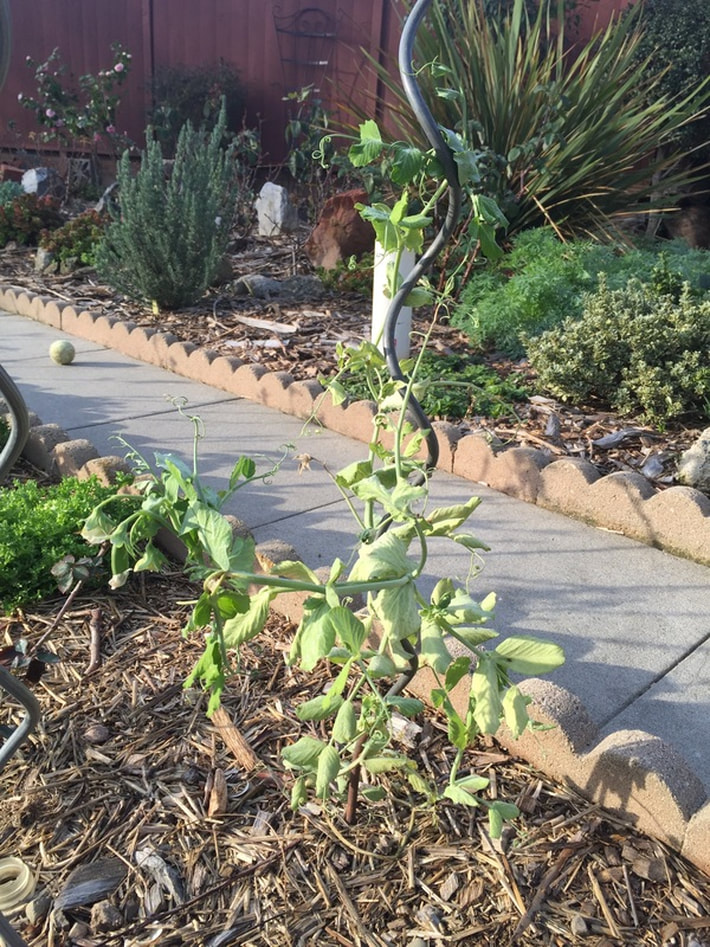
It might sound like it’s more trouble than its worth, but it’s not. Simply storing unused flower pots and pot saucers upside-down can prevent a life-threatening disease. Get out in the garden, but do it safely! UPDATE (July 22, 2016): The Zika virus has now been found in Culexquinquefasciatus mosquitoes. The Culex mosquito is far more common than species previously found carrying the disease. This means all mosquitoes should be treated as potential carriers (unless you're an entomologist with excellent eyesight). *Research has shown that repellants made from citronella and lemongrass do not work (Consumer Reports) ** Window screens, introduced in the 1880s, were called "the most humane contribution the 19th century made to the preservation of sanity and good temper.” (Wikipedia) Have the pea plants in your garden turned white? If you look at the photo below, you will see that new (uninfected) growth is bright green, as it should be. Everything else on the plant looks bleached. That bleaching is symptomatic of a fungal disease known as Fusarium wilt.
The Fusarium oxysporum fungus has no known sexual stage. Instead, it produces three different asexual spores: microconidia, macroconidia, and chlamydospores. The germinating spores (mycelia) inject themselves into a plant’s root system. From there, the mycelia move through the cells of the root cortex and into the xylem (a plant vein). Then, it starts producing microconidia (asexual spores). The microconidia join the sap stream for a free ride to the rest of the plant. Eventually, there are so many microconidia that a vein is blocked. That’s when they germinate.
The vein blockage stops the plant from absorbing and moving nutrients, so the stomas close, the leaves wilt, everything looks bleached, and it dies. As the plant dies, the fungus spreads throughout the plant and sporulates. [Cool word, right? It means “to produce spores”] Plants affected by Fusarium wilt Fusarium wilt attacks many garden plants and can specialize according to the victim. Fusarium wilt can attack peas, beans, tomatoes, tobacco, sweet potatoes, cucumber, other cucurbits, and even banana plants! When Fusarium attacks cabbages and other cruciferous vegetables, yellowing and browning leaves are the most common symptom. This particular form is called Fusarium yellows. Fusarium wilt controls Plants infected with Fusarium wilt must be removed and thrown in the trash. Planting resistant varieties in the garden can help prevent Fusarium wilt. Crop rotation is not an effective control method because the chlamydospores can hang out in the soil indefinitely. Some fungicides can be marginally effective. Since Fusarium oxysporum prefers heavy, moist soil, aeration and increasing soil organic matter can improve soil structure and oxygen levels, reducing the welcome mat effect for many types of fungus. Ensuring proper drainage is the best way to avoid this garden menace. Fungicides are chemicals or organisms that kill or inhibit fungi and fungal spores. Since fungal diseases are responsible for significant agricultural losses, understanding the use and limitations of fungicides can protect your plants. 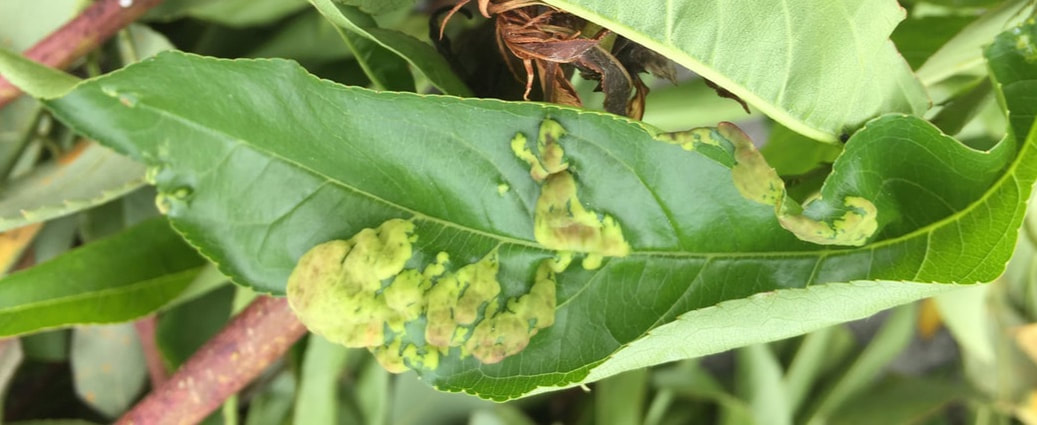 Peach leaf curl How do fungicides work?
Fungicides work in one of three ways:
Fungicide ingredients Sulfur, neem, rosemary, and jojoba oils are ingredients of most fungicides. Sometimes you can add beneficial bacteria (Bacillus sabtilis) and fungi (Ulocladium oudemansii) to fungicides to improve their effectiveness. Fixed copper and Bordeaux mixtures also work as fungicides. Over-the-counter fungicides commonly contain cadmium, copper, mercury, and tin, which can reach toxic levels in your soil. Fungal diseases treated with fungicides Fungal plant diseases include anthracnose, blights, cankers, damping off, downy mildew, galls, powdery mildew, rusts, scabs, spots, and Fusarium and Verticillium wilts, among others. Unlike most fungal diseases, fungicides do not work against Fusarium and Verticillium wilts. While fungicides can be effective, prevention is a better course of action. To reduce the chance of fungal diseases, install resistant resistant varieties, improve airflow with good pruning, avoid overhead watering, and remove diseased plant tissue. Ensuring good drainage is another way to reduce the need for fungicides. Whenever warm, dry areas get much-needed rain, gardeners must be aware of a disease that starts showing symptoms in winter and spring - citrus blast. Also known as bacterial blast or black pit, citrus blast is a bacterial infection that becomes visible after periods of wind-driven rain.
Symptoms of citrus blast The bacteria, Pseudomonas syringae, enter through thorn punctures, wind damage, and insect feeding sites. This disease is more likely to appear on the south-facing side of your citrus tree. The first symptom of citrus blast is dark lesions on the leaf petiole. The petiole is the little stem that connects a leaf to a twig. Once the bacteria enter through these lesions, it travels down the leaf axil, or stem, and into the rest of the tree. Infected leaves wilt quickly, curl up, and dry on the tree before breaking off. Usually, the petiole is left attached, creating a larger wound for further infection. Diseased areas may also show a reddish-brown scabbing, and entire twigs may die. Citrus blast will also leave black spots on the fruit. New growth is especially vulnerable to citrus blast, so it is a good idea to minimize fall and winter feeding and pruning to reduce winter growth in areas prone to citrus blast. Preventing citrus blast Applying fixed copper or Bordeaux sprays before the first rain can reduce the likelihood of bacterial infection. These treatments are also effective against fireblight, walnut blight, black spot on roses, peacock spot on olives, downy mildews and powdery mildew on grapes, and leaf curl, and shot hole on nectarines and peaches. Bordeaux sprays consist of copper sulfate, lime, and water. You can make your own Bordeaux spray by combining 3-1/3 tablespoons of copper sulfate and ten tablespoons of dry hydrated lime (calcium hydroxide) in one gallon of water. These materials are available at most garden centers. Avoid using slaked lime (calcium oxide), as it can burn your skin and eyes. Diseased twigs should be removed and thrown in the trash. As you prune out diseased areas, sanitize your tools with a household cleaner between each cut to avoid spreading it to healthy plant tissue. To prevent citrus blast, plant citrus trees with some wind protection and remove any dead or diseased twigs as early as possible. Put on your science caps, dear readers! Today we are learning about the nitrogen cycle! In its most basic terms, the nitrogen cycle is a process by which bacteria convert atmospheric nitrogen into a form available to plants. Plants use the nitrogen to grow. The plants are then eaten and turned into organic waste. This waste enters the soil where it is again taken up by plants. And so it goes! Nitrogen (N2) makes up 78% of our atmosphere and it is a necessary component of every living thing. Nitrogen, in the form of nitrates (N03), nitrites (NO2), and ammonium (NH4) help create amino acids and nucleic acids, which turn into proteins and DNA. The nitrogen cycle consists of:
 Nitrogen Cycle (EPA) Atmospheric nitrogen is generally unavailable to plants, but they really need it. For nitrogen to be absorbed by plants it must be “fixed”. When lightning strikes the Earth, nitrogen is fixed, but the majority of fixation occurs via microorganisms called diazotrophs.
Diazotroph bacteria carry an enzyme that converts atmospheric nitrogen into ammonia, which is then converted into other organic compounds by the bacteria in a process called nitrification. Other microorganisms, such as mycorrhizae, carry similar enzymes that can also fix nitrogen into the soil. In exchange for their efforts, plants provide these bacteria with carbohydrates and sugars. The most effective nitrogen fixing bacteria are from the Rhizobium family. These nitrogen fixing bacteria are found in the root nodules of legumes, such as beans and peas. If your soil is low on nitrogen, it is a good idea to plant members of the legume family and let their microscopic nitrogen fixing factories get to work! Industrially, a method called the Haber-Bosch process uses heat and pressure to convert atmospheric nitrogen (N2) into 30% of the ammonium (NH4) used in agriculture. Since the agricultural revolution started 10,000 years ago, humans have been responsible for doubling the amount of nitrogen available to plants. The level of ammonia (NH3) has tripled and nitrous oxide (N20) has begun to break down our protective ozone layer. Rather than applying chemical fertilizers, there are other ways to improve the nitrogen cycle in your garden. Adding nitrogen naturally An excellent way to add valuable nitrogen to your soil is to raise or encourage worms in the garden. When worms poop, or die, the nitrogen released is available to plants through ammonification. Worms have the added advantage of improving soil structure, aeration and percolation. Without good soil structure, heavy rains can saturate the soil, creating a bog. In a bog environment, other bacteria step in and convert fixed nitrogen back into the unavailable atmospheric variety in a process called denitrification. Blood meal is an excellent source of nitrogen. Applying mulch and compost can also improve soil health and soil structure. Nature has evolved effective, sustainable mechanisms for all living things. We can best continue by following those examples. Warm temperatures and moist soil are all it takes to help weeds invade your garden, lawn, and landscape. Fighting weeds is a constant battle, but it is much easier while they are young and vulnerable.  Dandelion (Greg Hume) CC BY-SA 3.0
Why get rid of weeds? Getting ride of weeds is work, so why bother? There are many reasons for getting rid of weeds:
So, getting rid of weeds helps your plants stay healthy. Most of the time. Benefits provided by weeds Before trying to rip out every weed on your property, you may be surprised (and relieved) to learn, as I was, that some weeds actually provide benefits. Because they grow and go to seed so fast, weeds reduce erosion and the loss of top soil. Weeds can also be used to support soil microorganisms and to add organic material back into the soil. Weeds absorb carbon, keeping it out of the atmosphere, increase biodiversity, and provide food and shelter for native insects and animals. In some cases, weeds act as trap crops, luring pests away from favorite plants. Looking at the sunny dandelion in this new light, we see it has a taproot that grows in even the most compacted soil, provides nectar and pollen for beneficial insects, new greens can be used in a salad, and flowers can be used to make wine! So, not all weeds are bad. But most of them are not what we want in our gardens. What is a weed? Before we start learning about some of the more common weeds, let’s be clear about what a weed is and what it isn’t. According to Gallagher, “If you pull it out and it grows back, it’s a weed.” I’ve always said, "A weed is a plant that grows after you try to kill it.” So, how do we get rid of unwanted weeds? Weed control Weeds are some tenacious opponents. They have evolved to go to seed only days after emerging from the soil. Their stems and roots tend to be brittle, so part of them is left behind to continue after you try to pull them out. There are only two ways to get rid of weeds: the Hard Way and the Hard Way.
Which of these weeds cause problems in your garden?
Annual sowthistle (Sonchus oleraceus) Like dandelions, sowthistle seeds travel on the wind, so they will always be back. Learn to recognize these weeds while they are young, before they go to seed. Burning nettle (Urtica urens) and stinging nettle (U. dioica), have tiny hairs along the stem that sting for several minutes and can itch for hours. Common lambsquarters (Chenopodium album) may be edible, but these weeds can also carry beet curly top, potato viruses M, S, and X, tomato ringspot, and several mosaic diseases of alfalfa, barley, beans, beets, cucumber, eggplant, hops, lettuce, squash, and watermelons. Field bindweed (Convolvulus arvensis) may have pretty flowers, but that root system can down 20 feet or more! Also, bindweed frequently plays host to viruses that impact beans, potatoes and cereals, such as tomato spotted wilt, vaccinium false bottom, and potato X disease. If you discover bindweed in the garden, your best bet is to monitor the area frequently and pull new growth as soon as it is seen. You can also use sheet mulching. Pigweeds (Amaranthus spp.) provide overwintering sites for disease-ridden green peach aphids and beet armyworms, which negatively impact beans, buckwheat, celery, cilantro, citrus, cole crops, cucurbits, lettuces, parsley, peppers, strawberries, and tomatoes. Spotted spurge (Euphorbia maculata) is a common weed that can reach a surprisingly large size. Mature plants can be several feet in diameter! Of course, poison ivy, poison hemlock, and crabgrasses are commonly referred to as weeds, as are the many invasive plants being installed haphazardly. Kudzu, ice plant, purple nutsedge, and English ivy are wreaking havoc on local environments wherever they occur. Once established, it is very difficult to get rid of them. If you are unsure about a potential weed in your garden, post pictures in the Comments section and we can work together to identify it. There’s a fungus among us! The root systems of nearly all your plants (except those in the cabbage family) are infected with a tiny fungus called mycorrhizae. Now, before you panic, you need to understand that this is a good thing! 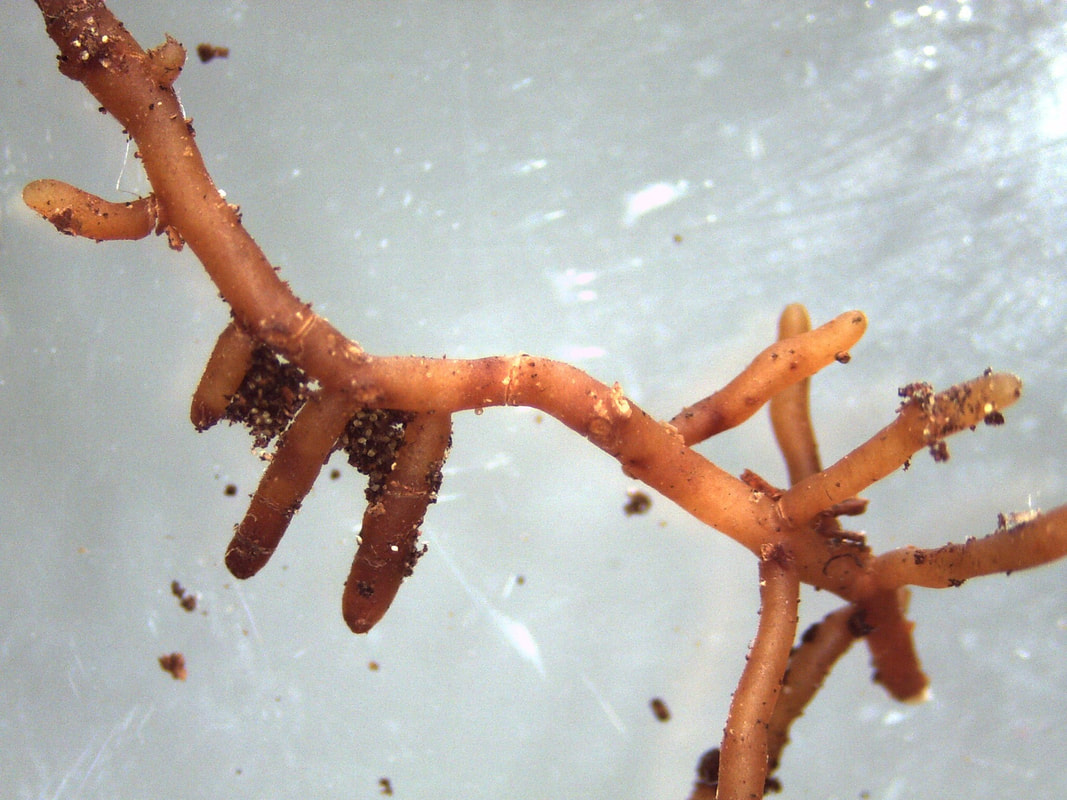 Beech tree root with mycorrhizae (Katrin Schulz) Pixabay Mycorrhizae means ‘root fungus’. These microorganisms have evolved in a symbiotic, or mutually beneficial, relationship with plant roots. Just as rhizobium bacteria help plants ‘fix’ atmospheric nitrogen into a form usable by plants, mycorrhizae are important part of the soil food web and critical to plant health. Mutually beneficial arrangements Tiny root hairs give the mycorrhizae sugars, created through photosynthesis, B vitamins, and other important resources in exchange for water, hormones and minerals found in the soil. This is how plants absorb soil nutrients. Without these critical elements, plants fail to thrive and they become susceptible to pests and diseases. Plants that host mycorrhizae have access to 50-100 times the nutrients than plants without. This is especially true when it comes to pulling phosphates from the soil. Types of mycorrhizae There are several types of mycorrhizae with two major players: those that live mostly on and occasionally inside roots (ectomycorrhizae) and those that “infect” the roots of nearly 80% of all plant species (ednomycorrhizae). These microscopic fungi extend thread-like appendages, called hyphae, into the soil. These are the white threads you see under decomposing wood chips, mulch, and compost. And they are worth their weight in gold! Mycorrhizae provide far more than a simple trade agreement with your plants. They also:
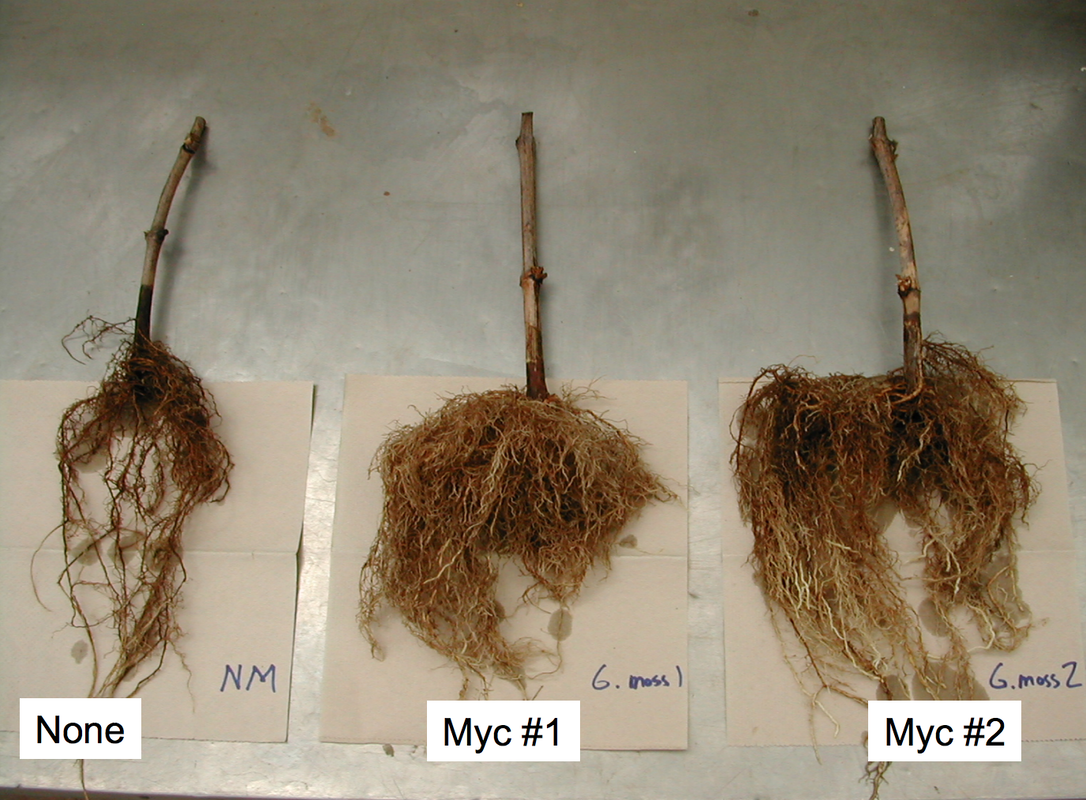 Mycorrhizae improve root growth significantly (USDA) Public Domain You can inoculate your soil with store bought mycorrhizae, but the conditions of temperature, moisture and soil must be exactly correct, or they will simply die off and be a waste of money. In most cases, repopulating soil with purchased mycorrhizae only works in the lab and not in the field. Instead, you can make your soil more hospitable to these mycorrhizae with these tips:
You can improve the health of containerized plants by tossing them a handful of soil from outside. That soil will contain beneficial mycorrhizae that will help your potted plants thrive.
If you live in a drought-prone area, you have probably noticed that your water is getting "harder". This is because of the minerals that are being dredged up from the bottom of reservoirs and ground water sources. It's not necessarily a bad thing (unless you are a coffee-maker or an iron), but it doesn't taste as good as it used to. Unlike the water that comes out of our faucets, rain water collected in rain barrels is free of chlorine and other chemicals used to make water potable. Watering container plants and in-ground plants with water from rain barrels means less potable water is being used. If you wash your hair from rain water, you may find that your hair feels softer, too.
Different roofs collect different amounts of water. You might not get any in Arizona. Your average 2700 sq. ft. roof in California’s Bay Area can collect more than 25,000 gallons of water each year. Most rain barrels are significantly smaller than that, so you will only be able to collect so much before that water has to go someplace else, but it still ends up saving on your water bill. The down side of rain barrels As good as rain barrels are at conserving water, there are certain things you should know before you go shopping for your very own Amazing Rain Catcher. Here is what I have learned:
Now, I’m not trying to discourage you. As I said, I have three rain barrels and I use them year round. In the peak of summer, if I have managed my 65-gallon rain barrels properly, they give me a total of 195 gallons of rain water to use on my plants that would have had to come from the taps. Let me know if you have any questions about rain barrels in the comments section. If you are planting bare root trees this January, you may need to provide tree supports for the first year or two. There are two reasons for staking trees: structural support and protection from human activities. An errant weed whacker can girdle a young tree and kill it before it has a chance to get started, and that bad driver can destroy your investment before it takes root. Tree supports should be installed when the tree is planted to avoid disturbing or damaging tender root systems. Tree supports should be placed one foot from the tree, with no branches touching. Structural support, or anchor staking, prevents the root ball from moving while the new roots are established. Tie your your tree to 2-4 posts with straps. Do not use rope, wire, or hose segments, as these put too much pressure on a narrow area, risking bark damage. Straps spread the pressure out over a wider area, keeping the bark healthy and intact. Since your tree will be growing, be sure to keep the strap around the trunk loose.
There is a correct height for tree support ties. Too low and no support is given. Too high and the tree won’t learn how to stabilize itself. To determine the correct height, grasp the trunk of your floppy new tree and gently try to bend it over with the other hand. As you move your hand up the trunk, you will reach a point where the flop ends and the tree bounces back to an upright position. This is the magic spot. Your stakes should only be a few inches taller than this height to avoid damaging new branches as they come in.
We've all seen some crazy things embedded in trees. But those trees are worse off for the invasion. Strong winds ripped a heavily laden branch from one of my orange trees in January 2016. While the damage was unfortunate (and preventable), the heady aroma was purely delicious! 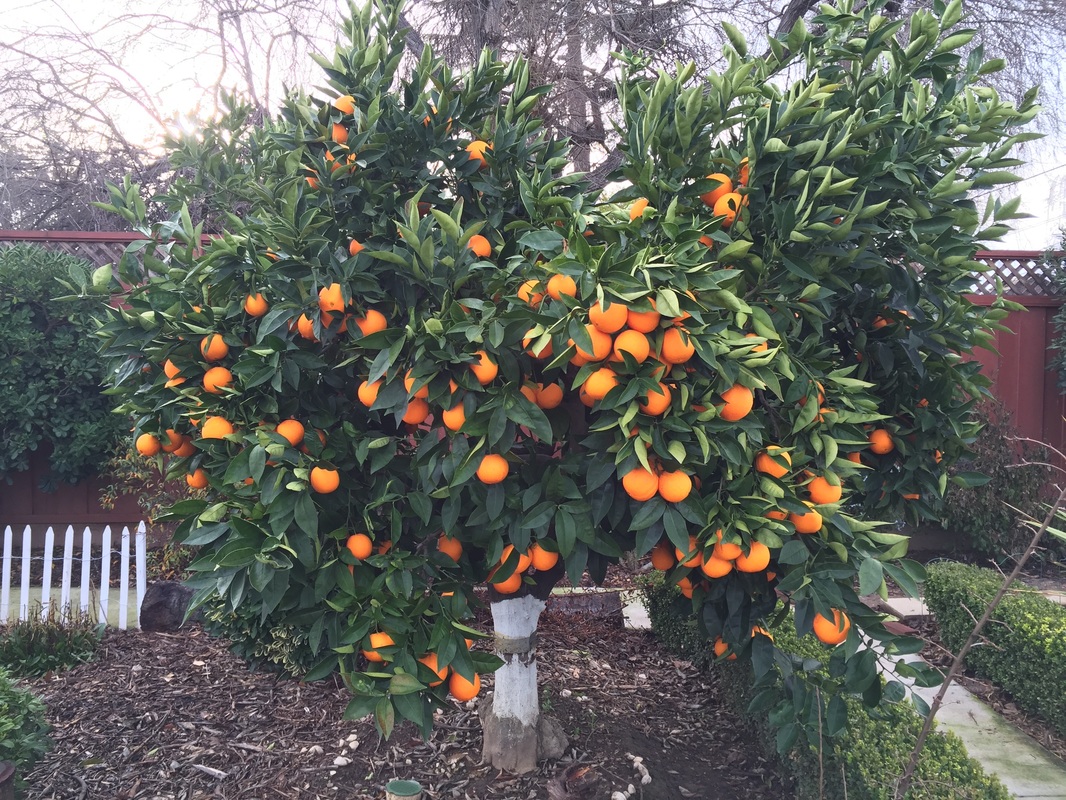 Heavily laden (and poorly pruned) Navel orange tree After pruning the damaged limb to help it heal faster, I plucked the fruit and gave it a good wash before bringing it in, hoping it was ripe enough. By the way, citrus trees have wicked thorns! Be sure to use caution when working in or around them. Citrus origins There’s no mistaking the heavy, oily skin of citrus. This skin provides moisture holding protection from its subtropical origins. Hailing from Southeast Asia and Australian, modern citrus fruits evolved from small berries found on pummelo, citron and mandarin orange trees. Crossing these three ancestors in different ways has led to the creation of oranges, lemons, limes, grapefruit, tangelos, kumquats and dozens of other variations. How to grow citrus Citrus trees and shrubs grow easily in warmer regions. They can be put in the ground or grown in containers. They prefer well drained soil and as much sun as you can provide. Since the fruit is very heavy, it is a good idea to protect them from heavy winds. Citrus trees can produce for 50-100 years, so use care when selecting a site. Be sure to feed and water your citrus regularly for maximum production. One-year old trees should be given 1/10 of a pound of nitrogen each year, while mature trees will need approximately 1-1/2 pounds. These amounts should be divided into three separate feedings in April, June, and August. If your trees are stressed by drought, you may want to spread those feedings out, using lighter amounts during the growing season, February through May. Blood meal is an excellent source of nitrogen, without all the fillers. Watering citrus Dumping too much water on your orange tree can leading to splitting. Split citrus are usually not ripe enough to eat but they provide the perfect breeding ground for bacteria, fungi, and other pests. Like mummies, they should be discarded as soon as they are seen.  Citrus fruit split Harvesting citrus
Knowing when to harvest your citrus can be tricky. Lemons and limes have distinct colors when they ripen, but Valencia oranges may still have a greenish tint to the skin when they are ripe. The only reliable way to tell if your fruit is ripe is to taste it. Unlike climacteric fruits, citrus does not continue ripening once they are removed from the tree. The best place to store your citrus is on the tree. If you do pick more fruit than you can use (or a branch breaks, dumping two dozen oranges in your basket), you can store them for 4-6 weeks in the refrigerator. You can also treat yourself with some fresh squeezed orange juice or a lemon drop! Personally, I grated the zest from two oranges over some sliced beef, juiced four oranges, and stirred in some corn starch, soy sauce, ginger and a pinch of Ghost Pepper for a delicious Spicy Orange Beef Stir-fry. Citrus pests Once established, citrus trees are pretty rugged. Here are some common citrus pests:
Citrus production Citrus trees are heavy producers. A mature tree can produce up to 300 oranges a year. Do the math and that comes out to over 130 pounds of oranges! If you find yourself swimming in citrus, here are some fun uses for lemons: • Remove fish smell from hands • Neutralize alkalinity from masonry work or Burning Man gear • Combine with salt to clean copper • Apply to stains on fabric and leave in the sun • Grind up peels in the garbage disposal for a fresh scent • Rub lemon on mold and it disappears! • Make your own invisible ink! Do you have any good ideas for using citrus? Share them here! One-by-one or two-by-two, scientists use seed structure as a major classification tool. Until recently, seeds were thought to exist in two basic forms: monocotyledons and dicotyledons. Since those words have so many syllables and are tricky to spell, most people call them monocots and dicots. Monocots, such as corn, have only one seed body. Dicots, such as beans and most nuts, easily break into two halves. 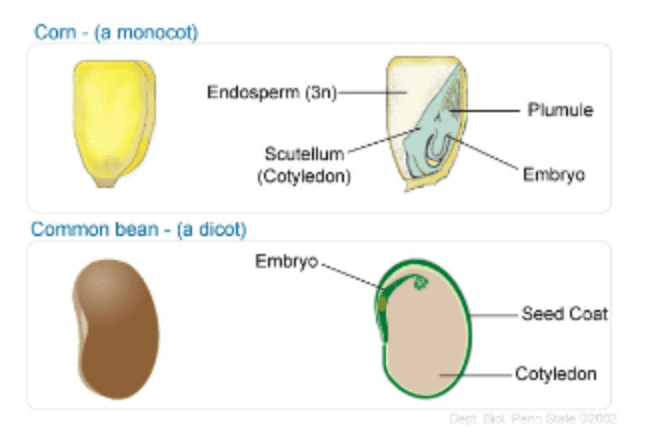 Monocots vs. dicots (PennState Wikispaces) Way, way back, nearly a billion years ago, plants and animals diverged into two different life forms. Before that happened, life existed as eukaryotes. Eukaryotes are organisms with a true nucleus. They evolved approximately 2.7 billion years ago, but I digress.
What I find fascinating is that the complete protein originally found in eukaryotes is regained when we eat monocots and dicots at the same time. Crazy, right? Traditional meals of rice and beans, peanut butter and bread, even oatmeal cookies with nuts provide your body with the basic building blocks of life itself! Traditional classification Aside from having a single seed body, monocots also feature flower petals that are multiples of three, leaves with parallel veins, and fibrous roots. A cross section of the stem will show a chaotic arrangement of veins (vascular bundles). Bulbs, such as tulips and garlic, are modified monocots. Dicots, on the other hand, have flower petals in multiples of four or five, leaf veins that are random or scattered, and vascular bundles that look like the rings of trees. They also have taproots. But dicots are no longer a classification. Well, not exactly. Modern changes in taxonomy Electron microscopes and genetic mapping have drastically changed the way we look at plants. Superficial similarities can no longer be used to classify them. In 1991, researchers learned that dicots were not as simple as we thought. In fact, dicots are not even included in the new taxonomy! This is because dicots are not all descended from a single ancestor. A new term was created to differentiate between simple, primitive dicots and more modern tricolpate dicots. [How’s that for a word?]. That new word is eudicot. Plant identification So, how does understanding all this evolution help you in the garden? Plant classification can help you determine if you are looking at an infant prized heirloom tomato or a weed. Also, some herbicides are designed to only attack monocots, while others only kill dicots. Most important, cutting the top off of a monocot will kill it (lawns being a notable exception). Can you identify the different classes of plants in your garden? I’ll bet you can! Mummies in the garden?!!? If you have fruit or nut trees, you may have noticed brown, shriveled-up fruits hanging from branches or splattered onto the ground. Other parts of a plant can also experience mummification, but fruits are the most obvious.  Pear mummy due to brown rot (Jerzy Opioła) CC BY-SA 4.0 These fruits are called mummies, and you do not want them around. Fruit mummies are rotted fruits that have turned dark, wrinkled, and hard. The rotting is due to fungal diseases such as brown rot and anthracnose.
Mummies are what happens when fungal structures replace healthy plant tissues. Fruit mummies are breeding grounds for hundreds of millions of fungal spores that can wreak havoc on your current or next summer’s harvest. Mummies can occur in any fruit-producing tree, shrub, or vine. Reduce the chance of spreading the responsible pathogen by bagging the mummy in plastic before removing it from the tree and throwing it in the trash.  Symptoms of Eutypa dieback in grape vine leaves (A. Andolfi, et al) CC BY 3.0 While scientists debate the Latin name of this little fungus (depending on which plant it attacks and who you talk to), Eutypa dieback is no joke. Also known as dead arm disease, Cytosporina, and gummosis, you often won’t see symptoms in time to save the tree. Symptoms of Eutypa dieback In apricot trees, the leaves on an infected branch will wither and die but remain attached to the tree (flagging). Oozing cankers occur along lower limbs, and the bark turns darker. Two years after Eutypa dieback infection takes hold, grape vines display leaf cupping and distortion, chlorosis, and stunted new growth. A cross-section of the wood shows V-shaped cankers. 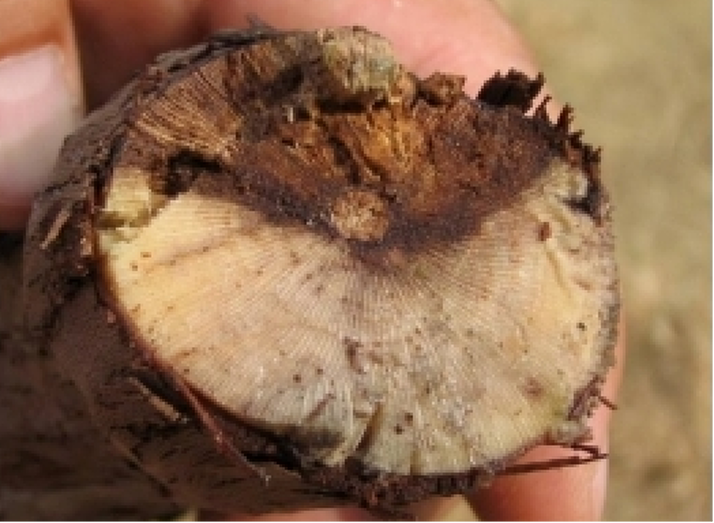 Characteristic V-shaped necrosis of grape vine trunk infected with Eutypa dieback (A. Andolfi, et al) CC BY 3.0 Vulnerable plants This insidious microorganism moves toward the trunk, killing the entire tree or vine. Also, the fungus responsible for Eutypa dieback seems to be broadening its dietary preferences to include almond, apple, blueberry, citrus, fig, kiwifruit, nectarine, olive, peach, pear, plum, and walnut, as well as Ceanothus spp., chokeberry, crab apple, oak, oleander, poplar, native California buckeye, big-leaf maple, and willow. Remove infected trees and vines immediately to avoid spreading to healthy plants. Preventing Eutypa dieback Like most fungi, moisture is necessary for their development. While most pruning occurs in winter, plants susceptible to Eutypa dieback are best pruned in summer. All pruning cuts are wounds. While trees and vines can develop a protective callus, these cuts need time to dry and heal. Never apply sealants to these wounds. Sealants hold moisture in, creating the perfect habitat for disease. If it rains 2-6 weeks after pruning, the Eutypa dieback fungus can take hold and kill your tree. Improperly aimed sprinklers can cause similar risks.  (Pearson and Burr) USDA Eutypa dieback controls
If you discover an infected branch, you may be able to save the plant by removing infected limbs at least 12” below any internal symptoms. Examine the exposed cross-section for signs of infection. Dip your pruning tools in a household cleaner between each cut. Keep cutting down the branch until you reach healthy wood. Unfortunately, this method is only marginally successful. The bare branches of January make this an excellent time for pruning.
Winter pruning helps improve the appearance and health of trees, shrubs, and roses. The only exception is apricot and cherry trees, which are susceptible to Eutypa dieback. Apricot and cherry trees are best pruned in the dry months of summer. Pruning goals Different plants have different pruning needs, but the overall goals are the same: a balanced structure, adequate airflow, and the retention of productive limbs. There are two types of pruning cuts: thinning and heading. Heading cuts control height, while thinning improves air flow and sun exposure. Keep in mind, while pruning, that new growth will head in the direction of the remaining buds. The first goal of pruning is to remove dead, diseased or crossing branches. Dead and diseased limbs can allow pests and disease easy access into healthy tissue. Crossed branches will rub against each other, causing similar problems. You will also want to trim away branches that are angled too closely together and those that hang downward. Proper pruning protects people and property Structural pruning reduces the likelihood of uprooted trees falling on you or your house. Trees with too much weight to one side also risk splitting the trunk and killing the tree. Pruning early in the tree’s life can create a safer, more balanced structure. While the depth and spread of tree roots depends on a number of factors (soil structure, irrigation, variety and age of the tree, and more), pruning can help the root system keep your tree upright. To give you an idea of how much weight we are talking about: an average mature hardwood tree, with a circumference of 100” inches at chest height, weighs nearly 13,000 pounds! Your average commuter car weighs 2,800 pounds - so imagine 4 or 5 cars hitting your roof in a storm to see why good pruning is so important. How to prune larger branches Pruning larger branches (those with a diameter of 2" or more), it is important to use multiple cuts to avoid peeling the bark beyond the final cut and damaging the remaining branch. In drought-prone areas with heavy clay soil, moisture retention is an art that most plants have mastered. This also means fungal diseases can be a real problem. Roses and fruit trees are especially vulnerable to brown spot, rust and fireblight. Pruning for good airflow between twigs and branches can help reduce these diseases. It can also provide sunlight to inner leaves, which translates into more vigorous growth and heavier fruit and flower production Too much pruning is bad Now, as I’ve said before, too much of a good thing can be a bad thing. Excessive pruning can expose interior branches to sunburn. Also, while pruning some or a little can promote new growth, heavy pruning can cause irreparable harm or death to the plant. Before you start pruning, research the specific variety of plant to learn about its natural growth and shape. For example, some trees produce fruit on last year’s growth, while others produce fruit on new growth. There's no sense in cutting off your nose to spite next summer's harvest! Fruit trees The backyard orchardist will generally want trees that are small enough to make harvesting fruit easier, so you will want to use heading cuts to reduce the height of your trees. Branches that grow vertically tend to be more vegetative, while horizontal branches produce more fruit. Branches growing at 45 to 60-degree angles tend to do both. When you cut off the end of a vertical branch, phytohormones, such as auxins, will cause the remaining buds will send out new growth horizontally. When you tip a horizontal branch, it will send out new fruiting wood. This is also a way to prevent too much fruit developing and risking a broken branch. It is always a good idea to remove suckers and water sprouts. Water sprouts are flimsy twigs that quickly grow vertically, directly from the trunk or older branches. Suckers are similar growths that occur at the base of the trunk or from the root system. These growths drain energy from the plant without providing any benefits. Roses In Mediterranean climates, roses never go completely dormant, but winter is still the best time to prune for better spring and summer blooms. Generally speaking, you will want to remove 1/2 to 2/3 of the existing bush. Remove dead, diseased and crossing branches and then reshape the bush for better airflow. You can learn more about pruning roses at the San Jose Heritage Rose Garden. When pruning, it is best to cut close to the branch collar without cutting into it. You also want to avoid leaving nubs that interfere with a plant’s ability to heal itself. There is generally no need to apply sealants to pruning cuts. Plants have evolved an effective system for that all on their own. Finally, be sure to keep your tools sharp and to clean your cutting tools between cuts. Use a household cleaner, such as Lysol. Otherwise, you may be spreading disease to healthy plant tissue. It can be incredibly rewarding to take before and after photographs of your pruning work. Feel free to share them with us! No, it's not a new brand of mouthwash. Chlorosis is the plant equivalent of a human gasping for air. It is the word used to describe the yellowing or bleaching of leaves frequently caused by insufficient sunlight. Or, it might be too much water or disease. Or it might be pest feeding. Or a nutrient imbalance. 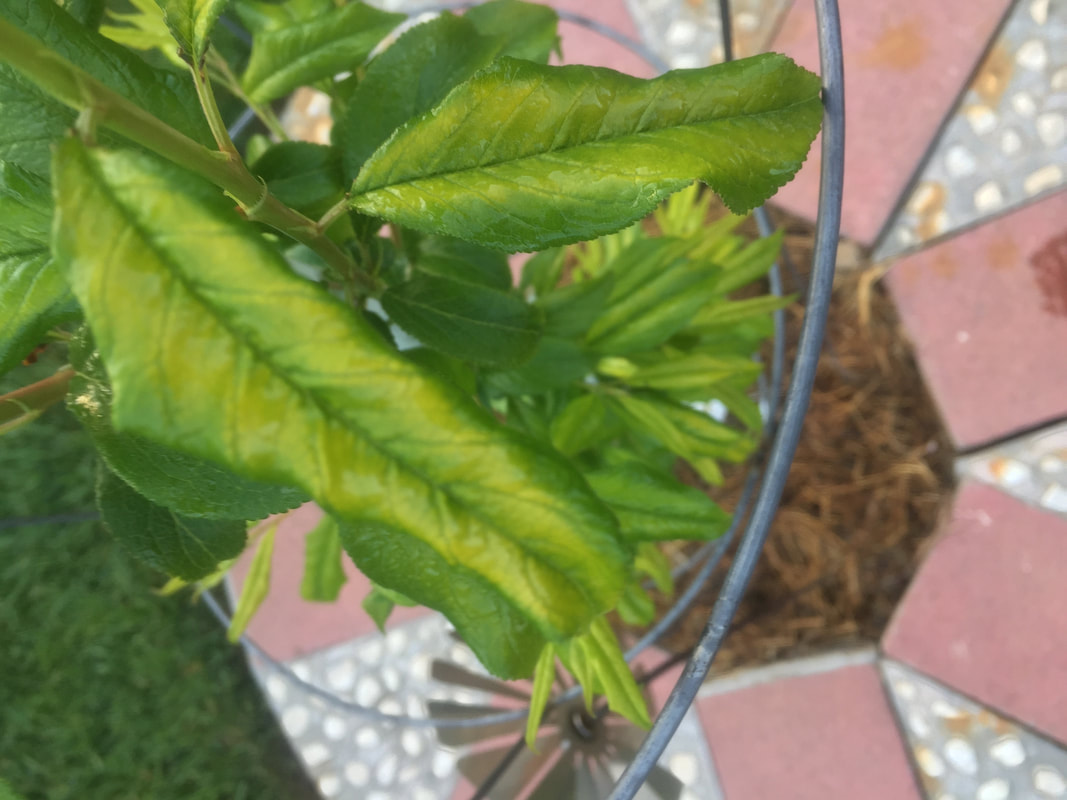 Iron deficient plum leaves Plants suffering from chlorosis are unable to produce chlorophyll. Since plants need chlorophyll to help them convert sunlight into energy, it’s a significant problem that warrants a closer look without delay.
If you notice chlorosis on any of your plants, consider these possible causes:
When I first bought my home, I sent soil samples to the University of Massachusetts Extension lab. [I think over-the-counter soil tests are a waste of money.] For the price of a bag of fertilizer, I learned exactly what was (and wasn't) in my soil. My soil test results told me that my soil had a superabundance of every nutrient known to humanity except iron. Since plants use iron to process nearly every other nutrient, the previous owner kept adding more fertilizer whenever her plants started yellowing. As a result, the soil had too many nutrients, interfering with the delicate chemical dance between microorganisms, plant roots, water, and nutrients. I sprayed my plants with liquid iron and applied ammonium sulfate. Over a few years, I was able to bring the excessive nutrient levels down a bit (which is harder than you might expect) and iron levels up. As a result, chlorosis was less common, my plants were healthier, and I saved money on fertilizer that I didn't need. As soon as you correct the problem causing chlorosis, your plant's little energy factory will kick right in. Everything should start greening up pretty quickly. We may not need Noah just yet, but many areas are prone to winter and spring flooding. Years with El Nino events can bring severe rain and flash floods, wreaking havoc with homes, drainage, and the garden. After making sure that your family and home are safe, it is important to protect your landscape and garden from the negative effects of flooding. 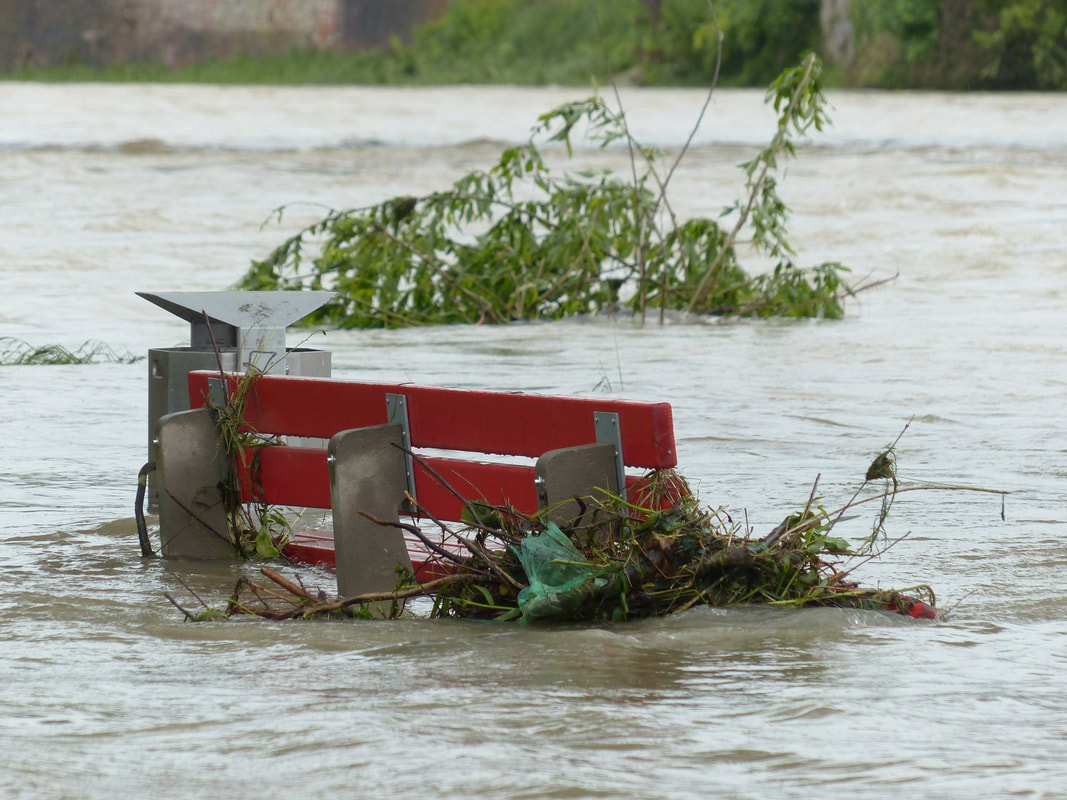 High water park bench (Hans Braxmeier) Pixabay Rain and soil
Too much rain at one time can cause mountain creeks and streams to overrun their boundaries, carrying debris, mud, and even more water crashing down into already soggy bottom lands. Soil is an amazing structure, but the bedrock that holds it in place also creates a water barrier that can lead to pooling, flooding and more mud than your landscape can handle. As we have discussed earlier, permeability refers to the ability of water to drain. Our heavy clay soil does not drain well, which makes it great at holding on to water during the dry months, but creates significant problems when rainfall rates overrun carrying capacity. Flooding and standing water can drown your plants. Roots need air space to breath and to conduct photosynthesis. Standing water and poor drainage also encourages the development of fungal infestations, mosquito breeding grounds, and disease-carrying pests such as fungus gnats. Just as over-watering causes leaching of nutrients, salts, and chemicals, flooding can wash away valuable topsoil and pollute local groundwater. When you notice standing water in your garden, it is time to take action. How to reduce the negative impact of flooding in the garden:
Floods can be devastating, but you can reduce the negative impact with these simple steps. Keep yourself and your garden healthy and safe! Crown rot may sound like a great punk rock band, but it can destroy nearly every plant in your garden. 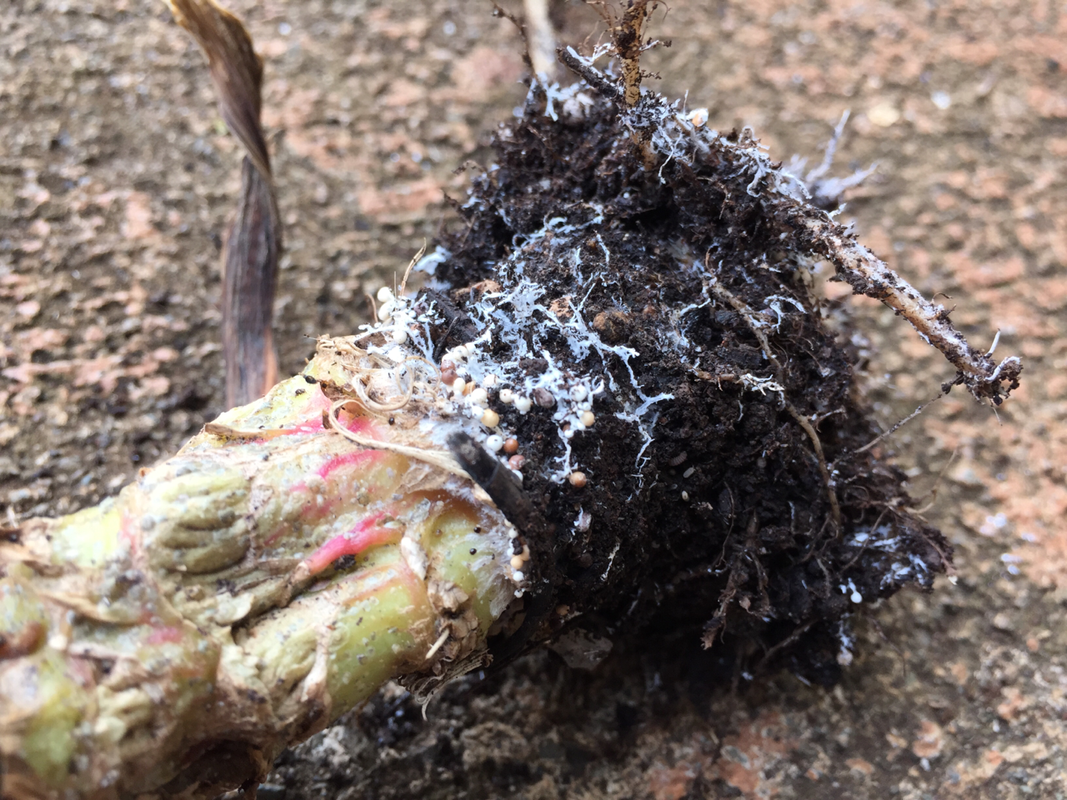 Swiss chard infected with southern blight (Scot Nelson) Public Domain Crown rot, also known as southern blight and southern stem blight, is more of a symptom than a condition. Several different diseases can cause crown rot. And some people call it southern stem rot, and others call it white mold, not to be confused with the Sclerotinia white mold growing on your grocery store strawberries.
Crown rot can be a sign of infection by several fungi or oomycetes (think amoeba with attitude) common in the soil. It favors heavy clay and wet conditions from over-watering and flooding. Once crown rot occurs, it is nearly guaranteed to kill a plant. Crown rot symptoms Signs of crown rot include rotted plant tissue at ground level, wilting, leaf drop, trunk discoloration, and leaves that turn yellow or even red or purple. Established trees may ooze a dark sap around the infected area. Older plants may survive a few years, but young plants die quickly. If crown rot occurs in the garden, your best choice is to pull up the plant and discard it. In rare cases, you may be able to salvage an infected tree by pulling the soil away from the trunk and cutting away diseased areas. Fungicides are ineffective in treating crown rot. Preventing crown rot Prevention is the best course of action in areas prone to crown rot. To reduce the likelihood of crown rot taking hold, use these preventative measures:
While we are all familiar with the pollinating power of honeybees, they are many other beneficials that pollinate, including wasps, flies, butterflies and moths, and even some beetles! As these beneficial insects move throughout the garden in search of pollen, nectar and prey, they carry sticky pollen from flower to flower, increasing garden production.
In addition to boosting the garden’s bounty, beneficial insects eat and/or parasitize insects that carry disease and devour crops. Parasitization occurs when a beneficial insect lays its eggs in the body of another insect. When the eggs hatch, the larva devour their host as a first meal. It’s brutal, but that’s how it works. In our age of convenience and quick results, many gardeners turn to chemicals to rid themselves of bad insects. This is rarely a good idea. Chemical pesticides may kill indiscriminately, removing beneficials as well as bad bugs. Encouraging predator insects to take up residence in the garden can keep most bad bugs under control without any adverse effects to you or the garden. The most common beneficial insects include:
So, how can you attract and keep these bastions of beneficial bugs? Many garden shops sell containers of beneficial insects, but this is generally a waste of money. If you do not provide the right habitat, they will leave for greener pastures. If you build it, however, they will come. The following is a list of plants known to attract and maintain beneficial insects in the garden:
Not only will these plants attract and maintain beneficial insects in the garden, but they also provide seasonal color and a few tidbits for the kitchen!
Clay soil holds far more water than sandy soils, but every soil has a holding capacity. Once that limit is reached, gravity will pull the water downward into underground waterways where it will ultimately flow to lakes and oceans. As it flows away, the water carries nitrogen, salts, fertilizer, pesticides, fungicides and whatever else was in your soil with it - leading to a potentially dangerous chemical soup that can wreak environmental havoc. Leaching also moves valuable nutrients out of reach from your plants roots.
To avoid leaching, it is always a good idea to water only as much as is needed. You can see for yourself where your irrigation water is going simply by inserting a moisture meter next to the plants you intended to water (but not too close). Many people are surprised to discover that the water intended for their tomato plants actually went in another direction due to hardpan, sandy pockets, or poor soil structure. Improving soil structure with compost can improve drainage and help prevent leaching. |
Welcome!You can grow a surprising amount of food in your own yard. Ask me how! To help The Daily Garden grow, you may see affiliate ads sprouting up in various places.
You can also get my book, Stop Wasting Your Yard!  Index
All
Archives
July 2024
|


 RSS Feed