|
Ashy stem blight, or charcoal rot, is a fungal disease of cucurbits. Your melons, squash, and cucumbers are all susceptible. It can also affect common beans, blackeyed peas, lima beans, chickpeas, corn, fenugreek, soybeans, sorghum, and sunflowers.  Ashy stem blight on mungbean (Photchana Trakunsukharati, Dept. of Agriculture, Thailand) CC BY 3.0 AU.jpg The soil-borne fungus (Macrophomina phaseoli) responsible for this disease loves hot days (> 85°F) and cool nights. This pathogen can stick around for up to 12 years. It often infects plants within two weeks after being planted. Symptoms generally do not appear until much later in the growing season, as temperatures rise - after you’ve invested weeks of irrigation, feeding, and weeding. So, learning how to recognize and prevent this disease can help ensure a better harvest.
Symptoms of ashy stem blight The first signs of ashy stem blight are black, water-soaked lesions or cankers along the stem at the soil line, stunting, and chlorosis (yellowing) of the upper or crown leaves. If you look closely at the lesions, you may see concentric rings. Infected pods may ripen prematurely. As the fungi population grows within the plant, you may see an amber gum oozing from the infected plant. Eventually, the stem turns dry and brown. Lesions may girdle the main stem and kill the plant. If you dig up an infected plant, you will see blackened roots and a lack of feeder roots. Preventing ashy stem blight This fungus is a stress pathogen. It preys on stressed plants. A heavy fruit load, high temperatures, drought, and water-stress can make plants more susceptible to infection. Keeping your plants healthy can help them protect themselves. While furrow-irrigated plants rarely have severe cases of ashy stem blight, you may be surprised to learn that the disease is common with drip-irrigated systems due to increased salt levels near the soil surface, creating salt stress. Monitor plants regularly for signs of infection. Once infection occurs, remove infected plants and throw them in the trash. A 3-year crop rotation with non-susceptible crops may break the disease cycle. There are no effective chemical treatments for this disease. Now you know. We’ve all heard that beans cause gas, but did you know beans rust? Well, not rust like the undercarriage of a New England truck, but rust just the same. Bean rust, like other plant rusts, is a fungal disease. Rust is found worldwide and it can wipe out your bean crop if it takes hold early enough in the growing season.  Bean rust (USDA) CC BY 3.0 US California’s cool, wet springs are just the conditions needed for rust to thrive. Add overhead watering or a decent breeze and the stage is set for an epidemic. Fungi are so efficient that, under ideal conditions, the disease cycle can be repeated every 10 to 14 days!
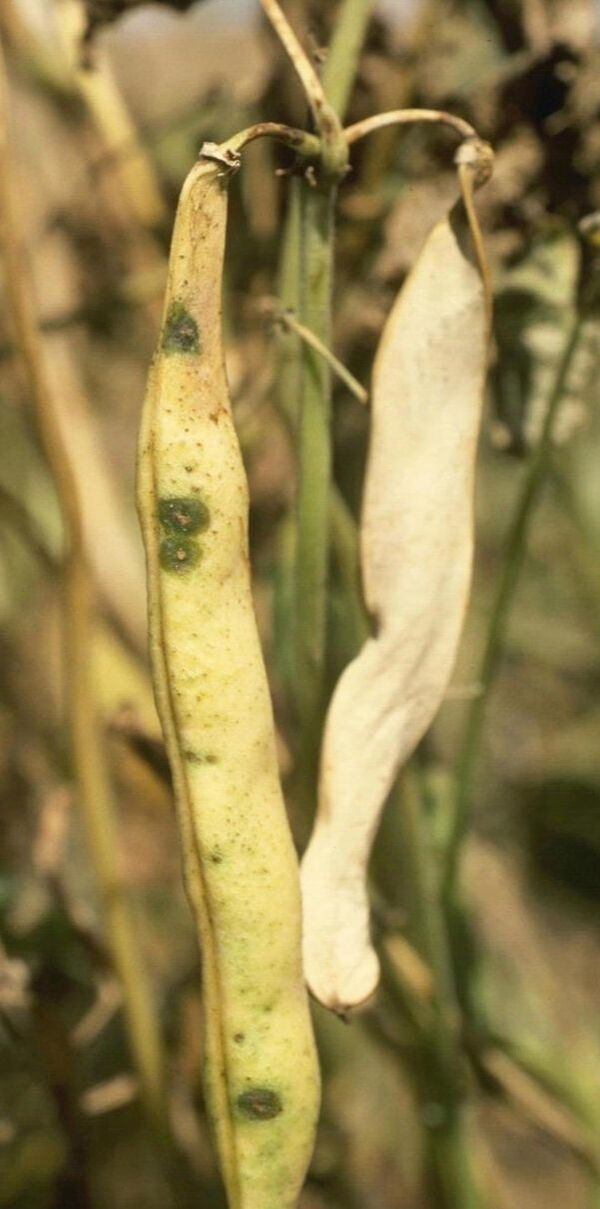
There are several strains of bean rust. Two of the most common are Uromyces appendiculatus and Uromyces phaseoli typica, but you don't need to know the Latin to recognize bean rust in the garden. Bean rust symptoms Similar to other rusts, bean rust prefers moist places and moderate temperatures (65 to 85°F). While it can occur on any aboveground portion of a plant, bean rust is most commonly found on the underside of leaves. Pods can also be affected. At first, it just looks like tiny white or yellow bumps. Then those bumps break open and turn into bright orange, reddish, or yellowish flecks. Those flecks are pustules that are made up of more fungal spores than any of us cares to count. [Okay, some scientists love counting things like that.] A yellow outer ring is sometimes visible. Leaves may begin to curl downward and plants may develop a scorched appearance. These symptoms are easy to see and make identifying the condition simple. Getting rid of it is something else all together. Bean rust control The fungi that cause bean rust can be spread by ants, aphids, and gardeners. It can stick to tools, fingers, and clothing. As with many other plant diseases, prevention is far easier than eradication. Use these tips to prevent and control bean rust in your garden:
Keep in mind that rust pustules are easily dislodged and can land somewhere else, or on the soil, where they can be bounced back up into your plants by rain, wind, and overly exuberant irrigation. And be sure to disinfect your tools after removing rust-infected leaves, to avoid spreading the fungus to healthy plants. With a name like halo blight, you might expect to read about little cherubs, but that’s not the case. The bacteria responsible for halo blight are no angels. Halo blight is a global disease of legumes, affecting kidney beans, lima beans, snap beans, scarlet runners, and other bean varieties.
Managing halo blight
As with other diseases, prevention is the easier way to go. Since moisture is needed for halo blight to develop and spread, avoid overhead watering and save the sprinklers for your lawn. Furrow irrigation will direct water to the roots without creating a potential disease site. Halo blight is most likely when temperatures are between 68 and 74°F (20 to 23 °C). Unlike many other blight diseases, halo blight bacteria prefer these slightly cooler temperatures. Use these tips to prevent halo blight in your garden:
Fixed copper or Bordeaux mixture treatments may prevent halo blight. Bean common mosaic is a viral disease caused by several different virus strains. A close cousin to bean yellow mosaic and clover yellow vein virus, bean plants can be unfortunate enough to be infected with all three simultaneously. What’s fascinating about this disease is that two different sets of symptoms may occur. 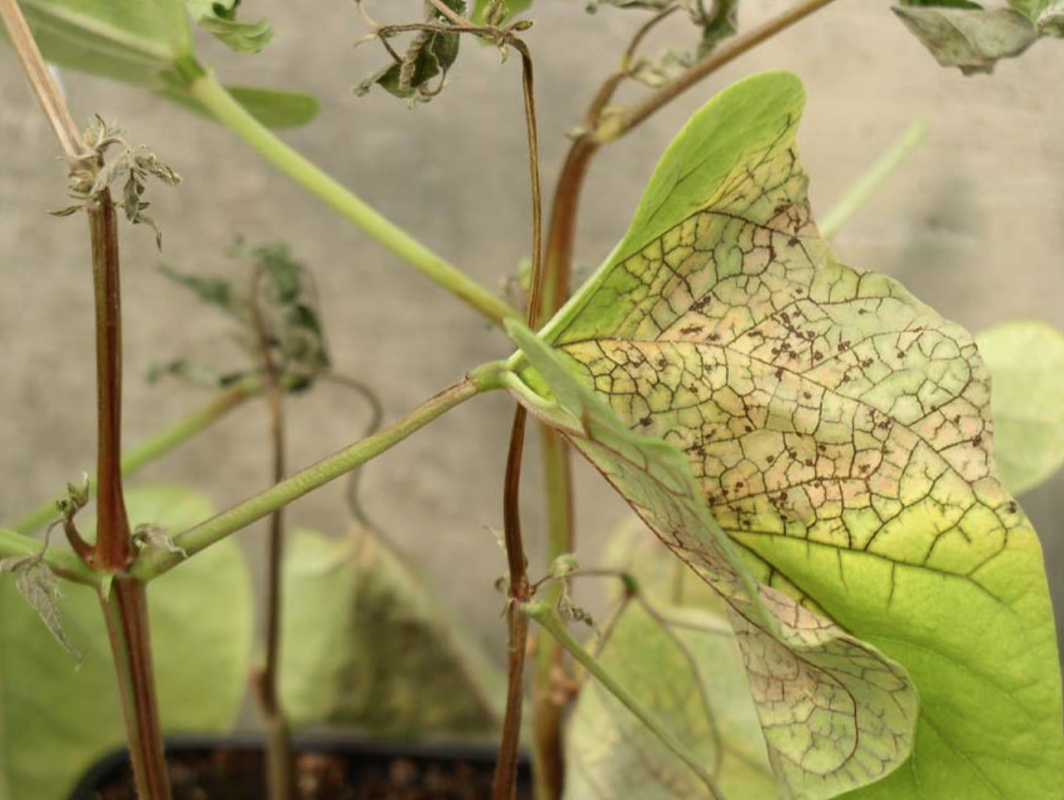 Bean common mosaic necrosis virus (USDA) Public Domain Symptoms of bean common mosaic Bean plants infected with these viruses may come down with bean common mosaic or bean common mosaic necrosis:
In both cases, leaves may be smaller, and blossoms and pods may be deformed. The symptoms your plants will exhibit depend on the virus involved, whether or not your plants have dominant or recessive genes, or if a particular gene is present. Symptoms of bean common mosaic are most likely to appear when temperatures are between 68 and 77°F. Bean common mosaic transmission The bean common mosaic virus overwinters in infected seeds and weeds. It is most often transmitted by aphids or spread on infected pollen. It can also move from plant to plant on clothing, tools, and vegetative material.
Resistant bean varieties
These bean varieties are resistant to one or more strains of this virus:
Once these viruses are in your soil, it is hard to get rid of them. It is far better to start with clean seeds and do what you can about those pesky aphids. We’ve all heard of a “hill of beans”, but did you know that beans have hilums? #/media/File:BlackEyedPeas.JPG) Cowpeas with visible hilums (Toby Hudson) CC BY-SA 3.0 Beans, peas, and other legumes produce fruits, called pulses, in pods. If you look closely, you can see where the seed attaches to the pod. Once the fruit or seed is mature, the pod opens along a seam, which means they are dehiscent. After the pod opens, the seeds fall to the ground where they are protected by a hard, water-resistant seed coat.
Seed coats have scars. When the seed separates from its pod, one scar is formed. This scar is called the hilum. On beans, the hilum is called the “eye”. Another scar, called the raphe, is a seed’s bellybutton. This is the scar that forms when the seed was separated from its placenta, within the pod. If you look even closer, you can see a tiny opening, called the micropyle, at one end of the hilum. This opening is where water is absorbed to allow germination to occur. Chestnuts have hilums, too. Now you know. You don’t have to grow tobacco to have reason to worry about the tobacco mosaic virus (TMV). Tomatoes are highly susceptible to tobacco mosaic, and the virus can travel on tools, clothing, cigarettes, and, yes, even on saliva and other bodily excretions of cigarette smokers. The tobacco mosaic viruses remain viable after their host dies and can withstand the extreme temperatures of tobacco curing.  Tobacco mosaic virus symptoms on orchid leaves (USDA Forest Service) Public Domain Tobacco mosaic hosts
In addition to tomatoes and tobacco, the tobacco mosaic virus infects over 350 plant species, including cucumbers and all plants in the nightshade family, as well as many flowers and ornamental plants. While they may not show symptoms, grape vines and apple trees can also become infected. Symptoms of tobacco mosaic Tobacco mosaic starts as nothing more than pale green between the veins of young leaves. This lightened area quickly becomes mottled, leaving a green, white, or yellow mosaic pattern. Bumpy wrinkles may also appear, in a behavior known as rugosity, and leaves may appear distorted or stringy. Leaf cupping may also occur. Leaf veins may also turn yellow, and you may see yellow streaking on the leaves. Many of these symptoms can be mistaken for signs of chemical overspray, but the mosaic pattern is usually distinct enough to rule this out. While this disease does not kill plants, it can stunt them severely. Infected leaves soon die, leaving dead patches in the plant and reducing production by up to 20%. The fruit that does grow is often discolored and deformed. How is the tobacco mosaic virus spread? Unlike many other diseases, which are spread by sap-sucking insects, such as thrips and aphids, the tobacco mosaic virus spreads primarily by direct contact. Chewing insects, such as grasshoppers and caterpillars, may infect plants. And bumblebees may transfer the infection as they pollinate flowers. Preventing tobacco mosaic virus Plants infected with tomato mosaic must be removed and destroyed. According to the Michigan State University Extension, you can prevent the virus from moving onto uninfected plants by spraying, just before transplanting, with a 20% nonfat dry milk solution. The milk solution coats the virus, rendering it inactive. The milk treatment only works while wet. You can spray containers, walkways, and other surfaces, as well. These other tips can also help reduce the likelihood of tobacco mosaic in your garden:
*Check plant labels for the letters V, F, N, T, or A. These symbols indicate resistance to verticillium wilt, fusarium wilt, nematodes, tobacco mosaic virus, and Alternaria stem canker. According to a study by the National Institutes of Health, all the cigarette brands studied tested positive for tobacco mosaic, while only 53% of those viruses were viable. Also, 45% of the saliva samples taken from smokers tested positive for tobacco mosaic virus. So, smokers and users of other tobacco products, please wash your hands before entering your (or someone else’s) garden, and always throw your butts in the trash. Thank you. While it may sound like a short, reckless redhead, tomato bushy stunt is a viral disease of tomatoes. But no one knows where it comes from or how it gets to our tomato plants. 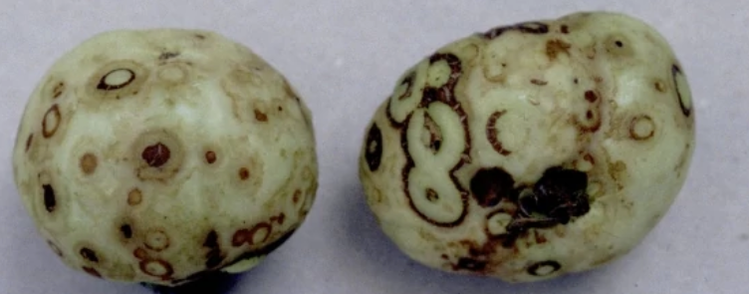 Unripe tomatoes infected with tomato bushy stunt virus (WikiGardener) CC BY-SA 3.0 Most diseases are spread by vectors, often sap-sucking or leaf-chewing insects. It is still a mystery how these viruses move around. Some experts believe they may travel in irrigation water. Contaminated seed, sewage, and tools may also be guilty. And we think the virus enters plants through damaged roots, but that has yet to be proven. We do know that tomatoes are not the only plants at risk.
Tomato bushy stunt host plants First identified in tomatoes in 1935, this is not an economically significant disease but can cause problems in your home garden if it gets established. Apples, artichokes, cherries, grapes, hops, sweet peppers, chili peppers, and eggplant can also come down with tomato bushy stunt. The virus can cause severe leaf dieback in many lettuce varieties. Tomato bushy stunt symptoms Plants infected with the tomato bushy stunt virus have smaller, cupped leaves that curl downward. New leaves are crinkled and twisted, with dead tips. Infected plants produce more lateral shoots, creating a bushier, stunted plant. Lower leaves may have a purplish tinge and tend to be chlorotic. Tomato bushy stunt causes a significant reduction in fruit production. The fruit that does reach maturity, well, let's just say it doesn't look very appetizing. Preventing tomato bushy stunt Since damaged roots create a point of entry for this and other diseases, avoid digging around established plants. Instead, feed plants by top dressing and banding, and disinfect tools regularly. Once the virus is present in the soil, crop rotations of four or more years may break this disease triangle. Remove infected plants and toss them in the trash. Tomato yellow leaf curl is a devastating viral disease of tomatoes that made its way to California in 2007. Mostly limited to greenhouse environments, this disease can wipe out all of your tomato plants, so you'll want to know what it looks like. 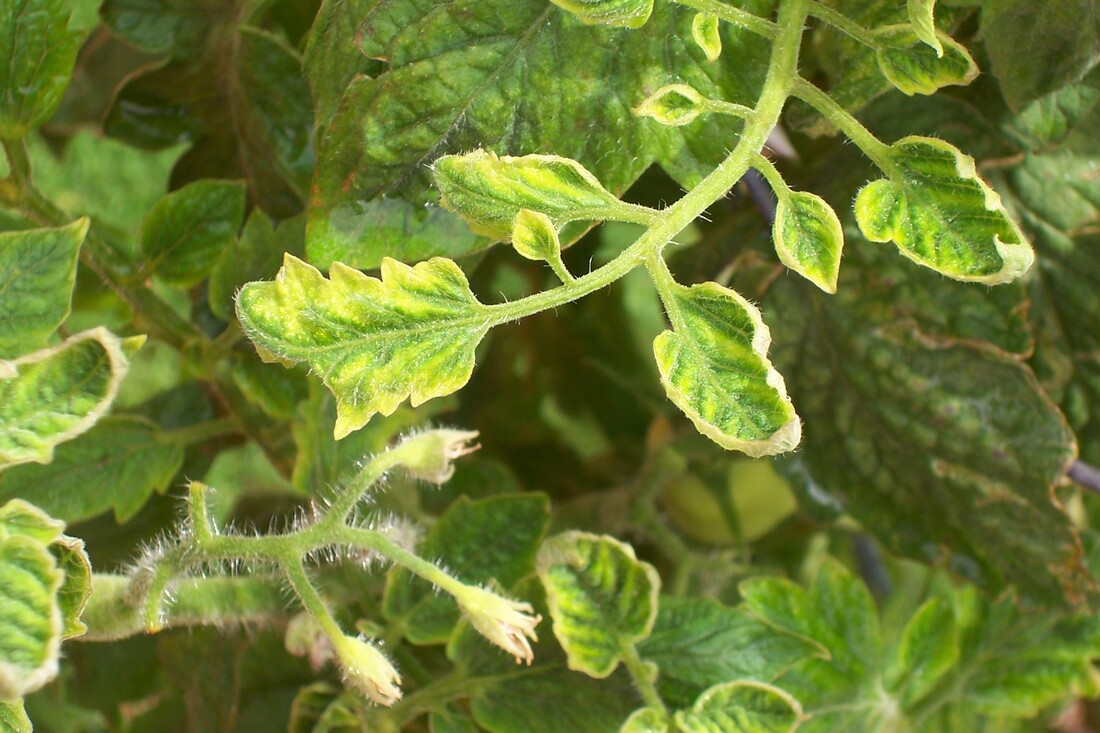 Tomato yellow leaf curl (Dr. Michael Melzer) Public Domain Whiteflies and leafhoppers carry this disease, and it is not limited to tomatoes. Other members of the nightshade family, such as peppers, can also be infected, as can beans and many as yet to be identified weeds. Most often, the disease spreads through contaminated plants.
Symptoms of tomato yellow leaf curl Infected tomato plants tend to grow unusually upright while being stunted. The virus shortens the internodes. Internodes are the spaces between the nodes where leaves emerge. Shortening the internodes makes the plant look bushier but not healthier. Tomato leaf curl virus also causes up to 100% flower drop, which means no harvest. Infected leaves are smaller, crinkled, and curled upwards. They also tend to turn yellow at the edges and between the veins. Unfortunately, many other viruses have similar symptoms. If you believe you have a plant infected with tomato yellow leaf curl, contact your local County Extension Office. Whiteflies and disease transmission Specific varieties of whiteflies (Bemisia) are responsible for transmitting this disease. Look closely to see that some whiteflies hold their wings tent-wise, over their bodies, like butterflies, while others hold theirs flat, like moths. In the same way, some nymphs will have smooth edges, while others have a fringe of filaments. You can capture whiteflies for these close inspections the same way you use clear packing tape wrapped around your hand to remove lint or pet hair from a pair of pants. Once they are stuck, you can use a magnifying glass or hand lens for a closer look. The whiteflies that hold themselves under a tent and whose nymphs have smooth edges that carry the tomato yellow leaf curl virus. Leafhoppers may also transmit the disease. Preventing the spread of tomato yellow leaf curl Tomato yellow leaf curl has the potential to temporarily eliminate tomato growing in certain areas, including your garden. This disease is why tomatoes are generally not grown in tropical and semitropical regions. Cold winters tend to kill off the whitefly vectors, but not always. You can use these tips to protect your tomato plants:
Tomato ringspot is a viral disease that can kill far more than your dreams of sweet summer salsa. This virus infects an astounding number of other plants and is fatal. 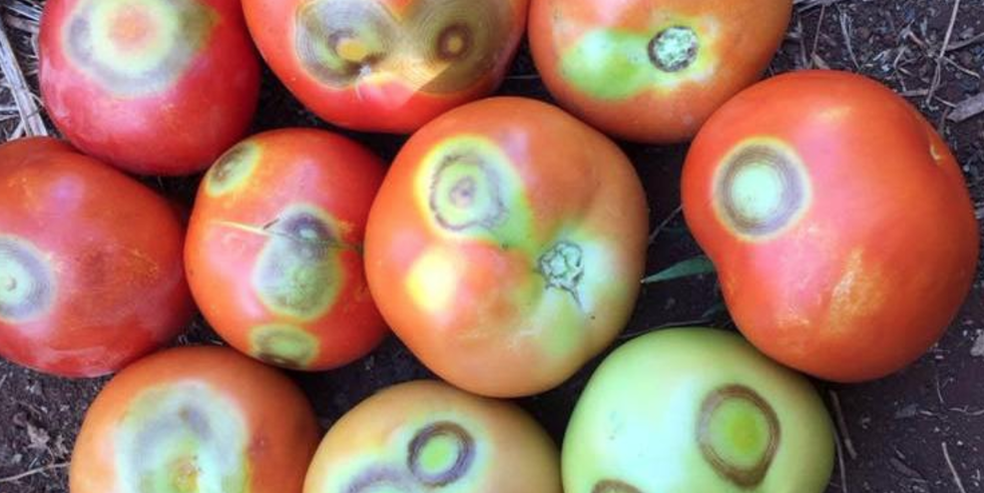 Tomatoes infected with tomato ringspot virus (sorhocam.com) Public Domain In addition to tomatoes, the tomato ringspot virus infects stone fruits, apples, grapes, cucumbers, cowpeas, beans, strawberries, currants, soybeans, and cane fruit, including those luscious raspberries and blackberries. This disease also infects begonias, geraniums, iris, hydrangeas, and many other popular garden flowers. Dandelion seeds can also carry this disease. Sadly, tomato ringspot is an incurable, highly contagious disease. Infected plants, and their neighbors, should be removed completely to prevent further spread.  Tomato ringspot virus on currants (USDA) Public Domain The virus responsible for tomato ringspot can be carried through the air, on pollen, or by dagger nematodes in the soil. As they feed on roots, they transfer the virus to healthy plants.
Symptoms of tomato ringspot Plants infected with tomato ringspot may fail to thrive but have no symptoms, acting as a way station for the disease without being impacted directly. They may slowly decline. You may see chlorosis or mottling. Cane fruits may turn dry and crumbly, similar to dryberry mite infestations. Stone fruits may develop prunus stem pitting or yellow bud mosaic. Yellow bud mosaic causes lower branches to lose leaves, moving upward into the canopy as the virus spreads. Leaf veins on either side of the midrib may turn white, and leaflike growths, called enations, may grow along the midrib on the underside of the leaf. Prunus stem pitting causes late leafing out. Leaves look pale and tend to wilt in summer, turning red or purple early in the season. Fruit size, quantity, and quality are all reduced due to the virus blocking the flow of water and nutrients through the graft union, effectively starving the tree. These symptoms can be mistaken for root damage caused by rats and voles, girdling roots, and fungal diseases. The difference is that the tomato ringspot disease causes the bark, above and below the soil line, to thicken and become spongy. This weakened area often allows the tree to topple over. Before that happens, you will also see pitting in the sapwood of the trunk. Usually, the tree dies before pitting occurs in any branches. How to control tomato ringspot In a word - you can’t. The disease is incurable and infected plants put nearby plants at risk. All you can do is remove the infected plants and those nearby and toss them in the trash. Just because symptoms disappear does not mean the infection is gone. Plants that no longer show symptoms can still spread disease throughout the garden. After removing infected plants, the affected area should be allowed to go fallow for at least eight months to starve out any dagger nematodes lurking underground and remove any potential disease-carrying weeds. These tips can help prevent tomato ringspot:
While removing plants from the garden or landscape is disappointing, removing more plants because of an initial delay is worse. Tomato pinworms are the larval form of a moth that prefers feeding on members of the nightshade family. This means tomatoes, eggplants, and potatoes are at risk. It also means weeds and native plants in the same family can harbor these pests. 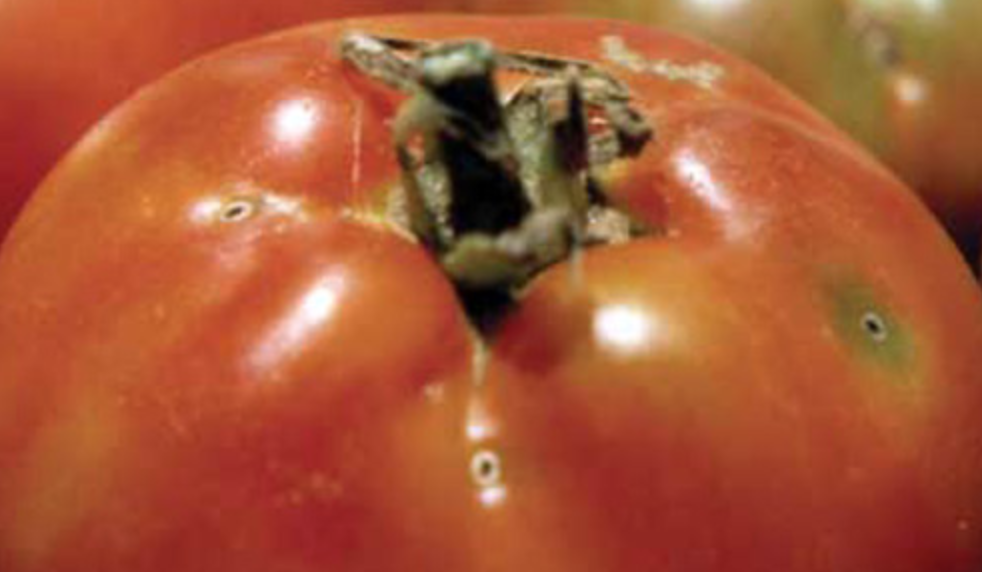 Tomato pinworm entry holes (UF/IFAS) Tomato pinworms (Keiferia lycopersicella) are predominantly found in areas with mild winters. They can also appear in greenhouses, so be sure to put new plants into quarantine until you are sure they are pest free. Tomato pinworm description Eggs are pale yellow, at first, but then they turn bright orange, just before hatching. Larvae appear dark with light bands. The moth is very small, and a mottled gray with long antennae. 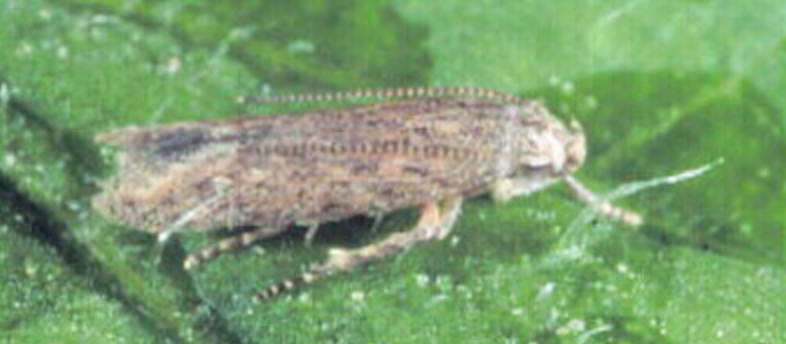 Tomato pinworm moth (UF/IFAS)  Tomato pinworm larva (Alton N. Sparks, Jr., University of Georgia, bugwood.org) CC BY 3.0 US Tomato pinworm lifecycle Moths lay eggs singly or in groups on leaves. When the eggs hatch, larvae spin protective webs. Then they burrow into the leaf to begin feeding. As the larvae move through 4 developmental stages, or instars, they may also fold leaves, or pull multiple leaves together, for added protection from predators. Tomato pinworms also move into stems and fruit, where they can make your crop inedible. 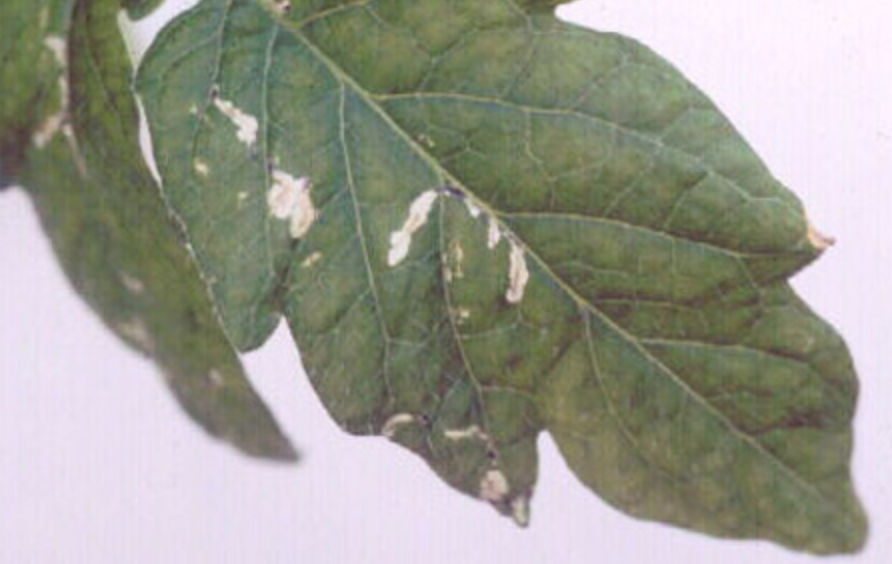 Leaf mining damage caused by tomato pinworm (UF/IFAS) After eating their fill, larvae then drop to the ground and form a loose cluster of sand grains around themselves, in a form of pupa. Two to four weeks later, they emerge as adult moths. There can be 7 or 8 generations a year. Because there are so many generations each year, and because generations can overlap, serious infestations can decimate your tomato plants. 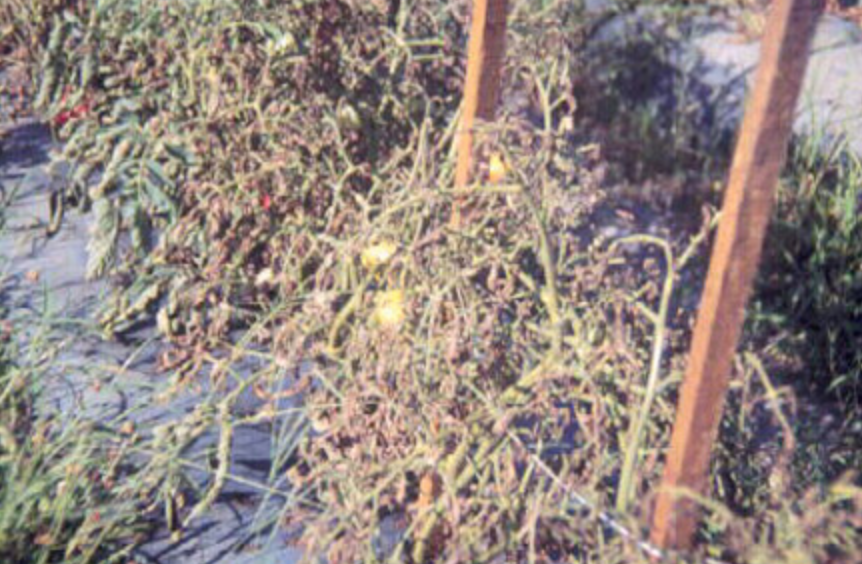 Tomato foliage showing field damage by tomato pinworm (UF/IFAS) How to control tomato pinworms In areas with mild winters, tomato pinworm eggs and larvae can overwinter in the soil, on tools, or in buckets or baskets. Closely monitoring plants for signs of infestation is your first line of defense. Pheromone traps can be used to monitor for the moth and mating disruptants can make it more difficult for adult males and females to find each other. Be sure to thoroughly compost or remove plant residue at the end of the growing season, and always put new plants into quarantine.  Larvae of tomato pinworm (UF/IFAS) Commercial growers use insecticides on the first and second instars, but later instars are protected by their spun tents and by being inside the plant. This is one pest that is hard to get rid of, once it becomes established. Moderate infestations can be slowed by not planting early and late season tomatoes the same year. To manage badly infested areas, the host crops must not be planted for a year or two, to break the tomato pinworm lifecycle.
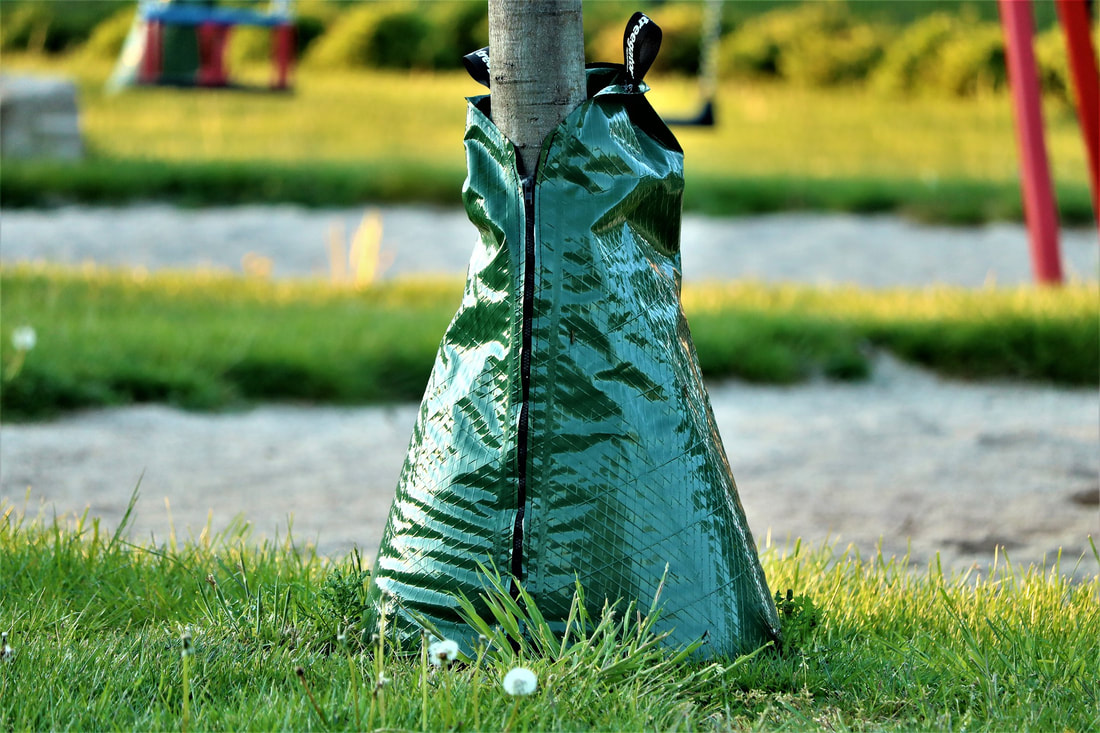
Crop rotation is not effective, as the moths simply fly from one part of the garden to another. There are right ways to water trees, and wrong ways. Watering a tree the wrong way can make it susceptible to fungal disease, such as crown rot, and water-stress. While roots are meant to be exposed to soil and water, bark is not.  Almond and apricot trees with trench irrigation rings (Kate Russell) The two most common wrong ways include planting a tree in the center of a bowl-shaped depression, where water pools around the trunk, or using a sprinkler that sprays the trunk. In both cases, water ends up collecting in the crevices of the bark, causing rot and fungal infection. Improper planting depth and over watering are the two most common causes of tree death.  Planting trees in depressions increases the risk of fungal disease (Kate Russell) While you can certainly water your trees with a hose, irrigation rings can save time and provide the water more slowly, preventing runoff. Irrigation rings are handy tools for preventing shade tree decline and conserving water.  Dripline (Ben McInerney) CC BY-SA 4.0 Where do trees need water? If you’ve ever stood under a tree canopy when it’s raining, you know that most, but not all, rain water is deflected away from the trunk by the leaves. The leaves farthest from the trunk form what is know as the tree’s drip line. Trees have evolved in ways that protect the trunk from excessive moisture, while allowing rain water to reach tree roots. Roots that grow beyond the canopy absorb the lion’s share of rainwater. You can mimic this action by providing irrigation water in a ring at the drip line of mature trees. Types of irrigation rings Irrigation rings provide water where it is needed most, in the top 2 or 3 feet of soil, by releasing the water slowly. Irrigation rings come in many forms:
 Irrigation bag (Jeyaratnam Caniceus) Pixabay
Or, you can do what I do, which is simply to dig a shallow trench, 4” deep and wide, in a circle under or slightly outside of the drip line. If you have a semi-dwarf tree with a canopy that is 8’ across, and a trench 4” wide and deep, that trench will hold approximately 20 gallons of water. One added benefit of the trench method is that it helps keep turf at a distance. This type of irrigation ring is not suitable for newly planted trees. Newly planted trees Newly planted trees need water close to, but not touching, the trunk. This is where all the roots are. As the tree becomes established and the root system spreads out, you can start using a trench irrigation ring. Of course, it’s a good idea to dig the trench before the tree’s roots reach that area. In each case, the benefit to the tree is that water is allowed to seep into the soil slowly enough to be absorbed by the tree, rather than running off as urban drool, or percolating downward where tree roots cannot access it as well. And don’t forget to mulch under trees, keeping the mulch 6” away from the trunk. This will reduce water needs, thwart opportunistic weeds, and stabilize soil temperatures. Sugar volcanoes are a tree’s response to boring, disease-carrying insects.
Now, when I say boring, I do not mean dull-witted conversationalists. These pests are invasive shot hole borers that chew holes through the bark to get at the sugary sap found in the cambium layer. Borers and disease Borer entry and exit holes, while very tiny (0.03” in diameter), compromise a tree’s outer layer of defense. As the beetles bore into the wood, they may carry three different species of fungal spores. These fungal spores enter the tree, bringing Fusarium dieback. Fusarium dieback is a fatal fungal disease in which fungi block a tree’s vascular system, halting the flow of water and nutrients. Avocados and exudates Fusarium dieback affects hundreds of tree species and grapevines, but sugar volcanos are specific to avocados and box elders. Exudates are secretions. When shot hole borers bring Fusarium dieback to an avocado tree, it responds by pushing a sugary exudate out of the borers’ entry and exit holes. This sugary secretion often includes frass and sawdust. As it dries, this sugary exudate forms a white, crusty ring or cone-shaped patch on the affected branch. And these crusty white patches, dear readers, are sugar volcanoes. Now you know. Geraniums are cheerful flowers, but cutleaf geraniums are pesky weeds.  Cutleaf geranium flower (Alvesgaspar) CC BY-SA 3.0
Cutleaf geraniums (Geranium dissectum) have disk-shaped, or orbicular, leaves with deep cuts, hence the name. The underside of leaves and stems may occasionally be red in color. Young plants grow in a rosette fashion. When growing in turf, these plants will stay prostrate, or low to the ground. In other locations, plants can reach 2-1/2 feet in height. The forked stem is hairy and those hairs, or trichomes, can emit fluids. Tiny pinkish-purple flowers have 5 petals and tend to appear in pairs, from March through October in California. Fruits are a 5-part carpel in the shape of a stork’s head and beak. As the seeds mature, each of the 5 parts curls back to release the seeds. Those seeds are round to oval and covered with tiny notches. If you pull up a cutleaf geranium, you will see a thin, shallow taproot with fibrous lateral roots.  Cutleaf geranium fruits (MurielBendel) CC BY-SA 4.0 Cutleaf geranium lifecycle
Cutleaf geranium can grow as either an annual or biennial plant, and is commonly found in disturbed ground and abandoned areas. Each plant can produce up to 150 seeds and those seeds can remain viable for 5 to 10 years. Controlling cutleaf geranium As with most the weeds, it is best to start controlling it early, before plants have a chance to go to seed. Hoeing is the best control. You’ve read the word countless times but what, exactly, are bracts? Bracts are specialized or modified leaves  Purplish-pink bougainvillea bracts surround tiny white flowers (Lumbar) CC BY-SA 3.0 Bracts are generally associated with a reproductive structure. That reproductive structure may be a flower, a cone, or an inflorescence. An inflorescence is a cluster of flowers. Bracts rarely look similar to other leaves on the same plant. They may be smaller, larger, a different shape, or a different texture. Plants with bracts are said to be bracteate or bracteolate, while plants without bracts can be referred to as ebracteate or ebracteolate. Very small bracts are called braceoles or braclets. Botanically speaking, bracteole are any bracts that occur on a pedicel, instead of under it. Pedicels are the tiny stems that hold individual flowers within an inflorescence. The presence of bracts, or lack thereof, can help you identify plants. Many shaped bracts The tiny leaves seen at the base of pineapples and dandelions are bracts. [Note that bracts are not the same thing as sepals. You can see the difference easily when looking at the base of a dandelion.] In many cases, what you think are flower petals are actually specialized bracts, called epicalyx. Dogwood, hibiscus, poinsettia, and bougainvillea are common examples of bracts looking like flowers. Occasionally, you may see an epicalyx formation in strawberry flowers.
Two large bracts coming together, or one large bract forming a sheath, is called a spathe. Iris, crocus, and palm spathes enclose flower structures as they develop. Peace lilies form flowers on a spike, called a spadix, which is shielded by a large white spathe. Grass family bracts Cereal grains, such as wheat and millet, and the grasses found in your lawn, have tiny florets that are held in a pair of bracts. The upper half is called the palea and the lower half is called the lemma. Each group of grass flowers, called spikelets, also have a pair of bracts, called glumes, at the base. When grain is winnowed to remove the chaff, the chaff being removed is made up of those bracts.  Bracts of a grain spikelet (Aelwyn) CC BY-SA 3.0 Conifer bracts
Pine cones are covered with scales used to protect seeds. Female cones have two types of scales, bract scales and seed scales. Bract scales grow under seed scales. This positioning is called subtending. Bract scales are more obvious at the time of pollination. Very often, seed scales will grow over bract scales as seeds mature. The next time you walk past a flower, take a moment to enjoy its fragrance and see if you can spot the bracts, while you’re at it. Because now you know. You need to know about hollow stem if you grow members of the cabbage family or cucumbers. Hollow stem is a physiological condition that damages the main supporting stem that holds up your cabbage, broccoli, or cauliflower. At first, small cracks develop in the center of the main stem. As the stem grows, the cracks enlarge, creating cavities prone to pest infestations and diseases, especially rotting. The damage is conspicuous when you cut open the stem of a plant with hollow stem. 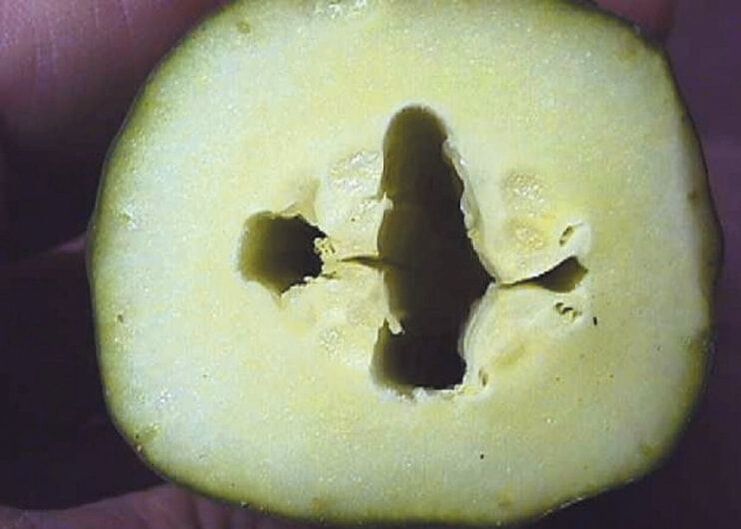 Cucumber with hollow stem (David B. Langston, University of Georgia, Bugwood.org) CC BY-SA 3.0 Causes of hollow stem
Too much nitrogen and hot temperatures are bad news for cole crops. The nitrogen causes rapid growth, but the heat puts too much strain on these cool-weather crops. As cracks develop within the stem, the pith is lost, and the stem weakens. Hollow stem and boron For many years, botanists and gardeners blamed boron deficiencies for hollow stem. We now know that this is not true. Boron deficiencies darken the edges of areas damaged by hollow stem, but the boron deficiency does not cause the disorder. If you suspect your soil is deficient in boron, send a sample to a lab for an inexpensive soil test. Preventing hollow stem While there’s nothing you can do about a sudden heat wave, there are many things you can do to prevent hollow stem from happening in the first place:
Keep your cucumbers and brassicas healthy by allowing them to grow slowly and steadily. Baking soda claims range from controlling powdery mildew to battling ants and slugs, killing weeds, and helping your tomato plants grow sweeter fruit. This “natural” cure-all is, unfortunately, not able to live up to all those claims.  Before we get started, let me step up on my soapbox about the use of the word ‘natural’.
As a proponent of organic gardening and least harm, it irks me when people say natural is better, because sometimes it isn’t. Malaria, death cap mushrooms, and the flu are all natural. Just because something is natural does not necessarily mean it is what you want in your garden. ‘Nuf said. Baking soda as weed killer Just dump baking soda on top of weeds and they will die! True? Yes, probably. Good idea? No, definitely. Baking soda, or sodium bicarbonate, is a type of salt. Remember reading about victors salting the fields of their enemies? This was done so that the losers couldn’t grow any food in those fields. Sprinkling handfuls of salt around your garden is never in your plants’ best interest. Baking soda and soil pH Baking soda is highly alkaline. You will find countless articles pointing to the use of baking soda as a way to boost flower production and improve fruit sweetness because of this increased alkalinity. This is only partially true. While improper soil pH can impact fruit and flower production, simply adding baking soda is not the solution. Low flower production can have many causes: not enough or too much sunlight, improper fertilizing, irrigation, or placement, pests or disease, or nutrient imbalances in the soil. Fruit sweetness or acidity is more often a function of irrigation levels and overall plant health, than anything else. To boost the flavor of your tomatoes and many other crops, forget the baking soda and try deficit irrigation. If soil pH is making it difficult for your plants to absorb nutrients, you can try altering it, or you could select plants better suited to your local soil. Altering soil pH is difficult and it requires accurate testing and regular treatments. Simply sprinkling baking soda on your soil is more likely to raise the salt content to toxic levels. Baking soda as pesticide You have probably read that you can mix baking soda with sugar to create the perfect DIY ant poison. Supposedly, the ants take the mixture back to their colony, where they eat it and then explode. Nope. Doesn’t really happen. Think about it. From an ant’s perspective, the sugar granules are probably about the size of a tennis ball and easily discernible from the baking soda bits. Plus, I could not find a single piece of scientific research to back up the ‘exploding’ claim. As for slugs and snails, well, baking soda is a salt. Salt does terrible things to slugs and snails. Better to feed them to your chickens or just step on them and be done with it. Baking soda as fungicide Countless ads and articles point to baking soda as a fungicide. This is because most fungi grow best in a slightly acidic environment and baking soda has a pH of 8.4, which is more alkaline. When conditions become too alkaline, fungi stop growing. Until conditions improve, that is! Then, they take up exactly where they left off. Because of this, baking soda is considered fungistatic, and not a fungicide. Also, while baking soda’s fungistatic properties are well documented in lab situations, those results have not translated to outdoor growing conditions, such as are found in your garden. If you can completely cover a surface with a baking soda solution, you may be able to temporarily halt the development of any resident fungi, such as those that cause black spot or powdery mildew. But, right away, problems begin to occur. First, ever-increasing amounts of baking soda are needed for the same effect. Also, being water-based, the solution needs to be replaced after every rain, and each treatment adds more salt to the soil than is healthy for plants or important soil microorganisms. You can, however, mix baking soda with horticultural oil for moderate, but inconsistent, results. Just be aware that phytotoxicity can occur. [Phytotoxicity means ‘poisonous to plants’.] When combatting powdery mildew, better results can be obtained by using potassium phosphate, potassium carbonate, sulfur, or even milk sprays. That being said, baking soda solutions can slow the development of certain fungi on produce after it has been harvested. Commercial growers frequently treat thick-skinned produce, such as citrus, with a boiling bath of baking soda in solution to prevent fungal growths while the fruit is in storage or being shipped. This is because the fungi that cause the blue and green molds on citrus are particularly sensitive to alkalinity caused by baking soda. In fact, that’s where the whole baking soda craze got started - from a test on citrus molds conducted in the 1930s. You may be surprised to learn that the use of a coarse organic mulch, such as arborist wood chips, provides better disease suppression than baking soda treatments. This occurs because the wood chips make life more difficult for fungal spores. Baking soda performs wonderful tasks in the kitchen, making muffins, deodorizing the fridge, and putting out grease fires. Let’s leave it there, where it can do the most good, and not in the garden. Sprinkle cornmeal in the garden to stop weed seeds from germinating! Cornmeal prevents fungal diseases, too! Wouldn’t that be convenient?  Cornmeal (Popo le Chien) CC BY-SA 3.0 Like many other garden fantasies, the fallacy about cornmeal originated in fact, but the above claims have not been able to withstand the tests of time and science.
How the cornmeal myth began In 1985, Dr. Nick Christians, from Iowa State University, found that corn gluten meal, a byproduct of the corn milling process, showed herbicidal effects during a turfgrass experiment. The corn gluten meal was found to desiccate newly forming roots of small-seeded plants in highly controlled greenhouse environments. As such, corn gluten meal can act as a pre-emergent herbicide, an idea that was patented in 1991, but those results have not been repeatable in outdoor environments, such as family gardens. What is corn gluten meal? Corn gluten meal is not the same thing as the cornmeal you find at the grocery store. Instead, it is what is leftover after the corn has been ground up to make cornmeal. Corn gluten meal is a byproduct used in livestock and pet food. It is the primary protein found in corn and does not actually contain true gluten. Corn gluten meal is not species specific, so it will, when conditions are just right, desiccate any new, small-seeded plant roots, including your lettuce, carrots, and many others. On the other hand, corn gluten meal contains 10% nitrogen, so sprinkling it on your lawn or garden will provide this important nutrient, leading to lush growth and healthier plants, weeds included. [Cornmeal has practically zero nitrogen.] Cornmeal as fungicide Popular claims also state that cornmeal will help control fungal diseases, such as brown patch, black spot, and dollar spot. That’s strikes me as funny, because cornmeal agar is produced as a medium specifically designed to grow fungi for laboratory work! Finally, for the record, ants do not “explode” or die in any other fashion when they eat corn gluten meal, cornmeal, or other foodstuffs. In fact, ants, rats, squirrels, and many other garden pests love cornmeal and corn gluten meal, so choose your battles wisely. If you want to get rid of weeds, cut them off at ground level before they go to seed, and apply a thick layer of mulch. Now you know. For generations, mothballs have been celebrated as a way to keep rodents, snakes, and insect pests out of the garden. Don’t do it.  Mothballs (Public Domain) Popular claims about mothballs in the garden
In one article, you are urged to add a few mothballs to a potted plant and then cover the whole thing with a plastic bag for a week as a sure-fire way to get rid of insect pests. In another post, you are told that adding mothballs to the garden will repel mice and rats. Then a friend urges you to scatter mothballs throughout your garden to deter squirrels, snakes, and rabbits. Is any of this a good idea? No, it isn’t. What are mothballs, anyway? You might remember smelling mothballs in your grandmother’s closet, attic, or basement. That distinct scent is unmistakable. Mothballs are spheres or disks of pungent chemicals that slowly evaporate into a gas that is toxic to moths and moth larvae. This is why people have used them to protect clothing and other fabric materials while in storage. The chemicals used to make mothballs can be naphthalene or paradichlorobenzene, both of which are carcinogenic neurotoxins that have no business near your food. There are clear and important instructions on how to use mothballs properly, if you must. For one thing, containers must be completely sealed to prevent long term exposure and the associated health risks. The truth is, it is illegal to use mothballs as a pesticide in many states. According to the National Pesticide Information Center, using mothballs outside poses a risk to children, pets, and local wildlife. Mothballs can also contaminate soil and water. So, the next time someone suggests using mothballs in the garden, you can protect them by educating them. Eggshells contain calcium. Plants need calcium. Lack of calcium causes blossom end rot. Therefore, adding eggshells to the garden will prevent blossom end rot and feed my plants, and snails won’t cross a line of broken eggshells, right? Wrong.
Eggshells and decomposition
As stated above, eggshells evolved to provide protection. Unless you are dropping eggs off the gym roof for a high school physics class or cracking them against your kitchen counter, shells are tough. They don’t even break down in boiling water. The moisture and microorganisms responsible for decomposition do not have a ghost of a chance of breaking down an eggshell in your lifetime. For example, 170 years ago, Thomas Jefferson raised chickens and ducks. An archeological excavation of the site found that eggshells from those birds were still intact in the soil. So, no matter how often you flip that compost pile, those eggshells will never significantly improve anything in the garden. Even if you let them dry and crush them into smaller bits, those bits are very unlikely to break down enough to be usable by your plants. Unless you have very acidic soil (<6.8 pH) and the eggshells are ground into a fine powder, they will add nothing to your soil. Eggshells and blossom end rot Blossom end rot is a condition that occurs when plants cannot move calcium to where it is needed. Calcium is an immobile nutrient because it takes a lot of water to move it around inside a plant. Calcium shortages can be due to low calcium levels in the soil [generally east of the Rocky Mountains] or irregular irrigation habits [generally west of the Rockies]. Get an inexpensive lab-based soil test from your local university or soil test lab to learn exactly what your plants are dealing with. Eggshells as a pest deterrent Crushed eggshells are said to be a barrier against slugs and snails, cutworms, and even deer. Those claims are false. The only thing you might find is some birds will be attracted to the shells, either through natural curiosity or as a calcium source during the egg-laying season, and some rats looking for a snack. I crush my eggshells and feed them back to my chickens. I don’t know if they eat them, but I think they do. Just in case, I offer oyster shells, as well, and water my tomatoes regularly. Epsom salts are wonderful in the bath, but they do not belong in the garden. Popular culture touts epsom salts as a garden miracle worker, but the truth is, adding Epsom salts to soil nearly always ends badly for plants.  Epsom salts (Public Domain) False claims about Epsom salts
The sheer volume of claims made about Epsom salts should be the first clue that there is a problem. Epsom salts are said to improve flower blooming, germination, photosynthesis, the uptake of other nutrients, fruit production and flavor, and to act as a valuable nutrient for overall health. Epsom salts are said to “enhance a plant’s green color” and “help plants grow bushier” while deterring pests, reducing blossom end rot, transplant shock, leaf curling, and chlorosis (yellowing). Epsom salts are also said to be a safe, reliable weed killer. With all these miracles provided by Epsom salts, why isn’t everyone using it all the time? Many advertisements and articles also state that Epsom salts are not persistent in the soil, so you cannot overuse it. Wouldn’t it be wonderful if all those claims were true? Unfortunately, they are not. The truth about magnesium sulfate Epsom salts, also known as magnesium sulfate (MgSO4), is made up of magnesium, sulfur, and water. Magnesium and sulfur are plant micronutrients. This means plants use them, but only in very small amounts. If a magnesium or sulfur deficiency has been identified via a lab-based soil test, Epsom salts can be safely used to counteract those deficiencies (assuming your soil is equally deficient in both nutrients at the same time). That’s also only after you are certain that the deficiency is not being caused by too much or too little of another nutrient. For example, too much phosphorus in the soil can make it difficult for plants to absorb magnesium, regardless of how much is present. [Are you beginning to see how important that soil test is?] Adding too much magnesium can cause just as many problems as having too little. More often than not, your soil probably has more magnesium than plants need. When I bought my house in 2012 and sent a sample out for a soil test, my results came back with 798 parts per million (ppm) for magnesium. The optimal range is 50 - 120 ppm. Whoever lived here before me kept adding more fertilizer (or Epsom salts), long after it was needed. Crops that commonly need magnesium include apples, beets, citrus, peppers, potatoes, tomatoes, and watermelon. Usually, deficiencies only occur when these and other crops are being grown intensively, and rarely in the home garden. There is no scientific evidence of Epsom salts repelling slugs, insects, grubs, voles, rabbits, or anything else. As for the blossom end rot claims, adding Epsom salts may actually interfere with your plants’ ability to take up calcium, making it more likely that your tomatoes will develop blossom end rot, rather than preventing it. Epsom salts may sound like a garden cure-all, but those claims should be filed under “too good to be true”. A healthy, productive garden does not come with quick fixes. Before jumping on a bandwagon, be sure you take the time to read the science behind those claims. And get a soil test. Your plants will be healthier and more productive, and you can save Epsom salts for the bath, where they belong. Some trees produce heavy crops each year. Other trees go back and forth between heavy bearing years and light bearing years. This is called alternate bearing.
Also known as biennial bearing, this tendency can explain why your fruit or nut tree doesn’t produce the same amount each year. It is not caused by pests or disease. It is simply the way some trees grow, mostly. Generally speaking, fruit and nuts are produced on long stems or on short, stubby stems called spurs. The spurs of alternate bearing trees tend to produce blossoms one year and leaves the next. This allows the tree to gather more of the sun’s energy, carrying it through its two year cycle of production. Therefore, it is not the tree, as a whole, that alternates production each year. Instead, it is the individual stems and spurs. Other causes of alternate bearing include weather conditions, such as a heavy frost that damages the blossoms, can result in a low production year. Since resources were not used to produce as much fruit that year, the following year will tend to be a heavy production year. Some trees may even take two years off after a particularly heavy year. In other cases, mineral deficiencies or excessive fertilization, especially nitrogen, can result in a cycle of alternate bearing to begin. Most perennial fruit crops start making fruiting buds during the previous season. If conditions are especially good or bad, those developing buds will become stronger or weaker, respectively. There is also some research that suggests the developing ovules of a heavy production year produce hormones that inhibit next year’s flower production. Scientists are still learning the details about what causes alternate bearing. Some commercial growers reduce the impact of alternate bearing trees by thinning blossoms and fruit on heavy production year. This is done to counteract the fact that fruit produced during heavy years tends to be smaller, while fruit produced during low production years tends to be of poor quality and more susceptible to pest and disease damage. Evening things out improves crop quality and tree health. Citrus, apple, pear, avocado, apricot, plum, mango, cranberry, blueberry, olives, pecan, and pistachio are common plants that exhibit alternate bearing behavior in the home garden. Grapes almost never do. You can reduce the negative impact of alternate bearing on your fruit and nut trees with proper pruning, irrigation, and feeding, along with regular fruit thinning, soil tests, and protective treatments against pests and diseases. Now you know. |
Welcome!You can grow a surprising amount of food in your own yard. Ask me how! To help The Daily Garden grow, you may see affiliate ads sprouting up in various places.
You can also get my book, Stop Wasting Your Yard!  Index
All
Archives
July 2024
|


 RSS Feed