|
PEST ALERT: Japanese beetles have found their way to the West Coast! If you ever lived on the East Coast, you’ve probably seen the devastation caused by Japanese beetles. These shiny green and bronze pests skeletonize leaves and can completely defoliate smaller trees and shrubs. If that weren’t bad enough, their larva attack from underground, feeding on root crops and lawn roots. 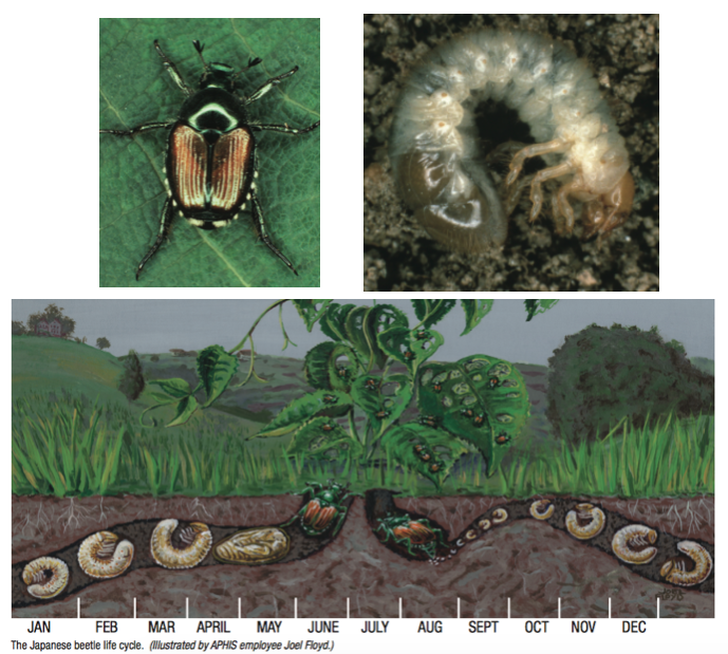 US Department of Agriculture Animal and Plant Health Inspection Service Japanese beetle identification
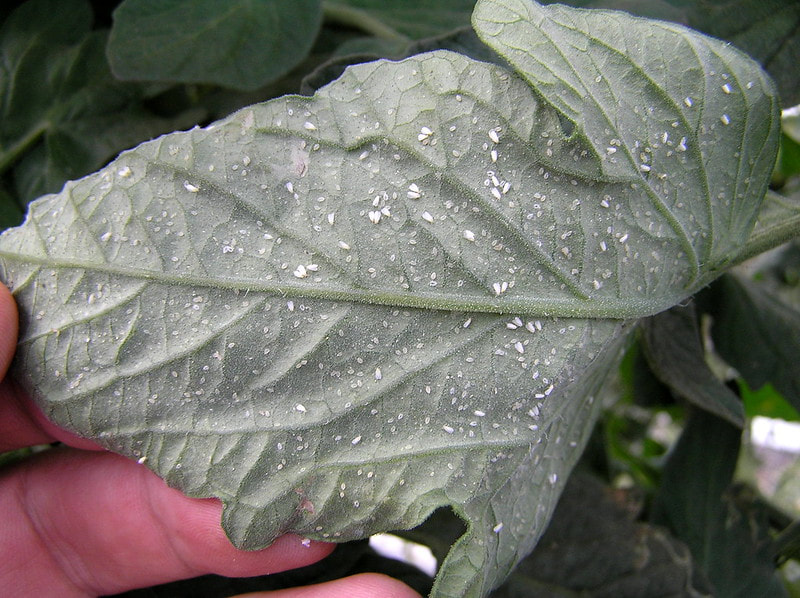
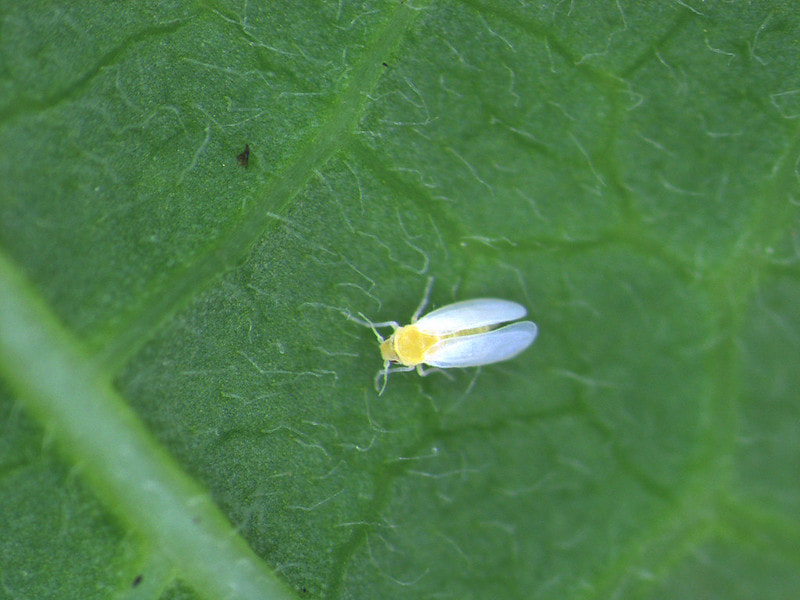
Adult Japanese beetles (Popillia japonica Newman) are just under ½” long and slightly less wide. Males tend to be a little smaller than the females. Japanese beetles are easily recognized by their metallic green body and shiny bronze outer wings. They are clumsy flyers. Up close, five small tufts of white hair can be seen on either side of the body. Beetle larva are about 1” long and white, with a small copper-colored head and a larger copper-colored rear end. Like many other grubs, they rest curled up in a C-shape. Japanese beetle lifecycle Japanese beetles go through complete metamorphosis. Female beetles burrow into the top 2-4” of soil, normally in turf and lawns, to lay 40-60 eggs throughout an area. These eggs hatch as larva in midsummer. Larval beetles go through 5 molts (or instars), feeding heavily on turf roots and root crops for several months. In the final instar, they reach a pupal stage. The pupae are reddish-brown to tan and ½” wide. The larva often burrow deeper into the soil for winter. Damage to lawns is often the first sign of an infestation. Mature beetles emerge in late spring and early summer to begin feeding above ground and to look for mates. Destructiveness of Japanese beetles Adult Japanese beetles attack over 200 garden plants. Every part of the leaf is eaten except the veins, causing skeletonization. Favorite foods include tomatoes, grapes, peppers, roses, cherries, peaches, pears, raspberries, corn, blueberries, beans, and strawberries. For a complete list of host plants, see the Wikipedia page on Japanese beetles. Larval forms of the beetle feed for several months on lawn roots and some root crops. The first sign of Japanese beetle infestation may be dead areas of a lawn. A drench test can be conducted to see if grubs are the cause of the problem. To perform a drench test, mark off a one square yard area of lawn (3’ x 3’) that includes both healthy and unhealthy grass with a rope or other clear marker. Mix 2-4 tablespoons of liquid dish soap with one gallon of water in a watering can. If the soil is especially dry, two gallons may be needed. Apply the solution evenly within the area. The soapy water will bring insects to the surface. Over the next ten minutes, check the area for visible signs of grubs and other insects. How to control Japanese beetles Pheromone traps are not recommended as a control for Japanese beetles. Research has shown that pheromone traps actually attract 25% more beetles than are captured. The majority of attracted beetles end up feeding on plants near the trap, rather than entering it. Beetles can smell the pheromone attractant from 1 kilometer (0.62 miles) away, so this method is counterproductive in areas with heavy populations. It may be effective locally, as we try to nip this potential tidal wave in the bud. Traps should be checked weekly. Habitats can be modified by adding plants that are resistant or unattractive to Japanese beetles. According to Held (2004), in “Relative Susceptibility of Woody Landscape Plants to Japanese Beetle,” Journal of Arboriculture 30(6), pp. 328-335, dogwood, forsythia and hydrangea are just a few plants that Japanese beetles find distasteful. For a more complete list, see the North Dakota State University page on Japanese beetles. Biological control can be achieved by introducing nematodes. Specifically, Heterorhabditis bacteriophora and Steinernema glaseri species have been effective. These nematodes are available commercially. They attack the grubs and should be applied in August. Milky spore disease is also effective against Japanese beetles. This bacteria (Paenibacillus popilliae) is eaten by the grubs and then causes fat depletion, resulting in dead grubs. Milky spore is not available for sale in some states, so ccheck with your local Master Gardeners. Insecticides have been used to control Japanese beetles, but timing is critical and the results may be a mixed bag. Systemic insecticides take time to work and must be applied repeatedly. PEST ALERT Japanese beetles were first found in the U.S. in 1916. Since that time, they spread west to the Rocky Mountains. Unfortunately, in 2015, a male and female Japanese beetle were found in Sunnyvale, CA. It was hoped that that was the extent of the infestation, but we don’t know for sure. If you think you see one of these destructive pests, please the call the Pest Hotline at 1-800-491-1899. You pluck an orange from a tree and a tiny white insect flies out from under a leaf. On the underside of that leaf is a strange white spiral. You have discovered whiteflies.  Whitefly on underside of leaf Whiteflies are not related to flies at all. Instead, they are close cousins to aphids, mealybugs, soft scale and armored scale. These pests cause billions of dollars in plant damage each year, sucking the sap from 500 different plant species, including your cabbage, cucumbers, eggplant, melon, squash, and tomatoes.  Ash whitefly (OSU) CC BY-SA 2.0 Whitefly identification Whiteflies got their name because most of them look like tiny white flies. Adult bodies are actually yellow or black, but they are hard to see. Whiteflies have 4 white wings and are often no bigger than 1 mm, which means you could stand 14 of them, end to end, across an American dime. Whitefly species There are more than 1500 whitefly species, worldwide. In California, we have 10 whitefly species that cause problems in the garden:
 Giant whitefly infestation (Scot Nelson) Public Domain Whiteflies are quick and difficult to see. It is easier to tell if a garden is infested with whiteflies if you see white spirals on the underside of leaves. These spirals are whitefly eggs. Whitefly lifecycle Adult females walk a spiral path, laying eggs in a waxy trail that holds the eggs to the leaf. In warmer parts of California, whiteflies can breed year-round. Whiteflies can reproduce at mind-boggling rates. They go through four developmental stages, or instars. Eggs hatch out as nymphs, called crawlers. The next three stages are nearly immobile, much like scale insects. The final instar is a pupal stage. Whitefly damage At each stage, these pests use piercing mouthparts to suck sap from the phloem of a wide variety of garden edibles and ornamentals, causing leaf drop and a general failure to thrive. The honeydew (sugary poop) left behind is host to sooty mold. Honeydew also attracts ants, which then protect whiteflies from their natural enemies. Some whitefly larva may transmit viral diseases, such as cucurbit yellow stunting disorder and tomato yellow leaf curl. Also, adults can carry other pathogens. Low whitefly populations are not a significant problem, but they can make trees look shabby.
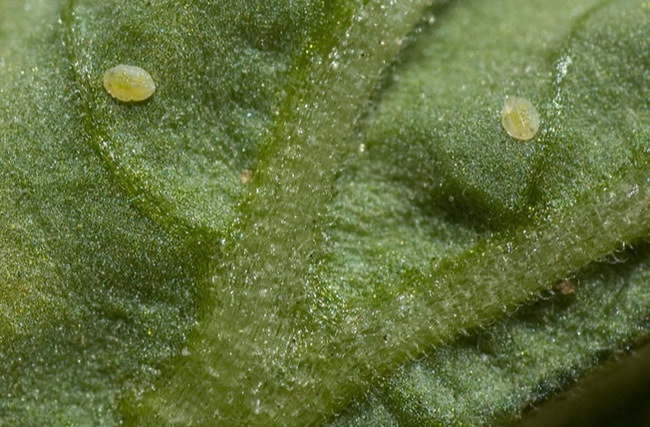
 Greenhouse whitefly on tomato (Scot Nelson) Public Domain Whitefly control Heavy whitefly populations are very difficult to control. Any leaves with whitefly eggs should be removed and discarded. If the leaf looks particularly healthy, you can simply rub your thumb over the eggs to destroy them. Reflective mulches repel adult whiteflies, aphids, and leafhoppers. Also, yellow sticky traps can be used to trap and monitor whitefly populations.  Whitefly egg spiral on hibiscus (Scot Nelson) Public Domain Natural predators, such as minute pirate bugs, green lacewings, big-eyed bugs, and hummingbirds are the best defense against whitefly infestations. You can attract these garden helpers by planting zinnias, bee balm, hummingbird bush and pineapple sage. Whitefly population explosions are often created when gardeners apply broad-spectrum pesticides that kill off beneficial predators, or when ants are allowed free access to host trees. Ants can be prevented from protecting whiteflies by applying a sticky barrier around the trunk. Dusty conditions can also put the odds in favor of whiteflies. Washing off dusty plants with a garden hose can help reduce whitefly populations. 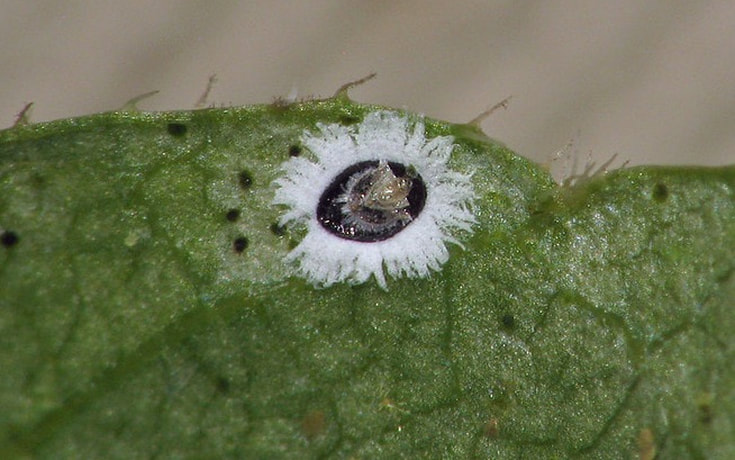 Mulberry whitefly pupa (Grover Schrayer) Public Domain According to companion planting lore, whiteflies can be discouraged from an area by planting basil, mint, thyme, and nasturtium. I don’t know if that works, but those plants are nice to have, in any case.
UPDATE (12/24/19): You may be surprised to learn, as I was, that plants release chemical compounds when bitten by insects or herbivores. These chemicals communicate with nearby plants, telling them to start protecting themselves against specific threats. These chemical messages also alert parasitic wasps and other beneficial insects, calling in the troops to protect the plant. Researchers have recently learned that silverleaf whiteflies have developed the ability to flip this self-defense mechanism to their advantage. It works like this. Whiteflies are known to carry viruses. When a whitefly bites plants, those plants used to defend themselves against the whiteflies. Now, they work harder to defend themselves against potential viral infection and create a more suitable whitefly habitat. This misinformation spreads to nearby plants, creating a cascade effect that can be very difficult to manage. It’s a war zone out there! Does it look like someone attacked your tree with a shotgun? Are leaves pelleted with BB-sized holes? If so, your tree may have shot hole disease.  Cherry leaves infected with shot hole disease Shot hole, or Coryneum blight, is a fungal disease of stone fruits, such as almonds, apricots, nectarines, peaches, plums, and prunes.
Symptoms of shot hole disease Spring is when shot hole fungi attack new growth. The damage first looks like small (1/10-1/4”) reddish or purplish-brown spots. There may be a light green or yellow ring around the holes. These spots get a little bigger, dry up, and the damaged tissue falls off, leaving the signature BB hole. As the fungus spreads, more leaf tissue is damaged until the leaf falls. Significant infections can reduce photosynthesis, weakening the plant and decreasing fruit production. The fungi can also affect the fruit, leaving toughened spots on the skin. Branches may develop concentric lesions when infected. Preventing shot hole disease Since the fungi thrive in wet conditions, avoid overhead watering. Remove any infected buds, leaves, fruit, and twigs and throw them in the trash. In the fall, apply fixed copper or Bordeaux mixture treatments. Bordeaux mixture is one part copper sulfate, one part slaked lime, and ten parts water. This mixture can injure leaves, so it is applied when trees are bare. It can also leave a blueish-green stain on walkways, fences, and buildings, so use it cautiously. You can buy ready-made Bordeaux mixes, but it tends to stick to leaves better when fresh. Total coverage is essential for either of these treatments to be effective.
Unlike other plant cells, slime mold cells have no cell wall. Instead, they are one giant, gooey cell with countless nuclei. This enlarged cell is called a plasmodium. As the tissue breaks down, you may see dark-colored spots of red liquid on the surface. In a couple of weeks, the mass will flatten out and dry.
Besides being funny-looking, dog vomit fungus is not harmful. Even if there was a way to get rid of them (which there isn’t), they don’t hurt anything other than your sense of beauty and aesthetics. Slime molds are important to garden biodiversity. They help break down woody materials and return those nutrients to the soil. Did you know that slime molds can be used to determine the most efficient layout for streets and highways? It’s true! It may sound like the title of a cheesy horror movie, but most parasitic wasps are your friends in the garden. That being said, there are some really strange truths about parasitic wasps that I can't wait to share with you!.  Tomato hornworm covered with the cocoons of pupating braconid wasps (David Hill) (CC BY 2.0) Parasitic wasps are not the hornets or wasps that plague summer picnics. Parasitic wasps tend to be tiny and they prey on garden pests, especially plant-sucking varieties, such as the eugenia psyllid. Also known as parasitoid wasps, this distinct group has evolved to lay their eggs on or in the body of their victim. When the eggs hatch, the larvae use the host’s body for food. Okay, it does sound like a cheesy horror movie! And it’s happening around you all the time. Unfortunately, some of these warrior wasps also attack other beneficial insects. Those wasps are called hyperparasitoids. Check out this amazing video of a parasitic wasp depositing eggs in an ant!  Cees van Achterberg and José María Durán CC BY 3.0 Like other wasp species, parasitic wasps have segmented antenna, only more. Parasitic wasps have 16 or more segments! There are two major varieties of parasitic wasp: Braconid [brac·o·nid] and Ichneumonid [ik·neu·mon-id]. The only real difference between the two species is their wing vein patterns (venation). Braconid wasps do not have a cell in the middle of the wing, whereas the Ichneumonidae do, but you’ll probably never notice.
Ichneumonid wasps Ichneumonid wasps vary greatly in size, ranging from a few millimeters to 7 or more centimeters. They tend to be bright yellow or black. There are 24,000 known species with an estimated total of 60,000-100,000, or more, making them the most varied members of the hymenopteran family. Unlike the Braconid wasp, female Ichneumons deposit venom into hosts, along with their eggs. Only the larger varieties of ichneumons can sting humans. Male wasps do not have stingers. Braconid wasps Braconid wasps are usually brown or black and some have red markings. There are 17,000 known species of Braconid and some estimates go as high as 50,000 different varieties! How’s that for a family tree? But the truth about Braconid wasps are stranger than any science fiction story. One hundred million years ago, their ancestors were infected with a virus. The wasps that survived that infection were then able to recreate the virus. On purpose! When braconid wasps deposit their eggs, they also inject the virus, which infects the host’s immune system. This infection makes the host unable to defend itself against the wasp’s offspring. The viruses have evolved within parasitic wasps to the point that they are unlike any other virus on the planet! Braconid wasps have an amazing sense of smell. They also have the ability to be conditioned to respond to certain smells by being rewarded with food (sugar water). Braconid wasps can be trained, within 5 minutes, to respond to explosives, illegal drugs, or human or plant diseases! How bizarre is that?!!? Parasitic wasp menu When parasitic wasp eggs hatch, they are hungry. Luckily for us, their favorite foods are the larval forms of many destructive garden pests. Parasitic wasps are one of the most effective regulators of insect populations. It is estimated that 10-20% of a region’s insect population is parasitized by these wasps. Ichneumonid wasps also eat nectar and sap. Wasp menus include moth and butterfly caterpillars (Lepidoptera), beetles (Coleptera), sawflies, ants, bees and other wasps (Hymenoptera) and aphids. Some varieties also eat spiders. Spraying broad spectrum pesticides can kill beneficial parasitic wasps, along with pests. It is a better choice to keep plants healthy naturally and to maintain an environment with plenty of biodiversity. This way, you can put nature to work for your garden! Planting it forward means adding plants to a landscape that can be gifted to others, shared at a holiday meal, or otherwise used at a specific time in the future. It also means designing a garden or landscape that provides year-round food and color.  Tomato in hand Seasonal planting As one season passes and another arrives, a whole new set of conditions take the stage. Sunlight hours, temperatures, and rainfall make it easier for some plants and harder for others. Planning a garden design for year-round food and flowers can increase biodiversity and pollination, while reducing weeds, pests, and erosion. It also makes a landscape look lovely every month of the year.
Nectar is the sugary liquid found in flowers. While the ratios can vary, nectar is generally 55% sucrose, 21% fructose, and 24% glucose. Basically, it’s the fruit punch of the plant world. Nectar is produced in a gland. [Who knew plants had glands?!!?]
Nectar as food
Other plants use nectar as payment to mutualistic animals and insects that attack the plant’s enemies. The glands that produce nectar as a food for these beneficial insects and other animals is physically separate from the flower. They are called extrafloral nectaries. Bats, hummingbirds, butterflies, lady beetles, moths, wasps, ants, and bees all eat nectar. They also chase off, attack, and kill insect herbivores and seed easters that may threaten this easy food source. As these beneficials move from flower to flower, feeding on nectar, they can also carry pollen and improve pollination rates. Nectar to honey Honey bees collect nectar and use it to make honey. Nectar has a much higher water content (60-80%) than honey (20% or less). Honey bees “ripen” the nectar by mixing it with enzymes in their abdomen. Then they regurgitate it and fan it with their wings to evaporate the water. I don’t know about you, but my mornings nearly always start with coffee. I’ve been making and drinking coffee for a really long time. And all that coffee brewing ends up leaving behind a lot of coffee grounds. It is estimated that Americans drink 700 million cups of coffee a day, which translates into nearly 17 million pounds of coffee grounds per day!  Morning coffee at The Coop There are many claims made about coffee grounds in the garden. It is said that they repel cats and insect pests, prevent weeds, kill slugs, add nitrogen, aerate the soil, and attract earthworms. Until recently, however, there wasn’t much real scientific proof behind any of those claims.
Chemicals in coffee grounds We now know that coffee grounds contain 1-2% nitrogen after brewing. That’s not much in the way of plant nutrition. Coffee grounds also contain 0.3% phosphorus and 0.3% potassium, plus cellulose (carbohydrates), structural lignin (woody plant parts), triglycerides (oils), lipids (fats), protective phenolics (flavonoids/non-flavonoids), and essential oils. There may also be a small amount of caffeine remaining. Breaking down coffee grounds After adding coffee grounds to the garden, fungi and bacteria work to break them down. These bacteria, in turn, are believed to help suppress many common fungal diseases, such as fusarium wilt, cavity spot (Pythium), and white mold (Sclerotinia). The caffeine and nitrogen decompose quickly, while other ingredients take longer, as with any other organic matter. Earthworms tend to pull coffee grounds deeper into the soil. This action aerates the soil, improves soil structure, and provides nutrients to deeper roots. The slower to decompose ingredients in coffee grounds provide humic substances (a fancy way of saying humus - the organic components of soil). In this use, organic does not mean chemical-free. The word organic refers to the fact that it came from living things. As coffee grounds decompose, the carbon-to-nitrogen ratio changes from high (25:1) to the ideal (10:1). The carbon-to-nitrogen ratio is important because soil microorganisms need both carbon and nitrogen when they feed. If the ratio is high (with more carbon), they will pull nitrogen from the soil. If the ratio is lower, these microorganisms will leave nitrogen behind for the plants. Effects of coffee grounds in soil Coffee grounds help moderate soil temperature, the same as any other mulch. Research has shown that coffee grounds bind to pesticide residues and toxic heavy metals. This is a really good thing because it keeps those chemicals from entering your plants. I have seen claims stating that coffee grounds help make nitrogen, iron, phosphorus, and zinc more easily available to plant roots in areas with alkaline soil, but I haven't found any verifiable proof. Contrary to common belief, coffee grounds do not consistently acidify soil. The pH of decomposing coffee grounds is very unstable and can range from mildly acidic to mildly alkaline. Plus, those changes in pH only affect the immediate area and not the soil profile as a whole. How to get the most out of coffee grounds in the garden Coffee grounds can be applied to the soil surface as a mulch (no more than 1/2” thick) or composted as a soil amendment. Fresh coffee grounds can cause light sensitivity (phytotoxicity) to above-ground plant parts, so direct contact should be avoided. Here are a few more interesting facts about coffee grounds in the garden:
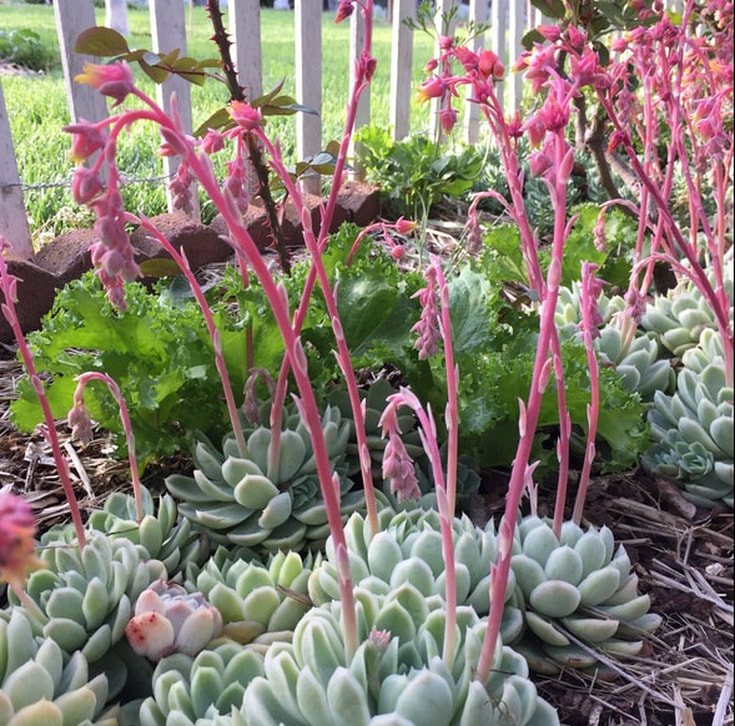
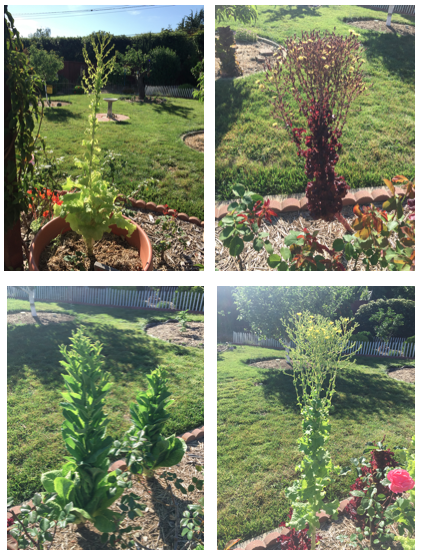
So, enjoy that cup of java and let your garden make the most of what's left behind! Like an arrow from a bow, many plants may suddenly send up new growth, covered with flowers. This is called bolting.
What causes bolting?
Bolting is caused internally by plant hormones. These hormones can be triggered by a sudden heat wave or cold snap, changes in sun exposure, water stress, or insufficient nutrients in the soil. Cool season annuals, in particular, have evolved to go to seed when cool temperatures turn warm or hot. Mulching, regular watering, and planting resistant varieties can all help reduce the chance of bolting. Which plants tend to bolt? Lettuces are very prone to bolting. Onion, celery, basil, spinach, beets, rhubarb, and members of the brassica family (broccoli, cabbage) are also likely to bolt. Unfortunately, bolting often makes plants taste bitter. In most cases, once bolting starts, there isn’t much that can be done. Harvest what is edible. Rhubarb is generally the only exception. If rhubarb starts to bolt, the flowering stems can be removed without negatively impacting the crop. You can reduce the likelihood of bolting by including these plants in your shade gardens. Before removing other bolting plants, however, consider taking advantage of this garden opportunity. Take advantage of bolting Rather than cutting down plants that have bolted, consider leaving them alone and letting them do their thing. By leaving lettuces in my garden after bolting, I now have lettuce popping up all over the place. If a more tidy garden is desired, seeds can be collected from plants that have bolted and planted more deliberately. Personally, I have a high tolerance for a little chaos in the garden. By allowing bolted plants to go through their life cycle, fertilized seeds end up in a larger variety of locations. Plus, the flowers provide pollen and nectar to beneficial insects. As a result, I have a far bigger crop and more biodiversity! What summer picnic would be complete without the tang of rhubarb pie? While purists may enjoy their rhubarb raw, dipped lightly in sugar, many of us prefer rhubarb pie with luscious strawberries. However you eat rhubarb, it is a sturdy perennial that can provide shape, color, and food in a garden or landscape for decades. These plants can get pretty big, making rhubarb excellent anchor plants in a foodscape. 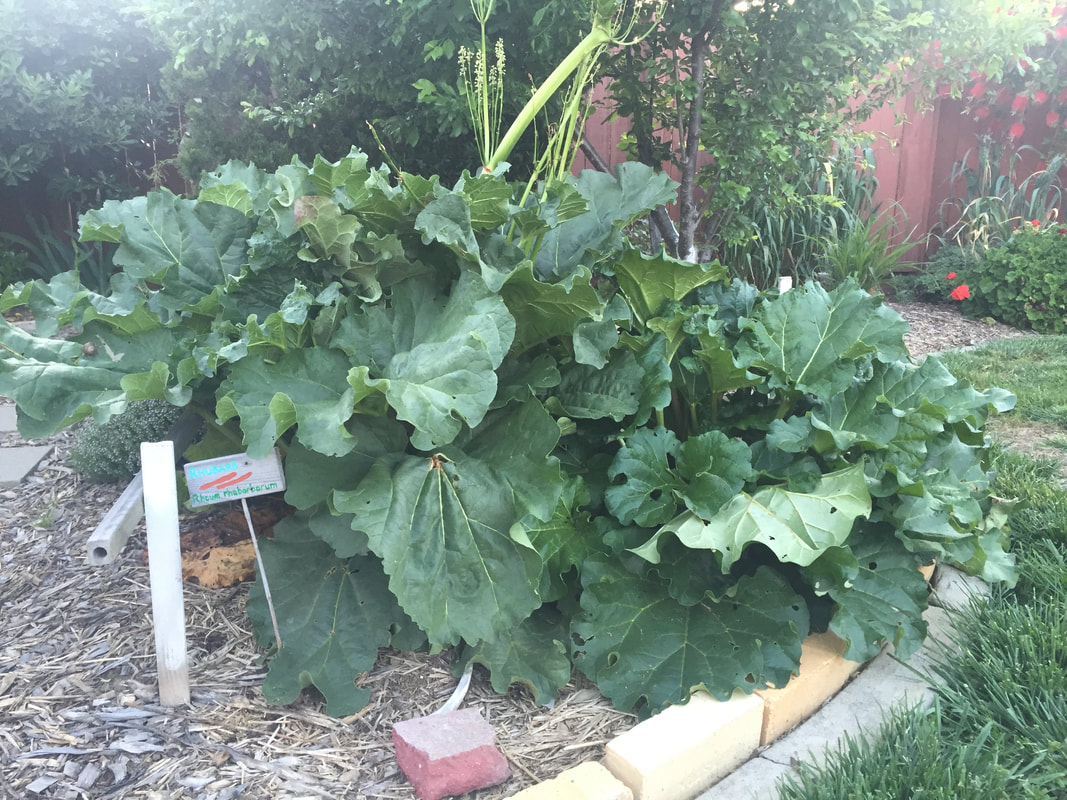 Rhubarb Rhubarb (Rheum rhabarbarum) is generally a cool season plant. It needs temperatures below 40ºF in the winter and prefers temperatures below 75ºF in the summer. That being said, I have had excellent success with rhubarb in San Jose (CA) where our peak summer heat can reach above 100°F. You may be surprised to learn that rhubarb is related to buckwheat. If you look at the seeds, you can see the similarity. Rhubarb is believed to have started in Asia, some 5,000 years ago. Marco Polo is cited as the one who brought it to Europe and Benjamin Franklin carried rhubarb to North America, way back in the 1700s!
How to grow rhubarb When selecting a site for rhubarb, keep the plant’s mature size in mind. Rhubarb plants can reach 3’ in height and 4’ in diameter. Rhubarb generally prefers full sunlight, but mine are under a small apricot tree (which probably protects the rhubarb from our summer heat). In temperate regions, the rhubarb harvest begins in April and continues until September. Individual plants will be productive for 8-20 years, but, since they grow from rhizomes, the plants will replace themselves over time. [Side note: my mother purchased a 200-year old farm house in Upstate New York many years ago and decided to plant rhubarb along the southern side of an outbuilding. Apparently, the original owners felt the same way because, come spring, not only did the new plants come up, but so did the offspring of the original plants! Needless to say, Mom had plenty of rhubarb!] Rhubarb can be grown in large containers, as long as there is enough room for a season’s growth. Rhubarb will do much better in the ground. Follow these steps to get your rhubarb patch started:
*While rhubarb leaves are mildly toxic, they are not the poison we have been led to believe. You would have to eat several pounds of rhubarb leaves to cause problems. In fact, spinach has more oxalic acid than rhubarb. That being said, I do not feed them to my chickens. One easy way to keep weeds down in a rhubarb patch is to simply take a few of the large rhubarb leaves and lay them on the ground. The leaves block sunlight needed by the weeds and then they break down, adding organic matter to the soil.
Get your rhubarb crowns in today for a lifetime of red-stalked deliciousness! Acrobatic hummingbirds are delightful garden visitors. Not only are they fun to watch, they are excellent pollinators! Creating a habitat for hummingbirds increases pollination, reduces pests, and adds biodiversity to the landscape. Hummingbirds are naturally attracted to red, tubular flowers. Adding these plants to the garden is a beautiful attraction to hummingbirds:
Hummingbird feeders are a popular method of attracting hummingbirds, but the red dye contained in commercial food may not be good for these tiny fliers. There isn’t any real research available, but Red Dye #40, the most commonly used, is made from coal tar. It just doesn’t sound healthy. Plus, there is no need to add dye to the sugar-water mix in a hummingbird feeder. Most feature red plastic, which is all that’s needed to get a hummer’s attention.
To make hummingbird food, mix 1 part white sugar with 4 parts water and stir well. Do not use brown, ‘raw’ or turbinado sugars, as they contain iron, which can become toxic to hummingbirds. Honey and artificial sweeteners should also be avoided. To reduce the chance of bacterial and fungal infections, it is recommended that this mixture be boiled for 2 minutes and then cooled before putting in a feeder. (Extras can be stored in the refrigerator.) Hummingbirds are very territorial and they will aggressively defend their food supply against other hummingbirds. To offset this tendency, planting a wide variety of flowers and hanging multiple feeders in different areas of the yard will attract the maximum number of hummingbirds to the garden. A hummingbird’s long beak can reach nectar from flowers that many other pollinators dismiss, leaving the pollen untouched. Hummingbirds also eat nectar and insects, such as gnats, flies, ants, and spiders. So, the next time an ant trail is seen leading to the hummingbird feeder, leave it alone. These tiny morsels are like protein-infused potato chips to a hummingbird! Unlike most other birds, hummingbirds seem to have a genuine curiosity about humans. If you are very patient, you can even get a wild hummingbird to perch on your finger! Codling moth (Cydia pomonella) is one of the worst orchard pests. The larval stage of these moths burrows into the core of apples and pears, and the nut meat of English walnuts, leaving a tunnel filled with frass (bug poop).  Damage to apple caused by codling moth larva (USDA) Public Domain Codling moth identification Codling moths are mottled gray in color, so they are camouflaged when on tree bark. If a codling moth is trapped, a copper band can be seen along the outer edge of the wing. Codling moths rest with their wings held like a tent over the body. Adults are 1/2-3/4” long. The larvae are white to pink worms with a black head and they are usually only seen when you bite into an infested apple or pear. Yuck! Uncontrolled codling moth infestations can damage 20-90% of a crop. Infested fruit can be eaten, but the damaged parts should be cut out because they can contain mold toxins (aflatoxin).  Female codling moth (Simon Winkley & Ken Walker, Museum Victoria) CC BY 3.0 au Codling moth lifecycle In late April and early May, adult moths emerge from cocoons that have overwintered in the soil and leaf litter around host trees. These moths have only one thing on their minds: sex. After mating, female codling moths lay 30-70 eggs on leaves, spurs and fruit. When this abundant family hatches, the only thing on their mind is your apples and pears. Larvae burrow into the fruit to eat and eat and eat. Then, they leave the fruit (hopefully, before anyone took a bite) and drop to the ground. Here, they hide in the soil or leaf litter, where they enter a pupal stage. Depending on the weather, there can be as many as four generations a year.  Adult codling moth Olaf Leillinger CC BY-SA 2.5 Codling moth controls
Since the lives of codling moths are all about reproduction, managing their courtship has been one of the best control methods. Since most insects find mates by the sense of smell, pheromone traps are very effective. Pheromones are sex hormones. When a male codling moth gets near a pheromone trap, he becomes too confused to find a mate. Also, these traps feature a sticky substance that traps the moths. These can be found at most garden supply stores. Pheromone traps work best in solitary trees, when several traps are used. According to companion planting lore, codling moths are said to avoid areas where garlic and wormwood are planted. To prevent codling moths from laying eggs on fruit, individual fruits can be protected with paper lunch bags. To bag apples and pears, wait until the fruit is 1/2-1” in diameter. Thin fruit to one to a cluster (which generates bigger fruit). Simply lift the bag over the fruit and fold the edges over and staple the bag shut. This will protect your pears and apples, but it interferes with color development. Many gardeners remove the bags 1 or 2 weeks before harvest to allow fruit to reach its normal mature color. Some commercial growers use insecticides to kill codling moth eggs, but the timing and temperatures must be exactly right for it to be effective. Once the larvae enters the fruit, it’s too late. A biological insecticide, codling moth granulosis virus (CYD-X), is now available in California. This virus attacks coddling moth larvae when they eat it. Gardeners can also dust fruit with kaolin clay to prevent coddling moth infestation, but coverage must be complete to be effective. Kaolin clay is very fine clay used to make porcelain. While it doesn’t hurt people or animals, it is deadly to insects. Being so fine, it clogs their breathing holes. As an added benefit, kaolin clay improves photosynthesis and helps keep trees a little cooler through the summer! Sometimes, the only direction available to an urban gardener is up. Tower gardening is a great solution for small spaces, lack of soil, or unfavorable conditions. Even if there is plenty of garden space, tower gardening can make better use of space and add nice color and structural accents to a garden.  Strawberries growing in tower An extension of container gardening, towers can be used indoors or out. If climbing plants are used, tower gardens can supplement a window sill garden by providing more soil without using up a lot of space.
Which plants can be grown in towers? It is astounding how many different types of plants can be grown in tower gardens. Whether you are foodscaping or simply adding color, tower gardens are very versatile. Strawberries, potatoes, herbs, lettuce, spinach, radishes, squash, succulents, and other ornamentals are just a few. As plant selections are being made, keep in mind how much sunlight is available, your local microclimate, and what plants will actually be eaten or enjoyed. (There’s no sense growing a bountiful crop of Brussels sprouts if no one is going to eat them!) How to make a tower garden After deciding what to grow, it is time to build a garden tower. Garden towers can be placed on the ground or on top of a large planting container. In its simplest form, a tower garden is nothing more than a cylinder of wire filled with potting soil. There are high-tech versions that incorporate irrigation, hydroponics, and much more than we will go into here. (I’m a big fan of keeping life simple.) For our garden tower, hardware cloth or chicken wire are the best materials for the cylinder. Landscaping cloth can be used with stakes, all by itself, but those tend to fall over. Begin by deciding the tower diameter. Multiply that figure by 3.5 for the length of hardware cloth needed. Most hardware cloth comes in 36” or 48” heights. Either is fine. Cut the hardware cloth to the desired length and roll it into a cylinder. Join the edges with wire, paper clips, or whatever is on hand, with a little overlap; just make sure it won’t break down after extended exposure to sun and moisture. Place the cylinder where it will remain and then line the inside with newspaper, landscape cloth, or straw. This job can be made easier by slowly adding soil as you go. The soil will hold this barrier up against the tower. If potatoes or strawberries are being planted, plants can be added at different soil levels for a bigger crop. Otherwise, keep filling the tower with high quality potting soil up to the top. Now you are ready to really start planting! Planting a tower garden Using a screwdriver or similar pointy object, poke holes in the side of the tower garden. Your fingers can make the hole as large as is needed to insert seeds or seedlings. Continue the process until you run out of appropriately spaced plants or seeds, depending on the variety being planted. Water thoroughly and regularly as the seeds sprout or the seedlings take hold. As plants grow in a tower garden, the roots will spread throughout the soil, collecting nutrients and water. If you happen to notice stray worms on the ground after a rain, add them to the tower garden for better aeration and soil structure. Aged compost can be placed on top and watered in to add more nutrients to the soil. Over time, your tower garden crop will grow and thrive. As an added benefit, weeding is almost completely eliminated with tower gardens! Have you ever seen strawberries with leaves growing out of the fruit? This is called vivipary. 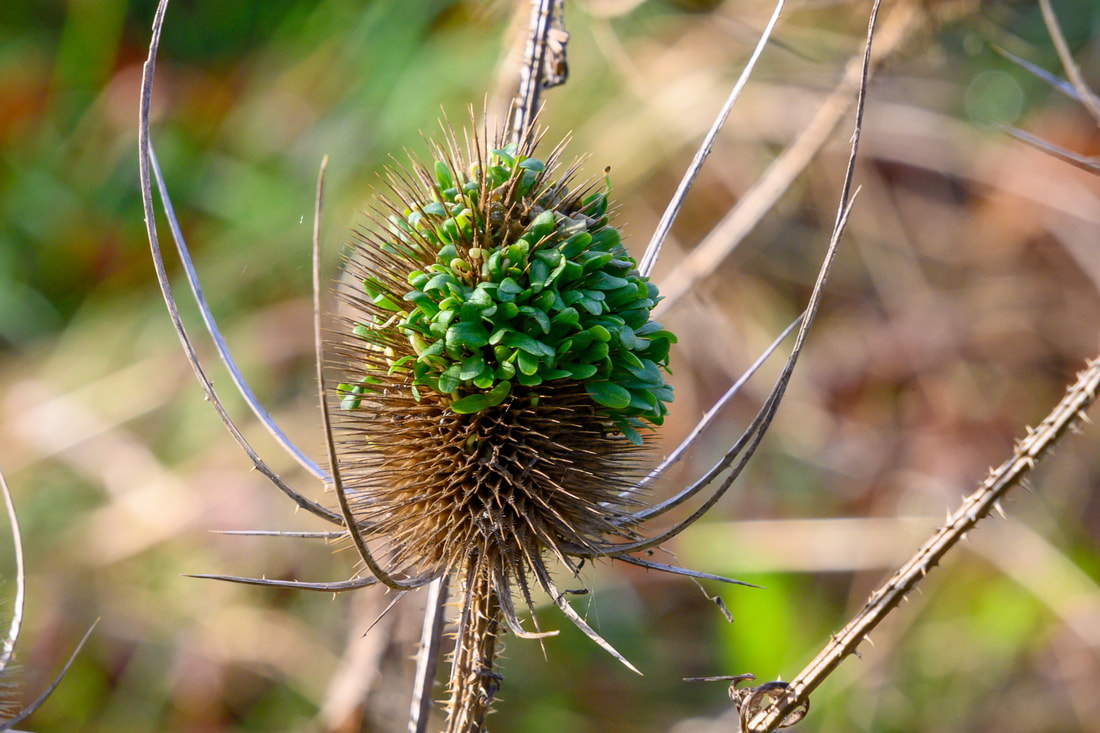 Teasel head with seeds germinating while still attached (vivipary) (TheDragonflyMan) CC BY-SA Vivipary, also known as phyllody, describes a condition that occurs when the embryo within the seed breaks through the seed coat while still attached to the parent plant. Viviparity mean “giving live birth’. Viviparity is normal for mammals, but it looks strange when strawberries and other plants do it.
When strawberries begin to exhibit vivipary, the tiny black seeds on the surface, called achenes, are actually sprouting leaves! These fuzzy strawberries are still edible, but the tiny leaves don’t taste very good. After showing it to all your friends and neighbors, you could try planting the viviparous strawberry, but you wouldn’t have any luck. Strawberry seeds that develop viviparously generally do not develop any roots. Vivipary in strawberries is rare. While vivipary in other plants can be caused by phytoplasms (bacteria-like parasites carried by leafhoppers), physiological damage is the culprit in strawberries. This damage occurs in runners held in cold storage or subject to freezing temperatures during the winter. So, protect your strawberry plants in winter and enjoy those luscious fruit in summer without tiny leaves attached! Raised bed gardening is a method that uses a variety of materials to frame an area, elevating the garden soil from 12" to 36” above the surrounding soil. Raised beds tend to be more productive and easier to manage. One exciting new example of raised beds is keyhole gardens. 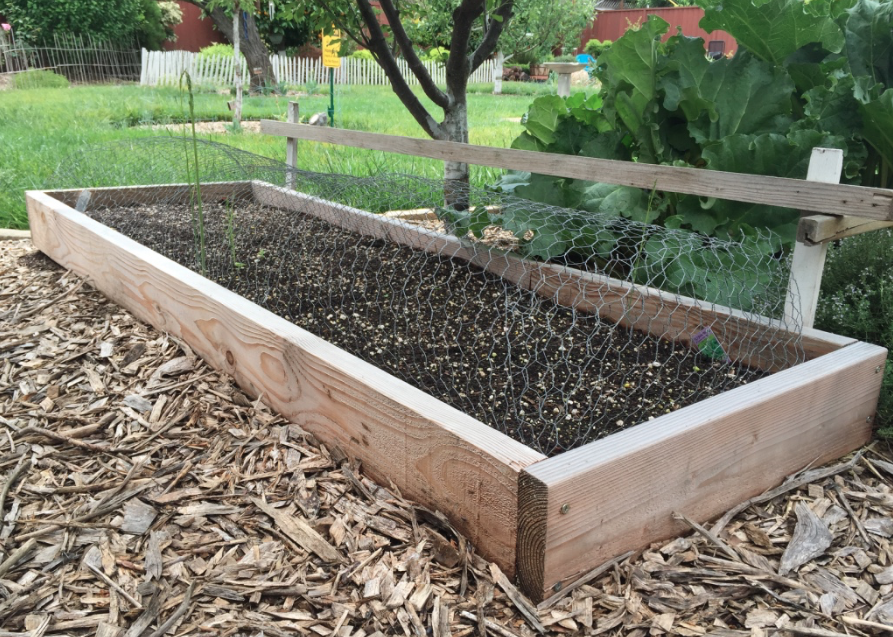 Benefits of raised bed gardening Raised beds in the garden make it easier to control soil structure, irrigation, and pests. Raised beds also allow you to plant earlier because the soil warms up more quickly. Generally, plants in raised beds are planted more closely together, creating a beneficial microclimate that suppresses weed growth and retains moisture. Since gardeners do not walk on raised beds, soil compaction is avoided, and they make reaching plants (and weeds) much easier! Raised beds are an excellent choice in limited spaces, or if you are a renter and not allowed to alter the landscape. Another added benefit of using raised beds is that it is very easy to add trellising, row covers and protective wire to keep birds away from seedlings. 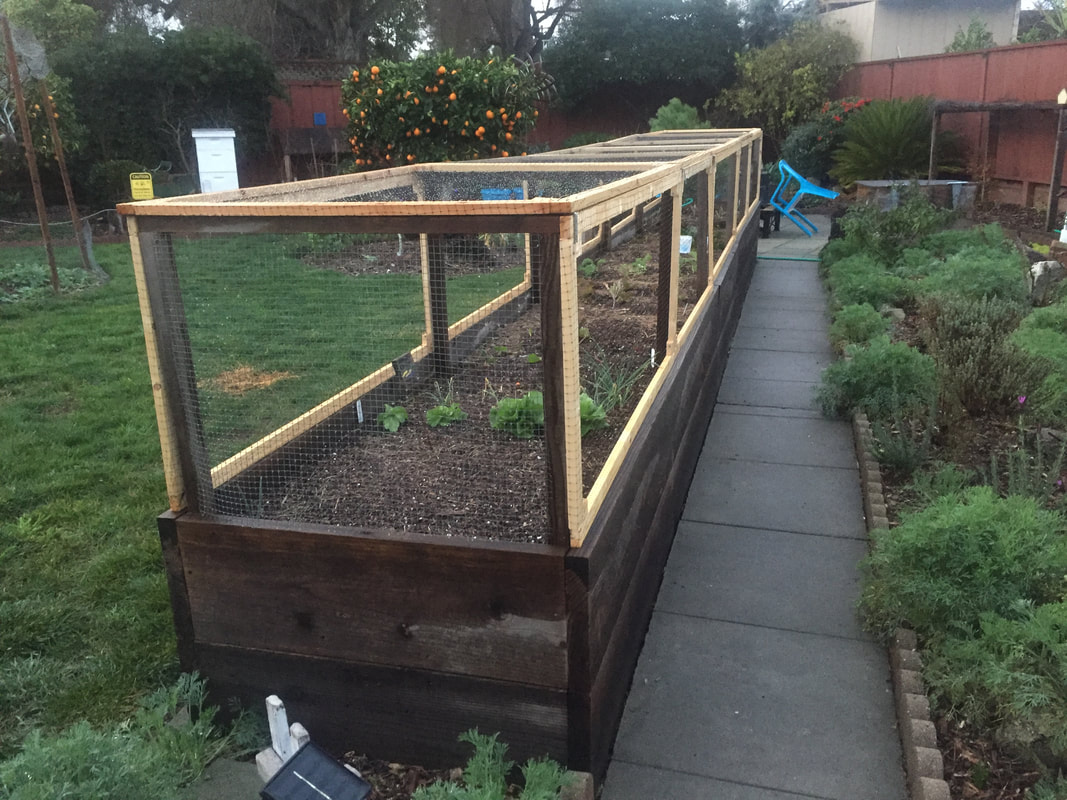 Netted or screened panels help keep pests out of raised beds How to build raised beds
Raised beds can be practically any size or shape. A raised bed can be nothing more than a walled area on the ground or it can be an elaborate artistic structure that showcases garden gems, or anything in between! You can see an excellent sampling of different types of raised beds at instructables.com. The steps below can help you get started creating your very own raised bed. 1. Select a location
2. Select building materials
3. Clear the area
4. Measure twice, cut once
5. Add soil
Plants for raised bed gardening Raised beds are a great tool for productive foodscaping, since the root systems of most vegetable crops are relatively shallow. If your raised bed is on the ground, however, it won’t matter. Even the worst soil is bound to improve over time, with a raised bed above it, to allow deeper-rooted plants to perform well. If ground squirrels and voles are a problem in your area, attached hardware cloth, not chicken wire, to the bottom of your raised bed. This will protect your plants' roots. The first rule of vegetable gardening is to plant what will grow where you are. Email me you zip code and I will send you a planting chart for your zone. Borage, or Starflower, is an easy-to-grow cucumber-flavored herb that thrives just about anywhere, even in areas affected by drought. Honey bees will flock to any garden with borage, improving pollination of nearby crops.  Borage flowers Native to the Middle East, borage was believed to ‘gladden the heart’ and to bring on bravery and courage - who doesn’t need more of that? The star-shaped flowers emerge pink or pale purple and then darken to bright blue. A white flowered cultivar is also available. Borage (Borago officinalis) is an annual that grows very quickly from seed, reaching a full size of 2-3 feet in just a couple of months. Borage grows so fast that it can become top heavy and individual branches may fall to the side. But don’t worry - those spaces will quickly be filled with new stems and abundant bright blue flowers. Pinching back stems can prevent plants from becoming top heavy. How to grow borage Borage seeds can be sown directly in the ground after the last frost date. Seeds should be covered with 1/4-1/2” of soil and kept moist, but not soggy, until sprouts emerge. Overwatering is the biggest mistake gardeners can make when growing borage. Borage prefers well-drained soil in a semi-neutral pH, with full or dappled sun, but it is often found thriving in the worst possible locations. Once borage plants are established, they need practically no care at all. Due to its tap root, borage is not suited to growing in containers. If that is your only option, use the largest container possible and pinch stems back frequently. 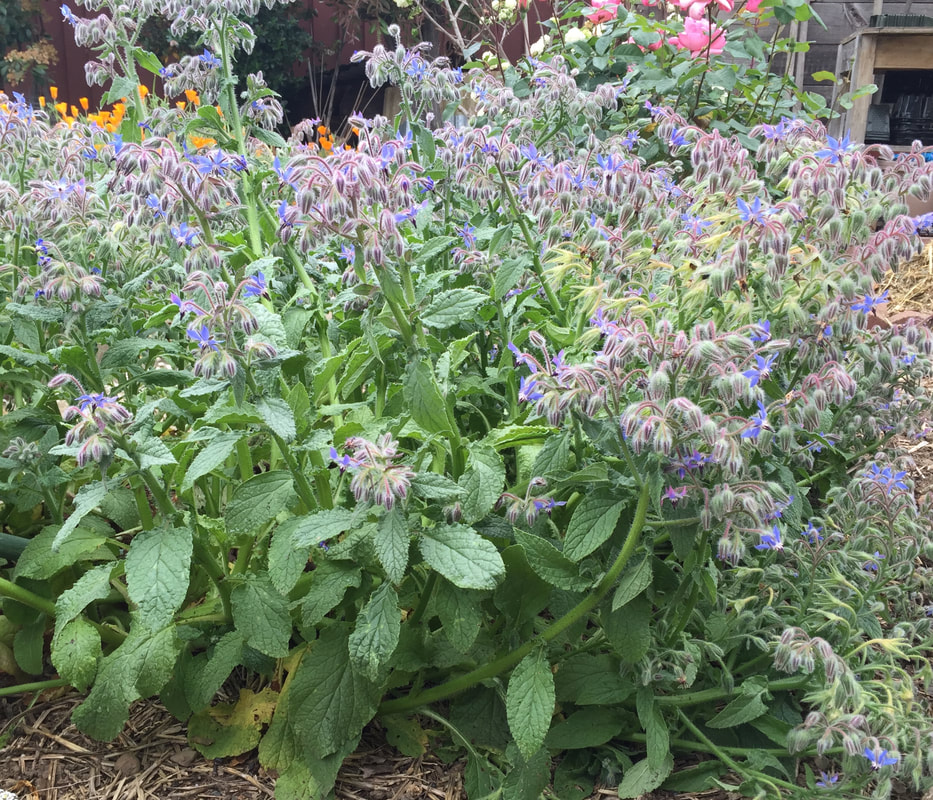 Borage hedge Select a dedicated site when growing borage because it reseeds readily, which means it will be around for a long time. Adding a thin layer of mulch each fall will feed and protect the next year’s generation. Temperatures permitting, borage plants will be a popular favorite of honey bees all summer long. Planting borage near cucumber, tomatoes, brassica, beans, grapes, summer squash, peas, and strawberries can significantly improve pollination and production.
Borage is an excellent addition to any butterfly garden and its calcium and potassium content benefit compost piles. Culinary uses of borage Every part of the borage plant, except the roots, is edible. The honey-flavored flowers can be added to salads for a splash of color or candied and used to decorate baked goods. You can even freeze borage flowers in ice cubes for a delightful summer soirée! Borage seeds are cultivated for their oil and the flowers are frequently included in potpourris. In Italy, borage is used to stuff ravioli. Frankfort, Germany boasts a delicious green sauce made from borage. Some gardeners are put off by the tiny hairs found on borage, but those hairs give the plant a glistening appearance and they won’t hurt you. You may want to wear gloves, however. The cucumber flavor of young leaves can be included in salads and older leaves can be chopped up for soups or sautés. They can also be brewed for a refreshing tea. Do yourself and your local honey bee population a favor and start growing borage today! As temperatures rise (or fall), many of us head outdoors to enjoy a nice evening fire (assuming there’s no Spare the Air alerts, of course!). There’s just something primal about sitting around an open fire with family and friends, enjoying the stars, good conversation, and maybe a bottle of wine. But what about the ashes left over from the fire? Can they be used in the garden? The answer is yes, and no. 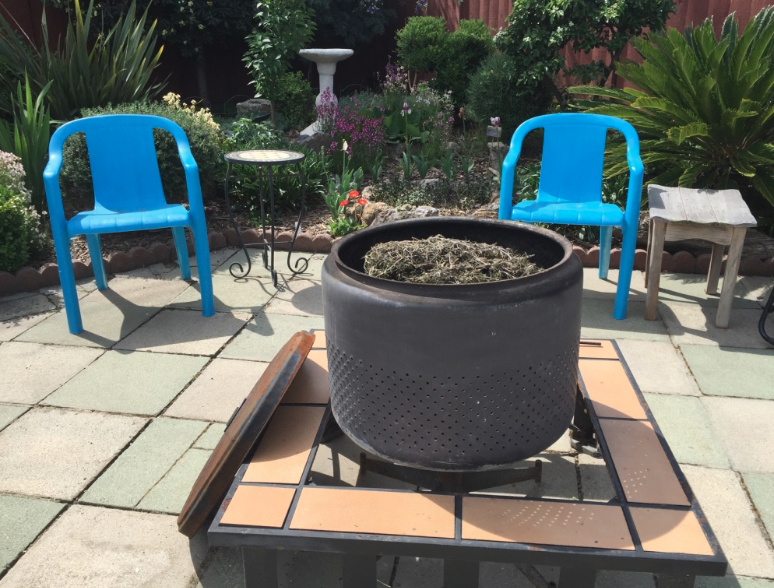 Fire pit made by a dear friend from a discarded washing machine tub What is in your wood ash?
Before adding wood ash to the garden, it is important to know what it was before it was burned. Ashes from BBQ grills, plywood, pressure treated, stained or painted wood, cardboard and even paper bags should never be used in the garden. These materials can contain toxic chemicals that you certainly don’t want in your soil, especially if you are growing food plants. Wood ashes vary in their nutrients, depending on the type of wood that was burned. Soft woods, such as pine, contain only one-fifth of the nutrients held in hardwood. Ashes from good quality hardwoods contain a lot of potassium, or potash. This is the “K” in the standard N-P-K found on fertilizer packaging. On average, wood ash contains 0-1-3 using this scale. Wood ash generally contains the following micronutrients as a percentage of weight: Potassium supports root growth and cell structure. Stronger roots and cells make plants more resistant to pests, diseases, and environmental stresses. Wood ashes can also improve soil structure, but there’s a price. Wood ashes and pH Wood ashes are very alkaline. Using the pH scale, substances are measured on a range from 0 to 14, with 7 being neutral. Lower numbers are more acidic and higher numbers are more alkaline. Wood ash can have a pH of 9-13! Our San Jose soil tends to already be alkaline, so adding wood ash might end up being a bad idea. The only way to really know what you are working with is through a soil test from a reputable lab. Over-the-counter soil test kits are not currently reliable or accurate enough to be useful. If your soil could benefit from applying wood ash, the best time of year to do this is in the fall and winter. Save cold wood ashes until then and apply over a period of time. Smaller plants and seedlings can be dramatically impacted, for better or worse, with sudden changes in pH. Other garden uses for wood ash If your soil does not need its pH altered, there are several other uses for wood ash in the garden:
If you’re feeling really adventurous, you can use those wood ashes to make soap or shine up Granny’s silver. Just be sure to wear protective clothing when working with wood ashes. Wood ash particulates can irritate your lungs and wet wood ash (lye) can dissolve your fingernails, so be careful! Sticky barriers are organic mechanical pest controls that block insects and caterpillars from climbing your trees and shrubs, eating leaves, laying eggs, and spreading the diseases they carry. These barriers are easy to install, cost practically nothing, and they are extremely effective.  Sticky barrier on whitewashed trunk How to make a sticky barrier
Sticky barriers can be store bought (Tanglefoot, Bug Gum Mastic, Roxo Bug Glue) or home made (petroleum jelly, axle grease). In either case, tree trunks should first be wrapped with tape that is at least 2” wide. The sticky material can damage bark. To be effective, the tape must fill all nooks, crannies, and cracks. The sticky barrier substance is then spread on top of the tape. You can use a putty knife, paint brush, or gloved fingers. It is a good idea to place the tape high enough to avoid attracting grass blades, the higher the better. As soon as something creates a bridge across the sticky barrier, it is useless. Sticky barrier maintenance To keep these barriers effective, it is a good idea to inspect them regularly. Extremely hot water can cause dripping that renders the barrier ineffective. Also, as ants and other pests try to cross the sticky barrier, their dead bodies will eventually create safe passage for those that come later. It may be necessary to replace the bands as they become soiled. Barriers should be in place before pests emerge. To replace the barrier, I strongly urge you to wear disposable gloves. This stuff is really sticky. Peel the old barrier off and put it in an old can or box. I tried using a trash bag - bad idea. Then, simply reapply a new barrier and a new layer of of sticky barrier substance. It’s pretty amazing, seeing evidence of just how many tiny crawling insects threaten the health of your trees, vines, and other plants! So, what’s wrong with these crawling insects? Crawling insects often eat vulnerable new growth, reducing production, and making plants susceptible to other pests. Crawling insects can carry bacterial and fungal disease to healthy plants. Some of these crawlers protect other insects that cause damage. Below are just a few of the insects thwarted by sticky barriers:
Rather than applying chemical pesticides that can kill off pollinators and other beneficial insects, sticky barriers create safe protection against crawling insects in the garden. Plant blackberries and dark, juicy berries will be your reward for many years to come! Excellent on cereal, as jam or jelly, in a cobbler, or used to make wine, blackberries are an excellent addition to a garden. 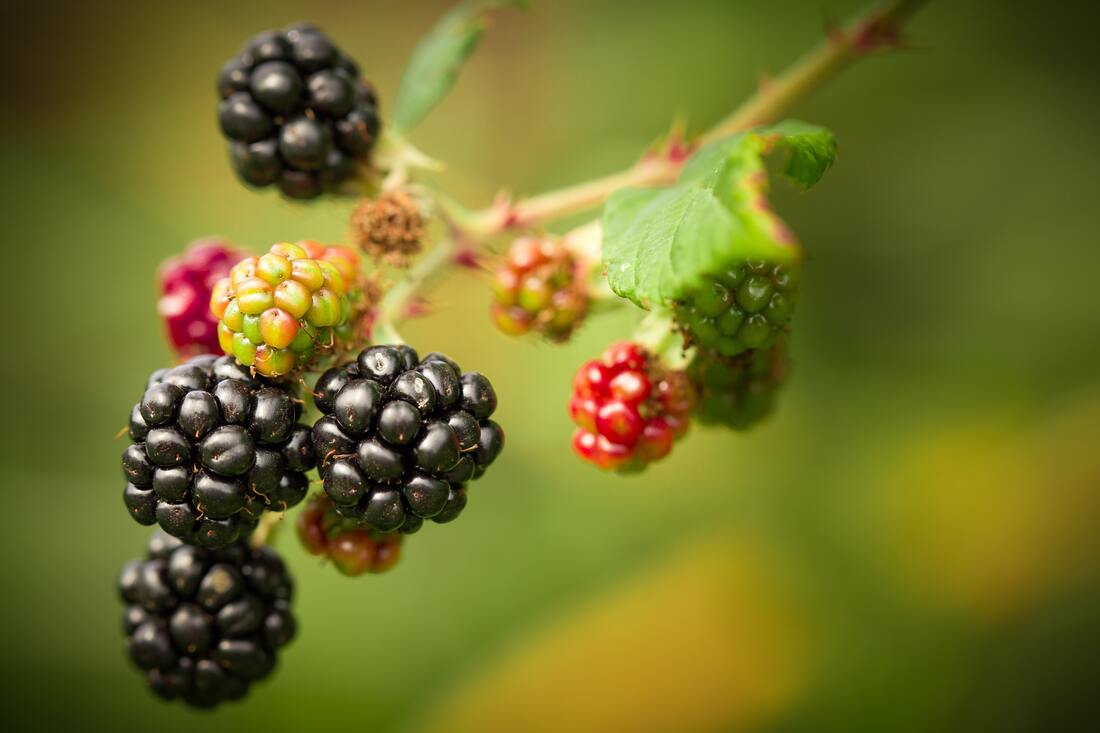 Blackberries (Thierry Fillieul) Pexels People have been enjoying blackberries for thousands of years and blackberries are native to North America. This delicious perennial edible can be grown up a fence, trellised, or even on a window sill garden! While you will not get fruit the first year, a healthy blackberry plant can produce fruit for decades.
Blackberry behavior Blackberry (Rubus fruticosus) plants propagate by sending suckers up from the roots and by generating roots where stems touch the ground. Because of the blackberry’s ability to propagate so readily, some gardeners consider them to be a pest. Rather than looking at this behavior as a negative, you can take advantage of this tenacious fruit producer in your garden! Blackberries grow from a perennial root system, putting out new biennial stems (canes) each year. In a blackberry cane’s first year, when it is called a primocane, it will reach its full length without producing fruit. In its second year, it becomes a fruit producing floricane. The fruit is produced on racemes found at the tip of lateral buds. After the second year, the cane dies, making room for the next year’s crop. Botanically speaking, blackberries are not berries at all. Like raspberries, they are an aggregate fruit made up of small drupelets. First and second year canes are often covered with numerous sharp prickles, mistakenly called thorns. Prickle-free (thornless) varieties are available. I have heard from several growers that thornless varieties produce bigger fruit, but that varieties with prickles have far better flavor. Personally, I’ll take quality over quantity any day! There are two basic cultivars of blackberries: erect and trailing. Erect blackberries have stiff canes that arch. While not completely self-supporting, erect blackberries tend to grow into huge thickets if not pruned. Trailing cultivars, also known as dewberries, will spread horizontally across the ground. If you live in a cold area, there are even late-season blackberry varieties that can produce late summer crops. The University of California provides an excellent list of blackberry cultivars. How to grow blackberries Blackberries are rugged. In the wild, they grow best near creeks, in alluvial soil. Blackberries can be grown in containers, as long as they are at least 5 gallons in size. Blackberries can be grown in poor soil and will transform an empty lot into a fruit-producing thicket, left unchecked. Blackberries do best in raised beds where drainage and weeds are more easily controlled. To plant your blackberries, follow these tips for the best results:
Pollination is critical for fruit production. If blackberries are being grown indoors, hand-pollination will be needed. To hand-pollinate, simply take a fine paintbrush or Q-tip and touch each flower repeatedly every day until the flower begins to turn brown. To protect your outdoor pollinators and other beneficial insects, avoid using chemical pesticides during bloom time. Blackberry pruning and training Like other cane berries, blackberries are very low-maintenance once established. After a cane has produced fruit, it can be removed. This cuts down on the thicket effect and it encourages the root system to generate new canes that will produce even more fruit. First-year canes can be pruned to a manageable size or trained onto a trellis. It is a good idea to wear long sleeves, long pants, and heavy gloves when working with blackberries. Those prickles are sharp! Harvesting blackberries Blackberries are green when they are red. This old saying reminds blackberry growers that unripe blackberries are red. They become ripe 2-3 weeks later, when the fruits are black, but still firm. Do you know how to tell blackberries and raspberries apart? Hint: It’s not the color. The only way to really tell the difference between blackberries and raspberries is to look at the way the fruit comes away from the torus, or stem. If the torus comes with the fruit, it is a blackberry. If the torus breaks away from the fruit, it is a raspberry. British folklore warns against picking blackberries after Old Michaelmas Day (October 11) because the devil is said to have spit on them! This tradition has a reasonable explanation in science. As cooler, moist weather kicks in, several types of mold can begin to grow on the fruit which can make it toxic. So, enjoy your blackberries before October 11th and leave the rest for the birds! Blackberry pests & diseases As rugged as blackberries are, there are still some pests and diseases to watch for. Deer, birds, and other critters will try to enjoy your harvest before you do. Netting can help, but it’s a pain to take off. Many varieties of caterpillar will also happily munch on fruit and leaves, so monitor plants every few days in spring and hand pick those beasties. You can always feed them to your chickens! Being close cousin to raspberries, blackberries are prone to many of the same pests and diseases. In either case, watch for signs of these blackberry (and raspberry) pests:
Blackberries may also be infected with the following diseases:
Now, don’t let all those threats to your blackberry crop discourage you from trying this amazing plant. They are only possibilities and blackberries seem to survive against the odds. Even notorious Brown Thumbs have been able to grow blackberries successfully! You can, too! If you see red, puckered leaves on peach, nectarine, or almond trees, it’s probably peach leaf curl. Peach leaf curl can seriously reduce the leaf canopy, cutting the number of leaves available for photosynthesis. The Taphrina deformans fungus costs U.S. orchardists approximately $2.5-3 million in losses annually. Fungal spores stay on tree surfaces year-round as ascospores. When spring rains or poor drainage occur, the spores germinate, forming blastospores that attack vulnerable new growth.  Peach leaf curl on nectarine leaves Symptoms of peach leaf curl
Red, blistered leaves that tend to twist and curl are a sure sign of peach leaf curl infection. Like the initial signs of Eugenia psyllid infestation, peach leaf curl damage progresses down twigs and stems, into the trunk, significantly reducing fruit production. As infected leaves mature, they become thicker and rubbery. Leaves turn from green to purplish-red to white. Infected leaves fall early, as well. If you cut into the wood, the vascular bundle will be discolored, showing where the fungal spores are reproducing. Red lesions may also occur on the fruit. Peach leaf curl treatment Once peach leaf curl takes hold, all you can do is treat it with fungicides each autumn after the leaves have dropped. Those leaves should be removed and destroyed. Effective fungicides include fixed copper and Bordeaux mixture. For non-organic growers, chlorothalonil is the only effective non-copper fungicide. Chlorothalonil is a carcinogen that can damage your kidneys, so I don’t recommend it. Heavy infestations may require a second treatment as buds swell before leaves become visible. Unfortunately, long-term copper use can result in a toxic build-up in the soil. [Yet another argument for getting regular soil tests.]To help an infected tree during the summer, thin the fruit later in the season to minimize points of entry for further infection. It was once a common practice to remove the affected leaves in spring. Research has not shown this to be effective at combating the disease or helpful to the tree. Removing too many leaves reduces photosynthesis and can lead to sunburn damage. If you must remove infected leaves, sanitize your tools between each cut with a household cleaner, or you may spread the disease further. Also, protect exposed limbs by whitewashing them with a 50:50 solution of water and white latex (not enamel) paint. Severely damaged trees may need additional nitrogen later in the growing season. April is an excellent time of year to start planting asparagus. Now, growing asparagus is not a task for the impatient. You will not get a crop the first year. You won’t get a crop the second year, either. However, those succulent stalks are certainly worth the wait. Plus, once they start producing, you will continue to get harvests for many years. Asparagus was offered to the Egyptian gods over 5,000 years ago, and people have been enjoying it ever since. 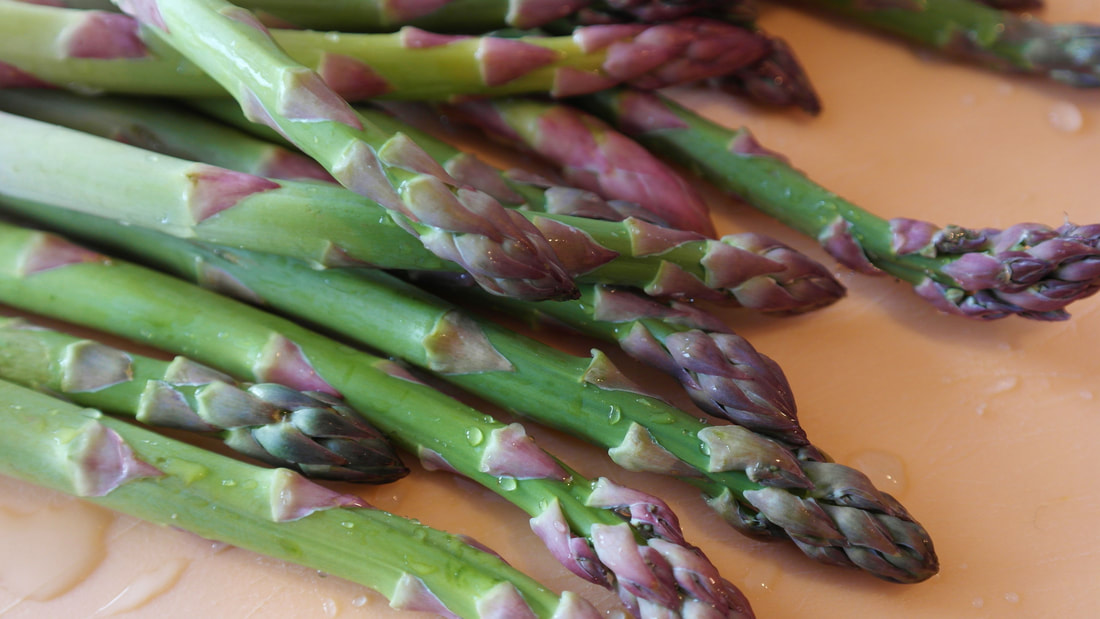 Asparagus stalks (PxHere) Public Domain Asparagus lifecycle Unlike many of our vegetable crops, asparagus grows from crowns, which are food storage rhizomes. The familiar spears, left to their own, will open up and grow into ferny branches that can reach 4-5’ in height. Asparagus leaves are actually modified stems, much like conifers. The root system is adventitious. Yellow to greenish-white flowers emerge and become red berries when fertilized. DO NOT EAT ASPARAGUS BERRIES. They are poisonous to people.  Purple asparagus really makes a statement! How to grow asparagus Before you starting planting asparagus, give the site some thought. Asparagus plants may take a few years to really start producing, they will continue to produce for 20-30 years or more! Asparagus loves raised beds in full or partial sun, and lots of compost-rich soil. Asparagus does not compete well against weeds, so be sure to keep the asparagus bed weed free. Mulching will help a lot. One year old crowns are the best way to start. Dig a trench 12” deep in the bed and place asparagus crowns 18” apart. Spread the roots out, cover with soil and water, but do not fill in the trench. Watch for new growth. As shoots begin to appear, add more soil, repeating until the trench has been filled. If you want to grow asparagus from seed, the seeds must be germinated between damp paper towels and then gently transferred to soil. Keep the asparagus bed consistently moist, but not soggy. While spears may appear the first year or two, force yourself to ignore them. Allow the plants to go through their annual cycle. This will help them develop a strong root system, necessary for long term production. Asparagus pests & diseases Asparagus is susceptible to Fusarium wilt and asparagus rust. Remove and discard diseased shoots. Aphids can also become a problem. To get rid of the aphids, simply spray the plants with the hose. Harvesting asparagus By the third year, you should be able to harvest some, but not all, of the spears. They taste the best when they are 5-7” tall. Cut or snap the spears off at or near ground level. By late spring or early summer, your asparagus harvesting season is done. Allow any spear that come up to complete their normal cycle. If you want white asparagus, you will need to blanch them. That means covering them with soil, newspaper, or some other material that will halt photosynthesis as they grow. 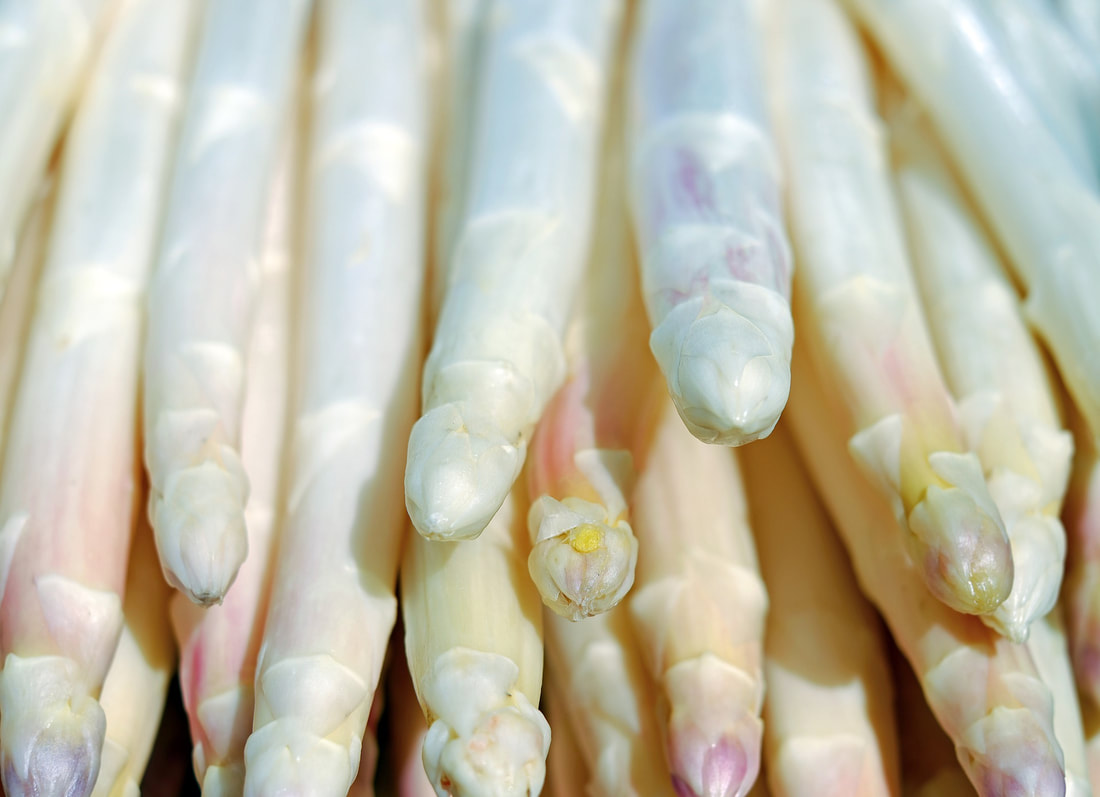 White asparagus stalks (Couleur) Pixabay If you end up with a bumper crop of asparagus, you may be tempted to eat it all. That might be a bad idea. Eating a lot of asparagus can make urine smell pretty awful. Instead, the shoots can be pickled and stored for several years. They taste particularly good in a Bloody Mary.
|
Welcome!You can grow a surprising amount of food in your own yard. Ask me how! To help The Daily Garden grow, you may see affiliate ads sprouting up in various places.
You can also get my book, Stop Wasting Your Yard!  Index
All
Archives
July 2024
|


 RSS Feed