|
Do you remember the fire safety lesson from elementary school where they told you that three things had to be in place for a fire to occur? [The answer is fuel, heat, and oxygen.] Take any one of those components out of the equation, and voila! No fire. Well, plant diseases work much the same way.  The three sides of plant disease
For disease to occur, the environment, host plant, and pathogen must all be present. Alter any of those three and make infections less severe and less frequent. Remove one side of that triangle to eliminate the disease. Since prevention is far easier than treatment, the disease triangle is a handy tool for you to use in the garden. Environment You can control common environmental factors with these good cultural practices:
Host The host is the plant that gets sick. It can also be a plant that shelters a pathogen or disease vector. Some diseases affect only a single host, while others can infect many different types of plants. [Did you know that lilacs grown near apple trees are more likely to get bacterial blight?] Protect host plants from disease with these tips:
Pathogens Pathogens are disease-carrying bacteria, viruses, or other microorganisms. You may be surprised to learn that many pathogens are already in your garden. New arrivals are unusual and notable, which is why quarantines are so effective at protecting your plants. If they are not present, pathogens may catch a ride into a landscape on insects, tools, shoes, and newly acquired plants. Chewing insects may create a point of entry for disease or may be infected, transferring viruses or bacteria to the host plant as they feed. You can interrupt the pathogen side of the triangle with these tips:
Time Many botanists have added time as a factor in disease prevention, converting the disease triangle into a pyramid. They do this because time can be a critical factor in disease development. Diseases take time to infect a plant and reproduce. Water sitting on a leaf for a few minutes may do nothing, while several hours of surface water on the same leaf may be deadly. Regularly monitoring plants for signs of disease can put time in your favor. How healthy plants defend themselves If all the disease-carrying pathogens are already present, why don't all plants die a horrible death as soon as they sprout? Like us, plants have evolved ways to protect themselves. They do not have immune systems. Instead, they use these steps in a type of chemical warfare:
All this time, you probably thought plants were relatively passive, right? Symptoms & disease identification Plant disease symptoms include wilting, stunting, deformed leaves or other growths, cankers, chlorosis, and more. If you notice disease symptoms, use that information to determine the cause. Contact your local Master Gardeners or the Department of Agriculture for advice. Once you know what your plants are fighting, you can use the disease triangle to break the cycle. Each microclimate has its own set of problems. Learning about your plants puts you in control. Cole slaw and corned beef simply wouldn’t be the same without cabbage. Cole crops, or cruciferous vegetables, such as broccoli, cauliflower, Brussels sprouts, and the lowly cabbage were placed in the same family partly because they all have four-petaled flowers that look like a cross (Cruciferae is Latin for “cross bearing”). Luckily for us, there is no cross to bear when it comes to growing cabbages! 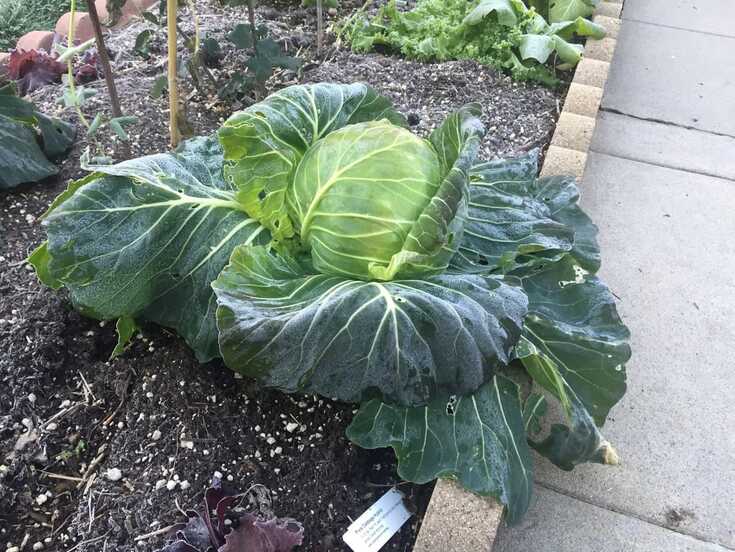 Cabbage are sweetened by mild frost These densely headed members of the Brassica family are biennials grown as annuals. If you grow cabbage for seed, you will want to make sure there is some distance between your cabbage plants and other members of the Brassica family because cross-pollination can occur. Seriously. In fact, that’s how rutabagas came to be - cabbages crossed with turnips. Hmm, how about tiny cauliflowers that grow on a stalk, like Brussels sprouts - we could be on to something!
How cabbage grows In the wild, as temperatures reach 80°F, two-year old cabbage heads send up a flowering stalk, the same way lettuce and spinach do, in a process called bolting. Tiny helicoptered seeds catch rides on every breeze, spinning their way to new homes. Over the next year, a taproot will go down and a head will form, preparing to repeat the cycle. How to grow cabbage Cabbage seeds should be planted 1/2 inch deep, with plenty of space around each plant. Cabbage plants can reach 2 feet in diameter. The more space they are given, the faster they will mature and the less likely they are to being attacked by pests or disease. Cabbage plants prefer sunny locations with good drainage, but they can tolerate partial shade. Cabbage grows best when given occasional deep waterings, rather than frequent shallow irrigation. Also, you can prevent many diseases by avoiding overhead watering. Cabbage is a heavy feeder, so you may want to work some aged compost into the soil before planting. In spite of having a taproot, cabbages can be grown in containers that are at least 8 inches deep. Rather than have all your cabbages reach harvestable size on the same day, it’s a good idea to plant seeds in succession. Cabbage pests & diseases There are plenty of pests and diseases that attack cabbage. The nice thing is, cabbage grows a set of outer leaves that frame a tightly packed head. Most cabbage pests never reach the inside of the head. That being said, it’s a good idea to know what you’re up against. Cabbageworms are common cabbage pests. These small white imported butterflies have black dots on their wings and they are relentless. Eggs are laid on the underside of leaves. Larvae emerge and start feeding like crazy. You can hand pick the caterpillars and I have taught my dogs to chase these pests away. Row covers can also protect your plants from cabbageworms. Cutworms, aphids, armyworms, cabbage maggots, darkling beetles, earwigs, flea beetles, wireworms, whiteflies, leaf miners, nematodes, and the ever-popular slugs and snails will appreciate finding cabbage in your landscape, but good cultural care and regular monitoring can minimize the damage. Cabbage is prone to several diseases, including clubroot, damping off, downy mildews, black rot, yellow virus, Verticillium wilt, Phytophtora root rot, and bacterial leafspot. Don't let all those threats deter you from trying your hand at growing cabbage. If you buy cabbage in the store, chances are 30 to 1 that it was grown in China. This is unfortunate, because cabbage is easy to grow, it looks nice in a landscape, and all that shipping traffic can’t be good for the environment. Grab a pack of seeds, or a couple of seedlings from your local garden store, and give cabbage a try. Peasants and Senators have been growing cabbage for nearly 3,000 years. You can do it, too! Did you know that the fruit of a pomegranate tree is a berry? That’s if you ask a botanist. Like other berry plants, pomegranates (Punica granatum) have spiny branches and delicious fruit. When I was a child, growing up in the San Fernando Valley, there was an empty lot down the street. On that lot was a giant old pomegranate tree. It had grown up and out and down, almost like a willow, creating a magical circular space underneath. No one could see us from outside the tree, the growth was so thick! We would pick sun-ripened pomegranates from the outside of the tree and then enter our Secret Clubhouse, where we would tell stories and make wild guesses about growing up, as we munched on the sweet-tart fruity seeds. These healthful fruits are perfectly suited to growing in drought-prone areas. With a small initial investment of time, money, and water, your family can enjoy fresh pomegranates for many years to come. 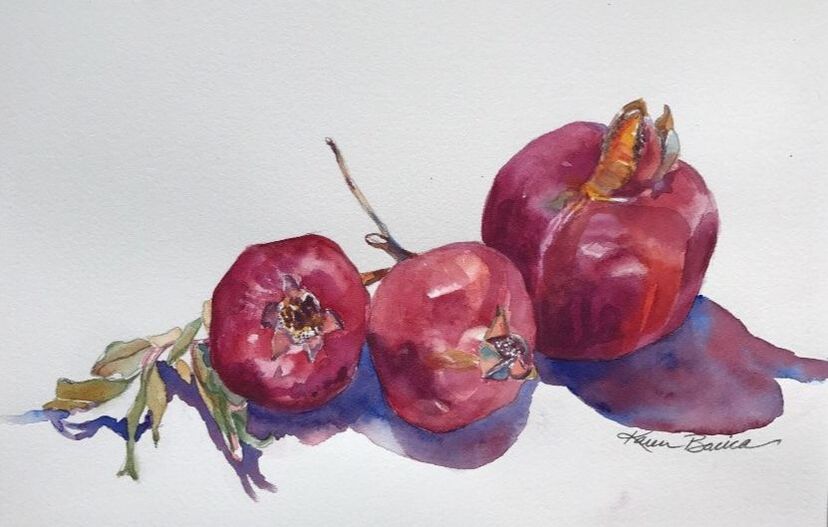 'Pomegranates' by Karen Bacica Pomegranate varieties Before you buy a pomegranate tree, be sure that the variety you are buying is an edible and not an ornamental. There is no sense dedicating space and water to an inedible variety when you can have an edible! Pomegranates grow in a variety of colors and sizes. Rinds can be red, yellow, pink, orange, green, and even black. Some varieties have seeds that are very hard, while others are softer. UC Davis offers a helpful Pomegranate Cultivar Chart to help you select the best variety for you and your family. Both ornamental and edible types can be self-pollinating or cross-pollinated by hummingbirds and insects. It takes a pollinated flower up to 7 months to produce an edible fruit. How to grow pomegranates Pomegranates are a very tolerant plant, when it comes to soil types and irrigation. They prefer full sun and hot summers, but they can handle some partial shade. Pomegranates will founder in wet soil or full shade, so choose your site accordingly. Pomegranates can be grown from seeds, but it will take a few years before you get any fruit, and pomegranate seeds do not always grow true to the parent plant. You can also plant rooted cuttings or bare root trees. Grafting does not work for pomegranates. Newly planted trees should be watered every day until new growth is seen. Then water only once a week (assuming it doesn’t rain). Keep weeds away with mulch, just be sure the mulch stays 6 to 8 inches away from your pomegranate. 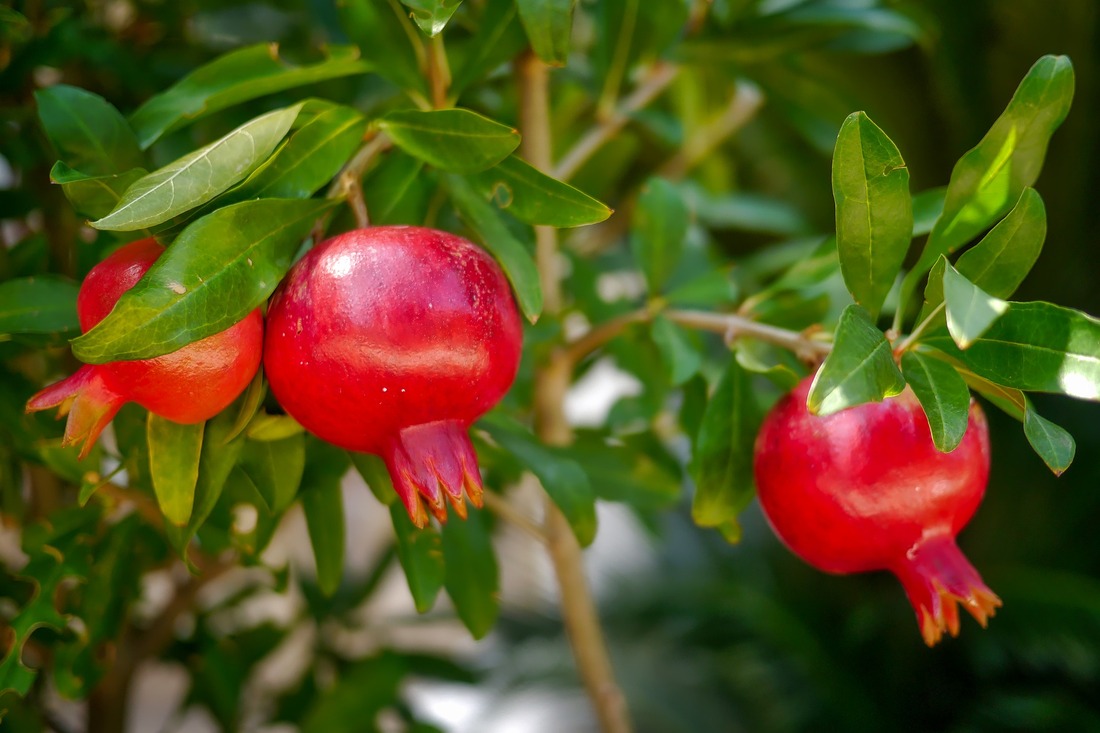 Pomegranate fruit (Albrecht Fietz) Pixabay Pruning pomegranate
Pomegranates are deciduous trees that can grow up 30 feet in height and 15 feet wide (most are 6 to 12 feet tall). Pomegranates produce fruit on second-year wood, so you will want to make sure that you leave some of the last year’s growth when pruning. Pomegranates can be pruned as full-sized trees, hedges, landscape anchors, or shrubs. They can also be grown in containers. You can even create bonsai and topiary from pomegranate! Pomegranate pests & diseases Like tomatoes and citrus, pomegranates are susceptible to citrus fruit split. Other diseases that can turn up include Alternaria rot, Armillaria root rot, Botrytis blight, and other fungal diseases, especially if plants are over-watered. Common pests include whiteflies, fruit flies, ants, cotton aphids, mealybugs, soft scales, leaf-footed bugs, and the pomegranate butterfly. Eating a pomegranate Those little seeds are tasty, but getting to them can be a pain. The easiest way I have found is to cut the fruit in half, hold one half peel side up, over a bowl, and beat the bejeezus out of it with a wooden spoon. The seeds fall out and the rest of it tends to stay put. It is easy to remove any other debris simply by adding water to the bowl: the fruit sinks and everything else rises. Viola! Pomegranates grace holiday tables, a symbol of prosperity, but you can add them to your yard or balcony for some prosperity of your own! Curly endive, Belgian endive, or whatever variety of Cichorium strikes your fancy, this is one vegetable that should be part of every foodscape. 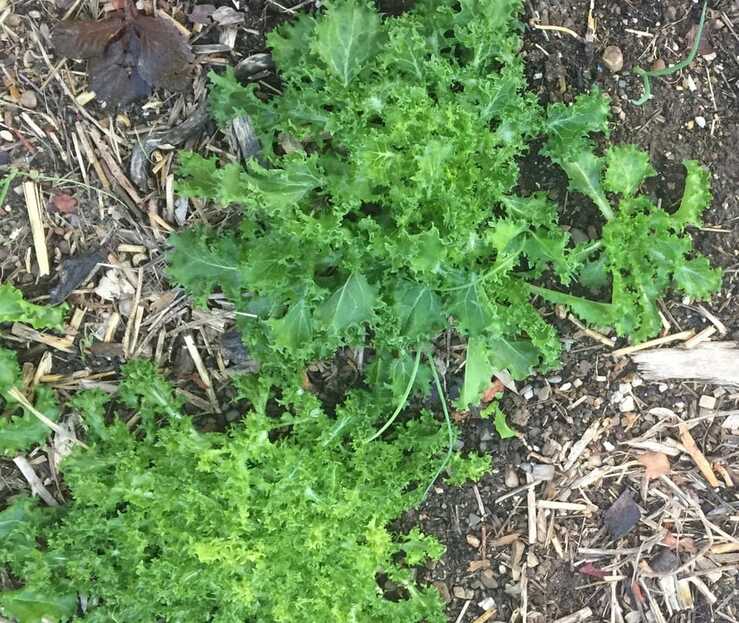 Curly endives can be rugged, durable plants If you eat salads, soups, or burgers, curly endive is an excellent addition to your garden. It looks pretty, it tolerates both heat and cold, and, if allowed to go to seed, will decorate your yard with dozens of rosette-shaped edible plants! These cousins to dandelions and sunflowers have much to offer the home gardener. One cup of fresh endive contains 220% of the Daily Value for Vitamin K, 36% folic acid, 20% manganese, and plenty of other nutrients. Endives also add a distinct depth of flavor to many dishes. There are several members of the endive family. They are all cool season greens, with high nutritional values and varying degrees of bitterness. Now, bitterness is a weird thing. I just read Evolution of bitter taste sensitivity, from ScienceDaily, and learned how the conflict between disliking bitterness protects us from eating toxins and prevents us from enjoying healthy foods is more complex than you might expect. Give it a read! Endive varieties:
How to grow endive Endive is a cool season biennial plant, like lettuce and spinach, that can be grown in sun, shade, or outdoor containers. (It would look nice on an apartment balcony, too!) In warm regions, endive can be started in late summer, fall, or winter. The plants are tolerant of light frost, which is about all we get. Plants prefer plenty of sunlight and a soil pH of 5 - 6.8, which is more acidic than we tend to have, but my plants don’t seem to care. Seeds should be planted 1/4 inch deep. Mature plants will need to be 8 to 12 inches apart, unless you are growing Belgian endive, which is another story altogether (below). If plants are too close together, they are more likely to bolt, or go to seed. Water regularly to keep the bitterness to a minimum. Dressing the plants with aged compost once or twice during the growing season adds nutrients needed for the best flavor and growth. (Dressing means putting aged compost around a plant.) When plants are 5 to 6 inches tall, they can be harvested by cutting them off at ground level. The remaining stump will grow another plant for a continuous harvest. Or, you can simply remove outer leaves, as you need them, which is what I do.
Endive pests & diseases I have found slugs and snails to be the biggest pests, but even they don’t do a whole lot of damage to my curly endive. Aphids and cutworms may also show up, but, again, the damage is minimal. Apparently, the bitterness that makes endive so healthy for us is also what makes it undesirable to pests. Curly endive has no serious diseases. Broad leafed varieties, however, have a tendency to collect water on the leaves, creating habitat for occasional fungal diseases.
Lettuce may not look like it has much to offer, but this member of the sunflower family can provide good food, ground cover, and fun!  Lettuces look lovely between rose bushes and other anchor plants Lettuce is a biennial garden staple that finds its way into most burgers and lays the foundation for nearly every salad ever made. With half of the world’s lettuce crop being grown by China, and numerous cases of E. coli and Salmonella poisoning in bagged salads, lettuce should be one of the first garden plants you try. Fresh lettuce is cheaper, tastier, safer, and far better for the environment than anything that has been shipped from halfway around the planet. History of lettuce The ancient Egyptians took advantage of a certain type of weed, whose seeds contained a lot of oil. Over time, those weeds became domesticated and the edible leaves started being used for food and medicine. The Romans gave lettuce its Latin name, Lactuca sativa, for the white latex (lactuca) that drips from cut stems. (Sativa means cultivated.) Being people, we saved seeds from our favorite types to ultimately create nearly 150 varieties of lettuce. Lettuce varieties Lettuce generally grows in a crisphead, loose leaf, or romaine form, but there are seven cultivar groups:
Loose leaf and romaine lettuces can be harvested in a cut and grow method, in which outer leaves are removed for consumption and the plant is allowed to continue providing edible leaves for the entire growing period. How to grow lettuce Lettuce, like spinach, tends to bolt when it gets really hot outside, so fall, winter, and spring are the best times of year for growing lettuce in warm regions. Lettuce can be grown in containers, in the ground, or on a window sill. Lettuce prefers sun, but it can grow just fine in shade gardens, too! In spite of its taproot, lettuce does not need a particularly large or deep container to provide you with fresh leaves for your sandwich or salad. Lettuce seeds are really tiny, so don’t try planting outside on a windy day. (Yep, I learned that one the Hard Way.) Seeds only need to be covered with 1/4” of soil, but they must be kept moist until they germinate. Spacing between plants depends entirely on the variety. Keep planting new seeds every few weeks, in succession, for a continuous harvest.  Lettuces add color and texture to containers Bolting Once temperatures start rising, your lettuce plants will probably bolt, or go to seed. You can tell this is happening because your docile, rounded lettuce plants will suddenly send up a spike of growth from the center that looks very un-lettuce-like. If you allow this to continue, and I urge you to do so, your lettuce plant will become too bitter to eat, but it will produce flowers and seeds for future generations. I allow my lettuce plants to go to seed and let them fall where they will. (You can also wrap bags around flowering heads to collect seeds.) I now have an attractive foodscape, with all sorts of lettuces growing in all sorts of places. Unless it’s the peak of summer, I can create a fresh salad with a variety of lettuces simply by walking around my backyard!
Lettuce pests & diseases
Aphids are a lettuce plant’s worst enemy, with snails and slugs being a close second. Earwigs, cutworms, weevils, rabbits, and voles will all be attracted to your lettuce plants, and white mold can sometimes be a problem. Finally, any packet of lettuce seeds that you buy will have far more seeds than you will be able to use in a growing season. Solution: invite your friends over for a seed-luck. What's a seed-luck? That's when everyone brings a packet of a different type of lettuce (or other) seed, a dessert, and a bottle of wine. You will need to provide little packets or envelopes for guests to (decorate and) use to take their bounty home. A good time is sure to be had by all, and everyone ends up with a bigger variety of plants! Slime molds are the red-headed stepchildren of the garden world. Not a plant, not an animal, recent research has created more questions than answers about this garden visitor. This species will appear in your garden. Slime molds do not hurt your crops. Instead, they make nutrients more readily available. 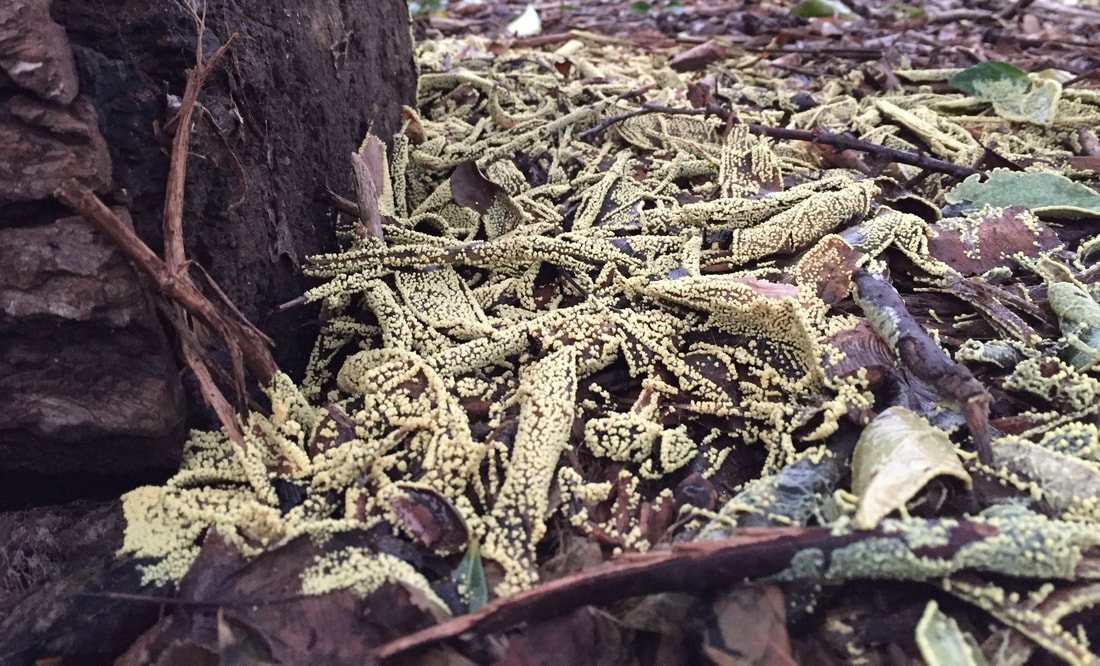 Slime molds help break down leaf litter and mulch Slime molds often appear after it rains. They can be yellow, red, orange, blue, gray, black, clear, beige, or hot pink. They may be flat, lumpy, or a fat, rounded blob. Some slime molds look like thousands of tiny balls, while others look like thready networks. One group is called dog vomit slime mold. Slime molds usually grow on rotting wood and mulch but can also occur on tree and shrub leaves, berries, succulents, and other plants. The presence of slime mold does not hurt living plant tissue since it doesn’t usually last for very long. At one stage, they look like somebody spilled something foamy on the ground (the infamous dog vomit slime mold). Slightly disturbing, these shiny, lumpy spills move of their own volition, yet they have no brains. At another stage, tiny, individual critters look more like flowering moss, with a small sphere waving around at the end of a stalk. Scientists affectionately refer to slime molds (myxomycetes) as myxos. 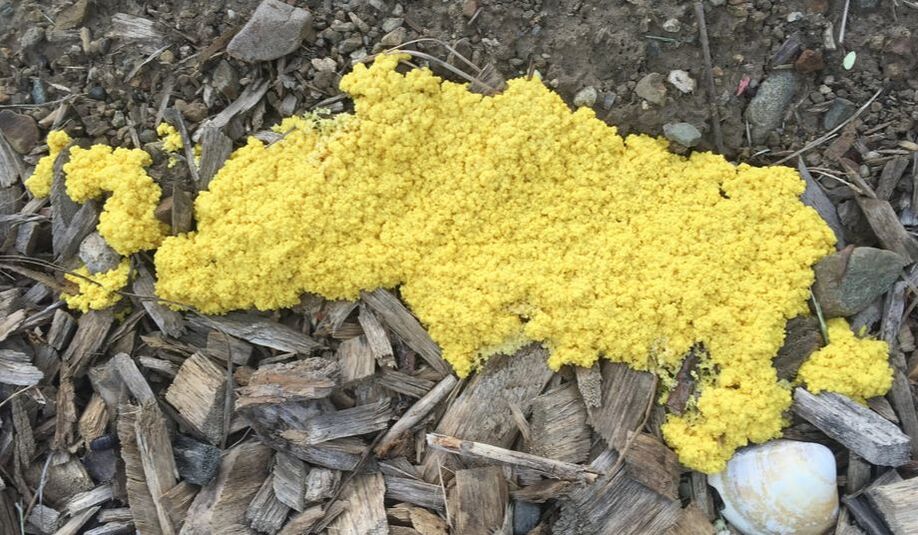 Dog vomit slime mold Slime mold taxonomy Slime molds are members of the Protista kingdom. More than a billion years old, slime molds are probably life’s first attempt at joining individual cells into complex organisms. There are two types of slime mold: acellular and cellular. Acellular slime molds have many nuclei (the part of a cell that holds DNA) but only one cell wall during the plasmodium stage. There are 1,000 known species of acellular slime molds. There are only 70 species of cellular slime molds. Each cellular slime mold is an individual cell. 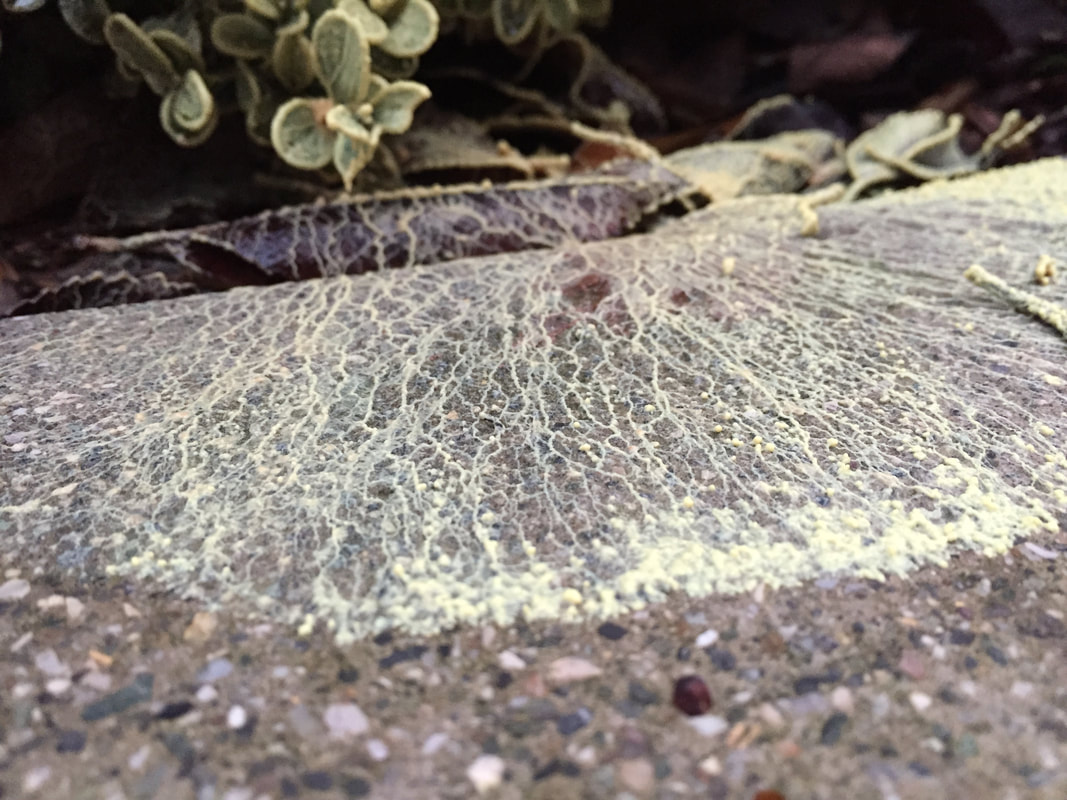 Some slime molds create a fan shape as they seek nourishment Slime mold lifecycle All slime molds start as spores, but how they reach that point is pretty amazing. Cellular slime molds, as individual cells, emit a chemical that calls other cells to huddle up into a slug-like structure that eventually becomes a stalk rather than a simple mass called a plasmodium. These mindless stalks can spew ammonia to keep competitors away as they generate spores. These parenting bodies discharge spores, usually into the wind or on a water spray (like fungi). The spores then germinate (like seeds) and then join with other germinated spores to form zygotes (like mammals). These single-celled zygotes feed on decaying wood, fungi, bacteria, and plant material, growing into a plasmodium. These plasmodia can reach several feet in diameter. The record-holding slime mold to date was nearly 60 square feet! They contain no neurons or central nervous system. But they have a surprising ability to solve problems. 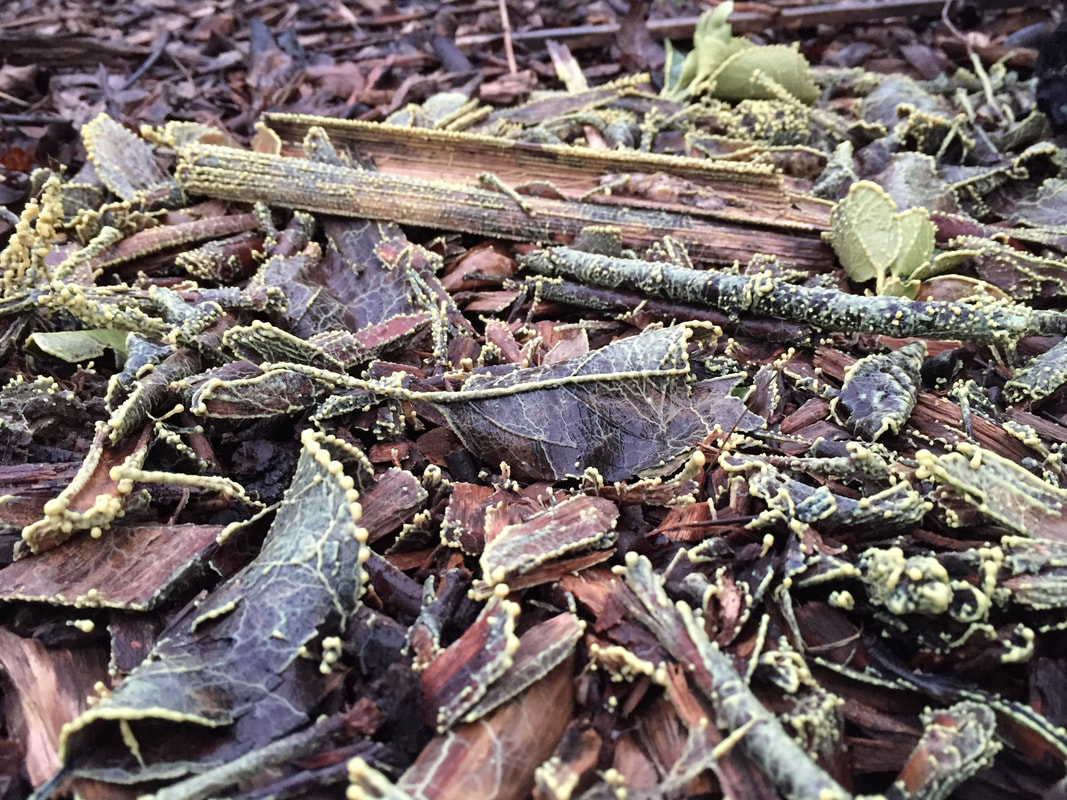 There's a lot more going on than meets the eye when it comes to slime molds Crazy experiments with slime molds We, humans, think that we’re pretty smart. We attribute some level of intelligence to our pets and other favored species. As life forms become more foreign, we are less likely to consider intellect or self-awareness, but this might have to change in light of recent experiments:
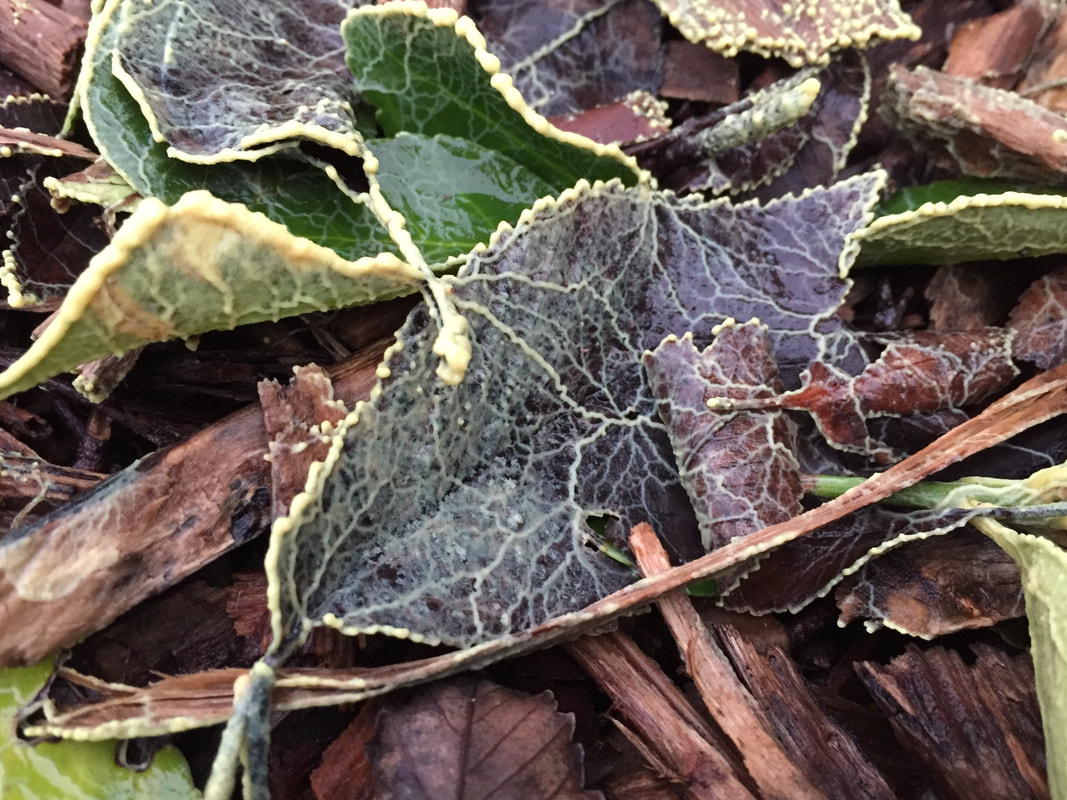 Slime molds can also be a thing of fleeting beauty Slime molds will not hurt your garden unless they are both thick and persistent. Instead, they help break down dead complex structures into nutrients plants can use. Usually, they are only visible for a short time. If you use a powerful spray of water to eliminate a slime mold, you will spread spores in all directions. If it must go away, dig it up with a pitchfork or shovel and add it to the compost pile. Fixed copper treatments will also eliminate slime molds. But they will reappear in areas with plenty of shade, moisture, and organic material, no matter how often you try.
Summer iced teas, winter colds, and many fruit and fish dishes are all made better with lemon balm. This easy to grow perennial herb is a member of the mint family, which means it is a rugged, tenacious, and fragrant addition to your foodscape.  Lemon balm (Nabokov) CC BY-SA 3.0 Using lemon balm
Also known as cure-all, sweet balm, and honey plant, lemon balm adds a soothing lemon flavor to teas, tinctures, and steam. Traditionally, lemon balm has been used to treat digestive upset, anxiety, thyroid disease, Alzheimer’s disease, ADHD, high blood pressure, sores, and even insect bites. Scientific research has demonstrated that lemon balm does provide some significant benefits (besides making a great cup of tea):
Unlike other herbs, lemon balm loses much of its flavor when dried, so fresh is better. I just learned that there is a lemon balm pesto recipe - I’ll let you know how it tastes in an update. How to grow lemon balm Once lemon balm is established, it will readily self-seed, so choose a site that has room for it. Individual plants can reach 2 feet in height and width. It can also spread vegetatively, where twig ends touch the ground and develop roots. Unlike many other members of the mint family, lemon balm does not spread using stolons (runners). Regular trimming will keep lemon balm plants healthy and attractive. You can also grow lemon balm in a container. My in-ground lemon balm has always stayed rather low-growing and has been pretty year-round (even after frost!) with just a little bit of trimming. Lemon balm normally dies back in winter above-ground, but comes back in spring. Lemon balm seeds require light and warmth (70 °F) to germinate, but the mature plants prefer some afternoon shade. Lemon balm prefers rich, moist soil with good drainage, and a pH of 6 to 7. Lemon balm attracts honey bees! The scientific name of lemon balm, Melissa officinalis, is a reflection of how much it attracts honey bees. The word ‘Melissa’ is Greek for bee. Small flowers, which can be white, pink, red, or yellow, appear each summer, packed with nectar. Many beekeepers throughout history have planted lemon balm near their hives. Whether you keep honey bees or not, attracting them to your garden is sure to improve pollination and production. Add lemon balm to your garden, landscape, or balcony for healthier bees and a happier you! Chilling hours are the accumulated periods of cold temperatures that allow many fruit and nut trees and shrubs to provide us with their bounty each year.
We are all familiar with the buds and leaves of spring, the prolific growth of summer, and the harvest of autumn, but fruit and nut trees and shrubs (and strawberries!) are working through winter, too. Colder winter temperatures are part of a deciduous tree’s natural lifecycle. In preparation to survive potentially freezing temperatures, many fruiting trees and shrubs produce a hormone that initiates a state of dormancy. What are chill hours? Just as many seeds require vernalization (a period of cold temperatures) to germinate, many fruit trees have the same need for hours between 32°F and 45°F each winter, called its chilling requirement. In this temperature range, the growth-inhibiting hormone responsible for dormancy begins to break down, allowing trees and shrubs to produce buds that ultimately become the leaves and flowers of spring. Fruiting trees and shrubs that do not receive enough chilling hours in a year will generate fruit and leaves erratically. Any fruit produced will be lower in both quantity and quality. Also, insufficient chilling hours can extend bloom time, making delicate buds and flowers vulnerable to diseases like fireblight and brown rot. How are chilling hours calculated? There are different models used to calculate chilling hours, but they all take the same basic information into account:
The Utah model provides chilling hours, while the Dynamic model provides chilling portions. Whichever model you use will give you a better idea of the best varieties for your microclimate. How many chill hours do my trees need? Different species need varying amounts of accumulated chill hours. Within each species, each variety has its own needs, as well. For example, northern varieties of blueberries have chilling requirements of 800 to 1,000 chilling hours, while southern varieties may only need 150 to 200 chilling hours. Your local chilling hour station Universities work with the USDA to provide valuable information to farmers and orchardists. You can access this information to learn the cumulative chilling hours in your area. The accuracy of this information will depend on where you live and how far you are from the nearest recording station. Click on the county and town closest to you for historical averages or current season figures for hours below 45°F and those between 32°F and 45°F. Almonds are a staple crop in California. Part of the reason is most almond varieties only need 200 to 300 chill hours. Northern California receives an average of 800 to 1,500 chill hours, while southern California only gets 100 to 400 chilling hours. Ultimately, your fruit and nut crop will depend on pollination rates, weather, plant age, soil nutrition and structure, irrigation, and chilling hours. You can get the most out of your fruit and nut trees and shrubs by selecting varieties best suited to your microclimate and the average number of chilling hours each year. We’ve all heard some seeds or plants described as heirlooms and others hybrids, but what do those terms really mean? Both hybrids and heirlooms come about through naturally occurring cross-pollination, as opposed to genetically modified organisms (GMOs), which are created in a lab using altered DNA strands. Pre-industrial agriculture Before agriculture became an industry, people grow a wider variety of plants for food. That biodiversity helped offset inclement weather, diseases and pests, and other threats to a failed crop and the resulting starvation. Corporate agriculture, on the other hand, feeds countless millions by generating a smaller variety of uniform plants that consistently grow at specific rates, that can be sprayed with a variety of pesticides, herbicides, and fungicides, ship well, and store well. As many of you know, taste and texture often suffer s a result. 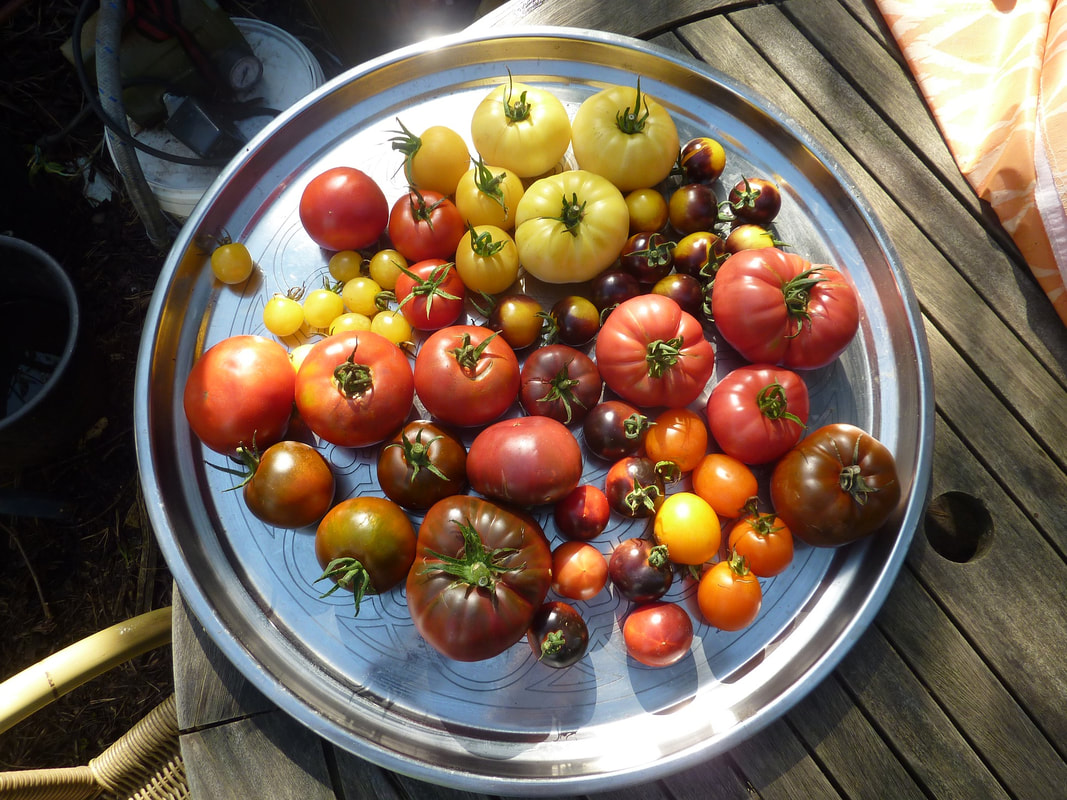 Heirloom tomatoes (hedwigmaria) Pixabay Pros & cons of heirlooms Heirloom seeds are those that have been handed down, person to person, in a specific geographical region, for a very long time. Also, heirlooms are open-pollinated, which means pollination occurs naturally, by wind, birds, animals, and insects, and not by human efforts. Heirloom varieties are at least 50 years old (some say 100 years), and many of them have been grown consistently, in the same locale, since before WWII. These plants have evolved to take advantage of local microclimates and beneficial insects. Heirloom seeds are hand selected by gardeners from the very best plants each growing season. Many heirloom plants do not have the uniformity or long term storage capabilities of hybrids, but growers (myself included) claim that the flavor is significantly better. Heirloom crops have more variety in size and shape than hybrids, but they always grow true to their parent plants. Heirlooms are more genetically diverse, making them more durable as a species, and less susceptible to local pests and diseases. Heirloom offspring are fertile and can reproduce. Pros & cons of hybrids Hybrid plants are intentionally created by cross-pollinating different varieties of a species. The intention of hybridization is to take advantage of the best characteristics of each parent plant, creating what is known as hybrid vigor (heterosis). This vigor only lasts for one generation. Hybrid seeds do not grow true to their parents and they lack vigor and genetic diversity. This lack of diversity is what caused the Irish Potato Famine of the 1840s. If all the plants are identical, they are equally susceptible to pests and diseases. A single threat can be devastating. Creating a hybrid that grows “true” to the desired characteristics takes years of diligent effort. Plants are often pollinated by hand or grown in greenhouses or pollination bags that block contamination from outside pollen to ensure that pollination only occurs between the desired plants. The majority of the fruits and vegetables you see in grocery stores are hybrids. Harvests are very consistent in size and shape. Hybridization is done for many specific characteristics:
When shopping for plants and seeds, one way to know if it is a hybrid is to look at the Latin name. If you see the letter “x” between words in the name, it is a hybrid. For example: Raspberry (Rubus idaeus) crossed with blackberry (Rubus ursinus) creates Loganberry (Rubus x loganobaccus) *Check labels for the letters V, F, N, T or A. These symbols indicate a resistance to verticillium wilt, fusarium wilt, nematodes, tobacco mosaic virus or alternaria stem canker, respectively.
Understanding the difference between heirlooms and hybrids can help you make the right choice if you want to collect viable seeds from your harvest for next year’s planting. Are your raspberries dry and crumbly, instead of sweet and juicy? It may be dryberry mites.
Dryberry mites attack raspberries, blackberries, Loganberries, and boysenberries. They are so small that you may not realize you have a problem until it is time to enjoy the fruits of your labor. If your cane fruits are dry and crumbly, there are steps you can take to protect future crops. Dryberry mite description Dryberry mites (Phyllocoptes gracilis) are not what you would expect from the Arachnids. If you could see them, these tiny pests look more like worms than spiders, with yellow to brown sausage-shaped bodies and only two pairs of stubby legs. (If you’ve ever seen a sea cucumber, you have the basic idea.) Dryberry mites are only 0.1 mm long, so you cannot see them without a microscope or a 15X hand lens. This particular group of Arachnids are called eriophyid mites and they are parasitizing plants all around the world. Dryberry mite lifecycle Dryberry mites are found in the nooks and crannies of your caneberries, around buds, nodes, and fruit. Dryberry mites begin life as transparent, round eggs, deposited in leaf buds. Colonies of 50 to 200 mites may overwinter together in the crevices of last year’s growth. As temperatures begin to rise in spring, the mites move to areas of new growth, feeding on primocane leaves and developing fruit, and laying more eggs. There are multiple generations present during summer and fall. Damage caused by dryberry mites Yellow blotching on leaves and reduced leaf size are caused by dryberry mites feeding on the underside of the leaf. Damaged leaves mean less sugar production through photosynthesis. Less sugar means less fruit and plants that are more susceptible to other problems. Young fruit may turn brown just as the flower petals fall, never reaching full size. Loganberries, boysenberries, and the earliest fruits of other caneberries to form are the most vulnerable to dryberry mite feeding. Raspberries may look sunburned and many of the little spheres of deliciousness that make up a raspberry fruit, called drupelets, will be white or tan. Dryberry mite management Natural predators are your best defense against dryberry mites, so avoid using broad spectrum pesticides. This means you have to be willing to tolerate a certain amount of fruit loss, but the biodiversity will work in your favor in the long run. If infestations were particularly bad during the previous year, apply sulfur just before buds open. You can also apply horticultural oils to green fruit every 2 or 3 weeks. Just be sure that you do not use both oil and sulfur. These treatments should never be used within one month of each other, to avoid chemical reactions that can damage your plants. Cutting back old growth and disposing of the old canes may interrupt the mite lifecycle. Other causes of dry berries Mites are not the only cause of dry berries. If dry berries are happening, take a look at which plants are affected and where they are affected. Physical damage will only occur at the point of impact, while exposure to too much sun or cold will show up more on outer fruit and leaves than on those protected on the interior or closer to a fence or wall. Consider these possibilities:
Growing caneberries is an investment of time. These perennial members of your foodscape deserve your attention and care. Who else is going to give you sun-warmed sweetness the way a raspberry plant can? New disease warning! Imagine a world without oregano. Or celery. Or sage. Or chrysanthemums. It could happen. %20and%20healthy%20(Left).jpg) Sticky monkey flower plant infected with P. tentaculata (right) compared with a healthy plant. (USDA) There is a new plant disease on the horizon. Its name is Phytophthora tentaculata.
Just because this disease is tricky to pronounce (Fie-TOF-ther-uh), doesn’t mean you should ignore it. Its name is Greek phytón (plant) and phthorá (destruction), so the name phytophthora means plant-destroyer. (The tentaculata part of the name refers to its retractable tentacles.) First noted in Germany in 1993, Phytophthora tentaculata hitched a ride on contaminated nursery stock and made its way to Central California and Monterey County in 2012. It is still spreading and is deadly to many of your garden and landscape plants. According to the Retail Nursery and Garden Center IPM News, Phytophthora tentaculata poses a long-term environmental and economic threat to many native and non-native plants because this pathogen can stay viable in the soil for many years. There is currently no known treatment. What is Phytophthora tentaculata? Phytophthora tentaculata is a member of the water mold family. Water molds fall between fungi and algae. These pathogens attack stems and roots and frequently kill their host plant. There are several types of phytophthora, including those that cause potato blight, crown rot, and sudden oak death. You cannot see these organisms with the naked eye, but watch for the symptoms and know which plants are currently considered susceptible. Host plants The following garden plants are highly susceptible to Phytophthora tentaculata:
These ornamental plants are also at risk (and may harbor the disease):
Symptoms of Phytophthora tentaculata Symptoms of Phytophthora tentaculata look a lot like many other plant diseases: chlorosis, reduced root growth, root lesions, root rot, stem cankers, stem collar lesions, and stunted growth are strong indications of infection. Preventing Phytophthora tentaculata infection Contaminated nursery stock is the most likely way this pest will reach your garden. Good water management is the best way to prevent infection. Phytophthora tentaculata is a soil-borne disease. Spores can also stick to plants, tools, containers, and shoes. And they travel through the movement of water. Spraying an infected plant can transfer the water molds to nearby plants. Since symptoms take time to be visible, avoiding potentially infected plants is in your garden’s best interest. These tips can help you protect your garden:
If Phytophthora tentaculata appears in your garden or landscape, contact your local Cooperative Extension Office. They may have helpful advice to protect your plants. And they need to know how this disease is spreading. Soldier beetles rank right up there with lady beetles and lacewings in the world of beneficial insects. Soldier beetles are predators that love to eat aphids. For that, alone, they are loved by gardeners. They also help pollinate crops as they feed on pollen and nectar. Soldier beetle larvae love to eat the eggs and larvae of moths and butterflies, beetles, armyworms, and other insect pests. 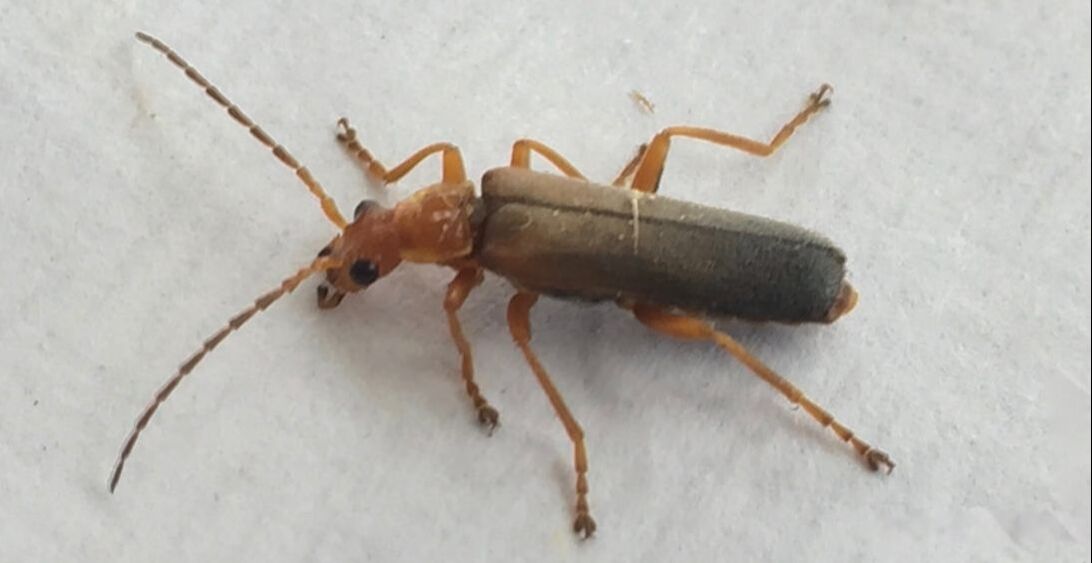 Adult soldier beetle Soldier beetle identification
Unlike many hard-shelled beetles, soldier beetles have softer, more leathery bodies. In fact, some people call them leatherwings. There are many different species of soldier beetles (Cantharidae), but they all have rather long, narrow, rectangular bodies that are approximately 1/2 inch long. They commonly have a red, orange, or yellow head, back and abdomen, with dark gray or brown wing covers. You will see a large dark spot on the wings, when open. The larva are long, flat, and dark colored. Larva are often found under bark and in leaf litter. North America is home to more than 100 different species of soldier beetle. There is another bug with an almost identical name, spined soldier bug (Good Guy), but they look more like brown marmorated stinkbugs (Bad Guys).If you look closely, you may discover these soldier beetle lookalikes in your garden:
Encourage soldier beetles in your garden with the following tips:
Chamomile makes a soothing tea, an excellent ground cover, and, hey, it looks pretty. Just ask Beatrix Potter fans! Seriously, these dainty little flowers have been used and enjoyed for a really long time. According to the National Institutes of Health, “Chamomile is one of the oldest, most widely used and well documented medicinal plants in the world and has been recommended for a variety of healing applications.” Scientific research has shown chamomile’s anti-inflammatory and soothing properties to be moderately to significantly effective against a number of digestive, respiratory, and sleep-related problems.
Attracting beneficials with chamomile
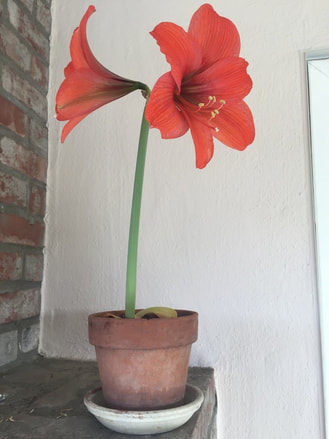
If all those medical conditions weren’t reason enough to add chamomile to your garden or foodscape, many beneficial insects are also attracted to chamomile. Syrphid or hoverflies, parasitic wasps, tachinid flies, bees, and other pollinators are attracted to chamomile. Chamomile varieties There are many daisy-like plants that fall under the name chamomile, but only two genuine varieties: Roman and German. German chamomile (Matricaria recutita), also known as ‘Water of Youth’ or wild chamomile, is an annual that can grow up to 2 feet in height and 2 feet across. Roman, English, Russian, or garden chamomile (Anthemis nobilis) is a low-growing perennial, often used as a ground cover or lawn replacement. When selecting chamomile plants for tea, be sure to select German chamomile and not Roman. How to grow chamomile Chamomile (or camomile) prefers full sun to partial shade and moderate amounts of water. It can be grown in a container or directly in the ground. Chamomile is best planted in protected areas if temperatures are expected to rise above 100 degrees F. Chamomile generally does not require supplemental fertilizer. Chamomile is best grown from established plant cuttings or division, but it can be grown from seed. Chamomile seeds require light to germinate, so they should not be covered. Seeds take 1 or 2 weeks to germinate. Plants should be cut back 3 to 5 inches every so often to prevent excessive size and legginess. Trimming will also promote flower production. If growing for tea, flowers should be removed (deadheaded) on the first day they bloom for the best flavor. Chamomile pests & diseases Chamomile is a sturdy, drought tolerant plant, but it may become susceptible to powdery mildew, white rust, leaf blight, aphids, thrips, and mealybugs if weakened by lack of water or other environmental stresses. Several beetles find chamomile flowers to be as appealing as we do, so it is important to wash plants off when harvesting, to avoid contaminating your tea. The bad news Just when you had every reason to add chamomile to your garden, it is important to know that it is not for everyone. All the chemicals that make chamomile so helpful can also make it harmful. People who are sensitive to ragweed or chrysanthemums may develop allergic reactions to chamomile. Also, since chamomile has been shown to stimulate uterine contractions, it should be avoided by pregnant and nursing women. You can dry chamomile flowers in an old pillowcase, the same way you can preserve lavender. Dried flowers should be stored in an airtight container out of sunlight. So, put the kettle on and have yourself a piping hot cup of soothing chamomile tea. Poinsettias, Amaryllis, and miniature Christmas trees make delightful gifts during the holiday season, but they need special care to last.  Red & white poinsettias Two plants couldn’t be more different than poinsettias and miniature pine trees, and their care is equally diverse. In each case, if these plants are simply set on a countertop and watered occasionally, they will probably never make it to the end of January. Amaryllis plants are often watered to death. Being bulbs, your holiday Amaryllis can last for several years, given the proper care. Understanding what these popular holiday gifts need to stay healthy can transform them from short-lived hostess tokens to durable members of your garden, landscape, or home interior. Poinsettias Poinsettias (Euphorbia pulcherrima) are fascinating plants. The bright red blooms we see are bracts or modified leaves. The plant itself is a tree that can reach 13 feet in height! The flowers of poinsettia plants are tiny structures hidden away in pseudo flowers called cyathia. Native to Mexico, poinsettia plants need 12 hours of darkness for at least five days in a row to turn from green to red, in a process called photoperiodism. The slightest exposure to sunlight, street lights, headlights, or table lamps will interfere with this process. Poinsettias need strong morning sunlight and afternoon shade to be healthy. They can be grown outdoors, in warmer regions, as long as they are protected from frost. Commercially grown poinsettias are infected with a phytoplasma (bacteria) that causes the plant to produce abundant lateral buds, which make the plant grow in a more bushy structure. Poinsettias left on their own have a more open, spindly growth. Poinsettias are susceptible to certain fungal and bacterial diseases, including leaf spot, stem rot, crown gall, anthracnose, blight, black rot, dieback, gray mold, powdery mildew, rust, scab, mosaic, and root-knot nematodes. These tendencies indicate the importance of allowing plants to dry out between waterings and providing good drainage. The University of Vermont Extension provides an excellent way to remember how to care for your poinsettias:
As a member of the spurge family, poinsettias contain latex, which can be an irritant. Contrary to popular belief, poinsettias are not poisonous.
In early fall, as the leaves begin to turn brown, cut the leaves back to 2 inches from the bulb and remove the bulb from the soil. Clean the bulb and place it in the crisper drawer of your refrigerator for 6 weeks. Just be sure there are no apples nearby, as they will sterilize your amaryllis bulb! After 6 weeks in the cooler, bulbs should be returned to the soil about 8 weeks before you would like fresh blooms. This cycle can continue for several years.
Most holiday plants receive too much water, not enough sunlight, and too much heat to make it through the holiday season. Understanding what these popular holiday gifts need to stay healthy can transform them from short-lived hostess tokens to durable members of the garden, landscape, or home interior. Sorrel may be considered a weed by many, but it ’makes real nourishin’ soup,’ according to Milly in Seven Brides for Seven Brothers, and she was correct. Similar in appearance to spinach, sorrel grows very easily in many different environments. Sorrel is far more heat tolerant than spinach and is less likely to bolt. There are actually two different types of sorrel and both are edible: common sorrel (Rumex acetosa) and French sorrel (Rumex scutatus). Common sorrel has a more bitter taste than the French variety, which is more lemony, but both have been used in soups and salads for thousands of years. Sorrel description & lifecycle A close cousin of curled dock (R. crispus), rhubarb, and buckwheat, sorrel is a perennial herbaceous plant commonly found in the grasslands of Europe, Scandinavia, and Central Asia. It is an introduced species in North America. The plants are dioecious, which means that there are distinctly male and female plants. Flowers are reddish green. Sorrel has deep roots that can help break up compacted soil. Garden sorrel vs. French sorrel Common sorrel goes by several other names: garden sorrel, spinach dock, sheep’s sorrel, sour dock, red sorrel, vignette, acedera, and narrow-leaved dock. “Dock” refers to broad-leafed members of the knotweed family (Polygonaceae). Common sorrel grows tall, up to 3 feet in height, and has many branching stems. French sorrel has a more prostrate growth pattern, usually no more than 18 inches tall, and leaves tend to clump together on the upright stems. French sorrel leaves are smaller and more rounded than common sorrel leaves.  French sorrel (Salicyna) CC BY-SA 4.0  Common sorrel (Burschik) CC BY-SA 3.0 Uses of sorrel
The edible juicy stems and narrow leaves of sorrel are packed with nutrients. A single cup serving of raw sorrel provides 15% of the DV of fiber, 16% Vitamins A & C, 5% calcium, 17% iron, 14% potassium, nearly 3 grams of protein, and all for only 29 calories. Sorrel leaves taste somewhat sour. It has been described as tasting similar to unripe strawberries or kiwi. Sorrel adds a good tang to soups, salads, and otherwise too heavy casseroles, and it has been part of the human diet for a very long time. Sorrel is the primary ingredient in traditional French “soupe aux herbes”. As folk medicine, sorrel has been used effectively as a diuretic, for treating bacterial infections, to reduce pain and inflammation, and it is currently used in the herbal cancer treatment Essiac. Sorrel contains tannins, which can help dry out congested nasal passages associated with sinusitis. On the downside, sorrel also contains oxalic acid, which can cause problems for individuals prone to gout, arthritis, rheumatism, or kidney stones. How to grow sorrel Sorrel is a tenacious addition to your edible landscape. Sorrel self seeds easily, is drought resistant, and wicked tough. Seeds should be planted in spring or fall. Sorrel can tolerate shade, but it prefers full sun. Sorrel leaves should be harvested while they are relatively small, for the best flavor. As with all greens, it is best to harvest in the morning, while they are at their crispest. Sorrel pests & diseases Many butterfly and moth species larvae feed on sorrel. Other than that, sorrel grows pretty much uncontested. Adding sorrel to your edible landscape not only provides your family with nutrient rich greens, it also adds biodiversity and improved soil health. Dark, sooty patches on leaves, stems, fruit, or flowers are probably sooty mold. 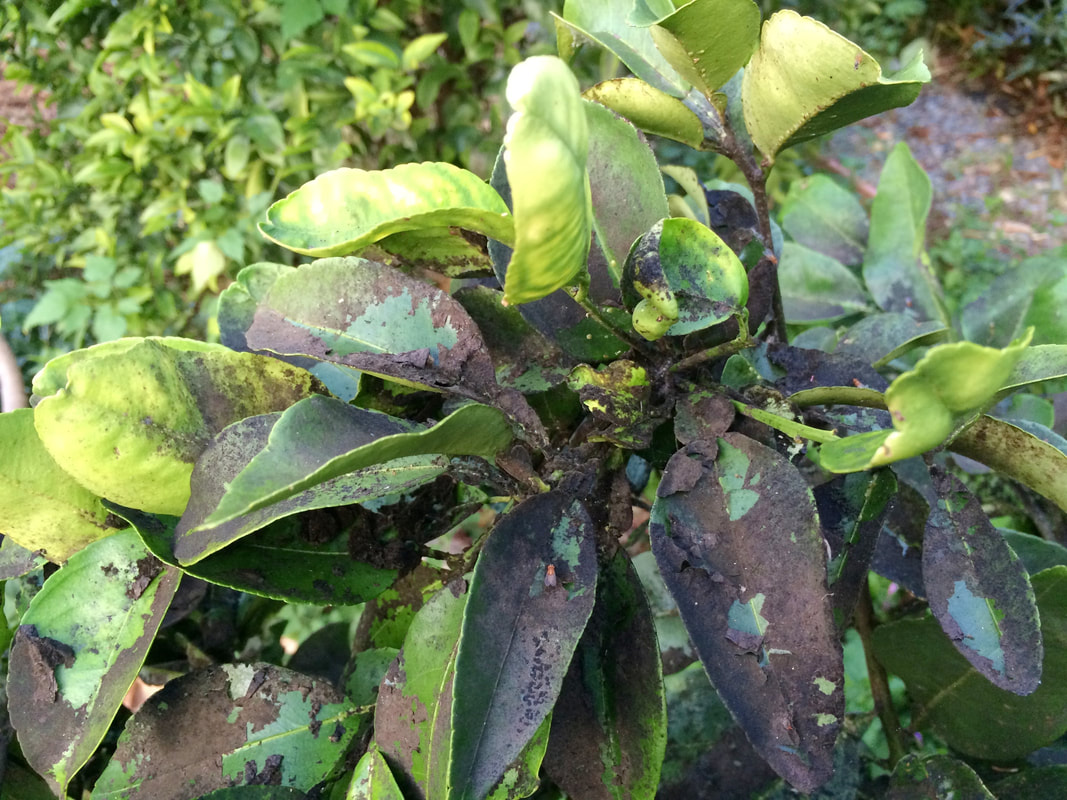 Sooty mold on citrus leaves (Scot Nelson) Public Domain Sooty mold refers to several fungi that grow on the honeydew excreted by plant-sucking insects. Honeydew is a delicate way of saying sugary bug poop. Some of the more common insects responsible for sooty mold include the following: As they feed, these insects excrete much of the sugary sap they eat. The honeydew they leave behind is a petri dish for fungus in the garden. The black, sooty-looking areas you see are most commonly the threadlike mycelium of the Aspergillus niger fungus. Some fungi are plant-specific, while others are less particular.  Sooty mold on eucalyptus leaf (Bidgee) CC BY 3.0 Sooty mold as a symptom
If you see sooty mold in your garden, plant-sucking insects are or recently were present. You can use that information to manage the pests leaving the honeydew behind. Interrupting the lifecycle of these pests will help your garden plants because the honeydew they leave behind interferes with photosynthesis, and many of them carry and spread disease pathogens. Ant control Ants will protect, farm, and harvest honeydew-producing insects. You can interrupt this cycle by blocking ants from climbing trees and shrubs. Wrap tree trunks with sticky barriers. Since ants can carry diseases from one plant to another, these barriers are a good idea whether or not you see sooty mold. Sooty mold control Sooty mold can get a little out of control in cool temperatures and wet weather. You can use strong streams of water from the hose to displace aphids and other plant-sucking insects. The water will also wash away some sooty mold, but leaves need a wipe down with soapy water to wash off the sugary honeydew that sustains it. Horticultural oil, neem oil, or insecticidal soap can help control the insects that leave the honeydew behind. You can still eat fruits and vegetables covered with sooty mold. Just wash them off with soap and water first. Spiders in the garden may provide a frightful shock for those on the phobic end of the arachnid spectrum. For the rest of us, seeing spiders indicates a healthy ecosystem with plenty of biodiversity. How do spiders help your garden and which ones should you be worried about? 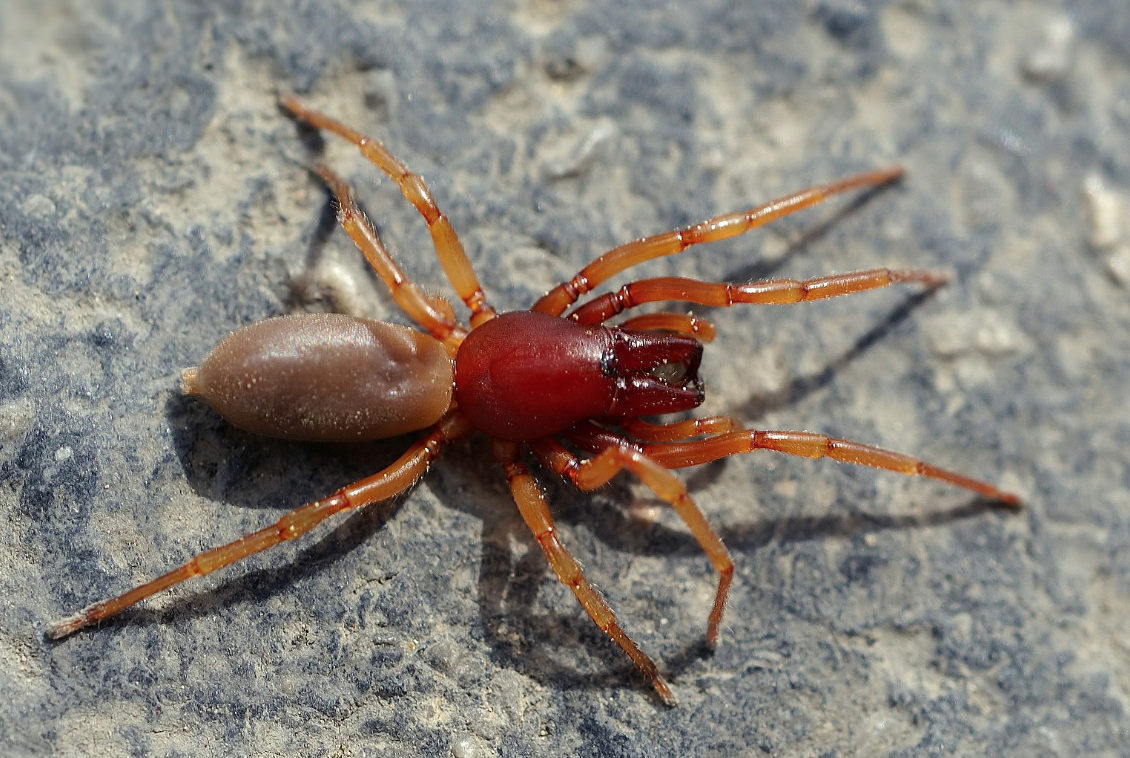 Woodlouse spider © Hans Hillewaert CC BY-SA 3.0 What makes a spider a spider? Spiders are not insects, even though they have exoskeletons, jointed bodies, and appendages. Spiders and insects are both arthropods. The difference is that spiders have six or eight eyes, eight legs, and fangs that inject venom, which insects do not. Also, spiders do not have antenna (though there are spiders who pretend to be ants by holding their front legs to make them look like antennae). Spiders and scorpions are both members of the arachnid class. Spiders have a more centralized nervous systems than other arthropods, and they move their limbs using hydraulic pressure, rather than muscles. The webs we see are produced from glands that make silk that is spun into threads using spinnerets. There is a wide variety of web sizes, shapes, and styles within the spider community. Did you know that spiders tune their webs to specific frequencies?  Tiny male Golden orb weaver (top) protected from the female by producing the right web vibrations and being too small to be worth eating. (DirkvdM) CC BY-SA 3.0 Common spiders Below is a list of the common types of spiders found win North America:
Spider behavior Except for one herbivorous species that was identified in 2008, all spiders are predators. These beneficial insects hunt and feed on insects and other spiders, and some of the larger varieties hunt lizards and birds. (Yikes!) The familiar sticky webs are not the only way spiders capture their prey. Some species use a lasso, while others mimic their prey to get close enough to grab them, and others actually chase their prey down before injecting them with paralyzing venom. After capturing a meal, spiders must inject victims with digestive enzymes, because spider guts are too narrow to process solids - they actually have filters on their faces that prevent solids from getting in. Some species of spiders form social groups of up 50,000 individuals, but most spiders are solitary. Spiders generally only live for two years, but some captive species have lived as long as 25 years. According to Wikipedia, “Male spiders identify themselves by a variety of complex courtship rituals to avoid being eaten by the females.” (Sorry guys, I couldn’t resist.) Anyway, recent research has shown that spiders eat more than insects and other spiders: many species also drink nectar, And young spiders that eat pollen have been shown to have higher survival rates than those who do not. Some spiders are scavengers, eating dead insects that they find. Captive spiders have even been observed feeding on egg yolk, sausages, milk, bananas, and marmalade. Good spiders Scary looking or not, spiders help us fight many garden pests without the use of chemical pesticides. In fact, spiders are believed to be the most beneficial insect we can have in the garden! Spiders commonly eat earwigs, roaches, flies, moths, mosquitoes, aphids, caterpillars, cucumber beetles, grasshoppers and crickets, pine sawflies, redhumped caterpillars, armyworms, leafhoppers, spider mites, thrips, leaf miners, spruce budworms, tobacco budworms, sorghum midges, and fleahoppers. (It may have been easier to list what they don’t eat!) Spiders also eat other beneficial insects, but the damage they prevent far outweighs the damage they do. Most types of spider venom are not dangerous to people, with the few exceptions listed below. In fact, research is being conducted to explore the use of spider venom as both pesticide and medicine. Bad spiders While spiders are a great addition to any garden or landscape, there are a few exceptions. Black widow, recluse, and funnel spider bites can cause life-threatening reactions. That being said, only 100 deaths occurred in the 20th century due to spider bites, while 1,500 people died during the same time frame from jellyfish stings. Weird. Anyway, most spider bites are much like bee stings - they hurt like crazy, at first, and then go away. You can reduce the discomfort by cleaning the area, applying antiseptic, and then ice to the area. If unusual or severe reactions occur, get to the hospital as quickly and as safely as you can or call poison control (in California, that number is 1-800-222-1222). If you don’t have the number for Poison Control in your contacts, you should do that now. Really. By the way, if you do get bit by a spider, try to capture it for identification. Your doctor will thank you. There are very few poisonous (to people) spiders in California. These include:
 Female black widow (Ken-ichi Ueda) CC BY 4.0
 Yellow sac spider (Judy Gallagher) CC BY 2.0
 Chilean recluse (Mampato) CC BY-SA 3.0 If you see spiders in the garden, be glad for the help they provide. And consider this:
In the 16th century, monks would go out into forests and fields to collect spider webs to use to make gossamer canvases for religious paintings. (And we thought plastic wrap was hard to work with…) A hose is a hose is a hose. Right? Well, no. Garden hoses and soaker hoses sure make watering plants one heck of a lot easier than back in the days of carrying buckets, back and forth and back again. At 8 pounds a gallon, that water gets pretty heavy. Our handy green garden hose makes light work of a regular garden task, but what’s in that hose and can it leach out into our soil, where it can be absorbed by our plants? The answer is uncertain. 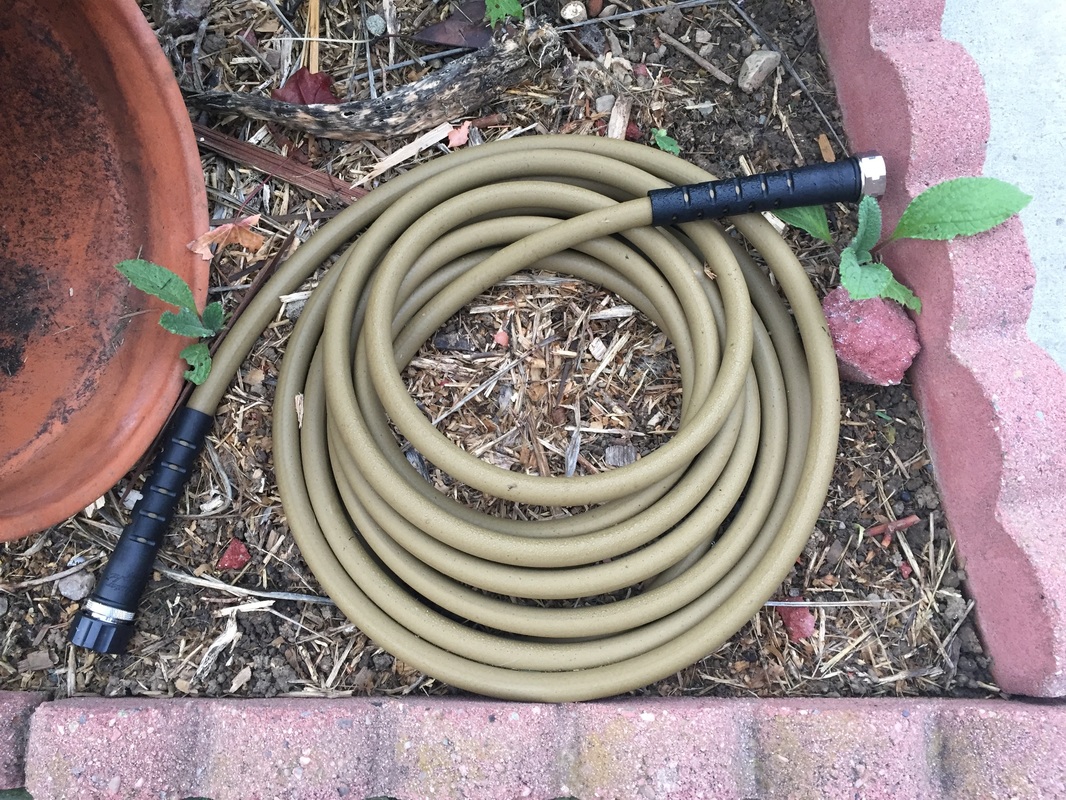 Water Right soaker hoses are food-grade Food grade hoses vs. garden hoses
After living in an RV for 5 years, I understood all too well the importance of my white hose with its blue stripe. This particular hose was used to bring potable water into my home. (Potable means safe to drink.) What made that hose different from your standard green garden hose? Being sold as a food grade hose means it is covered by the Safe Drinking Water Act. This bit of regulatory protection limits the materials that can break free from the hose and enter the water moving through it. Garden hoses are not (but I think they should be). Because garden hoses are not covered, they can contain significantly higher levels of lead and other toxic chemicals. Garden hose test results Public opinion and concern have pressured regulators to look into the issue of toxic garden hoses, but it’s slow process. Many garden hoses contain significant levels of lead, BPA, and phthalates. The bass fittings on the ends of garden hoses have been found to contain dangerous levels of lead about 1/3 of the time. BPAs are used to make hard, clear plastic. The Food and Drug Administration says BPAs are safe, but has banned their use in infant bottles and sippy cups. Huh. Garden hose materials The Environmental Protection Agency (EPA) actively encourages manufacturers to use “old tires and recycled plastics” to make garden hoses. This is great for reducing the amount of trash in landfills but it begs the question of what, exactly, is in those materials and how tightly are they bound to the hose? According to the Centers for Disease Control and Prevention (CDC), garden hoses contain chemicals called phthalates. Phthalates, or plasticizers, are used to make plastic strong and flexible and they are found in all standard garden hoses. Drinking water from a hose made with phthalates puts these chemicals in your body. Watering plants with the same hose puts those chemicals in your soil. The National Institutes of Health (NIH) classify phthalates as "reasonably anticipated to be a human carcinogen.” Another huh. If all that weren’t enough, the National Center for Biotechnology Information (NCBI) warns that garden hoses provide the perfect growth medium for Legionnaires’s disease! Spraying water into the air turns the Legionella bacteria into an inhalable aerosol. Food grade garden hoses In the greater scheme of things, the amount of lead and other chemicals that end up in your soil, plants, and food from a garden hose are probably negligible. There is debate about whether BPA molecules, which tend to be large, can even be absorbed by plants. I certainly don’t know. What I do know is that I want to keep carcinogens, lead, and other toxins as far away from me and my garden as possible. These tips can reduce health risks:
If you are concerned about the possibility of chemicals leaching out of your garden hose, you can always do what I did and switch to higher quality products. Companies, such as Water Right, eartheasy, and others, offer garden hoses made to food grade standards. In my opinion, it’s worth it. Hose trivia: The Irrigation Museum tells us that the first residential hose nozzle was patented in 1877. Who knew there was an Irrigation Museum??? Grow lights try to replicate the spectrum of light that plants receive from the sun. You can find grow lights at your local hardware store or online, but the choices can feel a bit overwhelming. By learning a little but about what’s available, you can choose the grow lights that are best for your plants.  Rainbow Now, everyone knows that most plants need light to grow. What you may not know is that plants need very specific types of light to perform photosynthesis. Grow lights can provide the right light for your indoor plants and windowsill gardens. Grow lights can also used to get a head start on the spring growing season, by planting seeds earlier than they could be started outdoors.
This is not going to be an in-depth scientific post about grow lights. The topic is too complex and new research is emerging that can alter the usefulness of old information. That being said, there are some facts about plants and light that can help you make the best choice when considering grow lights. Ornamental houseplants Many popular houseplants are shade-loving tropicals that evolved under the jungle canopy, where only filtered light was available. Peace lilies, African violets, and coleus can thrive without added light, but it’s not enough for many herbs and other edible plants. Even sunny windows that provide enough sunlight in summer, may need supplemental help come winter’s shorter days and weaker light. What is the right light? Picture a rainbow. That arc of color is the range of visible light, organized by wave length. Plants need the full spectrum of color to grow and thrive. Plants that don’t get enough of the right sort of light tend to grow long and spindly. Plants use very specific ranges of light waves for photosynthesis and different stages of development. It should come as no surprise that light quality changes throughout the year. Spring time sunlight is more in the blue and violet range, which encourages vegetative growth of roots, stems, and leaves, and promotes disease resistance. As the Earth’s tilt and rotation bring us through summer and closer to autumn, the light quality changes to the more red end of the spectrum, encouraging flowering and other reproductive growth. The light used by plants is measured using an index called the PAR value. PAR stands for Photosynthetically Active Radiation. Light bulbs Standard household light bulbs emit light most heavily in the orange and red end of the spectrum, leaving plants without the wavelengths they need to properly perform photosynthesis. According to NASA, the range of light used to grow plants can actually alter their nutritional value and antioxidant content. “How they are grown and then consumed in space could have a positive impact on people’s moods and could protect against radiation in closed environments.” (Dr. Ray Wheeler) Hey, in my humble opinion, Earth is a closed environment, so we could all benefit from making sure that the food we eat is grown in ways that promote good health and positive moods! Types of grow lights There are three basic types of grow lights: high-intensity discharge lights, light emitting diodes, and fluorescent lights. Within those three categories, there are several options. This [modified] list from Wikipedia makes it a little easier to understand: High-intensity discharge (HID) lights - currently the most popular, but they require some heavy duty electrical connections and each bulb type must have a specific ballast. (Just because a bulb screws into a socket does not mean you are using the correct combination.)
Light-emitting diodes (LEDs) - efficient and economical; used by NASA; can be plugged directly into a household electrical outlet; this bulbs do not get hot, unlike many others; while more expensive than most, LEDs last profoundly longer (11 years) Fluorescent lights - efficient and economical; some people get migraines or have seizures because of fluorescent lights
Many of these bulbs are available at a variety of intensities, the same way as regular light bulbs. To pick the right combination of intensity and color spectrum, you will need to learn about the sunlight requirements of your indoor plants. There are grow light bulbs that screw into traditional lamps, stand-alone planters with their own grow lights, and you can build your own seed starter set-up with inexpensive shop light hoods installed with fluorescent grow lights. How do you use grow lights? No, we’re not talking about your grandmother’s undergarments. Girdling, or ring-barking, refers to the removal of a complete ring of bark from a stem, branch, or trunk that generally kills whatever was growing past that point.  Girdling cut (Lamiot) CC BY 3.0 Sometimes girdling happens on purpose and sometimes it’s an accident. Accidental girdling frequently occurs when tree supports are used incorrectly. They may be allowed to rub against the bark enough to create a ring, or supports may be left on for too long and then removed, ripping off the bark that has started growing over the support. Beavers and rabbits are notorious pests aboveground and voles do the same work underground. Girdling can also be caused by grazers forced to eat bark during a harsh winter, or by birds or insects that have bored so many holes around an area that it is girdled. There are some insect pests who girdle tiny twigs or flower parts. Girdling is one reason why you see young saplings with protective plastic around the trunk. (Sunburn and protection against herbicides are other reasons.) Vines, such as English ivy and Wisteria, a tree’s own roots, and your weedwacker can cause girdling, too. How does girdling kill a tree? To understand how girdling can kill a tree, we first have to understand how trees grow. Trees grow by adding new layers (sapwood) on top of old layers (heartwood), underneath protective bark. It is the inner layer of bark, called the cambium, where this growth of sapwood occurs. Looking from the outside in, bark has several layers that serve different functions:
If you recall, trees, like other vascular plants, have structures that help move water and nutrients. Interrupting that action can result in wilting and death. Surprisingly, the center of an entire tree can be rotted out and the tree can continue growing, as long as the vascular bundle is intact! A quick review of those important parts:
Girdling removes the phloem. This interrupts the flow of sugars created in the leaves through photosynthesis. Since water and minerals are still being brought up though the xylem, death is not immediate, but it is nearly inevitable. In some cases, trees and shrubs are able to put out new branches below the girdled area, but pests and diseases will find easy access through the dying upper parts. It is possible to repair a girdled tree, if you want to try. How to repair girdling damage A tree that has been girdled can be saved by replacing the phloem path with healthy twigs. The twigs act as bridges and their healthy phloem tissue will provide a path for the tree to use until it is able to grow a new cambium layer. Follow these steps to repair girdling damage:
Done correctly, these repairs will provide a path for critical sugars. In time, the tree will grow new layers that will cover your handiwork - but you’ll know it’s there and that you saved a life! In some cases, an entirely new tree is planted right next to a girdled tree, to act as root stock to the damaged tree. Partially girdled trees can be aided by covering the damaged area with damp moss and wrapping it with waterproof adhesive tape to keep the moss in place and moist. Girdling on purpose Girdling on purpose is called cincturing, or scaffold girdling. It is an agricultural method used to force fruit-bearing plants to produce bigger, sweeter fruit. Think about it. You have a mature fruit tree. The roots are pulling water and minerals up from the ground through the xylem. Leaves are producing sugars which are distributed through the phloem. You girdle the trunk just below a major branch, or scaffold, blocking the path of sugars headed elsewhere. The only place for these sugars to go is in the fruit on the branches above the cut. The fruit gets more sugar, grows bigger, tastes sweeter. Viola! This method is commonly used on a surprising number of trees and vines: Care must be taken when using this method that only the layers above the cambium layer are removed. Done correctly, the tree will heal itself within a few weeks. (Part of me can’t help think how cruel we can be, as a species. Other methods for improving or increasing yield include beating on a tree, hammering nails into the trunk, or pruning the roots. From the trees’ point of view, it all sounds brutal.)
On purpose or by accident, girdling is a severe tree injury that should receive immediate attention if possible. These feathery beige moths are responsible for the loss of 25 - 50% of each year’s California coastal artichoke crop. If you are lucky enough to live in desert areas, this pest isn’t a problem. Otherwise, read on! But, before we start learning about this pest, I have to comment on its scientific name. If you read this blog regularly, you know that I always try to include the Latin names. Some of them can be pretty entertaining, such as carrot’s Daucus carota. Any coincidence to Bugs’ “What’s up, doc?” Hard to say for sure, but this plume moth’s scientific name just begs to be, well, something. I mean, Platyptilia carduidactyla just screams platypus pterodactyl to me. Ok, maybe not. 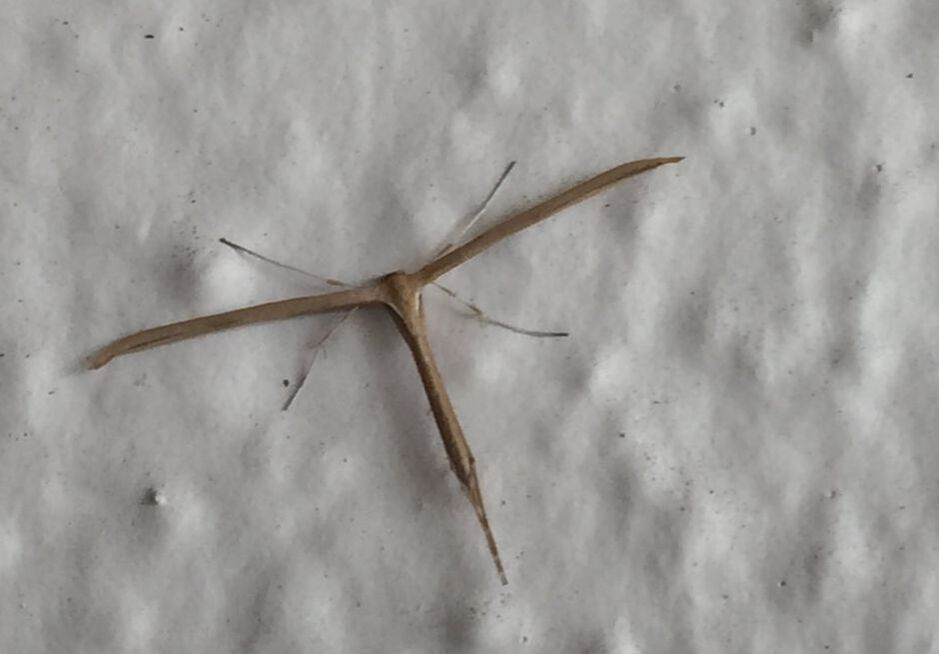 Artichoke plume moth Artichoke plume moth description
Adult moths are brownish beige to beige, with a wingspan of 3/4” to 1-1/2”. The wings are unique for a couple of reasons. First, they look very narrow when moths are at rest, with ends that are wider or “footed”. If you can look closely, you will see that the hind wings are fringed. Also, both sets of wings are lobed, creating the illusion that they have several wings. First instar larvae are pale yellow and only 1 mm long, so they are difficult to see. Later instars are larger, with the final instar reaching a little over 1/2” in length, and a more pinkish color. Eggs are only 0.5mm long and shiny. They start out a pale greenish yellow and turn a darker orangish-yellow before hatching. Artichoke plume moth lifecycle Female moths lay an average of 245 eggs singly on the underside of leaves and on stems, usually close to unopened buds. When they hatch, larvae begin feeding on leaves, stems, and buds. After their first molt, larvae borrow into your precious artichoke plants. With three or four overlapping generations a year, plume moths can inflict some serious damage! Controlling the artichoke plume moth Back in the 1940’s and 50’s, DDT was used to control these pests. Luckily, those days are behind us. Research has shown that good sanitation and cultural controls are very effective, although insect growth regulators (IGR) and pheromone traps are used on many commercially grown crops. You can protect your artichokes from the plume moth with these practices:
Have you seen this pest in your yard? Let us know in the comments! It’s not unusual to see a spot on a leaf. No big deal, right? Maybe. A single spot on a leaf might be nothing, or it can be home to more fungal spores than we can count. Each of those spores can catch a ride on a breeze or a raindrop to infect nearby leaves and plants. Before you know it, your garden has a fungal problem.  Septoria leaf spot on tomato (Dr Parthasarathy Seethapathy, TNAU, bugwood.org) CC BY 3.0 Symptoms of leaf spot
Symptoms can be insignificant spots, solitary bumps, or entire patches of brown, black, purple, or yellow over most of a leaf. You can determine what causes leaf spot by considering the plant species affected. Once you identify the cause of leaf spots in your garden, you will be better able to help your plants. Alternaria leaf spot The cabbage family, escarole, mango, calendula, and marigolds are susceptible to Alternaria leaf spot. Also known as Alternaria leaf blight, this disease starts out looking like other leaf spot diseases. But it can become a bigger problem, distorting and damaging broccoli and cauliflower heads. Bacterial leaf spot in almonds Bacterial spot (Xanthomonas arboricola pruni) is a relatively new disease that can severely reduce your almond crop. Symptoms begin in spring when dark spots develop where water collects, turning yellow and causing premature leaf drop. This bacteria also attacks the nuts, causing reddish lesions that later ooze an amber-colored gum. The nut inside shrivels up and becomes inedible. Lesions and cankers also occur on young twigs. Remove all infested leaves, cut away infected wood, and remove mummies. You can also interrupt this bacterium’s lifecycle by removing all the leaves before the rainy season hits. Fixed copper sprays in late January and again in late March can protect your almond trees from future infestations. Bacterial leaf spot in spinach Spinach leaves with water-soaked, angular areas of damage probably have bacterial leaf spot (Pseudomonas syringae spinaciae). What starts as tiny dark spots grow into large (3/4”) angular damaged areas that can merge with nearby areas for complete leaf loss. Infestations are visible on both the top and the bottom of the leaf. Overhead watering is the most common cause of bacterial diseases. Common leaf spot in cane fruits Your blackberry or raspberry plants may play host to the Mycosphaerella rubi fungus. Common leaf spot can also appear in gooseberry, boysenberry, dewberry, and olallieberry. The leaf spots are brown and circular with dark brown or purple margins and white centers. Oval lesions also occur on canes. Improved air circulation is the best treatment. Copper and sulfur sprays may also provide some control. Common leaf spot in strawberries Strawberries are vulnerable to a fungal disease called common leaf spot (Ramularia tulasneii). Symptoms include tiny purple dots on the upper leaf surfaces. These dots can grow to 1/4” in diameter, turning brown, gray, and white. Lesions may form on stems (petioles), stolons (runners), and fruit clusters (trusses). The lesions block the flow of water and nutrients in the vascular bundles. Common leaf spot is the most destructive leaf spot disease of California strawberries. Commercial growers use a fungicide called chlorothalonil (Bravo, Echo, and Daconil) on plants in the nursery to eliminate this pathogen. The use of resistant cultivars is the only option available to home growers. Entomosporium leaf spot fungus in pomes Apples, crabapples, loquat, pears, and quince are all vulnerable to the Entomosporium leaf spot fungus (Entomosporium mespili, aka Diplocarpon mesophilic). Symptoms of Entomosporium leaf spot include reddish spots with dark purple, red, or yellow halos, pale glossy specks in the center of these lesions, and early leaf drop. Fixed copper sprays can help reduce the infection. Septoria leaf spot in tomatoes Septoria leaf spot affects celery, chicory, cucumber, other cucurbits, parsley, and tomatoes. Plants infected with Septoria develop tiny yellow spots on leaves. These may be angular or round, with a reddish or yellow halo. These spots eventually merge and turn brown, killing leaves. Remove infected plants and throw them in the trash. Leaf spot controls Since fungicides are not considered justifiable for most causes of leaf spots, these cultural controls are your best bet:
|
Welcome!You can grow a surprising amount of food in your own yard. Ask me how! To help The Daily Garden grow, you may see affiliate ads sprouting up in various places.
You can also get my book, Stop Wasting Your Yard!  Index
All
Archives
July 2024
|


.JPG)
 RSS Feed