|
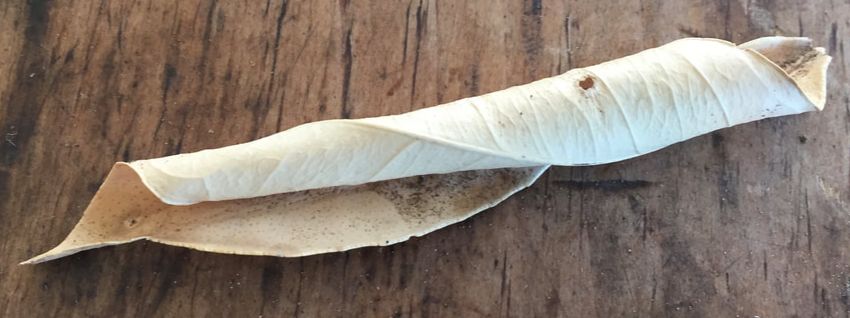
Rove beetles are a family of mostly elongated predators that protect your plants against a great many garden pests. 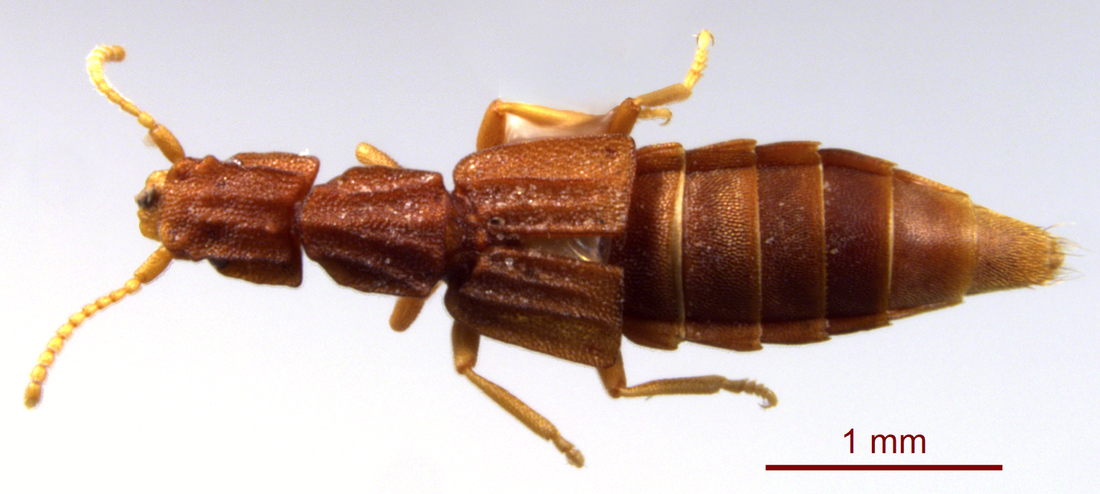 Myrmecosaurus ferrugineus rove beetle (Spongymesophyll) CC BY-SA 3.0 There are over 63,000 different species of rove beetles (Staphylinidae), making them the largest beetle family in the world. There are approximately 4,360 species in the United States. Rove beetles have been around for over 200 million years and it may take another 200 million years to sort out this particular family tree. Currently, there are over 30 subfamilies of rove beetle, and scientists are still trying to sort it out. However these tiny beetles end up being related, the majority of them pack a wallop when it comes to devouring many common garden pests. 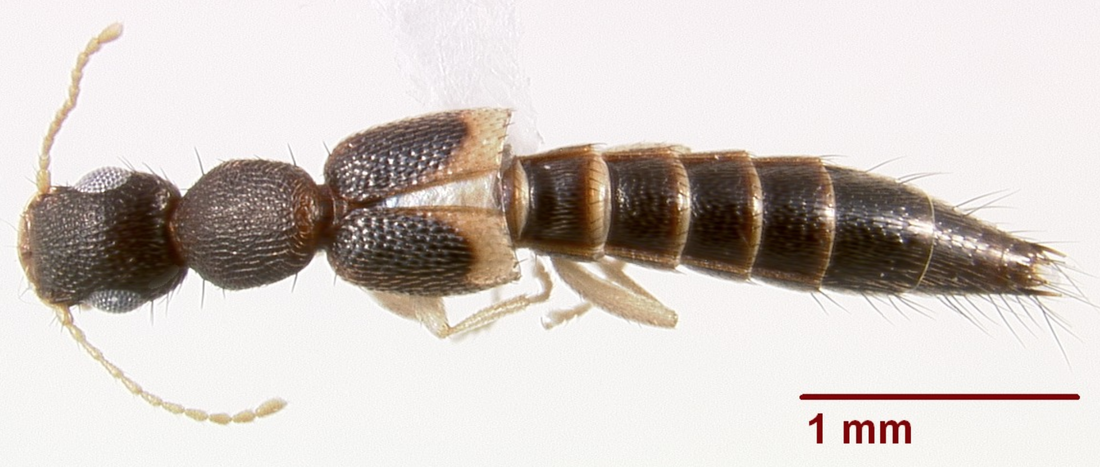 Astenus cinctus rove beetle (Spongymesophyll) CC BY-SA 3.0 Also known as trash beetles, these beneficial insects are often found in leaf litter, mulch, under loose bark, and around fallen trees. They may also be found in bird nests and rodent burrows where they presumably feed on fly and flea larvae. This huge family is extremely diverse. Some have evolved to live within caves, while others prefer living in mushrooms. Rove beetle description As you might expect from a family of this size, rove beetles come in a variety of shapes and sizes. Most of them are very small, averaging only 0.08 to 0.30 inches long, but they can range from 0.03 to 1.5 inches in length. Most rove beetles have a narrow body that can squeeze into tiny crevices in search of prey and shelter. Rove beetles can be black to brown, yellow to red, and even an iridescent blue-green. They have thread-like antennae with 11 segments; some of them have little knobs at the ends. Most rove beetles have short wing covers (elytra), which means you can see several abdominal segments. Many rove beetles look like a multicolored earwig without its pincers, but certainly not all. #/media/File:Lithocharis_nigriceps_Kraatz,_1859_(37530171470).png) Staphylinidae rove beetle (Udo Schmidt) CC BY-SA 2.0 Rove beetle eggs are typically white, but can be spherical, pear-shaped or oval. Flattened larvae may have a distinct ‘neck’ or an armored head, though not all exhibit those characteristics. Pupae can be hard, dark colored cases, or naked white grubs, depending on the species. Adults tend to be long-lived. Many rove beetle species produce secretions. Some of these secretions help repel water, allowing clumsy insects to recover from falling into water, while other secretions can be particularly toxic. One of those toxic secretions, found in the Paederous group, is transferred from mother to offspring, at birth, providing protection against spiders. This secretion can cause skin irritation and it can damage your eyes. It is the most powerful animal toxin that we know of, but scientists are learning how to use it to heal lesions and treat cancer. Rove beetle diet Adult rove beetles eat mites and small insects, as well as root maggot eggs and larvae. Rove beetle larvae also parasitize root maggot larvae. The rove beetle diet is a Who’s Who of garden pests, including:
If eating all those pests weren’t reason enough to appreciate rove beetles, it ends up that adult rove beetles also pollinate cherimoya fruit.
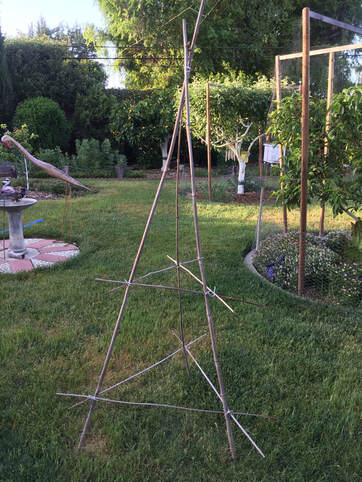
You can help the rove beetles in your garden by avoiding the use of broad-spectrum pesticides and insecticides, and by maintaining permanent areas planted with bunch grasses or other low-growing perennials to provide year-round habitat for these tiny hunters. What types of rove beetles have you seen in your garden? Get your beans growing skyward with a tuteur. Tuteur is French for ‘trainer’ and pronounced the same as that tutor who helped you through middle school algebra. 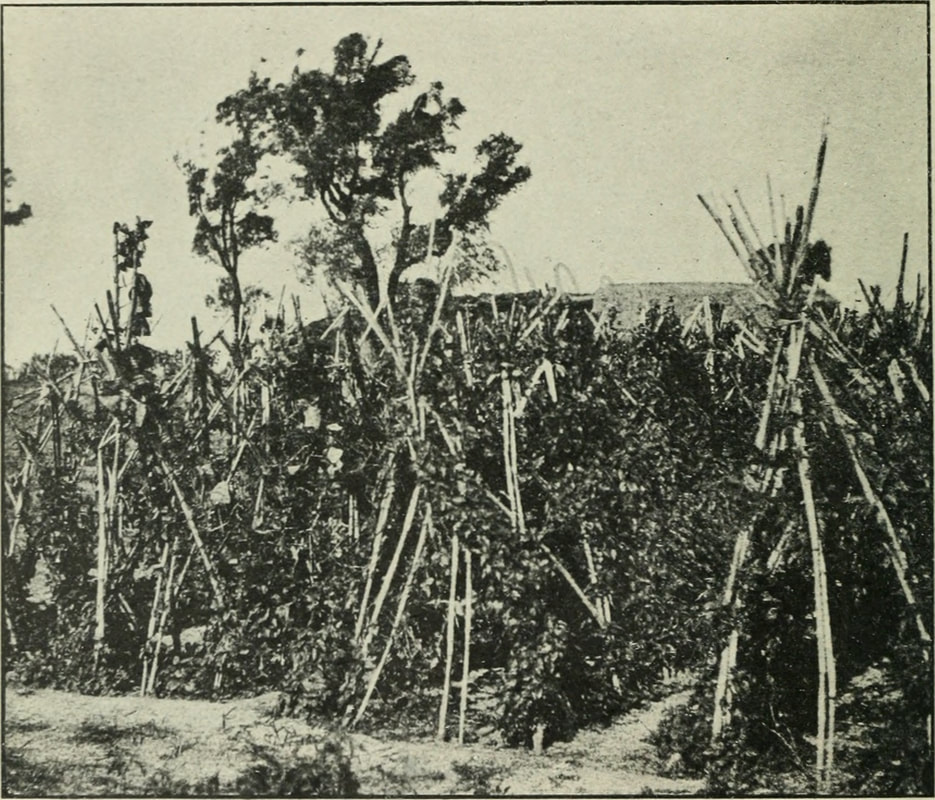 Traditional pole bean tuteurs (Image from page 209 of "Bulletin. 1901-13”) Public Domain What is a tuteur? Tuteurs are 3- or 4-legged obelisk-shaped trellises used to provide a climbing structure for peas and pole beans and other climbing plants. Actually, a tuteur can have as many legs as you like, as long as it is sturdy enough to not topple over. Traditionally, tuteurs were nothing more than a handful of branches lashed together at the top and spread apart at the bottom, teepee-style. Placed over young pea and pole bean plants, these structures provided supports for young tendrils to wrap around as they climb toward sunlight. Like other forms of vertical gardening, tuteurs take up less space while expanding your growing options. They also reduce pod exposure to fungal spores and slugs and snails, and they create interesting focal points in your garden. While you can certainly buy a tuteur, they are very easy to make and odds are good that you already have all the materials you need to make one for free. How to make a tuteur At its most basic level, a tuteur can be nothing more than 4 long poles lashed together near the top, with the legs spread out at the bottom. At the other end of the design spectrum, you can construct an ornate obelisk, complete with gazing globes, wind chime, or whatever strikes your fancy. Whatever design you choose, keep in mind that some plants can become substantial, so you will want your tuteur to be sturdy enough to handle whatever will be using it for support. Of course, once the tendrils do all their winding and climbing, they will add a measure of stability to whatever structure they climb. To create a simple tuteur, you can use bamboo poles, scrap untreated lumber, tree branches, rebar, and many other reusable materials, following these steps:
Vinegar makes for great pickles and salad dressings, but can it kill weeds? Let’s find out! We’ve all heard the story - spray your weeds with vinegar and they die. What a great idea! And so easy! But does it really work? First, let’s learn a little bit about vinegar. 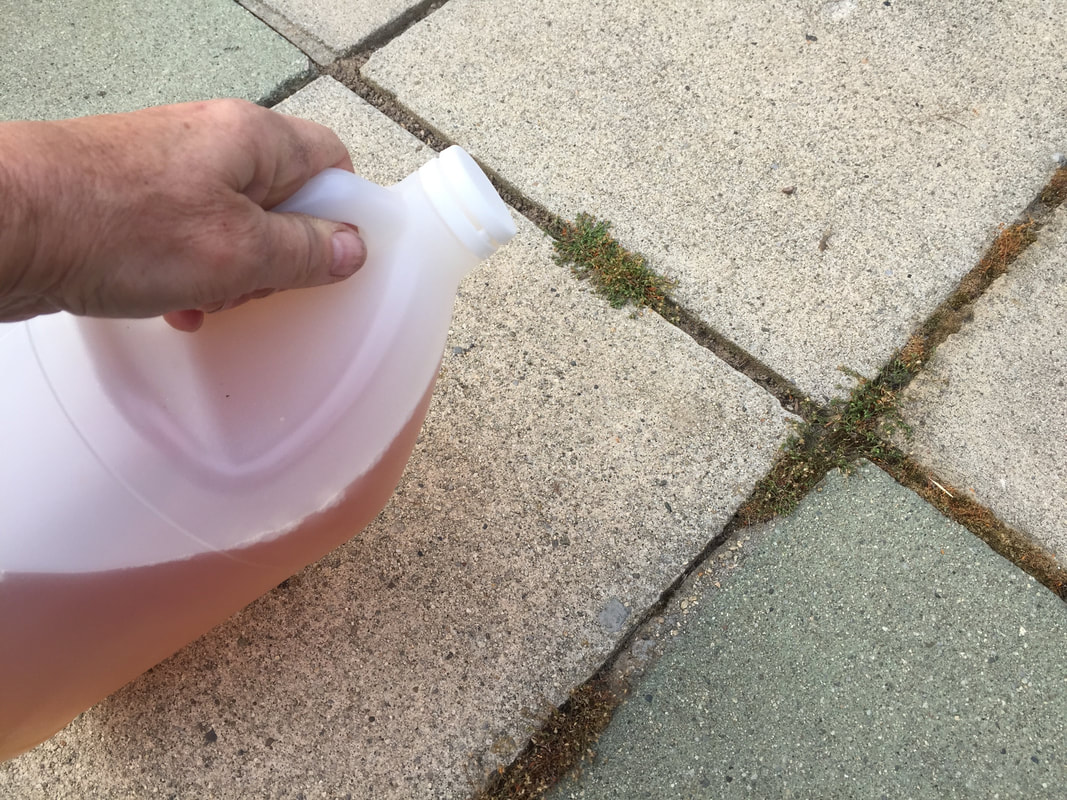 Vinegar is not the weed killer you've heard about What is vinegar? You know it when you smell it or taste it. There is no mistaking the tang of vinegar, or the smell of decorating Easter eggs. Vinegar is a sour, acidic liquid made from fermented low-alcohol liquids, such as beer, wine, or cider. The acid in vinegar is called acetic acid. The vinegar you buy in the grocery store is 95% water and 5% acetic acid. When the concentration is 8% or higher, it must be labeled acetic acid. Some people call this higher concentration horticultural vinegar, but I find that label misleading. It is not vinegar. Vinegar is food, while acetic acid is a potentially dangerous chemical. The difference between the two matters. 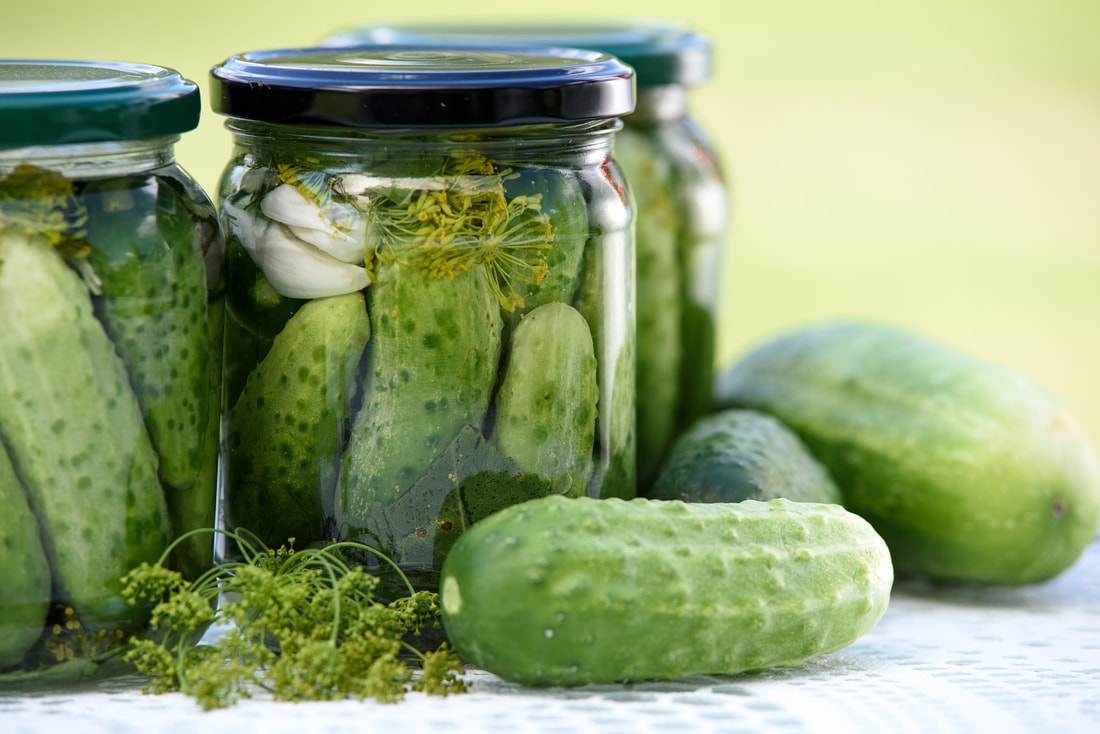 Pickles (PhotoMIX) Pixabay Acetic acid as herbicide To be used as an herbicide, commercial agriculture uses a 20% concentration of acetic acid while wearing protective clothing. Acetic acid is a contact herbicide. This means it must come into contact with weeds to kill them. Acetic acid acts by dissolving cell walls, which allows fluids to leak out. This dries out the plant, potentially killing it. This method is more effective on younger plants and those with thinner skins. Tough, woody plants are more resilient, resulting in a burned appearance while remaining alive. Repeated treatments are often needed to kill off tenacious perennial weeds. Unsprayed parts are not affected. Plants accidentally sprayed are affected, as with any chemical overspray. You cannot buy acetic acid at the grocery store, but you might find it at a garden center. If you decide to use acetic acid to clear out some tough weeds, do not use your aluminum sprayer. Acetic acid will damage aluminum and iron surfaces. As with any pesticide, it should only be used on plants listed on the label, and it the manner described in the instructions. And be sure to wear eye protection and other personal protective equipment (PPE) when applying acetic acid.  Chemical Hazard symbol (The Navigators) Public Domain Vinegar as herbicide
If you spray weeds with household vinegar, the aboveground portion of the plants might dry up and die. Or, it might not. It will not affect the root system. By the time the vinegar filters through the soil to reach the roots, it will have gone through chemical changes that make it practically harmless. And what do weeds do when you kill off the aboveground portion? They come back, again and again, ready to produce thousands of little weed seeds. Of course, if you treat weeds repeatedly with vinegar, you will eventually force the plant to use up all the food stored in the root system, killing the plant. Probably. But honestly, it would have been simpler to just cut it off or pull it out in the first place. Let’s stop sharing these myths about vinegar in the garden and leave it in the kitchen where it belongs. That being said, if you have a bad sunburn. try gently wiping the affected area with a cloth soaked in vinegar. You might smell like a salad, but it won’t hurt anymore. I have no idea why. Transpiration burn may sound like a bad deal, but it refers to the damage caused by mite feeding.
What is transpiration? Plants exhale water through tiny openings called stomas in a behavior known as transpiration. Stomas are generally found on the underside of leaves, but they also occur on stems and flowers. Stomas open and close to allow for gas exchanges necessary for photosynthesis [carbon dioxide in; oxygen out]. Transpiration also helps move plant nutrients, such as zinc, into and within a plant. The combined effects of plant transpiration and evaporation of water from the soil are called evapotranspiration. Maintaining the proper water levels within a plant is critical to its health. When mites start feeding, that balance changes. Types of mites There are over 42,000 different types of mites in the world. They can be black, yellow, green, brown, or red. They are tiny. Gall mites, spider mites, European red mites, and thread-footed mites are common garden pests. Some mites prefer buds, others raise blisters on plants, and others create rust patterns. All mites have piercing mouthparts used to suck suary fluids from your plants. Transpiration burn occurs when mite feeding reaches critical levels. Symptoms of transpiration burn Mite feeding often causes leaf stippling. The loss of water and nutrients from countless microscopic punctures threatens plant health, especially in areas with scorching summers prone to drought. As temperatures rise, mite feeding increases and bronzing occurs. The accumulated water loss from mite feeding reaches a point where entire areas of the leaves die, leaving spots of dead brown or black tissue. Less leaf area means less photosynthesis, reduced crops, and unhealthy trees. Transpiration burn is a common problem of pear trees. Preventing transpiration burn A large, well-hydrated tree can lose up to 100 gallons of water a day during the peak of summer. Proper irrigation, using irrigation rings or soaker hoses, can prevent water stress on fruit and nut trees, helping them counteract the damage caused by mites. Mite control is tricky. These pests quickly develop resistance to chemicals, so pesticides don’t work. You can use a strong stream of water from a garden hose to displace mites. You can also buy predatory mites that hunt and feed on the mites feeding on your plants. Insecticidal soaps and oils can also kill mites, but use them carefully. They can cause sunburn damage and other problems. Keep your plants healthy and monitor them regularly for webbing and stippling, so you can deal with mite populations before they get out of hand. If you have a walnut tree, you should know about walnut scale. Even if you don’t, this is still an interesting read.
Walnut scale insects (Quadraspidiotus juglansregiae) have a unique behavior that makes them particularly fascinating. Like other armored scale insects, females protect themselves under round, dome-shaped covers. But walnut scale takes this concept to a whole new level. Walnut scale lifecycle Female walnut scale insects lay eggs in spring. These eggs hatch in only 2 or 3 days. Female crawlers move around a little bit, searching for a good spot to set up household. Once a spot is selected, they begin feeding and start building their protective cover. Male crawlers wander around, looking for a female. When they find one, they huddle up next to her, tucking themselves under the edge of her ‘skirt’, where they excrete their own elongated scale coverings. This often creates a daisy-shaped cluster of scales. After these groups mate, those females lay the year’s second batch of eggs. These eggs hatch, usually mid- to late summer, and stay in the crawler stage over winter. In spring, females claim real estate and males emerge with wings, which they use to find a female. Walnut scale description Walnut scale coverings start out white. This is called the white cap stage. Then they darken to gray or brown within a week or so. If you lift the covering off the central, round female walnut scale, you would see a yellowish body with indented margins. Other scale insects do not share those characteristics. Damage caused by walnut scale Like other scale insects, walnut scales use piercing mouthparts to suck plant juices from the cambium layer of twigs and branches. This weakens the tree, leading to branch dieback, cracked bark, and reduced harvest. Walnut scale feeding also increases the likelihood of canker development and fungal diseases caused by Botryosphaeria. How to control walnut scale You can’t control them if you don’t know they are present. Make a point of inspecting your trees regularly for signs of infestation and infection. You can apply sticky barriers near walnut scale adults to capture crawlers, as they emerge. There are many beneficial predators that feed on scale insects. Parasitic wasps, twicestabbed lady beetles, and a tiny black beetle that goes by the name Cybocephalus californicus, in particular, love to feed on walnut scales. Commercial growers apply insecticides during dormancy or when crawlers emerge in spring. Narrow range oils can also be used, but walnut trees are very sensitive to horticultural oils. Do not use oils on walnut during dormancy, or between bud break and shoot elongation. Oil use at these times can harm your tree. Horticultural oil can be used with caution as buds begin to swell and the tree enters the delayed dormant period. If your walnut tree is water stressed or suffering other forms of stress, do not apply oil. Oils should also never be used when temperatures are above 90°F. Scale infestations are on the rise. This is believed to be the result of several different factors, including reduced numbers of beneficial insects. Keeping your trees healthy makes them less likely to be harmed by pests such as walnut scale. Now you know. After investing time and garden space to asparagus, one of the last things you want to see is something attacking your spears. Originally from Europe, this tiny fly is now found everywhere asparagus grows. While asparagus miners do not cause serious damage, they can carry a disease that will.  Adult asparagus miner (Morri362) CC BY 3.0 Asparagus miner description and lifecycle You won’t see the early life stages of asparagus miners. Whitish eggs are only 1/1000” in diameter and laid under the epidermis, at the base of asparagus stalks. Slightly larger larvae (15/1000”) are also white and tapered at both ends, with black mouth hooks. After feeding, they will grow to 1/5” in length before pupating. Pupae are dark brown and flattened and can be up to 17/100” long. These pests overwinter in the pupal stage, either in the soil or in stalks.  Asparagus miner pupa, late instar, early instar from left to right (Morri362) CC BY 3.0 Adult flies are small (1/10”), shiny black and somewhat humpbacked. They have clear, tapered wings. They appear most often in May and again near the end of the summer.
Damage caused by asparagus miners Damage is usually seen during the fern growth stage. As they feed, asparagus miners burrow a meandering pattern just below the surface. This feeding behavior can result in girdling, which causes chlorosis. More often, the damage is mostly cosmetic. The real problem associated with asparagus miners is that they are vectors for Fusarium root and crown rot. If you see bright yellow discoloration or wilting in your asparagus plants, it may be that asparagus miners have brought Fusarium root and crown rot to your asparagus bed. In that case, both the affected plant and the surrounding soil should be removed and thrown in the trash. Controlling asparagus miners Generally, parasitic wasps keep asparagus miners in check. If a heavy infestation occurs, remove the fern growth at the end of its season and throw it in the trash. Insecticides are not effective. Now you know. Cardboard and newspaper have long been touted as excellent tools to block weeds, protect raised beds, and in sheet mulching. We were wrong. 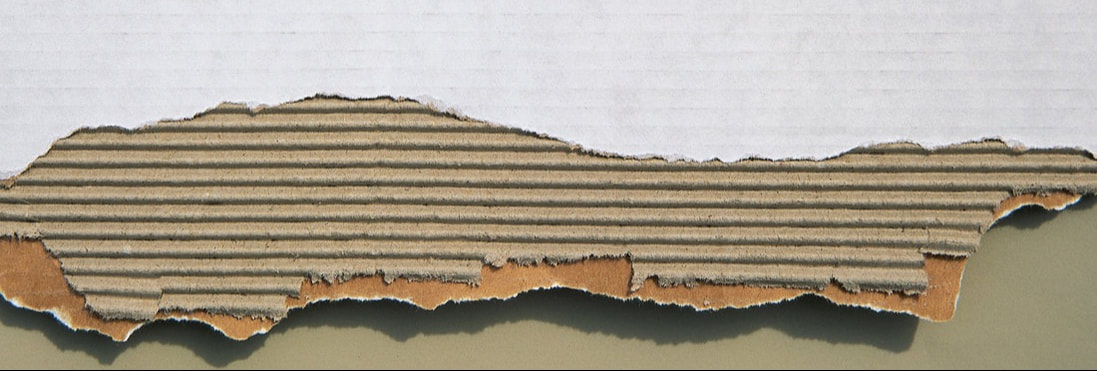 Cardboard (Pixabay) It is true that cardboard and newspaper block weeds. What we have found is that cardboard and newspaper do not always breakdown the way we expect. Without sufficient moisture, cardboard and newspaper can create durable barriers that attract a couple of serious pests. Cardboard and vermin It ends up that termites and voles love cardboard. By putting a layer of cardboard under your raised beds, you are putting out the vole and termite welcome mat. If you have voles, forget the cardboard and use sturdy hardware cloth instead. Cardboard and sheet mulching The use of cardboard and newspaper in sheet mulching restricts water and gas exchanges. This means nearby plants have a harder time getting the air and water they need. Depending on the soil structure and other conditions, the soil may become so dry that it is hydrophobic, leaving installed plants to die of thirst and weeds around the edges of the cardboard to enjoy the runoff it creates. Cardboard and newspaper can also slow evaporation and aeration, setting the stage for fungal disease and root rots. Newspaper, if kept moist, will break down. If it is not kept moist, it becomes a barrier. Sheet mulching only works successfully as a temporary weed control measure. Long term use of newspaper or cardboard actually creates more problems than it prevents. What to do if the cardboard is already in place? If you already have cardboard and newspaper in place, inspect it for signs of termites and voles. If signs of either are visible, remove it completely, bag it, and throw it in the trash. Then, inspect the soil underneath for signs of life. If the sublayer looks like hardpan or mud, you will need to treat it accordingly. Hardpan layers need organic material. Mud needs to dry out. Unless roots have grown into the cardboard layer, it is better to remove it completely. If it cannot be removed, poke holes in it and water it until it decomposes. Once you have corrected the problem, cover the area with a healthy layer of coarse wood chips and let it go fallow for a while. The wood chips will reduce weeds while feeding important soil microorganisms. 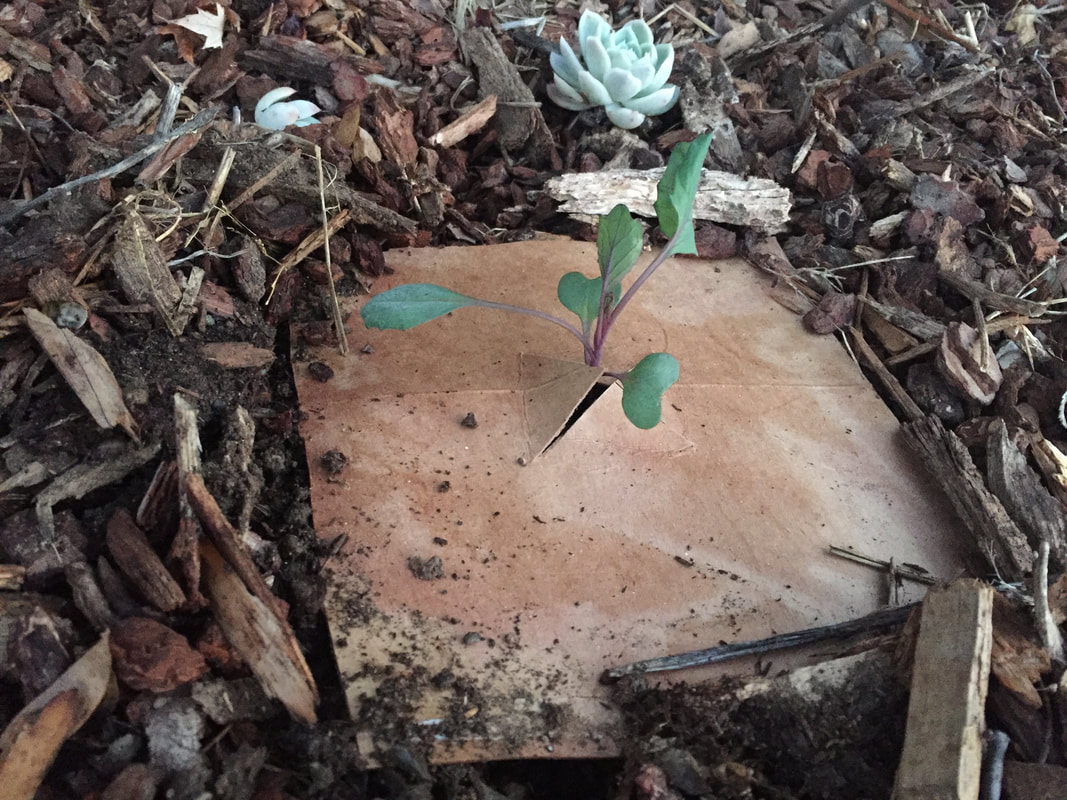 Brassica collar Cardboard still makes an excellent brassica collar or earwig trap. Beyond that, send it to the recycling center.
Adding manure to the garden provides a wealth of plant nutrients, right? Yes, it does! It can also make you very, very sick. 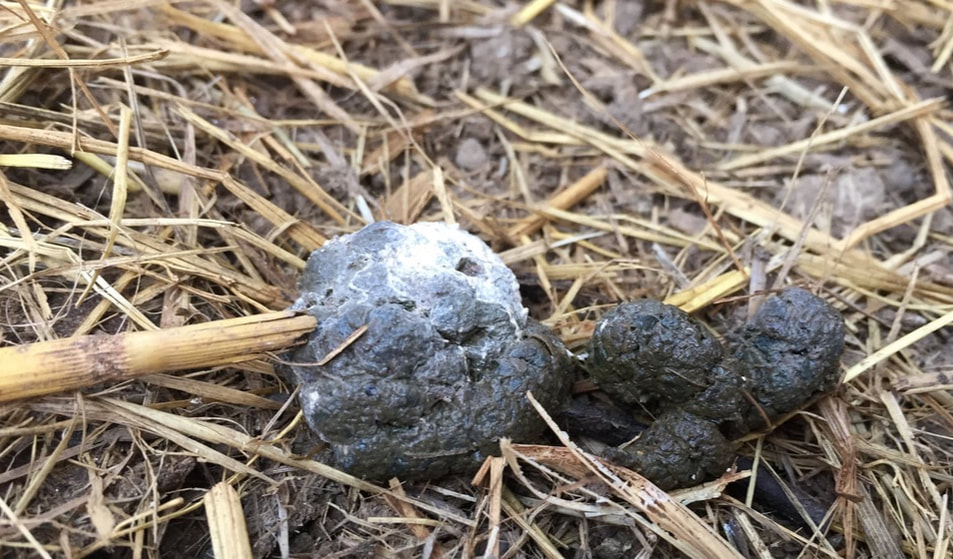 Chicken manure and straw Improper management of manure in agriculture is what leads to those massive recalls of grocery store lettuce and salad mixes. Yes, it can kill you. But don’t panic, there are steps you can take to make it safe. Chicken bedding, rabbit droppings, horse manure, and cow patties are filled with valuable plant nutrients. Rather than allowing those resources to go to waste [Sorry, I couldn’t resist], you can put them to good use in the garden by following some simple safety precautions. Benefits of manure Plants don’t care what you feed them. To them, an element is an element, wherever it came from. Instead of buying fertilizer, you can grow great soil by adding organic material such as manure. Animal manure provides far more than chemical nutrients. It is the slow-release vitamin plants need to grow and thrive - 700 million years of evolution can’t be wrong! In addition to nutrients, manure contains undigested feed and bacteria that improve soil structure, increase water and nutrient retention and water holding capacity, reduce erosion, and supports important soil microorganisms. Incorporating manure into your garden soil improves its tilth, making it far easier to work. Nutrient content of manure Sadly, animal manure does not contain as much nitrogen as you might have hoped. Nitrogen occurs in two forms in manure: organic and inorganic. Organic nitrogen (N) is a slow release nutrient. Inorganic nitrogen occurs as ammonium (NH4+) and nitrate (NO3–) and is immediately available to plants. But you need to act quickly, when it comes to nitrogen. Nitrogen is a highly volatile element. Left to sit on the surface, nearly 100% of the nitrogen is lost to the atmosphere in a process called volatilization. If manure is incorporated into the soil right away, only 20% is lost. If you are a fan of no-dig gardening, composting will be your only option. Manure contains high levels of potassium and phosphorus, which your soil may or may not need. I’ve said it many times: get your soil tested by a reputable lab before adding anything. to avoid creating toxicities (and wasting money). Manure also contains many important micronutrients. Varying levels of calcium, copper, magnesium, manganese, sulfur, and zinc may also be present in animal manure. But not all manures are created equally. Even within a species, nutrient values can vary. Still, there are ranges of nutrients found in most manures and beddings that make them a valuable asset to the home gardener. Did you know that broiler chickens produce a different manure than roaster chickens? I didn’t either, but you can look at a chart from the Clemson University Extension if you want to learn more. 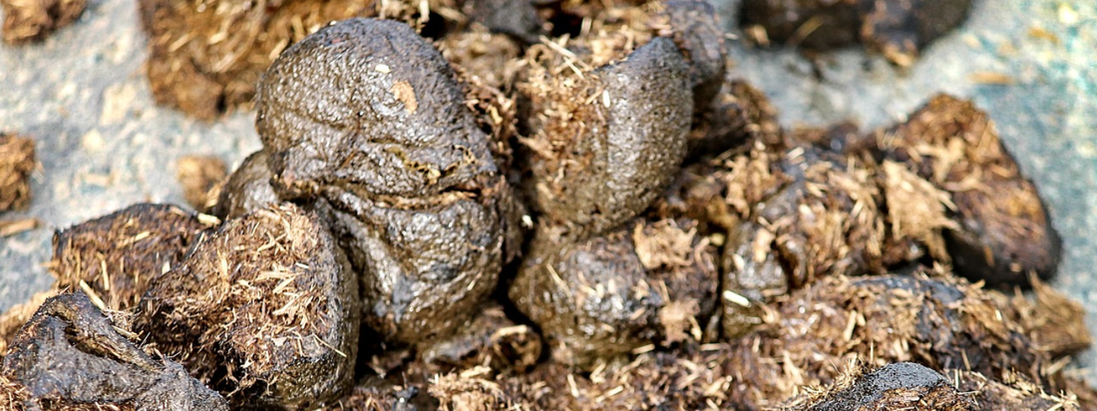 Horse manure (Pixabay) Raw manure
Raw manure should never be applied to the soil while plants are growing. If it is, be sure that the manure does not touch the plants. After manure is applied, plants that come into contact with the soil (lettuces, melons, squash) should not be harvested for 120 days. Crops that do not touch the soil (tomatoes, corn, pole beans) should not be harvested for 90 days. But you can’t wait that long, you say? What about composted manure? At what point does it become safe to use? Composted manure Simply allowing manure to sit in a pile until it looks done is not adequate to protect your family’s health against disease. Many pathogens can survive for years in a pile of poo. Research has shown that manure must be composted for at least 45 days, 15 of which must be at temperatures between 131°F and 170°F, and turned at least 5 times to be safe to use. Assuming it hasn’t been recontaminated by air-dropped bird poop or other pathogens. How certain are you that those temperatures have been reached? Seriously. If you are using manure in your garden, you need to be out there with a thermometer and a pencil, documenting those temperatures. You can get a soil/compost thermometer for around $10. Compared to trip to the emergency room, it’s worth it. Manure sources As many of you already know, I raise chickens for eggs and compost. Poultry manure has a high nitrogen content and, mixed with straw bedding, makes for an excellent soil amendment. I only feed my hens organic laying pellets, organic treats, and mostly organic kitchen waste, so I feel safe using it after it has been properly composted. Before you accept a truck load of cow or horse manure from the local farm or stable, keep in mind that you have no control over medications being used on those animals, or on any pesticides, herbicides, or other chemicals that were used on their feed and which can pass through their digestive systems. Signs of toxic manure include poor germination rates, seedling death, distorted leaves and fruit, and smaller harvests. Also, horse and cow manure tends to be high in salt, which is fine once in a while, but it can build up to toxic levels if used too frequently. Many people worry that using manure will make their garden smell bad. Properly aged manure smells more like rich earth. Mushroom compost, as my Gilroy neighbors know, has a much more pungent aroma. Now you know. You’ve heard of tannins, but what are they? The word tannin comes to us from Medieval Latin and it refers to oak bark. Oak, chestnut, and other tanbarks were used in tanning leather. Now, I do not mean some cow slathered itself with cocoa butter and lounged on the beach. Hardly. The process of tanning a raw animal skin and converting it into durable leather requires a lot of hard work and some powerful chemicals. Tannins.  Chestnut tree (Public Domain) Tannin molecules Tannins are large acidic molecules that bind to and alter proteins, which is why they were used in tanning leather. Tannins also bind to starches, minerals, and cellulose. This binding action slows decomposition. You may have seen ponds in forest environments with brownish water. That brown color is likely caused by tannins leaching out of nearby plants and into the water. In the plant world, tannins are used as pesticides, to protect against predators, and to regulate growth. Protective tannins Plants produce tannins to make themselves less palatable and harder to digest. This discourages feeding by some herbivores. To counteract the presence of those tannins, some plant eaters have evolved to include a tannin-binding protein in their saliva. [Isn’t the world amazing?] The latex produced by dandelions contains tannins.  Chickpea seedlings contain tannins Tannins as growth regulators Tannins also have antimicrobial and allelopathic actions. Allelopathy is a type of plant chemical warfare in which one plants releases chemicals that inhibit the growth of neighboring plants. This growth regulation can occur by reducing the available nitrogen or oxygen in the soil, killing nearby beneficial soil microorganisms that support plant life. Edible tannins If you bite into an unripe fruit, it is the tannins that cause your mouth to pucker. As fruits approach maturity, the level of tannins decreases. Many popular garden plants contain tannins, to one degree or another, including:
 Persimmon tree in autumn (Gphoto) In autumn, when leaves turn color, the golds and yellows you see are the result of tannins.
Now you know. We’ve all heard about ladybugs, but what about twicestabbed lady beetles? Common ladybugs, or lady beetles, have the classic red half-domed shape, stubby antennae, and multiple black spots. This particular lady beetle has a black domed shape with two distinct red spots, hence the name. If you turn one over, their undersides are red or yellow.  Adult twicestabbed lady beetle (Judy Gallagher) CC BY 2.0 Twicestabbed lady beetle description
Twicestabbed lady beetles (Chilocorus orbus) are only one of four black lady beetles with red spots. The other three are Axion plagiatum, Chilocorus kuwanae, and ashy gray lady beetles. All four species are beneficial predators, so it isn’t critical to be able to tell them apart. [The ashy gray lady beetle has a unique ability to change its color from gray to red, but we will discuss that another day.] Twicestabbed lady beetle larva have the same bristled, elongated, alligator shape of other lady beetle larvae, but are more gray than black. Adults are 1/10 to 15 of an inch long. Twicestabbed lady beetle diet Twicestabbed lady beetles feed predominantly on adults and larvae of scale insects. Their diet includes armored scale on avocados, brown soft scale on citrus, European fruit lecanium on cherry, San Jose scale on pear, and more. You will rarely see twicestabbed lady beetle larvae because they spend most of their time hidden under scale insect domes, feeding. Eggs are even less likely to be seen, at 1/32” in length. Eggs may be laid singly or in clusters. Feeding is normally done by piercing the victim and sucking out their innards. Older lady beetles also bite and chew their food. As with other lady beetle species, it does no real good to buy them. If they don’t like what’s on the menu in your garden, they will simply fly away. If you make your garden appealing to lady beetles, they will find you. This means providing fresh, mosquito larvae-free water. [Use mosquito dunks in all standing water.] Lady bugs also eat pollen, so planting a variety of flower colors and shapes may attract them. Allowing dill, cilantro, and fennel to go to seed provides a ready food source for both you and lady beetles. Also, avoid the use of broad spectrum pesticides and insecticides. How many different species of lady beetles are in your garden? If you can get beyond their disease-carrying behavior, viruses are amazing things.  Pepper mild mottle virus (Pamela Roberts) CC BY 2.5 What are viruses? First off, they are obligate, which means they cannot reproduce on their own. Instead, viruses need living plant tissue to survive and reproduce. The jury is still out on whether or not viruses are alive at all. Most viruses consist of half a DNA strand, called RNA, protected by a coat made out of protein. A small handful of plant viruses contain full DNA strands. Another group, called viroids, contains an RNA strand but does not have a protein coat. In a recent article, The Scientist reported that new research shows different segments of a virus’ genetic information infect separate cells, creating a domino effect of plant disease.  Leaf curl virus (Philarium) CC BY-SA 3.0 The science of viruses Viruses enter a plant cell and use their RNA strand to reprogram that cell’s genetic instructions, causing the cell to start producing more of the virus’ RNA. These new strands then infect neighboring cells, and so on. Several families of viruses cause plant disease. And you can use their names to determine which plant is most likely to become infected and the most characteristic symptom. For example, bean yellow mosaic commonly occurs in beans, and a yellow mosaic pattern is the most common symptom. Symptoms of viral infection Many viral diseases share similar symptoms. The most common symptoms include the following:
Viral vectors Viruses often infect plants through insect feeding. Common disease-carrying insects include aphids, artichoke plume moths, leafhoppers, mealybugs, psyllids, thrips, and whiteflies. Dagger nematodes and some fungi and single-celled organisms also carry viruses. Viruses also move around the garden on pollen, clothing, tools, and plant debris. Many viruses overwinter in seeds, flowers, perennial weeds, and crop root systems, where they can lie dormant for years. Common viral diseases There are an estimated 1,000 viral plant diseases. But you may only face a handful of those problems, and many are avoidable. The most commonly seen viral diseases include the following:
You can find lists of viral diseases common to your area by contacting your local County Extension Office.
Controlling viral diseases in the garden Healthy plants are better able to ward off viral infections. Proper feeding, irrigation, and pruning help keep plants healthy. Select resistant plants suitable to your microclimate, buy certified disease-free plants and seeds, plant at the proper depth, and avoid mechanical injuries from rubbing branches and weedwackers, among other things. Integrated pest management (IPM) programs can help control viral diseases. An IPM lures natural predators and parasites with insectary plants and water. Sanitizing garden tools can slow the spread of disease. Cover crops and crop rotation can interrupt any potential disease triangles. Yellow sticky sheets can trap many disease-carrying pests. Pesticides and insecticides used to kill disease carriers are generally not effective. Reflective mulches can confuse some disease-carrying insects, but they can burn sensitive plants during the peak of summer. Diseased plants should be removed and thrown in the trash to prevent healthy plants from becoming infected. Viral diseases of plants are on the rise, mainly due to monoculture, mass production, climate change, global shipping, and other human activities. You can reduce the likelihood of viral diseases affecting your plants by putting new plants into quarantine and knowing what to look for. Now you know. Odds are pretty high that you are walking around your garden each spring, removing spent stems and frost damaged twigs and leaves, shaping shrubs, deadheading spent blossoms, and curbing rampant growth. All of those snips, trims, and cuts are then taken to the compost pile, where they are watered and flipped repeatedly, until the mixture is ready to be spread out as plant food and soil amendment. That’s fine, but, in many cases, you can simply chop and drop, right where you found the plant in the first place. 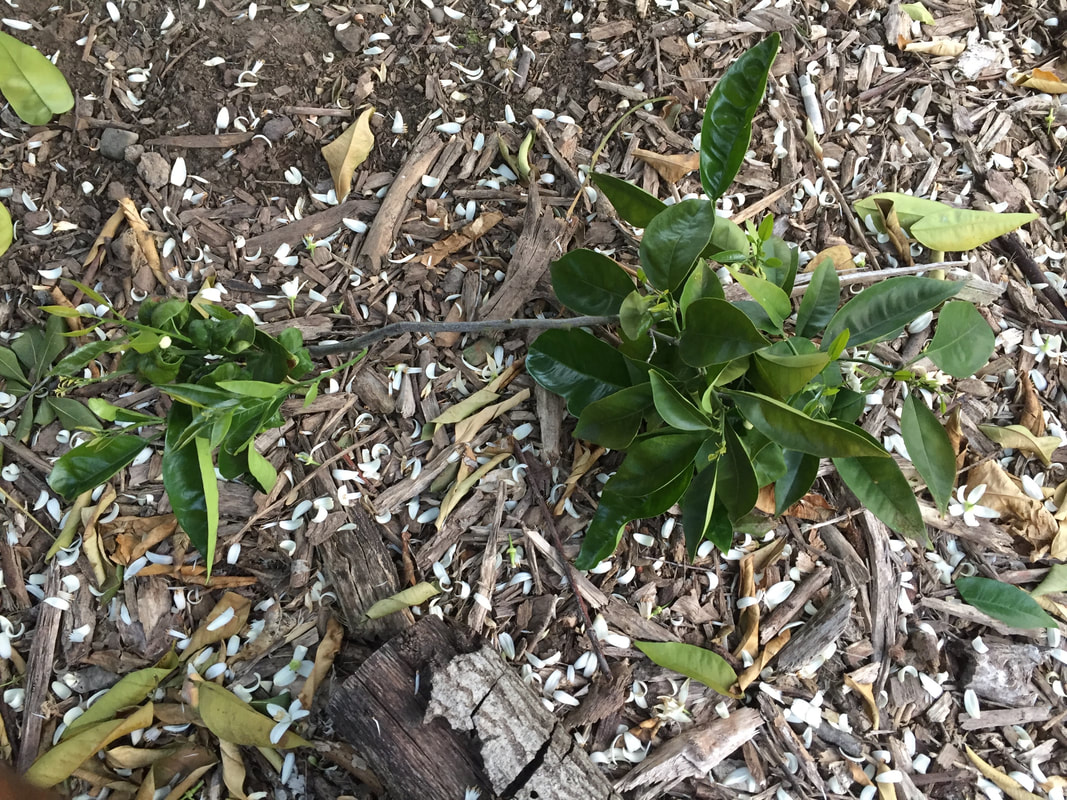 Valencia orange branch pruned from the tree (Kate Russell) Stop fighting natural cycles Moving materials around is often unnecessary. Instead, copy the natural cycles that have evolved over millions of years. Simply chop plant material where you find it and drop it on the ground. This saves a lot of time and energy, while still putting all that organic matter to work for you in the garden. Insects, animals, microbes, rain, and foot traffic will move that chopped plant matter into the soil, improving soil structure and adding important nutrients, just as it has since plants arrived on the planet’s surface. No wheelbarrow required. Benefits of mulch Mulch, of practically any sort, creates a buffer against erosion and temperature extremes. It also makes weeding a lot easier. While I am a huge proponent of coarse wood chip mulch, you can use the same idea to simplify your spring garden work: trim off bits of plant, chop it where you stand, and let it fall. Using a plant’s own material to create instant mulch puts the nutrients that plant needs to grow and thrive within easy reach. Of course, you should still get your soil tested every 3 to 5 years, to make sure there are no deficiencies or toxicities. Levels of effort In one school of thought, the chopped material is simply dropped to the ground after the first snip. This green manure will, over time, break down. Obviously, woody stems will take far longer than green leaves and new growth, but they will break down eventually. Personally, I take a slightly more active role and chop the removed plant parts into smaller pieces, just as I do at the compost pile. 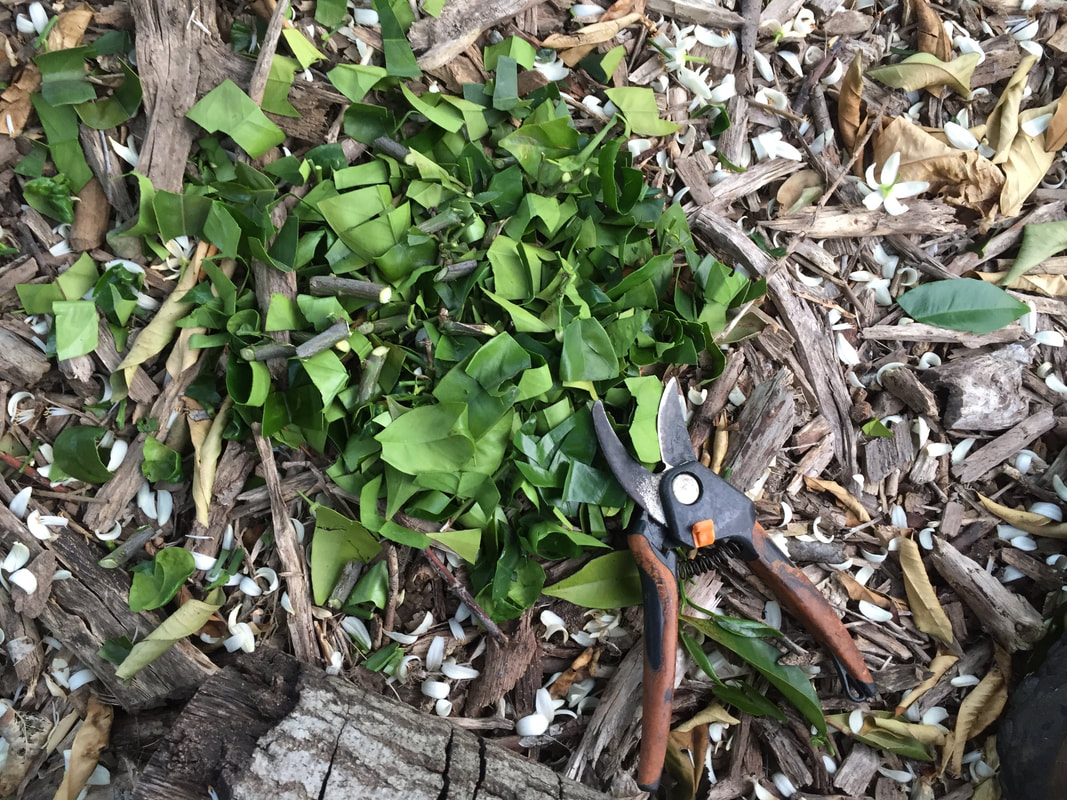 Valencia orange branch chopped and dropped as mulch (Kate Russell) Recycling plant material
Chopping plant material speeds the decomposition process. Dropping it where you found it puts nutrients back where the plant can reuse them. This is the same idea behind grasscycling, which is when you mow the lawn without the bag attachment, allowing the clippings to fall right back on the lawn. Yes, you will be more likely to track snipped blades of grass around on your shoes for a day or two, but the nutrients and soil structure improvements are worth it. Come autumn, when leaves start falling, leave them where they fall, unless they fall on your lawn. In that case, mow them where they fall, or blown them into flower beds and around shrubs and trees, where they will create a winter blanket of protection that is transformed into food in spring. Some claims are made about plants containing especially high levels of nutrients, making them excellent green manure crops, perfect for chop and drop mulching. These ‘dynamic accumulators’ are mostly hype. The truth is, plants contain a wide variety of elements used to help them grow. Some produce more volume, or biomass, than others. That’s all. A word of warning While chopping and dropping is an excellent way to save time while improving soil health, you don’t want to drop heavily diseased or infested plant material where reinfection or re-infestation can occur. By throwing diseased plant material in the trash, you are breaking the disease triangle for that pathogen on your property. In most cases, infestations by insects can be added to your compost pile. In both cases, you can also go ahead and drop everything, allowing natural predators to kill off most of the pests. Most disease pathogens do not last long in green manure, with the exception of fungal diseases, such as peach leaf curl and rust. When those diseases are present, I toss leaves in the trash. Chop and drop weeding Unless they have gone to seed or are spread by runners, weeds can be pulled, chopped, and dropped where they are. Weed plants with seeds and those that spread using runners are fed to my chickens, or you can add them to your compost pile. [Compost piles are still great to have for kitchen waste and to process chicken or other animal bedding. As you move through your garden, pruners at the ready, snip off unwanted stems, spent blooms, and the like, chop them where you stand and let them fall to the ground. If you think it looks messy, you can chop while standing behind the plant instead of in front. In a surprisingly short period of time, you will forget they were even there as natural cycles take hold and transform yard waste into valuable plant food and soil amendments. For free. Brown soft scale (Coccus hesperidum) may be found on pomegranate and citrus trees, as well as bay laurel.
Brown soft scale lifecycle
Brown soft scale females give live birth, or lay eggs which hatch almost immediately. These young crawlers move around freely on leaves and twigs, feeding as they go. They continue moving around until they are about half grown, molting twice. Controlling brown soft scale Sticky barriers around the trunks of susceptible trees can cut off protection to brown soft scale pests by ants. Also, avoiding the use of broad spectrum pesticides allows natural predators to feed on these pests. If you see scale shells with holes in the top of them, you will know they have been parasitized by beneficial insects. Heavy infestations can be treated with dormant oil in winter, but this is rarely necessary. No, it's not a flying snake. Introducing another beneficial insect on the garden scene: the snakefly. #/media/File:Snakefly_-_Agulla_species,_Packer_Lake,_California_-_26063118522.jpg) Snakefly (Judy Gallagher) CC BY 2.0 I don’t know why they call it a snakefly. It doesn’t look like a fly or a snake. Apparently, snakeflies are native to the western half of North America, as well as Europe and Asia. Until yesterday, I had never heard of snakeflies. Let’s see what we can find out! The first thing I learned about snakeflies is that they are considered living fossils, having remained relatively unchanged for over 140 million years. Snakefly description Snakeflies (Agulla adnixa) have long, thin bodies with lifted torsos (prothorax), large eyes, extended mouthparts (mandibles), relatively long antennae, and a long, thin backend. Adults are reddish brown and can be 1/2 to 1” long. All four wings are transparent, and longer than the body, similar to lacewings (except that snakefly wings are covered with black veins). The long backend is not a stinger. Instead, it is an ovipositor, or egg-laying tube.  Snakefly (Judy Gallagher) CC BY 2.0 Larvae have squishy bodies, and the head and first segment are hardened (sclerotised), but they look like a cross between an earwig and a ladybug larvae. [Sorry, but I couldn't find any free-to-use photos.] Snakefly larvae have 3 pairs of true legs, and, you won’t believe this: Snakeflies have an adhesive strip on their abdomens that allows them to move up walls and trees!
Snakefly lifecycle Eggs are deposited in the soil, where they are able to absorb soil nutrients to help them grow and develop. When they hatch, larvae stay in the soil or move to the bark of nearby trees. There, they feed on soft-bodied pests, such as grubs and caterpillars, as well as the eggs and larvae of many garden pests. Snakefly larvae go through as many as 10 moltings before reaching adulthood. This process can take 2 to 6 years. Next, after temperatures reach 32°F, the larvae enter a pupal stage. Unlike other insects, the snakefly pupa is mobile, leaving its pupal cell for day trips or to relocate. The pupal stage is temperature dependent, lasts a few days to 3 weeks, upwards of 10 months. [This is one long lived insect!] Adults snakeflies are very territorial as they feed on insects, such as mites and aphids. [Yay!] It is also believed that they occasionally nibble on pollen. Snakeflies court one another with cleaning rituals. You may see them practicing their flirting skills by cleaning their legs and antennae when alone. Have you seen any snakeflies in your garden? To me, they look almost Edwardian. Calendula officinalis is an edible flower that can add color and attract honey bees to your garden. Believed to be native to Europe, Calendula officinalis has been grown by people for so long and in so many locations, it is hard to tell for sure.  ‘Calendula officinalis’ (Berdan) CC BY-SA 3.0
Pot marigold description Unlike the Tagetes genus of marigold, which have leaves that appear alternately along a stem, pot marigolds have slightly hairy leaves that are arranged in a spiral around the stem. They are short-lived perennials, typically grown as annuals, that grow 18 to 30” tall, with 2” flowers. Flowers are bright yellow or orangish-yellow, with ray florets and disk florets, common to sunflowers. Pot marigold’s curved seeds are actually dried fruits, called achenes.  Calendula seeds (H. Zell) CC BY-SA 3.0 Pot marigold as an attractant In addition to looking lovely as a border plant, or in a parterre, Calendula officinalis will attract important pollinators, such as honey bees to the garden. Unfortunately, they will also attract cabbageworm butterflies, large yellow underwings, an invasive moth of the cutworm variety, and setaceous Hebrew character moths, whose larvae feed on a number of popular garden plants. Pot marigolds as food Pot marigold flower petals have a tangy, peppery flavor. Traditionally added to German soups and stews, pot marigold is also added to herb butters and cheeses, or chopped and used to garnish deviled or scrambled eggs, fish dishes, or steamed vegetables. Pot marigold flower petals add color and tang to salads. If you add marigold flower petals to rice, while cooking, the rice will turn yellow. For this reason, it is also known as Poor Man’s Saffron. Farmers have fed marigolds to chickens for years to make the yolks a deeper yellow. One variety of pot marigold, ‘Mexican Mint’, has the flavor of tarragon. It is also known as Texas tarragon. Pot marigold petals also make a delightful tea.  Pot marigold at the beach (Public Domain) Pot marigolds as medicine Pot marigolds also have medical merit. Research has shown that tinctures of pot marigold are used today to treat skin irritations and burns, to speed healing, and to control bleeding. [I wonder how they would look growing next to some aloe vera - just to keep the medicinals together.] This is not my area of expertise, and I won’t make any personal claims, but it is interesting to see how, every once in a while, those old treatments hold true. That being said, some people are allergic to pot marigolds. How to grow pot marigolds Pot marigolds are easy to grow from seed and they tend to be drought tolerant. Start seeds in small pots, only lightly covered with soil. Keep the soil moist, but not soggy, until germination occurs. Then, move plants to a sunny location with good drainage. Calendula may need protection from scorching summer afternoon sun, and they can be grown in containers, or on windowsills. Marigolds readily self-seed. Calendula pests and diseases While these plants are relatively trouble-free, they may become infected with powdery mildew, root rot, and smut. They are also susceptible to Alternaria leaf spot, aster yellows, charcoal root rot, cottony rot, cucumber mosaic, gray mold, Pythium root rot, root knot nematodes, rust, southern blight, spotted wilt (from the tomato spotted wilt virus), stem rot, and Verticillium wilt. I couldn't find any pests that significantly bother pot marigolds. Many of these diseases can be prevented by providing good drainage and air flow, so top dress soil regularly with organic matter, space plants with mature sizes in mind, and avoid overhead watering. So, do you know if your marigolds are edible or not now? This poem may help:
Psyllids are jumping plant lice that suck plant juices. Most native psyllid species do not pose a threat to your garden. Local predators tend to keep those populations in check most of the time. Invasive psyllid species are something else altogether.  Asian citrus psyllid (USDA ARS) Psyllid identification Psyllids look like tiny cicadas or winged aphids with tubular mouthparts. They have powerful legs and short antennae. Psyllids can be 1/12 to 1/5” long. Adults hold their wings in a roofline position. Nymphs are flattened and look a lot like soft scale insects. Psyllid nymphs commonly produce waxy filaments or covers called lerps using wax and honeydew.  Potato psyllids look like flies (Whitney Cranshaw, Colorado State University, bugwood.org) CC BY 3.0 US Psyllid lifecycle
Regardless of the species, psyllids start as tiny eggs that hatch and go through five developmental stages or instars. Adult psyllids can fly, but most prefer to jump. If you think you see a psyllid run or fly, it is probably a psocid [SO-sid]. Psocids are beneficial insects that feed on fungi. They have a narrow “neck” and chewing mouthparts. Psyllid host plants As a species, psyllids have strong preferences for particular host plants. While some psyllids will prefer your sweet peppers and chilis, others will go after your peaches and nectarines, others will only feed on olive or pear trees, and other psyllid species will only feed on potato and tomato plants. The invasive Asian citrus psyllid carries huanglongbing,, a deadly citrus disease. Citrus trees infected with huanglongbing must be destroyed and removed by a professional arborist, which is both sad and expensive. These pests, when present, are most active in spring. Psyllid species most likely to threaten your garden include:
Dozens of psyllid species infest ornamental trees and shrubs, as well. These include the recent invasions of Ficus leaf-rolling psyllids and spotted gum psyllids. On the other hand, some psyllid species are beneficial. The Australian melaleuca psyllid, for example, has been purposefully introduced to Florida to help control paperbark trees, an invasive weed tree. Damage caused by psyllids One of the biggest problems associated with psyllids is their poop. After they have robbed your plants of valuable nutrients, they add insult to injury by excreting a large portion of the sap they ate and depositing it on leaves. Sap-sucker poo or honeydew is rich in sugar and other nutrients. Honeydew ends up being food for fungal sooty mold and disease-carrying ants. Psyllid feeding can also spread diseases, such as calico, and zebra chip, and disorders, such as galls, leaf and bud discoloration and deformation, and premature leaf drop. Leaf distortions often look similar to peach leaf curl. Pear psyllids inject fruit with toxins that blacken leaves and fruit skins. Psyllid feeding also creates points of entry for other pests and diseases. How to control psyllids in the garden Control psyllids with insecticidal soaps and yellow sticky sheets. Do not use dish soap. Parasitic wasps and pirate bugs feed on psyllids, so avoid using broad-spectrum insecticides. Severely infested plants should be removed and destroyed or thrown in the trash. Usually, simply monitoring plants can make controlling these and other pests much easier. To prevent invasive psyllids from finding your garden, only buy pest-free plants from reputable nurseries, and place new plants in quarantine.
Leafrollers are the larval forms of several tortricid moth species. Tortricid moth larvae feed on young buds, flower clusters, leaves, and fruit. Heavy infestations can kill strawberry, blueberry, blackberry and other cane fruit plants. Leafrollers are also found on almond, apple, apricot, avocado, cherry, citrus, grapes, pear, plum, prune, quince, and walnut, depending on the species. Leafrollers also occur on roses and several ornamental trees, including ash, birch, California buckeye, box elder, elm, locust, maple, poplar, and willow. The tubes are used to provide protection as larvae feed and pupate.
Leafroller species There are several leafroller species, here are some:
A quarantine is in place for the light brown apple moth. See if you live in an affected area by clicking on the CA Dept. of Food & Agriculture’s Boundary Index Map. If you live outside of California, you can contact your local Cooperative Extension Office for more information  Omnivorous leafroller larva (Barry Freeman) CC BY 3.0 Leafroller lifecycle
Leafrollers start out as clusters of flat, irregularly shaped eggs often found on twigs and leaves. These egg masses are coated with a dark gray or brown glue that later bleaches to white, giving them an appearance similar to fish scales. If you look closely at an egg mass in spring, you can see tiny pinholes where larvae have hatched. After hatching, larvae pull leaves into a cylinder for protection as they feed. Most larvae feed through summer and then overwinter as pupae, though some species continue feeding throughout the year, causing considerable damage. When disturbed, leafroller caterpillars tend to wriggle wildly and then rappel to the ground on a single silken thread. Botanical stigmata are part of the female reproductive system. 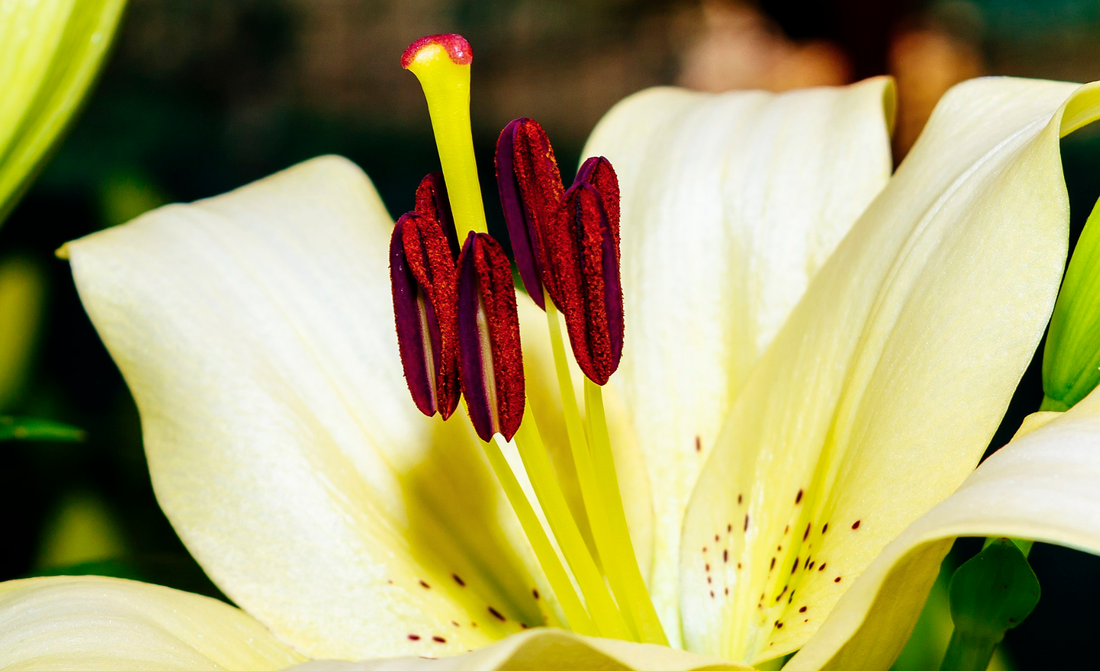 Closeup of stigma surrounded by stamen of White Lilium ‘Stargazer’ lily (Subhrajyoti07) CC BY-SA 4.0 Tiny stigmata may not grab your attention at first glance, but maybe they should. Before we learn why, let’s do a quick review of flower anatomy.
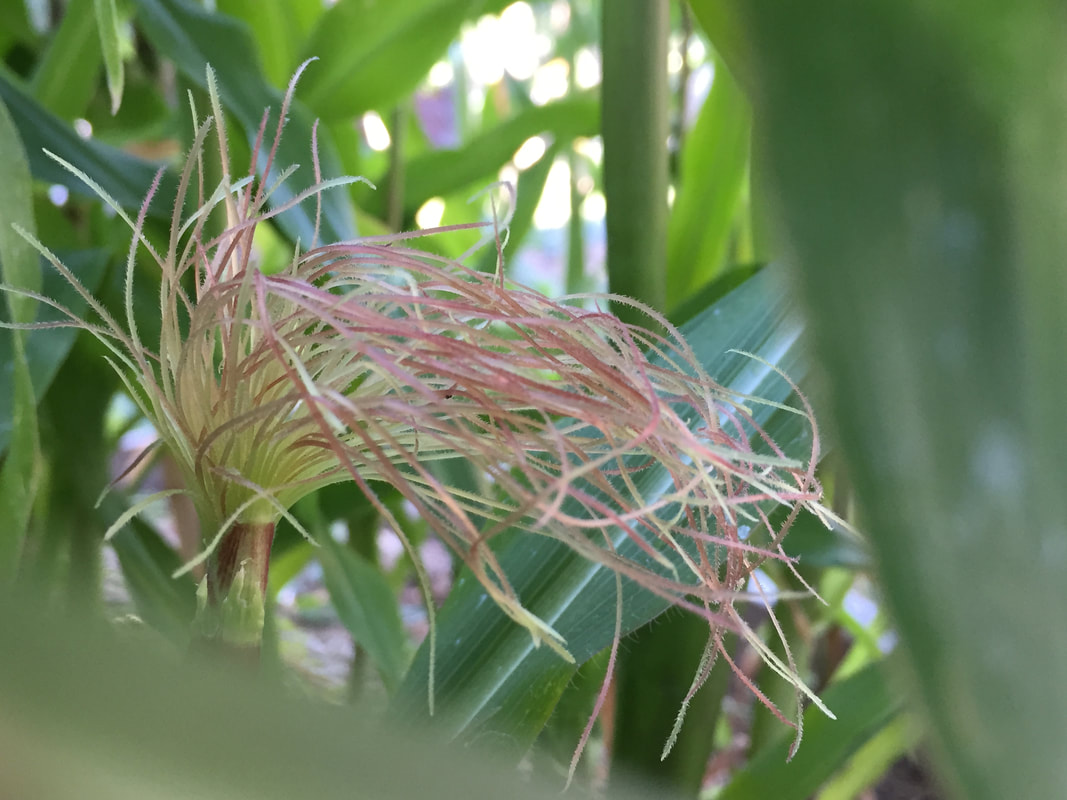
Carried by insects, bats, or wind, pollen is received at the stigma by sticky, specialized cells (stigmatic papillae). Once the pollen has been captured, the stigma, which is often quite moist, helps to rehydrate the pollen after its lengthy travels. Once hydrated, the pollen grain germinates, sending a pollen tube down the style to the ovary. To ensure that the proper pollen is collected, stigmas have evolved some very fancy attraction and capture methods. You may be surprised to learn, as I was, that high temperatures, usually above 104°F, for 2 or more days prior to pollination, can exhaust the stigma of tomato plants to the point they cannot capture pollen. This may explain why, during particularly hot summers, we see lots of tomato blossoms, but no fruit. High temperatures (above 100°F) also reduces pollen germination. 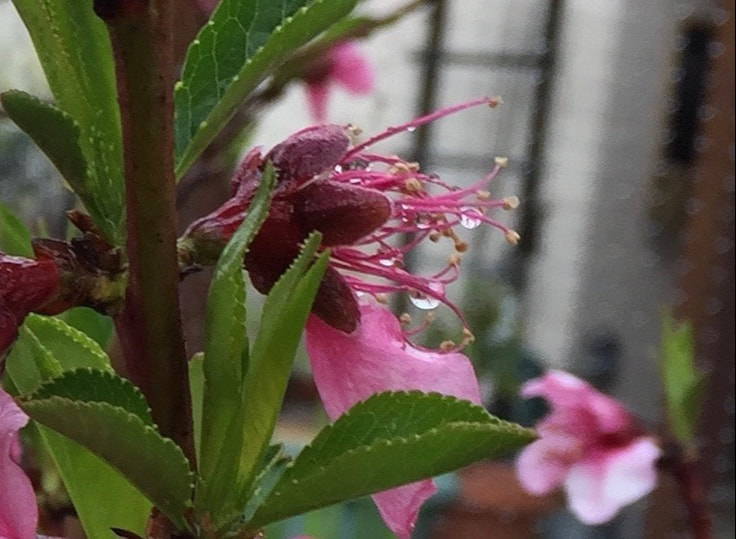 Delicate nectarine blossom stigmas Specialized stigma Besides being sticky, stigmas use various shapes, flaps, and hair arrangements to help ensure that the correct pollen is captured and all others are rejected. These shapes can be simple tubes, truncated tubes, threadlike, bulbous, conical, lobed, feathery, hairy, beaked, fan-shaped, brush-like, leaflike, or disc-shaped. The familiar threads found on ears of corn, called silk, are stigmata.
The long, bright orange stigmata of autumn crocus are harvested as one of the world’s most expensive spices: saffron.
How many different stigmata shapes are there in your garden? The word rachis comes to us from the Greek word for backbone. But, plants don’t have backbones!  Vertical fern rachis with horizontal leaflets (Christian Guthier) CC BY-SA 3.0 That’s true. But they often have a main axis or shaft, similar to those seen in feathers. In fact, the shaft of a feather is also called its rachis [ray-KIS].  ‘Buddleja paniculata’ inflorescence arranged along a central rachis (Ptelea) CC BY-SA 3.0 Botanically, the rachis can be the central stem seen in ferns, in compound leaves, or in the portion of an inflorescence found above the peduncle. Rachis is a type of stipe. Stipes are stalks that support other structures.
Now, when someone mentions a rachis or a stipe, you will know what they are talking about! When you cut flowers for a bouquet, you are generally cutting the peduncle. Peduncles are simply flowering stems, but they may surprise you.
Peduncles and inflorescences When clusters of flowers grow together, it is called an inflorescence. An inflorescence is also supported by a peduncle, but the stems within the cluster, supporting the florets, are called pedicels, or strigs. For example, clusters of grapes grow on a peduncle, while the individual grapes hang from pedicels. Peduncles can occur in plants without stems, they may continue to grow indefinitely, and some peduncles grow underground. The peduncle of a simple flower is easy to recognize. It is the classic stem you hold, cut, or put into a vase to admire. Its job is to support the flower. An artichoke stem is a peduncle, and for the same reason. Accrescent peduncles While many plants are hardwired to stop growing once they reach a certain size, other plants, such as the mighty redwoods, continue growing throughout their lifetime. In other cases, certain parts of a plant will continue to grow larger. These plants are called accrescent. In some cases, only the peduncle is accrescent, and then only until the flower reaches maturity
 Peanut pegs penetrating the ground (Alain Busser) CC BY-SA 1.0 Now you know.
A flower is a flower, unless it is a bunch of flowers growing on the same stem, then it’s an inflorescence. 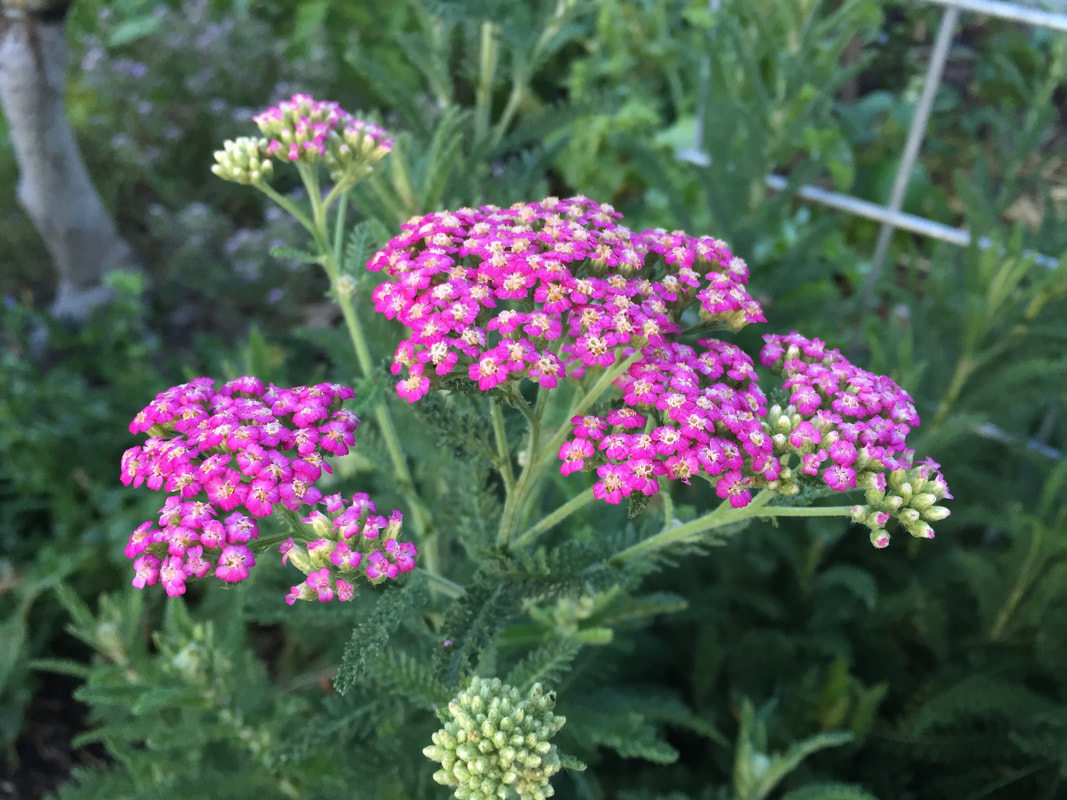 Yarrow Anatomy of an inflorescence A singular flower appears at the end of a stem, called a peduncle, nestled in a (normally) green cup, called the receptacle, and surrounded by modified leaves, called sepals. When there are multiple stems or branching stems (rachis), or flowers that occur on a disk, it is an inflorescence. The stalks of individual flowers within an inflorescence are called pedicels. These flowers are called florets, and their leaves are called bracts. 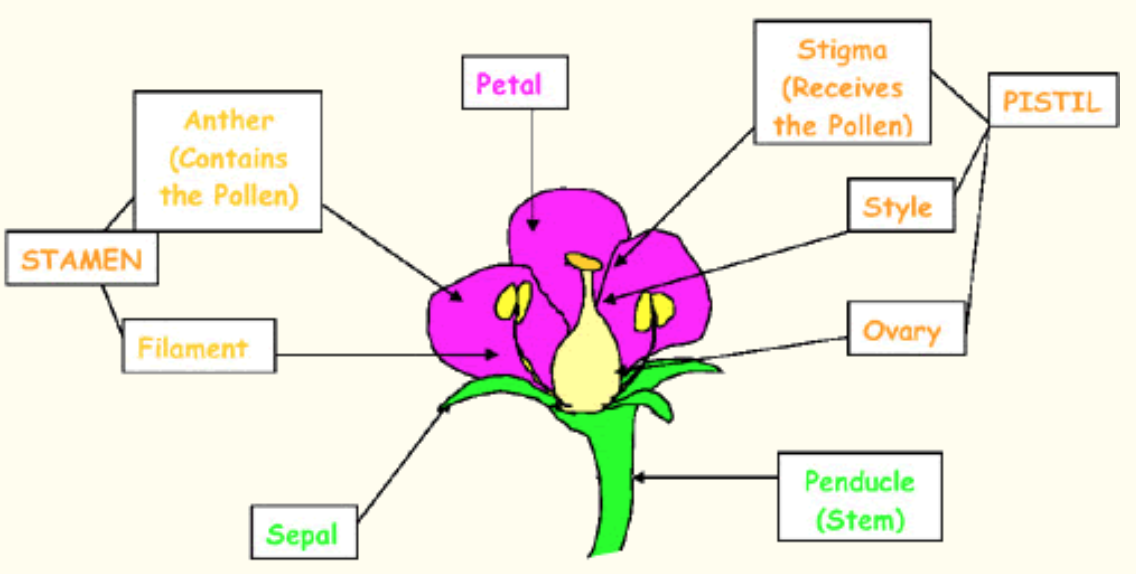 Parts of a flower (USDA) Types of inflorescences Inflorescences can be determinate or indeterminate. The oldest flowers of a determinate (cymose) inflorescence are found at the end of the stem, as other flowers bloom in succession, down the stem, with the youngest flowers at the base. Indeterminate inflorescences are just the opposite, with older flowers at the base and younger flowers occurring closer to the tip.
There are also catkins (mulberry), spadix (cobra plant), and many subdivisions of each category, but this is a good start.
When an inflorescence produces fruit, such as sunflower seeds, it is called an infructescence. Now you know. April is the time to start checking apple, apricot, avocado, cherry, peach, pear, plum and prune trees, and blueberries, for signs of the dreaded Pacific flathead borer.  Flathead borers Like other borers, these pests chew tunnels in wood, weakening a tree’s structure, and robbing it of important nutrients found in the inner cambium layer. Newly planted trees and trees weakened by drought, water-stress, scale insects, carpenterworms, or diseases, such as Phytophthora or Armillaria, are particularly susceptible. These weakened areas are then more likely to be attacked by other pests, such as shot hole borers. Pacific flathead borer feeding can also girdle a young tree, killing it. The only symptom you may see is a dark colored depression in the bark, or tiny cracks where you might see frass (bug poop), usually on the side receiving the most sunlight. Pacific flathead borer identification Pacific flathead borers (Chrysobothris mali) are flattened, wedge-shaped, dark bronze beetles that can be 0.5 to 0.75” long. You may see copper-colored spots on the wing covers. Eggs are very tiny, only 0.04” in diameter, flattened, oval, and white. Larvae grow to 0.75” in length and are white, with an amber colored head. Larvae are flattened, with a widened area just behind the head, tapering towards the rear end. Pupae are also whitish and flattened, getting darker as they mature. Pacific flathead borer lifecycle These pests overwinter in a prepupal stage. As temperatures begin to rise, they pupate. From April through July, adult beetles emerge, usually beginning around the same time apple trees are blooming. Then females mate and begin laying eggs in the bark, favoring areas weakened by sunburn or mechanical injury from tree supports, weedwackers, and out of control lawn mowers. When the eggs hatch, larvae burrow directly into the bark and begin feeding on the sugary cambium layer, robbing your trees of the nutrients they need to grow and produce fruit. As the larvae mature, they will either create a pupal chamber in the xylem, or burrow under the bark, where they will stay until the following spring.  Flathead borers are easy to miss Pacific flathead borer controls
Healthy trees are better able to resist and recover from Pacific flathead borer attack. This means selecting trees suitable to your microclimate, planting them at the proper depth, and feeding, irrigating, training, and pruning them properly. Since eggs are laid in weakened bark, protect trees from mechanical injury, and be sure to whitewash exposed bark before sun damage can occur. Birds, especially woodpeckers, will find and remove Pacific flathead borers, and carpenter ants eat both larvae and pupae. Insecticides are commonly used in commercial orchards to kill new larvae, but once the larvae are inside the tree, there is nothing you can do besides pruning out infested wood and burning it. Now you know. |
Welcome!You can grow a surprising amount of food in your own yard. Ask me how! To help The Daily Garden grow, you may see affiliate ads sprouting up in various places.
You can also get my book, Stop Wasting Your Yard!  Index
All
Archives
July 2024
|

.jpg)

#/media/File:Stigma_shapes_(Capitate_and_simple).jpg)


#/media/File:Agave_with_emergent_peduncle_IMG_5336.JPG)

 RSS Feed