|
Cereals may show up in boxes on store shelves, but they always start out growing in a field or garden the same way all the other grasses you see coming up in lawns grow.  Oats and wheat It is believed that people started cultivating figs some 11,000 years ago and that full-fledged farming of cereal grains started some 8,000 years ago. Many historians attribute modern society to the wealth created by agriculture and farming cereal grains in particular. We get the word cereal from the Ceres, the Roman goddess of agriculture and the harvest.
Edible fruits A cereal grain is actually a type of fruit called a caryopsis. The seed heads are called ‘ears’, even when you are talking about something other than corn 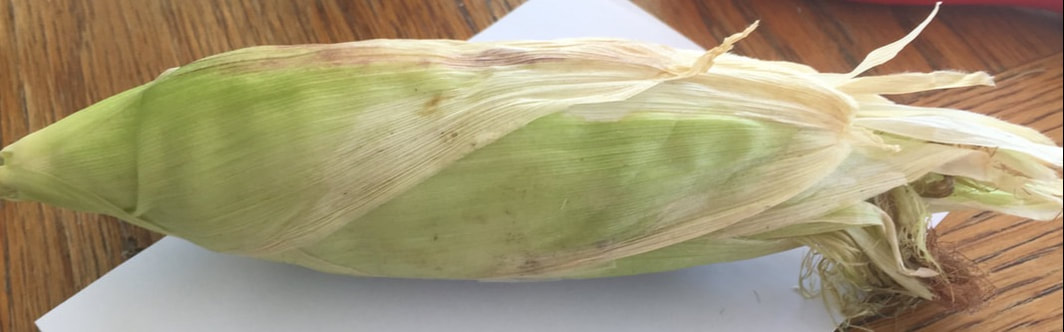 Ear of corn Combining the fruit of a a cereal grain with a legume provides us with complete proteins needed to stay healthy. This means peanut butter (legume) on wheat bread (cereal), or rice (cereal) and beans (legume) gives us the same amino acids as eating meat [though I will rarely turn down a steak]. Cereal grains contain amino acid chains, called peptides, that bind to the same receptors in our brains as opioid drugs, which may explain why those carbs are so damned addicting.
How cereal grains grow There are warm season cereals and cool season cereals. Most of them are cool season plants, which means they grow best in mild climates. Of the cool season cereals, there are spring and winter types. Spring types are planted in early spring and then mature in late summer. Winter varieties are planted in autumn, grow for a time, and then go dormant during the winter. When spring rolls around, these plants have a head start on the competition and burst into full flower before maturing in late spring or early summer. How to grow cereal grains at home Most cereals are planted by broadcasting seed across a prepared bed and then raking the area to a depth of 2”. The area is then watered thoroughly and then covered with a 2- to 4-inch layer of straw. The straw helps retain moisture and reduces seed loss to birds. It also makes life more difficult for weeds. After that, there isn’t much you need to do. I like growing cereals alongside fences and the house, though you do have to watch out for mealybugs and fungal diseases.
Pests and diseases of cereal grains
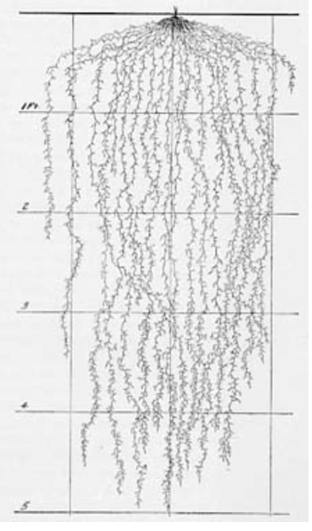
Rats, mice, and other rodents, and birds love cereal grains and you will be hard pressed to keep them out of your cereal grain crop. Netting helps, somewhat. Extended rains can lead to blotch disease, rust, and leaf spot. I have also found mealybugs to be a problem. Harvesting cereal grains Amber waves of grain isn’t just a line from a song. Field or garden patches of ripening seed heads create a comforting sense of satisfaction. And that’s a good thing, because harvesting cereal grains takes a lot of work. First, the dried stalks, or stover, are cut off, close to soil level, and hung or stacked to finish drying. Then the threshing begins. Threshing breaks the seeds free of the non-seed portion, or chaff. Then the material is tossed into the air on a windy day or in front of a fan to get rid of the chaff. Growing cereal grains is a great way to provide for your chickens and local wildlife, increasing biodiversity, and it looks pretty neat, too. If you grow enough of it, you can even make your own bread or pasta! What would corned beef be without rye? Completely different from the ryegrass growing in your lawn, rye has a lot more to offer your landscape than just a marbled deli sandwich.  An ear of rye (LSDSL) CC BY-SA 3.0 Cousin to wheat and barley, rye is a cereal grain used to make bread, beer, and liquor. Native to Turkey, rye has been cultivated since the Bronze Age and it is considered the hardiest of all the cereal grains. Rye has a lower gluten content than wheat, and higher fiber content. But, even if you don’t eat it, rye provides many benefits to your soil. Benefits of growing rye Rye (Secale cereale) makes an excellent green manure and cover crop, particularly in no-dig gardening environments. Rye grows well in poor soil, especially in sand. A fast grower, rye not only suppresses weeds but it produces allelopathic chemicals that reduce weed growth. Rye also prevents erosion, and its tough, fibrous root system can easily reach depths of nearly 3 feet, and as much as 7 feet deep in sandy soils, helping reduce soil compaction and improving drainage. Rye is also used frequently in crop rotation and in orchards and vineyards as a way to improve soil health.
If you have a patch of really poor soil, plant a mix of rye, hairy vetch, and crimson clover in the autumn. Near the end of winter, cut it all down and leave it where it falls. By late spring, you should be able to grow the best tomatoes in the county on that soil, and those tomato plants will be bothered less by Colorado potato beetles and early blight, due partly to beetles having a hard time moving through the residue and reduced soil splashing.
The rye plant Similar to wheat, there are winter ryes and spring ryes. Spring ryes are usually used as wind breaks and nurse crops that are cut down before seed heads develop. Winter rye is grown for everything else. Rye is a rugged plant. It can tolerate drought, flooding, and freezing temperatures. In fact, rye has a surprisingly high tolerance for frost. Winter varieties of rye even contain their own version of antifreeze! Rye plants quickly reach 3 to 6 feet in height, making it an exciting winter crop along fences. Allowed to go through its entire lifecycle, this annual will produce flowers in April and May, with seed heads maturing in May and June. Stalks, or stover, are very fibrous and they break down slowly. Rye pests and diseases Rye has very few pests and those it has cause little or no damage. Pests of rye include cereal bugs, cereal chafers, dart moth larvae, fruit flies, gout flies, Hessian flies, leaf beetles, nematodes, and rustic shoulder knot larvae. Rye plants also harbor bird cherry-oat aphids. The more intriguing side of rye includes is high susceptibility to ergot, a fungal disease. Apparently, eating rye infected with ergot causes hallucinations, convulsions, and witch trials, due to the LSD-like chemicals produced as waste products by the fungi. The infamous Salem Witch Trials are believed to be the result of hungry communities eating rye infected with ergot. Not exactly a recreational drug, ergotism also causes miscarriages and the loss of fingers and toes, and it can kill you. Luckily, ergot isn’t the problem it used to be. How to grow rye Unlike other cereal grains, rye is very particular about seed planting depth. Plant it more than 2” deep and the seed will die. You can drill holes in the ground for rye seeds or you can broadcast the seed over an area and rake it in. Keep the area moist, but not soggy, until germination occurs and then you can pretty much leave rye to its own devices. When seed heads mature, they turn a golden brown and dry on the stalks. You can leave the plants where they are and allow the seeds to feed local birds and other wildlife and reseed the area, or you can cut the stalks and hang them to dry more completely before threshing and winnowing the grain. Threshing means beating the snot out of the seed heads to break them loose. Winnowing means throwing everything up in the air in a windy (or fan-blown) place to get rid of the non-seed parts, or chaff. This is a very labor-intensive process, but seeing a bowl of rye (or wheat) berries harvested by your hand is a very satisfying experience. If you grow rye for no other reason, lady bugs love it! Amaranth is an ancient, drought-tolerant, high protein grain that thrives in alkaline soil.  Prince’s feather amaranth (Hardyplants) Public Domain My first experience with amaranth was disbelief, when someone told me you could pop tiny amaranth seeds like popcorn. They were correct. [Did you know that you can also pop wheat, rice, millet, sorghum, barley, and quinoa? It’s true.] Cousin to pigweed, amaranth is a pseudocereal. Pseudocereals are grains used as cereals but are not members of the grass family. Quinoa and buckwheat are pseudocereals. How amaranth grows Amaranth plants are able to fix atmospheric nitrogen, the same way legumes do, which helps these plants to grow rapidly, even in poor soil. Seeds germinate in only 3 to 5 days, under ideal conditions. Plants grow best in sunny locations, spaced 8 to 10 inches apart. Amaranth branches little or not at all, putting all their efforts into striking seed heads. These upright flower spikes become weighted down with an abundance of white, brown, black, green, red, purple, or pink seeds, depending on the species.  Love-lies-bleeding amaranth (Kurt Stüber) CC BY-SA 3.0 Amaranth species Native to Central and South America, people started growing amaranth around the same time corn was domesticated, but amaranth only uses half the water needed by corn. A green, prostrate variety of amaranth, the seabeach amaranth, once found in abundance on Long Island’s sand dunes, is now one of the most threatened plants on Earth.  Seabeach amaranth (Mark Burlas) Public Domain The name amaranth comes to us from the Greek words for unfading flower. Aside from amaranth’s unfading flowers, you would be hard pressed to find a more confusingly diverse group of plants. Botanists and plant geneticists are still trying to sort it out. All we need to know, at this point, is that amaranth plants fall into one of three categories: those grown for looks, greens, or grains.
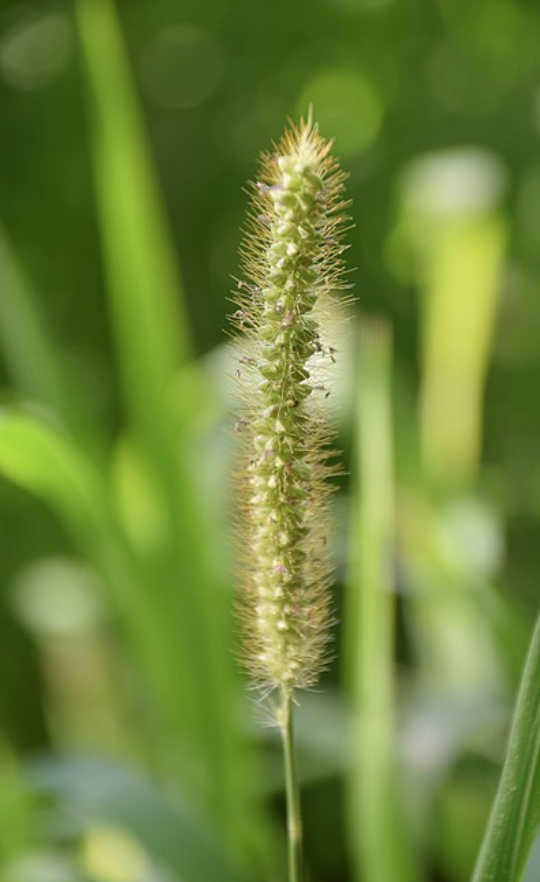
Grain amaranth A single amaranth plant can produce over 2 pounds of seeds. Amaranthus caudatus, A. cruentus, and A. hypochondriacus are the best choice for grain production. These seeds are easy to harvest, easy to cook, and they readily self-sow an area. As autumn approaches, those stunning flowers will have transformed into seed-covered spikes, coveted by finches and other seed-eaters. If you rub a flower head between your hands and the seeds come away easily, it is time to harvest, thresh, and winnow your crop. To harvest amaranth grain, cut off all ripe seed heads and place them on a clean bedsheet. You can wait until they dry, which makes the job more prickly, or you can thresh the seed right away. [To thresh means to remove grain from a plant.] To thresh amaranth, rub fresh seed heads vigorously between your hands, or walk on dried seed heads covered with another bedsheet, dislodging the seeds in either case. If you opted to work with fresh amaranth, the seeds will need a few protected days to dry. After threshing, you can sift your amaranth through a screen, to remove some of the chaff. Chaff is the inedible seed hull. You can also try using a blow dryer to whoosh the chaff away, just be sure to use the cool setting. Amaranth leaves, stems, and roots If you prefer growing amaranth as a vegetable, you will want to plant Amaranthus cruentus, A. blitum, A. dubius, or A. tricolor. Popular in dishes from Africa, Greece, India, Malaysia, and China, amaranth’s vegetative parts are cooked the same way as many other greens and they can be used fresh, in salads. In fact, many people grow vegetative amaranth to fill the dietary void caused by spinach’s tendency to bolt in summer. Amaranth pests and diseases Being so well suited to drought conditions, too much moisture can lead to damping off disease, so proper spacing and weed removal are important for young plants. Flea beetles, amaranth weevils, and tarnished plant bugs are the most common pests of amaranth. Amaranth as a weed Because of its rapid growth and heavy seed production, unwanted amaranth species are considered invasive and noxious weeds. Amaranthus albus, A. blitoides, A. hybridus, A. palmeri, A. powellii, A. retroflexus, A. spinosus, A. tuberculatus, and A. viridis should be avoided. Just so you know, A. palmeri is glyphosate resistant, and, research has shown that, when grown near soybeans, it can reduce soybean crop by 17 to 68%. Whether you grow amaranth as an ornamental or food, this sturdy, attractive plant can bring bright colors to your landscape. If you hang a bird feeder in your yard, you are probably already growing millet. Millet is those tiny, blonde seeds found in bird seed. It is also a delicious, easy to grow, gluten-free porridge. [In the same way as corn, rice, barley, and wheat, millet seeds are actually a specialized dry fruit, called a caryopsis, but we'll leave that for another discussion.]  Foxtail millet (STRONGlk7) CC BY-SA 3.0 Originally from Asia and Africa, people have been growing and eating millet for over 7,000 years. Some historians believe that millet played a major role in humanity’s shift from hunter-gatherers to farmers. Today, millet is still an important food source in many regions. You may be surprised to learn that millet, and not rice, is the primary carbohydrate food source in northern China. Millet can be eaten as a sweet, with milk and sugar, or as a savory dish, with the addition of meat and vegetables. Millet is high in protein, dietary fiber, and several B vitamins. A single serving of millet provides 76% of the RDA for manganese, which makes me wonder why we don’t eat more of it. The only cereal-related nutrient that millet is lacking is lysine, but buckwheat contains high levels of this important amino acid, so eating millet and buckwheat together makes for a healthy diet. Types of millet Millets are actually a group of plants in the grass family (Poaceae). Unlike most families, many millet varieties are only remotely related to one another. You can track down the different groupings, if you feel so inclined, but the most commonly grown are:
 Pearl millet (USDA ARS) Public Domain Sorghum, also found in bird seed mixes and cereal bowls, is sometimes called Great millet, but it is generally considered a separate cereal from millet. How millet grows Millet is an annual that grows quickly in hot, dry weather, on crappy soil. Of course, it performs far better when plant nutrients and irrigation are present, but it’s an extremely resilient plant. [The only thing it cannot tolerate is waterlogged soil and mud.] Depending on the variety, mature millet plants can reach a height of 2 to 5 feet.
Millet grows so fast that seeds will sometimes sprout while still attached to the spike! Normally, seeds germinate in 5 days, and spikes are ready to harvest in 50 to 180 days, depending on the variety and weather conditions. Because it grows so quickly, millet can also be used for erosion control, or as a green manure. It also tends to grow faster than most weeds. Millet is a good choice for filling in difficult spaces of the yard. Local birds will appreciate the free lunch, too!  Sprouting millet (Kaitha Poo Manam) CC BY-SA 4.0 How to grow millet
Millet seeds can be broadcast by hand over an area and raked in, or you can drill holes that are 1 to 4” deep for the seeds. [Did I mention that millet is rugged?] Once plants are established, they will readily self-seed the area, year after year. Because of millet’s high carbon to nitrogen (C:N) ratio, it is best balanced with low C:N plants, such as legumes, in crop rotation. Millet pests and diseases Generally speaking, millet has few pests, other than Bagrada bugs and crane flies. Millet diseases lean toward the fungal variety, with blast, leaf spot, downy mildews, ergot, rust, Johnson spot, smut, and blight causing the most problems. Simply provide good drainage and reasonable irrigation to avoid most of these diseases. Millet, it’s not just for the birds (though you may need to protect your crop with netting or row covers, if you want any left to harvest). You can have it for breakfast, use it to increase biodiversity in your yard, or, if you’re feeling adventurous, millet can even be used to make alcoholic beverages! Buckwheat pancakes, buckwheat eye pillows, and soba noodles are all made from buckwheat seeds, but what is it, really? And what can it do for your garden or landscape? 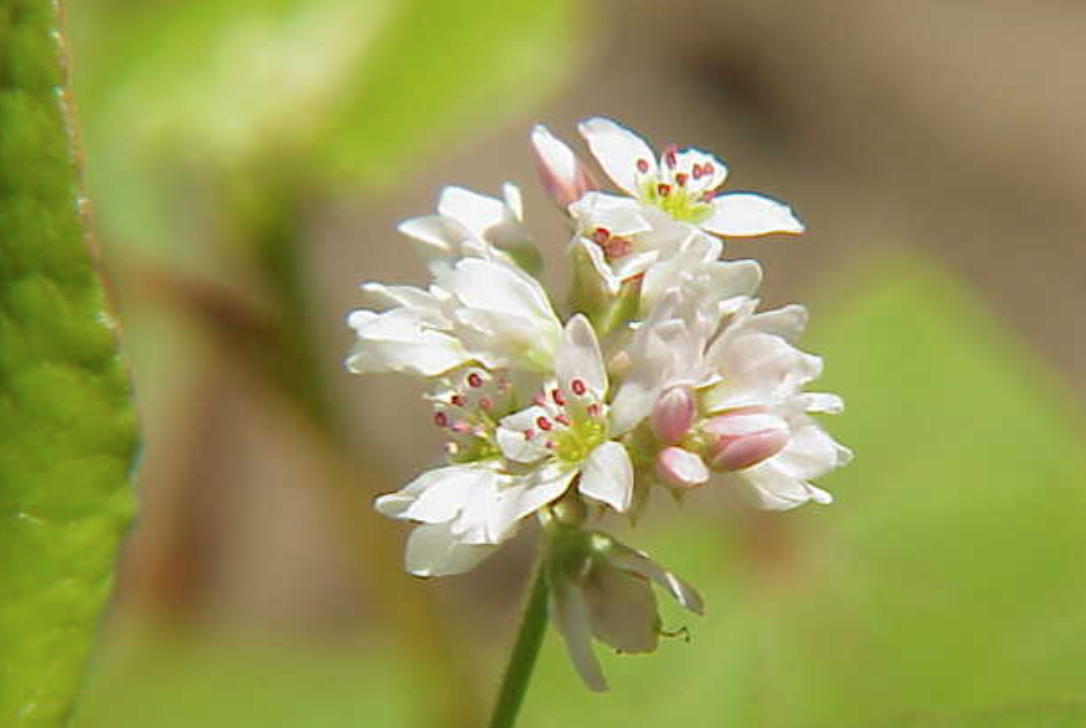 Individual buckwheat flower (Kurt Stüber) CC BY-SA 3.0 Despite its name, buckwheat (Fagopyrum esculentum) is not a type of wheat. Nor is it a type of grass. Instead, buckwheat is related to knotweed, sorrel, and, you won’t believe this - rhubarb!
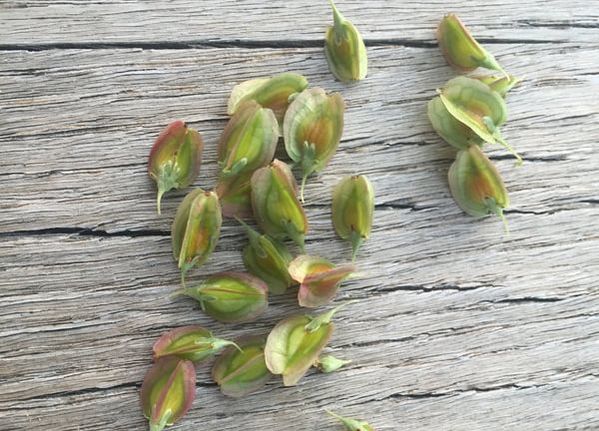
If you compare buckwheat seeds with rhubarb seeds, you can see the similarity. Both produce triangular seeds. Buckwheat gets its name because it is used like wheat, but it has triangular seeds, similar to the beech tree. [The Dutch word for beech is boec.] Buckwheat, like quinoa, is a type of pseudocereal. Originally from Yemen, buckwheat was a popular food staple for nearly 8,000 years. This was true until nitrogen became commercially available, which made other cereal and pseudocereal crops more productive than buckwheat. The buckwheat plant Buckwheat has a taproot that goes deep in search of water, and a dense, fibrous root system that stays within the top 10 inches of soil. Here, roots produce a mild acid that breaks down phosphorus, making it easier to absorb. Buckwheat is three times more effective at phosphorus extraction than barley, and ten times more effective than wheat. In areas with excessive phosphorus, growing buckwheat can help bring micronutrients back into a better balance for other plants. When the buckwheat is used as a green manure, those nutrients are returned to the soil. The buckwheat plant reaches a height of 30 to 50 inches. Its seeds are a type of simple dry fruit called an achene. How buckwheat grows Buckwheat does not handle heat, drought, or compacted soil very well. That being said, it’s fast growth makes it the best choice for newly cleared or overly farmed land. I have planted buckwheat next to my fences, partially under large, established plants, in an effort to bring life to soil that was exposed to the elements for decades before we moved in.  Withered buckwheat flowerhead with seeds (K.G.Kirailla) CC BY-SA 3.0 How to grow buckwheat
You can broadcast buckwheat seeds over an area, or you can drill holes for it. Drilling 1/2 to 1-1/2 inch holes for your buckwheat seeds means more will grow, and local birds will get less. These holes can be surprisingly close together. Converting the farming instructions of 50 to 60 pounds of buckwheat seed per acre, using 15,000 seeds per pound, you can cram 15 to 20 buckwheat seeds per square foot of garden space. Buckwheat pests and diseases Like many other ancient grains and pseudograins, buckwheat has very few pests or diseases that affect it. Occasionally, leaf spot and root rot can take hold. Also, competition from lambsquarters and pigweed can seriously reduce buckwheat growth. Buckwheat as cover crop and green manure Buckwheat makes an excellent cover crop and green manure. Buckwheat is a fast-growing plant that grows well in crappy soil. Germination usually occurs in only 3 to 5 days. Because buckwheat grows so quickly, you can plant it just before harvesting one crop, and before the next crop takes hold. This will help stabilize the soil, support soil microorganisms, and add nutrients in just a few days. In less than 45 days, your buckwheat plants will grow, flower, and be ready for mowing, as a green manure. You can also mow your buckwheat in the early stages of flowering to encourage regrowth and to extend the growing season. If you want the seeds for food or replanting, they will be ready in 70 to 90 days. Buckwheat as insectary Buckwheat plants start producing flowers within 3 weeks, and those flowers can last for 10 weeks. This is good news because buckwheat flowers are favored pollen and nectar sources for many pollinators and beneficial insects that parasitize aphids, mites, and other garden pests. Some of these beneficials include minute pirate bugs, green lacewings, insidious flower bugs, hoverflies, predatory wasps, big-eyed bugs, tachinid flies. and lady beetles. The “other” buckwheats Completely different from the pseudograin buckwheat, California hosts a collection of over 125 native plants known as buckwheats. These plants are in the Eriogonum genus. You can find both annual and perennial native buckwheats. These plants are also enjoyed by butterflies and other beneficial insects. Unlike the edible buckwheat, native buckwheats are very drought tolerant, and most of them are evergreens, adding color and texture to the landscape for most of the year. Popular varieties of native buckwheat include:
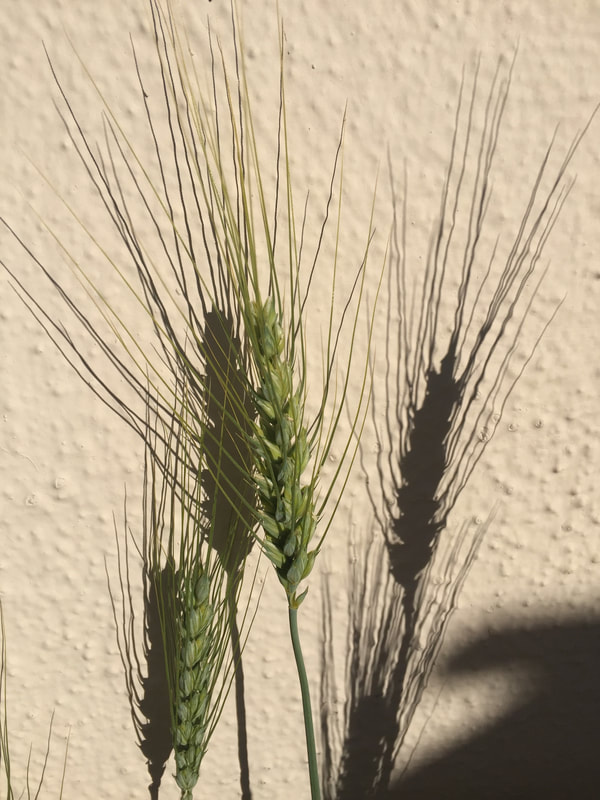
Native buckwheat provides food and habitat to native beneficials, with minimal effort. Edible buckwheat suppresses weeds, attracts pollinators, and improves soil structure and soil health. Whichever type of buckwheat you decide to add to the garden or foodscape, the soil and local beneficial insects are sure to improve! Oats in the garden or landscape? Why not? Long, long ago, when people were first growing cereal grains in the Fertile Crescent, there was a weed on the side of the fields. These weeds may have benefited from the irrigation and fertilizers used on the primary crop, or they may have cross-pollinated - I don’t know. But that pesky weed turned out to be oats, of oatmeal cookie fame.  Oats and wheat Oats are members of the grain plant family (Poaceae). Like other cereal grains, the seeds we use to make oatmeal are actually a fruit, called a caryopsis. Unlike other grains, oats contain a legume-like protein, and eating oats regularly can help reduce cholesterol levels. Along with alfalfa, wheat, ryegrass, clover, and timothy, oat hay is grown as animal fodder. Even today, oats (Avena sativa) are grown more as livestock fodder than for human consumption. [My chickens LOVE oat seed heads and leaves.] But, there are plenty of other reasons to grow this versatile weed-come-cereal-grain. Oats in the landscape Oats make an attractive stand of tall stalks and waving seed heads. As an annual, oats can reseed an area. Unlike many other grain crops, oats are not as attractive to most small songbirds. Larger birds, such as mourning doves, may flock to your oat stands. I think that their pretty cooing often makes up for any lost grain. But why would you want to add oats to your landscape or garden? Here are just a few good reasons:
How to grow oats You can plant oats as soon as temperatures are consistently above 40°F. Seeds can be broadcast over an area and raked in or, in the case of severely compacted soil, a drill can be used to create holes 1/2 to 1 inch deep. How much seed was a little tricky to calculate for the home garden. All I could find was information for farmers, which told me 2.75 to 3.25 bushels per acre. Huh. I own a bushel basket but I have never had a bushel basket full of seeds. Ever. After hunting around on the internet, I have come to the conclusion that you should simply follow the directions on the seed packet. If you want to see what I learned, you can read the note below.] Oats grow quickly. Also, oat plants are triggered to flower as nights get shorter, in a behavior called photoperiodism, so seeds become available rather quickly. Oats are heavy feeders, so side dressing young plants will give them the nutritional boost they need to thrive. Oats are more tolerant of cooler temperatures and rain than other cereal grains, which makes them a good late winter and early spring crop, here in the Bay Area. Most oat plants will go dormant in the high heat of summer. The stems and stalks left behind by your oats are called stover. Stover can be added to the compost pile, used to create barriers, or left in place for climbing beans to use as a trellis. The oats you see growing along roadsides are probably wild oats (Avena fatua). Many farmers are angry about wild oats because of cross-pollination. Oats and crop rotation In traditional crop rotation, a three-field system would grow legumes in one field, a grain, such as oats, in a second field, and allow the third field to rest, or go fallow. You can use a similar plan, whether you grow in rows, raised beds, or containers. This practice interrupts the disease triangle of many common plant pathogens. Pests and diseases of oats Bacterial blights can affect oats, along with stem and bulb nematodes, and barley root knot nematodes, dried fruit beetles, and crane fly larvae. Fungal diseases, such as leaf blotch, stem rust, crown rust, and powdery mildew are common, but not serious, threats for the home garden. Harvesting oats You may never harvest your oats, but, then again, you may. If you harvest these tiny fruits while they are still green, you can eat them fresh from the stalk (they don’t taste like much), or you can wait until they ripen and get hard. When I say hard, I mean it. These little suckers are like tiny oval rocks. Guess what? That’s why oats are rolled. Rolling oats means they are crushed between two giant heavy rollers, to flatten them and make the fruit accessible. Honestly, unless you are growing acres of oats, it probably isn’t worth trying to make your own oatmeal (even though you can). Grown for their attractive, soil improving, chicken feeding properties is reason enough for adding these members of the cereal grain family to your annual crop rotation, garden, or landscape. Seed calculation Rabbit Hole:
The amaranth family got its Greek name from the word for ‘fire’ because of their flame-shaped flower clusters. Also known as the pigweed family, this group of plants belongs to the order Caryophyllales. The Caryophyllales include ice plants, cacti, carnations, and many carnivorous plants. As different as all these plants seem, from the outside, their seed structure and photosynthesis pathway make it obvious to people who look that closely. We’ll just take their word for it as we learn about this particular plant family. Amaranth family plants In addition to amaranth, this plant family includes quinoa, lamb’s quarters, and pigweed. These plants have been used as vegetables and pseudocereals for thousands of years. Many people are allergic to the pollen of these plants, which is present late summer through autumn.
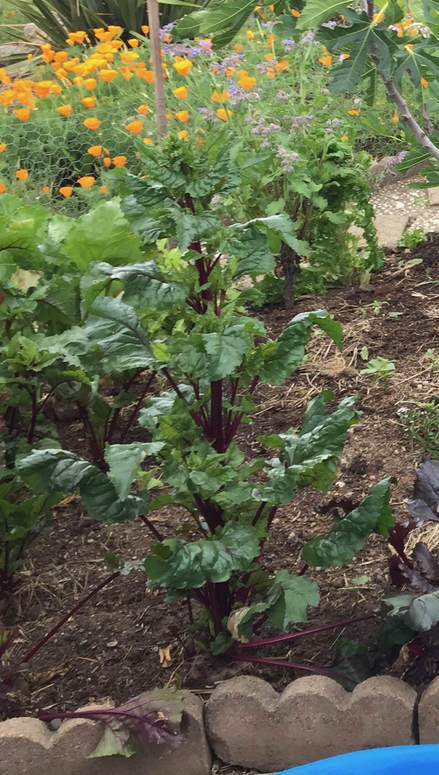
Recent genetic testing has shown that it also includes the goosefoot family, or chenopods. The chenopods got their name because the leaves look like a goose’s foot. Common chenopods include beets, sugar beets, California goosefoot, spinach, and chard. One interesting trait of this family is that perennial stems exhibit a thickening secondary growth, the same growth used by trees. Most monocots do not do this.
Overall, members of the amaranth family tend to be very drought tolerant, and they perform better in alkaline soils, making them a good choice in San Jose, California. Amaranth family plants can also grow in soil with higher salt levels than many others.
Amaranth family flowers The attractive spiked flowers are what make this family popular as both edible and ornamental plants. If you grow members of the amaranth family in your landscape, and allow them to bolt and go to seed, you will be able to enjoy these amazing floral displays, plus, you will be able to harvest hundreds and hundreds of seeds for your meals or future crops. [I just learned that beet sprouts are delicious in salads!] While members of the amaranth family are not poisonous, many varieties contain oxalic acid in their leaves, so the cooking water should be discarded. Did you know that you can grow your own quinoa? Just don’t do what I did, which was to start it as summer temperatures were reaching 100°F! Let’s learn more about this high protein, ancient grain, so that you can add it to your foodscape. What is quinoa? Quinoa (Chenopodium quinoa) is a member of the amaranth family, along with beets and spinach. Quinoa is grown for its high protein seeds. Unlike most cereal grains, quinoa is not a grass plant, so its seeds are classified as a pseudocereal. People started farming quinoa 4,000 years ago in the Peruvian Andes, but it has been a food staple for as long as 7,000 years. One of the things that makes quinoa so special is that it contains all eight essential amino acids used by our bodies to make a complete protein molecule, plus it is gluten-free, for those suffering celiac disease.  Quinoa plant before flowering (Christian Guthier) CC BY 2.0 The quinoa plant Quinoa is a self-pollinating dicot, which means its seeds split in half and its flowers have petals that are in multiples of four or five. Unlike many other plants, quinoa flowers are green. Quinoa plants have deep taproots that make them drought resistant. Its leaves are broad, with tiny hairs (trichomes), and lobed. Plants can grow from 18 inches tall to over six feet. The central stem may be green, purple, or red, depending on the variety. Quinoa seeds can be black, tan, white, pink, red, or purple, depending on the cultivar. All quinoa seeds are coated with saponins, which taste bitter. This protects developing seeds from birds and other seed eaters, but the coating needs to be rinsed off before cooking and eating your quinoa. [In parts of Africa, those saponins are collected and used as a laundry detergent!] While young quinoa leaves are edible, they do contain high levels of oxalic acid, which can cause respiratory and kidney problems. But you’d have to eat an awful lot of quinoa leaves to have a problem. How to grow quinoa Quinoa plants are pretty rugged. They can be grown from sea level all the way up to the highest mountain tops (13,000 ft.), just give them plenty of sunlight. You will want to select a variety that is suited to your microclimate and elevation. Quinoa grows best in loose, sandy soil. If that's not what you have, you can either grow your quinoa in a raised bed, or you can incorporate a lot of aged compost into your quinoa bed before planting. This will provide nutrients and improve drainage. Do not try growing quinoa in containers - it needs more underground space than a container can provide. Quinoa prefers a soil pH of 6.0 to 8.5, so our alkaline soil isn’t a problem. Seeds should be planted 1/4 of an inch deep and watered very gently, to avoid washing seeds away before they get a chance to germinate. Quinoa plants prefer temperatures from 25°F to 95°F. This means you can start growing your quinoa in autumn. That way, your plants will be harvested long before the summer heat kicks in! Quinoa plants take 90 to 120 days to mature, so plant accordingly. Freezing temperatures will sterilize quinoa pollen, so frost that occurs during flowering can be problematic. These plants grow very slowly during their first two or three weeks, so snipping off weeds at ground level is the best way to reduce competition without disturbing the soil. Depending on the variety, plants only need 10 to 39 inches of water during the growing season. Quinoa plants should not be watered once they start going to seed. Quinoa pests and diseases While quinoa seeds protect themselves with saponins, many birds will still feast on your crop. You can use netting to reduce losses. Other pests include flea beetles, caterpillars, aphids, armyworms, and the recently discovered quinoa plant bug (Melanotrichus sp.). Bacillus thuringiensis can be used to control caterpillars. According to a report from Perdue University, there are no pesticides cleared for use on quinoa. Quinoa is prone to several fungal diseases, which is why good drainage is so important. Damping off disease, downy mildews, fusarium wilt, seed rot, leaf spot, and brown stalk rot can all affect your quinoa plants.  Quinoa field in Bolivia (Michael Hermann) CC BY-SA 3.0 Harvesting quinoa
You will know it is time to harvest your quinoa crop when the leaves turn yellow, red, or purple, and start to drop off. The difficult part about harvesting quinoa is separating the seed from the rest of the plant. Similar to harvesting stone pine nuts, this is a labor intense process. Start by snipping off as much non-seed containing plant material as possible, and allowing the seed head to dry completely. You will want to protect these seed heads from moisture, because seeds will begin to germinate within 24 hours of being exposed to water. You will know the seeds are completely dry when you cannot leave a dent in one with your fingernail. Once they are completely dry, you can gently rub the seed heads against a colander or strainer to knock the seeds loose. Even if you don’t harvest your quinoa, adding this plant to your garden or foodscape can increase biodiversity and, hey, it’s a strikingly beautiful edible plant!
There are spring and winter varieties of barley, depending on whether or not they need a period of cold to transition into their reproductive phase. In warmer regions, that generally means planting in either October or January. Barley’s reproductive phase is characterized by true stems, called culms, carrying flowering heads, also known as a spikes or ears, that emerge from the sheath, or boot. surrounding the uppermost leaf (called the flag leaf). Barley grows 2-1/2 to 3 feet tall. Barley hulls Barley seeds have tough coverings called hulls. Most varieties have hulls that are difficult to remove without losing or damaging some of the grain. These are also known as ‘covered’ barley. The barley you see in the store is usually hulled or pearled barley. Hulled barley is a whole grain, but pearled barley is not. Pearling removes several outer layers of the grain along with the hull. There are also hulless, or ‘naked’ barley varieties, but they aren’t really hulless. Instead, the hull is simply easier to separate from the grain. Barley hulls are often used to make pillows. Why grow barley? You may want to grow a small patch of barley, simply as a testament to our agricultural history, to know that you can. You may want to try making your own beer or whiskey. You may want to grow more of your own ingredients for a hearty winter soup. Barley can also be grown as a cover crop or green manure, to reduce erosion, improve soil structure, and suppress weeds. Barley is an excellent crop to install as your winter fava beans start ending their growing season. If you add a legume, such as peas or beans, and leave the plants in place, you can significantly improve nutrient cycling. Barley grown in winter has a deep, fibrous root system that can go down over 6 feet! Also, because barley grows so quickly, it absorbs surface water that would otherwise be used by weeds. Barley plants also shade out weeds and the plants emit allelopathic chemicals that suppress weed growth. Barley can also be used as a nurse crop. Nurse crops provide protection for slowing growing crops, such as beets. How to grow barley Barley seeds are planted using a method called drilling. Drilling is exactly what it sounds like: you drill a hole in the ground and drop a seed in. Commercial growers have heavy equipment that drills and plants seeds automatically. You probably don’t have one of those machines in your garage, so you will have to do it by hand. Barley seeds are planted deeply. By deeply, I mean 2 inches deep. When I first started growing things in my California concrete soil, I actually used a battery powered drill to plant seeds. After five years of composting, mulching, and top dressing, the drill is no longer needed. Now, I use a hand weeding tool to poke a hole in the ground. Barley does not like waterlogged soils, so allow the soil to dry out between waterings. Of course, if it’s a rainy winter, there isn’t anything you can do about it other than continuing to add organic material to the soil, to improve drainage. You can see a spreadsheet of various barley cultivars suitable for growing at home here. Barley pests and diseases As a cereal grain, barley is prone to fungal diseases, such as leaf scald, net blotch, stripe rust, leaf spot, and stem rust. Common pests include mites, armyworms, grasshoppers, crane flies, stinkbugs, wireworms, and aphids. Also, aphids may carry a viral disease called barley yellow dwarf. Some people claim that barley acts as a natural pesticide, but research has not shown this to be true.  My first barley crop! So, how about making a little room for a patch of barley? As a food crop, I expect that it will be much like endive, nasturtiums, lentils, and tomatoes - it will continue to turn up long after I have stopped planting it.
* What is malting? Malting is a method used to make grains more appropriate for beer, whiskey vinegar, shakes, and many other food products. Malting consists of soaking cereal grains in water, to stimulate germination, but then drying the seeds with hot air before germination actually occurs. This triggers certain enzymes into action that convert starches into sugars, and break down certain proteins that are later used by yeast as food. Malted grains ferment quickly and become slightly alcoholic on their own. Sorghum is a global food and fodder crop and it makes a pretty good syrup. Sorghum is a drought and heat resistant member of the grain family, making it an easy plant in warmer regions. Even if you don't enjoy a bowl of cooked sorghum (and you really should try it), the seeds make excellent food for local birds and wildlife (and backyard chickens). If you’ve ever bought a bag of wild bird seed, the larger, dark brown seeds are sorghum. Sorghum is used predominantly in the South to make syrup, but it is the world’s fifth largest cereal crop. Sorghum’s high sugar content makes it useful in making biofuels, alcoholic beverages, and flour. It can even be popped like popcorn or added to soups and stews, the way you would use barley. Sorghum is an ancient grain, having been domesticated some 8,000 years ago, and it is gluten-free. 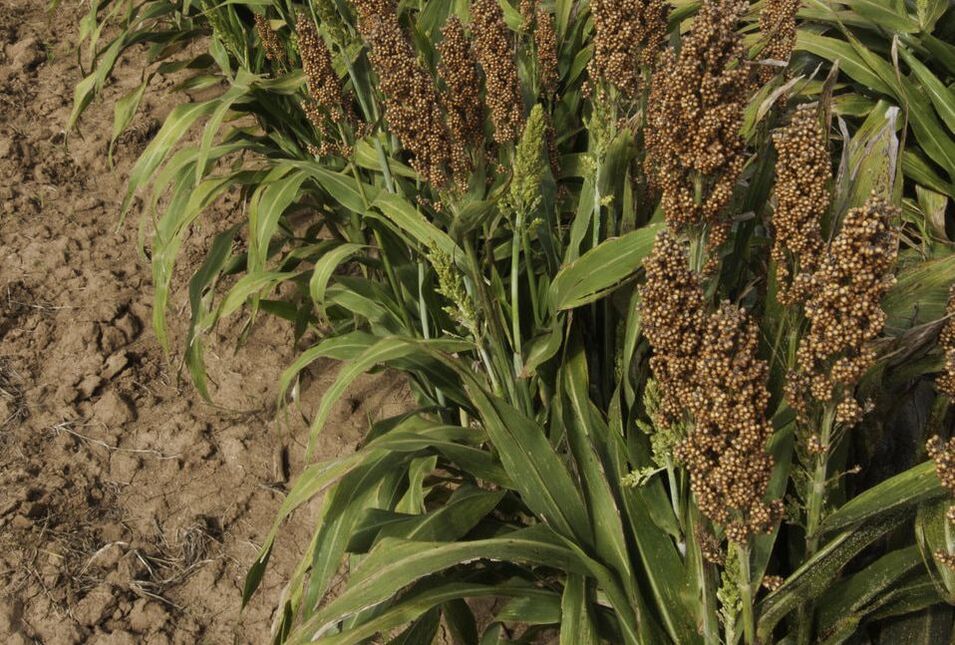 Sorghum field (USDA) Public Domain Durable sorghum
Cousins to sugarcane, sorghum is one rugged plant. It reproduces by rhizomes and by seeds and it grows and spreads so well that “Johnson grass” (Sorghum halapense) has earned its reputation as a troublesome invasive. The same characteristics that make sorghum a potential problem are the very same characteristics that make it a useful landscape addition. Some sorghum varieties grow as tall as corn, while others have more of a clumping growth. In either case, the wide, flat leaves grow upward and then hang over, staying green all summer. The seed clusters are abundant and prolific. Sorghum is a short-day plant. This means that is needs long nights to begin the flowering process. Most sorghum plan its will die back to clumps in winter and then come back each spring, providing a wealth of seeds for local birds and wildlife (and you!) throughout the summer. Nitrogen ‘fixing’ sorghum Like legumes, pineapple, mango, and sweet potatoes, sorghum has evolved alongside a helpful bacteria (Gluconacetobacter diazotrophicus) that fixes atmospheric nitrogen, making it available to the plant and its neighbors (until it goes to seed). Sorghum pests and diseases Like many other plants, sorghum has built-in defenses of its own. In its early stages of growth, and when severely stressed, sorghum plants contain relatively high levels of hydrogen cyanide and other chemicals that protect it from being eaten. Dried fruit beetles, sugarcane aphids, crane fly larva, and sorghum midges may also attack your sorghum, but I have found this to be a very durable plant. Using sorghum in a home garden or landscape While you can certainly grow sorghum in an agricultural field, this plant also lends itself nicely to the edges of walkway paths, raised beds, difficult areas, and poor soil. Once established, sorghum needs only minimal care and irrigation, compared to most other plants. Also, it will come back, year after year, without any effort on your part. Try adding this ancient grain to your garden landscape today! Corn is the biggest U.S. grain crop and you can grow it, too! Fresh from the garden ears of sweet corn, heated, and then topped with butter, salt, and pepper, well, life just doesn’t get much better than that! Now, we are not talking about the corn used to feed livestock. That brand is called grain corn. Sadly, I wasn’t particularly happy with my Indian corn crop experience, either. It may have historical merit, but the kernels were tough and very starchy. Call me spoiled, but I prefer my corn with fat, sugar-filled kernels that burst on my tongue with every bite.  Ear of corn (mali maeder) Public Domain History of corn For anyone who has had the opportunity to explore Mitchell, South Dakota, you know there’s a lot to be said for corn. Corn, or maize, was domesticated by people in what is now Mexico nearly 10,000 years ago. Early corn plants only grew 1-inch long cobs, and only one cob per plant. Selective breeding brought us to cobs of several inches in length and plants capable of producing multiple cobs on each plant. One of the three most genetically modified crops, nearly 90% of the U.S. corn harvest is of GMO corn. In addition to being eaten from the ear, or as grits or meal, corn (Zea mays) is also used as a sweetener (high fructose corn syrup), biofuel, and to make plastics, fabrics, adhesives, and liquor. There are six types of naturally occurring corn (and 142 GMO types, as of 2015). Those six types are dent corn, pod corn, flour corn, flint corn, popcorn, and our beloved sweet corn. How corn grows Being a member of the grass family (Poaceae or Gramineae), corn is cousin to bamboo, rice, and your lawn. Corn grows a hollow stem that is wrapped with leaf blades. Each corn plant produces both female and male flowers, but they are not self-pollinating. This is called monoecious. These flowers both start out bisexual (referred to as ‘perfect’ in the world of botany), and then develop into one gender or the other. Corn kernels are actually female inflorescences, or flower clusters, that turn into fruit. These fruits are protected by tightly wrapped leaves that we call husks. At the top of each stem (or cob) is a male inflorescence (tassel) that releases pollen onto the wind. The silks we work so hard to remove are actually elongated stigmas from the female flower. There is an ovary at the end of each silk thread that must be pollinated for fertilization to occur, allowing a kernel to develop. Since pollen is carried on the wind, corn must be planted in blocks, rather than rows.  Corn field (Public Domain) How to grow corn
Corn needs lots of nutrients in the soil, so be sure to prepare the beds ahead of time with plenty of aged compost. Corn does not transplant very well, so wait a couple of weeks after your last frost date before planting. Seeds should be planted one inch deep and 4 to 6 inches apart. Soil needs to be at least 60°F for germination to occur. Once your corn seedlings emerge, thin them to 8 to 12 inches apart. Corn plants have very shallow roots, so proper irrigation is important. In the heat of summer, your corn plants may need an average of 5 gallons of water per square yard each week. Since each microclimate is different, you will have to make your own adjustments. Just keep in mind that insufficient irrigation can reduce the number of silks that emerge and that means less developed kernels on your ears of corn. One way to give your corn seedlings an extra boost of nitrogen is to use the Three Sisters Method and plant corn with beans and squash. The beans ‘fix’ atmospheric nitrogen, making it available to nearby plants, and the squash produce large leaves that shade the soil. Corn pests and diseases We are not alone in our love of corn. An old saying tells us, “One for the blackbird, one for the crow, one for the soil, and one to grow.” You may or may not be able to scare away the crows (and chickens) with scarecrows (I use my dogs), but nothing can stop a determined raccoon. It is the smaller pests, however, that will probably cause you the most problems. These generalists include: armyworms, aphids, spider mites, thrips, wireworms, cutworms, flea beetles, cucumber beetles, and grasshoppers. Corn-specific pests you might see are leafhoppers, leaf miners, seed-corn maggots, and corn earworms. Corn is also subject to fungal and bacterial diseases, such as smut, soft rot, fusarium root and ear rot, maize dwarf mosaic, pythium stalk rot, seed rot, and damping off disease. Of course, corn smut really is delicious, so don't panic if it shows up. Harvesting corn Sweet corn loses its sweetness soon after harvesting, so pick it as you will be eating it. Corn is ready for harvest when the tassels turn brown. If your harvest is bigger than you can eat, corn freezes well. If you have a patch of ground, give corn a try! Wheat is the staff of life for many of us humans. This cereal grain (which is technically a fruit) provides a higher protein content than other grains, such as rice and corn, and wheat has been farmed for over 8,000 years.  Wheat field (Bluenose) CC BY-SA 3.0 What is wheat, really? We all recognize wheat in the form of bread, pasta, pancakes and pizza crusts, but this amazing plant has more to it than meets the eye. While most domesticated plants have two sets of chromosomes (diploid), wheat (Triticum) is also found with four sets (tetraploid) or even six (hexaploid)! There are currently hundreds of wheat cultivars available, some of which were produced through mutation breeding and the application of gamma x-rays, ultraviolet light, and harsh chemicals. Before you get scared off, however, consider wheat as a viable option as a cover crop that can provide natural aeration, weed control, and, oh yeah, food. Wheat can be classified by when it is grown (spring or winter), its protein content, gluten quality, seed hardness, or grain color (red or white). Within the United States, wheat is classified into these categories:
How to grow wheat Wheat is a self-pollinating plant that is sown in swathes. Wheat makes an attractive border or wide row plant in nearly any landscape or garden. Winter wheat is planted 2 to 2-1/2 inches deep, 6 - 8 weeks before any chance of freezing temperatures. This gives the plants time to develop a strong root system before temperatures drop and dormancy occurs. As soon as temperatures begin to rise, the plants resume growing. Spring wheat is sown 1 to 1-1/2 inches deep, as early as the soil can be worked. In either case, tamp down the soil once seeds are in place to create good seed-soil contact. Wheat production can be significantly increased by rotating wheat crops with legumes. You may find it difficult to buy small quantities of wheat seed in garden or farm supply outlets, but resist the urge to use bulk pet or grocery store wheat as they may carry pests and diseases that can persist for years in your garden. 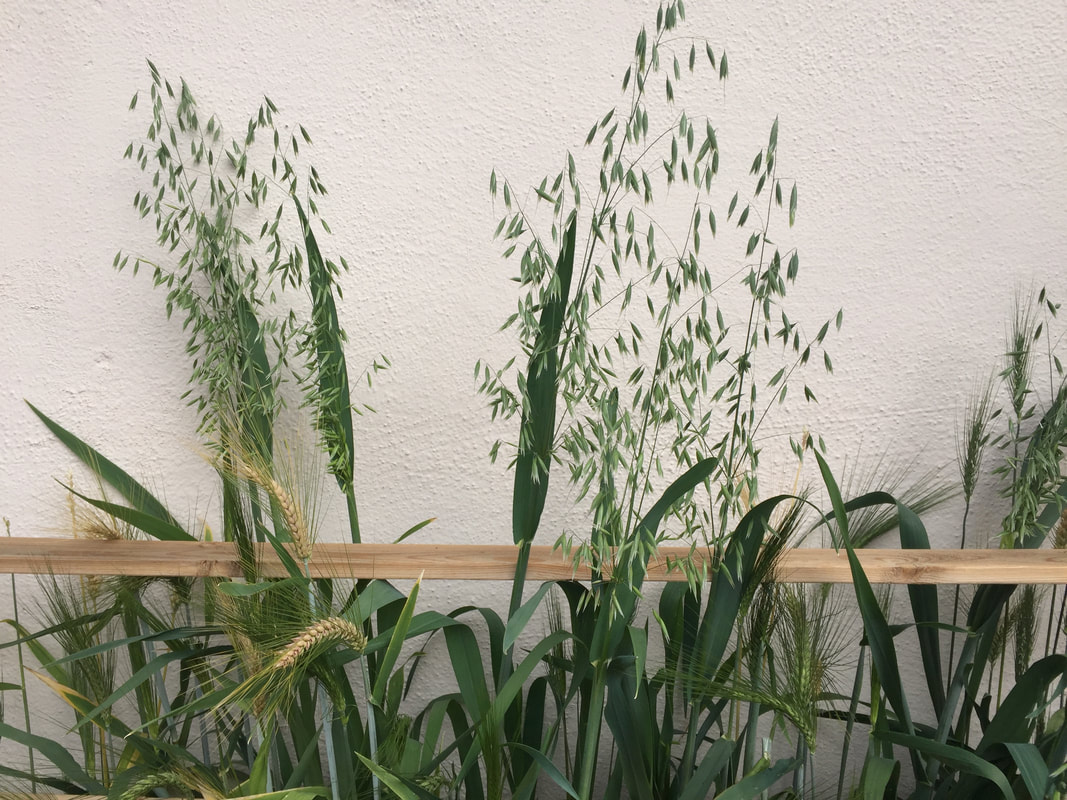 Oats and wheat Wheat pests & diseases
Wheat can be attacked by powdery mildew, stem rust, Fusarium head blight, leaf blotch, and several fungal seed diseases. Crown rot and root rot may also occur. Crop rotation and proper irrigation can minimize the likelihood of these problems. How to harvest wheat One of the main reasons agriculture has moved toward the use of machines is that it is very labor-intensive work. Wheat is no exception. Wheat is cut when the heads are dry, heavy, and bent over, and the stalks have turned yellow or brown, usually 110 to 130 days after planting. Winter wheat is normally harvested in midsummer, while spring wheat is harvested in late summer or early fall. The best way to tell if your wheat is ripe is to eat a few kernels. If the grains are soft or chewy, let them grow. If they are crunchy, it is time to harvest. Harvesting wheat involves a multistep process of cutting, bundling, curing, threshing, and winnowing. Wheat stalks were traditionally cut with a scythe, but small plots can be cut by hand. Lay the stalks so that the heads are all pointed in the same direction. After the wheat is cut, it must be bundled into sheaves. Each sheaf is simply a bunch of stems that you can hold in your two hands. These bundles can be secured with string, baling wire, or green wheat stems. Now, the grain must be cured. Stack your sheaves of wheat upright in an area that is dry, well-ventilated, and safe from seed-eating critters. Allow the sheaves to cure until the grain is hard to the point that you cannot dent it with your fingernail. Threshing separates the grain from the straw (stalks) and chaff (husks, hulls). Threshing can be done by flailing or beating. Flailing is a bit tricky. Basically, you attach a 3 foot piece of wood to a 2 foot piece of wood, using a rope or leather strap, and beat the bejeezus out of the wheat heads. In half an hour of flailing, you can expect to thresh 4 or 5 pounds of wheat. An easier method is to use a large, clean metal trash can and beat the sheaves against the side of the trash can. This method is faster but it creates more debris and many seed heads end up mixed in with the chaff. Winnowing is the way all that chaff is separated from the grain. Traditionally, grain was poured from one basket to another, allowing the wind to blow away the lighter bits of straw and chaff. Electric fans can be used to speed the process. Planting 9 square feet of wheat should provide 4 cups of finished flour, enough for a single loaf of bread. |
Welcome!You can grow a surprising amount of food in your own yard. Ask me how! To help The Daily Garden grow, you may see affiliate ads sprouting up in various places.
You can also get my book, Stop Wasting Your Yard!  Index
All
Archives
July 2024
|


 RSS Feed