|
Silver leaf may inspire memories of your great-grandmother’s fancy tea service, but this fungal disease is anything but elegant.  Silver leaf fruiting body (Strobilomyces) CC BY-SA 3.0 Silvering leaves spread throughout an infected tree and can lead to tree death. Caused by the Chondrostereum purpureum pathogen, this disease infects many members of the rose family (Rosaceae), most commonly apples and pears, plums, and other stone fruits. It can also occur on alder, beech, birch, buckeye, hawthorn, larch, maple, poplar, spruce, and willow, so these trees should be monitored for the disease, as well as rhododendron.
Silver leaf symptoms The leaves of affected limbs slowly turn silver or bleached. Silvering occurs when toxins are released into the vascular bundle and carried to the leaves. These symptoms spread progressively throughout the tree, killing branches as it goes. Infected wood is darker. A whitish crusty area may also be seen on the bark. This is the actual fungus. If you look closely, you may notice the edges are purple. The body of the crust feels rubbery and may be covered with white hairs. After the fungal bodies have fruited, this crust turns beige or brown. Spores float on cool, moist breezes. When they land on freshly exposed sapwood, the infection begins. That sapwood may have been exposed due to pruning, herbivore damage, a playful child, or too much fruit. Other causes of leaf silvering Environmental stresses, like drought or cold, can also trigger leaf silvering. This is called false silver leaf. In this case, the interior wood remains normal. Leaf symptoms may also be caused by whitefly feeding. Silver leaf management Trees infected with silver leaf often die. Use these steps to prevent it from occurring in the first place:
If an infection occurs, cut off the affected limb at a point six inches below the infected area, sanitizing your cutting tool with a household cleaner between each cut. Infected wood should be bagged and tossed in the trash to prevent further infection. Continue to monitor the tree closely for symptoms.
0 Comments
Aster leafhoppers are also known as six-spotted leafhoppers, but you’re unlikely to see those spots without a hand lens. Like other leafhoppers, these insects are fast. They hide under leaves and jump away when disturbed. It may seem easier to just ignore these tiny sap suckers, but aster leafhoppers (Macrosteles quadrilineatus) are vectors for aster yellows disease. 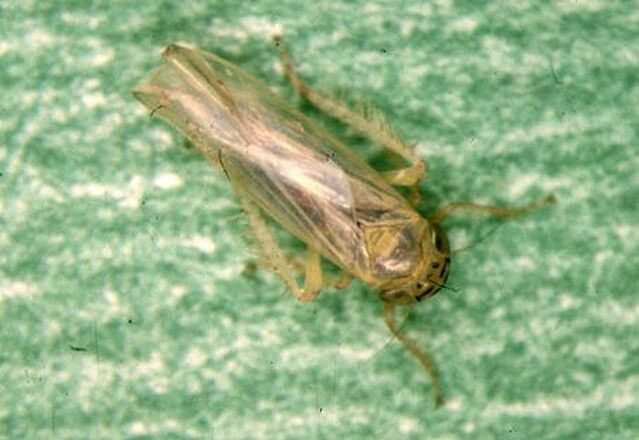 Aster leafhopper (Whitney Cranshaw, Colorado State University, Bugwood.org) CC BY 3.0 US Aster leafhopper damage
As aster leafhoppers feed, they often spread aster yellows disease. Aster yellows is a bacterial disease of carrots, celery, dill, lettuce, oats, onion, potato, radish, rye, and sunflowers. Several ornamentals, such as coneflower, may also become infected. The first symptoms of aster yellows are yellowing veins and leaves that may become twisted, and distorted, sterile flowers. But carrying disease isn’t the only damage caused by aster leafhoppers. Aster leafhoppers use piercing mouthparts to suck plant juices from leaves and stems. This gives plants a bleached, stippled appearance and it puts a serious dent in a plant’s ability to perform photosynthesis. It also creates points of entry for several other pests and diseases. Adding insult to injury, their excrement creates a habitat for sooty mold. Aster leafhopper identification Aster leafhoppers are very small, averaging less than 1/5” in length. They are wedge-shaped and olive green. If you look closely, you will see that the abdomen is yellowish-green and the forewings are grayish-green. If you could hold one still and look through a hand lens, you might be able to see the three pairs of black spots on the head. Wings are transparent. Nymphs look like miniature adults, but they are cream-colored or dark green and they lack wings. Aster leafhopper lifecycle These pests blow in on strong winds, usually coming out of the south. Eggs are quickly inserted under the leaf epidermis of host plants and assorted weeds. Eggs hatch in only a week and their lifecycle only lasts four weeks. During that time, they are eating and spreading disease. Aster leafhopper management Aster leafhoppers often hide out in weeds such as dandelion, horseweed, pineapple weed, Queen Anne’s lace, and ragweed, so keeping those weeds away from your garden may help. Yellow sticky sheets can be used to attract and capture these and other pests. As always, remove any plants infected with aster yellows disease and toss them in the trash. Horticultural oil, neem oil, or insecticidal soap can also be used against aster leafhoppers, but they are only effective if the pest is coated with the stuff, which is difficult to do. They tend to move away rather quickly when sprayed. What you can do is use row covers to protect plants from aster leafhoppers. Reflective mulch has been shown to repel leafhoppers. I hope that aster leafhoppers never blow into your landscape. Tarnished plant bugs feed on more than half of our garden crops, using their piercing mouthparts to suck the life from beans, stone fruits, strawberries, and other edibles. While these pests were once only found east of the Rocky Mountains, they now occur throughout North America. .jpg) Close-up of tarnished plant bug face (USGS Bee Inventory and Monitoring Lab) Public Domain Tarnished plant bug damage Tarnished plant bugs (Lygus lineolaris) eat all aboveground parts of a plant. They feed by injecting saliva into host plants. This saliva breaks down the pectin and plant tissues, making it possible to suck up their meal. As they feed, they cause distorted and discolored fruit and pod lesions. You may also see growing tips that are distorted, have lesions, or are dying back. Affected flowers tend to be distorted, discolored, or have signs of blight. These pests are responsible for blossom drop of tomatoes and peppers. Seeds may be distorted or shriveled. And the entire plant may show signs of dwarfing or rosetting due to tarnished plant bugs  Tarnished plant bug (Rylee Isitt) CC BY-SA 2.0
 Tarnished plant bug nymph (Scott Bauer) Public Domain Tarnished plant bug lifecycle
Tarnished plant bugs overwinter as adults in weeds and fruit trees. Females prefer laying their eggs in cotton plants, but they will make do with what’s available. These eggs are laid in mid-spring and hatch in early summer. Populations tend to peak when eggs hatch and again in mid-autumn. Tarnished plant bug management These pests like to hide in nearby weeds, so lose the weeds and mulch those areas with free wood chips from your local arborist. Tarnished plant bugs have several natural enemies. One nursery web spider, Pisaurina mira, loves to feed on tarnished plant bugs, so avoid those broad-spectrum pesticides. While pesticides are commonly used against juvenile tarnished plant bugs in commercially grown crops, the effectiveness of those chemicals is decreasing. Pesticides don’t work well on adult tarnished plant bugs, to begin with. Research has shown that these pests are attracted to pink sticky paper, so that’s an easy organic control method. Certain parasitic wasps also play a role in controlling tarnished plant bug populations. A strong spray from the hose can dislodge juveniles, who are often unable to find their way back to a host plant. Be on the lookout for these pests the next time you’re weeding around your fruit trees or garden plants. A perfectly healthy plant takes a sudden turn for the worse. It wilts. It shrinks. It changes color. It looks starved. It might be infected with root-knot nematodes  Root knot galls (Wikipedia) Public Domain Root-knot nematodes (Meloidogyne spp.) are plant parasites that thrive in regions with hot summers and short winters, causing problems in over 2,000 different plants. They will infect everything in your garden except onions and corn. And I don't know why scientists say plants are infected with nematodes instead of infested, but they do and so will we. The only way to tell if a plant is infected with root-knot nematodes is to dig it up. Before we do that, let’s see what we’re up against. What are nematodes? Nematodes are microscopic, unsegmented worms. Some of them are beneficial and some carry disease. Beneficial nematodes kill cutworms and corn earworm larvae. Disease-carrying nematodes include needle nematodes, stubby root nematodes, and root-knot nematodes. The real problem with nematodes is that there are so many of them. It is estimated that, for every person on earth, there are 60 billion nematodes. [Thank goodness they aren’t all bad!] _penetrates_a_tomato_root_-_USDA-ARS.jpg) Juvenile root-knot nematode penetrates tomato root, magnified 500x (William Wergin, et al) USDA CC BY 2.0 Root-knot nematode lifecycle and damage There are over 90 different types of root-knot nematodes and they are found worldwide. Females lay eggs in roots. Those eggs hatch into juveniles that go through several molts. During that time, they may stay in their mother’s plant or go find their own. Root-knot nematode larvae infect plant roots, causing galls to form. Galls are swellings that occur in response to invasion. Galls caused by bacterial or fungal infection contain bacteria or fungi, respectively. Galls caused by root-knot nematode larvae contain only plant tissue. These goals interfere with the uptake of water and nutrients, so young plants starve to death, and older plants struggle. Those struggling plants are more susceptible to other pests and diseases, as well as environmental stresses, such as drought or unhealthy soil. If that weren’t bad enough, root-knot nematodes can also carry Aster yellows phytoplasma. That’s the disease that gives you fuzzy carrots and damages your caraway, celery, cilantro, and lettuce. 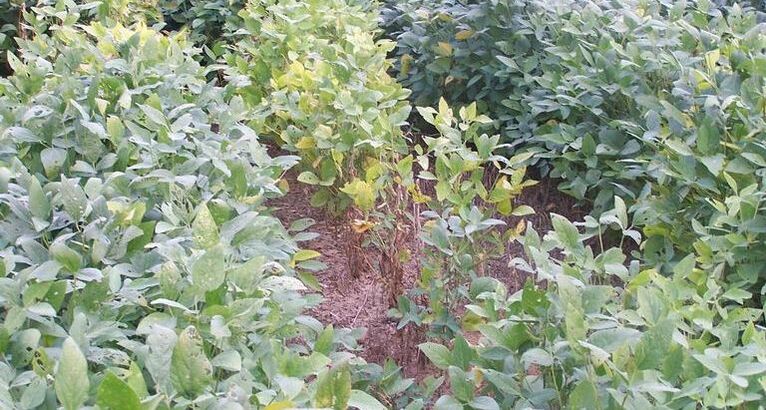 Soybean infected with root-knot nematodes (Edward Sikora, Auburn University, Bugwood.org) CC BY 3.0 US Root-knot nematode management
Commercial growers use chemicals called nematicides to combat root-knot nematodes. Many of those chemicals have been banned because of the harm they cause. Luckily, there are organic methods of controlling root-knot nematodes. The prettiest way is to grow Tagetes marigolds. The roots of these lovely flowers put out chemicals that suppress these pests. But you have to plant a lot of them. Pretty rows won’t cut it. And not all Tagetes species are effective. Avoid using signet marigolds (T. signata or tenuifolia) because these attract and feed nematodes. Maintaining healthy soil is one of your best defenses against root-knot nematodes because microorganisms compete with each other. Healthy soil contains a lot of microorganisms that will compete with these and other pests. Mulching and top dressing with aged manure and compost feeds those helpful microorganisms. You can install resistant plant varieties, making sure to buy certified disease-free seeds and seedlings. Crop rotation and allowing planting areas to go fallow every few years will help keep nematode populations in check. And plant some of those lovely marigolds! Malabar spinach is native to tropical Asia, so hot weather isn’t a problem. Unlike regular spinach, which bolts as soon as temperatures begin to rise, Malabar spinach grows best in summer. Malabar spinach isn’t a type of spinach. Instead, it is a distant cousin to amaranth, beets, cacti, and ice plants  Malabar spinach leaves (Joydeep) CC BY-SA 3.0 Also known as Indian spinach and vine spinach, Malabar spinach contains high levels of vitamins A and C, calcium, iron, potassium, magnesium, and manganese, and lots of soluble fiber. Young leaves are often used in salads. Crisp and juicy, they are said to taste like a cross between citrus and sweet peppers. Older leaves, which taste more like spinach, are steamed or boiled. Cooked Malabar spinach has a mouth-feel similar to okra. As such, Malabar spinach acts as a thickening agent in stews and other dishes. The flowers are edible, too.  Malabar spinach flowers (Shizhao) CC BY-SA 1.0
_Malabar_spinach_fruit_at_Bandlaguda_02.JPG) Malabar spinach berries (Adityamadhav83) CC BY-SA 3.0 How to grow Malabar spinach
These plants grow best in loose, nutrient-rich soil with a pH of 5.5 to 8.0 and good drainage. Seeds, cuttings, and transplants can be started in early spring in a protected location. Seeds should be planted 1” deep. Once temperatures have warmed, move your Malabar spinach plant to a cattle panel, fence, or trellis. Plants should be spaced two feet apart. As tropical plants, Malabar spinach needs consistent moisture. Water deeply and mulch around the plants to hold that moisture in place. You can grow Malabar spinach in partial shade, but it prefers full sun. Malabar spinach pests and diseases Malabar spinach has few problems for the home gardener. Leaf miners, root-knot nematodes, and tarnished plant bugs may cause feeding damage. Rotating Malabar spinach with amaranth or corn may minimize damage caused by root-knot nematodes. Fungal leaf spot diseases may also occur. As productive and trouble-free as Malabar spinach is, you may want to give it a try in your garden. The tomato mottle mosaic virus was seen first in 2013 in Mexico. It now occurs around the world, and it threatens your tomato and pepper plants. This disease is still relatively rare, but scientists believe that it may be able to infect members of the cabbage family and other members of the nightshade family. Scientists are still sorting out all the details. Symptoms of tomato mottle mosaic Symptoms of tomato mottle mosaic virus include the following:
 Tomato mottle mosaic virus (ToMMV) symptoms. a Tomato. b Pepper. c Chinese lantern d Petunia. e Australian tobacco. f Brazilian tobacco. g Tobacco. h Tobacco. I Tobacco. j Apple-of-Peru. k Napa cabbage. l Mustard. (Li, Yueyue, Wang, Y., Hu, J. et al.) CC BY 4.0 Without flowers, there is no fruit. These symptoms spread rapidly, and the disease is highly contagious.
Tomato mottle mosaic management Scientists believe that ToMMV spreads through plant-to-plant contact and contaminated clothing and tools. Pollinators, contaminated irrigation water, and infected seeds may also help spread this disease. There are no resistant plant varieties. Some studies have shown that this particular virus can break the resistance of our garden plants to tomato mosaic virus and tobacco mosaic virus. This ability has farmers worried, and with good reason. There are no known treatments against tomato mottle mosaic virus (yet), so these preventive tips offer the best course of action:
If you suspect tomato mottle mosaic virus in your garden, collect a sample and contact your local County Extension Office or Department of Agriculture. Working together, we can help slow the spread of this and other plant diseases. Some plants, such as lettuce and broccoli, need a lot of water. Succulents and herbs need far less water. If these plants are grown together, somebody is getting too much, or somebody isn’t getting enough. Hydrozoning refers to the practice of growing plants with similar water needs together.  Watering can (Alexas_Fotos) Pixabay Benefits of hydrozoning Grouping plants with similar water needs makes your job as a gardener easier. Areas that need lots of water get more attention, while areas needing less water can be irrigated less often. This practice conserves water resources. More importantly, it keeps plants healthier and less prone to pests or diseases. Overwatering and underwatering both set the stage for problems in the garden. With mixed water use plantings, some plants are getting the wrong amount of water. By grouping plants according to their water needs, you can provide exactly the right amount of water in each planting area, and everyone is better off. 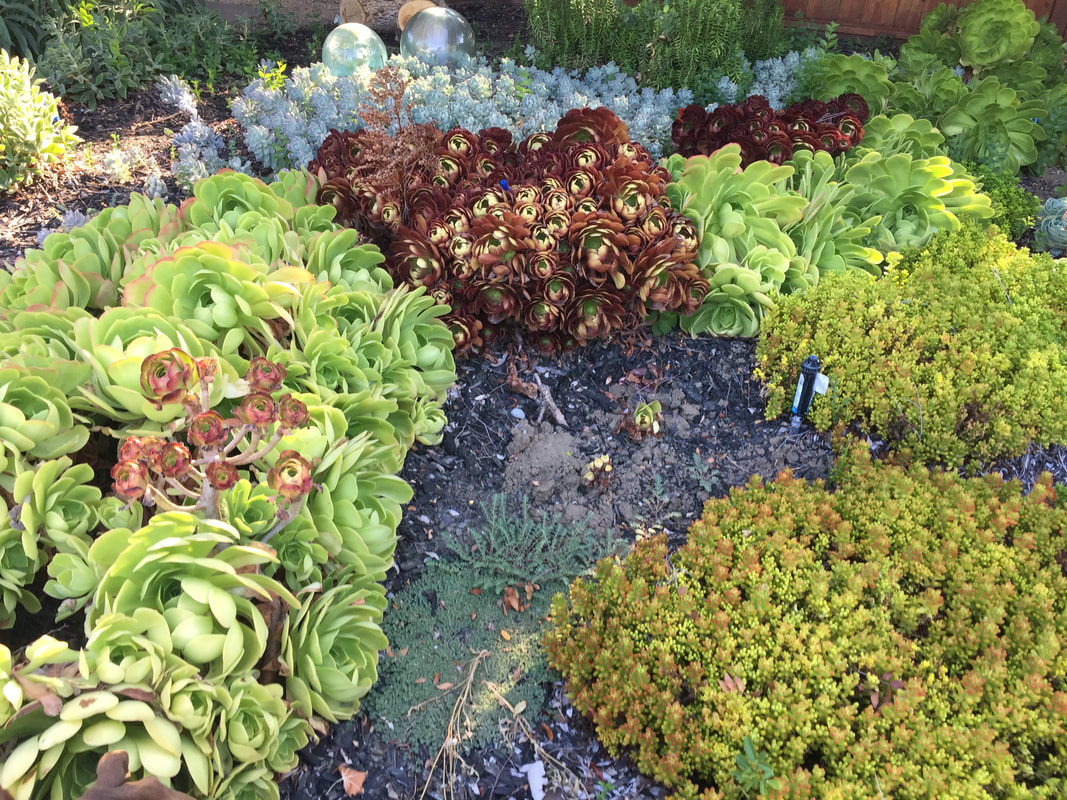 Succulents require very little water, but you can't eat them (Kate Russell) Designing for hydrozoning The easiest way to design your hydrozones is to put plants that need the least amount of water furthest from your water source while placing plants that need more water closer to your hose spigot. Of course, for perennials that are already in place, this isn’t an option. But you can still use the hydrozoning concept. For example, I have several fruit trees in my yard. Each tree has an irrigation ring around it. These trees can use a lot of water in summer. I also grow a fair number of tomato plants. I have found that it simplifies everything, irrigation-wise, to grow my tomatoes around my trees. That way, I put water in the irrigation rings and both types of plants thrive. My potato bed, on the other hand, is at the far back of my yard. Since potatoes rot when overwatered, making it a little less likely benefits me and my plants. You will probably find that crop rotation puts your planting beds closer to or further from your water source from year to year, but you get the idea. 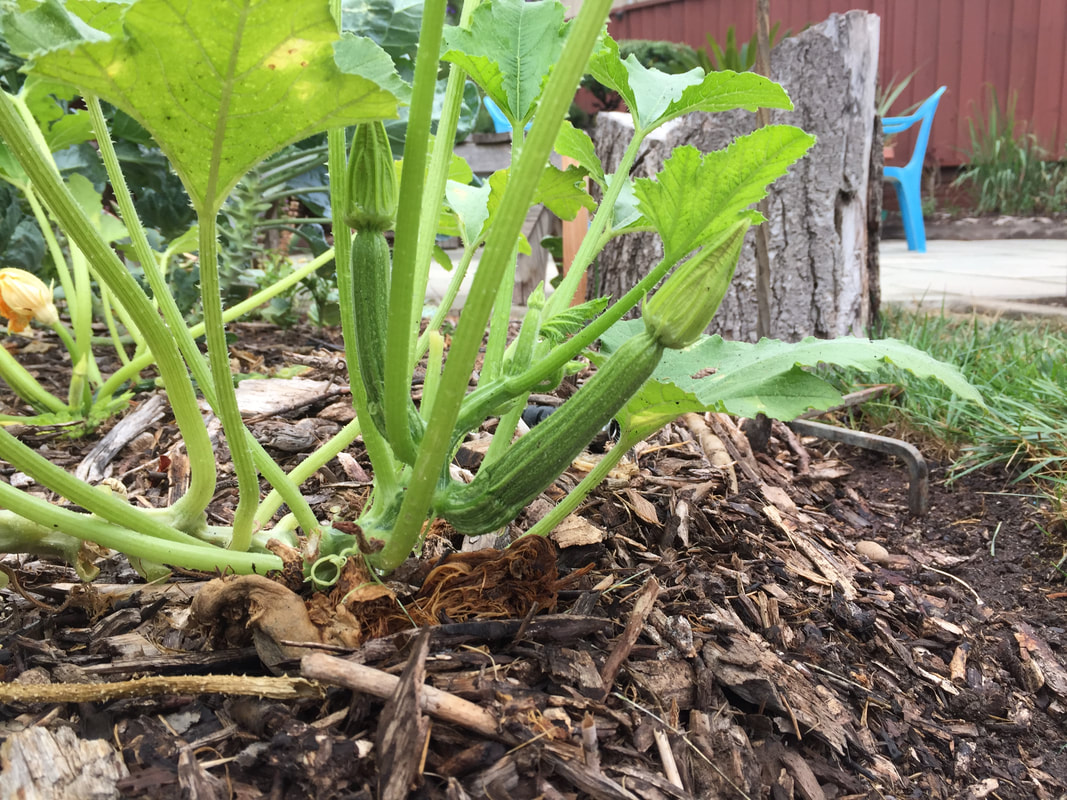 Zucchini grows well next to a fruit tree irrigation ring (Kate Russell) Which plants go into which hydrozones?
Each garden is unique, but we can make some generalizations about which plants have similar water needs. And those water needs are not simply about irrigation. Rooting depth is another factor. Some plants have shallow root systems that need frequent watering in summer. Other plants have deep roots that allow them to collect some water for themselves. And those water needs will change during a plant’s lifetime. Creating fruit or seeds is hard work for a plant and they need extra water to make those beans, squash, and tomatoes. Even those potatoes need more water when tubers are setting.
Keep in mind that specific cultivars may have different characteristics than the rest of their family when it comes to water needs. Tepary beans thrive in deserts, while other bean species need more frequent watering. You may have to experiment with hydrozones in your landscape, but that’s okay. It’s one of the joys of gardening, in my opinion. One project or plant may feel like a disaster one year. The next year, it may be a complete success. As you learn more about your soil and the plants you grow, the better able you will be to give them the water and care they need to thrive. Hydrozoning is one way to achieve that goal. Gummy stem blight is a fungal disease of cucumbers, melons, pumpkins, squash, watermelons, and other cucurbits. Gummy stem blight (Didymella bryoniae) is responsible for crop losses of up to 30% when it occurs, but there are steps you can take to prevent it. First, you need to know what it looks like. 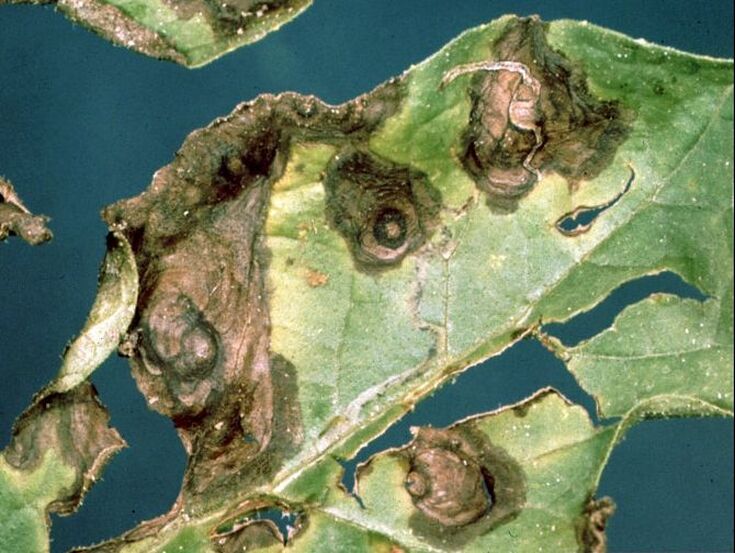 Watermelon leaves with severe gummy stem blight symptoms (Clemson University - USDA Cooperative Extension Slide Series, Bugwood.org) CC BY 3.0 US Gummy stem blight symptoms Plants infected with gummy stem blight show symptoms on leaves, stems, and fruit. Symptoms can vary, depending on the host plant. Generally, leaves develop circular, water-soaked lesions that start light brown and turn dark. These lesions may develop yellow halos or change shape. When they dry, they may crack and then fall away. Leaf edges (margins) may also turn dark brown.. 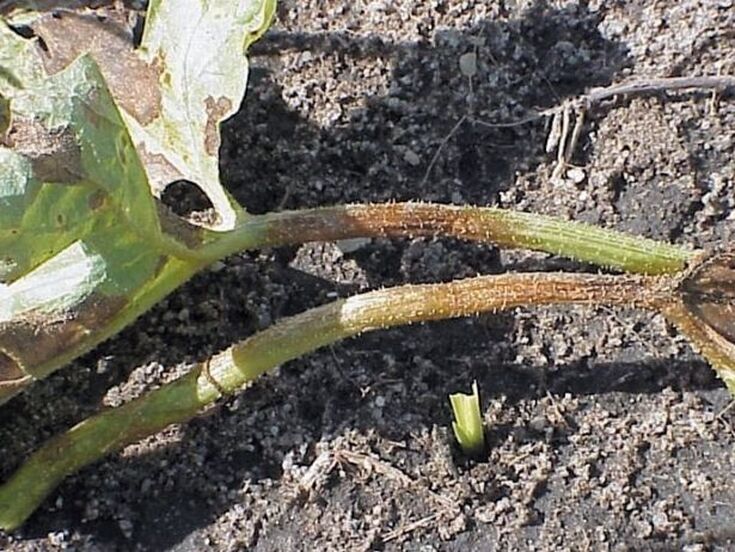 Gummy stem blight on watermelon (David B. Langston, UGA, Bugwood.org) CC BY 3.0 US Infected stems have water-soaked areas that turn tan. In some cases, those areas evolve into dark cankers that may contain fruiting structures that look like black pepper. These fruiting bodies are called pycnidia [pik-NI-dea]. These cankers often discharge a gummy brown ooze, hence the name. That ooze can collect into reddish-brown or black beads, making it easy to confuse this disease with Fusarium wilt. Plants infected with Fusarium wilt won’t have the black pycnidia seen in gummy stem blight. New seedlings infected with gummy stem blight look like they absorbed too much water and are darker than healthy plants. 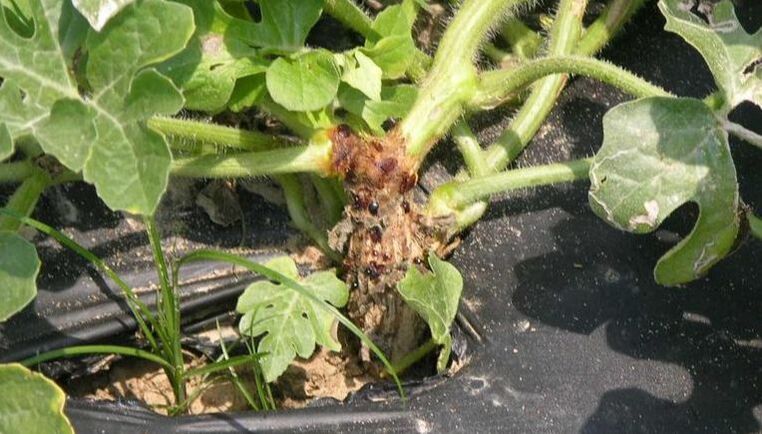 Gummy stem blight lesion at the base of a watermelon plant. (Don Ferrin, Louisiana State University Agricultural Center, Bugwood.org) CC BY 3.0 US Fruits infected with this pathogen are often said to have black rot. But this is not the bacterial black rot disease that affects members of the cabbage family. Fruits infected with gummy stem blight start rotting at the stem end, making it look like an upside-down version of blossom end rot. Fruit rot can also occur from the inside out. Gummy stem blight disease cycle Gummy stem blight spores are common in the environment. This disease is both seed- and soil-borne. For infection to occur, there must be enough heat and moisture for fungal spores to germinate. This disease is most likely when humidity levels are above 85% and temperatures are between 68°F and 77°F. Leaves that stay wet for more than one hour provide the moisture needed for spores to germinate and penetrate healthy plant tissue. Spores also enter through plant wounds created by insect feeding, happy dogs, and other garden visitors. Other diseases, such as powdery mildew, can also weaken a plant, making it easy for fungal spores to take hold. Once it enters a plant, this pathogen moves to the stems, where cankers start forming. 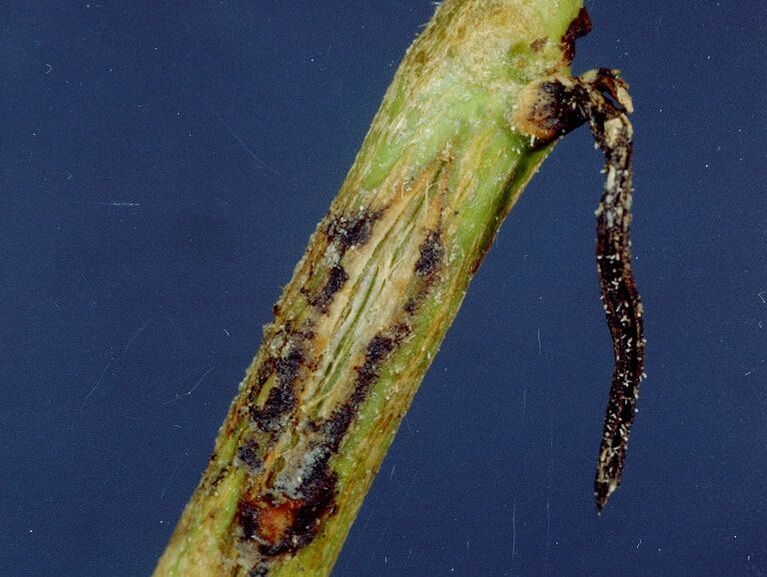 Watermelon stem infected with gummy stem blight (Clemson University - USDA Cooperative Extension Slide Series, Bugwood.org) CC BY 3.0 US Gummy stem blight management
Remove infected plants and toss them in the trash bin. Two- or three-year crop rotations, removing plant debris at the end of each growing season, and maintaining proper plant spacing help prevent gummy stem blight. And keep those leaves dry by avoiding overhead watering. While no resistant varieties are available, you can buy seeds treated for gummy stem blight. Four-lined plant bugs are sap suckers. This means they have piercing mouthparts, similar to their cousins, tarnished plant bugs and capsid bugs. Small populations can be ignored, but things can get out of hand. Four-lined plant bugs (Poecilocapsus lineatus) are traditionally found east of the Rocky Mountains, but that can always change.  Four-lined plant bug (Judy Gallagher) CC BY 2.0 Four-lined plant bug identification Four-lined plant bugs look like small beetles, but they lack the characteristic hardened wing covers. They are greenish-yellow with four distinct black stripes running the length of their wings. The head is orangish-brown, with prominent red eyes, and they average ¼” long or a little more. Newly hatched nymphs are bright red with black wing pads. If you flip one of those nymphs over, you’ll see black spots on the abdomen. As they mature, nymphs turn more orange, and a stripe develops on the wing pads. 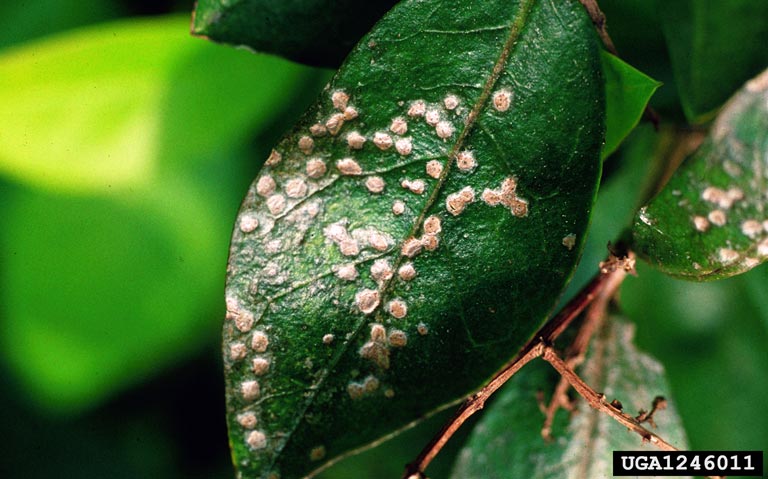 Four-lined plant bug leaf damage (Whitney Cranshaw, Colorado State University, Bugwood.org) CC BY 3.0 US Damage caused by four-lined plant bugs Adults and nymphs feed on basil, cucumber, currants, gooseberry, lavender, mint, oregano, peppers, and sage. They also suck the vital fluids from several flowers and woody shrubs, including azalea, butterfly bush, dogwood, geraniums, Shasta daisy, and zinnia. As they pierce plant cells and siphon out sugary liquids, dark, round, sunken spots appear. Those spots range from 1/8” to 1/16” in diameter. Those spots may turn black or translucent. After a few weeks, the dead plant tissue falls away, leaving holes in leaves. These holes are commonly mistaken for leaf spot disease. If leaf holes have discolored edges, they are more likely to be bacterial or fungal disease than insect feeding. Distorted growing tips may also occur. 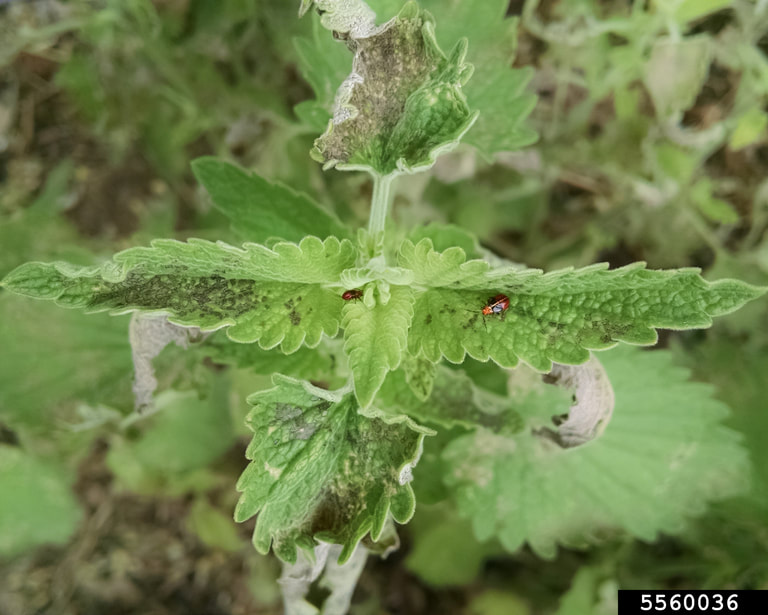 Four-lined plant bug (young and late nymphs) feeding on catnip, with visible damage to new growth. (Matthew Borden, Bartlett Tree Experts, Bugwood.org) CC BY 3.0 US Four-lined plant bug lifecycle
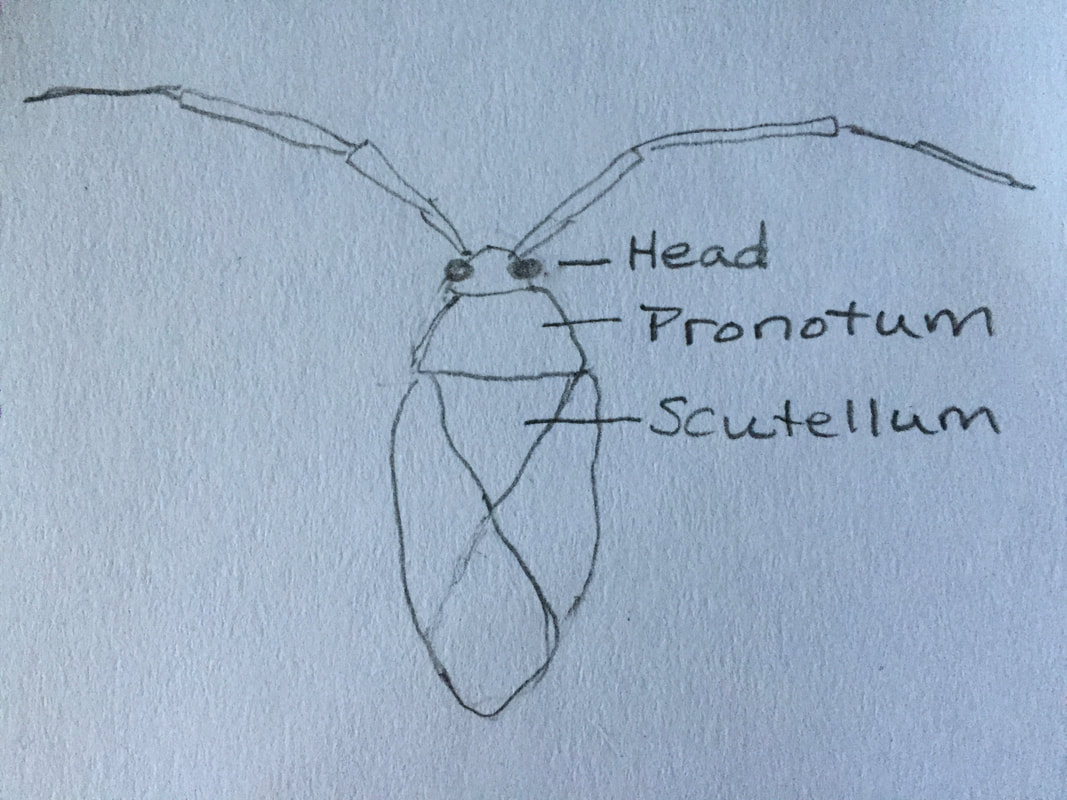
Four-lined plant bug nymphs emerge in late spring and start feeding on the upper side of leaves. One month later, they molt and become adults. Those adults continue eating as they look for a mate. Females then cut 2” vertical slits into stems where they lay six or more banana-shaped eggs. Adult feeding continues through mid-summer. The next spring, those eggs hatch, and the cycle continues. Four-lined plant bug management Unless the infestation is severe, you don’t need to do anything about four-lined plant bugs. Monitor your plants for signs of infestation as you work in the garden. Don’t be surprised if one of these pests falls to the ground if you surprise them. They tend to panic that way, even though they can fly. They are also known to try hiding from us behind stems as we pass by. And they move quickly. If four-lined plant bug infestations become troublesome in your landscape, you can reduce their numbers by removing the aboveground portion of host plants in autumn and tossing them in the compost pile. Composting destroys many eggs before they have a chance to hatch. Treat severe nymph infestations with insecticidal soap or neem oil. These treatments aren’t very effective against adults. I have no idea why. Tattered leaves, distorted flowers, and corky fruit may indicate capsid bugs. .jpg) Nettle capsid bug and leaf damage (Line Sabroe) CC BY 2.0 Capsid bug identification There are several capsid bug species, but they all have one thing in common: a triangle on their back. Capsid bugs can be green or brown and up to ¼” long. They fold their wings over the abdomen. The 2/3 of the wings closest to the body are darker and thicker-looking. The outer third is translucent, showing a diamond-shaped area on the insect’s rear end. Nymphs are pale green and wingless. Some of the more common capsid bug species include:
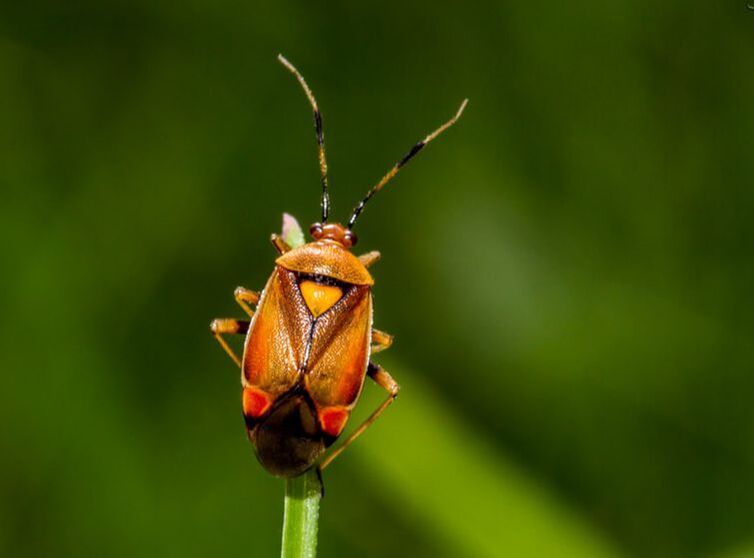 European predatory capsid (Nikk) CC BY 2.0 Capsid bug hosts Capsid bugs feed on many different flowers, including butterfly bush, chrysanthemums, clematis, dahlia, fuchsia, hydrangea, roses, and salvia. They can also be found on apples, beans, and pears. Some capsid bugs are predators. Capsid bug damage Early capsid bug damage is easy to overlook. What starts as several small leaf holes can transform into something that looks like gale force shredding. Leaves growing near shoot tips may also be misshapen with several small, brown-edged holes. Flowers often become distorted. Apples and pears develop corky growths where capsid bugs fed on them during their early development. These bits can be cut off. The rest of the fruit is fine. 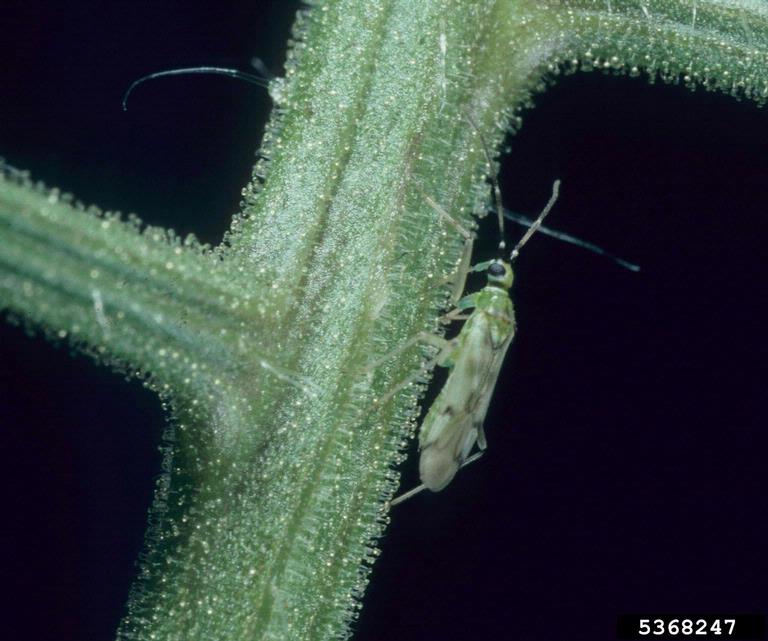 Green tobacco capsid (Merle Shepard, et al, Insects and their Natural Enemies…, Bugwood.org) CC BY 3.0 US Capsid bug lifecycle Capsid bugs are true bugs, which means they have mouthparts designed for piercing and sucking. These pests are active in late spring through summer. They lay their eggs in the bark of twigs and branches. Those eggs hatch in spring. Except for the tarnish bug, which overwinters as an adult. Depending on the species, there can be one or two generations each year.  Delicate apple capsid (Mick Talbot) CC BY 2.0 Capsid bug management
Minor capsid bug infestations can be ignored. The threat of capsid bug feeding can be reduced by planting resistant cultivars. Capsid bug management starts with monitoring susceptible plants, starting in spring, and removing weeds from around those plants. At the end of the growing season, remove plant debris from around these plants, as well. This eliminates hiding and overwintering places for capsid bugs. Birds and ground beetles eat capsid bugs, so making the garden safe and appealing for them will help. Severe infestations can be treated with summer oils, neem oil, or pyrethrum [not pyrethroids]. It would be nice to think of spotted lanternflies as Asian equivalents to our gentle fireflies of summer evening fun, but that would be a mistake. According to Penn State, lanternflies “could be the most destructive species in 150 years.”  Adult spotted lanternfly (Walthery) CC BY-SA 4.0 Native to China and India, invasive spotted lanternflies (Lycorma delicatula) were first detected in the U.S. in 2014. But it appears they snuck in on shipments of stone, woody plants, firewood, wood products, landscaping materials, and outdoor furniture two or three years before that. [Why in the world we are shipping stones from China is beyond me…] Today, spotted lanternflies occur in several states, and they threaten gardens and farms everywhere. There are also serious concerns about our nation’s forests. Crops vulnerable to spotted lanternflies include apple, cherry, chestnut, grape, hops, nectarine, peach, pear, plum, and walnut. Vulnerable ornamentals include birch, maple, pine, poplar, and rose. Its favorite host is the tree-of-heaven (Ailanthus altissima), also known as Chinese sumac, and varnish tree (because of its stinky odor). There may be more plants at risk. We don’t know yet. What we do know is this—we need to report these pests every time. Let’s learn how.  Spotted Lanternfly (Lawrence Barringer, Pennsylvania Department of Agriculture) Public Domain Spotted Lanternfly identification As far as bugs go, spotted lanternflies are rather pretty. They are large, mothlike bugs, approximately one inch long and an inch-and-a-half wide. Adults have a black head and grayish-brown forewings with black spots. The plump abdomen is yellowish with black and white stripes. If you see one in flight, you’ll see that they have red underwings and a white triangle in the middle of the wing. Their hindwings have a brick-and-mortar pattern around the edge of the wings. Spotted lanternfly lifecycle Yellowish-brown eggs are laid in inch-long, rectangular masses on stones, smooth-barked trees, or other vertical surfaces. These egg masses are covered with a gray or yellowish-brown waxy coating and are referred to as egg cases. Each cluster contains 30–50 eggs. In spring, the eggs start to hatch. Wingless nymphs go through several developmental stages, or instars, before reaching adulthood. The first instar is black with white spots. As they develop, red spots become visible. In the final instar, the upper body is red, and you can see red wing pads if you look closely. These spotted lanternfly nymphs crawl or hop to feed on a wider variety of plants than adults. I guess as they mature, their taste buds change. By midsummer, adults are actively seeking mates and wreaking havoc in gardens, fields, and orchards. While lanternflies can fly, they seem to prefer jumping. Eggs are laid starting in autumn and ending as winter arrives. Late season eggs overwinter unseen, and the cycle begins again in spring.
Because this pest is new on the scene, there is a lot we don’t know. While spotted lanternflies have natural enemies in China, that may not be the case elsewhere. At this point, the Pennsylvania Department of Agriculture makes the following recommendations:
There may still be time to eradicate spotted lanternflies from North America, but only if we all keep our eyes open and report any sightings. I can’t stress this enough: if you see a spotted lanternfly, catch it, kill it, and report it to your local County Extension Office or Master Gardeners. Bright yellow, red, or purple leaves may indicate beet western yellows, though this plant disease is not limited to beets or the west. Beet western yellows virus is responsible for significant losses in many global crops. Unfortunately, free-to-use photos are not as readily available. You can search online to see what this disease looks like. Beet western yellows host plants This disease occurs on over 250 plant species, including beets, broccoli, cabbage, canola, cauliflower, chickpeas, endive, escarole, fava beans, lentils, lettuce, mustard, peas, peppers, radish, spinach, sunflowers, tomatoes, turnips, and oilseed rape. Oilseed rape is a member of the cabbage family grown for its oily seeds and as food for livestock. It can also occur on annual phlox, bee’s friend, false flax, and lupine. Weeds that harbor beet western yellows include chickweed, common groundsel, prickly lettuce, little mallow, shepherd’s purse, sowthistles, and pennycress. [Even though it is a weed, pennycress is commonly used to salvage toxic soil through phytoremediation.] 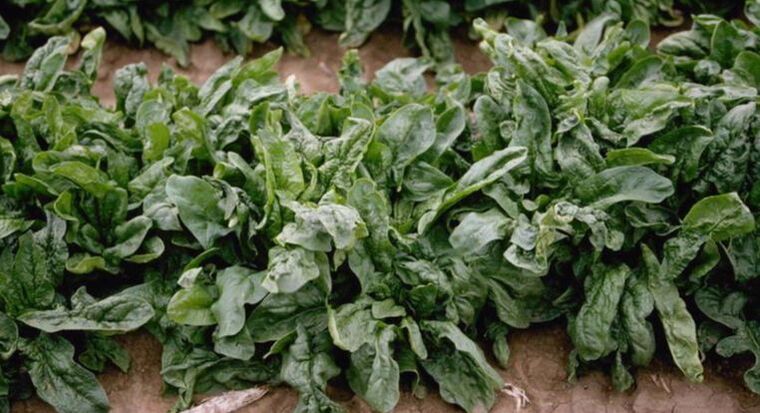 Spinach plants infected with beet western yellows (Howard F. Schwartz, CSU, Bugwood.org) CC BY 3.0 US Beet western yellows virus symptoms
Symptoms of beet western yellows infection vary depending on the affected species and the virus strain, making diagnosis tricky. Most plants infected with BWYV don’t show any signs at first. Then red, blue, purple, or black discolorations that start at the tips and edges of leaves appear. Eventually, the entire leaf turns bright yellow or orange. Petioles and veins remain green or may be pale. Infected leaves feel thick and brittle, and they may curl upward. Stunting is common, and leaf crinkling may occur. These symptoms look similar to iron or nitrogen deficiencies or chemical overspray. Beet western yellows virus management Aphids spread beet western yellows. Green peach and wheat aphids are the biggest culprits, though other aphid species are involved. So, the best way to prevent and manage beet western yellows is to control aphids and eliminate rouge host plants. Also known as turnip yellows and turnip mild yellows, some cultivars are resistant to this disease. Look for the letters TuYV, BWYV, and TuMYV on plant labels. Buying resistant plants makes your job a lot easier. Avoid planting too early in a season, as this can make plants more vulnerable to beet western yellows. Toss infected plants in the trash. There are no chemical controls for viruses (yet). Asian bean thrips were first seen on US soil in March 2020, in Florida. Native to tropical Asia, this pest now ranges from Japan to Australia. And in March of 2021, it was found in Central America, in Belize. It’s probably only a matter of time until it spreads to our gardens, so let’s see what we’re up against. 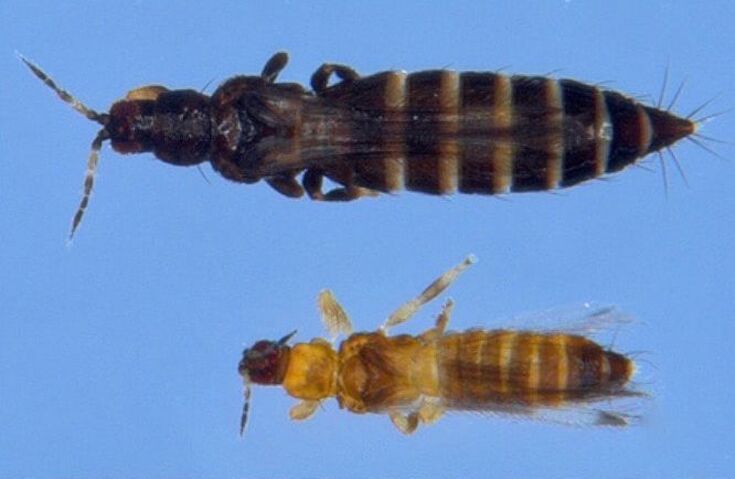 Asian bean thrips male (left), female (right). Note white antennae bands. (Felipe N. Soto-Adames, FDACS-DPI) Public Domain Asian bean thrips damage Asian bean thrips (Megalurothrips usitatus) suck the sap out of snap bean, cowpea, lima bean, peanut, and soybean plants. And potatoes. They also feed directly on host plants. This feeding usually begins in the flowers. Pods and growing tips become deformed and twisted, with streaks of russeted reddish-brown where thrips feeding has occurred. Heavy infestations can cause stunting, wilting, and poor pod set. In China, Asian bean thrips are responsible for crop losses of 30% to 100%. 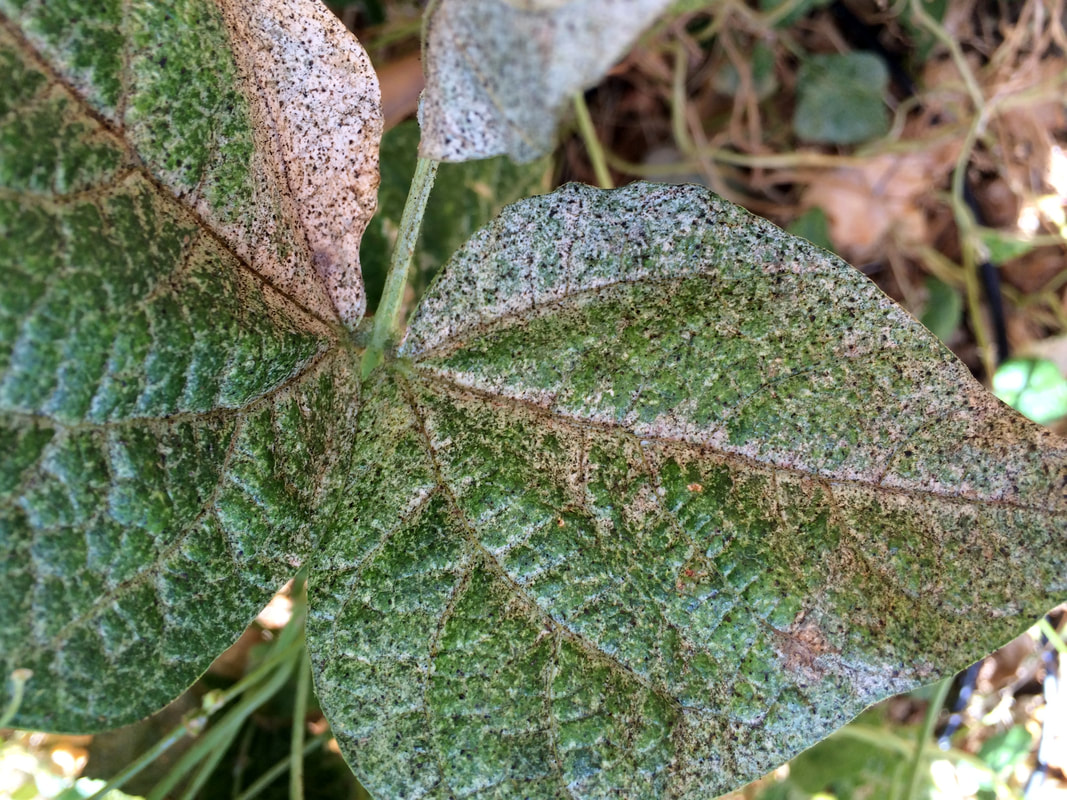 Thrips feeding damage to bean leaf (Scot Nelson) Public Domain Asian bean thrips identification
To me, Asian bean thrips look like hoverflies with pointy rear ends. They are very small. You could almost fit 10 females across the face of an American dime. Males are only half that size. Size isn’t the only difference. Females are black, with yellow or white bands. Their wings are banded, too. Males are yellow, with a similar but less defined banding pattern. Both males and females have black antennae with white bands. Larvae start yellow but turn red as they near adulthood. Asian bean thrips lifecycle These pests love warm weather and they can complete their lifecycle in as little as 10 days. Eggs are inserted into flowers, leaves, and pods. After hatching, larvae go through two molts over 2 or 3 days before dropping to the ground to pupate. Pupae seem to prefer moist, sandy soil, so they probably won’t feel welcome on my sun-scorched clay, but I’ll still keep a lookout. Just in case. Adult Asian bean thrips feed on pollen, mate, and lay eggs. If no mate is available, they can reproduce without them. This ability is called parthenogenesis and it is why aphid populations can seem to explode overnight. I can only imagine that Asian bean thrips populations can do the same thing. Asian bean thrips management Since this invasive pest is new to North America, we’re not really sure what we’re up against. Many beneficial insects eat thrips, but we don’t know their efforts will be enough. We’re not even sure if those garden helpers like the taste of Asian bean thrips. All we can do is hope. Actually, we can also remove plant debris once a crop has finished its cycle. Adding that plant material to the compost pile may help reduce hiding places for this new pest. Since thrips, as a group, are known to develop resistance to pesticides rather quickly, chemical sprays are not recommended. My guess is that mechanical control methods, such as diatomaceous earth (DE) and sticky barriers may help. They can’t hurt. If you think you have Asian bean thrips in your garden, try to catch one or take a picture and reach out to your local Master Gardeners, County Extension Office, or Department of Agriculture. Those groups work hard to protect our gardens from invasive pests, and we can help them with any information we might have. Chubby, round peas tearing through your garden without their pods is not pea streak, but it does conjure a cute mental image.
Unfortunately, there isn’t anything cute about pea streak virus (PeSV). Aphids carrying this viral disease spread it as they feed. The virus responsible for pea streak also causes chickpea wilt. Pea streak symptoms Stems of infected plants develop dark brown, gray, or purple longitudinal streaks. These streaks are similar to those caused by alfalfa mosaic and bean yellow mosaic. Infected plants produce deformed pods that have sunken areas. The pods do not fill out, and many leaves wither and die. Dieback starts at the growing tips and moves toward the center of the plant. Pea streak management There are no chemical treatments for pea streak. All you can do for infected plants is remove them and toss them in the trash. You can reduce the likelihood of pea streak in your garden by starting with certified disease-free seeds and seedlings and removing potential hideouts. Aphids infected with the pea streak virus often hide in alfalfa, clover, and other perennial legumes. Bean plants can be surprisingly prolific, and the fresh, crisp beans are a treat. Except sometimes things go wrong. Sometimes, bean plants turn yellow. It is normal to see lower, older leaves turn yellow and fall off. When entire plants start turning yellow, there's a problem.  Green beans (flockine) Pixabay Bean leafroll virus (BLRV) goes by many other names: chickpea stunt virus, pea leafroll virus, legume yellows virus, and pea yellow top virus are just a few. Bean leafroll is a luteovirus infection spread by aphids. And this luteovirus attacks more than just peas and beans. Once found only in peas and beans, bean leafroll has spread to include alfalfa, chickpeas, lentils, soybeans, and many other legumes. It can also occur in clover and vetch. 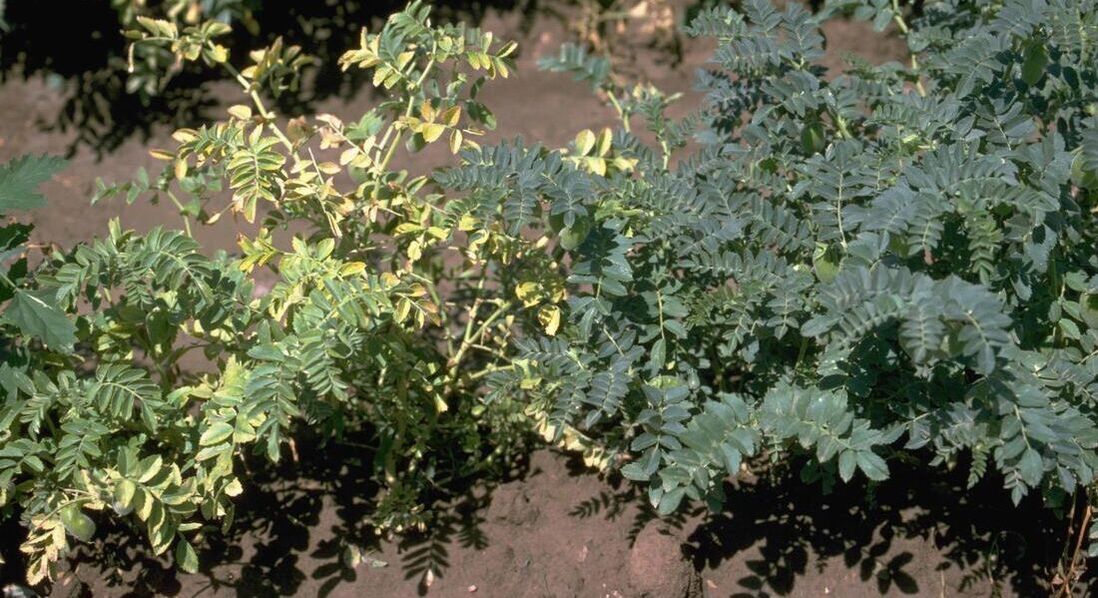 Chickpea plant infected with bean leafroll virus (Howard F. Schwartz, CSU, Bugwood.org) CC BY 3.0 US Bean leafroll virus symptoms
Plants infected with bean leafroll turn yellow, and the leaves curl. This chlorosis occurs between the leaf veins. Stunting is common. These symptoms are similar to beet western yellows virus (BWYV) and nutrient stress. Symptoms can vary between species. In addition to these symptoms, these species-specific symptoms may occur:
There can be a 50% to 90% reduction in pod production due to bean leafroll. In some cases, symptoms may appear and then fade away, creating a problem since the plant is still infected, and any aphids that feed on it can then spread the disease to neighboring legumes. Bean leafroll virus management The best way to reduce the chance of bean leafroll from occurring in your garden is to control aphids —easier said than done, I know. While you can dislodge aphids with a strong spray from your garden hose, not all plants take kindly to that treatment. Neem oil and insecticidal soaps are organic methods of aphid control. Removing other host plants, such as burr medic and subterranean clover, can help reduce the spread of this disease. Since aphids and aphid eggs are brought into your landscape on other plants, putting new plants into quarantine is always a good idea. There is no treatment for the bean leafroll virus. Remove infected plants and throw them in the garbage. Watch for resistant varieties being made available. They will have BLRV somewhere on the label. Finally, you can break this disease cycle by rotating your legumes with cereal crops, such as barley, corn, millet, or oats. There are two types of torus in the plant world. One is related to flowers, and the other is a donut-shaped plug that protects plants when they cavitate. 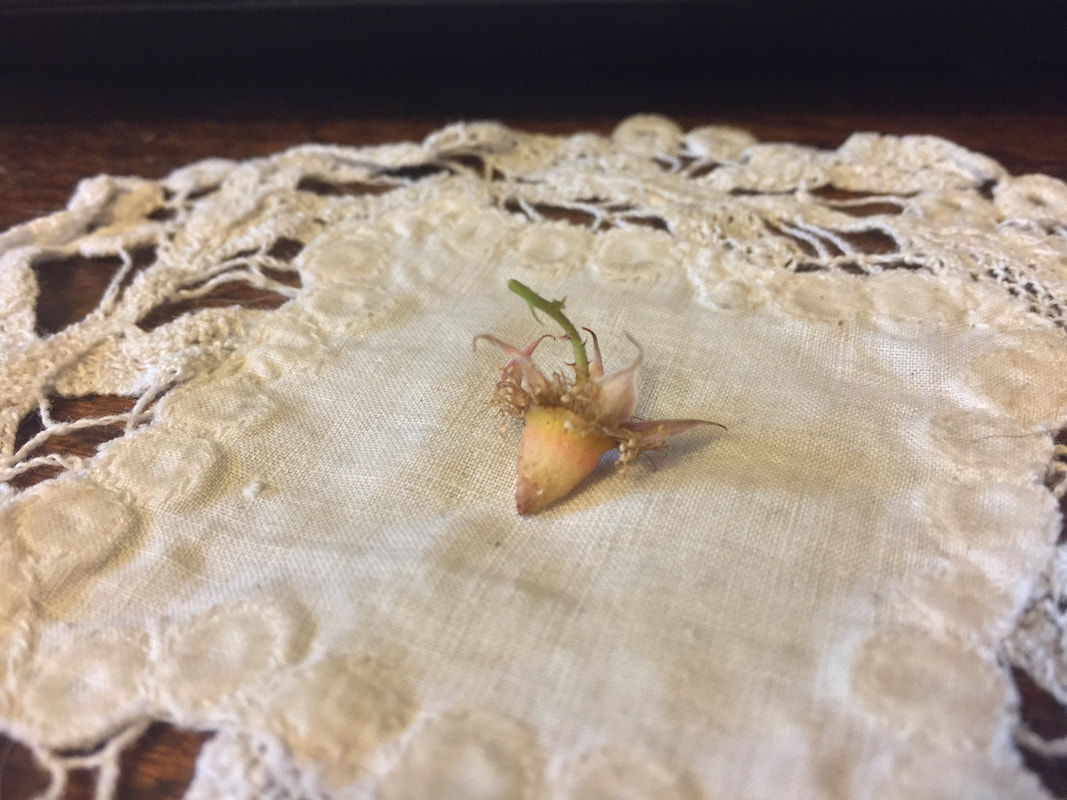 Raspberry torus (Kate Russell) Xylem torus The donut-shaped plug variety occurs within the xylem. The xylem is part of the vascular bundle that pulls water from the ground. The torus found within the xylem protects plants from cavitation. Cavitation occurs when the water pressure within the plant is greater than the atmospheric pressure outside the plant. You can hear it happening to trees in summer. It sounds like a large crack. Cavitation causes sap to vaporize, creating embolisms. The torus, held within a pit called the torus-margo structure, acts as a plug. This plug reduces the spread of the embolism. #/media/File:Torus_and_Margo.png) Diagram of a torus-margo structure, top open and bottom closed Note how the margo flexes under stress. (Pagliaccious) CC BY 4.0 Flowering plant torus The place where a stem meets a flower is called the torus, or receptacle. The torus is the thickened part of a stem from which flowers emerge. Accessory fruits, such as apples and strawberries, grow from the torus. And it is the way you can tell blackberries from raspberries! That mammoth sunflower head? It’s a torus, too. Types of flowers The torus is found at, below, or surrounding a plant’s reproductive organs, depending on the species. Flowers can be hypogynous, perigynous, or epigynous. Don’t let the words scare you off. The -gynous part of these words means it refers to the Lady Parts of your plant. Stamens and petals are below the ovaries (or gynoecium) of hypogynous flowers. They are at the same level in perigynous flowers. The ovary is enclosed in the torus of epigynous flowers, with the petals and other parts above. You can use this information to help identify plants and win at Scrabble. #/media/File:Ovary_position.svg) Gray torus in relation to red ovary in hypogynous (I), perigynous (II), and epigynous (III) flowers (Ulf Mehlig) CC BY-SA 2.5 Raspberry or blackberry? Do you know how to tell blackberries and raspberries apart? It’s not the color. There are black raspberries and red blackberries. The only way to tell the difference between blackberries and raspberries is to look at the way the fruit comes away from the torus.
If the torus comes with the fruit, it is a blackberry. If the torus breaks away from the fruit, it is a raspberry.
Now you know. I was so inspired by Linda King’s guest post, Gardening With Nature, that I decided to transform my backyard lawn into a meadow, as well.  Meadow (RÜŞTÜ BOZKUŞ) Pixabay Living in California, the first, most obvious reason for shifting a lawn to anything else is water conservation, but there are several other reasons to let nature take its course. Within reason. For many years I thought California was called the Golden State because of the gold mining. It ends up that the name refers to the hillsides turning a golden brown as everything dies in the scorching heat. My lawn was no exception. My normal summer landscape is green where I water it and brown where I don’t. Until July. By that time, most of the lawn is brown no matter what we do. We made every attempt to make our lawn look like a golf course. In California, that’s pretty unreasonable when you consider how much water a lawn takes. No matter what we did, the scorching summer sun would burn our green grass to a crisp. We watered. We edged and weed-whacked. We mowed. We aerated. We altered the pH and added missing soil amendments after a lab-based soil test told me my soil had no iron and too much of everything else. For 2–4 weeks of the rainy season, we have a beautiful lawn. That’s in February. The rest of the year has been a struggle. After reading Linda’s post, I decided what the heck. We stopped mowing. We stopped edging. We pretty much left it alone. What happened surprised us. Before I tell you what happened, let’s find out more about meadows. 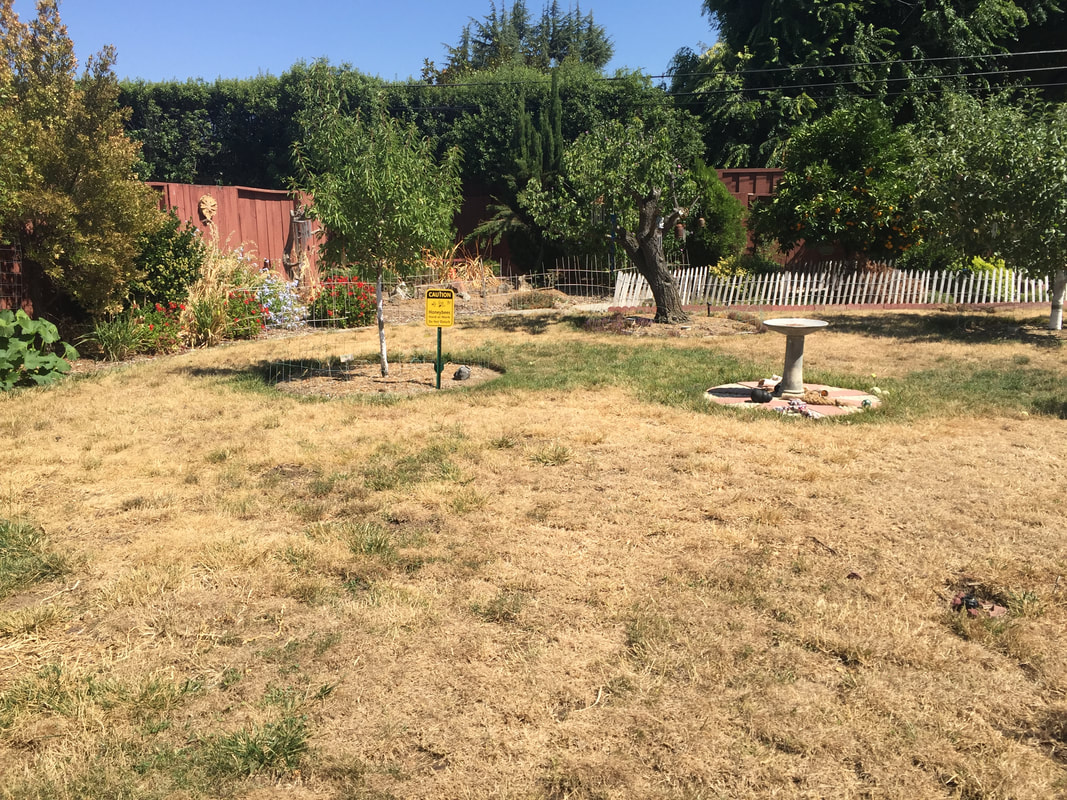 Sun-scorched summer lawn (Kate Russell) What is a meadow? Meadows are open habitats that feature grasses, herbs, and other non-woody plants. There can be occasional trees or shrubs, but the main idea is an open field. Traditionally meadows were used to grow hay for livestock. The word meadow comes to us from the Old English mǣd, which came from the Germanic word for mow. Returning to our open field concept, meadows feature a variety of plants. This means there can be all sorts of flowers, seeds, and vegetation occurring at the same time, changing with the seasons. This makes food and habitat available to many amphibians, birds, insects, and reptiles that see lawns as desolate, unforgiving landscapes. Types of meadows I never gave it much thought before. It ends up that there are different kinds of meadows. They can be agricultural, transitional, perpetual, or urban. Agricultural meadows are those we mentioned earlier that are allowed to grow on their own to produce hay for livestock. Agricultural meadows are similar to pastures except that pastures are grazed during the summer and meadows are not. Transitional meadows are more of the wild and woolly type. They are not mowed or grazed. They are just left to flower and go to seed. Transitional meadows generally do not last long. Perpetual meadows occur naturally in a variety of environments. Alpine, coastal, desert, prairie, and wetlands are the primary types but there are others. Perpetual meadows reach a point of balance, an equilibrium that we can rarely replicate. Which leads us to urban meadows. Urban meadows are the ones we create. Urban meadows are gaining in popularity as we learn more about the importance of biodiversity and least harm to the environment. As honey bee and monarch butterfly populations decline, many other creatures are at risk due to habitat loss. Urban meadows allow pockets of natural habitat to co-exist along with our driveways, air-conditioners, and patio furniture. My meadow I live across the street from a park. This means seeds (and trash) are blowing in all the time. I used to see those seeds as weed sources. Now I recognize that they are the plants that grow in my yard without any help. In less than two weeks, seed heads have started appearing in what used to be my lawn. Goldfinches, Black Phoebes, California Towhees, and other birds I have yet to identify are now visiting my yard regularly. There are more butterflies, lacewings, and hoverflies, too. 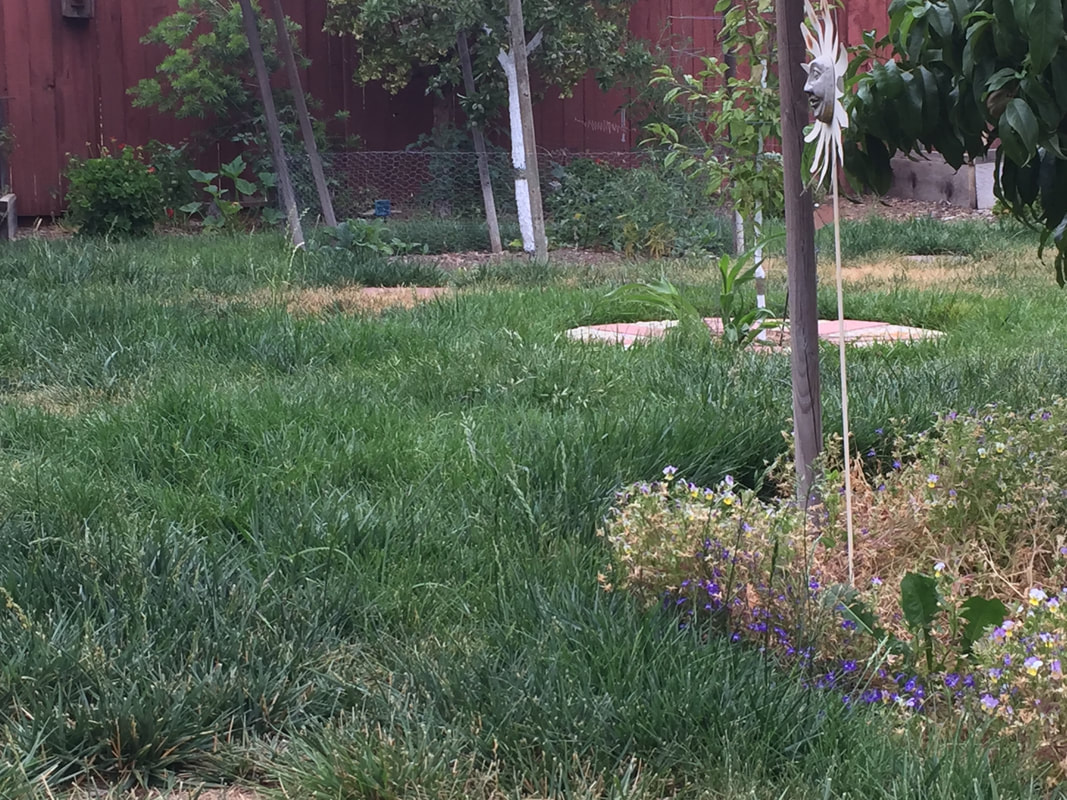 My meadow looks and feels better for everyone! (Kate Russell) Hiding under a self-watering container now lives a tiny lizard I affectionately refer to as Little Buddy. Little Buddy is the offspring of an alligator lizard that lives near one of my raised beds. I hope they stay. The grass that was struggling is now 4” tall and still green. It’s even putting out seeds of its own. There are still brown patches but I expect they will be filled with herbaceous plants without any effort on my part at all. That doesn’t mean I’m completely off the hook by having a meadow. Urban meadows may not require watering, fertilizing, mowing, or edging, but you do need to be vigilant about invasive plants, unwanted weeds, such as foxtails, and disease. 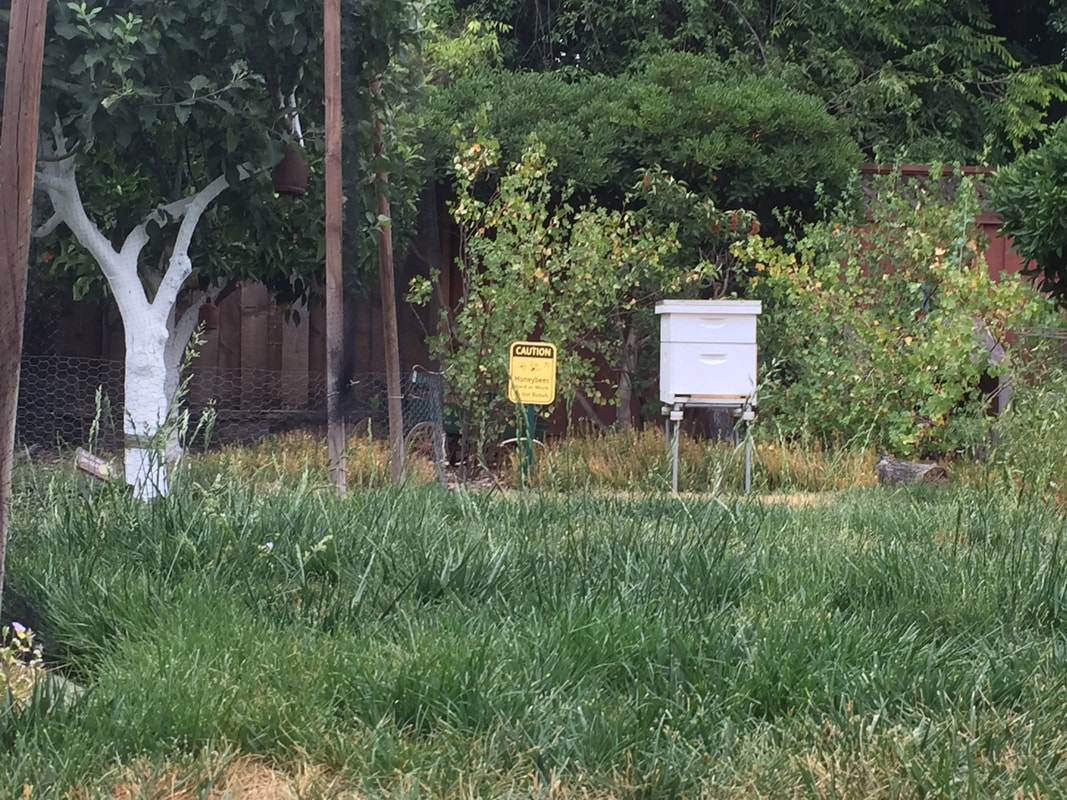 There is so much more life in a meadow! The bees seem happy about it, too. (Kate Russell).jpeg Instead of a manicured (temporary) lawn, I now have a softer, richer environment that features more variety and takes less work. I’ll probably toss out some native flower seeds just to see what happens. Instead of working my lawn, I can now sit back and enjoy watching my meadow.
Thanks, Linda! |
Welcome!You can grow a surprising amount of food in your own yard. Ask me how! To help The Daily Garden grow, you may see affiliate ads sprouting up in various places.
You can also get my book, Stop Wasting Your Yard!  Index
All
Archives
April 2024
|


.jpg)
.jpg)
 RSS Feed