|
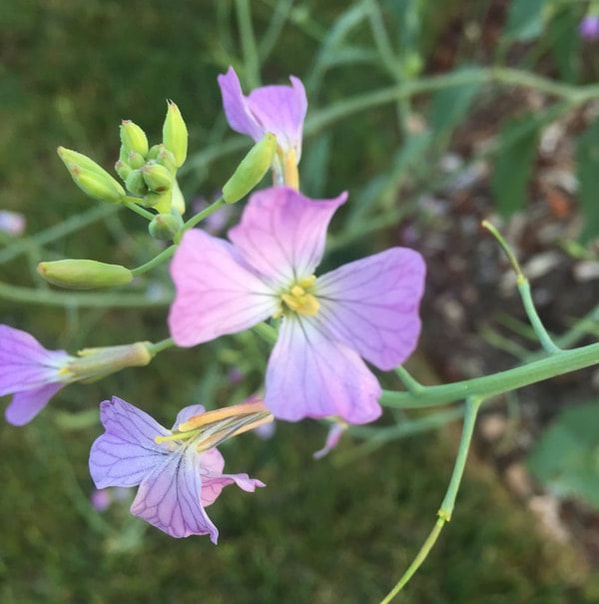
Condiment or cover crop, mustard’s sunny yellow flowers, tasty seeds, and deep tap roots make it a useful plant worth learning about.  Mustard field in Spain A member of the Brassica family, mustard is a popular hot dog condiment and a cheery yellow weed that grows in even the driest areas. Before ripping out any stray mustard plants in your garden, consider these benefits:
As mustard nears the end of its life cycle, you can feed the soil or feed yourself. By mowing the plants before they go to seed, nutrients are added to the soil. If the plants are allowed to go to seed, the seeds can be collected and used in cooking or to make your own prepared mustard. The condiment is made by combining crushed seeds with vinegar and water. The leaves (greens) are also edible and oil can be extracted from the seeds. Mustard is related to radishes and turnips. People have been growing it for nearly 4,000 years. There are three basic types of mustard: white (Sinapis hurta), black (Brassica nigra), and oriental (Brassica juncea). White mustard is most commonly used as a cover crop. Related to jasmine, lilacs, and Forsythia, olive trees have been cultivated since the Bronze Age, some 6,000 years ago, for oil, fruit, and wood.  Ripe olives (Hans Braxmeier) Pixabay
Growing olives
Unpruned trees can reach a height of 26-49 feet. The trunk tends to twist and becomes beautifully gnarled as it ages. Olive trees are evergreen, retaining their oblong, silvery leaves year round. Small white flowers occur on the previous year’s growth, which then produce the olive fruit. Some people are allergic to the pollen of the olive tree. Botanically, the fruit of an olive tree is known as a drupe, as are plums, cherries, and almonds. Olive trees (Olea europaea) prefer soil that is less than ideal. Like many herbs, olives thrive in rocky, poor quality soil. They can perform well in clay soil as long as it has good drainage. Soggy soil will kill an olive tree. Olive trees grown in nutrient rich soil are more disease prone and they produce poorer quality oil. Olive trees are very drought tolerant and they love lots of direct sunshine. They also seem to have a preference for coastlines. When selecting a site for olive trees, keep in mind that they may live for centuries. Most olive cultivars are self-sterile, which means they cannot pollinate themselves, so you may need to plant two trees. Olive cultivars can be primarily for table olives, olive oil, or both. The Santa Clara County Master Gardeners website recommends Ascolano, Manzanillo, Mission and Sevillano cultivars for the Bay area. You can contact your local County Extension office to see which cultivars are best for your area. Olive trees can be propagated by cuttings and layers, from suckers, or grown from seed. To ensure that you are planting a specific cultivar, it is a good idea to buy root stock from a reputable nursery. Cuttings and suckers can be started by covering with aged manure and watered regularly. Seeds are more likely to germinate if the oily outer flesh (pericarp) is encouraged to rot slightly by placing it in hot water or in an alkaline solution, but olives grown from seed often do not produce fruit. Once trees are established, fertilizer should be applied annually, just before flowering. Olive tree roots tend to be shallow, so avoid digging nearby. This is also what makes them excellent container plants. Pruning olive trees Olives grow very slowly, but pruning is necessary for good health and fruit production. Since fruit is borne on the previous year’s growth, two-year old wood should be removed, to maintain a manageable size. In many commercial orchards, fruit laden branches are simply cut off the tree before the olives are removed. Pests & diseases of olive trees The olive fruit fly is a common pest that lays its eggs in the fruit. Once the eggs are laid, the fruit becomes unfit for consumption. Dusting with kaolin clay is an effective organic preventive measure. Rabbits can cause considerable damage to young trees by eating the bark. If the bark is removed all the way around the tree, girdling it, the tree will likely die. Verticillium wilt is a serious threat to olive trees in California. Curculio beetles, black scale, some caterpillars, and the Cycloconium oleaginum fungus can also cause problems. Once an olive tree is established, its extensive root system can recover from the complete destruction of the above ground portion of the tree. Harvesting olives Olives are harvested in September through February, depending on the cultivar and the use for the fruit. Green (unripe) olives are picked September to November, blonde olives are picked October to November, and black olives are picked mid-November through early February. Generally, olives are picked by hand to preserve the fruits’ shape and texture. Oil quality from fallen fruit is not as good as handpicked fruit because of bruising. Semi-dwarf varieties may produce 30-40 pounds of fruit, each year, while full sized trees may produce 100 pounds each year. Making olives edible Like acorns, uncured olives are quite bitter. This bitterness is caused by oleuropein and other phenolic compounds. Olives must be cured and fermented before they are eaten. The only exception is the Greek Throubes olive, which is allowed to dry on the tree and can be eaten as is. There are several commercial curing methods:
These slow-growing trees can produce fruit for the next several hundred years or more. Some olive trees are over 2,000 years old and still produce fruit! Most people really enjoy butterflies flitting through the garden. And what would a summer evening be without an occasional moth?  Gulf fritillary Generally speaking, these beneficial insects improve pollination and they are a sign of a healthy environment. Moths and butterflies (and their caterpillars) are prey animals to many predators, such as bats, birds, and lizards. The presence of butterflies and moths indicates a healthy level of biodiversity that translates into a healthier garden. The plight of the Monarch butterfly is a well known indicator of environmental problems. Differences between butterflies and moths The jury is still out on the exact difference between butterflies and moths. Skippers and butterfly moths muddy the taxonomic waters, but there are some clear differences (with several exceptions):
 Head of a leaf miner moth showing the extent of scales on the head (Louis Howard) Public Domain Lifecycle of butterflies and moths In spite of the differences, butterflies and moths share the same basic 4-stage life cycle. Moths and butterflies start out as eggs, which hatch into caterpillars. These caterpillars are what cause most of the damage to garden plants. Caterpillars are voracious eaters! After they fatten up on garden plants, moth caterpillars spin a cocoon around themselves, while butterfly caterpillars form a chrysalis. Inside these tidy little protective packages, caterpillars are transformed into insects of the sky. [I just learned, watching BBC, that the Arctic Wooly Bear caterpillar may take 14 years to complete its metamorphosis and that it can survive being frozen solid!]  Comparison of moth and butterfly dorsal anatomy (Mrice20) CC BY-SA 4.0 Moth and butterfly identification
A student at the University of Washington created a lovely animation of 42 North American butterflies. You can see it here. This is an excellent resource because it also shows range maps! Another great interactive tool can be found at Butterflies and Moths of North America. Damage caused by butterflies and moths While moths and butterflies won’t damage your plants, their caterpillars certainly will. This is especially true for the imported cabbageworm. During summer months, monitor plants for feeding holes, frass, and rolled or webbed leaves. Since moth and butterfly caterpillars are food to so many other critters, handpicking is the best treatment. Adding pesticides simply disrupts the natural controls already in place. Verticillium wilt is a soil-borne fungus that strikes tomatoes, peppers, berries, snapdragon, eggplant, olives, potatoes, and over 300 other garden varieties. Non-host species include beans, broccoli, corn, and cereal grains. 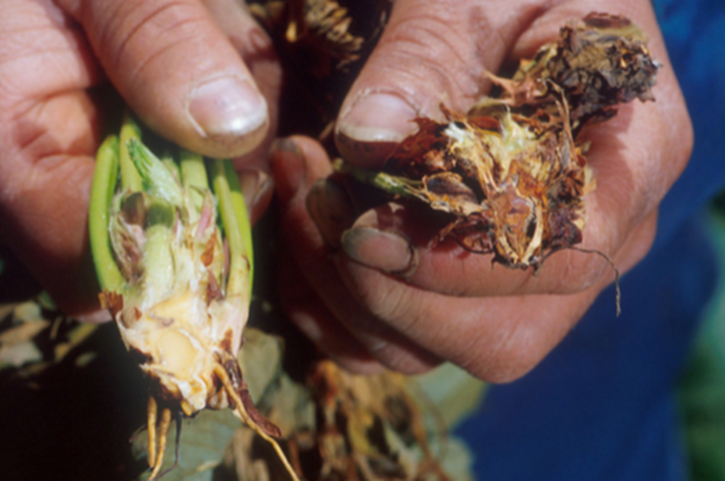 Healthy strawberry plant (left) and plant infected with Verticillium wilt (right). (Brian Prechtel) Public Domain Fungal spores can come into the garden on infected plants, shoes, seeds, and tools. Infected plants can also contaminate the surrounding soil and irrigation water.
The biggest problem with wilt diseases is that the fungi (Verticillium dahliae) can stay in the soil for several years. All it takes is an insignificant wound to nearby roots to create an entryway for the disease. Older specimens may be able to survive, losing branches on only one side. Smaller plants and seedlings nearly always die. Infected plants contain millions of fungal spores and should be removed from the garden and thrown in the trash. Symptoms of verticillium wilt Verticillium wilt looks a lot like Fusarium wilt. The most obvious sign is, you guessed it, wilting. Wilting occurs when the xylem is blocked by fungal spores, halting the flow of food and water within the plant. Tissue death, yellowing of leaves (chlorosis), and leaf loss are also symptoms. If you cut the stem of an infected plant, you may see discoloration of the vascular tissue.. Just sanitize your cutting tool afterward with a household cleaner to avoid spreading the contamination. The primary difference between Fusarium and Verticillium wilts is that the damage is often restricted to the lower or outer parts of the plant when it is the Verticillium fungi causing the problem. How to prevent verticillium wilt Since there are no controls for wilt disease, prevention is the only option. Use these tips to keep your garden (relatively) free of this fungal disease:
If Verticillium wilt is present, remove the infected plant(s). If the infection becomes widespread, soil solarization may be the only effective treatment. Fungicides are not effective in small-scale gardens. How many of us, as children, pinched snapdragon blooms between our fingers to see the floral dragon open and close its mouth? Yep, count me in!
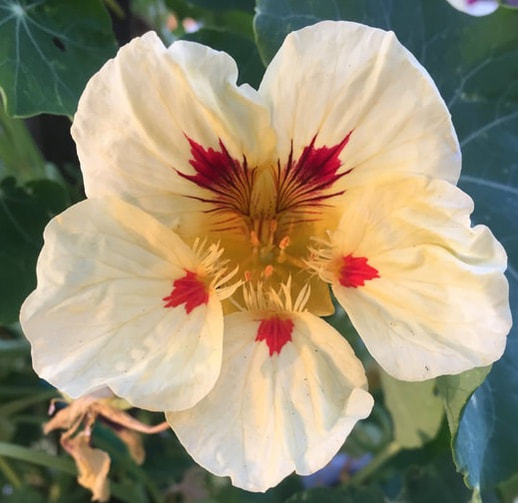
Snapdragon classification
Standard snapdragons are classified as midget (6-8”), medium (15-30”), and tall (30-48”). There are also fairy snapdragons (pictured) that provide delicate, miniature versions of the blooms. How to grow snapdragons Snapdragons perform best in full or partial sun. They prefer well-drained soil and do well in rockeries. Unlike many other flowers, snapdragons can withstand frost and often provide cool season flowers. Snapdragons are difficult to start from seed, but it can be done. The normal lifecycle of a snapdragon is to bloom in fall and winter (weather permitting) and then drop seeds in spring. These seeds are exposed to a lot of heat during the summer. If you want to grow snapdragons from seed, simply reproduce that cycle. Cold, damp weather or soil will halt their growth. After flowers have passed their peak, be sure to deadhead the plants for more blooms. Snapdragon plants can become leggy and may need support. You can reduce this need by pruning the longest stems to form a bushier shape. Regular deadheading will promote more flower development. Snapdragon pests & diseases Once established, snapdragons should be allowed to dry out between waterings. They are prone to several fungal diseases, such as:
Anthracnose, root knot nematode, crown gall, and leaf and stem spot are also occasional problems on snapdragon. WARNING: ALL PARTS OF SNAPDRAGON ARE POISONOUS IF EATEN. Thyme is one of the easiest herbs to grow. Crumbled into scrambled eggs, baked with chicken, or simmered in a favorite spaghetti sauce or stew, the sweet, savory aroma of thyme adds a delicious level of complexity to even the simplest dish.  Thyme grows into a lovely small shrub Thyme is a woody, aromatic evergreen herb. Cousins to mint, thyme and oregano are the foundation herbs used in many Italian dishes, herbs de Provence, and bouquet garni. As an added benefit, the tiny fragrant flowers are big favorites among honey bees and other beneficial insects.
How to grow thyme Thyme prefers hot, dry sunny locations, with well-drained soil. It is an excellent foodscape addition to areas affected by drought. Thyme grows well in containers, especially unglazed ceramic pots that allow the soil to dry out completely. Thyme can be grown from seed, cuttings, or by dividing root clusters. If growing from seed, simply follow the directions on the package. Cuttings can be placed directly in loose soil. Root clusters should be placed with the crown (where the stem meets the roots) at the same level as the surrounding soil. Thyme plants should be watered regularly as they are getting established. After that, they need little or no care. These hardy plants can withstand freezing winters and scorching summers. Thyme prefers a slightly alkaline soil. Pinch growing tips to keep plants bushy. If a thyme plant becomes too tall or leggy, it can be cut back by 1/3 in spring. Just be sure to cut above some new growth, or the stems may die. Thyme varieties People have been using thyme since the ancient Egyptians and there are currently over 50 varieties of thyme available. Put simply, there are ornamental thymes and culinary thymes. Some of the more popular edible varieties include:
Thyme Lore The ancient Greeks believed that thyme was a source of courage and it was placed under pillows during the Middle Ages to ward off nightmares. According to companion planting claims, thyme is said to repel cabbage moths, but I have not found this to be true. Supposedly, tomato hornworms and whiteflies are also offended by thyme, but I haven’t found any definitive proof. Thyme oil does have antiseptic properties that may combat minor bacterial and fungal infections. According to Medical News Today, washes made from thyme can help get rid of acne and rubbing your skin with thyme may prevent being stung by the Asian Tiger mosquito, a West Nile virus and Zika virus carrier. These and other potential health benefits of thyme are currently being studied. Angiosperms are plants that produce flowers. The word angiosperm comes from the Greek words for “vessel” (angeion) and “seed” (sperma). There are 350,000 known species of angiosperm plants and they all generate seeds. Nearly 80% of all the green living plants on earth are angiosperms. This is the most diverse group of plants in the world and they make up the majority of our food supply.  Almond blossoms Vascular plants Plants with veins are called vascular plants. Vascular bundles, made up of the xylem and phloem, carry water and nutrients throughout the plant. Angiosperms are vascular plants. The way those veins are arranged within a stem can help you identify a plant. You know those long threads that get caught in your teeth when you eat celery? Those are plant veins.  Monocot v. dicot (FlowerPower207) CC BY-SA 3.0 Until recently, angiosperms were divided into two groups: monocots and dicots. Monocots, such as corn, have a single seed, a single embryonic leaf (cotyledon), fibrous root systems, parallel leaf veins, flower petals in multiples of 3, and scattered veins. Whereas dicots, such as peas, beans, radishes, and nasturtiums, have seeds that split in half, two seed leaves, a taproot, webbed veining, flowers petals in multiples of 4 or 5, and a circular arrangement of veins. 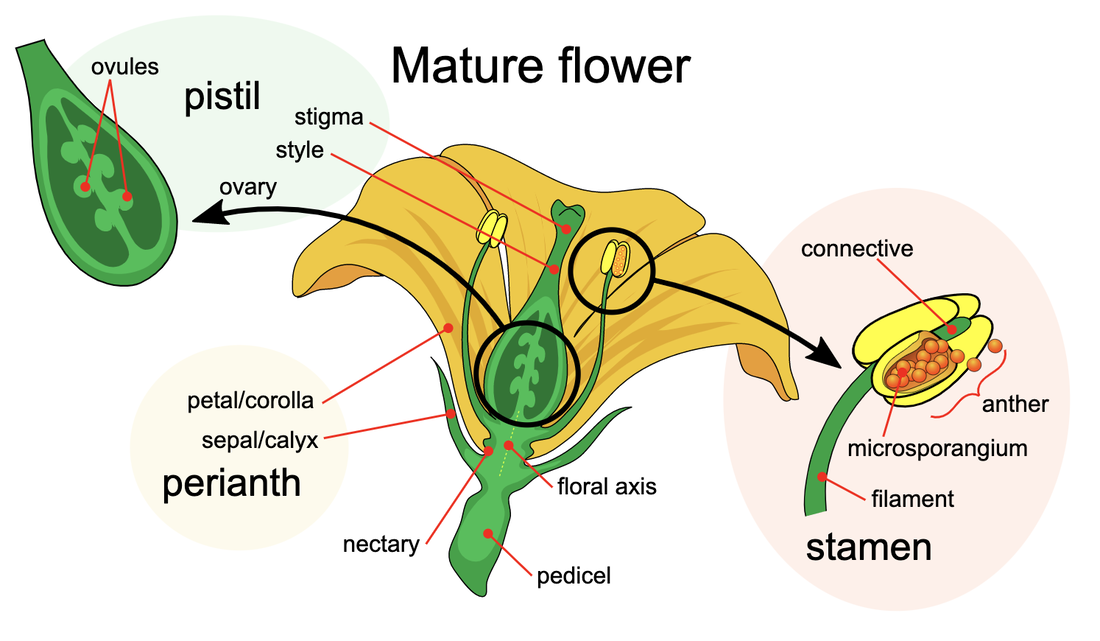 Mature flower diagram (LadyofHats) Public Domain Genetic testing and electron microscopes have taught us that those generalizations were too simplistic. As a result, dicots have largely been recategorized as a new group, called eudicots. If you want to get super technical, the modern plant classification system identifies 8 different angiosperm groups. Angiosperm lifecycle All angiosperms start out as seeds. Seeds are produced when the stigma of a female flower is pollinated by pollen from a male flower’s stamen and the ovules are fertilized. This process is called double fertilization. The seed is protected and fed by fruit that surrounds it. The fruit is actually a mature plant ovary.
Cereal crops, such as wheat and rice are also angiosperms, you just don’t usually see the flowers.
How many different angiosperms are growing in your yard?
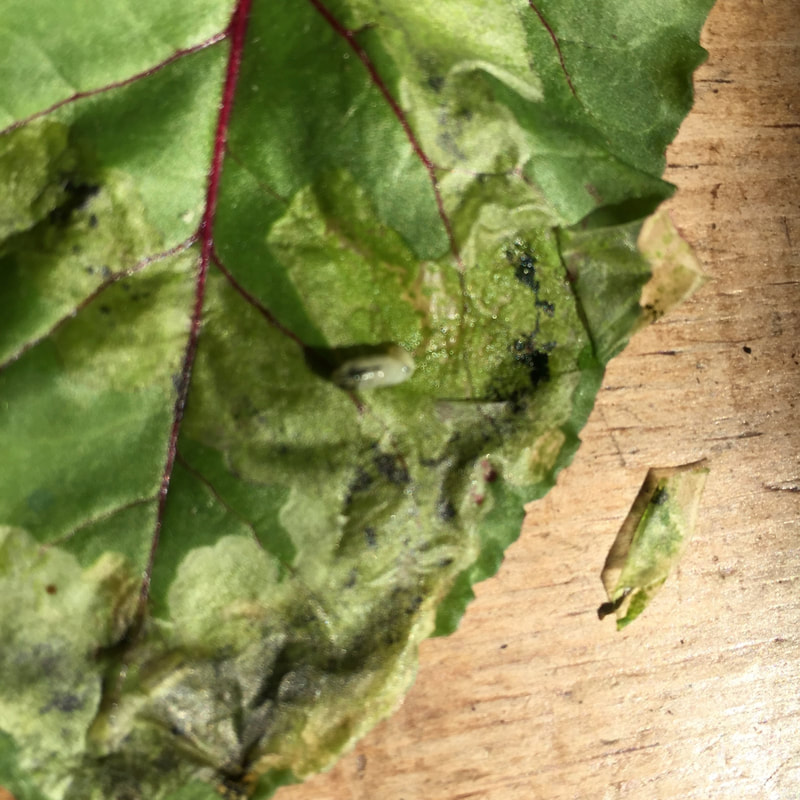
If you have citrus trees, you have leaf miners. Leaf miners can be found feeding on many edible and ornamental plants, including tomatoes, beans, cole crops, cucurbits, aster, peas, impatiens, petunia and dahlia. While leaf miners are generally not a threat to plant health, they can detract from a plant’s appearance and it is still a good idea to monitor infestations.  Tomato leaf with leaf miner damage (N3v3rl4nd) Public Domain Leaf miners are not a specific insect. Instead, they are the larval stage of several moths, sawflies and some beetles. The damage is distinct burrows within leaves, leaving what looks like serpentine, white trails. By feeding within the leaf, leaf miners are protected from predators and pesticides. In fact, applying pesticides actually helps leaf miners by killing off their predators. To make matters worse, all leaf miner species are resistant to carbamates, pyrethroids and organophosphate pesticides.
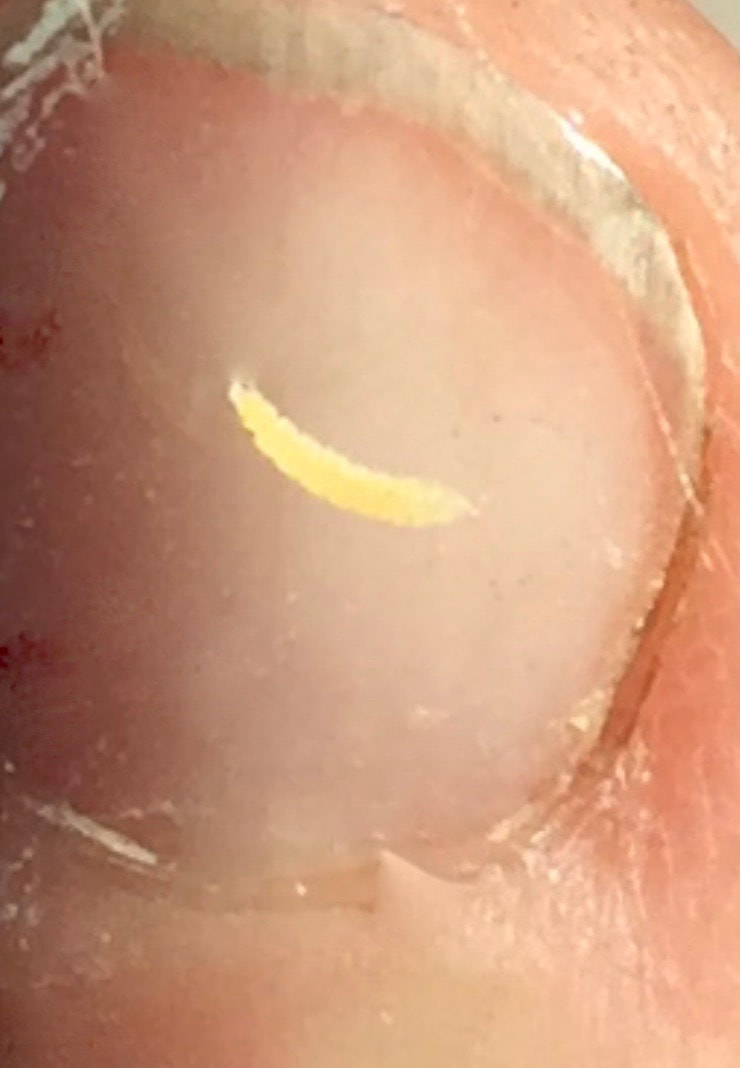
If you peel back the top layer of an infested leaf, you can actually see the pest, though you may need a magnifying glass.
You can minimize leaf miner damage by planting trap crops. Trap crops are preferred feeding plants. The most common trap crops are:
Also, do not prune unnecessarily, as this stimulates new growth which is more susceptible. There’s a fungus among us! There are millions of fungal species and more individual fungi than anyone could imagine. Fungi are the most common cause of plant disease and are responsible for significant crop losses. Did you know that fungi are more closely related to animals than plants? How is this possible? Let’s find out!
Spores in spring As the weather starts warming and rains fall, fungal spores take to the skies on every breeze. A single citrus mummy can hold billions of fungal spores that can infect nearby fruit, trees, and other plants. If you see a mummy in the garden, get rid of it. Also, don’t count on the drier weather of June and July to clear out fungal diseases - powdery mildew LOVES dry weather! Common fungal diseases Fungal plant diseases can be hard to get rid of. Common fungal infections include blights, blotches, molds, mildews, rots, rusts, scabs, scurfs, and spots. You can find a more detailed list below. How to control fungal diseases The most common response to fungal infestations is the use of fungicides. But fungi evolve quickly, so applying fungicides often creates resistant varieties that are even more difficult to control. These good cultural practices can help your garden plants protect themselves without chemicals:
When it comes to fungal diseases, prevention is far more effective than trying to get rid of them. Detailed list of fungal diseases: Lacewings are delicate, highly beneficial insects in the garden. Lacewing larvae are frequently called aphid lions, because of their voracious appetite for these tiny pests. Lacewings also eat small beetles, scale insects, caterpillars, leafhoppers, thrips, mites and small flies. There are nearly 2,000 species of lacewing worldwide, most of them occurring in North America. .jpg) Green lacewing (Mathias Krumbholz) CC BY-SA 3.0 Lacewing identification Lacewings can be brown or green, and they grow to 1/2” in length. Lacewings are named for their long, slender wings. They also have long antenna and copper-colored eyes.
Lacewing lifecycle
Like many other predatory insects, lacewings lay eggs near aphid and other insect infestations. A single female can lay 100-200 eggs in her 6-week lifetime. The eggs are protected by being attached to white stalks that hang from the underside of leaves. Brown or yellowish-gray larvae emerge from the eggs and begin hunting right away. They feast for 2-3 weeks and then build a cocoon where they pupate into adult lacewings. In addition to many garden pests, adults also eat pollen, nectar, and honeydew made by scale insects and aphids. As they move through an area feeding, adult lacewings can help pollinate the garden. Lacewing activity Lacewings are most active during night and twilight hours. When lacewing larvae feed, they inject a digestive secretion that can dissolve the insides of an aphid in 90 seconds! Lacewings are very susceptible to chemical pesticides. Rather than spraying chemicals in the garden, you can protect biodiversity by encouraging these beneficial insects. You can attract lacewings to the garden by planting (or tolerating) the following:
Eugenia are woody, evergreen flowering plants in the Myrtle family. Often found in landscapes as ornamentals, Eugenia’s glossy green leaves can become infected with the eugenia psyllid (Trioza eugeniae). The eugenia psyllid sucks plant juices from leaves and secretes honeydew that provides habitat for sooty mold. Introduced to California from Australia in 1988, eugenia psyllid has become a serious threat to many landscapes. 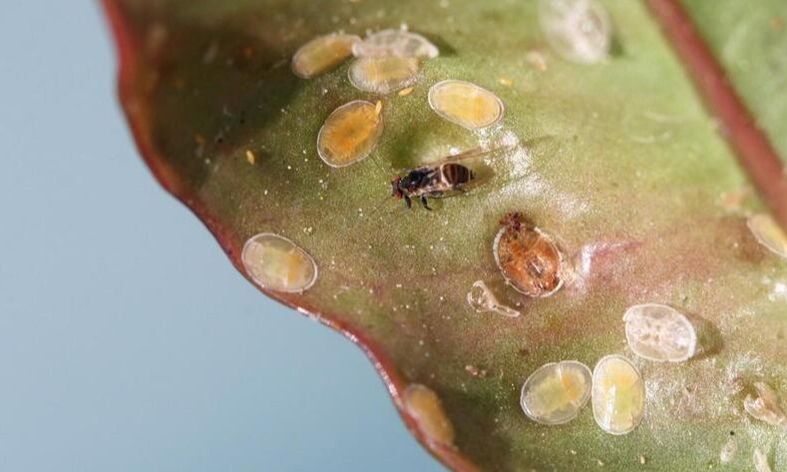 Eugenia psyllid adult and nymphs on brush cherry (Whitney Cranshaw, CSU, Bugwood.org) CC BY 3.0 Plants commonly attacked by the eugenia psyllid:
Eugenia psyllid identification Infected leaves look similar to peach leaf curl. This psyllid attacks new growth at terminal (end) points, leaving bumps and pitted areas. Leaves may also become discolored and appear red. Heavy infestations can cause the leaves to fall off (defoliation) and can kill a mature plant. Adult eugenia psyllids are dark brown with a white abdominal band. Nymphs are yellow with orangish-red eyes. Eugenia psyllid lifecycle Tiny, golden eggs are laid on leaf edges. Eggs hatch into first-instar nymphs, called crawlers, that feed on new growth. Nymphs pass through five instars before becoming winged adults. Mature eugenia psyllids are only 1/10” to 1/5” long. They are related to aphids, but they have more powerful jumping legs and shorter antenna. Eugenia psyllid control When eugenia psyllid first arrived in California, the damage was so extensive that many home owners were forced to remove Eugenia plants from the landscape. In 1993, a parasitic wasp (Tamarixia dahlsteni) was released in Santa Clara County. This beneficial insect has helped bring eugenia psyllid populations to manageable levels. Since eugenia psyllid nymphs prefer feeding on new growth, regular, frequent shearing can reduce infestations. Shearing is recommended at 3-week intervals during periods of new growth. It is important to leave the clippings on the ground, around the shrub or tree. This causes the eggs and nymphs to be on the ground, where they will die, while still providing food for parasitic wasps. Dormant oils are specifically designed for use on trees during the dormant season. They have a heavier viscosity than other horticultural oils and they stay on the plant longer, as a result. This is great when you are trying to suffocate insect pests, but it can be devastating to foliage if temperatures rise, a condition called phytotoxicity. Summer or horticultural oils are lighter weight and evaporate more quickly, reducing the likelihood of burnt leaves.  Armored scale infestation Effectiveness of dormant oils Dormant oil applications create barriers that block respiration of many, but not all, insects and limit the spread of infectious diseases. Spider mites, San Jose scale, leaf curl, powdery mildew, shot hole, and scab infestations are common reasons for applying dormant oil applications in winter or early spring. Pacific or two-spotted spider mites, peach twig borers, navel orangeworm, and oriental fruit moth are not affected by dormant oils alone. These oils are not recommended for aphid control. Dormant oils can suffocate the eggs of many garden pests and deter females from laying eggs on specific trees. As a side benefit, the application of dormant oils has been shown to delay bud break, protecting tender new growth against potential frost damage. It has also been found to enhance the aroma of ‘Golden Delicious’ apples and increases the diameter of oranges. How to use dormant oils Dormant oil application should be done after pruning and is most effective after a foggy or drizzly day. Pump sprayers can be used to apply dormant oils, but it is important that every surface is sprayed: trunk, stems, twigs, and tops and bottoms of any leaves. If you have several trees, this can be a bit of work. Problems associated with dormant oils One of the biggest problems associated with dormant oil is the risk of hot weather. A single sunny day can transform fresh, young, green leaves into cinders. This is especially true up to 30 days after sulfur or other fungicides have been applied. [I speak from personal experience.] Also, heavy dormant oils can harm beneficial insects right along with the pests. Dormant oils are not recommended for use on walnut trees BE SURE TO FOLLOW PACKAGE DIRECTIONS EXACTLY
The diaprepes root weevil (Diaprepes abbreviatus), also known as the citrus root weevil, arrived in Florida from the Caribbean in the 1960’s. Since that time, it has expanded its range to the entire country and has caused extensive damage to citrus, avocado, loquat, roses, potatoes, palm and birch.  Adult diaprepes root weevil (Keith Weller, USDA) Public Domain This pest feeds on both leaves and roots, leaving crescent-shapes leaf edges and a severely weakened plant.
White egg clusters are laid on leaves that have been folded and sealed shut. A single female weevil can lay 5,000 eggs in her lifetime. In 7-10 days, larvae emerge and drop to the soil, where they begin feeding on roots. The larvae frequently attack a plant’s taproot, killing the plant. Larvae are plump, whitish C-shaped grubs with a black head. They can be 1” long. After several months, larvae then pupate in the soil and emerge as adult weevils. Because this is an introduced pest, Diaprepes root weevils have no natural enemies. There are chemical treatments being used and research is being conducted on bacteria and parasitic wasps that may help combat this pest. PEST ALERT: IF YOU SEE THIS PEST, PLEASE CONTACT THE CDFA AT 1-800-491-1899 Brown rot is a fungal disease of stone fruits, such as nectarine, peach, apricot, cherry, plum, prune, and almond trees.  Brown rot on cherries (Mary Ann Hansen, VPI SU, bugwood.org) CC BY 3.0 Brown rot identification
Brown rot appears as brown, withered blossoms (blossom blight), cankers, and rotten fruit. Infected twigs may also display brown, sunken areas that ooze a sticky brown goo that contains millions of fungal spores of Monilinia fructicola. Fruit mummies hold even more potential infestations. Brown rot control Copper fungicides can minimize fungal populations, as can removing mummies and pruning out diseased tissue. How to prevent brown rot Pruning for better airflow can reduce the likelihood of infection, as can furrow irrigation. Do not allow sprinklers to wet blossoms. Soil solarization is an environmentally friendly method used to rid an area of pretty much everything: weeds, fungal and bacterial pathogens, and nematodes. Solarization is particularly effective against the pathogens that cause fusarium wilt, verticillium wilt, root rot, blight, tomato canker, and crown gall disease. It is also used to eliminate a lawn and prepare it for more drought-resistant varieties of plants.
To prepare an area for soil solarization, it must be smoothed flat and free of dirt clods and visible weeds. Solarization works far better on level areas than on hillsides, but sun exposure is critical for the process to be effective. Shady areas are not suitable. Basically, soil solarization covers an area with clear or white plastic and lets the sun cook everything to death. Now, when I say covered, I mean completely. No cracks, no bubbles, no loose edges. If gophers, ground squirrels, or birds are a problem in your area, this can be difficult. Here are the steps to use for effective soil solarization:
NOTE: Black or colored tarps should not be used unless you live in a cooler, coastal area. In this case, a black tarp will prevent weeds from growing during the early part of the process and the tarp will need to be left on longer than normal. When selecting the sheeting material, heavier is generally better:
Using a double layer of plastic, separated with plastic bottles or PVC pipe, can increase the effectiveness of solarization. This has been shown to increase temperatures by 2-10°F. If it is done properly, the heat of the sun should reach 140°F, killing pathogens and weed seeds, without the use of chemicals. Another benefit of soil solarization is that it speeds up the breakdown of organic matter, making all the nutrients bound up in various life forms available to new plantings. Plants grown on solarized soil tend to grow bigger and faster, as a result. Of course, this process also kills earthworms and beneficial soil microorganisms. Soil solarization can also be used on planting containers and in raised beds that have become infested with undesirables. In this case, use a double layer of plastic and place the container in the sunniest place you can. Once solarization is complete, carefully remove the plastic and put it in the trash or recycling, depending on your region. Disturb the ground as little as possible to avoid planting newly arrived weed seeds. |
Welcome!You can grow a surprising amount of food in your own yard. Ask me how! To help The Daily Garden grow, you may see affiliate ads sprouting up in various places.
You can also get my book, Stop Wasting Your Yard!  Index
All
Archives
July 2024
|


_01.JPG)
 RSS Feed