|
Small living spaces do not eliminate your gardening options, they simply mean looking at what you have in a new way. Rather than tolerating a lack of space, you can look at it as a challenge to grow vertically! Balconied apartments, duplexed mini yards, townhouses, and small properties are often seen as too small to garden, but this is simply untrue. All you have to do is look at the dandelions and other weeds pushing their way through concrete in a dank alley to see that plants can and will grow pretty much anywhere that isn’t completely dark or in the Arctic Circle.
Growing up Here are just a few fun and easy vertical container gardening ideas:
The point I’m trying to make here is that the only thing limiting your vertical garden is your imagination - and sunlight. Light levels Sunlight is often the most limiting factor when it comes to growing plants in tight spaces or indoors. This is not a time for guessing. You need to know how much sunlight actually reaches each area. For the uninitiated, sunlight exposure is defined as:
If you try growing sun-loving plants in an area with inadequate light levels, the plants will get long-stemmed (‘leggy’) and weak. This is called etiolation. Often, these plants will look pale or bleached, and they usually die. For each space that you have identified, take the time to note when it receives direct sunlight, and for how long. This information can make or break your vertical garden. Plant selection You need to select plants that are suited to the available sunlight. Plants such as tomatoes, peppers, and cucumbers need full sun, while root vegetables, such as carrots, beets, and potatoes, can perform beautifully in partial sun, partial shade, or dappled sun. Salad greens and other leafy vegetables can grow very nicely in full shade or dappled sun. Herbs need sunlight, but they are a pretty tolerant bunch. Once you have identified how much sunlight is available, and the types of plants you want to grow, then comes container selection! Choosing your containers Different plants have different types of roots. If you want to grow plants with taproots, your containers will need to be deeper. Plants with fibrous root systems need more lateral space. 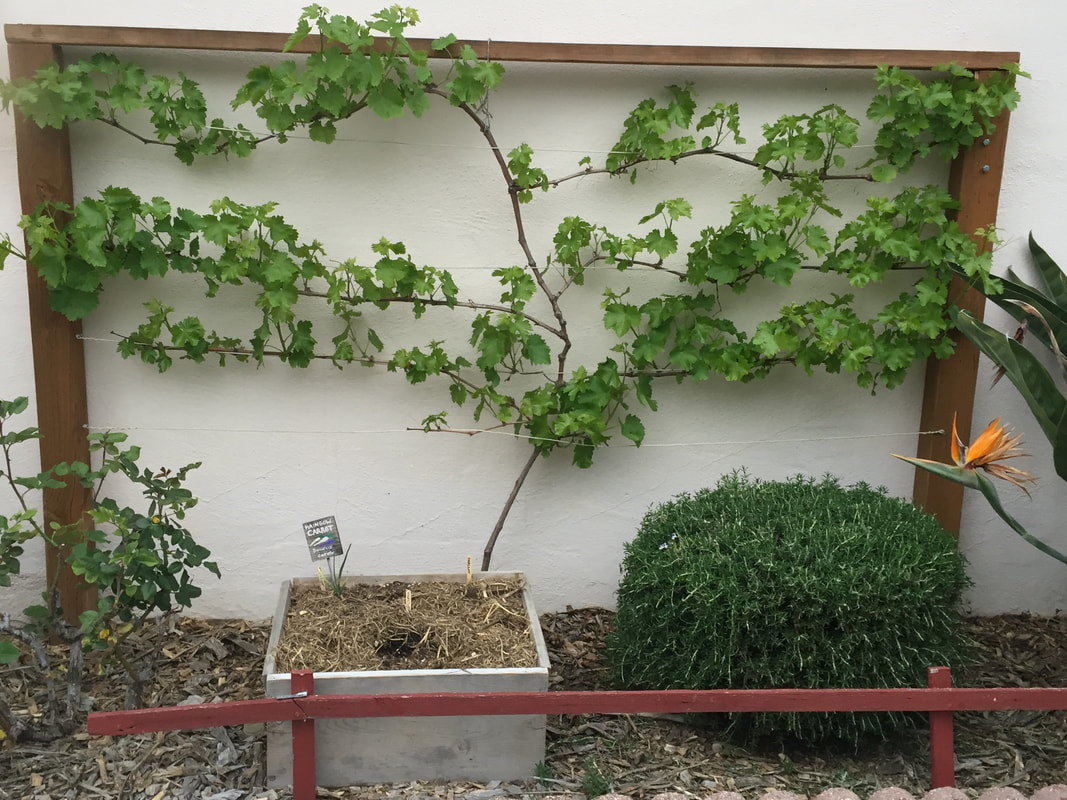 Espaliered grape with boxed carrot Note: There are countless images of amazing and inspiring vertical gardens online. Keep in mind that many of the plants pictured are not actually growing. Very often, they are well hydrated, cut plants, put in place just for the photo shoot. Do not use these images to guide you in your plant selection. Most plants need more root room than many of those images imply. Find out about the normal root depth of the plants you want to grow. 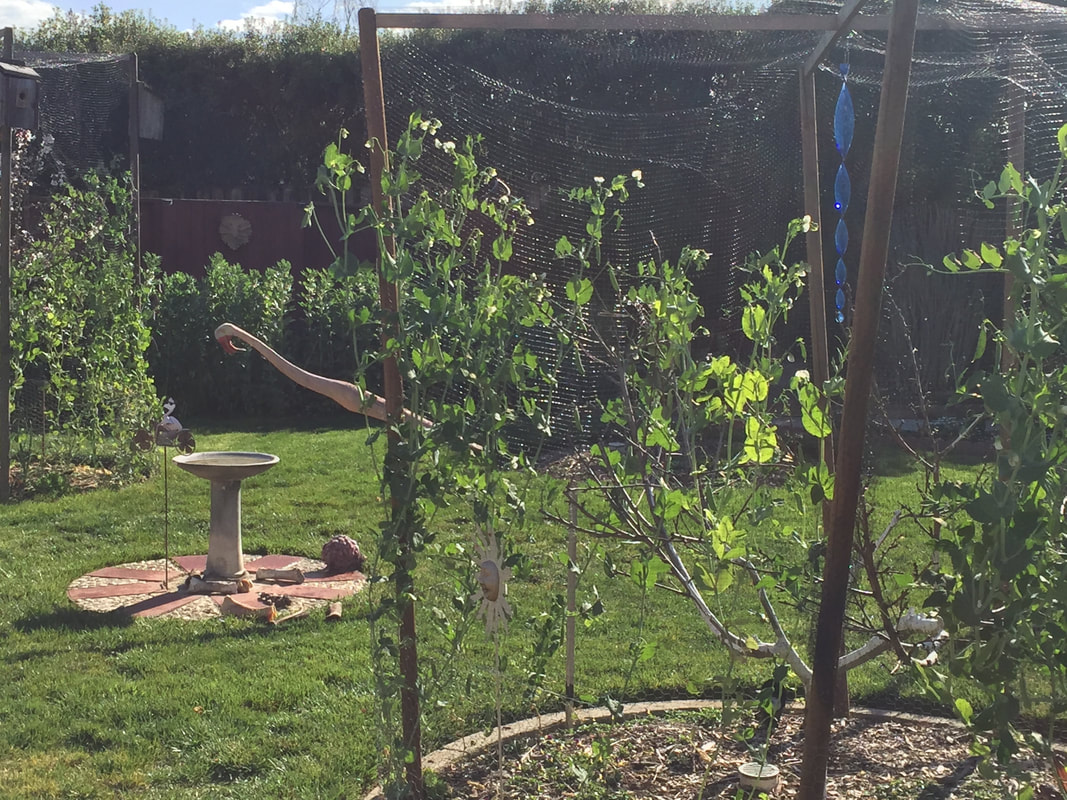 Peas growing up tree cages are productive but a pain to clean up after Manufactured planting containers are generally plastic or ceramic, with drainage holes and trays that are either attached or separate. Use these gardening container tips to help your plants stay healthy:
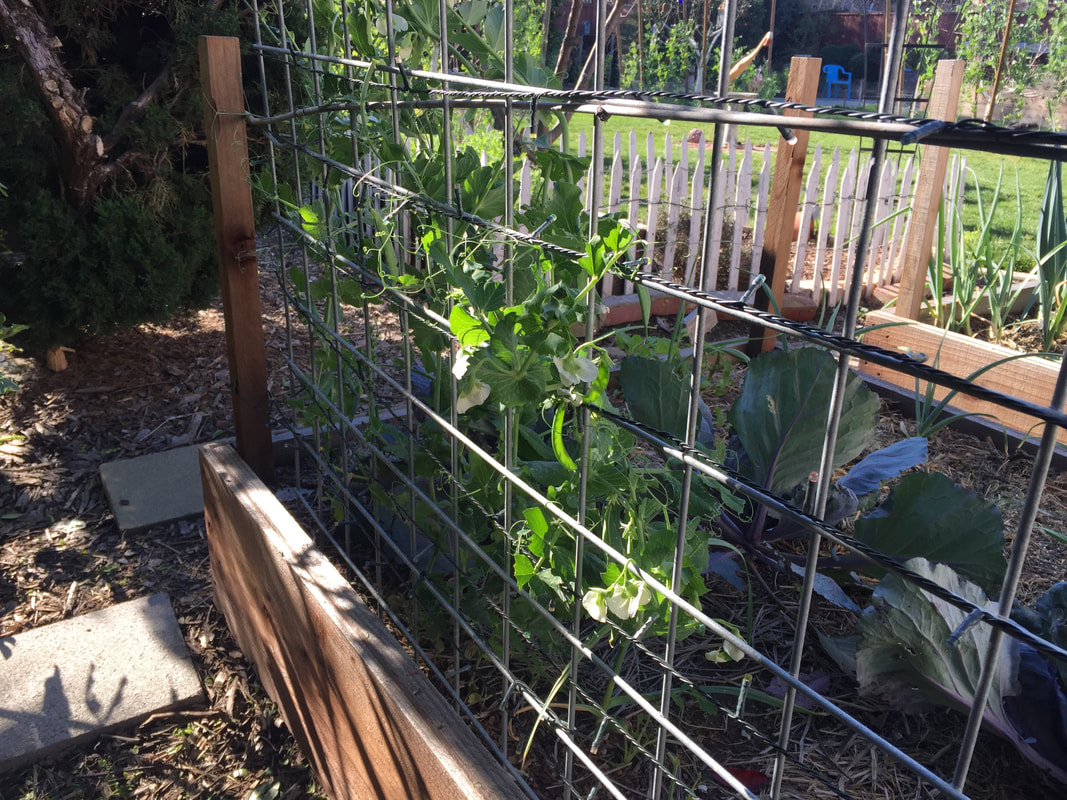 Peas growing up a cattle panel Trellises and hammocks
A trellis can be a sheet of lattice, purchased from your local lumber yard, a section of wood-framed chicken wire, a teepee of bamboo rods, a stock panel, or any other framework that supports your plants as they grow upward. If you are growing crops that produce heavy fruit, you may need to provide a little extra support. Melons, pumpkins, and squash can be held in place with net or fabric hammocks, attached to the trellis or fence. As you go about your normal day, keep an eye open for unique, useful items that are often kicked to the curb by your neighbors. That unwanted pet staircase can be repurposed into a beautiful, space-saving tiered herb garden! Straw bale gardening is touted as providing all the benefits of raised beds without the cost. Poor (or absent) soil can be overcome by growing vegetables in bales of straw. Also, if your soil is host to Verticillium or Fusarium wilt, nematodes, or really tough weeds, straw bale gardening may be the answer. Or, it may not.  Straw bale garden (Colling-architektur) CC BY-SA 3.0 Like other Quick Fixes, straw bale gardening is more complex than simply sticking some seeds into a bale of straw and adding water. First, straw bales do not contain enough of the nutrients needed by garden plants. Also, your straw bales will begin to decompose as plants are watered. As the bales decompose, they also generate a significant amount of heat (up to 140°F). These temperatures can kill your plants. Preconditioning is necessary to create temperature, chemical, and microorganism stability. Preconditioning straw bales for gardening Preconditioning takes approximately 2 to 3 weeks to complete. The preconditioning process is a controlled composting that makes nutrients available to whatever you will be planting in your straw bale garden. In a standard compost pile, the ratio of carbon to nitrogen is 30:1. A bale of straw is closer to 40:1 or even 100:1, so nitrogen must be added. These preconditioning steps are needed for successful straw bale gardening:
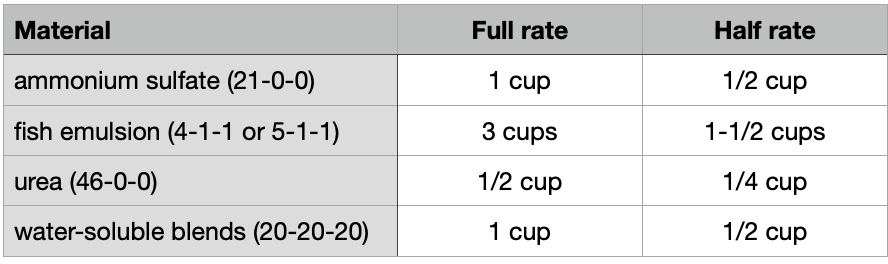 *Full- and half-rates of common water-soluble fertilizers When are my straw bales ready for planting?
If synthetic fertilizer is used, you can start planting on Day Twelve. If organic fertilizers were used, wait until Day Seventeen. Before you start planting, however, you need to consider other potential problems. Potential problems with straw bales Aside from decomposition and the need for frequent watering and fertilizing, straw bales are often produced in fields where persistent herbicides are used. These herbicide do not breakdown quickly and they can adversely affect your crops, your compost pile, and your soil. If you do not know for sure, you have to assume that these chemicals are present and are best avoided. If you can find organic straw bales, you are ready to move forward. Seeds vs. transplants Crops that are grown from really tiny seeds, such as lettuce, are best started in potting soil and then transplanted to the straw bale garden. Otherwise, those tiny seeds will end up somewhere in the middle of your straw bale where the only thing they can do is decompose. Adding a shallow layer of potting soil on top of your straw bales can also eliminate this problem. Use a trowel to open up a space in the straw bale for transplants and be sure to water after adding plants or seeds. What can be grown in a straw bale garden? Each bale of straw can be used to grow a surprising variety of plants. You can grow 2 or 3 tomato, squash, or melon plants, 4 or 5 pepper plants, or as many as 15 bean plants in a single bale. You can also grow potatoes. The most critical issues of a straw bale garden are water and nitrogen. If either of these are in short supply, your plants will suffer. Feeding and watering a straw bale garden Drip emitters and soaker hoses are your best bet for a straw bale garden. Early in the growing process, more water will be needed as plants send roots throughout the bale. Since straw bales are not soil, it is important to monitor your plants for signs of nitrogen deficiency. Stunting and chlorosis (yellowing) are the two most common signs. Normally, monthly feedings will be sufficient. Multiple plantings Until your straw bales completely decompose, you can have multiple plantings, especially if you keep tightening the twine. As the bales decompose, they will shrink. You can keep them compressed by tightening the twine with a stick inserted behind the twine and rotated over the twine as many times as it takes to keep it tight, tucking the stick behind the twine. Straw bales gardens may last for more than one season, but they will ultimately decompose. Once the bales are unusable as growing mediums, they can be added to the compost pile or used as mulch. What have you grown in a straw bale? We’d love to see photos! Growing houseplants and herbs is a simple way to add beauty to the home and flavor to meals. Houseplants clean indoor air and add a touch of nature to the home or office. Herbs can be very expensive to buy and fresh herbs are often unavailable during certain months of the year. Houseplants and herbs are easy plants to grow with some simple maintenance, such as repotting. Repotting allows you to inspect the root system, refresh the soil, and clean the pots thoroughly.
Prepare for repotting Healthy plants are far more likely to avoid shock from repotting than plants that are already stressed. To ensure the success of your repotting project, be sure to water any plants that are to be repotted thoroughly a day or two before repotting. You will also want to wash the new pots. Salts, petroleum products, and chemicals on new pots can kill freshly repotted plants. When selecting new containers for herbs, it is a good idea to use pots that are no more than 2" larger than the current one. If there is more space than that, your herbs will focus on root growth, rather than providing you with their delicious leaves, until the container is fully explored. You will also want to buy nutrient rich potting soil. To prepare the pots, fill the them halfway full with soil, tamping the soil into a cup-shaped space in the middle that is big enough to cradle the herb's current root system. Good drainage is critical for most herbs and houseplants, so make sure there is a drainage hole. How to repot container plants Repotting goes more smoothly if you have everything you might need already at hand. Sheets of newspaper can help keep the area clean. Scissors and pruning shears are handy tools for trimming dead roots, twigs, and leaves. It is a good idea to have your bag of potting soil already opened and conveniently at hand. Depending upon the size of the current container, it is easiest to dislodge the plant by placing your hand over the top of the dirt, with the plant stems between your fingers, and flip it upside down. To dislodge plants from larger containers, roll it on its side and gently rock it back and forth to loosen the root ball. If you are working with a really large container, you may want to lay a tarp on the lawn. If the roots have wedged the plant into the pot, you may need to use a soil knife or other serrated blade to cut around the edge. It is important that as much of the dirt around the roots remains where it is to prevent shock. At the same time, this is an opportunity to inspect the root system. As plants grow, their roots continue to grow and spread. Eventually, a plant can become root bound. This occurs when the roots have filled all the available space in a container. If your plants are root bound, you can trim away some of the roots that are wrapping around the root ball before placing the plant in its new container. Next, place the root ball in the new pot and add potting soil around the sides, pressing down gently. Air pockets in the soil can dry out roots and cause wilt. Finally, water your newly repotted plants. As the soil settles, you may need to add more potting soil. It is a good idea to leave the soil ½" lower than the edge of the pot to facilitate future waterings. After Repotting Repotting can stress your herbs. For this reason, it is a good idea to keep plants out of direct sunlight for a few days after repotting and water frequently but not excessively. Your repotted houseplants and herbs will now thrive in their new home and you will be able to enjoy their fragrant beauty and delicious additions to meals for years to come! Watercress is one of the most nutrient dense foods you can eat, according to the Centers For Disease Control and Prevention (CDC), and some people say it isn’t all that hard to grow. I'm feeling a bit challenged, but here's what I've learned so far. 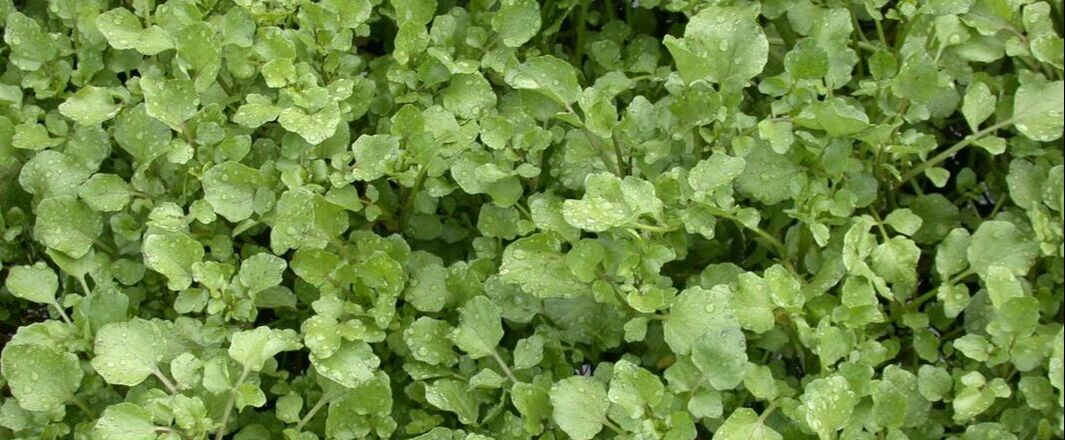 Healthy watercress plants (Scot Nelson) Public Domain We all know that watercress does not ship or store well, so growing your own is a great way to keep yourself supplied. While watercress prefers growing near slowly moving water, you can recreate these condition closely enough for a crop of watercress. Unlike most of the species we talk about at The Daily Garden, watercress is an aquatic or semi-aquatic plant. You do not need to create an entire hydroponic growing system, however, to grow your own watercress, you just need to keep the soil wet.
Experts tell us that people have been eating watercress longer than any other leafy vegetable. Ever. Despite its Latin name, watercress (Nasturtium officinale) is no cousin to the popular salad flower from nasturtium plants. Nasturtiums are Tropaeolum, a unique family, while watercress is a member of the cabbage family. This makes watercress a cousin to mustard, wasabi, radishes, broccoli, and horseradish. This also means that the dreaded, imported cabbageworm (Pieris rapae) will be a major pest of your watercress, should you decide to grow it outdoors. Watercress may attract flea beetles and mustard beetles. Whiteflies, spider mites, and snails might also cause problems. On the other hand, if your watercress goes to flower, you will receive the added benefit of attracting hoverflies to your garden. Hoverflies love to eat aphids and thrips, so they are welcome any time! Unfortunately, once a plant flowers, much of the flavor is lost. You will get more seeds, however! By the way, if your watercress does become infested with any sort of pest, simply submerge the entire plant for about an hour. Do not use composted manure from mammals to feed your watercress. It may contain liver flukes (Fasciola hepatica), which can lead to some really nasty digestive conditions. Manure from chickens and fish emulsion are fine to use on watercress. How to grow watercress One recommended way to grow watercress is in a fishbowl or other medium-sized glass container. [Check your local thrift store for something truly unique and inexpensive!] Put a 2 inches of pebbles or rocks in the bottom and fill with water. Sprinkle seeds on top of the water or float a few plants on the water surface. The roots will reach down into the rocks and the hollow stems will bring snip-able greens to the water surface. For extra interest, plant food, and glass cleaning, add an algae eater to the mix! [Update: I tried using a fish tank and it didn't work as planned. I'm not sure if that's because I started with mature plants or just poor logic. Before the plants died completely, I put them in the wading pool outside that serves as a giant dog watering bowl. We'll see what happens.] [Update.2: The wading pool didn't work, either, and now the algae eater has gone missing. Now my nearly dead watercress plants are in a container outdoors with some bog sage, which also likes lots of water. Fingers are crossed.] Another suggested way to grow watercress is in aluminum or plastic takeout trays. You will need one tray that is larger than the other, to act as the base. This is the water storage area. The smaller tray is used to hold the plants, but be sure to poke some drainage holes in it before flipping it upside down and filling it 3/4 full of normal potting mix or soilless potting mix that contains perlite or vermiculite. Next, sprinkle watercress seeds on top. You can also use purchased watercress that has any sort of root growth. It grows very quickly. Seeds germinate best at 50 to 60°F. If watercress is being grown in a container, it is important to change the water every few days. The standing water can be used to irrigate other plants. Also, watercress can tolerate morning sun, but it really prefers being in the shade. With all the water needed by watercress, you may want to plant it near the hose. It also makes an excellent windowsill garden plant. While nutrient deficiencies are unusual for watercress planted in the ground, it is a good idea to have a basic understanding of what those deficiencies look like, so that they can be corrected:
Give your disease-fighting abilities a major boost with watercress! And if any of you have grown watercress successfully, please let me know how! Succulents are some of the easiest plants to grow. And don’t let those high prices fool you - all you need to do is start trading leaves with friends and neighbors! Succulents come in a wide variety of shapes, sizes and colors, some of which are really amazing. They make great ornamental additions to the garden because they take very little care and they help prevent erosion. Also, most of them have a spreading growth habit that makes it easy to turn them into living gifts for family, friends, and neighbors.  Potted succulents What are succulents? Succulents have evolved to store large amounts of water in fleshy leaves, stems, or roots, depending on the variety. This makes them an excellent choice for drought-prone areas. As temperatures rise, the plants absorb this stored water, shrinking the storage area for later use, rather than dropping leaves and making a mess. All plants that can survive in dry environments are called xerophytes. Common characteristics of succulents include:
There is some debate about the difference between succulents and cacti. Basically, not all succulents are cacti, but most cacti are succulents. There is also debate over whether or not the mucilaginous sap of aloe actually does anything, but, hey, if it makes us feel better, that’s good enough for me. Most of these plants are not edible, but some are. Be sure to identify a plant beyond any doubt before trying it for a snack. Some mistakes can be deadly.
Succulent families Here is a list of the more popular succulents (and where they originated):
 Hawthoria (Stan Shebs) CC BY-SA 3.0  Faucaria (Egor V. Pasco) CC BY-SA 3.0  Gasteria (Stan Shebs) CC BY-SA 3.0 Propagating succulents If you know someone who already has succulents, they will probably be more than happy to give you cuttings, baby plants, or leaves, depending on the species. Jade plants, in particular, can be started from a single leaf. Simply place the stub of the leaf on moist, rich potting soil and mist it regularly. Within a week or two, new roots should be visible. Cuttings and baby plants can be propagated in the same way. Caring for succulents Succulents can be used as permanent ground cover, in containers, and they make lovely windowsill gardens, as long as they get enough bright sunlight. Succulents prefer well-drained soil, making them an excellent choice for slopes, raised beds, and containers. These tips will help you get the most out of your succulents: • Avoid planting succulents in low areas where water may collect and cause crown rot. • Do not place succulents near other plants that require a lot of water. • Remove any dead leaves to prevent bacterial or fungal disease. • Adding rocks to the soil can improve drainage and they look nice. • Stop watering if leaves start to look mushy. • In winter, cover frost sensitive varieties with lightweight, breathable fabric (not plastic). • Monitor for slug and snail damage.  Dudleya (Wikipedia) Public Domain  Crassula capitello (Eric Hunt) CC BY-SA 2.5  Kalanchoe (David Hughes) CC BY-SA 3.0 Succulent container gardens look lovely year round, and they are surprisingly easy to make. You can see several inspiring ideas (complete with instructions) at the Instructables page on Succulents.
Sometimes, the only direction available to an urban gardener is up. Tower gardening is a great solution for small spaces, lack of soil, or unfavorable conditions. Even if there is plenty of garden space, tower gardening can make better use of space and add nice color and structural accents to a garden.  Strawberries growing in tower An extension of container gardening, towers can be used indoors or out. If climbing plants are used, tower gardens can supplement a window sill garden by providing more soil without using up a lot of space.
Which plants can be grown in towers? It is astounding how many different types of plants can be grown in tower gardens. Whether you are foodscaping or simply adding color, tower gardens are very versatile. Strawberries, potatoes, herbs, lettuce, spinach, radishes, squash, succulents, and other ornamentals are just a few. As plant selections are being made, keep in mind how much sunlight is available, your local microclimate, and what plants will actually be eaten or enjoyed. (There’s no sense growing a bountiful crop of Brussels sprouts if no one is going to eat them!) How to make a tower garden After deciding what to grow, it is time to build a garden tower. Garden towers can be placed on the ground or on top of a large planting container. In its simplest form, a tower garden is nothing more than a cylinder of wire filled with potting soil. There are high-tech versions that incorporate irrigation, hydroponics, and much more than we will go into here. (I’m a big fan of keeping life simple.) For our garden tower, hardware cloth or chicken wire are the best materials for the cylinder. Landscaping cloth can be used with stakes, all by itself, but those tend to fall over. Begin by deciding the tower diameter. Multiply that figure by 3.5 for the length of hardware cloth needed. Most hardware cloth comes in 36” or 48” heights. Either is fine. Cut the hardware cloth to the desired length and roll it into a cylinder. Join the edges with wire, paper clips, or whatever is on hand, with a little overlap; just make sure it won’t break down after extended exposure to sun and moisture. Place the cylinder where it will remain and then line the inside with newspaper, landscape cloth, or straw. This job can be made easier by slowly adding soil as you go. The soil will hold this barrier up against the tower. If potatoes or strawberries are being planted, plants can be added at different soil levels for a bigger crop. Otherwise, keep filling the tower with high quality potting soil up to the top. Now you are ready to really start planting! Planting a tower garden Using a screwdriver or similar pointy object, poke holes in the side of the tower garden. Your fingers can make the hole as large as is needed to insert seeds or seedlings. Continue the process until you run out of appropriately spaced plants or seeds, depending on the variety being planted. Water thoroughly and regularly as the seeds sprout or the seedlings take hold. As plants grow in a tower garden, the roots will spread throughout the soil, collecting nutrients and water. If you happen to notice stray worms on the ground after a rain, add them to the tower garden for better aeration and soil structure. Aged compost can be placed on top and watered in to add more nutrients to the soil. Over time, your tower garden crop will grow and thrive. As an added benefit, weeding is almost completely eliminated with tower gardens! Many people wish they could garden, but think they can’t because of where they live. Nothing could be further from the truth. Container plants can grow on window sills and in sunny rooms without the addition of artificial light, assuming the area receives 6 to 8 hours of sunlight each day. Grow lights can also be used for even better growth. Growing edible plants serves many purposes: cleaner air, tastier food, less fossil fuels being burned, and, hey, container gardening is fun!  Many herbs can be grown on a window sill Window sill garden resources Start your window sill garden by figuring out what resources are available with these questions:
Choosing plants for your window sill gardens The next step is deciding what to plant. Being grown indoors, many of these plants will need to be hand-pollinated, but it's not difficult.
Window sill garden containers The next step is selecting container(s). This is an excellent time to go outside and start walking around the neighborhood. It is astounding what people will throw away these days. Very often, the perfect container can be found just by walking around with an open mind and mindful eyes. Just be sure to provide drainage for container plants. Over-watering and poor drainage kill more indoor plants than everything else put together. Contrary to popular belief, it is not a good idea to add rocks at the bottom of planting containers. Rocks take up valuable soil space and provide fungal spores with a great place to reproduce. Just be sure there are a couple of holes at the base of plant containers to allow water a way to escape. Place tuna cans, coffee canister lids or plastic packaging under plant containers to catch excess water. A few container possibilities include:
WARNING: IF A CONTAINER IS GOING TO BE USED TO GROW EDIBLE PLANTS, BE SURE THE CONTAINER IS SAFE FOR FOOD. MANY PLASTICS AND CERAMIC GLAZES CAN BE TOXIC. Soil for window sill gardens
There are several sources for soil for container plants:
Seeds & plants for window sill gardens
It’s time to plant! Plants are more likely to grow to their full potential if they are planted according to the directions on the seed packet. If the information isn’t available, Google it! * Hand-pollination To get fruit from some plants, especially fruit trees, the flowers will need to be hand-pollinated. Just grab a small paint brush, Q-tip or something similar, and touch it to each of the flowers every couple of days until the flowers start to turn brown. This bee-ly duty will transfer pollen from one flower to another, completing the pollination cycle. Self-pollinating varieties don’t need this. That’s all there is to it! The only thing stopping you from gardening now is, I have to say it, YOU! Many people assume they can’t garden because they live in an apartment, rent a room, or have a tiny yard. Nothing could be further from the truth. Nature finds a way to put plants everywhere except Antarctica and you can, too. Container gardening is an excellent way to work around space limitations (or grumpy landlords).
To container garden successfully, there are a few things to keep in mind: container selection, soil and nutrient needs, light requirements, and plant selection. You may also need to consider hand-pollinating indoor plants. Container selection This is where the fun really starts! Plants can be grown in practically anything that isn’t toxic. I have seen photos of toilets, trucks, and old boots being used as planting containers. You can hang a decorative net over a sunny window and plant climbing nasturtiums, peas, or beans in a nearby pot. Transform a bookcase into a vertical garden or put plants under a glass table top. You are limited only by your own imagination. All containers will need drainage holes. Also, if you will be moving plants indoors during winter, be sure they are not too heavy to lift, or use a plant stand with wheels. WARNING: IF A CONTAINER IS GOING TO BE USED TO GROW EDIBLE PLANTS, BE SURE IT IS SAFE FOR FOOD. MANY PLASTICS AND CERAMIC GLAZES CAN BE TOXIC. Soil, nutrients, and water Generally, there are two types of soil you can buy: planting soil and potting soil. You want potting soil in your containers because it is formulated to retain water and nutrients better than planting soil (which is for use in the ground). Avoid using soil that contains sedge peat - it interferes with drainage. Over time, your container plants will use up nutrients in the soil. You can supplement with aged compost (my favorite), fertilizer, or by changing out the potting soil every few years. That last one is pretty traumatic to root systems, so I don’t recommend it, unless necessary. Also, some plants will become root bound in containers. You can either repot these plants into a larger container, or trim the roots. Container plants need to be monitored closely for water stress. Over-watering and under-watering are the biggest sources of problems for container plants. It is important to let the soil dry out between waterings. At the same time, hanging plants and unglazed ceramic pots need to be watered more often in hot weather. Lighting Most container plants need 6 or more hours of daylight each day. You may need to supplement with grow lights if your home, patio or balcony do not receive enough sunlight. I have heard good things about LED grow lights, but haven’t tried them yet. (If you have, please let us know your thoughts in the Comments section.)
Plant selection
Not all plants do well in containers. This is especially true for plants with taproots. If you are using containers to grow food, you’re in luck - most edible plants have fibrous roots that will do just fine in containers. Here are just a few delicious edibles you can grow in containers:
*A single packet of celery seeds contains up to 100 seeds. If you plant one seed a week in a window box, bucket, or a leaky hummingbird feeder, you can produce up to 200 pounds of celery over the next 2 years! Hand-pollinating As long as you get a self-pollinating variety, you won’t need to pollinate by hand to get fruit. If hand pollination is necessary, simply use a small paintbrush and gently (like honey bee feet) touch the tip to each flower a couple of times every few days, until the flower starts to fade and fall apart. By doing this, you will take pollen grains from the anther and place them on the stigma. If you look carefully, you can actually see the pollen grains on the stigma! Sometimes, gently shaking self-fertile varieties is all you need to do to get the pollen grains where they need to go. So, get out there and start gardening! As a new gardener, I was disappointed to see my containerized tomatoes starting to look more like apple dolls ~ those wrinkled faces made from withered apples. I thought I had given them plenty of water and nutrients, but the fruit looked awful.  Wrinkled tomatoes
When a plant is severely root-bound, it may be necessary to cut the circling roots to encourage outward growth. To do this, use a clean, sharp knife. Cut vertical lines up the side of the root ball in several places. You only need to go in an inch or so. Then tickle the bottom roots outward as you place the plant in new soil.
Be sure to water this traumatized plant well. Before long, these plants will grow new roots to support delicious above-ground growth! Self-watering plant containers are an excellent way to conserve water while keeping your plants healthy. Container gardening makes it possible to garden in small spaces or in those areas with poor soil quality. One of the biggest problems with container gardening is the need for frequent watering. This is especially true for unglazed ceramic pots, which allow a large amount of water to evaporate, and for gardeners in areas with a lot of hot, dry weather.  DIY self-watering container (Gamzeyaavor) Public Domain Self-watering plant containers feature a water reservoir below the plant medium (soil), separated by a perforated platform. The platform keeps the soil out of the water, but it allows roots access to the water supply. Being relatively sealed under the soil, water evaporation is significantly reduced, while providing your plants with all the water they need.
You can make your own self-watering plant container out of discarded 5-gallon buckets. Give it a try and let us know how well it works for you! Vermiculite is a brownish silicate mineral commonly used to help create air spaces in soil, which improves drainage and nutrient movement.  Vermiculite (Wikipedia) CC BY-SA 3.0 Seed starting
A layer of vermiculite is often placed over newly planted seeds, in pots. This helps retain moisture, which improves germination without encouraging fungal diseases, such as damping off disease. Soilless growing medium Vermiculite is also a component of soilless growing medium. Combined with materials such as peat or composted bark, this mixture provides a very light medium, filled with water, air, and nutrients, making it easy for new roots to become established. Root and bulb storage If you store root crops or bulbs over the winter, keeping them in a bed of vermiculite can stabilize moisture levels, preventing rot. Soil conditioner Because it is so light, vermiculite can be mixed with heavy clay to create more macropores and micropores. This improves soil structure, making it easier for roots to move through the soil. With all of those good characteristics, you would expect more people to use vermiculite, right? Unfortunately, until 1990, many sources of vermiculite contained asbestos. Pure vermiculite does not contain asbestos, but there is no way to be 100% sure that the vermiculite in the bag at the garden center hasn’t absorbed asbestos or some other harmful chemical. Using it in small doses is probably fine. I prefer renewable resources, such as aged compost, which I know is healthy for everyone involved. |
Welcome!You can grow a surprising amount of food in your own yard. Ask me how! To help The Daily Garden grow, you may see affiliate ads sprouting up in various places.
You can also get my book, Stop Wasting Your Yard!  Index
All
Archives
July 2024
|


 RSS Feed