|
If you have fruit and nut trees, you can prune those trees to improve both the quantity and quality of your crop, or you might eliminate production altogether. 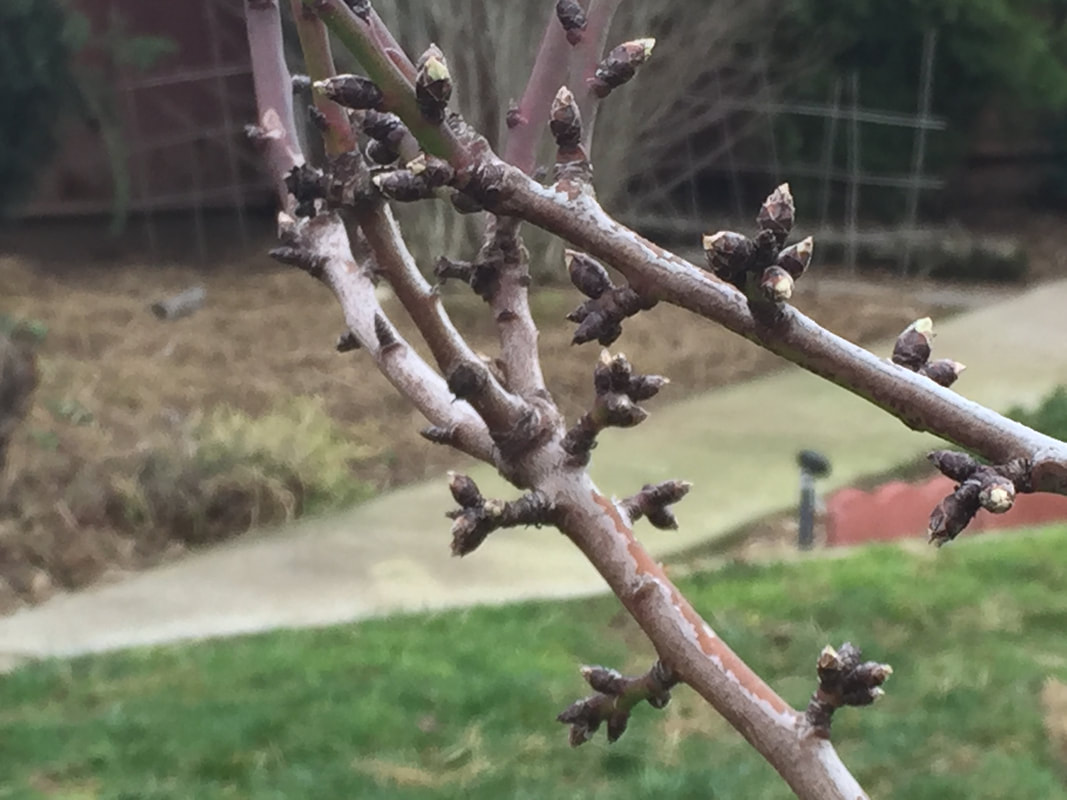 Lateral spur buds of almond Normal pruning Normal annual pruning involves removing dead, diseased, and rubbing branches. It also means training trees for shape, size, structure, and air flow. This is normally done while trees are dormant, in winter. There is also renewal pruning, done in autumn, which stimulates new growth the following spring. But, did you know that you can also prune for better fruit production? It’s true! How fruit happens Fruit and nut trees produce buds. When those buds are fertilized, they can grow into fruit or nuts. [Assuming the tree of healthy enough and old enough.] But some trees produce fruit on new growth, while others produce fruit on old growth. If you keep cutting off productive wood, you won’t have much of a crop. Where do trees produce fruit? Depending on the species, trees produce fruit either on long shoots or on stubby spurs. That fruit can be arranged laterally, along the sides, or at the terminal end. Take a look at the chart below for information about your trees. 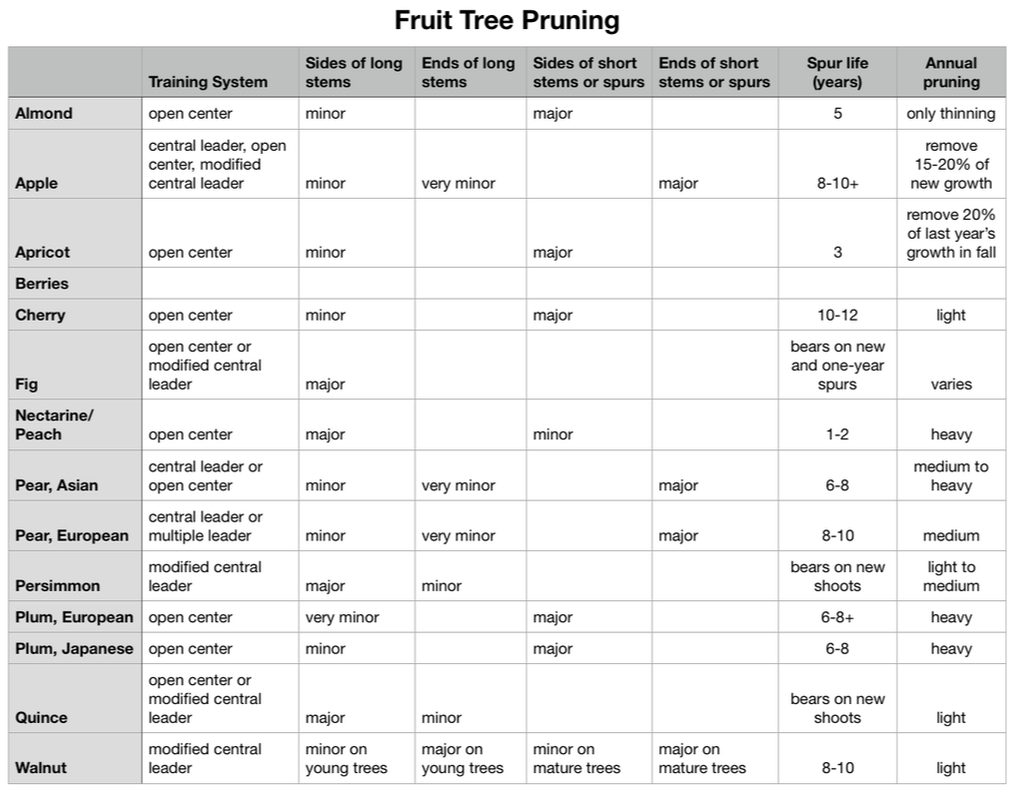 This may seem like too much information to be useful, but let’s walk through a few examples together, so you can see how to better prune your trees. Almonds You can see that almond trees produce the majority of their fruit on lateral spurs, and some fruit along lateral shoots. You will also see that each spur is good for 5 years, that very little pruning is needed, and that almond trees are best trained in the open center system. So, what does all this mean to the owner of an almond tree? First, snipping the tips off of anything on an almond tree won’t harm nut production. Of course, if you snip too much, the tree will have to put energy into healing, rather than filling your hopper with delicious almonds. The open center system is exactly what it sounds like - the center of the tree is left clear of major branches in the middle, creating a bowl shape which allows for plenty of sunlight and air to move through. Apples Looking at the information for apples, you can see that snipping off the ends of all the spurs would leave you without much of an apple crop, but cutting off the ends of long shoots would only have a very slight impact. Persimmons Now look at persimmons. All of the fruit production occurs on long shoots of new wood. Cutting out all of your new growth would hamper fruit production. The same is true for quince. Figs are produced on new wood and one-year old shoots.  Terminal shoot bud of fig Generally speaking, citrus trees do not need to be pruned to improve fruit production.
If you sort the chart by location of major fruiting buds, you have:
Armed with this information, go outside, sanitized pruners in hand, and see where you can prune your fruit and nut trees for improved overall health and a significant increase in production! Bare, dormant stems begin to swell in spring, transforming from green to red tips, from which tight clusters of pink blossom buds emerge. Those buds will bloom, drop their fruit, assuming they have been pollinated. That is, of course, unless blossom brown rot has taken hold. Blossom brown rot (Monilinia laxa), also known as brown rot blossom blight, is a fungal disease of almonds, apricots, cherries, and other stone fruits..  Cherry blossoms infected with blossom brown rot (Elizabeth Bush, Virginia Polytechnic Institute and State University, Bugwood.org) CC BY 3.0 US Blossom brown rot looks similar to brown rot (Monilinia fructicola), affecting flowers from the pink bud stage through petal fall. All parts of the flower are susceptible.
Symptoms of blossom brown rot The first sign of blossom brown rot is the death of young flower blossoms. What should be a colorful, flower-laden tree buzzing with pollinators looks more like sticks with clusters of brown, dried-up tissue paper. [That would be an extreme case.] More often, infected flowers are intermittent (at first). Gum may ooze from the base of infected flowers, and cankers may form on twigs. Those cankers will have tan centers and dark edges. Blossom spurs and their leaves may collapse. Under humid conditions, you may see tan to gray spore masses. Blossom brown rot life cycle Fungal spores overwinter in twig cankers, on mummified fruit, and on any diseased flowers that remain attached to the tree. As temperatures rise in spring, fungal spores begin populating nearby twigs and other blossoms, causing twig and branch dieback and blossom losses. Spores are airborne and spread by irrigation, splashing raindrops, and insects. How to control blossom brown rot This fungus thrives in rainy weather with temperatures in the 70s(F). High humidity can also encourage spore development. Growth is almost directly related to local humidity and temperature levels, which can be tough to control in the home garden. Proponents of compost tea recommend foliar sprays as a treatment for blossom brown rot, but research has shown that compost tea either has no effect or worsens the condition. Unless you want to apply chemical fungicides, you are best off selecting varieties that are resistant to this disease in the first place. The following species of almond tree are most susceptible to blossom brown rot: Butte, Carmel, Drake, Ne Plus Ultra, Winters, and Wood Colony. You can also reduce the likelihood of blossom brown rot by removing any mummies as soon as they are seen and disposing of them in the garbage. Pruning and training for better airflow can also reduce the time needed for blossoms to dry. Curly dwarf may sound like the punchline from a bad joke, but this viral disease can ruin your artichoke plants.
Curly dwarf is a fatal disease spread by insects. Knowing what it looks like can help you keep it from spreading to uninfected plants. While only found on artichokes, in the field, cardoons, sunflowers, and zinnias have been infected in laboratory tests. Curly dwarf, also known as artichoke curly dwarf, is caused by the artichoke curly dwarf virus (ACDV). While we know very little about this particular virus, we do know that it is almost always found in tandem with another virus (Artichoke latent virus), which seems to have no disease symptoms. Symptoms of curly dwarf Severe stunting, leaf curling, and reduced bud production, with buds remaining small and often misshapen, indicate that your plant has become infected with curly dwarf. Leaves may also have dark, dead areas. Preventing curly dwarf As of this writing, we do not know which insects spread curly dwarf. We do know that it is transmissible. Remove infected plants right away. This virus can also spread when divided infected plants for propagation purposes, so only use certified disease-free plants. Since the virus also lives on milk thistle (Silybum marianum), keeping those weeds away from your artichoke plant may reduce the chance of infection. Winter months are an excellent time to prune fruit and nut trees. Naked and dormant, it is easy to see each tree’s structure. This is also a good time to inspect for common pests, such as scale insects and European red mites. While you will certainly want to get rid of any San Jose scale, walnut scale, Italian pear scale, or frosted scale insects you see, you should leave the European red mites where they are. Why in the world would you want to leave pests on your trees?  European red mite being attacked by a predatory mite (CSIRO) CC BY 3.0 Like many other plant-sucking pests, European red mites overwinter as eggs, tucked tightly against the bark of twigs, stems and leaf and bud scars. When they hatch, they begin feeding. The thing is, these tiny pests have small populations, at first. They don’t cause significant damage until late summer. By that time, they will have attracted an army of hungry, beneficial predators. European red mite description and lifecycle If you look closely, you may be able to see the reddish-orange eggs of European red mites. If you use a hand lens, you might even be able to see that these eggs have a spike. While winter eggs are attached to bark and stems, summer eggs are generally found on leaves, near leaf veins, and on fruit. Around the same time that walnut trees start leafing out, these winter eggs will hatch and bright red, tiny mites will appear.  European red mite egg clusters can be found in the crooks of tree branches (University of Georgia Plant Pathology Archive, University of Georgia, bugwood.org) CC BY 3.0 These mites will go through 3 moltings, or instars. First instars have 3 pairs of legs, while older instars have 4 pairs of legs. Freshly molted mites may sometimes have a green tint. Adult females are reddish, with 4 rows of curved hairs emerging from white spots. Males are smaller than females and brown in color. Females measure in at 1/72 inch. Males are 1/80 inch, which means you could line up 4 of them on the edge of a dime.
Females can lay eggs without mating, but these offspring will all be male. [This is called arrhenotokous parthenogenesis. Most parthenogenetic offspring are female, as with aphids, so this is different.] If populations become especially high, European red mites will disperse themselves in a behavior called ballooning. Damage caused by European red mites While it is all well and good to let these pests have their day in early spring, as temperatures rise and populations increase, they can cause serious damage to apple, cherry, pear, plum, prune, and walnut. They may also be found on almond, chestnut, currants, gooseberries, grapes, peach, and raspberries, as well as roses, privet, lilac, elm, alder, and black locust. Young mites prefer feeding in the relative safety of the undersides of leaves. Older, more mature mites feed on both sides. Light feeding will cause leaf stippling. Heavy feeding can bronze leaves. Bronzing may be fine for baby shoes, but it makes photosynthesis impossible. Whereas other mites produce webbing and cause leaf drop, the European red mite produces little or no webbing and no leaf drop. Persistent, heavy mite feeding can also cause transpiration burn (dead spots), reduced fruit size and quality, shoot growth, trunk and limb growth, and root growth. If populations of European red mites become significant, you can apply delayed dormant horticultural oil, but that oil may cause sunburn damage. It’s a tough call. Since European red mites have demonstrated resistance to miticides (a type of pesticide geared toward mites), it is better to avoid chemical sprays. Spraying these pests with a hose does nothing. If your garden or landscape has a lot of biodiversity, odds are pretty good that there will be enough predators to control European red mite populations. Also, keeping plants dust-free makes the environment less hospitable to these pests. Amaranth is an ancient, drought-tolerant, high protein grain that thrives in alkaline soil.  Prince’s feather amaranth (Hardyplants) Public Domain My first experience with amaranth was disbelief, when someone told me you could pop tiny amaranth seeds like popcorn. They were correct. [Did you know that you can also pop wheat, rice, millet, sorghum, barley, and quinoa? It’s true.] Cousin to pigweed, amaranth is a pseudocereal. Pseudocereals are grains used as cereals but are not members of the grass family. Quinoa and buckwheat are pseudocereals. How amaranth grows Amaranth plants are able to fix atmospheric nitrogen, the same way legumes do, which helps these plants to grow rapidly, even in poor soil. Seeds germinate in only 3 to 5 days, under ideal conditions. Plants grow best in sunny locations, spaced 8 to 10 inches apart. Amaranth branches little or not at all, putting all their efforts into striking seed heads. These upright flower spikes become weighted down with an abundance of white, brown, black, green, red, purple, or pink seeds, depending on the species.  Love-lies-bleeding amaranth (Kurt Stüber) CC BY-SA 3.0 Amaranth species Native to Central and South America, people started growing amaranth around the same time corn was domesticated, but amaranth only uses half the water needed by corn. A green, prostrate variety of amaranth, the seabeach amaranth, once found in abundance on Long Island’s sand dunes, is now one of the most threatened plants on Earth.  Seabeach amaranth (Mark Burlas) Public Domain The name amaranth comes to us from the Greek words for unfading flower. Aside from amaranth’s unfading flowers, you would be hard pressed to find a more confusingly diverse group of plants. Botanists and plant geneticists are still trying to sort it out. All we need to know, at this point, is that amaranth plants fall into one of three categories: those grown for looks, greens, or grains.
Grain amaranth A single amaranth plant can produce over 2 pounds of seeds. Amaranthus caudatus, A. cruentus, and A. hypochondriacus are the best choice for grain production. These seeds are easy to harvest, easy to cook, and they readily self-sow an area. As autumn approaches, those stunning flowers will have transformed into seed-covered spikes, coveted by finches and other seed-eaters. If you rub a flower head between your hands and the seeds come away easily, it is time to harvest, thresh, and winnow your crop. To harvest amaranth grain, cut off all ripe seed heads and place them on a clean bedsheet. You can wait until they dry, which makes the job more prickly, or you can thresh the seed right away. [To thresh means to remove grain from a plant.] To thresh amaranth, rub fresh seed heads vigorously between your hands, or walk on dried seed heads covered with another bedsheet, dislodging the seeds in either case. If you opted to work with fresh amaranth, the seeds will need a few protected days to dry. After threshing, you can sift your amaranth through a screen, to remove some of the chaff. Chaff is the inedible seed hull. You can also try using a blow dryer to whoosh the chaff away, just be sure to use the cool setting. Amaranth leaves, stems, and roots If you prefer growing amaranth as a vegetable, you will want to plant Amaranthus cruentus, A. blitum, A. dubius, or A. tricolor. Popular in dishes from Africa, Greece, India, Malaysia, and China, amaranth’s vegetative parts are cooked the same way as many other greens and they can be used fresh, in salads. In fact, many people grow vegetative amaranth to fill the dietary void caused by spinach’s tendency to bolt in summer. Amaranth pests and diseases Being so well suited to drought conditions, too much moisture can lead to damping off disease, so proper spacing and weed removal are important for young plants. Flea beetles, amaranth weevils, and tarnished plant bugs are the most common pests of amaranth. Amaranth as a weed Because of its rapid growth and heavy seed production, unwanted amaranth species are considered invasive and noxious weeds. Amaranthus albus, A. blitoides, A. hybridus, A. palmeri, A. powellii, A. retroflexus, A. spinosus, A. tuberculatus, and A. viridis should be avoided. Just so you know, A. palmeri is glyphosate resistant, and, research has shown that, when grown near soybeans, it can reduce soybean crop by 17 to 68%. Whether you grow amaranth as an ornamental or food, this sturdy, attractive plant can bring bright colors to your landscape. Scalybutt is a disease of citrus tree bark. Also known as exocortis, scalybutt is a virus-like disease caused by a particle, not a virus, called the Citrus exocortis viroid (CEVd).
Viroids are the smallest known infectious pathogens, made of a single, naked RNA strand. Other diseases caused by viroids include potato tuber spindle disease, avocado sunblotch, and peach latent mosaic. Scalybutt used to be a serious threat to citrus trees, especially those grown with Trifoliate rootstocks, but strict regulations and agricultural inspections have reduced the likelihood of scalybutt affecting your citrus trees. That is if your trees are relatively young. Older trees (>40 years) may still be infected. This is important because you don’t want to spread exocortis viroids to uninfected trees. Symptoms of scalybutt If you see drying, cracking, and lifting bark, it may be scalybutt. Damaged bark may also peel away from the tree trunk in thin strips in a behavior called shelling. Of course, these are the same symptoms of sunburn damage, so how would a gardener know the difference? For one thing, you may also see gum droplets under the loose bark or stunting. Stunting occurs because nutrients have difficulty moving through damaged or exposed vascular bundles. Sunburn damage generally does not cause stunting or gummosis. Dealing with scalybutt You can’t cure scalybutt, and it is highly contagious. But it probably won’t kill your tree. It will reduce harvests and make the tree susceptible to other pests and diseases. Unless you are ready to commit to complete sanitation of shoes, tools, and anything else that might come into contact with an infected tree, its removal is your best option, if only to protect neighboring trees. Imagine a container plant that grows a lush 6 feet tall and produces delicious, soft-skinned, seedless tropical fruits. Introducing… the babaco tree. Also known as mountain papaya, babaco is cousin to that other sweet tropical fruit of mammoth size. Commonly eaten fresh, or used in fruit salads, smoothies, and ice cream, babaco (Carica pentagona Heilborn) is believed to be a naturally occurring hybrid from Ecuador. People have been eating babaco fruit since the 1500s, but I had never heard of it until recently. 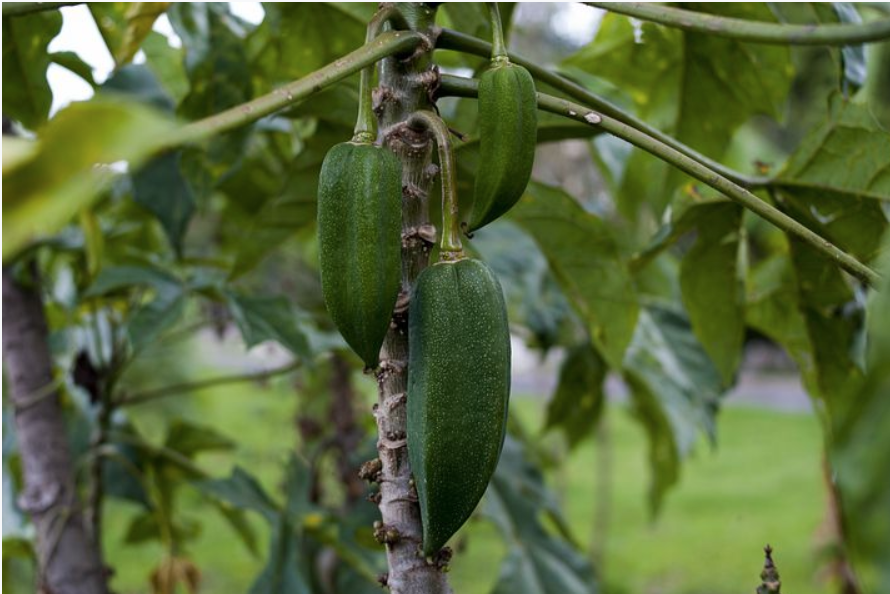 Babaco tree (Pixabay) Babaco description These herbaceous shrubs feature thick, mostly unbranched trunks that are covered with leaf scars, similar to other members of the Carica genus. The healthier the plant, the thicker the trunk. Large, palmate leaves, with prominent veins and long petioles, make this an attractive house or patio plant. Flowers are all female and fruit is generated parthenocarpically. That’s a big word which means without seeds. And it’s the fruit that should make babaco worth considering for those of us who prefer growing our own food. Five-sided babaco fruit is large, reaching 12” in length and 8” wide. Said to taste like a combination of strawberry, papaya, and pineapple, the fruit is somewhat acidic and not overly sweet. The skin is also edible. How babaco grows Babaco performs best in cool subtropical climates. Too much sun exposure can result in sunburned fruit and immature fruit drop. While it prefers coastal areas, babaco can be grown it semi-protected areas throughout California and other Mediterranean regions. While babaco can withstand brief exposure to freezing temperatures (>28°F), they are best brought indoors or put in a protected place during the coldest part of winter to avoid root rot. Babaco plants can easily be grown in containers and they thrive in greenhouses (or warm, moist homes). How to grow babaco Since babaco do not produce seeds, they are propagated vegetatively, or asexually. To do this, one foot diagonal segments are taken from an existing trunk, after fruit production is completed. These segments are first washed with a fungicide and then the bottom (rooting) side is dipped in rooting hormone. Segments are then stored vertically in a location where they can dry out and form calluses, much the way we treat pineapples. In time, roots and shoots will begin to appear and the segment of trunk is planted 8” below soil level. In just a little over a year, your babaco will be producing fruit!  Babaco fruit (Siegert) For the best fruit production, prune out any additional trunks as soon as they appear, except for one trunk, sometime around September, every year or two. This new trunk will replace the existing trunk. Trunks are only productive for a year or two. Babaco can also be propagated from cuttings, but with less success.
Babaco grows best in light, well-drained soil. They require frequent irrigation and nitrogen feeding during fruit production. Mulching with composted chicken bedding will help your babaco tree thrive. Pests and diseases of babaco Babaco leaves are susceptible to fungal diseases, such as powdery mildew. Phytophthora root rot can also become a problem. Certain mites, specifically the two spotted mite and the strawberry mite can become problematic, as can snails and slugs, and deer. Add a touch of the tropics to your home or patio with a delicious babaco! In many gardening catalogs, you can find trees that boast multiple types of fruit. This is done by grafting twigs from various trees onto a parent tree.  Apple tree grafting (Karelj) Public Domain A man named Sam Van Aken created a tree with 40 different types of fruit growing on it. His Tree of 40 includes almonds, cherries, nectarines, peaches, and many other stone fruits, all grafted onto a single tree. Grafting is an excellent way of making the most out of a small gardening space and it can look pretty amazing. Grafting is an old technique used to join two plants together. A newer version, called budding, does the same thing, but in a different way. How does grafting work? The top half of a graft is called the scion and the lower portion is called the rootstock. Grafting works because plant hormones, called auxins, allow the vascular cambium tissues of both the scion and rootstock to merge. This allows water and sap to continue moving through the xylem and phloem. Before you jump on the grafting bandwagon, however, keep in mind that grafting is tricky. It takes practice. You also need to know that, after a graft is completed, even though a protective callus has formed, and the vascular tissues have fused, the wood does not. This means that graft unions should always be considered structurally weak. You should also know that the fruit and nuts produced on grafted trees contain seeds that hold the genetic information for the scion wood only, and not that of the rootstock. Also, if you have a plant that is putting out suckers, keep in mind that these are from the root stock, and not the productive aboveground portion of your plant.
Advantages of grafting It is pretty safe to assume that nearly all fruit and nut trees available today are grafted combinations of hardy, pest- and disease-resistant rootstock and highly productive scions. Grafting speeds up production because young scions can be grafted onto older rootstock. This is called precocity and it allows growers to skip the 5- to 12-year juvenile phase, when trees are focusing on root system development, rather than fruit production. Grafted trees can also selected for size. Simply graft a scion from a full-sized tree onto dwarf rootstock and you get a dwarfed tree that produces more fruit. In many cases, grafting is used to imbue a tree with pest or disease resistance. This method is also used on watermelon, tomato, eggplant, cucumber, and other vegetative plants for the same reason. Grafting for the garden Let me say this up front - grafting requires skill. It easy to do incorrectly. There are several factors that contribute to successful grafts, and all of them are important:
Tools used in grafting Having your tools ready ahead of time will increase your odds of successful grafting. The last thing you want is for plant tissue to dry out before you are done. [Many gardeners hold scions in their mouth as they work, to keep the plant tissue moist.] You will need sharp, sanitized pruning clippers, stretchable, biodegradable grafting tape, a sharp grafting knife, and sanitizer. You may also want to have some tree sealant or grafting wax handy.
There are several different types of grafts:
In rare cases, graft hybrids, called chimera, will occur. This happens when rootstock tissues grow into the scion wood. This can lead to trees that produce flowers of both plants, plus strange combination flowers. Chimera are almost impossible to reproduce. Whichever method you decide to use, grafting or budding, be sure to seal the area completely, either with grafting tape, tree seal, or grafting wax. This will protect against desiccation, pests, and disease, while providing some structural support, as well. Problems associated with grafting Grafting can provide you with added control over plants, making them more suitable to your garden theme. It can also make your foodscape healthier and more productive. But grafting requires skill and is labor intensive. Also, it is important that the proper rootstock is selected for your scions. Incompatibility may not kill the tree until several years of watering, fertilizing, and pruning have passed. Check with your local County Extension Office or rare fruit growers club for more information on compatibility before you get started. When you first try your hand at grafting, don’t be surprised or discouraged when the alignment and pressure are insufficient, or the graft union dries out before the scion “takes” to the rootstock. This happens to beginners all the time. If your graft works, make sure you plant your new tree at the proper planting depth. This is critical to its health and longevity. Placing graft unions below soil level invites fungal diseases, such as crown rot. The interaction between rootstock and scion wood can be pretty amazing when it comes to plant hormones. Check out my post on photoperiodism. Assuming you have already collected, labeled, and kept scions cool and moist, you are now ready to begin. [If not, read my post on scions first.] Did you know that you can graft a tomato plant onto a potato plant and get food from both? Now you know. You may love calico cats, as I do, or you may have fond memories of calico dresses from a favorite prairie-crossing children’s series, but calico in the plant world is something else entirely.  Alfalfa mosaic virus on potato leaves (Howard F. Schwartz, Colorado State University, bugwood.org) CC BY 3.0 Calico is a viral disease that can infect lentils, potatoes, tomatoes, peas, tobacco, and 600 or more other plants. There are several strains of this virus, most of which are species-dependent.The calico virus prefers warm, sunny days and soil with a slightly alkaline pH of 7–7.5. Research has shown that plants infected with calico have difficulty absorbing critical plant nutrients such as copper, iron, manganese, and zinc.
Symptoms of calico Calico, also known as Lucerne mosaic or alfalfa mosaic virus (AMV), is easy to spot. Visible in a dark green sea of potato plants, you will see a bright yellow patch or yellow blotching. Infected leaves may look shiny compared to their healthy neighbors. You may also see wilting or severe stunting. Closer inspection will show dead stems and tubers. The inside of your potato harvest may look dry or corky. If your potato plant looks more like a pale yellow Christmas tree, it is probably potato psyllid feeding. How calico reaches your garden Several aphid species can carry calico. Potato aphids and green peach aphids are the usual culprits. Infected seeds and pollen can also transmit this viral disease, as can alfalfa, clover, wheat, and parasitic dodder. Infected plants should be removed and tossed in the trash, not the compost pile. To avoid AMV in your potato patch, plant only certified disease-free tubers, keep your potatoes away from clover and alfalfa, and sanitize your tools regularly. A break in the much appreciated rain and I found myself out in the garden. [Where else?] When I moved a large plant container, I saw something I had never seen before.  ‘Bipalium adventitium’ or yellow land flatworm found in Northern California (Sanjay Acharya) CC BY-SA 4.0 Curled up in a perfect spiral, under what had been the very center of my container, I saw a flat yellow worm with a dark stripe down the middle of its back. Of course, I had to collect it for identification. Unfortunately, this particular specimen escaped and is, I believe, lodged in my moisture meter. Land planarians, also known as land flatworms, or arrowhead flatworms, are a family of flatworms known as Geoplanidae. There are nearly 1,000 different species of flatworm worldwide, broken down into 4 subfamilies, but we know very little about them. What we do know is simply too strange not to share.  Valdivian Rainforest flatworm (José Grau de Puerto Montt) CC BY-SA 3.0 Invasive planarians Land planarians are native to Indo-China. Sometime around 1901, soil containing these flatworms was transported to the U.S. At first, land planarians were only found in greenhouses. Now they are found in several states including: Alabama, California, Mississippi, New Jersey, New York, North Carolina, Ohio, Oklahoma, South Carolina, Tennessee, and Texas. If you find one in a state not listed, I’m sure that your local County Extension Office would love to see it. At this point, land planarians are only found in places where nursery plants go. They withstand freezing temperatures by hiding in protected areas. They cannot, however, tolerate low humidity or drought. Land planarian description Land planarians are flat, slimy worms. Apparently, the slime helps them move and is the only way they can maintain internal moisture levels. That slime is said to taste terrible, though I don’t know how or who figured that out. That bad taste means they have few, if any, natural predators. Planarians can range from less than one inch to nearly a foot in length. Most planarian species tend to be brown or brownish-gray, but they can also be yellow, green, black, or even bluish-green. Most planarian species have dark longitudinal lines that start at the head. Heads tend to be triangular or crescent shaped. Planarians do not have a mouth, per se. Instead, they have a single opening on the underside of their body. If the outside of a planarian looks strange, the inside is even more bizarre. Planarians are a mass of squishy tissue and nerves, with a layer of locomotive hairs on the underside. They have no brain, circulatory system, respiratory system, or digestive system. So, how do they eat?  Black Brazilian flatworm (Piterkeo) CC BY-SA 3.0 Land planarian feeding Cousin to parasitic tapeworms, planarians are nocturnal predators that feed on slugs and snails, pillbugs, millipedes, spiders, and earthworms. They use chemical signals that are produced in folds of their skin to detect prey. Some land planarians use physical force to hold their prey, while others have a sticky mucous that entraps their victim. Now, when I said they feed, it isn’t feeding as we know it. When a land planarian feeds, it slimes over top of a potential food, attaches its “mouth” opening, and vomits digestive juices , liquifying its prey. Then, it sucks up the soupy nutrients. Land planarians do not have an anus, so waste products are released through the same opening used to bring it in. If that wasn’t weird enough, land planarian reproduction is even more odd.  Iberian flatworm (Eduard Solà) CC BY-SA 3.0 Flatworm reproduction Like many other flatworms, land planarians are able to reproduce either sexually or asexually. Sexual reproduction culminates in eggs being placed in cocoons that hatch in 3 weeks. A single planarian will, every couple of weeks or so, attach its tail to a rock or some other immoveable object and slime away, tearing its tail from its torso. A new tail grows from the wound, as we would expect of a flatworm. The tail segment left behind, however, does the same thing, growing a new torso and head within 10 days. [When food is scarce, it is not uncommon for land planarians to eat their own reproductive tissues.] Scientists love studying flatworms because of those reproductive habits. In one study, it was found that decapitated flatworms retained the memories of their parent worms. [I can’t make this stuff up.] As far as invasive pests go, planarians are not a significant problem, unless you have a greenhouse or practice vermiculture. [Vermiculture refers to raising worms.] In most outdoor gardens, fluctuations in humidity help keep land planarian populations in check. If you do have a greenhouse, or raise worms, flatworms can wipe out your entire worm population in short order. The next time you see slime trails, don't assume they were made by snails or slugs. It may be that those garden pests are on the run from something far more terrifying (to them). 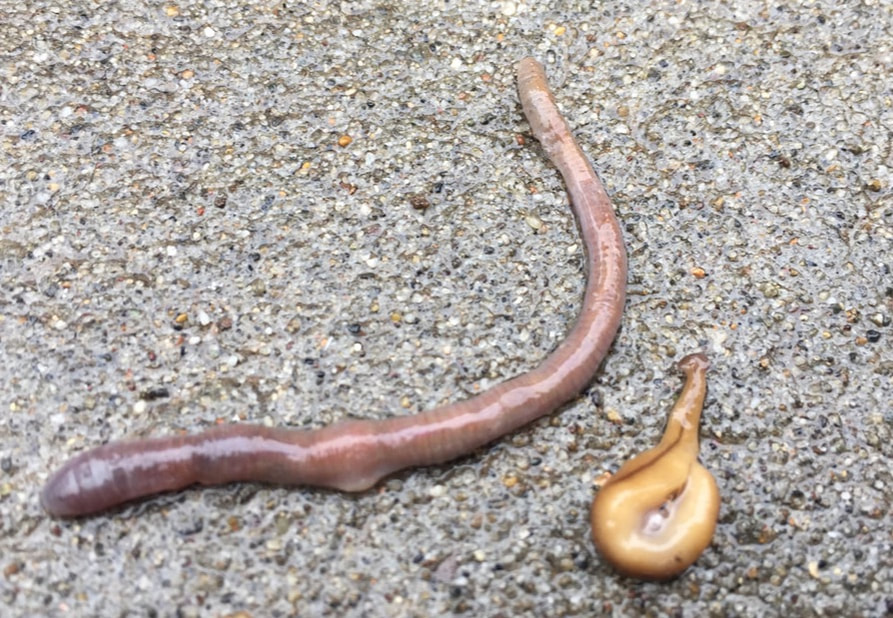 Earthworm rescued from flatworm. Note the swollen area of the worm, 1/3 of the worm's length from its head - that was where the flatworm had started feeding. (Kate Russell) Manganese is a micronutrient used by plants to make chlorophyll. Manganese can also be phytotoxic, which means it can be poisonous to plants. Made by large stars just before they go supernova, manganese is the 12th most abundant element of the Earth’s crust, and early man used manganese as a pigment in cave paintings some 20,000 years ago. How we use it in the garden can help or harm our plants.  Cave paintings of Lascaux (Public Domain) Manganese cycle You may have heard about the nitrogen cycle, the Calvin cycle, or the carbon cycle, but did you know there is a manganese cycle? I didn’t either. It ends up that manganese can take many different forms, depending on what it is attached to. [Mg2+ is the form most commonly used by plants.] Unlike many other elements, which can exist on their own in nature, manganese prefers being attached to other minerals, usually iron. This can cause a whole Domino Effect when it comes to feeding your plants. According to studies conducted by Cornell University, high levels of copper (Cu), iron (Fe), nickel (Ni), and zinc (Zn) can make it difficult for plants to absorb manganese. At the same time, plants low in calcium (Ca), iron (Fe), magnesium (Mg), phosphorus (K), or silicon (Si) are also more likely to be sensitive to high manganese levels. How plants use manganese Manganese is used by all living things as an antioxidant, to counteract the toxic effects of oxygen. In plants, it is an important component of chloroplasts. Chloroplasts are where chlorophyll is made. Manganese is also used during photosynthesis, in many enzyme reactions, and to make potassium and calcium more readily available. Crops such as oats, wheat, and barley use a lot of manganese, with corn using moderate amounts. Once inside a plant, manganese stays where it was first used. As a highly immobile plant nutrient, this means that deficiencies are most often seen in new growth, while toxicities are seen in older growth.  Manganese toxicity has a big impact on plant health (Alandmanson) CC BY 4.0 Manganese toxicities Plants can absorb too much manganese in acid soils, or under drought conditions. When acid-forming fertilizers, superphosphates (fertilizers made by treating phosphate rock with phosphoric or sulfuric acid) are used, or when nitrate (NO3-) is used as a nitrogen source, those acidic conditions can occur. Manganese is most available to plants when the soil pH is between 5.0 and 6.5. Soils with neutral or alkaline pH slow the solubility of manganese, so toxicities are less likely. The most common symptoms of too much manganese look a lot like the symptoms of too much boron:
Too much manganese interferes with root growth and causes overall stunting, especially in alfalfa, small grains, and beans. While magnesium is needed by all living things, too much magnesium can be very, very bad. At high doses, inhaled magnesium can lead to neurological damage called manganism, a condition similar to Parkinson’s disease. If you have to work with manganese, wear protective gear. 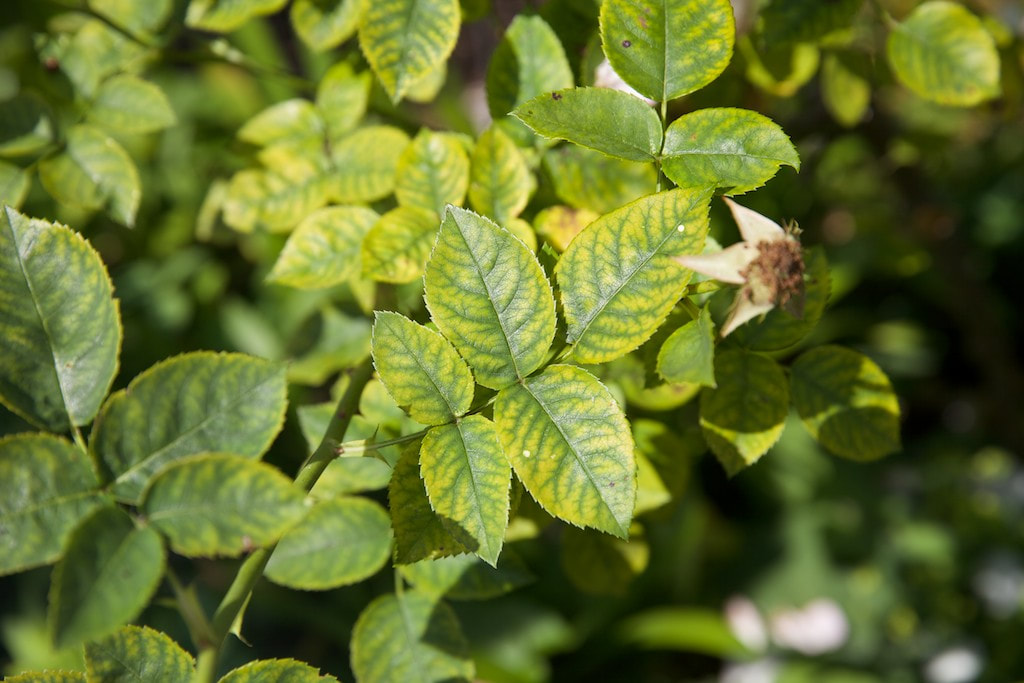 Manganese deficient roses (Malcolm Manners) CC BY 2.0 Manganese deficiencies
Being an immobile nutrient, manganese deficiencies are first seen in new growth. When manganese is in short supply, you will see interveinal chlorosis (yellowing between leaf veins). If there is a sharp distinction between veins and yellowing, it may be an iron deficiency, or a combination of insufficient manganese and iron. If this symptom is seen in older leaves, it is more likely to be a magnesium (Mg) deficiency. Manganese deficiencies are more common in mucky soil, which means providing good drainage can prevent this problem. Cold and wet conditions can also interfere with manganese uptake. Due to its immobility as a plant nutrient, foliar (leaf) sprays of manganese are recommended if deficiencies have been identified. Looking at plant leaves can tell you a lot about what they have and what they need. Galls are like warts or tumors in the plant world.  Oak apples are a type of gall (Maksim) CC BY-SA 3.0 Not really. Galls are neither warts nor tumors, but that’s how many of them appear. The word gall comes from the Latin galla, for oak-apple. Oak apples are not fruits. They are a plant’s reaction to the presence of a foreign substance.  Lime nail galls (Rosser1954) Public Domain The study of plant galls is called cecidology [see-SID-ology]. Most commonly associated with baseball-sized knobs seen on oak trees, galls come in all sizes and can occur on many different plants. Gall description Galls are swellings that occur in response to invasion. That invasion may be in the form of bacteria, fungi, insect larvae, eriophyid mites, nematodes, other pests, and even other plants. Mistletoe is one example of a gall-forming plant. Unlike fungal cankers, which involve plant tissue death, galls, fungal or otherwise, are cases of extra tissue growth. Galls are nearly always woody knobs that may occur anywhere on a plant. Galls may be simple, with a single chamber (unilocular), or highly complex, with multiple pockets (plurilocular). Galls can also look like a sphere, a saucer, pineapples, pinecones, pouches, pods, or fantastic, tiny red spikes. It just depends on the host plant and the cause of the gall.  Root galls found on roses Where they occur and how they look inside can tell you a lot about what caused them.
 Maple leaf galls (Jmeeter) CC BY-SA 3.0 If you cut a gall open, you will see distinctly arranged vascular tissues, depending on the cause of the gall, and an enlarged cambium layer. These distortions interfere with the flow of water and nutrients, leading to wilting and stunting. Or, you may see a large, open area, perfect for use as a larval nursery, with no noticeable impact on the host plant. Insect, mite, and nematode galls When insects invade a plant, they build galls. These galls can act as food or shelter for insects. They are not the same as the plant-produced domatia (tiny apartments) found in some thorns for beneficial insects. Insects inject chemicals (pseudo plant hormones) into host plants, triggering gall formation. Often, eggs are laid in these galls, providing developing larvae with food and protection. Gall wasps, sawflies, gall flies, scale insects, some aphid species, weevils, psyllids, and gall midges can all cause insect galls, but it is nearly always gall wasps or gall midges. Nematodes are microscopic round soil worms that can cause small galls on roots. Root knot nematodes are one such pest. These galls are made up entirely of plant tissue, unlike fungal and bacterial galls, which incorporate fungal or bacterial tissues, respectively. Insect galls may also house interlopers, technically called inquilines. Fungal galls When a fungus infects a plant, it grows alongside plant cells, creating swollen areas that can develop into galls. Several varieties of rust can cause galls to form. When these galls form on conifers, as in the case of cedar apple rust, they look like glutinous fingers called telial horns.  Dried cedar-apple rust gall Fungal galls on other types of leaves tend to look more spherical.  Eucalyptus leaf gall (fir0002) GFDL 1.2 Bacterial and viral galls Bacterial and viral galls develop because the bacteria or virus reprograms plant cells into producing more bacteria, viruses, or other supportive cells. Galls at or just below the soil level are nearly always crown gall. Crown gall is a bacterial disease that can occur on blackberries, sunflowers, grapes, and roses, along with almond, apple, apricot, cherry, and pear trees. Galls on roots may mean clubroot, a disease caused by parasites known as Phytomyxea. On the other hand, root galls may also indicate the presence of beneficial, nitrogen fixing Rhizobium bacteria. Galls have long been used in leather tanning, to make ink, and as astringents. Most galls contain high levels of tannic acid and resin. There are even a few edible galls, corn smut being the most notable. Sometimes, what looks like a gall is herbicide overspray. New and undifferentiated plant cells are most vulnerable to gall formation. Spring is a good time to monitor plants for signs of galls. Once gall development begins, the tissues have been reprogrammed and cannot return to normal. Gall management In a word, you can’t. Insect and mite galls rarely harm plants, and you can’t control these pests completely, anyway. Once they are inside the plant, there is nothing you can spray or apply that will reach them. Anyway, the gall is already in place. Fungal and bacterial galls may be prevented or reduced with fungicide treatments if you can time it perfectly. Or not.  Leaf galls on rhododendron (Xemenendura) CC BY-SA 3.0 If you are galled by galls, remove them with a sharp knife. Otherwise, recognize that galls are just another amazing aspect of playing with plants.
Damsel bugs have soft, slender bodies that may be brown, gray, yellowish, reddish brown, or tan. Adults are 3/8- to 1/2-inch long. They have long legs and long antennae, and may be confused with equally beneficial assassin bugs. Like assassin bugs, some damsel bugs can and will bite. They are, after all, predators. Medically speaking, as far as I know, damsel bug bites are harmless.
Damsel bug lifecycle Young damsel bugs, or nymphs, look a lot like adults, which means they go through an incomplete metamorphosis. They have 5 developmental stages, or instars, before reaching adulthood. This process takes approximately 50 days. Adult females hide eggs by laying them inside plant tissue. Damsel bugs are most active in the Bay Area mid-June through mid-August, but they overwinter in ground cover and winter crops, such as alfalfa and many legumes. Remember, just because you don’t see them doesn’t mean they aren’t there. Damsel bug prey Like lady beetles and praying mantis, damsel bugs are generalists. This means they will eat whatever they can hold onto long enough to eat. Very often, those meals are aphids, armyworms, small caterpillars and caterpillar eggs, fleahoppers, leafhoppers, lygus bugs, mites, proba bugs, spider mites, and thrips. (Hooray for damsel bugs!) Of course, they will also eat beneficial big-eyed bugs and minute pirate bugs, and occasionally they will even eat plants, but their net result to the garden is still very positive. In one study, it was estimated that a single adult damsel bug eats 42 moth larvae, 24 lygus bug nymphs, or 5 aphids every day. The same study estimated that a peak population of damsel bugs (283,000 bugs per acre) could consumer 12 million moth larvae, 6 million lygus bug nymphs, 1 million aphids, or some combination of those and other prey, every 24 hours. That’s some significant garden protection! If you keep a hand lens in your pocket, you may be able to see a damsel bug up close one day. Blackened roots, failure to thrive, yellowing leaves, and irregular stunting may all be signs of root rot, but not all root rots are black root rot. Root rot might refer to the cabbage family’s black rot, asparagus’ Fusarium crown and foot rot, or phytophthora root and crown rot, which attacks several varieties of plants and trees. And then there is black root rot. To tell the difference, you would need a microscope. But knowing what to watch for can reduce your losses.  Black root rot of carrots (Public Domain) Black root rot is a fungal disease. This fungus has a strange name, Thielaviopsis basicola. [THEE-lay-vee-OP-sis.] But being able to pronounce the Latin isn’t as important as recognizing this plant disease before it spreads. Before looking for symptoms, however, you need to know which plants are susceptible to this fungal disease.
Black root rot host plants Black root rot is a frequent problem for commercial growers of ground covers, cotton, rice, herbaceous perennials, snapdragons, tobacco, and our holiday poinsettias. Those lovely spring vinca, pansy, and viola plants can all carry this disease to your garden, even though they might look healthy in the store, which is why quarantining new plants is so important. In addition to those nursery crops, black root rot can appear on several garden plants, including beans and peas, carrots, citrus, cucurbits, horseradish, lentils, melons, peanuts, soybeans, berries, potatoes and tomatoes. Many times, you won’t see damage to roots until after harvest. Identifying black root rot Black root rot first appears as irregular growth patterns followed by uneven stunting. At this point, dig up a sample plant, wash its roots, and look for signs of infection. If the roots or stele exhibit elongated, reddish-purple lesions, it is probably black root rot. [The stele is the center, darker portion of a root.] Over time, those lesions will turn black. Infected roots may also be enlarged, with rough, black cracks. Infected roots are usually severely stunted. Conditions that favor black root rot Black root rot occurs most often in moist soil at 55° and 61°F. Fungus gnats, shore flies, splashing rain or irrigation water, infected flats, containers, and garden tools can spread black root rot. Soggy soil, poor drainage, and too much fertilizer all increase the likelihood of these soil-borne fungi taking hold of your plants. This condition occurs more often in alkaline soil. Preventing black root rot Commercial nurseries use chemical fungicides as preventive measures, but once the infection has occurred, the plant is a goner. [Always throw diseased plants in the trash bin.] In severe cases, soil solarization may be necessary. The best way to avoid black root rot is to provide plants with good drainage, avoid overwatering and excessive fertilizer, and control fungus gnat populations with yellow sticky paper. Acidifying the soil can help somewhat, but soil pH is difficult to change without ongoing treatments. Crop rotation can also interrupt this disease cycle. Remember, mulching with arborist wood chips is one of the best ways to improve soil structure and drainage, reducing the chance of black root rot finding its way to your garden.
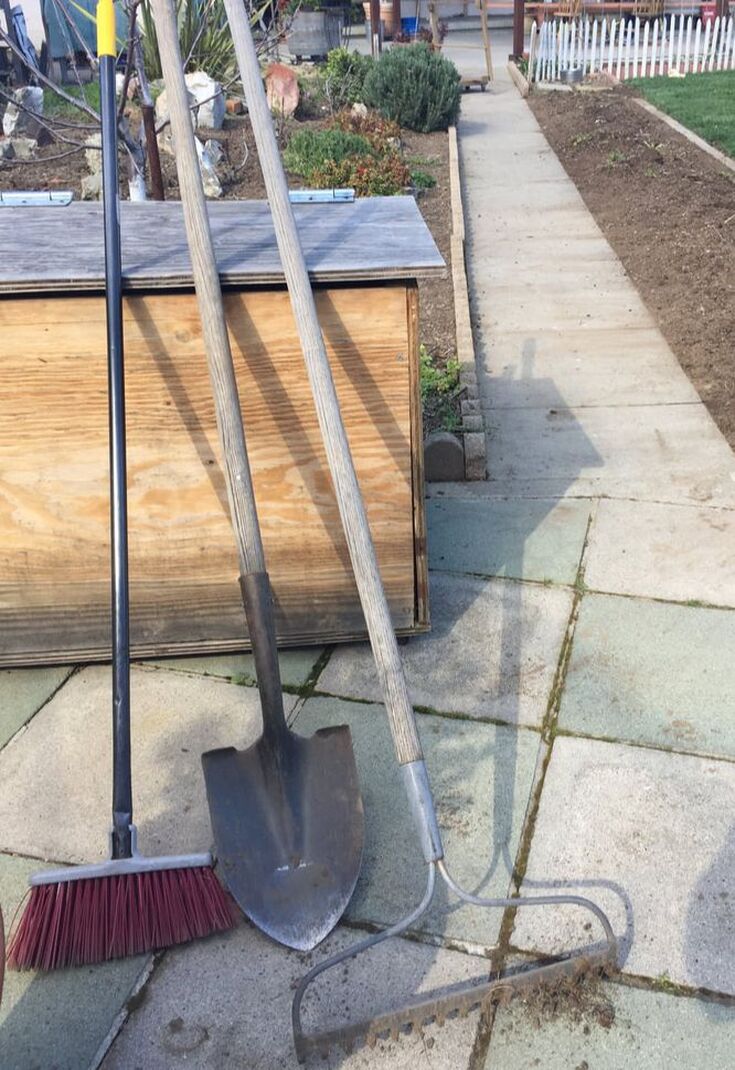
Pruners, shears, and loppers If you only have one garden tool, make it a high-quality bypass pruner. Pruners are used to prune away dead or diseased stems and leaves, shape shrubs and trees, espalier, and harvest the fruits of our labors. Bypass pruners work much like scissors in that the blades bypass each other to make a clean cut. This makes it easier for plants to heal. Anvil pruners use blades that cut against a flat surface, crushing plant material. Anvil pruners are a good choice for cutting dead wood and woody stems.  Hand pruners Shears look like pruners with the blades turned sideways. Grass shears have shorter blades and are used around trees and shrubs, where a string trimmer might damage the bark. Hedge shears are a larger version used to shear shrubs and hedges. For heavier cutting jobs, long-handled loppers are a good investment. For hard-to-reach cuts, pole pruners are a great choice. They allow you to trim the top of your trees without using a ladder. If you are like me and have arthritic hands, you can find pruners with a ratchet action, which provides increased cutting power. Buckets and baskets In my opinion, a sturdy, galvanized bucket is the second most useful garden tool, followed closely by a variety of baskets. Buckets can carry potting soil, water, weeds, chicken feed, tools, beverages, you name it. Baskets are great for carrying transplants, harvested fruits and vegetables, and other lightweight items. Buckets and baskets are simply too handy not to have, so I have several. Gloves While every gardener dreams of having a Green Thumb, that doesn't mean you actually want your thumbs to turn green. Gardening barehanded is an easy way to develop cracked, stained skin and dirty, chipped nails. Of course, gardening barehanded feels good. It also increases the number of mood-boosting soil microorganisms you absorb as your play with your plants. But you will still want good gardening gloves. Believe me. Thorns and blisters are not fun. When selecting gardening gloves, try on several sizes and brands to see which ones feel the best. To test the touch aspect of your garden gloves, try picking up a dime from a hard, flat surface. Once you find a style and brand you like, be sure to grab several pairs. You’ll be glad you did. Hoses and watering cans Watering cans are handy garden tools, helping keep your plants hydrated when and where they need it. The piece at the end of the nozzle is called a rose. A large watering can with a standard rose is best for larger plants. Use a smaller watering can with a long, narrow, open spout for watering containers. Before buying a jumbo-sized watering can keep in mind that one gallon of water weighs 8 pounds. It can get heavy after a while. Watering cans are generally made of metal or plastic. Plastic watering cans are lighter, but galvanized metals last longer. Personally, I opt for metal over plastic. Unless you are gardening on a balcony or indoors on window sills, you will need more than a watering can to keep your garden hydrated. Garden hoses and soaker hoses come in many lengths, colors, and styles. You can control the way water comes out of your garden hose with an adjustable nozzle or water wand. Water wands provide a gentle, rain-like sprinkling. My husband swears by them. I prefer using my thumb. When shopping for a garden hose, be sure the hose does not contain lead or other heavy metals. Lead is used in manufacturing many hoses, but it is probably not a good idea for your edible plants. Forks Pitchforks and spading forks look like dinner forks, only bigger. Pitchforks, or hay forks, have round tines and are used for pitching hay and flipping compost. Spading forks have flat tines that dig into turn the soil and lift plants out of the ground. Garden forks are handheld tools that look like a hand, with the fingers curled downward. A gardening fork is used to break up soil and when weeding. There are also potato forks, border forks, and broad forks, which you can read more about at the Garden Tool Company. Shovels and trowels Even if you employ no-dig gardening, sooner or later, you will probably need a shovel. A shovel is used to turn the soil, break up dirt clods, move materials around, and prepare beds for planting. Long-handled shovels are easier on your back, and short-handled shovels are better when working in tight spaces. There are two basic types of shovel: rounded end and square end. The end of a shovel is called its point. Round point shovels are used for digging. They usually feature a shelf for your foot to provide extra digging power. Square point shovels are better used for moving all that valuable mulch around. Shovels with sharp cutting edges are called spades. Narrow spades, used for digging trenches and installing transplants, are called drain spades. Trowels are simply miniature, handheld shovels. A trowel’s flat or curved blade surface is used to dig into and lift up soil, seedlings, and weeds without disturbing the surrounding area. Extra narrow trowels are called transplanters. Saws The most commonly used saw in the garden is the pruning saw. Pruning saws have a short handle and a short, curved blade, making it easy (usually) to work within a tree’s canopy. Bow pruning saws look more like hacksaws, with the blade held within an extended C-shaped metal handle. Wheelbarrows and carts Wheelbarrows are three-wheeled carts used for moving compost, soil, and other materials. Unless your garden is particularly small, you will want a cart or wheelbarrow. The bucket portion of a wheelbarrow is called its tray. Trays can be plastic or metal. If you are shopping for a wheelbarrow, I urge you to consider a more durable contractor grade. It’s worth the investment. Plastic wheelbarrows and carts have the advantage of being lightweight and they don’t rust, but sturdy and durable are worth the extra cost in my book. Hoes Most hoes are long-handled gardening tools with a small, thin metal blade, used to break up soil and when weeding. There are also handheld hoes, which are indispensable when it comes to getting to the root of problem weeds. In addition to your standard, rectangular garden hoe, there are three other common garden hoes: the Warren hoe, the action hoe, and weeding hoes. The V-shaped Warren hoe is used primarily for digging furrows. The sharp-edged action hoe is a flattened circle used to cut weeds on both the push and pull strokes. There are actually several varieties of this type of hoe, which we will explore another day. Weeding hoes are double-headed in that they have a flat blade on one end and two pointed tips on the other end. Rakes There are 3 basic rakes used in the garden: leaf rakes, cultivars, and thatching rakes. Leaf rakes feature flexible tines gathered at the top into a triangular shape. These cause minimal damage to lawns while collecting fallen leaves. Cultivators are comb-shaped rakes with sturdy metal teeth. Cultivators are used to move mulch, rocks, and soil. When a cultivar has a T-shape, it is called a flat rake. When the head is held in place with two curved steel supports, it is called a bow rake. Thatching rakes use short, sharp, blade-shaped tines, held horizontally, to scratch the soil surface and remove thatch from lawns. Other tools Other handy gardening tools include dibbles, brassica collars, moisture meters, soil sampling tubes, post hole diggers, edgers, stock panels, tree cages, tomato cages, canister sprayers, sticky barriers, brooms, tarps, rain barrels, knee pads… well, the list never really ends. Before adding to your tool collection, however, let’s take a look at common problems associated with garden tools. 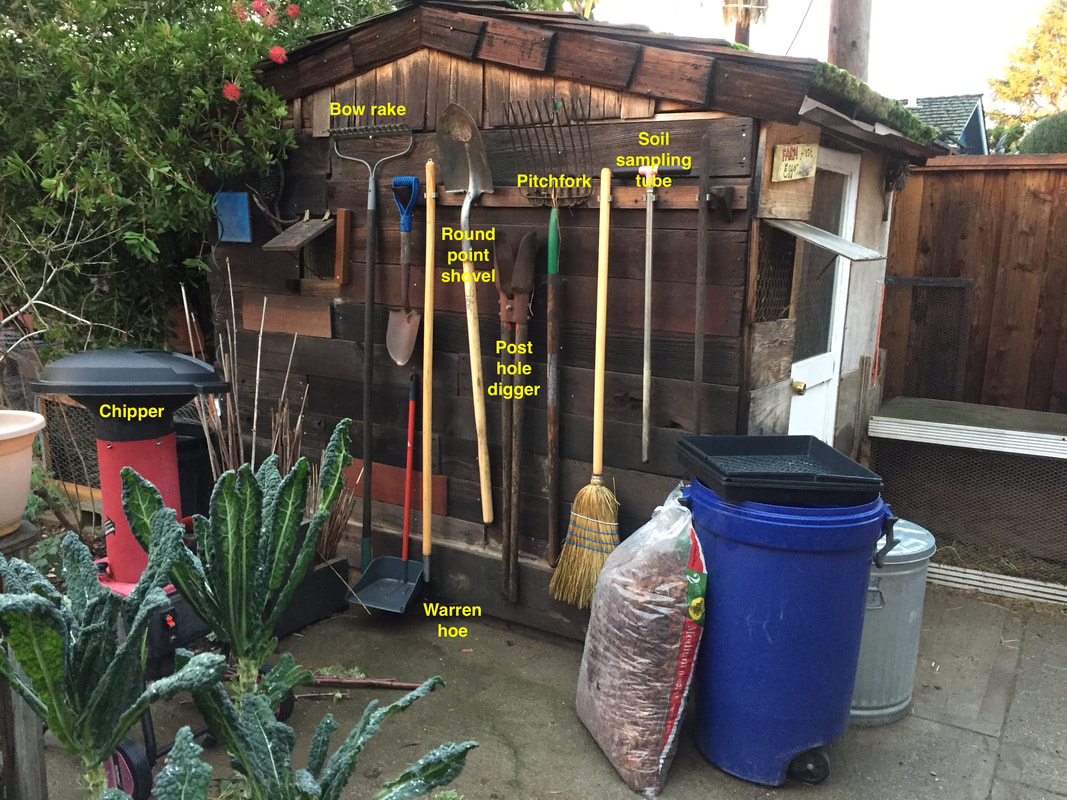 Popular gardening tools Problems with garden tools Dull tools are hard to work with. Dirty tools can carry pests and diseases. If your garden tools are not well maintained, they can become dangerous to you and your plants. A sharp, rusty edge can turn a small cut into a trip to the doctor’s office. Dull blades tear at plants, rather than making clean cuts. And if you don’t periodically sanitize your garden tools, well, you’re just asking for trouble. Tools should be sanitized regularly with a household cleaner. There are a surprising number of mostly fungal and bacterial diseases commonly spread by contact with infected tools:
Witches’ broom and clubroot can also be spread by infected garden tools. And those tools can carry vine mealybugs, nematodes, and San Jose scale to new plants.
Remember, pests and plant diseases are not the only things that get carried on tools - herbicides, pesticides, and tetanus bacterium can hitch a ride just as easily. Keeping tools clean is one way to break disease triangles and prevent accidental exposure. How to clean rusted tools It happens. You leave a tool outside overnight, or you decide, as I did, that your garden tools look lovely, hanging up against the chicken coop. Unfortunately, in each case, this exposes metal tools to water. Metal plus water equals rust. Compounding that problem, putting tools away without cleaning them leaves soil and microbes in contact with the metal surface, which can also cause corrosion. Even if you are diligent about cleaning and protecting your garden tools, they will still need regular care to work properly and last. Following these steps will help your garden tools stay useful longer:
So, what about those rarely heard of tools? How about a billhook? Or a sickle? Or a scythe? Scythes are those long-bladed tools you see being carried by Death or Father Time. If you ask my kids, they will tell you that scythes are implements of torture. This is due to my mother’s insistence that they help her mow a swath of path through her 97-acre Upstate New York farm one summer. Sickles are similar to scythes but only smaller. Billhooks are similar to sickles, but with a wider blade and an even shorter handle. Used to pull brush and vines closer, and then cut them, billhooks, block hooks, and brishing hooks are commonly used in vineyards and when pleaching. Pleaching is the art of building living fences. You want tools that fit nicely in your hands and aren’t too heavy. It is important to buy garden tools that are well made. The demands put upon them often cause lower-quality products to fail. I urge you to avoid poorly made, novelty tools. Ultimately, all your plants need is good soil, plenty of sunlight, and occasional rain. But well-made, properly maintained tools can make gardening a lot easier on your hands and your back. Before placing a bare-root tree or containerized plant in the ground, check for girdling roots. Girdling roots work very much as your great-grandmother’s elastic undergarment did. They cut off circulation and restrict movement. Girdling roots can kill your tree. 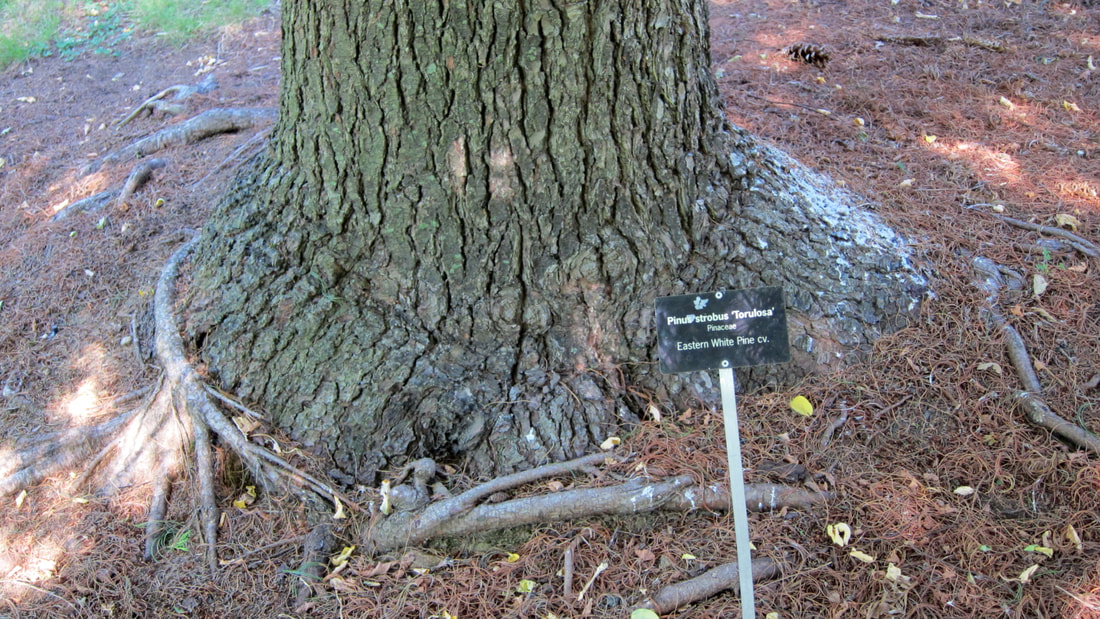 Girdling roots (cultivar413) CC BY 2.0 What is girdling? To ‘girdle’ means to surround something. When girdling happens aboveground, it refers to the removal of a ring of bark. This bark contains the cambium layer, which houses the vascular bundles that transport water, oxygen, and nutrients. Tree supports can result in girdling if left in place too long or installed improperly. Girdling roots create the same problem by encircling the trunk and neighboring roots, effectively cutting off the supply of water, oxygen, and nutrients. Wherever girdling occurs, whatever lies beyond the girdle will, in most cases, die. Healthy trees Perennial roots of healthy trees reach out horizontally, anchoring the tree in place and providing a pathway for resources to enter the tree. Those elements move through the xylem of transport roots after being collected by feeder roots. Unless they can’t, that is.
Roots emerge just below the root collar, where the trunk flares out. Trees planted too deep look more like pencils sticking out of the ground.If the root collar is buried below the soil level, as often occurs with modern, mass-produced trees, girdling, pest infestations, and fungal diseases are more likely. Planting trees too deep makes it harder for roots to access the water, nutrients, and oxygen they need.
Symptoms of girdling roots In some cases, girdling roots can be seen simply by looking at the base of the trunk. If the problem is occurring underground, these symptoms may provide a clue about what is happening underground:
In severe cases, the bole indentation can create structurally weak areas prone to twisting or breaking. Of course, a tree will struggle on, growing but not thriving. Within 2 to 10 years, the tree dies for no apparent reason. How to prevent girdling roots Inspect the root system before planting a tree or shrub. Loosen and straighten any circling roots. Remove any that are too woody to straighten. Next, ensure the planting hole is of the proper depth and diameter. Do not “spin” roots into a too-small hole. Dig the hole wide enough to allow the roots to spread out horizontally. Wider holes are better. Deeper holes are not. Dig the planting hole as deep as needed to keep the roots slightly below the soil surface. Planting it any deeper than that is setting the stage for failure. Loosen compacted soil, or the new roots will circle in this new ‘container’. Building foundations and big rocks can cause girdling roots. Mulching the area with arborist wood chips is an excellent way to (slowly) reduce compaction while keeping down weeds, stabilizing soil temperatures, and retaining moisture. Responding to girdling roots Giving a tree with girdling roots more water and fertilizer will not fix the problem. The offending roots must be exposed and removed. If that sounds like a lot of work, it is. First, remove enough soil to expose the choking roots. Make the first cut six to twelve inches from the trunk, usually with a chisel or a saw. This first cut prevents damage to the tree trunk. Very often, there is a lot of tension held in big roots. Suddenly releasing this tension in the wrong way can be catastrophic. For example, an apple tree with a 20” diameter trunk can weigh nearly 2-1/2 tons, so tension is probably occurring somewhere. The final cut is where the root meets the trunk. You can leave the severed roots where they are. Eventually, they will decompose. And this allows helpful microorganisms to migrate and continue their good works. Substantial roots must be removed in stages by a professional arborist. Cutting them off all at once eliminates their supply of water and nutrients, putting the tree at risk. Tree roots provide the lifeblood of the tree. If those roots start circling, you need to take corrective measures for the tree to survive. Chickweed may sound like a 1970’s party girl, but the name actually refers to several common California winter weeds that can harbor pests and diseases. 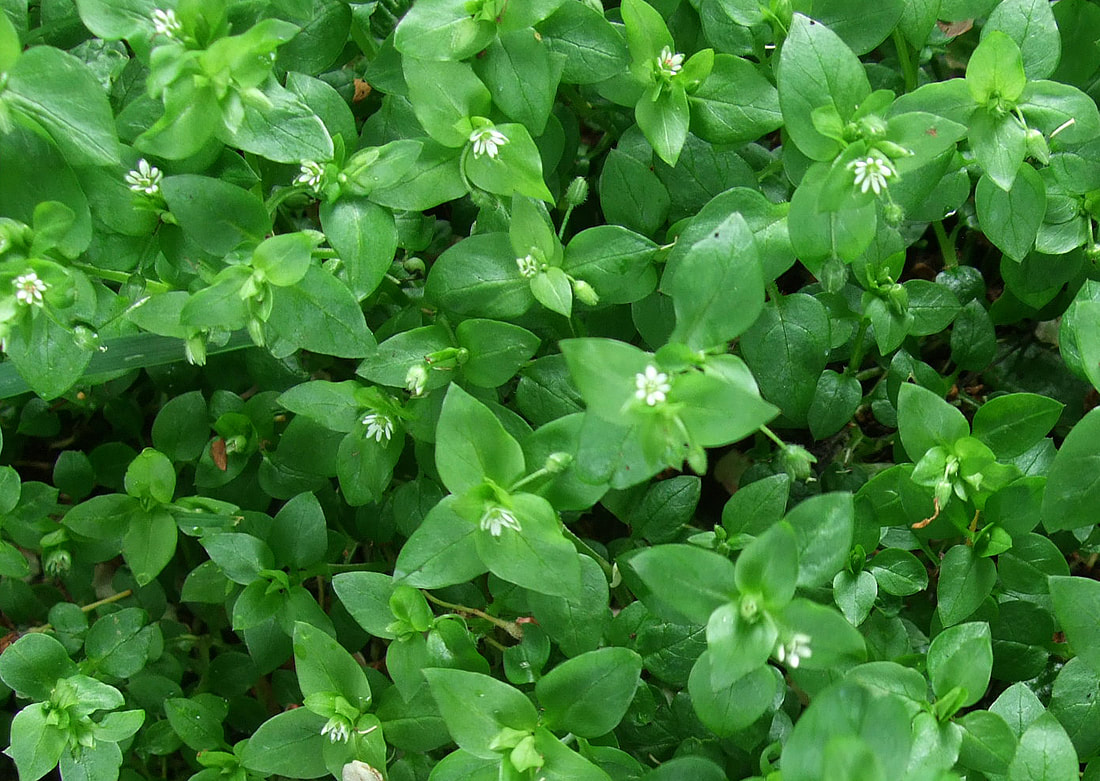 Common chickweed (Simon at Lawn Health) CC BY 2.0 While grown as poultry feed and ground cover, common chickweed provides food and shelter for lygus bugs, thrips, pale-banded darts or spotted-sided cutworms (Agnorisma badinodis), and dusky cutworms (Agrotis venerabilis). Common chickweed can also carry cucumber mosaic virus and spotted tomato wilt virus. Succulent leaves grow opposite one another, and have a pointed tip. Common chickweed can reach 4 - 6” in height, but it generally grows as a short, dense mat, especially in lawns. The roots are fibrous and found near the surface. Stems tend to be weak, and plants produce white flowers and seed capsules at the same time. Common chickweeds plants have 5-petalled flowers, but each petal is split, to create the appearance of 10 petals.There are three species of chickweed found in California and they all germinate quickly and in abundance, under the cool, moist conditions common to California winters. Chickweed can complete its lifecycle in as little as 5 weeks, with each plant producing 800 seeds. If a single chickweed plant goes to seed in your garden or landscape, it can take 8 years before the seeds of that first plant are no longer viable. Be on the lookout for chickweed seedlings from January through the end of March. Common chickweed Native to Europe, common chickweed (Stellaria media) is now found in many regions of North America and Asia. Also known as winterweed and chickenwort, common chickweed has been used as food and herbal remedy, though there is little or no scientific research to back up claims of common chickweed’s ability to provide cooling relief. Many people find the taste of this somewhat succulent annual too bitter to enjoy. Common chickweed contains high levels of iron, but the bitterness is caused by saponins, which can be toxic in large quantities. Common chickweed is differentiated from its non-edible cousins by fine hairs found only along one side of the stem, whereas other, non-edible chickweeds have hairs all around the stem.
Chickweed control
Removing chickweed is difficult. Under cool, wet conditions, chickweed plants may send out roots at the nodes, which means every tiny piece of chickweed is a potential new plant. Thick layers of mulch and hand weeding, preferably before plants go to flower, are really the only organic methods of control. Heavy infestations can be managed with soil solarization. Unless you are feeding these weeds to your chickens, it is better to get them off your property completely, to avoid reseeding. Ploughing or rototilling the area can reduce chickweed germination, but you may simply be trading one problem for another, as other weed seeds are brought closer to the surface. Maintaining a thick, vigorous lawn is another way to reduce the number of chickweed seedlings that make it to adulthood. Allowing your lawn to be taller than a putting green can reduce the amount of sunlight that reaches chickweed seedlings. Before you completely write off common chickweed as undesirable, you need to know that it is also one of the preferred foods of the rare dainty sulphur moth (Nathalis iole). How can you use soil test results? You could ask Mulder. We have learned a lot about plant and soil science in recent decades, but there is a chart that gives us some insight into how the minerals used by plants as food might interact. 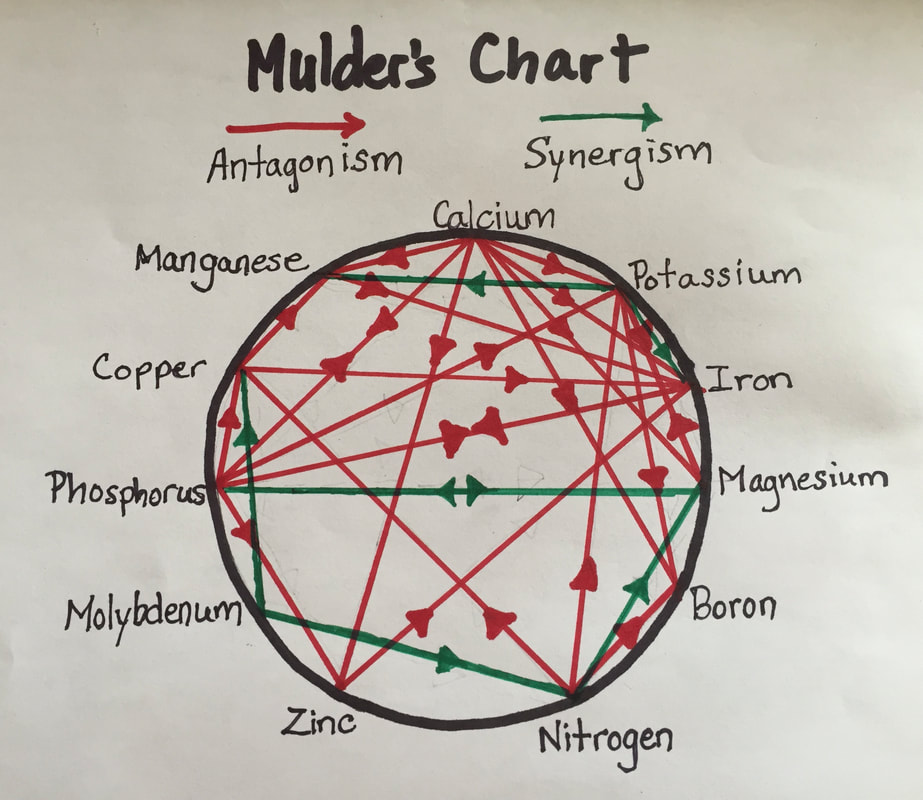 Mulder’s chart of antagonistic (red lines) and synergistic (green lines) elements. Before we learn how to use this chart, let’s review soil pH and nutrient absorption. Nutrient absorption The 20 or so minerals used by plants as food are found in soil as ions. Ions are atoms and molecules that have either a positive or negative charge. These cations and anions, respectively, attach themselves to water molecules and are pulled into the plant by root hairs. The ability of a plant to pull those nutrients in depends largely on soil pH.  Nutrient availability in relation to soil pH. The thicker the bar, the more availability. (CoolKoon) CC BY 4.0 Soil pH
Soil pH ranges from 0 to 14, with lower numbers indicating acidity and higher numbers indicating alkalinity. Using the chart below, you can see that more nutrients are available, and there is greater microbial activity, when soil pH is between 6.0 and 7.0. Most plants can survive in soil pH from 5.2 to 7.8, but the narrower range allows plants to thrive. As anions and cations are pulled out of the soil, the soil pH changes, ever so slightly. This is why too much or too little of certain minerals in the soil may interfere with nutrient availability. This is where Mulder’s Chart comes in. How to use Mulder’s Chart Looking at Mulder's Chart, you can see 11 essential plant nutrients and micronutrients arranged around a circle. Solid and dotted lines connect the nutrients, with arrows heading one way or the other. Solid lines indicate an “antagonistic” relationship, which means high levels of one nutrient leads to a problem absorbing the nutrient being pointed to, while dotted lines indicate a “synergistic” relationship. For example, according to Mulder’s Chart, high levels of nitrogen may reduce a plant’s ability to absorb boron, copper, and potash, as seen by the solid lines pointing from nitrogen toward the other nutrients. In the same way, high levels of nitrogen may stimulate magnesium uptake, and high levels of molybdenum might stimulate plants into absorbing more nitrogen, as seen by the dotted “synergistic” lines. Like most things in life, though, it isn’t really that simple. Soil chemistry Until you have a soil test from a reputable laboratory, you cannot know what is in your soil. Soil test results provide an amazing snapshot of what is really going on “down there”. Your soil test results will include individual measurements of several plant nutrients, as well as a cation exchange capacity rating, which describes a soil's ability to hold nutrients. According to Linda Chalker-Scott, associate professor of horticulture and extension specialist at Washington State University, “It makes sense from a strictly chemical point of view, but soils are also biological. Plants exude organic acids from their roots. Mycorrhizae can mobilize "immobile" nutrients. I find these types of charts way too simplistic for real world conditions.” While there is certainly a limit to its usefulness, I do encourage you to apply Mulder’s Chart to your soil test results and compare those results to what you are seeing in your garden. It may give you an idea of where problems may be occurring, or it might just be a fun way to review your soil test. |
Welcome!You can grow a surprising amount of food in your own yard. Ask me how! To help The Daily Garden grow, you may see affiliate ads sprouting up in various places.
You can also get my book, Stop Wasting Your Yard!  Index
All
Archives
July 2024
|


 RSS Feed