|
Viruses are nearly always bad news, but sometimes they can surprise you. The tobacco mild green mosaic virus is one of those.
This viral disease can infect your peppers, potatoes, and tomatoes. It can also help out. Symptoms of tobacco mild green mosaic Stunting, leaf mottling and puckering, and deformed fruits are all symptoms of tobacco mild green mosaic. These symptoms look similar to cucumber green mottle mosaic, tobacco mosaic, and tomato brown rugose, and with good reason. The viruses that cause these diseases are close cousins. There are no chemical treatments for tobacco mild green mosaic. Good cultural practices like hand washing, sanitizing your tools, and avoiding infected areas, can slow the spread of this disease. And keep weeds in the nightshade family at a distance. Tobacco mild green mosaic trivia This virus is an approved herbicide in the US. Scientists discovered that the virus responsible for tobacco mild green mosaic is lethal to tropical soda apple. Tropical soda apple (Solanum viarum Dunal) is a spiny, invasive weed that makes farmland, orchards, and pastures less productive. Florida estimated, in 2022, that tropical soda apple infested 1 million acres of their agricultural land. According to the American Chemical Society, this virus can kill parasitic nematodes. In 2017, parasitic nematodes cost the global agricultural industry $157 billion. That’s a lot of zucchini! So maybe the tobacco mild green mosaic virus isn’t all bad. Researching yesterday’s post on bacterial blight, I was astounded at the number of diseases caused by Pseudomonas. Pseudomonas [soo-doh-MO-nas] is a genus of bacteria that most of us gardeners end up fighting. These bacteria are commonly found in plant debris, soil, and water. They also hide out in many dicot seeds. But don’t worry, Pseudomonas only infects plants with leaves and stems. The rest of your garden is safe. *wink*  Tomato leaf infected with bacterial speck (Alan Collmer, Cornell University) Public Domain Pseudomonas plant pathogens To date, more than 500 strains of Pseudomonas have been sequenced. Here is a list of the most common bacterial diseases caused by Pseudomonas:
Small dark spots appear and expand into odd-shaped dead areas in nearly all these diseases. It’s all downhill from there.  Bacterial leaf spot on a beet leaf (Howard F. Schwartz, Colorado State University, Bugwood.org) CC BY 3.0 US Managing Pseudomonas These are some tough SOBs. These bacteria have evolved to survive rugged conditions. Their cell walls are equipped with pumps that eject antibiotics and other unwanted materials before they can do anything, so chemicals are often ineffective. Because of this, prevention is your best management tool. Most importantly, space plants far enough apart so they can dry off rapidly. And avoid overhead watering. 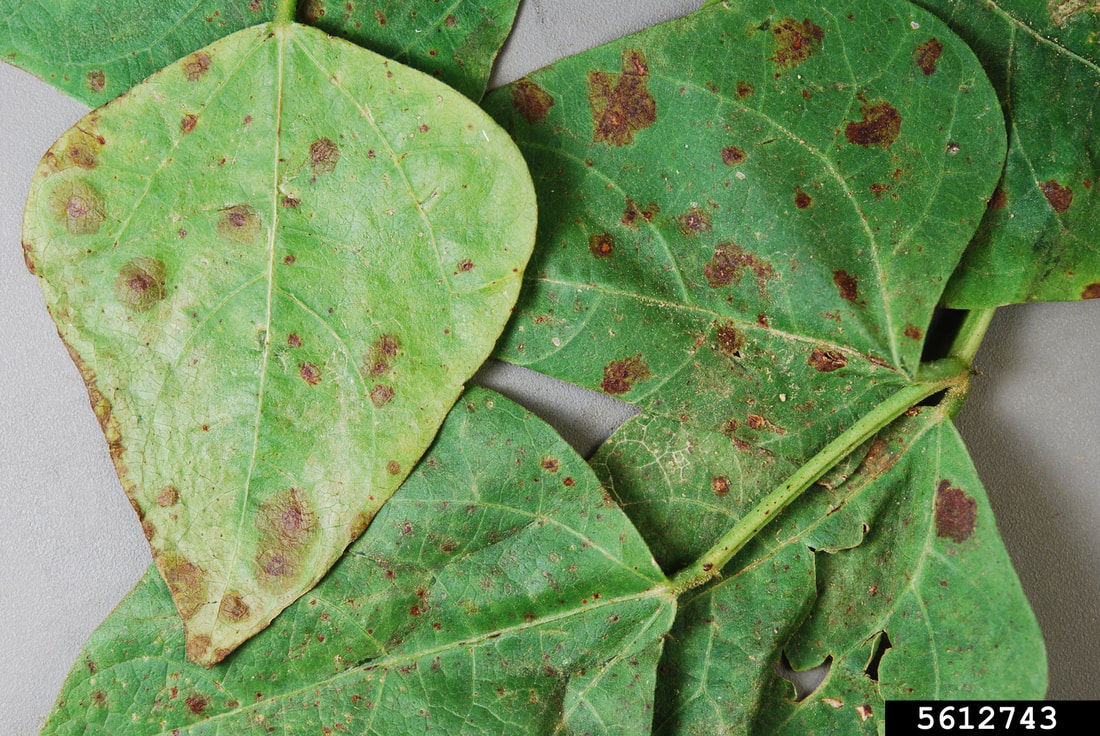 Bean leaves with bacterial brown spot (Nancy Gregory, University of Delaware, Bugwood.org) CC BY 3.0 US Pseudomonas isn’t all bad
As handy as it would be to say that all Pseudomonas are evil, it ends up that some of these soil bacteria help plants stay healthy. In fact, they practically make life possible on Earth. Life sure can be messy, eh? Some Pseudomonas protect plant roots against disease-causing Fusarium fungi and Pythium oomycetes. They also protect against plant-eating nematodes. And other strains help activate disease resistance within wheat and other cereal crops. Some Pseudomonas can metabolize pollutants and are used in bioremediation. Finally, Pseudomonas helps form most snowflakes and raindrops that fall on Earth. Now you know. If you grow apples, cherries, kiwifruit, mulberries, nectarines, peaches, pears, plums, or walnuts, you need to know about bacterial blight. 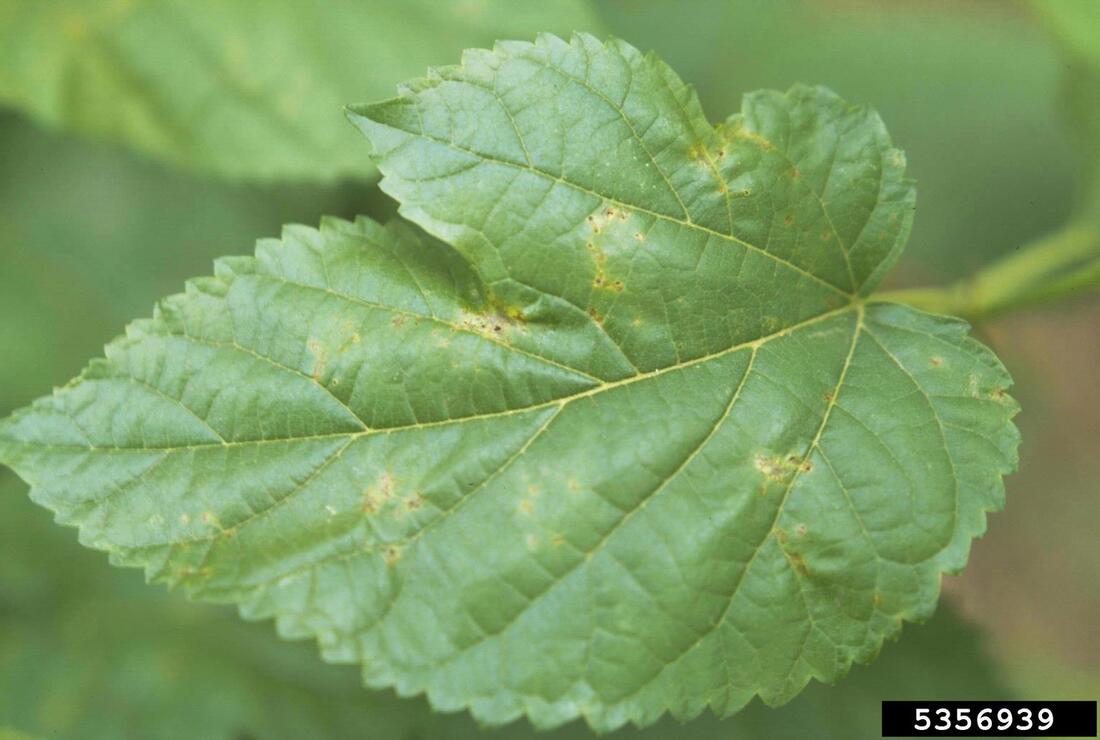 Early symptoms of bacterial blight on mulberry leaf (William M. Brown Jr., Bugwood.org) CC BY 3.0 US Bacterial blight is not the same thing as common bacterial blight, which attacks legumes. To make matters worse, many people call another bean variety of blight ‘bacterial blight’. I know, it gets confusing. Let’s see if we can clarify some of this.
The cause of bacterial blight Bacterial blight, also known as blossom blight or shoot blight, is caused by a bacterium called Pseudomonas syringae. There are over 50 different strains of this bacteria that cause plant disease. Common examples include bacterial canker, bacterial speck, citrus blast, and halo blight. Pseudomonas syringae is commonly found on the exterior surfaces of healthy plants. It is only when bacteria get inside, through wounds or natural openings, that the trouble starts. Bacterial blight symptoms Like the other diseases caused by this pathogen, the first symptom is water-soaked areas on leaves. These areas turn brown and mushy and often have yellow halos. If these spots occur early in a leaf’s development, leaf curling and twisting may also occur. Leaves may also start dying from the outer edge, with the infection moving inward toward the center. Twigs may exhibit black streaks, and it is common for infected blossoms, branch tips, and leaves to die. If infected twigs develop a shepherd’s crook shape, it’s probably fireblight. Managing bacterial blight Pseudomonas syringae is most commonly spread by wind and rain. Insects and your garden tools can also be part of the problem. You have to assume that the disease is present. These bacteria can survive in diseased plants, infected plant debris, and soil. Once a plant is infected, you can try to save it by trimming 10 to 12 inches below infected areas, making sure to disinfect your pruners between each cut. You can dip them in a 10% bleach solution for 30 seconds, though bleach is hard on tools. You can also use bathroom cleaner or other spray disinfectants that contain at least 70% alcohol. Just be sure to give it a few minutes to work before making another cut. Infected plant material should be bagged and thrown in the trash right away. Prevention is easier. To prevent bacterial blight from taking hold in your landscape, use these tips:
Fixed copper sprays may also help. Also known as cherry X disease, peach X disease, and cherry buckskin disease, X disease makes fruit small, pale, and bitter. It can affect stone fruits, such as apricots and cherries. Once a tree is infected with X disease, it must be removed to prevent the infection from spreading to other trees.  Cherries on the left infected with X disease (Plantpathfinder) CC BY-SA 3.0 What causes X disease? X disease is caused by phytoplasma. Phytoplasmas are microscopic, one-celled bacteria that have no cell walls or nuclei. To me, that’s just weird. Animal and plant cells and most bacteria have clearly defined cell walls that hold their insides in, where they belong, and a central nucleus that runs the show. I have a hard time wrapping my brain around these phytoplasmas. Maybe they are like parasitic amoebas, even though amoebas are animals. But I digress. So how does a cell with no wings, legs, feet, or brain find its way to our fruit trees? The answer is phoresy. Phoresy describes the relationship between two organisms in which one player is a hitchhiker but not a parasite. There are some pretty bizarre examples of phoresy. You may want to check it out. Phytoplasmas catch rides inside sap-sucking leafhoppers, planthoppers, and psyllids without harming their hosts. When a cherry leafhopper feeds on an infected plant, the phytoplasma responsible for X disease is sucked into the insect’s gut with the sugary sap. When that vector moves to an uninfected plant and begins feeding, the pathogen is transferred to the new plant, causing infection. What does X disease look like? This disease can take up to 9 months to appear after infection occurs. Eventually, trees infected with X disease produce pale fruit that is small and leathery. Symptoms are commonly seen on only one branch at first. The leaves on infected branches may appear bronzed and small. Older leaves tend to fall off. Beyond that, symptoms can vary, depending on the tree species. 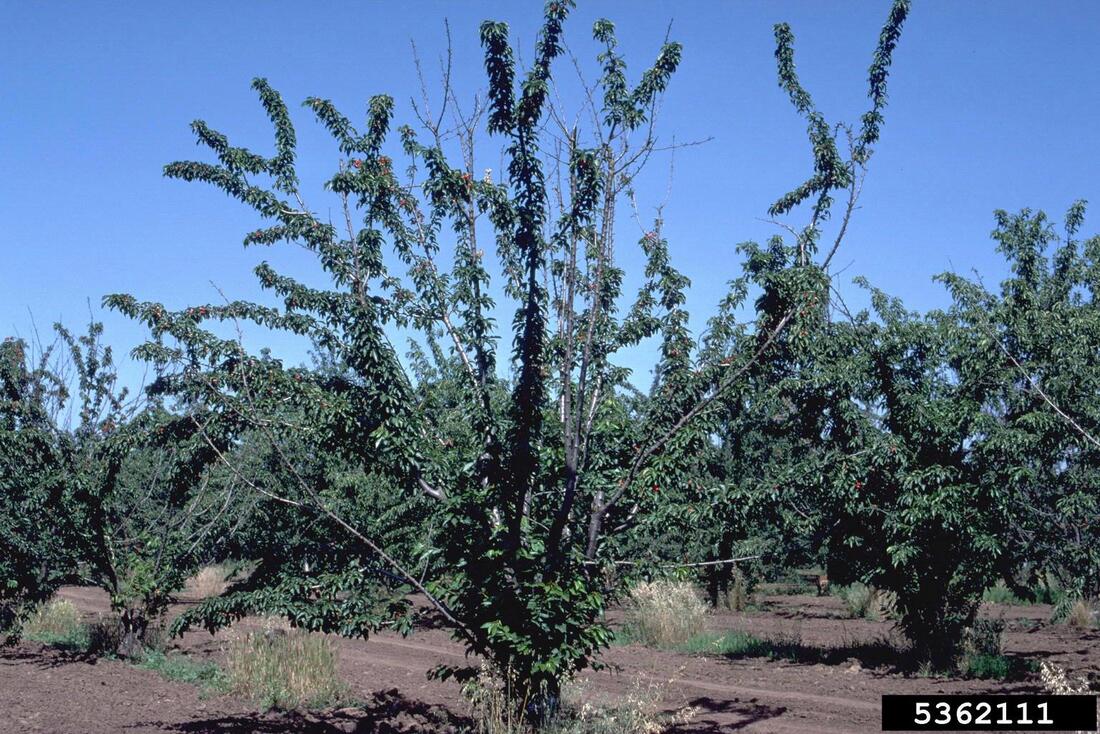 Cherry tree infected with X disease (H.J. Larsen, Bugwood.org) CC BY 3.0 US X disease is often mistaken for root rot. To figure out which it is, look closely at the graft union. That’s where the rootstock was grafted onto the fruiting stock. Pits and grooves are visible near the graft union if it is X disease. Cut into the wood and see brown areas in the phloem. These other symptoms of X disease are also common:
The fruit from infected trees tends to be pale, pointed, small, and nasty. X disease hosts There are two types of X disease hosts: those that don’t mind the infection (reservoir hosts) and those who succumb to the disease (non-reservoir hosts). Reservoir hosts are a problem because they look perfectly healthy but provide a source of infection to many important fruit and nut trees in our landscapes. Almond trees, chokecherries, sweet and sour cherries, Japanese plums, clovers, and dandelions are all reservoir hosts. [Dandelions?!!? Yes, dandelions.] Nectarines and peaches can also become infected with X disease but are non-reservoir hosts. This means that they can catch the disease but not spread it. Scientists don’t yet understand how that happens, but they’re working on it. X disease management Since scientists have been unable to reproduce the phytoplasmas responsible for this disease in the lab, there are currently no treatments for this fatal disease. To reduce the likelihood of X disease occurring in your landscape, do your best to manage the insect pests responsible for carrying the pathogen. The insects that spread X disease are often found on beets, burclover, ceanothus, curly dock, hawthorn, and pyracantha. Because of this, it is a good idea to maintain some distance between these plants and vulnerable trees. If you suspect X disease has infected one of your trees, get help. Contact your local Master Gardeners or the Department of Agriculture for verification. They can also help you figure out the safe removal and disposal of infected trees. No, we’re not discussing those yummy chocolate cherry cookies, though I may have to try baking a batch after researching this post! The cherry crinkle we are exploring today is a condition that occurs in cherry trees. Cherry crinkle looks like a viral disease, but it’s not. Also known as cherry vein clearing, this condition is believed to be a genetic mutation that may or may not be related to a boron deficiency.  Healthy cherry trees are a garden treat (Couleur) Pixabay Cherry crinkle symptoms
Vein clearing, especially in the margins, is the most common symptom of cherry crinkle. Vein clearing refers to the way veins look lighter or more yellow than normal. I wasn’t able to find a photo that I could use, but these other symptoms may also occur:
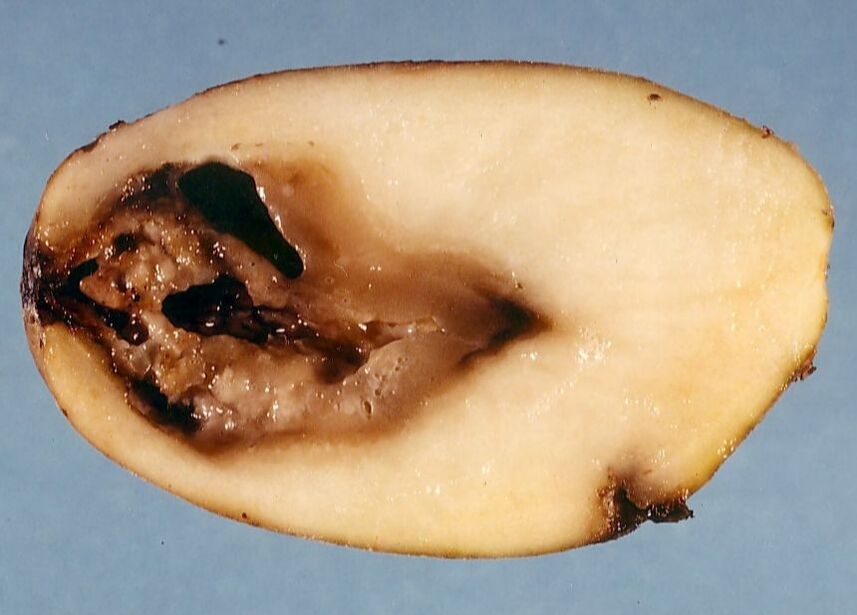
Cherry crinkle management If you suspect cherry crinkle, send a sample of soil to a lab for testing. This will tell you if your boron levels are low. It’s not a good idea to add nutrients without a soil test because too much of a nutrient can cause just as many if not more, problems as a nutrient deficiency. If boron isn’t the problem, the tree is probably a mutant and should be replaced. Cherry crinkle can be spread to unaffected trees by grafting mutated scions onto healthy wood. When shopping for a cherry tree, try to find one listed as unlikely to crinkle. Blackheart is a disorder caused by environmental conditions. It occurs in celery, potatoes, sweet potatoes, tomatoes, and other garden crops. The causes of blackheart are the same. If seen in almonds, it’s a fungal disease called Verticillium wilt. Causes of blackheart Blackheart is the result of insufficient oxygen or too much CO2. How can you control those levels, you might ask. It’s easy. Picture this: it’s a hot day. Your plants are wilting. You add water, a lot of water. Your intentions are good, but now the ground is saturated. This localized flood pushes oxygen out of the macropores and micropores of the soil, and blackheart takes hold. Blackheart is also caused by too many cold days, like in your refrigerator. Blackheart of celery If young tissues in the middle of your celery plants turn black, it may be blackheart. Much like blossom end rot of tomatoes and tip burn of lettuce, this condition is a calcium uptake problem. It means plants cannot access enough of it. It may be a calcium soil deficiency or insufficient water. An inexpensive lab-based soil test is the only way to know what is in your soil. Irregular watering, soil salinity, and excessive fertilizer, specifically magnesium, nitrogen, or potassium, can interfere with calcium uptake. 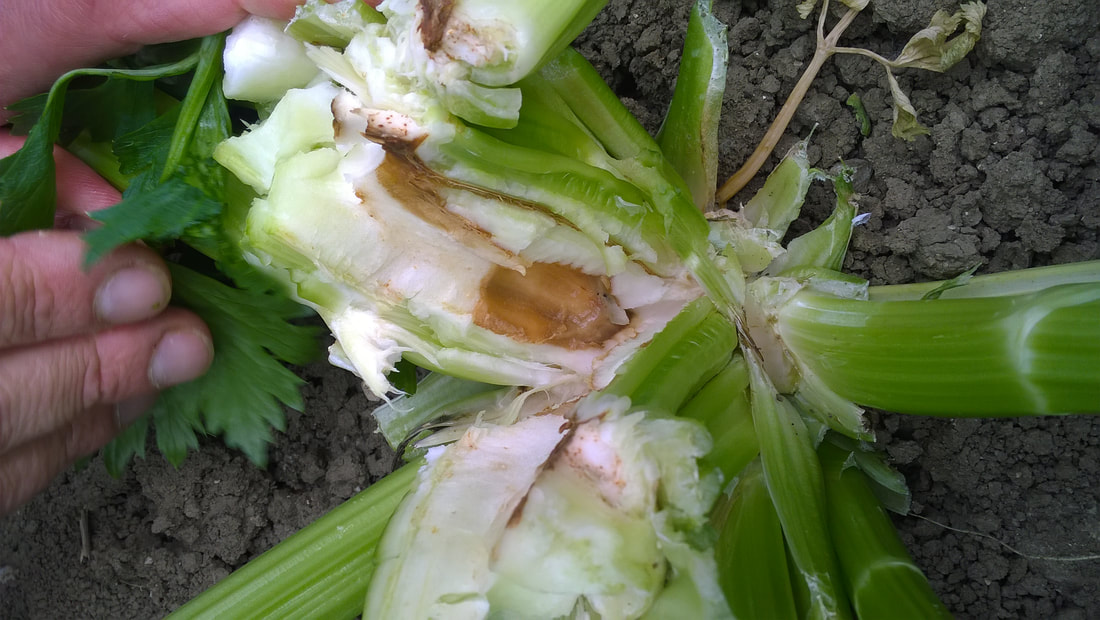 Celery blackheart (PlantVillage) CC BY 3.0 Blackheart of tomatoes and potatoes (sweet and otherwise) Commonly affecting potatoes and tomatoes, blackheart causes them to turn black in the middle. Fruit suffering from blackheart looks perfectly normal on the outside. Like hollow heart, which creates cavities within tubers, blackheart creates dark areas with distinct edges inside the fruit. These darkened areas start as random spots that can expand. There may be small cavities, but they are mostly absent. These symptoms are similar to soft rot and Phytophthora root and stem rot, except that the interior stays firm. Eventually, these darkened areas will rot. If your seed potatoes have blackheart, they will grow into weak plants, if they grow at all.
Preventing blackheart
To prevent blackheart from occurring, use these tips:
I hope the only blackhearts you have to deal with are the ones found in comic books. Sometimes things look fine on the outside when the inside is damaged. If you cut a beet, potato, seed, or watermelon in half and find a hole in the center, it has hollow heart. Also known as hallowheart, this condition indicates that the plant faced more stress than it could handle. 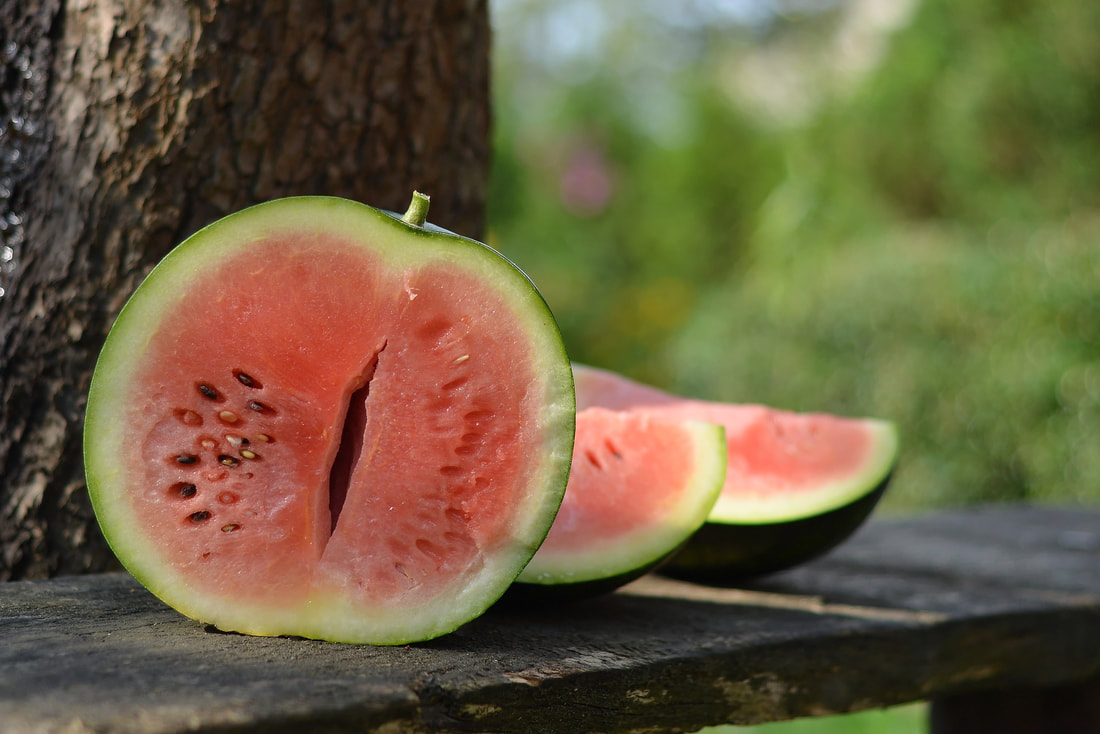 Watermelon with early-stage hollow heart (utroja0) Pixabay Hallowheart of watermelons Hollow heart in watermelons is a pollination problem. Poor pollination occurs when temperatures are low or when there are not enough pollinators in the area. Somehow, poor pollination causes the interior of watermelon to develop triangular, often symmetrical gaps in the fruit. Seedless watermelons are more susceptible to hollow heart than seeded varieties, and orange and yellow-fleshed watermelons are the most likely to develop this condition. Improve pollination rates in your garden by attracting pollinators with flowers that appeal to honey bees and bumblebees. You can offset low temperatures with row covers. Hollow heart in watermelons can also occur when they get too much fertilizer and insufficient water. The cells responsible for producing fruit cannot keep up with the cells producing rind under those conditions. Hollow heart of beets If you cut into a beet and find an empty center, it’s time to send a soil sample to a lab for testing. Hollow heart in beets is commonly a symptom of a boron deficiency. Look closely at the petioles (leaf stems) for signs of cracking, abnormalities, or stunting. If the cavity is rotting, it may be blackheart. Hollow heart of potatoes Hollow heart in potatoes can be a weather problem or a water problem. Potatoes are greedy plants. They need a lot of water and nutrients to produce those fat tubers. Hollow heart occurs when a developing potato is hit with cold weather, followed by hot weather. Or when a sudden dry spell ends with an extended wet period. Like that one time you forgot to water them and then gave them extra water to make up the difference. Where the cavity occurs will tell you its cause. Water or nutrient stresses that occur later in the growing season create holes at the bud end of the tuber. These cavities do not have a brown center. When hollow heart appears at the stem end of a tuber, cold weather followed by hot weather is the culprit. Brown centers are a common symptom of stem end hollow heart.
Hollow heart in seeds
Garden peas and other seeds can also develop hollow heart when unusually high temperatures occur right after germination begins. Because this disorder happens so early in the plants’ development, it leaves them vulnerable to several fungal diseases. The best way to avoid hollow heart in peas and other seeds is to plant at the optimal time of year for each species. Bottom line: regular irrigation, planting at the appropriate time, and the right amount of nutrients can help prevent hollow heart in your garden. Potato virus Y (PVY) is the Big Daddy of potato problems, right up there with early blight. And potatoes aren’t the only plants at risk. Peppers, tomatoes, and groundcherries can all catch PVY. Losses can be as high as 80%. Infected potatoes that make it to harvest don’t last in storage. And who wants to eat an infected potato?  Potato infected with necrotic ringspot (Chrisvis1) CC BY 3.0 Potato virus Y is spread by aphids but not in their saliva. Instead, these microscopic potyviruses stick to aphids’ mouthparts (stylets). As the vector aphids feed, they spread the disease. Your shoes, clothes, and garden tools can also transfer this virus.  Tobacco leaf infected with PVY (R.J. Reynolds Tobacco Company Slide Set, Bugwood.org) CC BY 3.0 The many flavors of PVY PVY used to be easy to identify, leading to the early removal of infected plants and reducing the spread of disease. Recent PVY virus mutations have made identification more challenging. There are fewer symptoms, so infected plants stay in place longer, spreading disease to nearby plants. 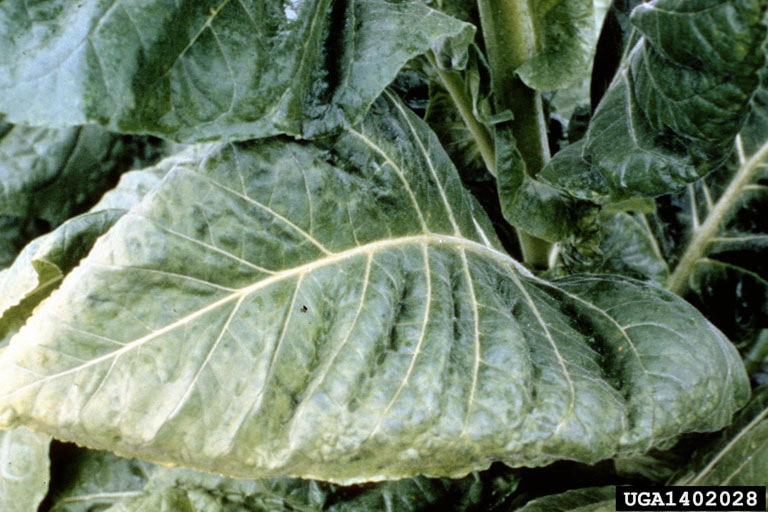 Tobacco leaf showing mild PVY symptoms (R.J. Reynolds Tobacco Company, Bugwood.org) CC BY 3.0 The most common variations of PVY include PVYO (ordinary), PVYC (uncommon), PVYN (necrotic), PVYNTN (tuber necrosis), and PVYN-Wi (a recombinant strain). The tuber necrosis strain can cause potato tuber necrotic ringspot disease (PTNRD). Potato virus Y symptoms Brown spots on leaves and tubers are the first sign of potato virus Y infection. Other symptoms vary depending on the plant age and health, environmental conditions, potato cultivar, soil health, virus strain, and other coinfections, such as PVA, PVS, and PVX. Chlorosis, curved midribs, leaf crinkling, mosaic, mottling, and vein distortions are early signs of PVY. Infected leaves feel rough (rugose) compared to healthy leaves. The underside of infected leaves exhibits dark lesions and black streaks on the midrib. As the disease progresses, leaf loss and stunting are common. This disease is easily mistaken for calico (alfalfa mosaic virus).  Tomato leaves infected with potato virus Y (Scot Nelson) Public Domain Potato virus Y management
Chemical treatments are not effective against potato virus Y, so these good cultural practices are your best line of defense:
Potatoes come in many colors: blue, purple, red, yellow, and white. But why does potato skin turn green sometimes, and can it hurt you? .jpg) Green-skinned potatoes (Rasbak) CC BY-SA 3.0 The simple answer is yes. Green-skinned potatoes can make you sick. According to WebMD, you can peel green-skinned potatoes, but those potatoes are still not entirely safe to eat because of toxins.
Potato toxins Like other members of the nightshade family, potatoes produce toxins. The toxins produced by potatoes are called solanine and chaconine. These toxins are defense mechanisms produced in abundance when the tubers are dug up and exposed to light. The green color under potato skin is chlorophyll. You can use it as a signal that lets you know a spud’s chemistry has changed. Why do potato skins turn green? Tubers belong underground. Uninjured potatoes are relatively stable in cool, dark locations. Expose them to light once, and nothing happens. Expose them to light several times, and things start happening. Imagine, if you will: First, they get dug up at the farm and see daylight for the first time. Then they are moved to a shipping truck and rolled down the freeway for more sunlight. Drop them off at the processing plant, and they get more light. You get the idea. By the time they leave the grocery store (where they got even more light) and arrive at your kitchen, some potatoes will have shifted from storage to growth mode. That is when trouble starts. Is peeling enough? Many say that peeling the green skin away makes the spud safe to eat, which is not entirely accurate. While most potato toxins are in the skin, they are also present in the rest of the potato. [Just as moldy cheese has mold growing throughout its interior, even if it is invisible.] Peeling green-skinned potatoes may not be enough, and cooking them does not affect the toxins. Healthy individuals with good digestive systems are generally not harmed by occasional green-skinned potatoes. If you notice any of these symptoms, however, see a doctor:
Preventing green-skinned potatoes You can’t control what happens to your potatoes before they arrive at your home (assuming you haven’t started growing your own yet). You can store your potatoes in a dry, chilly location with as much darkness as possible. Your refrigerator or pantry are ideal. If an occasional green-skinned potato appears, throw it in the trash if it was from the store. If homegrown, add it to the compost pile or plant it. Powdery scab may sound like an adolescent skin problem, but it is not. It is a potato disease that leaves spuds looking, well, scabby. You can cut away the affected bits and eat the rest of your potato, but the skin is where most of a spud’s nutrients are stored, so that’s a shame. Also known as corky scab, let’s see what we can learn about this disease and how to prevent it.  Potato infected with powdery scab (A.J. Gevens, UW Extension) CC BY-SA 3.0 US The powdery scab disease Powdery scab is a disease caused by one-celled creatures known as Cercozoa. They are not bacteria, fungi, or viruses. Instead, they are parasitic amoebas. Specifically, it is Spongospora subterranea that causes powdery scab. These microscopic critters exist around the world. Tomatoes, nasturtiums,, and other nightshade family members can also become infected with powdery scab. Once infected, plants are more susceptible to other diseases, such as potato mop-top and scab. Powdery scab spores can remain viable in the soil for up to 10 years. Powdery scab symptoms Small, purple lesions that look like pimples first form on the skin of an infected tuber. Those lesions grow bigger until they rupture, sending spores in all directions. Those spores are white. To the naked eye, these spore clusters look like scabs. You may also see galls on infected roots, leaf wilting, or discolored stems.  Red potato infected with powdery scab (Agronom) CC BY-SA 3.0 How to prevent powdery scab
Infected potatoes are not the only way powdery scab can enter your garden. Other potential pathways include infected bulbs, corms, rhizomes, firewood, planting containers, shoes and clothing, and soil from introduced plants. I am a big proponent of buying used garden gear from yard sales and thrift stores. But you have to wash everything thoroughly before using it. And always put new plants into quarantine. Chemical controls are not effective against powdery scab. But these practices can help prevent powdery scab:
Whatever you do, do not give in to the temptation to install spuds and other vegetables from the grocery store. These plant sources may be convenient and inexpensive, but they can bring a world of hurt to your garden. Produce bought at grocery stores is certified safe to eat, but it can still carry soil-borne diseases that may linger in your soil for decades. If you are growing in containers, this is less of a problem. If any disease appears in that case, toss it in the trash and start over. Hopefully, you catch it before any problems spread to the rest of your garden. If you have a large, lovely, and productive avocado tree, you will want to be sure to prevent avocado root rot. This disease is commonly caused by overwatering and it is usually fatal to the tree. [By the way, removing large trees is expensive and dangerous.] 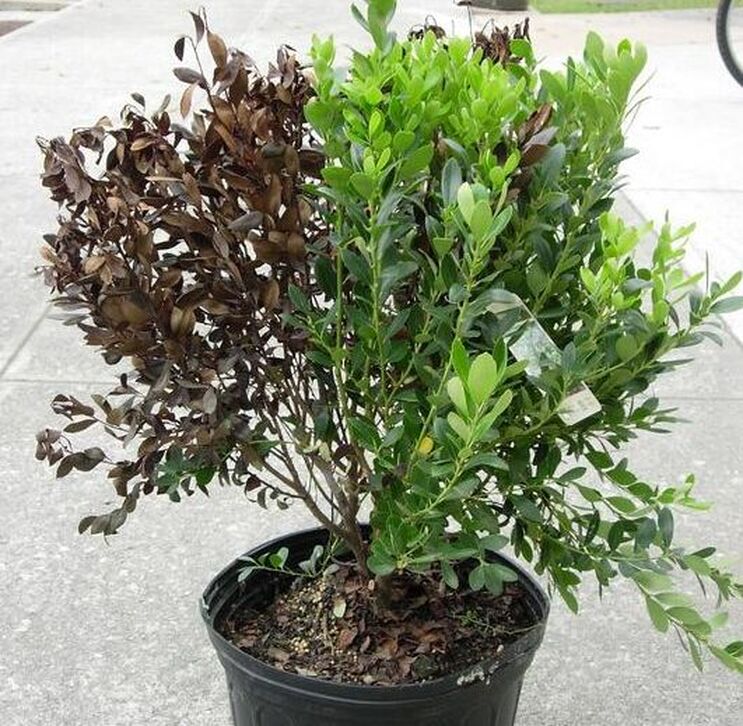 Gallberry plant infected with avocado root rot (Elizabeth Bush, Virginia Polytechnic Institute and State University, Bugwood.org) CC BY-SA 3.0 Avocado root rot is perhaps the most common disease of California’s avocado orchards, but nearly all fruit and nut trees are susceptible, as are azaleas, blueberries, boxwood, camellias, cinnamon trees, conifers, cycads, ferns, lilies, mosses, pineapples, and roses. Avocado root rot also threatens California’s rare endemic Ione manzanita (Arctostaphylos myrtifolia). What causes avocado root rot? Large trees and shrubs use a lot of water. Adding too much water creates habitat for tiny water molds, called oomycetes. Oomycetes are responsible for Phytophthora [Fie-TOF-ther-uh] root and crown rot diseases. This is one of those. The oomycete responsible for avocado root rot is called Phytophthora cinnamomi. The Global Invasive Species Database includes Phytophthora cinnamomi in its list of "100 of the World's Worst Invasive Alien Species". These water molds were originally found only in tropical and subtropical countries. They are now found around the world. Water molds fall between fungi and algae. They fly through the air and exist in waterways and the soil. Normally, they are not a problem. Until environmental conditions are suitable, the oomycetes that cause avocado root rot mostly remain dormant in the soil. Add too much water and spores germinate, producing mycelia or hyphae (tiny vegetative threads) and sporangia (reproductive parts). The sporangia release spores that are small enough to enter a root through the root tip. Once they enter the root, they start absorbing nutrients and carbohydrates, breaking down the root structure and preventing the plant from absorbing water and nutrients.  Roots infected with avocado root rot. Note the lack of short lateral roots and presence of black, necrotic and sloughing cortical tissues. (Edward L. Barnard, Florida Department of Agriculture and Consumer Services, Bugwood.org) CC BY-SA 3.0 Symptoms of avocado root rot The most common symptom of avocado root rot, or Phytophthora dieback, is wilting. This is a problem because many people respond to plant wilting by adding more water, which is what caused the problem in the first place. Other symptoms include brown edges on leaves, chlorosis (yellowing), collar rot, darkened patches of bark and root tissue, gumming, leaf curl, reduced fruit size, stem cankers, and young shoot dieback. Flagging may also be seen. Flagging refers to the way dead leaves are retained by the plant, rather than allowed to fall.
Preventing avocado root rot Proper tree planting depth is the best thing you can do to keep your trees healthy. Other preventive measures include:
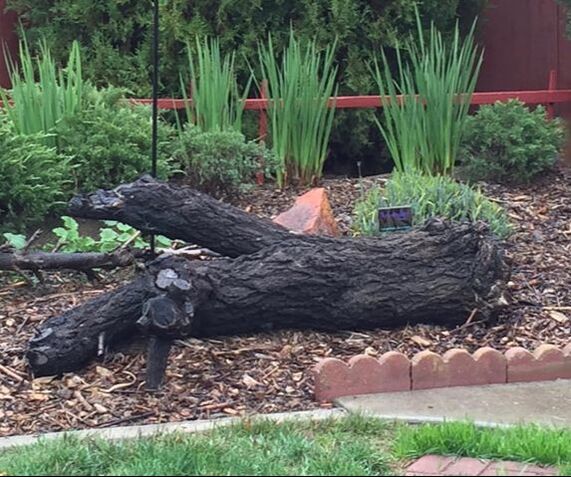
Commercial orchards infected with avocado root rot may inject or spray affected trees with fungicides, or resort to soil solarization. These are extreme measures that should be avoided by the home gardener unless absolutely necessary. One thing you can do is cover the area with composted mulch, which suppresses the oomycetes that cause the disease and prevent healthy trees from becoming infected. Or, you can get a load of free arborist chips which will, eventually, compost themselves, preventing disease and improving soil structure. Our story When we bought our place back in 2012, there was a lovely old apricot tree in the backyard. She wasn’t performing very well, however. Upon closer inspection, the tree seemed a little “loose” in the ground. When I gave it a shove, the whole thing fell over! The root system was practically gone. Luckily, the tree had been kept at a manageable size and no one was hurt. I decided to use the trunk to create a stumpery and plant a new apricot tree. We later learned that the sprinkler system was pointed directly at the tree, creating a recipe for disaster.
While you may not be able to eliminate the oomycetes that cause avocado root rot from your property, you can control the conditions that allow them to cause harm.
Measles on fruit, leaves, or stems can mean many different things, but it is not the human measles virus. Measles on plants can indicate fungal diseases that may look like anthracnose. Measles can also be a symptom of nutrient toxicities or an overabundance of irrigation water.  Apple measles due to manganese toxicity (UG Plant Pathology, Bugwood.org CC BY-SA 3.0 Grape measles If it looks as though your grapes have measles, it may be black measles, also known as esca or Spanish measles. Grapes infected with black measles develop small, reddish-brown spots on the fruit. These spots may appear at any time during the growing season. Ultimately they will cover the fruit, causing it to turn black and shrivel. If you were to eat these grapes, they would taste bitter. Leaves develop a characteristic ‘tiger stripe’ pattern in which the veins of white grapes remain green, haloed with yellow, and surrounded with dead, brown tissue. Red and purple cultivars develop reddish areas instead of yellow. Other symptoms include shoot tip dieback and complete defoliation. Also, cut wood tends to ooze a dark sap, and cross-sections show dark streaking in the xylem. Infected plants are highly susceptible to other fungal diseases, particularly rots. #/media/File:ESCA_Blattsymptom_1.JPG) Leaves infected with grape measles (Bauer Karl) CC BY 3.0 at Black measles is an infection by a collection of fungi, including Phaeoacremonium aleophilum and other subspecies, Phaeomoniella chlamydospora, and Fomitiporia mediterranea. Fungal spores enter plants through pruning wounds and natural cracks in the bark. Symptoms do not appear every year and seem to worsen in years with heavy rains. When a particularly bad measles infection occurs, it is called apoplexy. Apoplexy is nearly always fatal. There are no effective treatments against esca other than removing infected fruit and crossing your fingers. Otherwise, remove the plant and start over. While there are no immunizations against plant measles, providing good airflow and sanitizing your cutting tools with a household cleaner will go a long way toward protecting your plants against measles. Also, get your bare root stock and scions from reputable sources. Measles as a symptom of nutrient toxicity Measles can also indicate nutrient toxicity. Brown freckles on apples or pears may be a characteristic of the cultivar or indicate toxic levels of manganese in the soil. Apple measles creates round to oval concentric circles or lesions on the bark. The only way to know if there are toxic levels of nutrients (or heavy metals) in your soil is with a lab-based soil test.  Bark measles on an apple tree (William M. Brown Jr., Bugwood.org) CC BY-SA 3.0 Measles and irrigation Smooth-skinned cucurbits, such as crookneck squash, cucumbers, summer squash, melons, and pumpkins, are all susceptible to entirely different forms of measles. Small brown spots may be visible scattered over the surface but do not penetrate the fruit. These spots may also occur on leaves or stems. Unlike the viral infections and nutritional toxicities mentioned above, cucurbit measles are a physiological response to high soil moisture. When plants absorb too much water, they sweat it out.  Guttation on water horsetail (Luc Viatour) CC BY-SA 3.0 Healthy soil is teeming with microscopic life. Most soil organisms are beneficial, but some of them carry diseases.  Hands holding soil and seedling (Pexels) Pixabay The biggest problem with soil-borne diseases is knowing they are there. You can’t see the pathogens, so damage can occur before you know anything is wrong. Also, symptoms of soil-borne diseases can look a lot like nutrient imbalances, chemical overspray, and poor environmental conditions. Fungi and nematodes are behind most soil-borne diseases, but other conditions are at play, and some discoveries are new. Nematodes Nematodes are microscopic, unsegmented worms. Some of them are beneficial, and some carry diseases. Beneficial nematodes kill cutworms and corn earworm moths. Disease-carrying nematodes include needle nematodes, root-knot nematodes, and stubby root nematodes. The real problem with nematodes is that there are so many of them. For every person on Earth, there are approximately 60 billion nematodes. [Thank goodness they aren’t all bad!] _penetrates_a_tomato_root_-_USDA-ARS.jpg) Juvenile root-knot nematode penetrates tomato root (William Wergin, et al) USDA CC BY 2.0 Bacterial diseases Bacterial diseases are less likely to be soil-borne because it is difficult for bacteria to survive in the soil. Also, they need a wound or natural opening to get inside your plants. The following soil-borne diseases can occur in your garden:
 Bacterial wilt of muskmelon (Eeshie) CC BY-SA 3.0
Oomycetes Oomycetes used to be considered fungi but are now a separate class. Oomycetes cause soil-borne diseases such as damping off, downy mildews, late potato blight, some root rots, and sudden oak death.  Oomycete responsible for late blight ‘Phytophthora infestans’ (Matteo Garbelotto, et al) CC BY 2.5 Phytomyxea
There is another class of soil-borne disease carriers called Phytomyxea [FI-toe-muh-kia]. Scientists used to think they were a type of slime mold, but genetic testing and electron microscopes have taught us that they are a unique group. Phytomyxea are plant parasites that can cause clubroot in cruciferous vegetables and powdery scab in potatoes. Viral diseases Soil-borne viral diseases are rare. In most cases, nematodes and certain fungi carry these pathogens. Lettuce necrotic stunt and wheat mosaic, which causes stunting and mosaics in wheat, barley, and rye, are two common soil-borne viral diseases. How to prevent soil-borne disease In nature, plant diseases rarely get out of hand. Plants’ defense mechanisms and other organisms keep most pathogens in check. But, when we select plants, spray chemicals, and disturb the soil, we interrupt those natural processes. The primary cause of soil-borne diseases taking hold is an imbalance in soil populations. Reduced biodiversity gives pathogens the upper hand. One way to reintroduce that biodiversity is by top dressing with aged compost. Research has shown that top dressing with compost is very effective at suppressing soil-borne diseases in greenhouses, though less so in the field. There is a direct correlation between how much compost was applied and its effectiveness. Interestingly enough, sterilized compost is less effective. I think we can assume the effect is at least partially biological. As with most diseases, three factors must be present for a problem to occur: the host plant, the pathogen, and the right environmental conditions. Remove any one side of the disease triangle, and the disease is prevented or controlled. Crop rotation is an excellent way to break this disease triangle. Your rotation schedule will vary depending on the plants and pathogens in your garden. While you can sometimes apply treatments directed toward specific pathogens, they don’t always work. Most of these treatments consist of other microorganisms that prey on the pathogens. These only work if your soil already has everything the introduced microorganisms need. The funny thing is, if all those things were already there, so would the predators. Biodiversity. Mycorrhizal fungi (good guys) often create protective mats containing antibiotics and pathogenic toxins around plant roots. They also help plants absorb nutrients. Use these tips to prevent soil-borne diseases in your garden:
Finally, as tempting as they may be, chemical treatments are rarely a good choice for backyard gardeners. Pathogens are developing resistance to these treatments. Increasingly powerful chemicals are applied, resulting in a dangerous escalation. Whenever possible, use some other method of controlling soil-borne diseases. For every acre of garden, there is the equivalent of two mature cows, by weight, of soil bacteria living there. Ponder that a moment.  Biofilm of ‘Desulfovibrio Desulfuricans’, a soil bacteria believed to reduce toxic metals in soil and groundwater. Courtesy of Pacific Northwest National Laboratory. Your average cow weighs about one ton. Two cows weigh about the same as a car. That’s a lot of soil bacteria! For a different view, you could fit 15 trillion bacteria into a single tablespoon, if nothing else was there. What are all those one-celled creatures doing in your soil? Bacterial behavior Truth be told, much of your garden soil is made up of dead bacteria. Affectionately known as ‘bio bags of fertilizer’, soil bacteria are important players in nutrient cycling and decomposition. While still alive, their excretions improve soil structure by binding particles together into aggregates. This improved soil structure results in better water infiltration rates and it increases your soil’s water holding capacity. As bacteria breath, they release carbon dioxide into the soil. Plants love carbon dioxide. Soil bacteria are most commonly found in the film of water that coats soil particles. Bacteria can’t move very far on their own. They generally move with water, though they sometimes hitchhike on passing worms, spiders, and insects. This is called phoresy. Under ideal conditions, a single bacteria can produce 16 million copies of itself every 24 hours, doubling its population every 15-30 minutes. Conditions are rarely ideal, so bacteria reproduce as much as they can, whenever they can. There are four basic groups of soil bacteria: decomposers, mutualists, lithotrophs, and pathogens. Most soil bacteria are beneficial. Pathogens are the troublemakers. Beneficial decomposers The majority of soil bacteria are decomposers that break down plant and animal debris into simple compounds which plants and other living things then use as food. This makes soil bacteria an important part the soil food web. Some decomposers can break down pesticides and pollutants. Decomposers also store a lot of nutrients in their bodies. When they die, those nutrients become available to your tomato plants. [Soil bacteria are 10-30% nitrogen.] 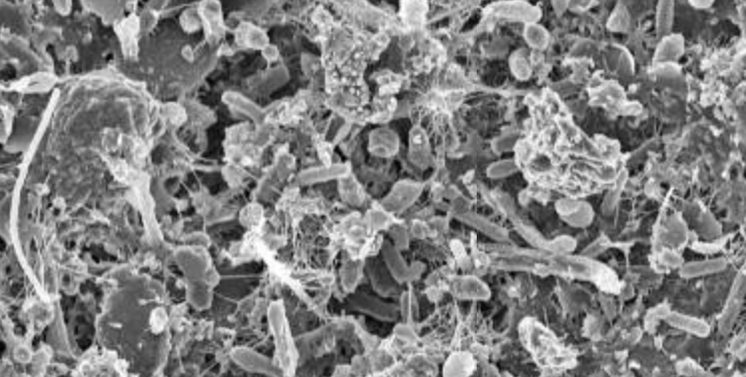 SEM image of bacterial biofilm on the surface of a sand particle. (Anthony D’Onofrio, et al) Public Domain Mighty mutualists Mutualists have working arrangements with plants that benefit both sides of the equation. The most commonly known mutualists are the rhizobia bacteria which convert atmospheric nitrogen into a form useable by plants. Very often, these mutualists live on or in the roots of legumes, such as peas and beans. Other mutualistic soil bacteria are able to convert atmospheric nitrogen without the help of plants, but the plants still benefit. Lithotrophs You don’t hear much about lithotrophs, but this group is unique in that they don’t eat carbon compounds, the way other bacteria do. Instead, they manufacture their own carbohydrates, without photosynthesis, and feed on chemicals, such as hydrogen, iron, nitrogen, and sulfur. This group is also known as chemoautotrophs. These soil bacteria help break down pollutants and are an important part of nutrient cycling.  Apple twig infected with fireblight (Kate Russell) Pesky pathogens These are the disease-causing bacteria. They can cause fireblight, bacterial wilts, cankers, galls, and soft rot. The beneficial soil bacteria are always at war with these germs, competing for food, space, air, and moisture. Killing bacteria is difficult. Most often, if conditions become difficult, a bacteria will simply enter a dormant stage. This is why many Quick Fix treatments don’t work. They don’t kill the bacteria, they just send it on a temporary hiatus. There are some soil bacteria (Streptomycetes) that actively protect plants from bad bacteria. 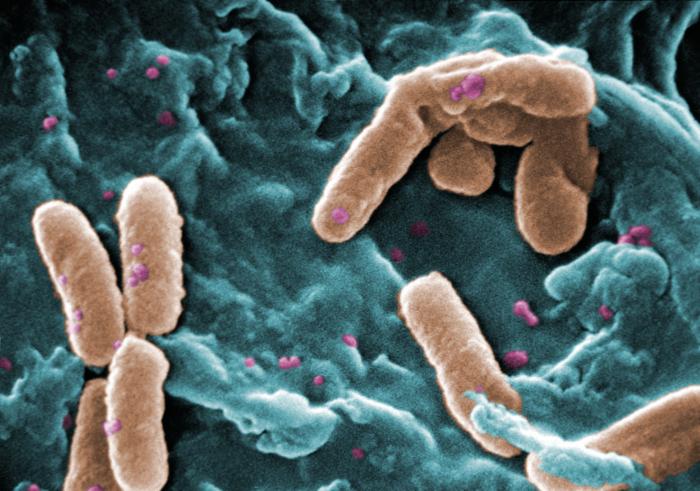 Pseudomonas aeruginosa, which causes soft rot in plants (Janice Haney Carr, CDC) Public Domain Why do soil bacteria matter to gardeners?
Most soil bacteria are valuable members of your team. They provide a huge benefit to your soil and plants. And you need to know what the bad bacteria look like when they start to set up housekeeping. The earlier you break those disease triangles, the faster your can return to harvesting your delicious crops. Most bacteria are aerobic, which means they need oxygen. This is why turning your compost pile makes everything decompose faster. You are providing the decomposer bacteria with the air they need. If you don’t, the anaerobic, non-air breathing bacteria take over. Those are the ones associated with rot and purification. [Ew!] Did you know that soil bacteria will consume more water than they can hold, causing their bodies to burst? Yet another argument against over-watering... What does ammonium bicarbonate have to offer your garden?  Ammonium bicarbonate (Wikipedia) CC BY-SA 4.0 In the garden, bicarbonates are touted as cure-all treatments of powdery mildew, gray mold, septoria leaf spot, and other fungal diseases, particularly sodium bicarbonate (baking soda) and potassium bicarbonate. The truth is, baking soda is a type of salt and always a bad idea in the garden. Potassium bicarbonate, on the other hand, is an effective organic fungicide. But what about ammonium bicarbonate? What are bicarbonates, anyway? Bicarbonates In chemistry, the word ‘bicarbonate’ is inaccurate and outdated. It was first coined in 1814 by a chemist who observed that there is twice as much carbon as sodium in sodium bicarbonate. After different types of bicarbonates were identified, with different ratios, the observation became irrelevant, but the habit lives on. Bicarbonates are the main form of dissolved inorganic carbon in the ocean. In freshwater plants, bicarbonates are released into the water as part of photosynthesis. This can shift the water’s pH to toxic alkaline levels. This continues until nightfall, when photosynthesis stops and respiration releases carbon dioxide, causing pH to return to normal. Bicarbonates commonly act as pH buffers in the human body [plop, plop, fizz, fizz] and in soil.
Salt of Hartshorn Ammonium bicarbonate used to be the leavening agent of choice, before baking powder hit store shelves. Still used today in flatbreads, German Lebkuchen, Danish Christmas cookies, and Swedish "drömmar" biscuits, ammonium bicarbonate is often referred to in older cookbooks as salt of hartshorn or hornsalt. This form of ammonium bicarbonate used to be made by dry-distilling horns, hooves, leather, and hair.
Ammonium bicarbonate fertilizer
In the plant world, ammonia means nitrogen. This makes ammonia bicarbonate sound like a good idea as a fertilizer, right? In China, ammonium bicarbonate is used as an inexpensive fertilizer. But, because of its instability, it is being phased out in favor of urea. Also, ammonium bicarbonate is an eye, skin, and lung irritant. If you were to use it (against my advice) be sure to wear protective clothing and a respirator. High soil bicarbonate levels commonly occur when soil or irrigation water have a pH of 7.5 or higher. Alkaline soil and irrigation water tend to have lots of bicarbonate and carbonate ions floating around. These ions tend to attach themselves to and transform calcium and magnesium into less soluble forms that are difficult for plants to use. Also, as these minerals are altered, they leave salt behind in your soil. Not good. When these conditions occur, chelated fertilizers should be avoided. The level of bicarbonates in your soil also determines how much acid is needed to acidify the soil. If powdery mildew or other fungal diseases are causing problems in your garden, forget the baking soda and ammonium bicarbonate, Instead, space and prune plants for better air flow and apply potassium bicarbonate, Bordeaux mixture, sulfur, fixed copper, or milk. You may also want to apply insecticidal soap (not dish soap) to reduce the spread of disease by ants. Conks are woody, shelf-like structures produced by some fungi. These fruiting bodies are often seen on trees and can indicate fungal diseases, such as canker rot or butt rot.  Canker rot conks (Joseph OBrien, USDA Forest Service, Bugwood.org) CC BY 3.0 US Polypores Conks are the reproductive form of a large group of fungi known as polypores. Polypores are found in the bark, trunks, and branches of trees, though some are in the soil. Polypores are the primary players in wood decomposition, so their presence often indicates decay. Polypores are important in nutrient cycling, so they aren’t all bad. This group is large and diverse, but they all have conks in common. The conk clan This group is defined by how they grow rather than genetics, so it is very diverse. The most common types of conks include:
 Turkey tail conk (Public Domain) Conk structure Also known as bracket fungi, or shelf fungi, this group (Basidiomycota) produces circular, shelf-shaped fruiting bodies that can appear in rows, columns, or singly. Basidiomycetes are the only fungi known to break down lignin. Lignin is what makes trees rigid. The disease that accomplishes this feat is known as white rot.  White heartwood rot conk (Dave Powell, USDA Forest Service, bugwood.org) CC BY 3.0 Some conks are annuals while others are perennials, Some conks can live for 80 years or more. In either case, they tend to be leathery, sturdy growths. These growths produce spores, called basidiospores, in pores found on the underside of the conk.  Sulfur shelf conk (Robert L. Anderson, USDA Forest Service, Bugwood.org) CC BY 3.0 Conks grow directly out of the wood on which the fungi feed. If you were to cut one open and look at it closely, you would see two layers: a tube layer and a supporting layer. The tubes are honeycomb-like structures lined with a spore-forming surface called the hymenium. The supporting structure creates the shelf and its attachment to the tree. The problem with conks is that their presence indicates that fungi have taken up residence in your tree. If your tree has conks, the first step is identifying the type. Some fungi are worse than others.
Preventing fungal conks
The fungi that produce conks enter trees through mechanical wounds, damaged roots, broken or rubbing branches, frost cracks, sunburned bark, and improper pruning cuts. Fungal spores travel on the wind, rain, and on birds and insects, so keeping your tree’s protective outer layer intact is the best prevention. The following tips should help with that:
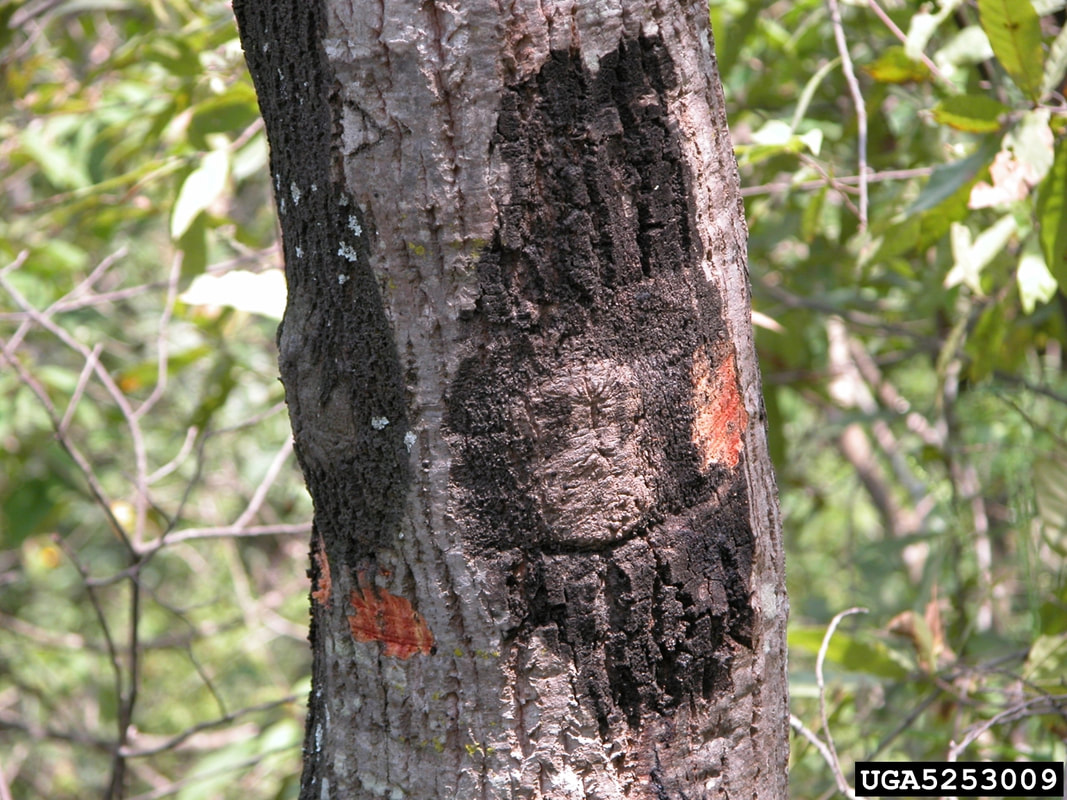
If you have a tree with conks, you should probably contact a certified arborist. They can inspect the tree for structural integrity and to determine the extent of the infection. Conks may look cool, but you don’t want them on your trees. Can you see a crack in the trunk or branches of your tree? It may be canker rot.  Canker on beech tree (Roger Griffith, Public Domain) Canker rot is a collection of fungal diseases that eat away at the interior of tree trunks and branches, weakening the tree and setting the stage for other pests and diseases. Canker rots can also girdle your tree and kill it. While most commonly seen in ornamental trees, canker rot can occur in apple and other fruit and nut trees.
 Canker rot on birch tree (MarkusHagenlocher) CC BY-SA 3.0 Canker rots can also cause swelling, sunken areas, gnarled bark, and conks. Conks are shelf-shaped fungal fruiting bodies. After spores are released, the conk will dry out and darken. It may remain on the tree or fall off. 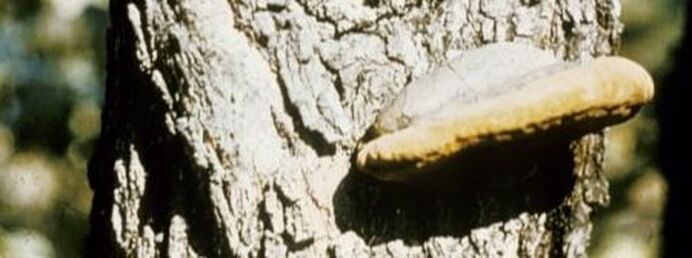 Canker rot conks (Joseph OBrien, USDA Forest Service, Bugwood.org) CC BY 3.0 US If you were to see inside your tree, you would see that the heartwood and sapwood have become discolored. Instead of warm, rich yellowish-browns of healthy wood, you would see gray, orange, or even pink-tinged wood, often extending three or more feet beyond the canker.
Canker rot lifecycle The fungi responsible for canker rot usually enter trees through pruning cuts and wounds. Fungi attach to the wood and then move to the cambium to access the water and nutrients flowing through the vascular bundle. The fungi also move to the bark, where they eject spores carried by wind to nearby trees. How to control canker rot As always, healthy trees are better able to protect themselves. So, select species suitable to your microclimate, plant them at the proper depth, irrigate and fertilize your trees properly, and monitor for signs of problems. Other actions you can take to reduce the chance to canker rot occurring in your trees include:
Trees with canker rot may fall over at any time. Large trees weigh several tons and can be extremely dangerous. If you suspect canker rot, call a licensed arborist right away. Whether you call them chickpeas, Bengal grams, Egyptian peas, or garbanzo beans, you definitely do not want them infected with this fungal disease. Ascochyta [ask-uh-SHOO-tuh] blight, also known as blackspot, is a major disease of garbanzo beans. 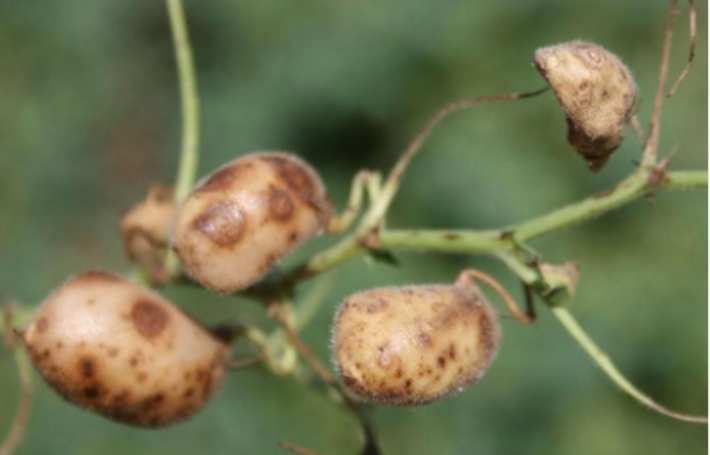 Ascochyta blight on chickpea pods (PlantVillage) CC BY-SA 3.0 US Not to be confused with the other black spot (Diplocarpon rosae), which primarily affects leaves, Ascochyta blight can infect any aboveground portion of your chickpea plants, as well as your lawn. Lawns infected with Ascochyta blight suddenly develop brown patches of dead-looking grass. Ascochyta blight is caused by Ascochyta rabiei (formerly known as Phoma rabiei). Ascochyta blight symptoms Brown lesions that start at the base of seedlings may start out looking like damping-off disease, but these lesions continue to move up the plant, eventually affecting everything aboveground. 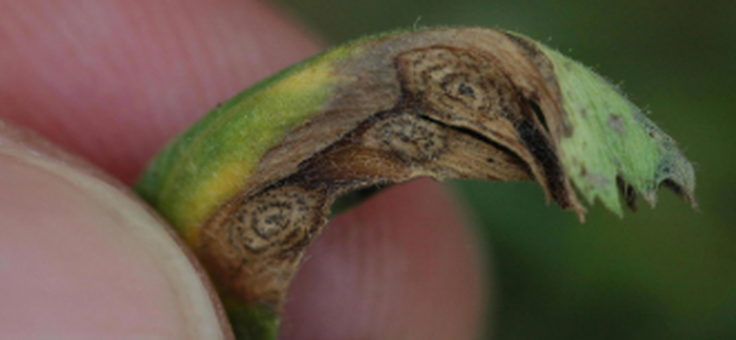 Ascochyta blight symptoms on chickpea leaf (PlantVillage) CC BY-SA 3.0 US Infection may also first appear on leaves and work its way elsewhere on the plant. Foliar infections start out as light brown spots. Once the fungi start reproducing, you will be able to see tiny black, raised dots within these brown spots. These black dots will appear in circles of their own. Stem lesions can cause the plant to fall over. Pod lesions reduce seed production and can cause seed shrinkage and discoloration. 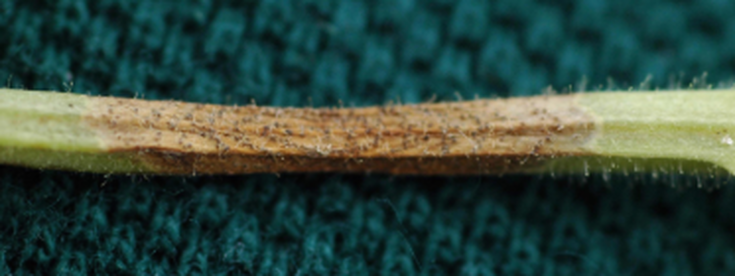 Stem lesion caused by Ascochyta blight (PlantVillage) CC BY-SA 3.0 US Ascochyta blight lifecycle In California, garbanzo beans are generally planted in November. This sets them up for Ascochyta blight because the spores grow best in cool, damp weather. Temperatures between 68°F and 77°F are ideal for this disease to develop. There are different forms of this fungi. One form is airborne, while the other is spread by rain and irrigation water. When these two forms meet under optimal conditions, the disease begins.
Ascochyta blight management
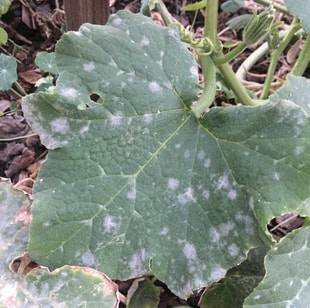
Ascochyta blight can be spread by infected seeds, so always start your garbanzo bean crop with certified disease-free seeds. Do not use that bag of garbanzo beans from the grocery store. The price might be appealing and those seeds are safe to eat, but they may also carry any number of pests and diseases that might take years to get rid of. You can also select disease resistant varieties. According to UCANR, the following varieties of garbanzo are currently resistant to Ascochyta blight: Sierra, Dylan, Sutter, San Joaquin, and the Airway Farms (AWF) series. That resistance can and will change because fungi evolve faster than plants. At the first sign of infection, the affected plant should be removed and tossed in the trash. You don’t want to leave infected plant material in the garden or compost pile because this can simply spread the disease to more plants. Ascochyta blight does not survive in the soil, so crop rotation is a good way to break the disease cycle. If Ascochyta blight has been a serious problem in past years, space plants out more for better air flow, and plant seeds as late in the season as possible. Fungicides can be used at the first sign of disease and reapplied according to package directions. Milk in the garden? Some say it can be used as a fungicide or fertilizer, while others praise milk’s ability to acidify the soil. Who is right? Are these myths or useful tools? Let’s find out!  Milk and sunflowers (Pixabay) According to Mother Earth News, a Nebraska farmer, David Wetzel, worked with a local County Extension agent, a soil specialist, a weed researcher, and an entomologist for 10 years to study the effects of milk on plant and soil health. According to his experience, plant production increased, soil porosity doubled, microorganism populations increased, grasshoppers abandoned his pastures, his pasture grass contained more nutrients and sugars (brix levels), and even his cows were healthier and produced more milk. At first glance, all that falls under the Too Good To Be True category, but is it? Can spraying milk on your garden plants really make things that much better? Before we learn what milk can and cannot do in the garden, you need to know that Wetzel’s ‘research’ was never published, and that the real data showed absolutely no correlation between milk and any of the benefits listed. You can read an excellent summary of this at Garden Myths. After winnowing through several real studies, I learned that milk can be useful in the garden in some cases, but not all. Milk as fertilizer Anything added to the compost pile or the soil will ultimately be broken down by microorganisms into its elemental parts. While milk is the perfect food for baby mammals, it may or may not be good for plants. Milk contains amino acids, enzymes, fats, minerals, proteins, salts, sugars, and vitamins. Those minerals include calcium, chloride, citrate (an ester of citric acid), magnesium, phosphate, potassium, and sodium. Most of those minerals are useful to plant health. The protein in milk contains an average of 0.5% nitrogen, another useful plant nutrient, but in a very small supply. So, yes, milk can be used as a fertilizer, but not a very good one. By the time you added enough milk to get a reasonable response, your garden would smell like a rotten dairy. Milk as soil amendment Milk can add calcium to the soil, improve porosity, and acidify the soil. That’s what they say, anyway. The fact is, milk is 90% water, which does nothing to improve soil structure or porosity. It also contains very little in the way of organic matter. Milk starts out with a pH of 6.4 to 6.8, which is great for plants. When milk starts to curdle, it has a pH closer to 5.0, which is acidic. Putting practically anything with a pH of 5.0 in your soil will alter its pH temporarily. As expensive as milk is, there are far more affordable, effective methods, but it won’t hurt. 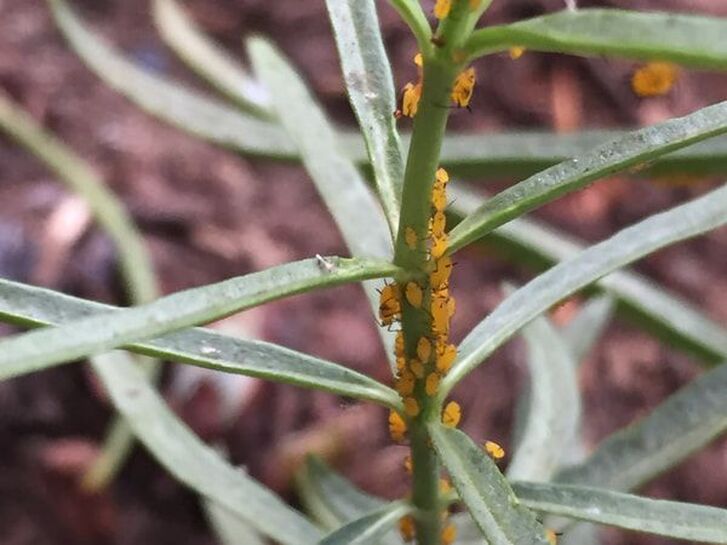 Oleander aphid on milkweed (Kate Russell) Milk as insecticide It is said that if you spray soft-bodied insects, such as aphids, with milk, they will weaken and die because they do not have a pancreas with which to digest the milk sugars. Huh. That just doesn’t sound right to me. I mean, soft-bodied sap-sucking insects live on sap. Sap contains a lot of sugar. Insects may not have a pancreas but they sure know how to process sugar! Some researchers believe that aphids may be deterred by foliar sprays of milk. It is not yet known why or how the milk spray does this. It may be that aphids simply do not like the milk film left on the plants, or it may be that microscopic pathogens that grow on the milk are a threat to aphids. We don’t know. Milk as disease treatment Foliar sprays of milk on wheat and grape, squash, melon, and pumpkin leaves are said to prevent fungal and bacterial diseases, such as powdery mildew and leaf black spot. There is, however, no research that demonstrates milk can control black spot on roses or other ornamental plants. Most of the studies that support this claim were performed in greenhouses, rather than outdoors, which makes a big difference. Just because something works in a greenhouse, a highly controlled environment, does not mean it will work in the field. 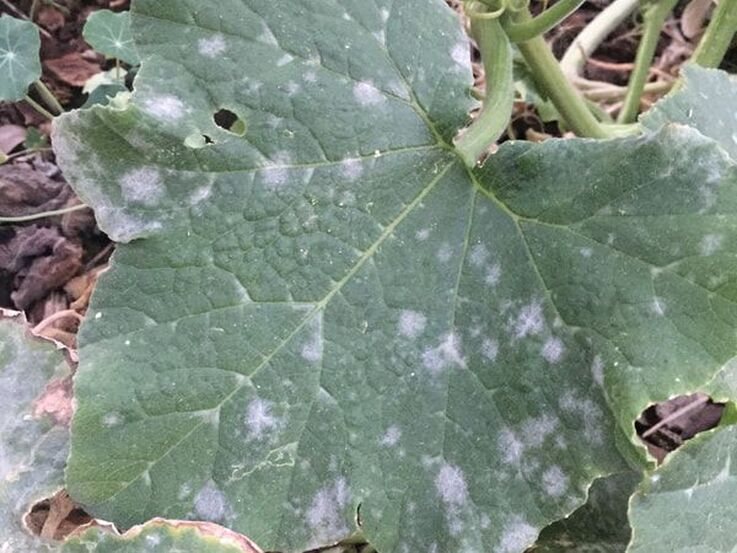 Powdery mildew on butternut squash leaf (Kate Russell) Generally speaking, milk or whey, applied before exposure to powdery mildew does reduce disease incidence. This may be because the benign microorganisms that start growing on the milk make it more difficult for powdery mildew organisms to take hold. Another theory is that the fatty acids contained in milk have antifungal properties. It may be for another reason altogether. We don’t know yet. Note that none of these studies succeeded using nonfat milk.
Research has also shown that foliar sprays of milk are effective in treating viral diseases, particularly tobacco mosaic and other mosaic diseases on barley, beans, beets, celery, peas, spinach, sunflowers, tomatoes, and zucchini. It is believed that the milk may either deactivate the viruses, or physically isolate them, but no one knows for sure. The milk spray may also prevent aphid attack, thereby reducing the number of aphid-borne viral diseases. Problems with milk in the garden The main problem associated with milk in the garden is that there has been very little scientific research conducted. Most of the information available is anecdotal, at best. Besides being expensive, there are three problems you should keep in mind before deciding to use milk in the garden:
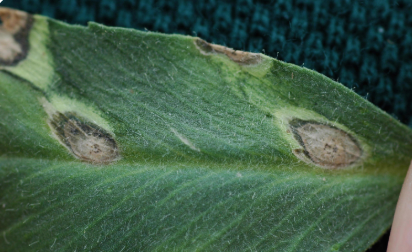
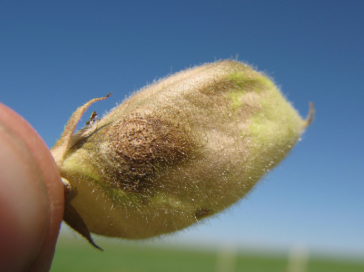
How to apply milk If you decide to use milk to prevent disease, it is recommended that whole milk be sprayed on soil prior to planting and again when insects appear or just prior to when powdery mildew and similar diseases are expected to occur. You can also dump sour milk into your compost pile or around acid-loving plants, such as blueberries. So, can milk help improve your plant and soil health? Yes, and no. Used as a preventative antifungal, antiviral, antibacterial treatment, milk may reduce disease incidence by 50% to 70% on some plant species. Small black spots on tomatoes and tomato leaves often indicate bacterial spot. Those black spots might not look significant, but this bacterial disease can also affect peppers, eggplant, groundcherries, and tomatillos. A close cousin to the bacterial spot of almonds and practically impossible to differentiate from bacterial speck without a microscope, bacterial spot (Xanthomonas campestris pv. vesicatoria) is perfectly capable of killing your tomato plants.  Bacterial leaf spot (Netty4299) Public Domain Bacterial spot symptoms
Symptoms of bacterial spot can appear at any time during a plant's development, from seedling to mature plant and on all aboveground plant parts. Bacteria enter through wounds and stomas. Infected younger plants can lose all their leaves. Older plants exhibit insignificant-looking water-soaked areas on mature leaves, usually near the bottom of the plant, making it easy to dismiss this disease. But that would be a mistake. These lesions start yellow or light green, turning dark brown or black. Older spots may become raised areas that average 1/3" across. Larger damaged areas may occur at the margins (leaf edges). Immature fruit can also be affected by bacterial spot. Bacteria enter through tiny hairs called trichomes. Infected areas have tiny, raised black dots that become sunken or dimpled and surrounded by a white halo, similar to bacterial canker. The halos eventually disappear as the spots get larger and become scabby. If these fruits mature before rotting on the vine, they are still edible. Just cut out the diseased areas and dispose of the infected parts in the trash. Do not add infected plant material to your compost pile. Controlling bacterial spot Because these bacteria overwinter in infected plant debris, you can protect next year's crops by clearing infected plant tissue out of your garden each fall. The disease can also appear on volunteer tomato plants, so watch rogue plants closely for signs of infection. Splashing rain, irrigation water, and contaminated tools can also spread the disease, so avoid overhead watering and sanitize your garden tools regularly. Since these bacteria need humidity and water droplets to survive, pruning for good airflow can go a long way toward preventing this disease. If you are like me and save seeds from each year's crops, be sure you don't use those from infected plants, as you will perpetuate the disease. As always, only buy certified disease-free plants and seeds and quarantine new plants. Fixed copper sprays may help reduce the chance of bacterial spot. There have been some cases of copper-resistant bacteria, so it's hard to say. Crop rotation can also help break this disease triangle. Protect next year's crops by tossing plants infected with bacterial spot into the trash and providing good airflow around future plants. If you grow raspberries, you should be on the lookout for spur blight. Blackberries and other bramble fruit are not affected by the Didymella applanata fungi, but red raspberries are especially vulnerable. Currently found most often in Scotland, Oregon, and Washington, spur blight can significantly reduce your raspberry crop. .jpg) Raspberry leaf symptoms of spur blight (Jerzy Opioła) CC BY-SA 4.0 Spur blight symptoms Spur blight first appears in mid to late summer. Initial symptoms of spur blight look similar to anthracnose, fireblight, and cane blight, with brown and purple lesions on leaves, around buds, and on the lower area of stems. These lesions cause buds to shrivel up. By spring, lesions will look ashy gray, and the buds will be weak or dead. Stems that grow from these infected buds will be wilted and weak. Infected leaflets have triangular-shaped brown areas and may fall off, leaving the petiole (leaf stem) in place. You might also see dead spots on the canes near petioles. This infection causes premature leaf drop, which weakens the plant overall. As the blight progresses, splits and cracks may form in the bark. .jpg) Raspberry cane symptoms of spur blight (Jerzy Opioła) CC BY-SA 4.0 Look closely to see tiny black dots emerging from those cracks. Those dots are fungal fruiting bodies called pycnidia. If you look at pycnidia with a microscope, they are flask-shaped. A different type of fruiting body, perithecia, comes next. Perithecia are also black, but they are medium-sized and, if you watch, erupt with spores.
Spur blight lifecycle Spur blight spores travel in wind, rain, and irrigation water. These spores are released each time wet weather occurs, even if that wetness is your garden hose. Infected water that lands on or near young canes, newly forming buds, leaves, wounds, or stomas, can result in infection. Once inside, this disease spreads throughout the plant, overwintering inside the lesions. How to manage spur blight Proper sanitation and pruning methods will go a long way toward preventing spur blight on your beloved raspberries. In late winter or early spring, before new canes emerge, remove all dead, diseased, or weak canes and put them in the trash rather than the compost pile. Keep canes properly spaced for good airflow, and train them up trellising to allow canes to dry quickly. It makes watering your raspberry plants at ground level easier, too. Keep weeds away, as they compete for water and nutrients and reduce airflow around the canes. Unless a lab-based soil test has indicated a need for fertilizer, avoid feeding your raspberry plants when spur blight is a problem. The presence of too many nutrients causes plants to produce an abundance of vulnerable tissue. As always, only buy certified, disease-free plants and place new plants in quarantine. In the case of severe infection, fixed copper or lime sulfur treatments may reduce lesion size and control internal infection, but only if applied when new shoots are 8-10” long. Spur blight is easier to prevent than treat. And raspberries are worth the effort. Strawberry vein banding is an invisible viral disease spread by strawberry aphids. You will never know it has infected your plants until another virus infects your strawberries.  Leaf infected with strawberry vein banding (left) compared to healthy leaf (right) Public Domain As soon as another virus infects your plants, usually strawberry crinkle, the leaf veins of your strawberry plants suddenly start to turn yellow. And if the strawberry mottle virus comes along, those yellowing veins won’t be visible. This triple threat is called strawberry decline.
Symptoms of strawberry vein banding The leaves of infected plants tend to be significantly smaller. Vein yellowing, when visible, appears erratically in new growth first. Sometimes only part of a vein has turned yellow. The two halves of each unopened leaf may look closer together than is normal, and the margins, or leaf edges, are wavier than normal. Some crinkling of the leaf surface may also occur. As the leaf opens, the bands of yellow become a little more obvious. Symptoms appear more strongly in the second and third leaves but are not likely in later growth. Unfortunately, the other symptoms include stunting and reduced fruit and runner production. Vein banding can reduce strawberry crops by nearly 20%. If another virus takes hold, you can lose your crop entirely. Strawberry vein banding vectors Strawberry aphids and other aphid species carry strawberry vein banding to your plants. Grafts from infected plants also spread the disease. Strangely enough, dodder can also spread the disease, but the sap from an infected plant cannot. Stranger still, a clone of the vein banding virus can infect turnips, a completely unrelated species. Strawberry vein banding control In a word, you can’t. Strawberry vein banding can only be prevented by installing certified disease-free plants, placing plants in quarantine when they first arrive, and removing any infected plants. Since aphids can fly at points in their development, the threat of this and other viruses is constant. All you can do, besides the preventive measures listed above, is monitor your plants for signs of aphids and control them as well as you can. Insecticides and insecticidal soaps work against aphids, but your strawberry plants need honey bees and other pollinators to produce fruit. Those insecticidal controls will impact your helpers, too, so avoid them while plants are flowering. Closely monitoring your strawberry plants and keeping other plants that might host aphids at a distance can go a long way toward preventing vein banding in your garden. Strawberry pallidosis is one of several viruses that make up strawberry virus decline.
Infected with only one of these diseases, strawberry plants often remain symptomless. It isn’t until a second virus enters the game that symptoms begin to appear. These other viral diseases include strawberry vein banding, crinkle, mottle, mild yellow edge, and beet pseudo yellows. Symptoms of strawberry pallidosis Stunting, reduced fruit and runner production, and older leaves turning red or purple are all symptoms of strawberry pallidosis. Also, roots are brittle and show fewer rootlets. Managing strawberry pallidosis Unlike many other strawberry viral diseases, whiteflies bring pallidosis to the garden. Management strategies are the same for all strawberry viral diseases: only install certified disease-free plants, quarantine new plants, remove infected plants, and control whiteflies as much as possible. Strawberry mottle is an unassuming viral disease that can cut your strawberry crop by 30%.
When strawberry mottle occurs alone, the damage tends to be relatively isolated. All too often, however, more than one virus appears simultaneously in a condition called virus decline. Virus decline can eliminate any chance of enjoying a sweet, juicy strawberry from your garden, no matter how well you care for your plants. Vectors of strawberry mottle disease Strawberry mottle is transmitted by insects, most commonly by strawberry, melon, and cotton aphids. Infected plants can also spread the disease. Unlike the strawberry mild yellow edge virus, which stays in an aphid’s gut for its lifetime, the strawberry mottle virus can only be transmitted for 2 or 3 hours after an aphid or other insect has fed on an infected plant, keeping outbreaks relatively localized. [Ten feet away probably looks impossible to a mostly flightless bug that is only 1/8” long.] Symptoms of strawberry mottle As insects pierce plant cells to suck out the sugary sap, viruses move from the insect’s saliva to the plant. As viruses tend to do, these pseudo-lifeforms start reprogramming plant cells to produce more viruses. All this reproduction clogs plant veins. Strawberry mottle first appears on young leaves as smaller-than-normal leaves. They may also show yellow distorted areas. Stunting may occur, and they produce less fruit and runners than they might otherwise. As the disease progresses, symptoms become more severe, with older leaves turning red. Strawberry mottle management Strawberry mottle is more likely when plants stay in place over the winter, but that doesn’t mean you must rip out your plants each year. [Note: don’t rip plants out of the ground. Instead, cut them off at soil level to leave valuable soil microbes in place.] To reduce the likelihood of strawberry mottle appearing in your garden, only buy certified disease-free plants and always place new plants in quarantine. As much as possible, try to control aphids around strawberry plants. If a plant becomes infected, remove it. For some reason, strawberry plants often get infected with more than one virus simultaneously. Strawberry mild yellow edge virus is one of those diseases.
Strawberry mild yellow edge virus is a long name for a disease that can reduce your strawberry crop by as much as 30%. Strawberry mild yellow edge virus often appears when the mottle virus does. They are both transmitted by aphids. Nematodes may also add raspberry ringspot virus to the mix. Strawberry mild yellow edge virus symptoms As with most viral diseases, stunting is a common symptom of strawberry mild yellow edge virus. Older leaves may turn bright red, but the leaves around the crown nearly always exhibit yellow margins or edges, hence the name. These yellowed areas eventually die and turn brown. Leaf cupping may also occur. Since these symptoms look much like water stress, fertilizer burn, overly acidic pH, boron toxicity, or bad weather, it is important to rule those out before deciding on a plan. Once strawberry mild yellow edge virus has made an appearance in your garden, there are steps you can take to minimize the damage. How to manage strawberry mild yellow edge virus Even though the fruits of infected plants are still edible, remove plants infected with strawberry mild yellow edge virus to prevent the disease from spreading. Aphids carrying the strawberry mild yellow edge virus are disease vectors for life. You can try to use insecticidal soap on every aphid that might be a carrier. Just be sure to do this at a time when honey bees and other pollinators will not be attending the flowers. Common lambsquarters and other Chenopods can also carry this disease, so keep these plants away from your strawberry plants. This disease is most common when plants are grown using a matted-row method. The matted-row system allows parent plants to send out runners, or daughter plants, which will produce fruit the following spring. This highly productive method has been around for a long time. It gets its name because the runners end up intertwined, creating a mat. The only problem with the matted-row system is that it means plants are in place longer, making infection more likely. As always, put new plants into quarantine until you know they are disease-free. |
Welcome!You can grow a surprising amount of food in your own yard. Ask me how! To help The Daily Garden grow, you may see affiliate ads sprouting up in various places.
You can also get my book, Stop Wasting Your Yard!  Index
All
Archives
July 2024
|


 RSS Feed