|
Those deliciously crisp snow peas in your stir fry can be grown at home. 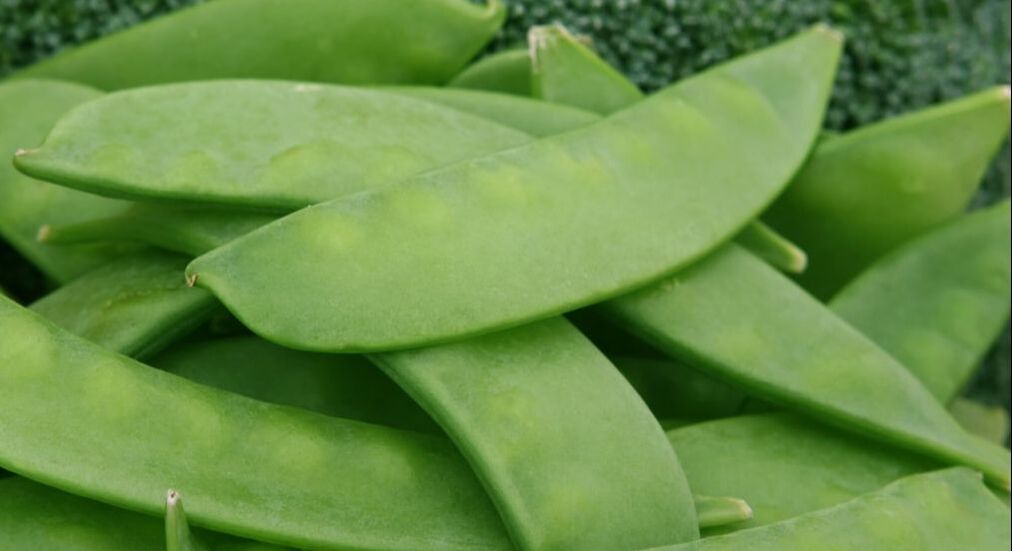 Harvested snow peas (Shutterbug75) Pixabay The story behind pea evolution is fascinating. Even more intriguing is why more people don’t grow their own snow peas at home.
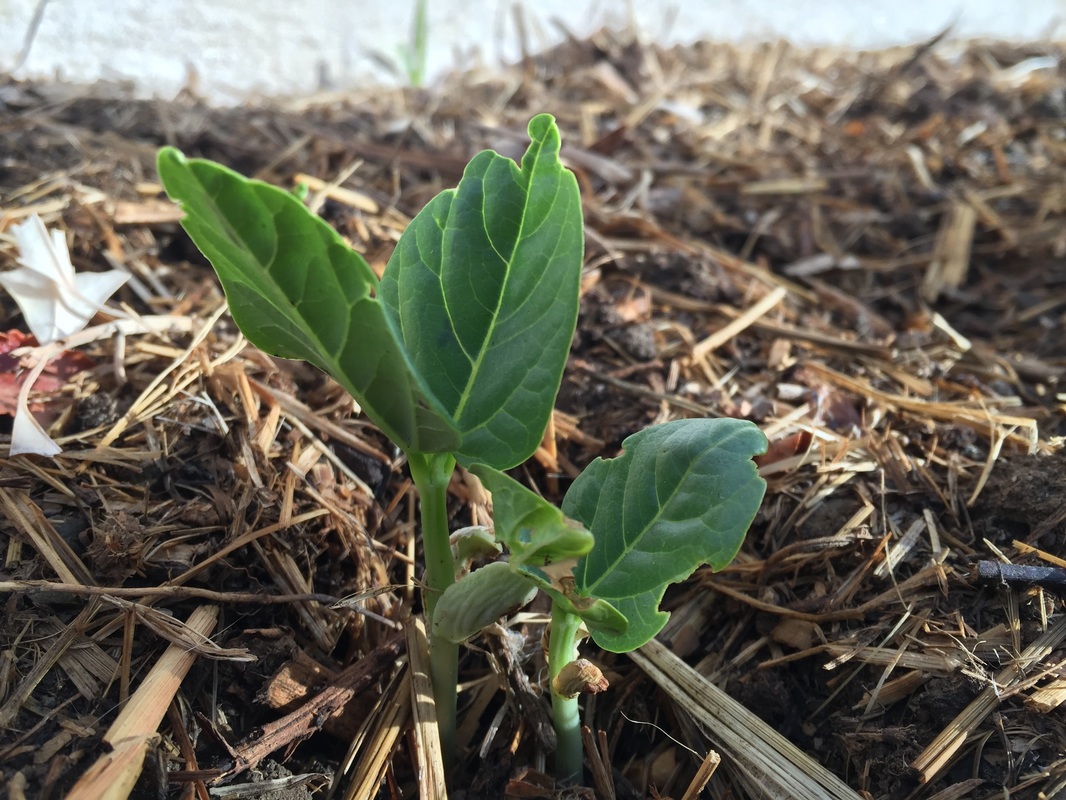
Seeds should be planted 1-2” deep and 5” apart in loose, nutrient-rich soil. Snow peas use tendrils to climb supports, such as stock panels and trellising. Harvest pods as they form to make the vines keep producing. Once plants sense that they have completed their reproductive cycle, pod production stops.
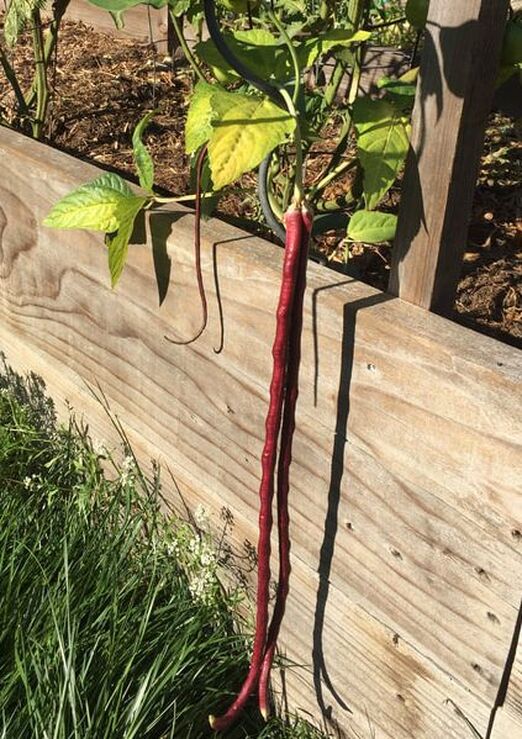
Snow peas are so easy to grow. You can add them to your stir fry garden, salad garden, or just grow them! Did you know that the immature leaves and stems are also edible? Now you know! The red noodle bean plant looks spectacular, grows rapidly, and provides a bountiful harvest.  Red noodle beans grow well on a trellis (Kate Russell) A dear friend gifted me with a packet of red noodle bean seeds a while back. As they were a type of pole bean, I planted the seeds around things they could climb and watered them regularly. At first, nothing seemed to happen, as is normal in the world of gardening. Then I went away for a few weeks. When I returned, I was delighted to find my red noodle beans had completely lived up to their reputation. [Thank you, Carol!]
Even if you never ate them, they would still be a stunning addition to your landscape, but you really should eat them. Both the beans and the pods are edible, though I have read that the pods do not take well to steaming. How to grow red noodle beans Red noodle bean seeds should be planted 3/4-1” deep and 4” apart. Like other legumes, red noodle beans have delicate root systems that do not recover well from transplanting. These plants need heat to grow, so be sure to install them in a sunny location after the soil has warmed from its winter nap. In fact, where other legumes succumb to scorching summers and drought, red noodle beans thrive. Vines need a sturdy support as they can reach 8’ in length or more. Trellises, cattle panels, fences, tuteurs, old ladders and pergolas can all be used as supports. Plants will need a thorough watering every 7-10 days to develop deep roots. Because red noodle beans are legumes, they do not need nitrogen fertilizer. In fact, they generally don’t need fertilizer at all, assuming your soil is healthy. You will need a soil test to know if that is the case in your garden. Being native to tropical rainy areas, red noodle beans need a fair bit of irrigation, just be sure to allow the soil to dry out between waterings to avoid many of the diseases common to legumes. Red noodle bean pests and diseases Red noodle bean pests include birds, gophers, rabbits, rats and squirrels, along with ants, mites, and aphids. Those aphids may also bring mosaic viruses to your red noodle bean crop, so monitor closely for those insidious pests. 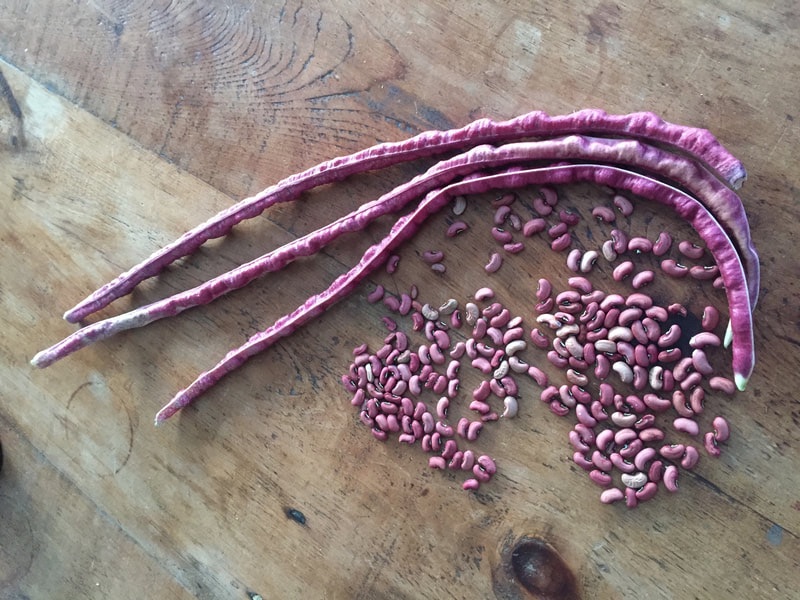 Red noodle bean pods and seeds (Kate Russell) Harvesting red noodle beans
Plants start producing pods within 80 days. By harvesting pods as they appear, you will stimulate the vines to continue producing. In other words, the more you take, the more they make. Pods can be harvested when pencil thin to be used whole in stir-fry, or you can allow them to reach full size to harvest what will dry into small, red beans. Keep in mind that allowing the beans to dry on the vine will slow or halt pod production. When harvesting, be sure to leave the buds above the pods in place. These buds can produce multiple sets of pods over time. You can also succession plant red noodle beans to make full use of your local growing season. Give red noodle beans a try! You are going to love how they look (and taste)! Black beans are sweet, meaty beans, native to the Americas and often used in South American, Cajun, and Creole recipes. Black beans are delicious, easy to grow, and dried beans can be stored for 2 years before they start losing their flavor. 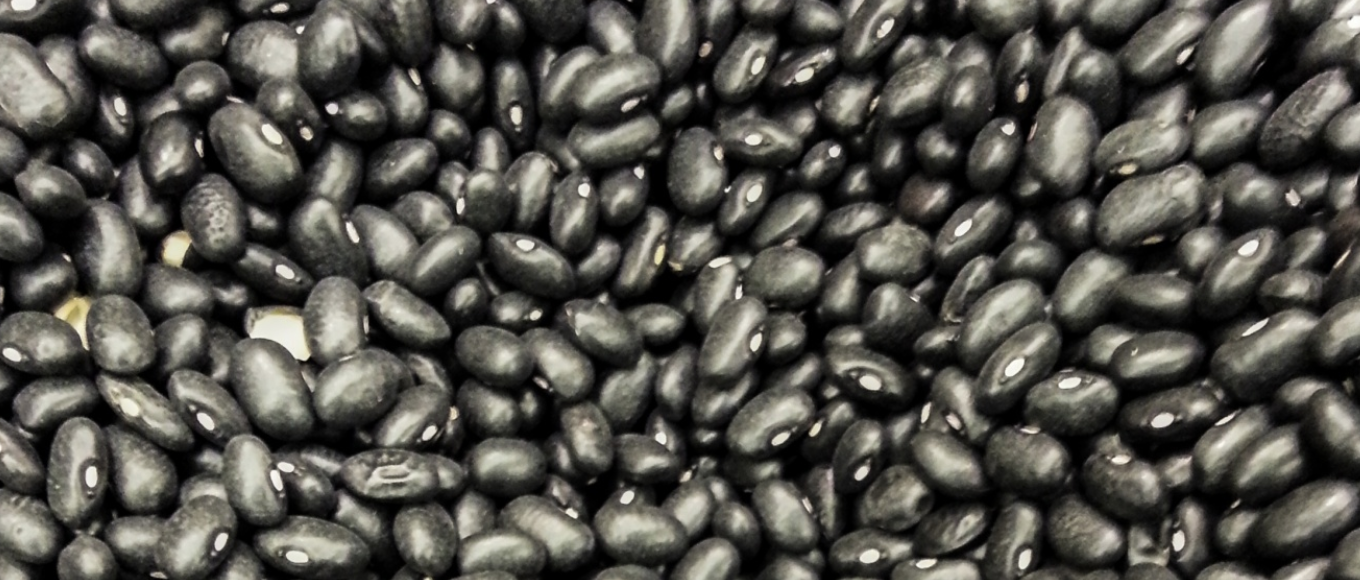 Black beans (Public Domain) Black bean plants Black beans (Phaseolus vulgaris) are legumes. This means they have nodules on and in their roots that allow them to fix atmospheric nitrogen into a form that they and neighboring plants can use. This nitrogen is only available until legumes begin flowering and producing pods. At that point, they keep the nitrogen for themselves. The large, familiar seeds of black beans split in half, which tells us that they are eudicots. This means that the vascular bundle forms a ring within the stem, plants have a taproot, and flowers generally have petals that appear in multiples of four or five. Black beans get their black color from flavonoids called anthocyanins. These are the same water-soluble pigments that give purple cauliflower and blueberries their color. Black bean varieties Black beans come in both bush and pole varieties. Pole varieties will climb trellises, cattle panels, and other vertical surfaces, and they tend to be indeterminate, which means they will continue producing pods. Bush varieties tend to be determinate and will produce all of their pods within a two-week time frame. Pole beans produce more pods than bush beans, but bush varieties are best if you are planning on doing any canning. Whichever variety you should, beans should be harvested as soon as they have plumped up. Leaving them on the plant for too long makes them tough. 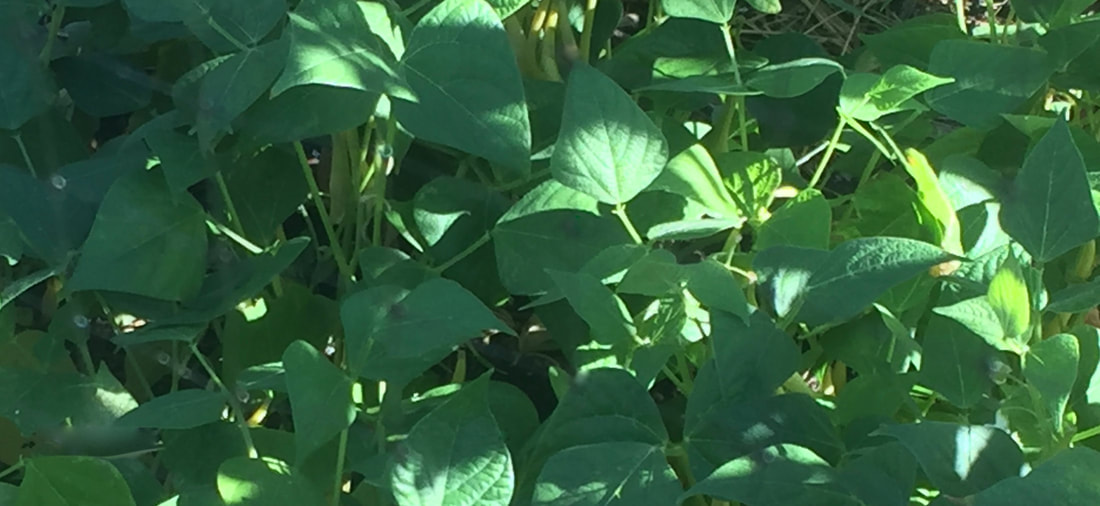 Bean plants (Kate Russell) How to grow black beans Beans are generally planted directly in the soil in spring and early summer. If planted too soon or too late in the season, the seeds will simply rot in the ground. You can start black bean seeds in smaller pots, but they have delicate roots and do not transplant well. You can also grow them in containers. Just keep in mind that bean root systems need 16-24” deep pots to thrive. NOTE: As tempting as it may be to use an inexpensive bag of dried black beans from your local grocery store as your seeds, don't do it. Grocery store items are safe to eat. That does not means that they are safe to grow. Many grocery store plants can carry pests and diseases that may take years to be rid of. Instead, invest in certified disease-free seeds and transplants. Your garden is worth it. 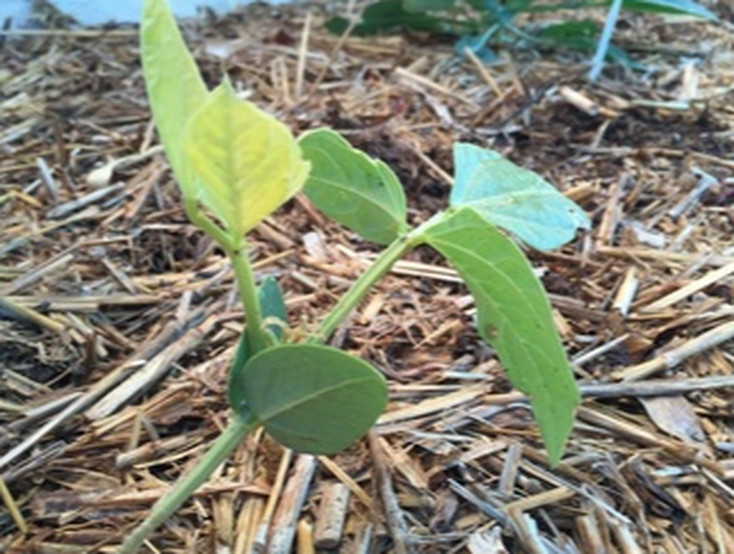 Bean seedling Black beans prefer warm temperatures (above 70°F) and need at least 6 hours of sunlight each day. They prefer loose soil with a pH of 6.0-7.0. Because they can fix atmospheric nitrogen, there is no need to feed bean plants with nitrogen. If a soil test indicates a nutrient deficiency, you can top dress around plants for the best yield.
Seeds should be planted 1-2” deep and 6-8” apart. Water enough to keep the soil moist (but not soggy) until germination occurs. This should take 8-14 days. After that, water deeply every few days, allowing the soil to dry out between waterings. For a continuous harvest of black beans, you can start new seeds every week or two throughout the growing season. This is called succession planting. Hand-weed around bean plants by cutting weeds off at soil level. This avoids disturbing bean roots while eliminating competition for water, nutrients, and sunlight. This practice also leaves valuable soil microorganisms in place, where they can benefit the bean plants. Black beans take 80-140 days to mature, depending on environmental conditions and variety. Black bean pests and diseases Disease that tend to affect beans include bean rust, curly top, damping off, Fusarium root rot, mosaic viruses, powdery mildew, and white mold. Most of these diseases can be prevented by avoiding overhead watering and allowing the soil to dry out between waterings. The real battle, when growing any type of bean, is the army of pests that may go after your crop. These pests include aphids, armyworms, bean weevils, corn earworms, cucumber beetles, cutworms, darkling beetles, earwigs, grasshoppers, leafhoppers, leaf miners, loopers, Lycaenid pod borers, Lygus bugs, nematodes, salt marsh caterpillars, seed corn maggots, slugs and snails, spider mites, stink bugs, thrips, whiteflies, and wireworms, but don’t let that stop you from trying your hand at these productive, delicious, easy to store beans. Three-year crop rotations can help prevent or break the disease triangle for many of these problems. Beans are easy to work with, they improve your soil, and are a satisfying crop to harvest. Chinese yardlong beans rarely grow a yard long, but they get close. These impressive beans are fun to grow and delicious to eat.
Yardlong bean varieties There are several varieties of yardlong beans, with varying maturity dates, colors, and growth habits. Here are just a few:
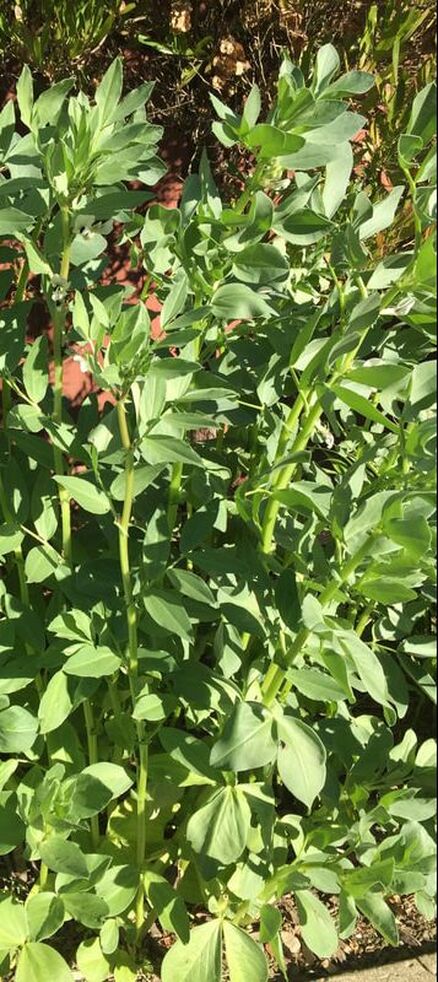
How to grow yardlong beans Yardlong beans need lots of sun and heat and something to climb (unless it’s a dwarf/bush variety). Seeds should be planted 1” deep, well after the last frost date, and next to trellising, a stock panel, a tuteur, or some other structure. Yardlong beans prefer slightly alkaline soil with a pH of 6.0 to 7.5. You may want to succession plant at 2-week intervals for maximum harvest. 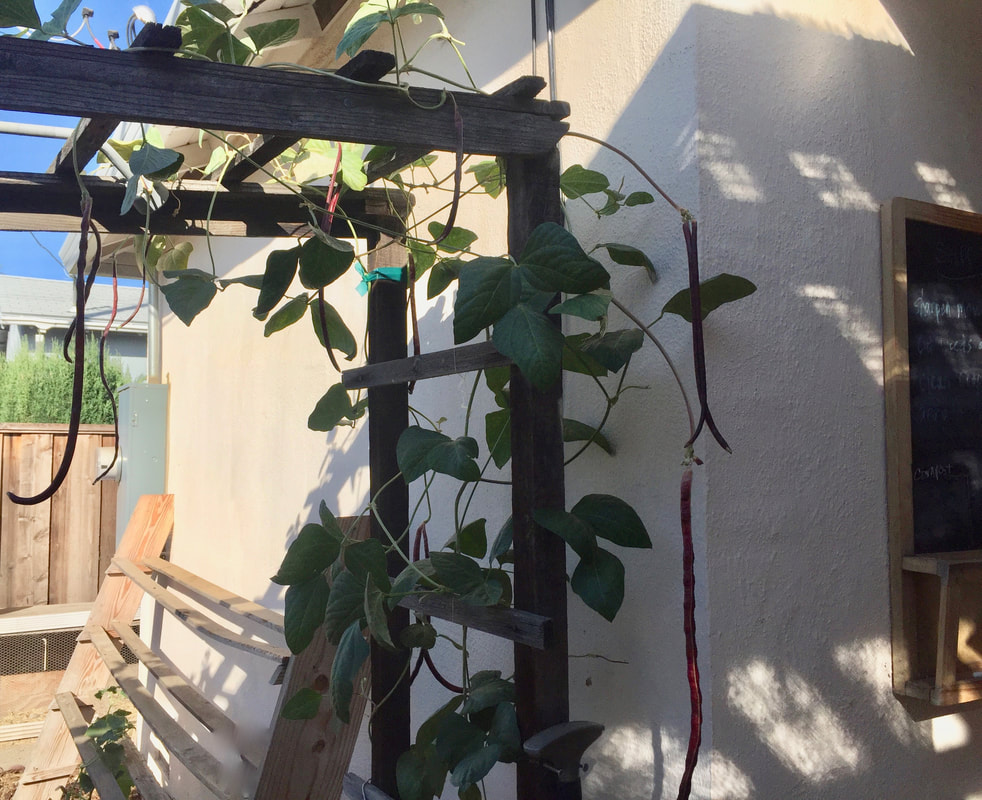 Red noodle beans growing on trellis At first, it won’t look like much is happening. It may take 60 to 90 days before beans start flowering. Once they start, however, they are very productive. Bean pods tend to form in groups of two or more and they are a striking addition to any garden. And they taste good!  Harvested red noodle beans Harvesting yardlong beans
Yardlong beans are generally eaten before they reach full size. This means checking every day during peak production. They taste their best when about the diameter of a pencil. If you leave them on the vine longer than that, production will slow and the beans will become tough. You can, however, allow them to get close to full maturity and then harvest the beans for food and next year’s crop. Just be careful when harvesting. Do not damage the buds from which the beans grow. These buds can produce multiple beans throughout the growing season. You can store yardlong beans in the refrigerator for several days before adding them to stir fry, casseroles and soups. These beans do not steam well. Yardlong bean pests and diseases Yardlong beans are not as susceptible to bean weevils as other bean species. Ants, aphids, and thrips, however, can cause problems. The most common pests are herbivores, such as rabbits, voles, and deer. Delicious and attractive, yardlong beans also attract pollinators. Give them a try! People started growing and eating soybeans three thousand years before the invention of written language. Originally from East Asia, this high protein legume is now found practically everywhere. Soy milk, tofu, and soy sauce are just a few products made from soybeans, but what about the plants themselves? Is there a place for soybeans in your summer garden?  Soybean fruit (H. Zell) CC BY-SA 3.0 The soybean plant Mature soybean plants can reach 2 to 4 feet tall, and they have trifoliate leaves. This means that each leaf is made up of three leaflets. Like other legumes, soybean roots have a symbiotic relationship with certain soil bacteria (Rhizobium) that help them use atmospheric nitrogen. They are deep rooted plants, going down 3 to 5 feet. Soybeans are photoperiodic plants. This means shortening days is what triggers them to start producing flowers. Soybean plants have small, self-fertile flowers that can be purple, pink, or white. Once flower production begins, many soybean plants drop their leaves.  Small, purple soybean flowers (Huwmanbeing) Public Domain Soybean fruits are 3 inch long, hairy pods that contain 2-4 seeds, called pulses. Soybean pulses can be brown, black, green, yellow, or multicolored. By 2010, 93% of soybeans grown commercially in the U.S. were genetically modified. In that same year, scientists mapped the soybean genome, the first bean to be sequenced. Types of soybeans There are two basic categories of soybeans: vegetable and field. Field soybeans are grown for oil production. Vegetable varieties are higher in protein, easier to cook, and taste better than field soybeans. Soybeans contain 38-45% protein and up to 19% oil. How to grow soybeans Soybeans (Glycine max) are an annual bean plant that loves hot, summer weather. Pulses should be planted 1 inch deep and spaced with mature sizes in mind. To provide an ongoing harvest, you may want to use succession planting, adding new plants every week or two during the growing season. Soybeans are ready to harvest within 80-120 days after planting. Pick pods while they are still green. Once they brown, the pulses lose flavor. Of course, you can always use mature pulses to plant the next season's crop! Because of their nitrogen-fixing ability, soybeans make an excellent player in crop rotation plans.  Mature soybeans (USDA) Public Domain Soybean pests and diseases
Spider mites are the most destructive pest of soybeans, followed by corn earworm moths, Mexican bean beetles, bean leaf beetles, and cyst nematodes. Fungal diseases, such as stem blight, rust, and white mold can infect soybean plants, along with bean yellow mosaic and other viral diseases. But don't let that stop you! If you have the space, give soybeans a try in your yard! If you enjoy curry, you may want to try growing your own fenugreek. But don’t do it for the wrong reasons. Fenugreek is one of those foods touted as a miraculous cure-all for cramps, hair loss, high blood sugar, insufficient breast milk, indigestion, and diabetes. While there may be some truth to the diabetes claim, all the other claims lack any scientific proof, and even the diabetes research is incomplete at this time. That being said, there are plenty of delicious reasons to grow your own fenugreek. 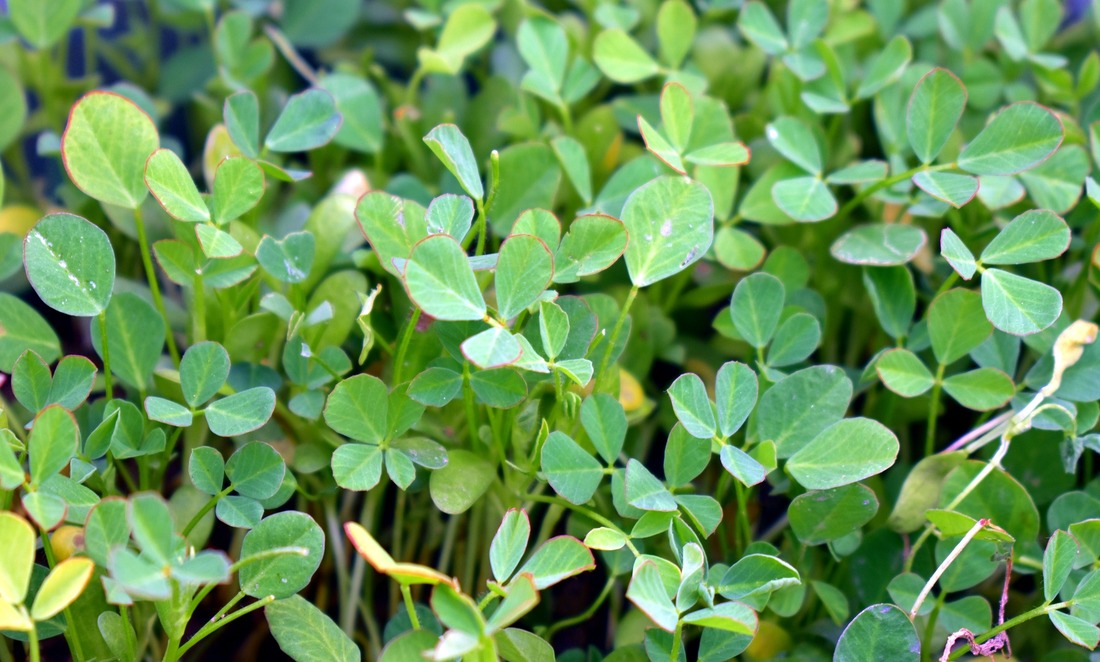 Fenugreek plants (SandeepHanda) Pixabay Fenugreek as food For over 4,000 years, people have grown this annual legume. It thrives in semiarid conditions, and its seeds and leaves are popular ingredients in dishes from South and Central Asia. Like other legumes, fenugreek is high in protein and fiber. A 3.5 ounce serving of fenugreek seed provides 323 calories, 58g. carbohydrates, 25g. dietary fiber, and 23g. of protein. It also contains significant portions of the RDAs for thiamine (28%), riboflavin (31%), Vitamin B6, (46%), folate (14%), iron (262%), magnesium (54%), manganese (59%), phosphorus (42%), and zinc (26%). [Who knew curry was so good for us?!!?] Fenugreek seeds are generally roasted to reduce bitterness and enrich flavor. And it’s not just the seeds of the fenugreek plant that are eaten. Fresh fenugreek leaves, which are said to taste similar to spinach, are used as a vegetable in many Persian and Indian dishes. Dried leaves are used as an herb. 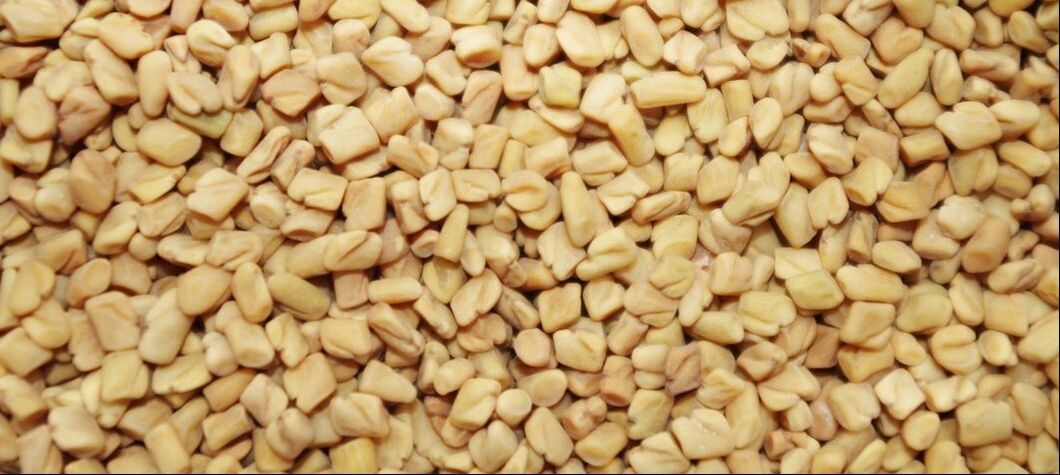 Fenugreek seeds (Ajale) Pixabay The fenugreek plant
Fenugreek (Trigonella foenum-graecum), also known as methi, samurai, and hilba, among others, is a fragrant annual. It may grow as a single stem, or as a small bushy plant, reaching a height of 2 feet. Green to purple oval leaves are small and trifoliate (having three leaflets). It looks a lot like clover and alfalfa. Flowers are small and either white or purple. Seeds develop inside curved yellow pods. This plant is moderately drought resistant and it can handle a light frost. How to grow fenugreek This plant needs heat, so you may want to grow it in a container, maybe on a windowsill. Fenugreek has a shallow root system, so the container does not need to be very large. You can grow fenugreek as a microgreen by simply sprinkling seeds on top the soil in a shallow container, and then lightly covering them with more soil. Fenugreek seeds should be planted 1/4” deep, in rich potting soil. Keep the soil moist until germination occurs. Fenugreek does not like our heavy clay, and it does not take kindly to being transplanted, so it is best started where it will stay for the growing season. These seeds sprout very quickly, usually in only 2 to 4 days, making it an exciting children’s activity. Fenugreek pests and diseases Fenugreek is susceptible to root rot, powdery mildew, and charcoal rot. These diseases can be minimized by allowing the soil to dry out between waterings. Aphids are the most common pest of fenugreek. Harvesting fenugreek Fenugreek can be grown as a microgreen, or you can go for the full growing experience. Generally, young leaves and shoots are snipped off the plant early in the growing season. Then the plant is allowed to continue growing to produce seeds, usually 3 to 5 months after planting. To harvest seeds, the plant is removed and hung upside down to dry. Have you had your fenugreek today? Pulses are the grain seeds of plants in the legume family. Legumes are a great high protein, high fiber food that tends to be pretty easy to grow. Popular legumes include beans, peas, lentils, chickpeas, cowpeas, and fava beans, just to name a few. Soybeans, carob, peanuts, tamarind, and alfalfa are also legumes, but not all legumes produce pulses. 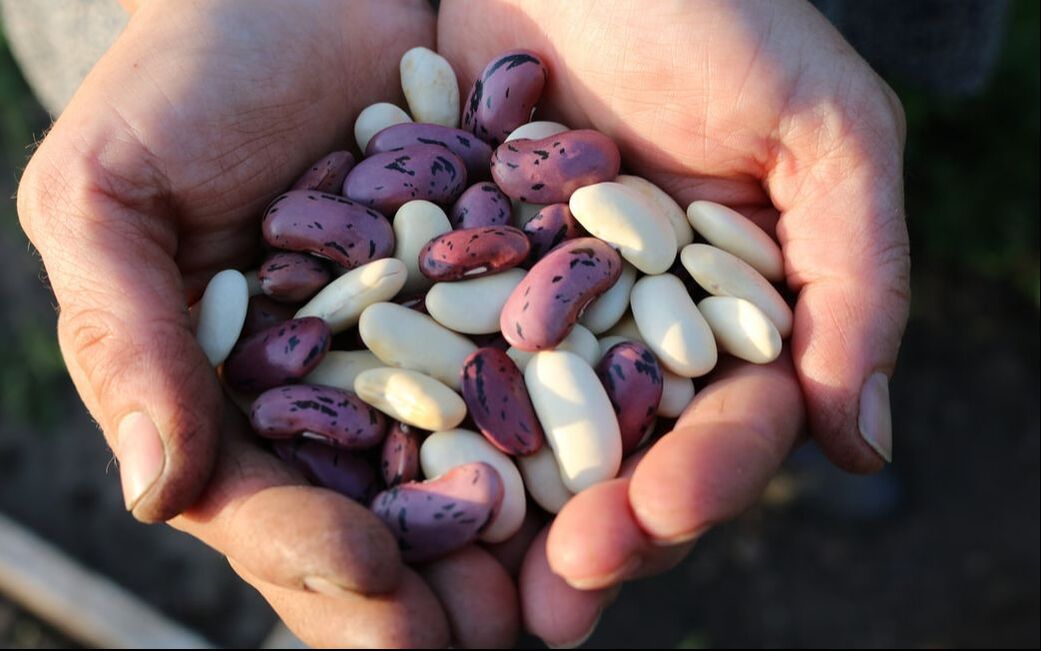 Pulses (Pexels) Pixabay Legume fruits
Legume fruits, or pulses, are simple dry fruits that are low in fat. They develop from a single carpel and are normally dehiscent, which means they unzip along one edge. These fruits are often called pods, but that isn’t exactly inaccurate. Pulses are only one type of pod. A radish silique and a vanilla capsule are also pods. While peanuts and soybeans are both legumes, they both have a high fat content, they are not considered pulses. No green pulses If you harvest peas or beans while they are green, they are not called pulses. They are simply vegetable crops (even though they are fruits). The same is true for legumes harvested specifically for their oil. This is a rule put out by the United Nations’ Food and Agriculture Organization (FAO). Differences between pulses and cereal grains Cereal grains, such as rice, wheat, barley, corn, and sorghum certainly deserve garden space for their seed crops, they are not the same thing as pulses. Pulses may seem like just another bunch of seeds, but there are fundamental differences that make them stand alone:
The only true pulses are the seeds from dry beans, dry peas, chickpeas, and lentils. These plants provide one of the best bangs for your gardening buck, providing excellent nutrition and soil health improvement. Chickpea, gram, or garbanzo bean, these legumes have been cultivated for 7,500 years. High in protein and easy to grow, chickpeas also make an excellent green manure.  Fruiting and flowering chickpea plant (Nundhaa) CC BY-SA 4.0 Speaking of green manure, chickpeas produce the most seeds when they are provided with plenty of sunlight and very little nitrogen. Being a legume, chickpeas are able to convert atmospheric nitrogen into a form usable as plant food. If they have access to too much nitrogen in the soil, you will get plenty of vegetative growth and very few seeds. The chickpea plant Chickpea plants (Cicer arietinum) grow 8 to 20 inches tall and are bushy. They have feathery leaves and delicate white flowers with pink, violet, or blue veins. Like other legumes, the seeds are called pulses. Often (incorrectly) called a pod, pulses are simple fruits that develop from a single carpel, and that usually open along a seam (dehisces). Each pulse contains one or two seeds. Chickpeas have taproots that can reach 15 to 40 inches down into the soil. This makes them a good choice for reducing compacted soil and improving soil structure. [Translation: this fall, pick the worst spot in your landscape and plant chickpeas. Fava beans are another good choice.]
Chickpea varieties There are four major chickpea varieties, and over 90 genotypes. The familiar garbanzo bean (kabuli chana) is light-colored, large, and smooth-coated. Cicer reticulatum only grows in Turkey. There are two black chickpeas: Desi chana and cici neri. Ceci neri are a rare large, black chickpea grown only in southeaster Italy. Desi chana is the closest relative to ancient chickpeas. It is small, dark, and rough-coated, and can be black, green, or speckled  Chickpea pulses (Eitan Ferman) Public Domain How to grow chickpeas
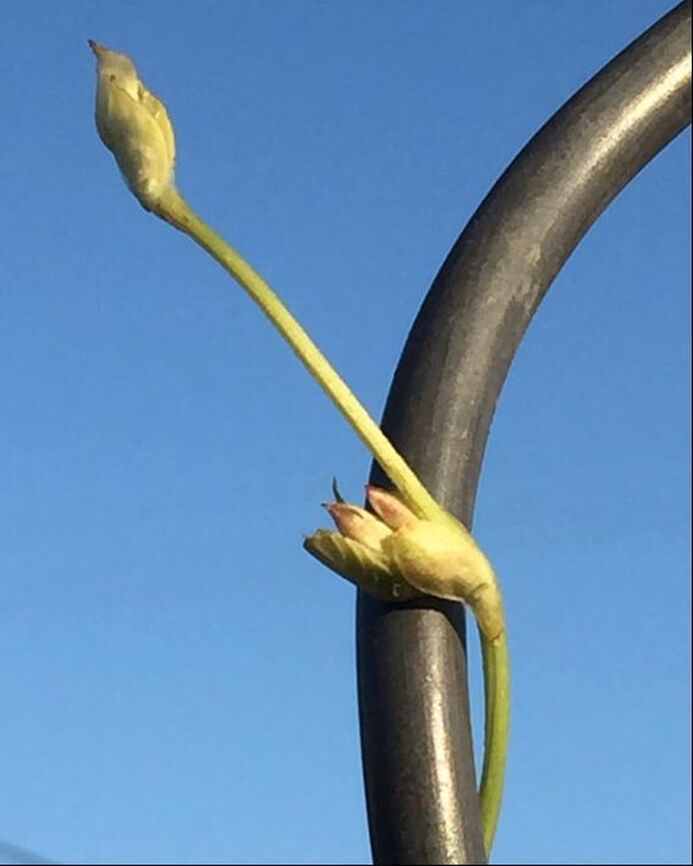
Here warm regions, chickpeas are a winter crop that is usually started around the first frost date. To speed the process, you can start chickpea seeds indoors, in pots, several weeks ahead of time, as long as you can provide them with enough sunlight and protection from summer heat. Transplant seedlings into the garden when they are 4 to 5 inches tall. Chickpeas prefer full sun. They can be grown in partial shade, but you won’t get nearly the same production. Chickpea seeds are planted deeply, from 1-1/2 to 2 inches deep. Contrary to popular myth, do not soak chickpea seeds before planting, or water heavily after planting, as this makes them susceptible to cracking. Seeds should be planted 3 to 6 inches apart and thinned to 6 inches between plants. If you are growing chickpeas in rows, space rows 18 to 24 inches apart. Your chickpeas will be ready to harvest in approximately 100 days. Chickpeas do not handle competition from weeds very well, so you need to stay on top of them. Also, high boron levels can stunt chickpea growth, so be sure to get your soil tested. There are also a few pests and diseases you’ll need to watch for. Chickpea pests and diseases Fusarium wilt, verticillium wilt, ascochyta blight, anthracnose, bacterial brown spot, bean mosaic, bacterial blight, cucumber mosaic, curly top, and several root rots affect chickpea plants, especially those caused by Pythium, Rhizoctonia, and Macrophomina. Charcoal root rot, white mold, and black rot may also occur, and nematodes can be a problem. Aphids, armyworms, corn earworms, cucumber beetles, cutworms, darkling beetles, leafhoppers, leafminers, loopers, lygus bugs, spider mites, stinkbugs, thrips, weevils, and wireworms may all try feeding on your chickpeas. Luckily, these plants can produce an abundant amount of food, and crop rotation goes a long way toward interrupting the lifecycle of most of these pests and diseases. Did you know that roasted chickpeas can be ground up and used as a coffee substitute, or that chickpea water (aquafaba) can be used as an egg substitute to make merengue? I didn’t either. I started my journey growing peanuts when something emerged from a planting container that I hadn’t planted. And it was unmistakably a peanut. 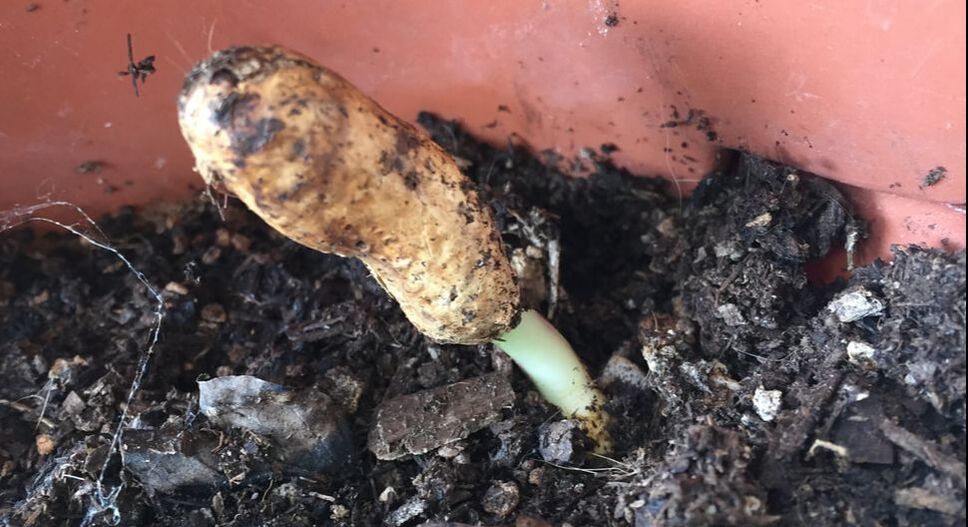 An unexpected peanut The only thing I could figure was that one of my local scrub jays had ‘planted’ it for later consumption. At the time, I had no bandwidth for growing peanuts. So I dug it out to take a closer look at the root system. [Now I let them grow!] 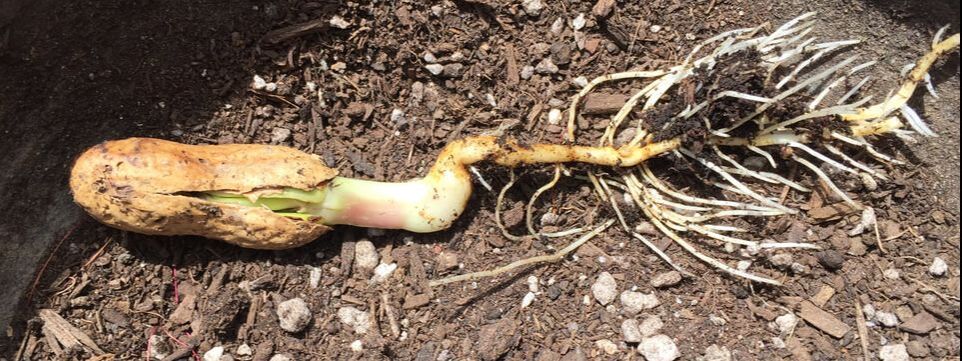 Immature peanut plant Nuts that are not nuts Peanuts, also known as goobers, or groundnuts, are legumes. This means that they are able to ‘fix’ atmospheric nitrogen into a form they can use as food, with a little help from certain bacteria that live on or in their roots. The botanic name, Arachis hypogaea, describes a legume that produces its seeds “under the earth”, in a behavior called geocarpy. Geocarpy is rare in the plant world. It is a means of reproduction in which pollinated flowers are transformed into specialized stems, called pegs. Pegs are budding ovaries that bend downward and push their way into the soil. Seeds are produced along these pegs. Unlike other plants, which produce seeds above ground for easy dispersal, the peanuts we eat are the underground seeds of the peanut plant. And they are not nuts at all.  Peanut pegs growing into the soil (H. Zell) CC BY-SA 3.0 Parts of a peanut If you look closely, it is easy to see how peanuts are related to peas and beans. They have very similar seed structures. Each delicious peanut has five parts:
 Peanut seeds (Jeusorizales) CC BY-SA 3.0 Peanut varieties Peanut plants come in two forms: runners and bush. Bush varieties are 18 to 22 inches tall, while runners can spread out 28 to 31 inches. Peanuts are believed to be a human construct, through artificial selection between two wild varieties. This occurred in Argentina or Bolivia, nearly 8,000 years ago. Selective breeding of this first peanut has resulted in six major and two minor landraces. A landrace is a regional, domesticated variety. These groups are:
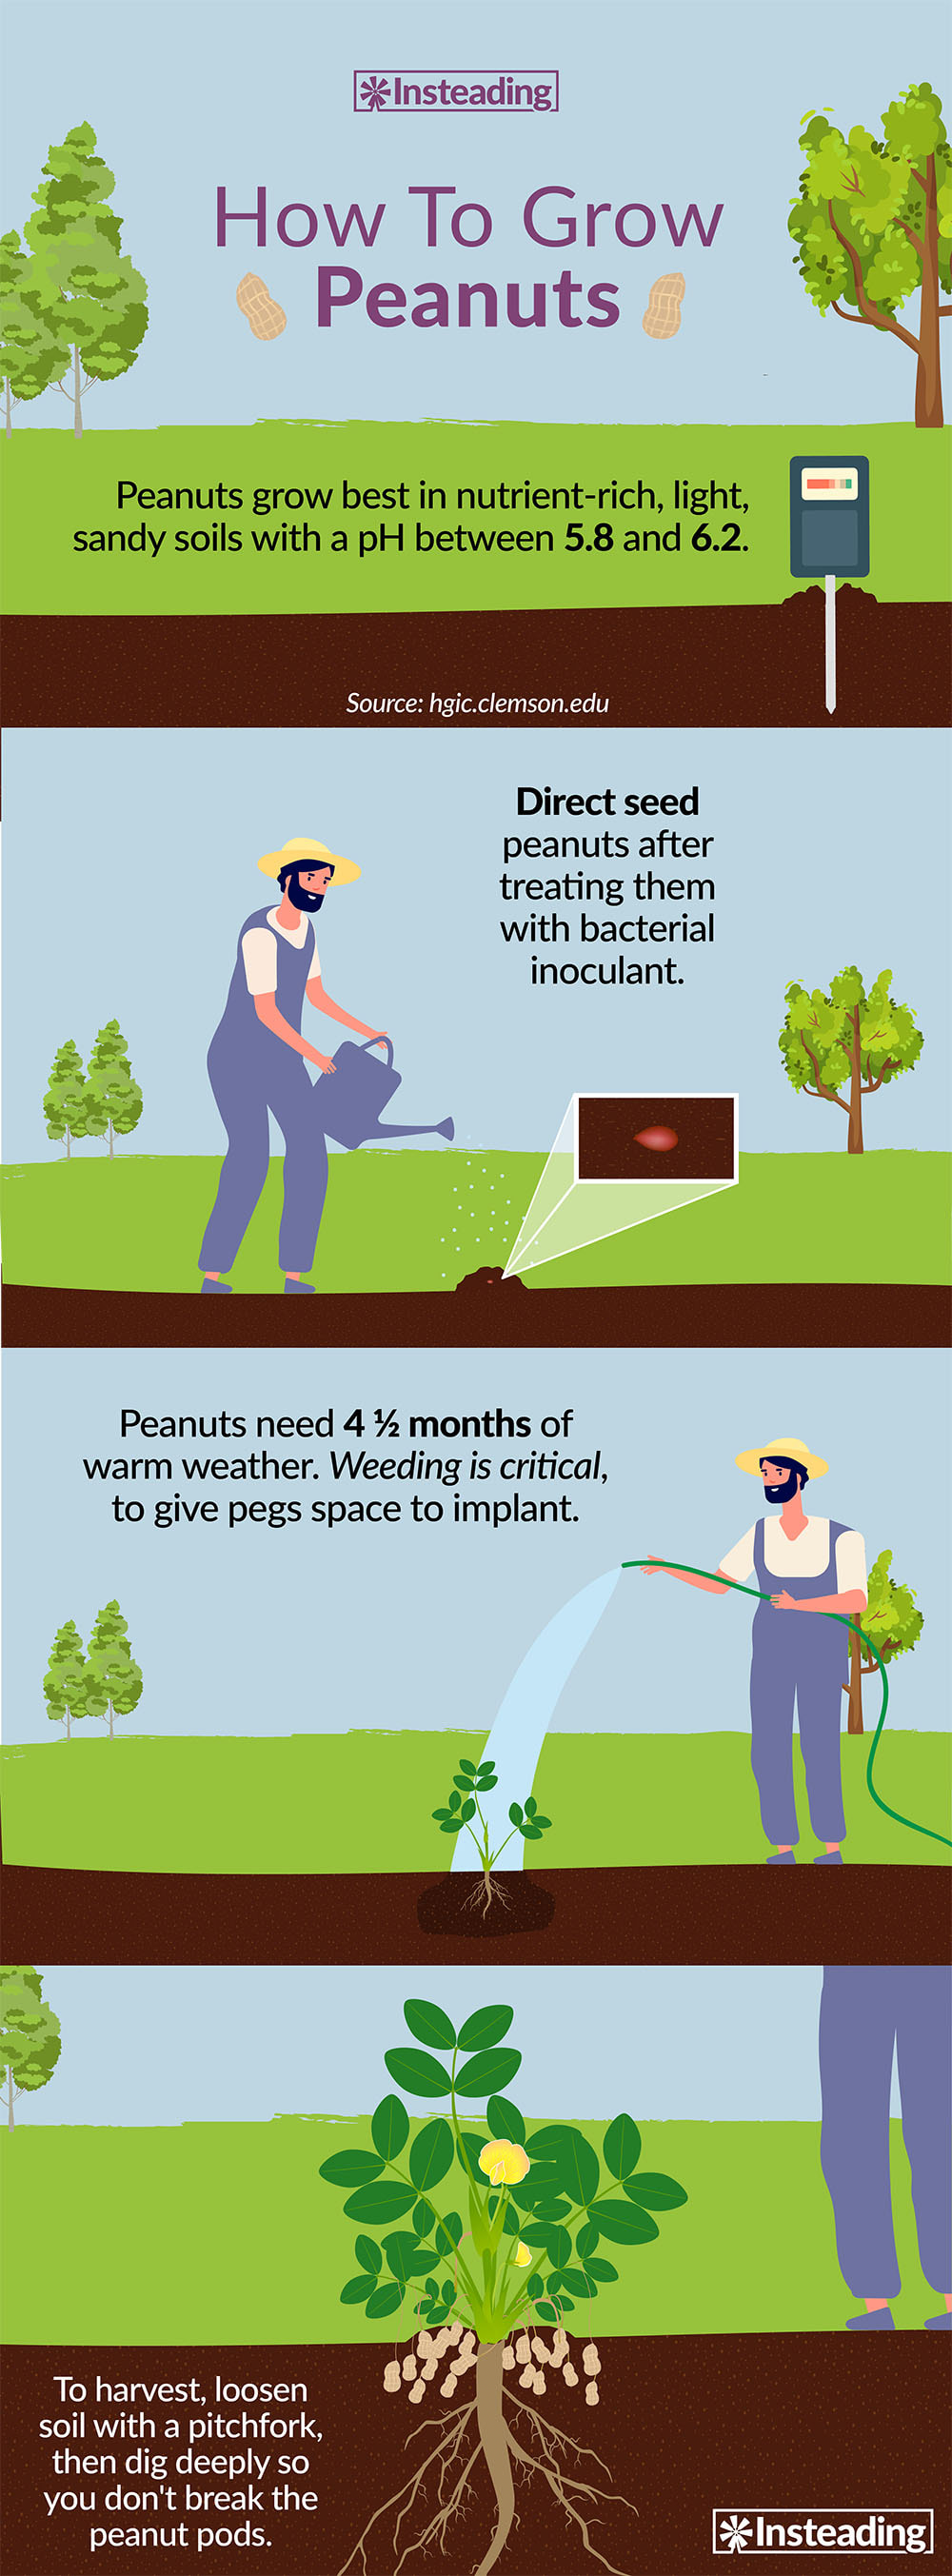
Until the 1930s, peanuts were used predominantly as a livestock feed. That was when the USDA actively promoted peanuts as a commercial crop for human consumption. How to grow peanuts While it’s true that peanuts prefer the sandy loam of the southeastern U.S., peanuts can be grown in raised beds and large containers that are filled with a lightweight potting soil. You can start peanuts in a tray filled with potting soil. Make one inch deep holes by hand or with a dibble, and drop one shelled peanut into each hole, cover with soil, and water well.
In commercial peanut fields, as peanut plants begin to yellow, machinery is used to dig plants out of the ground, give them a good shake, and then flip them over and leave them on the soil surface for a few days to dry. In the home garden, you will harvest your peanuts by simply pulling the plants out of the ground, giving them a good shake to get rid of any clinging soil, and leave them, upside-down, to dry for a few days. [You may want to do your peanut drying in the garage, to protect your harvest against marauding birds and squirrels.] Next, peanuts are threshed, or removed from their stems. You may be surprised to learn just how important the drying aspect of peanut harvesting is - peanuts stored with too much moisture can become infected with a fungus (Aspergillus flavus) that produces toxic substances that can be carcinogenic. Be sure to dry your peanuts thoroughly!  Mature peanuts (Pollinator) CC BY-SA 3.0
Licorice whips, dark, salty drops, and soothing teas all get their signature flavor from the licorice plant. Well, sort of. The root of the licorice plant is what gives us its sweet flavor. In fact, the word licorice comes from the Greek for sweet root. Licorice gets its flavor from certain chemicals found mostly in those roots. But licorice isn’t the only plant with those chemicals. Star anise, fennel, and anise, none of which are related to licorice, feature similar tastes. Most candies that are licorice-flavored actually contain very little licorice. Instead, aniseed oil is used to enhance and reinforce the flavor. A different kind of sweet Chemically, the sweetness of licorice is very different from the sweetness we expect from sugar. Licorice takes longer to register as sweet, but that sweetness lasts longer. In the Netherlands, dried sticks of licorice root are chewed as a candy. Thirty to fifty times sweeter than candy, these treats don’t hurt your teeth or your calorie count! Up until 2009, licorice root was used in the U.S. to enhance and moisturize tobacco products.
Licorice as medicine Licorice has long been seen as a treatment for upset stomach and upper respiratory illness. Countless other claims have been made about licorice as a medication, but the scientific research does not yet support those claims. What it has shown is that licorice contains chemicals that can cause medical problems. If you are pregnant, or have existing heart or kidney problems, you should not eat actual licorice root in excess. That shouldn’t be difficult, right? Licorice is a legume! The licorice plant (Glycyrrhiza glabra) is an herbaceous perennial legume. Being a legume, licorice has a relationship with certain root fungi, called mycorrhizae, that allow them to fix atmospheric nitrogen into a form the plant can use for food. Those roots (which contain most of the licorice flavor) are extensive. They can reach 3 to 4 feet deep, and the stolons can extend for up to 25 feet! Don’t let that scare you off. If you prefer, you can also grow licorice in a container.  Licorice foliage (Raffi Kojian) CC BY-SA 3.0 How to grow licorice
Traditionally, licorice was grown in Southwest Asia and the Mediterranean. The licorice plant prefers full sun to partial shade, good drainage, and slightly alkaline soil. Licorice can be propagated with cuttings, by division, or from seed. To start a licorice plant from seeds, you will need to soak the seeds in water for 24 hours before planting them 1/2 inch deep. Keep the soil moist until the seeds germinate, which should take two weeks. Germination is most successful when temperatures are around 68°F. These plants get large, so be sure to give each plant enough room to reach full size. Licorice is somewhat frost tolerant, able to withstand temperatures as low as 5°F, as long as it doesn’t stay that cold for long. Mulch around the plants to retain moisture, stabilize temperatures, and reduce completion from weeds. Your licorice plants do not need to be fertilized. Licorice pests and diseases The same flavors that make licorice so pleasant for us make it undesirable to most garden pests. Spider mites, slugs, and caterpillars are the only real pests of any concern. Powdery mildew can also be a problem. Other than that, licorice plants are trouble-free. How to harvest licorice Licorice root needs to grow for 2 or 3 years before it can be dug up in the fall. Leaving the main roots in place and undisturbed, dig up secondary roots, wash them, and store them in a dark location where they can dry. They can be kept for several months at this stage. To use, simply peel off the bark and chew or simmer out the root’s sweet deliciousness. You can also use licorice stems to make a tasty tea. This unassuming, resilient plant can fill a neglected spot in your garden or foodscape, providing a tasty diversion when the mood strikes. Horses and cows love it, but what is alfalfa? Is it the same thing as hay? What about straw? Let’s find out!  Alfalfa flowers (Victor M. Vicente Selvas) Public Domain To start, hay refers to any member of the grass or legume families that have been mown and dried as fodder, or animal feed. You can find oat hay, wheat hay, ryegrass hay, clover hay, timothy hay, alfalfa hay, and others. Straw, or stover, refers to the dried stalks leftover after harvesting grains, such as oats and rye. Straw is generally used as bedding, though it can be used as a low quality feed. Alfalfa stover makes a good bedding for rabbits, guinea pigs, and hens. Alfalfa is a legume, like peas and beans, but it grows more like oats or barley. Native to southwestern Asia, alfalfa is primarily grown as fodder for livestock. It is either dried and baled, or fermented as silage. Many gardeners are finding that alfalfa’s deep roots and nitrogen-fixing ability make it an excellent cover crop or green manure. Alfalfa history Alfalfa (Medicago sativa) is a flowering perennial in the pea family. Alfalfa was first farmed, over 6,000 years ago, in Iran. Then the Persians took this valuable crop to Greece around 500 BC. The Latin name, Medicago, refers to the ancient people of Iran, the Medes. The Arabic word for this crop, al-fiṣfiṣa, is what gives us our common American name for it. The rest of the world has been calling it lucerne, but that is slowly changing as more of the world’s alfalfa crop is grown in California. The alfalfa plant As a perennial, alfalfa plants grow for an average of 4 to 8 years, though they can live for 20 years. These deep-rooted plants, while only 3 feet tall, can reach down as much as 49 feet to find water! I guess it’s safe to assume that they are drought tolerant. In fact, alfalfa is rated as drought-resistant, meaning it can go for long periods of time without any water at all. Most of the time, alfalfa roots only go 6 to 9 feet deep, which is still pretty impressive, when most annual vegetables only root 6 to 12 inches down. Once established, alfalfa plants create a sturdy crown at ground level. Much like sorghum, these crowns contain bud shoots that make it possible to harvest a crop only to have a new one grow. Alfalfa is usually mown 3 or 4 times a year, but it can done up to 12 times a year, in an ideal microclimate. Overgrazing, or over-harvesting, can damage the crown. After flowering, pollinated flowers produce spiraled fruits that contain 10 to 20 seeds. Alfalfa plants uses chemicals to prevent other alfalfa plants from growing nearby. This is called autotoxicity. It is triggered after the first seeding of an alfalfa plant and it continues for the remainder of that plant’s life. because of this, crop rotation with corn, wheat, or other crops must be used before replanting an area with more alfalfa.  Mature alfalfa fruits (Philmarin) CC BY-SA 3.0 Nutrients in alfalfa
Alfalfa is a highly nutritious plant. It contains high levels of protein, fiber, and carotenoids. Alfalfa is highly combustible and it can cause bloating when eaten fresh, by livestock, so it is normally dried first. Alfalfa, like other legumes, also has root nodules that contain beneficial bacteria, Sinorhizobium meliloti, that are able to convert atmospheric nitrogen into a form usable by plants. You can buy alfalfa meal, as a nitrogen source, or you can grow your own. How to grow alfalfa Alfalfa, like wheat, can be sown in either spring or autumn. These plants need a neutral soil pH of 6.8 to 7.5 to thrive. Other factors are less important. Alfalfa uses a lot of phosphorus and potassium, but our Bay Area soil tends to have both in abundance. (See Soil Test) Alfalfa seeds are planted 1/2 inch deep and should be spaced at 6-inch intervals. When farmers plant alfalfa, they use a machine, called a drill, that inserts a single seed at the right depth and spacing, as the farmer drives over a field. Since alfalfa is sensitive to weed competition in its early development, the proper spacing is rather important. If you are growing your own alfalfa for the first time, use 1/4 pound of seed over a 25 square foot area (or 20 pounds of seed per acre). Planting it will take some time, because these seeds are really tiny, so put on some music and wear a hat. Alfalfa does not grow well on slopes or in areas with shallow soil. [Raw, unsprouted alfalfa seeds contain chemicals that can be toxic to humans, causing lupus-like symptoms, so don’t eat them. Also, there is no scientific research to verify medical claims made about alfalfa or its sprouts. Leave alfalfa to your soil and the livestock, where it belongs.] Alfalfa pests and diseases Blister beetles, thrips, spider mites, weevils, armyworms, nematodes, cutworms, grasshoppers and crickets, leafhoppers, and aphids are all attracted to alfalfa. Alfalfa is prone to several root rots, such as rhizoctonia, phytophthora, and Texas root rot. Other alfalfa diseases include fusarium wilt, downy mildews, anthracnose, bacterial wilt, and verticillium wilt. Since alfalfa, along with clover, rye, and other legumes can host bean mosaic, it is a good idea to keep some distance between them and your bean crops. Also, voles, pocket gophers, and ground squirrels can be major alfalfa pests. Alfalfa as insectary and habitat Insectaries are plants that attract and provide for insects. Alfalfa’s purple flowers are a big favorite of honey bees and other pollinators. Commercially, alfalfa and cotton are intercropped because of predatory insects attracted to alfalfa help to protect the cotton crop. Alfalfa also provides food and habitat to over 130 bird species and many other forms of wildlife. Alfalfa flowers are responsible for the majority of the honey produced in the United States. That being said, it ends up that bees and alfalfa don’t necessarily play well together. The structure of an alfalfa flower makes it so that a western honey bee gets knocked in the head each time they land on a flower. Apparently, bees don’t like getting knocked in the head, so they sip alfalfa nectar from the side of the flower, foregoing the pollen transfer. Since it takes young bees a few knocks to the noggin to learn this trick, pollination still occurs, but only because beekeepers make sure there are plenty of inexperienced bees in the hive when they service alfalfa fields. Alfalfa leaf cutter bees do a much better job of pollinating alfalfa than honey bees. Even if you only have a driveway or fence strip, try your hand at planting some alfalfa. It will improve the soil, attract pollinators, and it needs no care at all, once it is established. Legumes are nitrogen-fixing plants that produce many of the foods we eat. Peas and beans are common legumes. Peanuts, chickpeas, alfalfa, clover, lentils, vetch, mesquite, carob, tamarind, lupins, wisteria, and soybeans are also legumes. The unique behavior that makes legumes so valuable is that most of them are able to convert atmospheric nitrogen into a form that is usable by other plants. Nitrogen Over 80% of our atmosphere is made up of nitrogen. Plants are greedy for nitrogen, but they can’t use atmospheric nitrogen. Some plants, our beloved legumes in particular, have developed mutually beneficial relationships with certain bacteria that live on or in their roots. These bacteria are able to combine atmospheric nitrogen with hydrogen to create ammonia, which is then converted into a usable form of nitrogen. This is called the Nitrogen Cycle and is what makes legumes an important part of crop rotation and cover crops. Some people claim that marigold plants interrupt the nitrogen-fixing ability of legumes, but I have not found any research to support those claims.  Wax beans Legume plants With so many family members, it should come as no surprise that there is plenty of variety. Some legumes grow low to the ground in a spreading habit, while others vine, and other stand upright. All legumes are dicots, which means they produce two seed leaves before true leaves appear. It also means that the seeds tend to be made up of two halves. The fruit, nut, or seed of legumes is technically called a pulse. Pulses are grain seeds held within a pod, or simple dry fruits, that develop from a single carpel. Most legume seeds have a “zipper” along one side that opens up when the seed is ripe. This behavior is called dehiscence. These seeds are often rather large and fast-growing, making them an excellent choice when gardening with children.  Freshly dug peanuts (Pollinator) CC BY-SA 3.0 Legumes as soil amendment Legumes can be used as a green manure, cover crop, or an edible harvest. When used as a green manure, plants are allowed to reach the flowering stage and are then cut and left where they fall to decompose. This returns valuable nutrients to the soil and improves soil structure. Other legumes are grown as a cover crop to prevent erosion. Most legumes have strong, deep roots that help aerate compacted soil.  Legume selection (USDA) Public Domain Legumes as food
Legumes are a high protein, high fiber food source. Fava beans, wax beans, lentils, lima beans, and wheat are all just a few of the legumes we eat on a daily basis. Pests and diseases of legume crops While the pests and diseases of most legumes are more species specific, nearly all legumes are susceptible to Fusarium wilt. Bean mosaic and powdery mildew are common bean and pea diseases. Stinkbugs enjoy legumes and, what makes them worse is that they can also transmit tomato bacterial spot. Weevils and treehoppers are common pests of legumes. Adding legumes to your garden or landscape can improve the soil, feed nearby plants, and they provide a delicious harvest. Give legumes a try! Fava beans are the broad beans seen in falafel and not seen in minestrone. One of the only beans available in Europe until the discovery of the Americas, fava beans make an excellent ground cover and a delicious meal. Being a legume, like peas and other beans, fava beans are able to fix atmospheric nitrogen to feed themselves and their neighbors (until seed development begins). Fava beans are a close cousin to vetch.
Known as broad beans, Windsor beans, field beans, bell beans, and tick beans, fava beans look similar to lima beans and have been cultivated since prehistoric times for food, as a cover crop or green manure, and the seeds can even be roasted and ground as a coffee extender! These plants are prolific producers. 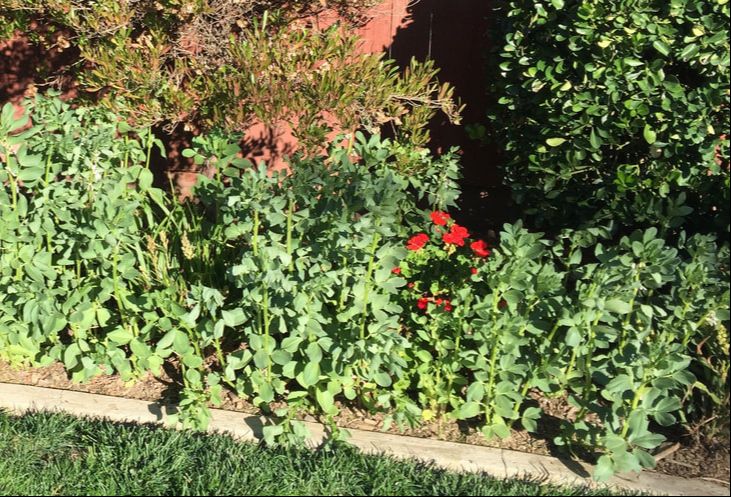 Fava beans grow quickly and make a nice tall border Fava bean plants Fava beans can grow to 2- to 5-feet tall on erect stems. They have a taproot and large leaves. Fava beans can tolerate temperatures as low as 20°F. The seeds can even germinate at 40°F! They will grow better if you incorporate some compost into the soil before planting, but they can tolerate our heavy clay soil. The flowers are large and fragrant, attracting many different pollinators to the garden. How to grow fava beans Fava beans (Vicia faba) are a cool weather crop, so you will want to start your seeds in September or November, in warm regions, for a cover crop or green manure. Crops destined to be eaten should be planted in February and March. Fava bean seeds should be sown one or two inches deep, depending on seed size, and 4- to 5-inches apart. Rows should be 2 or 3 feet apart. Seedlings should be thinned to 8- to 10-inches after germination. Regular irrigation is necessary for full pod set. If it is a wet winter, no irrigation is needed. Mulching around the plants will help keep the soil moist.
Fava beans are harvested when they have reached full size but are still green. They can also be left on the vine until they have dried. They take 80 to 100 days to reach maturity. Like Brussels sprouts, fava bean plants mature from the bottom up, so start harvesting from the bottom of the plant and it should keep producing for several months.
Fava beans as cover crop As nitrogen-fixing legumes with strong taproots, fava beans are well suited for use as a cover crop or green manure crop on heavy clay soil. Allowed to grow through their complete lifecycle, fava beans can prevent erosion and improve soil structure. If used as a green manure, which means cut down and left to lie where they fall, fave bean plants add nutrients to the soil for future crops. Fava bean sensitivity Some people are genetically predisposed to a sensitivity to fresh fava beans because they lack a certain enzyme. These individuals are generally men from southern Mediterranean and northern African regions. This condition is called favism. Symptoms include jaundice, back and abdominal pain, and dark urine. Fava beans also contain high levels of tyramine, so individuals taking monoamine oxidase inhibitors should avoid eating them. They also contain oxalic acid, so fava beans should be avoided by those prone to urinary tract stones. Don’t let favism (or childhood nightmares of lima beans) keep you from trying fava beans in your garden or landscape. Do you have a favorite fava bean recipe? Share it with us in the comments! We’ve all seen those cans of yellow wax beans in grocery stores, but these plants are easy to grow, they add nitrogen to your soil, and the crisp sweetness of a freshly picked bean far surpasses anything canned. Wax beans (Phaseolus vulgaris) actually refers to several different yellow-podded members of the common bean family. This family also includes lima beans, kidney beans, pinto beans, and immature ‘green’ beans. It is believed that wax beans got their name because the yellow color looks similar to beeswax, but no one is really sure. Wax beans are available in both bush and pole varieties.  Can you find the wax beans? How wax beans grow Beans are self-pollinating annuals. These plants are fun and rewarding to grow. They grow quickly enough to work well as a children’s activity, reaching maturity in only 60 days. What’s really fun about these plants is that they can be grown pretty much anywhere: on a windowsill, in a container, in a straw bale, and in partial shade. Of course, they prefer sunny raised beds or traditional garden rows, but, the point is, these plants are EASY. Like other legumes, wax beans are able to ‘fix’ atmospheric nitrogen, making it available not only to themselves, but to nearby plants. Of course, this only works until the plant starts producing seeds, then the free lunch is over. How to grow wax beans Like other beans, wax bean seeds are mostly endosperm (plant food). Plant seeds one inch deep and 2 to 4 inches apart. If you grow bush beans (not the canned barbecue product), your plants will get 18 to 24 inches tall and about a foot wide, so thin accordingly. Pole beans, however, can be trained up trellising, fences, lattice, sunflowers, trees, pretty much anything they can wrap their tendrils around, without thinning. They can also be used in the traditional Three Sisters Method, with corn and squash. Trellising pole beans on something that goes over your head looks really nice, with ripe beans hanging down, from overhead. It’s makes picking easy, too! Some people say that planting marigolds nearby can be a problem, claiming that they interrupt the nitrogen-fixing capabilities of legumes, such as peas and beans, but I don’t know if this is true. Wax bean pests and diseases When it comes to bean pests, it’s all the usual culprits: cutworms, bagrada bugs, cucumber beetles, weevils, thrips, wireworms, leaf miners, and dried fruit beetles. As delicious as fresh wax beans are, it’s no wonder so many critters are after your harvest. Bindweed can also choke out your bean plants. Common wax bean diseases include anthracnose, bean mosaic, and fusarium wilt. Wax beans should not be planted near soybeans to reduce the likelihood of stem blight. 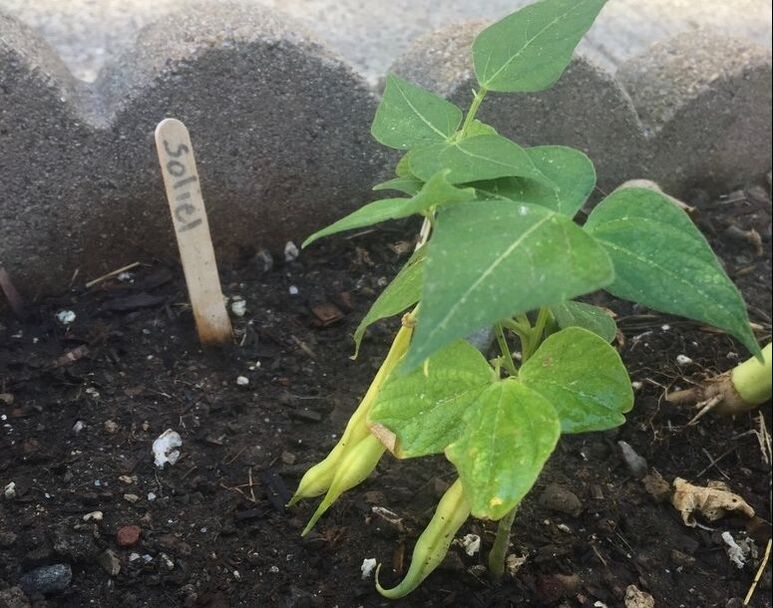 Even this baby wax bean plant is being productive! Harvesting wax beans
Beans are one of those edible plants that produce more food if ripe beans are harvested regularly. In other words: the more you pick, the more you get. Once picked, you can eat them fresh, steam them, add them to stir-fry, and or can them for winter eating. Wax beans are sensitive to ethylene gas, so they should be stored away from apples, bananas, and other ‘gaseous’ produce. Plant some wax beans today! Lentils are packed with protein and fiber, add nitrogen to the soil, and they are easy to grow.  Three types of dried lentils (Justinc) CC BY-SA 2.0 You see them in bags at the grocery story, but have you ever thought about growing your own lentils? People have been eating lentils for 13,000 years! These members of the pea family are called pulses because they are grown to be harvested as dried beans. Lentils are legumes that can “fix” atmospheric nitrogen, making it available to plant roots. Lentils grow 18 to 24 inches tall and produce small white to light purple flowers. The pods are very small, each containing only one or two seeds, so you will need 4 to 8 lentil plants per person. You can grow lentils in containers, but it takes several plants to get a decent crop. Lentil varieties Lentils come in several colors, ranging from brown and black, to yellow, orange, red, pink, and green:
How to grow lentils Being a cool season crop, lentils (Lens culinaris) can be started two weeks before the last frost date. Lentil seeds should be planted 1/2 to 1 inch deep, and 1 inch apart. Lentils prefer full sun, loose soil, and a pH of 6.0 to 6.5, so you may need to acidify alkaline soil. I grow my lentils in raised beds, so pH and compacted soil are not issues. It makes weeding one heck of a lot easier, too!  Puy lentil seedlings At 68°F, they will germinate in about 10 days. Seedlings should be thinned to one plant every 4 or 5 inches. Rows should be 18 to 24 inches apart. You may want to use row covers, at first, to protect young plants from pests. Be sure to keep the soil evenly moist, at first. Lentils are very drought tolerant once they get a good start. You may want to provide a low trellis, but it is not necessary. Lentils take 80 to 110 days to reach maturity, depending on weather, soil, and sunlight. Stop watering when the pods begin to dry.
Harvesting lentils Harvesting lentils is a labor of love. Allow the pods to dry out completely before using. Since each pod only holds one or two seeds, I suggest a good movie, a bowl for lentils, a towel on the floor, and a large pot between your feet to collect the discards. The job of hulling lentils becomes a rhythmic Zen sort of experience, once you find your rhythm. You can also harvest immature lentil pods the same way you would harvest green beans. Lentils can also be sprouted and added to salads. Lentil pests & diseases Aphids, weevils, nematodes, armyworms, cutworms, cucumber beetles, loopers, lygus bugs, leafminers, whiteflies, thrips, spider mites, stink bugs, and wireworms may try feasting on your lentils before you do. Insufficient air flow can lead to fungal diseases, such as Alternaria rot, anthracnose, root rot, Botrytis gray mold, leaf spot, collar rot, downy mildews, Fusarium wilt, powdery mildew, and rust. Lentils are also susceptible to viral diseases. These include bean leaf roll virus, bean yellow mosaic, pea seed borne mosaic, cucumber mosaic, broad bean mottle, and broad bean stain. It's a wonder that anything can survive! The best thing you can do to protect your lentils is to provide adequate air flow and monitor your lentils regularly. In spite of the number of threats, lentils are more rugged than they appear. Lentil trivia
The rich, earthy flavor of lentils make it an excellent addition to soups, stews, and salads. How about adding some lentils to your landscape this year? Give it a try! Jicama is my new favorite snack food. Cut like french fries, this crisp root vegetable is just sweet enough to be addictive, and without all the grease. It may not look or taste like it, but jicama (Pachyrhizus erosus) is a member of the bean family. It grows on vines, mostly in Central America, the Caribbean, Southern Asia, and in the Andes. Also known as yambean and Mexican turnip, jicama leaves, stems, and skin contain toxins that should not be eaten. Once you get inside, however, the flesh is delicious and versatile. Jicama can be added to salads, soups, stir-fry, and it goes equally well with fruits as it does with vegetables. While low in calories, jicama high in insoluble fiber and Vitamin C. It also contains inulin, which a form of plant sugar (fructan) that promotes calcium absorption and good gut bacteria. So let’s get growing!
How to grow jicama
Jicama prefers short days and high temperatures, so you may have to plant your jicama in a location where it receives afternoon shade (or make your own) to trick it into thinking the day is shorter than it really is. Like peppers, jicama seeds need warmth to germinate. Seeds should be soaked in warm water for 24 hours before planting 1/4 to 2 inches deep. You can wait until temperatures rise, or use can use seed heat mats to speed germination. Jicama performs better in alkaline soil. To get well shaped roots, the soil must be loose and nutrient-rich, making it a good choice for raised beds. As blue or white flowers appear, they should be removed by hand to stimulate root development. Lima beans have the ability to poison their attackers, and groups of lima bean plants work together to counteract threats caused by caterpillars. The world of plants never ceases to amaze me.  Lima beans (Howard F. Schwartz, Colorado State University, bugwood.org) CC BY 3.0 The lowly lima bean, hated by many, loved by some, is a legume. These particular legumes put out chemicals that attract parasitic wasps whenever caterpillars start chewing on their leaves. The wasps lay their eggs in the caterpillars, hatch, and devour their host. Lima beans also contain certain chemicals, stored in different parts of the plant, that become activated when the seeds are chewed, creating potentially fatal cyanide poisoning. Before the Lima Haters shout a resounding, “We told you so!”, it is important to note that cooking lima beans for at least 10 minutes eliminates those chemicals. So, in the case of lima beans, simply soaking isn’t good enough. You need to put them to the fire before eating. Why grow lima beans? Despite childhood trauma and potential poisoning, lima beans (Phaseolus lunatus) are actually a very sweet, high fiber source of protein, folic acid, iron, manganese, and potassium. Even better, they are easy to grow and excellent additions to balconies and windowsills, as well as standard gardens. You can select bush or pole varieties. (Sometimes the smaller bush varieties are called butter beans, if that makes them more palatable.) How to grow lima beans Lima bean plants will not put out pods in temperatures above 80°F or when it’s cold and wet, so spring and fall are the best times to grow lima beans. Seeds will take 60 to 90 days from planting, so plan accordingly. (Bush varieties take 60 to 80 days; pole varieties take 85 to 90 days). Lima beans prefer a soil pH of 6.0 to 6.8 and full sun, but they can handle partial shade, especially as summer temperatures rise. Surprisingly, too many nutrients in the soil will cause your lima bean plants to produce lots of vegetation, and not very many beans, so you can forego the aged compost. Also, too much water simply makes the beans split, so water sparingly. Plant seeds 1-1/2 to 2 inches deep. Bush beans can be planted 6 inches apart - the plants will actually help hold each other up. Pole beans should be planted 10 inches apart and be sure to provide them with a trellis, tomato cage, fence, or balcony to climb. Pole beans can reach 10 to 12 feet in height. If you need to thin your bean plants, simply cut them off at ground level. The roots have a symbiotic relationship with soil microbes that “fix” atmospheric nitrogen into the soil, feeding nearby plants. Lima bean pests and diseases Beans are commonly attacked by aphids, flea beetles, bean beetles, mites, and leafhoppers. Plus, those aphids can carry the bean mosaic virus. Other lima bean diseases include blight and anthracnose. Beans are also susceptible to many diseases found in the soil, so crop rotation is a good idea.  Dried, ripe lima bean pods California is responsible for 60 to 80% of the world’s lima bean crop. You can be responsible for 100% of your lima bean crop by growing your own!
Beans, beans, the magical fruit. The more you eat, the more you…well, you know. What you may not know about this nutritional powerhouse is that it is crazy easy to grow, germinates at lightening speed, adds nitrogen to the soil, and is just plain fun to watch grow. 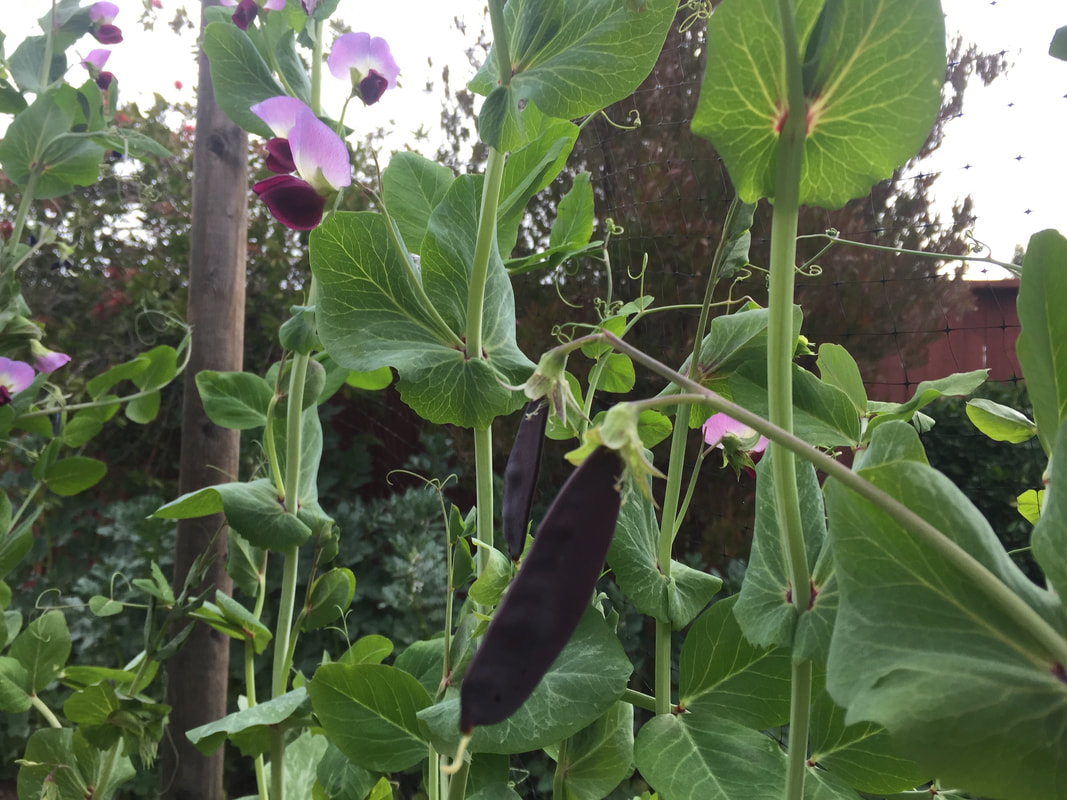 Purple pole beans are easy to find among the greenery Beans are the edible seeds of the legume family. Often, but not always, these seeds are kidney-shaped. There are over 40,000 different type of beans found in the world. Some of the more common varieties are:
If you have heavy clay soil, be sure you do not overwater. Clay soil can hold so much water that plants will rot or drown. Now, if you want to get really fancy, you can inoculate the seeds with a species-specific Rhizobium bacteria. This does not mean giving tiny shots to each and every seed (But it’s a funny image, right?) Beans can be dusted with, rolled in, or briefly soaked in the inoculant at planting time to help them get the most nitrogen out of the soil, for a better start. Personally, I’ve never used inoculants, but many gardeners and most farmers swear by them, especially in areas where beans have not been grown for a long time.
Beans and crop rotation If you grow beans regularly, it is a good idea to rotate the bean crop with sunflowers, tomatoes, or wheat, to interrupt the life cycle of some fungal pests, such as bean rust. Bean seedlings are susceptible to damping-off disease. UC Davis provides this extensive list of bean diseases:
Bean seed sources
As tempting as it may be to plant beans that were bought at your local grocery store, this is a bad idea. Those beans can carry diseases that you may never be able to get out of your soil, once they arrive. These diseases are not harmful when eaten by people, but they can be devastating to baby bean plants. Instead, invest in certified bean seed, and then save seed from your harvest for next year’s planting! Nutritious beans As a food, beans are high in protein, fiber, iron, potassium, thiamine, vitamin B6, and folic acid, with no cholesterol. Wikipedia has an excellent graphic that shows the protein, finer, and iron content of various beans. [Spoiler alert - lentils and kidney beans top the chart!] And if you want to avoid the undesirable side effects of eating beans, be sure to change the water a few times during soaking and/or cooking. Finally, according to the Smithsonian, kidney bean leaves can be used to trap bedbugs! Now you know. Black-eyed peas are said to bring good luck when eaten on New Years’ Day, but don’t wait that long! Put them to work in the garden for better growing all year. 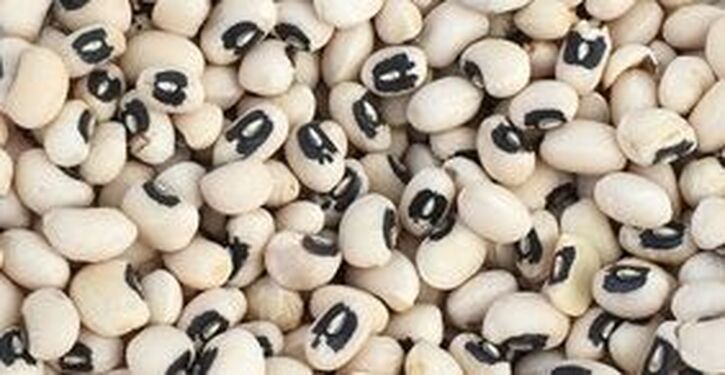 Black-eyed peas Black-eyed peas are just one variety of cowpeas. Cowpeas are a type of bean. Cowpeas (Vigna unguiculata) make an excellent cover crop or green manure. Because they are legumes. Legumes have nitrogen-fixing nodes on their roots that transform atmospheric nitrogen, which most plants can’t use, into soil-bound nitrogen, which all plants need.
Green manures are crops that are cut and either dug back into the soil or allowed to decompose on top of the soil, before they go to seed. Cowpeas will keep adding nitrogen to the soil right up until they start producing baby cowpeas of their own. Then, that nitrogen is absorbed by the plant and put to use. The nice thing about edible cover crops is that, even if you miss the mark and the plant goes to seed, you still get food! Cover crops are grown for several reasons. They prevent erosion, add organic matter and nitrogen to the soil, reduce weeds and deter some soil borne pests. Cowpeas are drought tolerant, germinate rapidly, and don’t seem to be bothered by heavy clay soil. In fact, these garden workhorses can be used to break up compacted soil with little to no effort on your part! While these beans prefer sun, they can also be incorporated into shade gardens. Fusarium wilt, aphids, weevils, and pod borers are the most common pests. Beans have long been used in companion planting or intercropping. Native Americans used the Three Sisters method of growing beans, squash and corn together. The squash shaded the ground, the beans climbed the corn and the corn soared skyward with the shaded ground and nitrogen-rich soil. How to grow cowpeas If you have areas of compacted or bare soil, it is simple enough to poke holes in the soil and drop in a cowpea. Cowpeas are not particular. The hole can be 1-4 inches deep. Plants should be spaced 2 to 3 inches apart and protected from birds until they sprout, which can happen in as little as 4 days! If you are feeling particularly creative or ambitious, you can plant cowpeas into patterns around trees, walkways, or other landscape features. As the plants come up, they will add a new texture to the garden, along with improving the soil structure and nutrient content! Peas have received a bad reputation from those forced to eat the canned spheres of mush that claim to be peas. As any gardener knows, plucking a fresh pea from the vine and eating it whole offers a crisp, sweet flavor that shares nothing with its canned (or even frozen) cousins.  Pea plant (Rasbak) CC BY-SA 3.0 Pea plants Peas (Pisum sativum) are legumes, which means they have a tidy little business arrangement with certain soil bacteria, called rhizobia, which allow them to use atmospheric nitrogen. Pea seeds develop in pods, making them a pod fruit. Peas are either green or yellow and pods can be green, brown, or purple.  Purple podded peas are easy to find in the greenery Peas are annual plants that can be low-growing bush varieties, but vining cultivars are the most commonly grown. Pea plants are self-pollinating, but the more plants you have, the better the pollination rates will be and the bigger your harvests will be. Pea varieties Modern peas are generally described as either edible pod or shelling varieties, but the story behind pea evolution may surprise you. Wild peas have been around for thousands of years. They were being cultivated back in the 3rd century BC. These early cultivated peas were shelling peas, or field peas. Field peas have a tough, dehiscent pod that is not eaten. Dehiscent means the pods unzip themselves when the peas are ripe and dry. Of course, dried peas are pretty tough eating, unless you cook them. As a rule, shelling peas are grown to be dried for later use in pea soup and pease porridge. [Pease porridge is a thicker version of pea soup, more of a pudding, often made with a ham hock or bacon.] These were dietary staples in medieval times. Sometime around the 15th century, somebody figured out that immature pea pods could be eaten whole. These “garden peas” or “sugar peas” were a decadent luxury back then. Over time, cultivars were developed that retained that tenderness. These sugar peas, or “English peas”, gained in popularity, especially after canning was developed.
Peas are very easy to grow. They prefer cooler weather, making them excellent winter crops. While peas grow best in full sun, they can also work well for shade gardening and container gardening. Many birds love pea seeds, so you may have to protect your crop with netting until the seeds germinate.
Seeds should be planted 5” apart and 1" deep in rich, loose, moist soil. As they grow, vining pea plants will use tendrils to grasp and climb, so you will want to provide stock panels, tuteurs, or trellising for them to climb. As tempting as it may be to let your peas climb up netting, don’t do it. You’ll have a mess on your hands at the end of the growing season. Take my word for it. If peas are being grown in a container, a tomato cage works well. Water regularly, allowing the soil to dry out between waterings, and be sure to harvest pods as soon as they are ready. This will keep the plant producing. Peas left of the vine will become too tough and starchy to eat, but they can be saved for planting or cooking. Succession planting can provide many months of harvestable peas. Pests and diseases of peas Fungal diseases, such as Ascochyta blight, basal stem rots, damping off, downy mildews, Fusarium wilt, powdery mildew, and root rot cause lesions and blackened areas on stems, roots, and leaves. Viral diseases include pea enation mosaic and pea streak, both transmitted by aphids. These diseases cause distorted pods and leaves. Pests include aphids, armyworms, cucumber beetles, leaf miners, nematodes, pea leaf weevils, pea moths, spider mites and thrips. Forget the mushy peas of your childhood. Grow your own peas for a delicious treat! |
Welcome!You can grow a surprising amount of food in your own yard. Ask me how! To help The Daily Garden grow, you may see affiliate ads sprouting up in various places.
You can also get my book, Stop Wasting Your Yard!  Index
All
Archives
July 2024
|


 RSS Feed