|
Adventitious roots are different from other roots. Roots are generally classified as primary or lateral. The primary, or main, root supports a number of side, or lateral roots. Root systems feature either a taproot or fibrous roots. Carrots are an example of a taproot. Fibrous root systems are more “all over the place”. In both cases, the roots are attached to the aboveground portion of the plant at the crown, or to other roots. This is not the case, when it comes to adventitious roots.  Banyan tree (Wknight94) CC BY-SA 3.0 What are adventitious roots? Adventitious roots emerge from a variety of non-root locations, and for different reasons. Unlike the classic, “stem goes up, roots go down” type of growth, adventitious roots appear at leaf and stem nodes, and at wound sites. What starts out as a normal bud or shoot can change its purpose and become an adventitious root. This often occurs as a result of low oxygen levels (flooding, burial) or high ethylene levels (pollution). Several different plant hormones can trigger this response, including auxins, cytokinens, gibberellins, abscisic acid, and ethylene. These roots are the ones that appear after you break a Jade plant leaf off of a parent plant. The wound dries and new cells form just underneath the callus. Some of those cells turn into adventitious root cells that allow the leaf to become an individual plant.  Adventitious stem and brace roots on corn (Jamain) CC BY-SA 3.0 Where are adventitious roots found? Adventitious roots resulting from normal growth are classified according to where they occur on the plant:
 Adventitious stem roots (Nzfauna) CC BY-SA 3.0 Why do plants create adventitious roots?
As with everything else plants do, it’s all about genetic survival. Under normal conditions, many plants have evolved to use adventitious roots to access more food and water, provide greater stability, or to procreate. Bulbs use adventitious roots to send new bulblets out over a greater area. When plants are faced with conditions such as flooding, stem burial, grazing, and nutrient deficiencies/excesses, adventitious roots are used to help the plant recover. These roots may form at any of the above mentioned locations, depending on the stressor and the plant species. How do we use adventitious roots? Adventitious roots are why we can propagate many plants from cuttings. Grape, apple, succulent, and stone fruit species are commonly cloned in this way. Tomato plants are often planted with the first set of stems buried below the soil level. This stimulates adventitious root growth, providing the plant with more water and nutrients, ergo better tomatoes. Tomato and pepper plants are often propagated with cuttings, to extend the growing season. Plants grown from cuttings tend to mature more quickly than those started from seeds. Many herbs, such as basil, rosemary, thyme, and sage can be grown from cuttings, thanks to their ability to generate adventitious roots. Acaulescent is the word used to describe plants with no visible stem. [It is pronounced a-kaw-LE-sent.] Most plants have one or more central stems that support the aboveground portion of the plant. These plants are called caulescent. Acaulescent plants do not appear to have stems. Instead, these plants tend to grow their leaves close to the ground in a clustered, rosette, or whorled pattern, common of many succulents. Some acaulescent plants can get quite tall, but these are generally still leaves growing out of the ground. Now, don’t be fooled. Acaulescent plants still have a stem, it’s just extremely short and the internodes (the spaces between nodes) are densely contracted.  Acaulescent succulents (Kate Russell) How acaulescent plants grow You may be thinking that many succulents have long stems that support flowers, and you would be right. Those inflorescence axis stems are called peduncles. Unlike a trunk or central stem, these growths are purely reproductive and not structural. Many acaulescent plants have modified underground stems, such as rhizomes, bulbs, or tubers. Instead of sending up a central stem, acaulescent plants put leaves out from the crown. Some of these leaves are thick and mucilaginous, as with succulents, while others are the familiar broad leaves of many tropical plants. The stems you do see attaching the leaves to the crown are actually part of the leaf. These leaf stems are called petioles. Examples of acaulescent plants Aloe, agave, and yucca are popular acaulescent plants. Most bulbs, including onion, garlic, chives, and crocus, are acaulescent. The aboveground growths you see in these plants are specialized leaves called scapes. Dandelions, carrots, pineapple, cilantro, lettuce, spinach, and California poppies are also acaulescent. In each case, leaves emerge from a ground level base. Some species of cycad, primrose, oxalis (Oxalis triangularis), and palm (Attalea cuatrecasana) are also acaulescent.
Why should you care?
Knowing that a plant is or is not acaulescent will not change the way you care for it or harvest it. What this information will help you do is to identify those mystery plants that keep turning up in your garden or foodscape. Knowing words such as acaulescent makes you sound pretty smart, too! We all know when a gym bag is ripe, but what about the fruits and vegetables in your garden? According to the dictionary, ripe refers to fruit or grain that has developed to the point of being ready to harvest and eat. Okay, so that rules out all those leafy vegetables, such as chard and spinach, that we can eat whenever we feel like it. That definition also pushes herbs to the side. With grain being the fruit of a cereal grain, it looks like ripeness only applies to fruit. But what (or who) decides when a fruit is ripe or not? An unripe fruit If you have ever tried eating an unripe fruit, you know that the experience can be less than satisfying. Starchy, bitter, and tough, unripe fruits are very unlike the ripe versions of themselves. Some fruits, such as lychee and Chinese lantern berry, can be downright dangerous to eat unripe. Unripe apples and plums are safe, but eat too many and you’re in for a stomach ache. And, if you happen to bite into an unripe persimmons, be prepared to feel like the inside of your mouth caved in on itself. So how do these hard, green, astringent fruits turn into the soft, juicy sweetness we love?  Ripe and unripe Early Girl tomatoes (Mika Masuzaki) CC BY 3.0 It’s all about ethylene The lowly ethylene molecule is responsible for many changes within a plant. Ethylene is used by plants in respiration and to inhibit the movement of auxins, a plant growth hormone. By manipulating auxin levels, plants use ethylene to stimulate seed germination and adventitious root growth. It is also used to bend the plant toward the sun (epinasty). This ripening, or aging, hormone also triggers abscission (leaf and ripe fruit drop), chlorophyll destruction, flower drop, and all the signs of senescence (deterioration related to aging). The physics of ripening Fruit is food for seeds and seed spreaders. When a fruit falls to the ground, it provides easy access to important nutrients to the seed or seeds contained in that fruit. It also attracts animals that may help the plant disperse its seeds over a wider range. There’s no sense in attracting fruit eaters if the seed isn’t ready. Just as the seed(s) approach maturity, a series of chemical changes take place within a fruit. That’s when ripening kicks in. We all know that, as a fruit ripens, it becomes sweeter and softer. Generally, fruit becomes less green and more colorful as it ripens, too. This is because enzymes are breaking down the chlorophyll. [One study found that birds of different continents prefer different colors of ripe fruit.] This sweetening and softening is the result of certain enzymes breaking starch down into various sugars, such as fructose, glucose, and sucrose. [Any time you see a word ending in -ose, it’s a sugar.] Some fruits stop ripening as soon as they leave the parent plant, while others continue ripening. Those that continue ripening are called climacteric. Common climacteric fruits include bananas, apples, mangoes, melons, and apricots. These fruits are frequently stored before appearing on grocery store shelves. Non-climacteric fruits, such as grapes, citrus, and strawberries must be harvested when ripe. 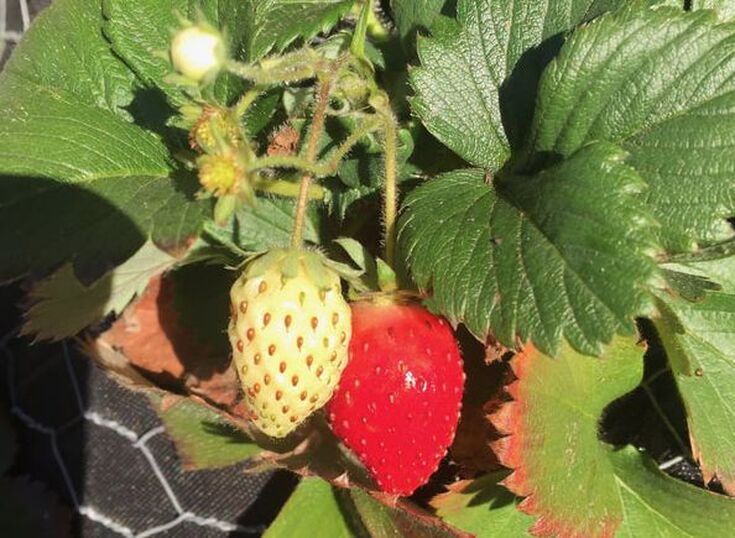 Unripe and ripe strawberries Natural vs. artificial ripening
Fruit can be ripened artificially, or it can be allowed to ripen naturally. Naturally ripened fruit takes longer and is less well suited to storage and shipping. It also has higher sugar levels, more complex flavor, and better texture. Fruits are artificially ripened using ethylene and acetylene gases in pressurized, temperature-controlled containers.. These methods are used by most large-scale fruit sellers. These fruits are picked green to allow for shipping and storage. But, before anyone starts bashing Big Agriculture for the problems they create, we have to give them credit for the Big Problem they have helped prevent: starvation on a very large scale. Figuring out how, and investing the necessary capital, to make such large quantities of food available year round is no small task, and I am grateful that they do. It is estimated that as much as 80% of all fruits are ripened artificially. [Check out thiat link and give it a read]. Unfortunately, as you saw in the linked article, too many ripening facilities use chemicals, such as calcium carbide, that are known to be unsafe. [I just learned that a glove is being developed that can tell if a fruit is ripe or not!] Even if a fruit is artificially ripened safely, it will still lack the flavor found in a naturally ripened piece of fruit. This is because artificially ripened fruits may look ripe, but they may not actually be ripe. As a fruit ripens, sugar levels increase. You can see a detailed study on sugar levels and ripeness here. Reaching that state of perfect ripeness takes time. So, I grow my own and urge you to do the same. Your sun warmed, fully ripened tomatoes, cucumbers, apples, apricots, and other home grown fruits have the time they need to reach their peak of flavor, sweetness, and texture. Some home canners claim that underripe and overripe fruits will float and just right fruits will sink, but this isn’t always true. Floating is related to density, so that rule is very species specific. Generally, smell is the best indicator of ripeness we have, unless it’s a cranberry. Ripe cranberries bounce. People have gone ape over bananas for a very long time - but can you grow your own? The answer is yes, you can!  Left to right: plantain, red banana, apple banana, and Cavendish (TimothyPilgrim) CC BY-SA 3.0 Native to Indomalaya and Australia, bananas are believed to have been first domesticated in Papua New Guinea around 6,000 years ago. Bananas are the world’s largest herbaceous flowering plant. Standard banana plants can reach 45 feet in height, but most end up only 16 feet tall. Dwarf varieties can range from 4 to 12 feet in height. According to Guinness World Records, the largest bunch of bananas held 473 bananas and weighed in at 287 pounds! The banana plant Most people refer to the banana plant as a tree, but it isn’t. Bananas plants are perennial herbs that grow from rhizomes. (If you recall, rhizome are underground stems that grow horizontally and herbs, in this case, are non-woody plants.) The fruit, technically, is a berry. The trunk of a banana plant is a false stem, called a pseudostem, made from tightly wrapped leaf sheaths that grow out of a mat or stool, called a genet, that forms a crown.  Banana crown (Obsidian Soul) Public Domain Each year, from the genet, new shoots will emerge to replace the parent plant, after its fruiting cycle is complete. The first lateral shoots to come through the soil surface are called peepers. As they grow, they are called suckers. There are two types of suckers: water suckers and sword suckers. Water suckers have broad leaves and a small rhizome base. These do not develop into plants strong enough to support a crop. Sword suckers are just the opposite, with a large rhizome and narrow leaves. Newly emerged leaves that are still rolled up are called cigar leaves and they are very fragile. Once foliage leaves are present, they are called maidens. The sucker selected to replace the parent plant each year after fruiting is called the follower or ratoon. Banana flowers From the central growth of leaves, a floral stem or aerial true stem, also called the banana heart, emerges with a cluster of female (pistillate) flower. Each of these female flowers develop a seedless berry by parthenocarpy (fruit development without fertilization). These flowers are arranged into two rows that, ultimately, become a bunch, or hand, of bananas. Before that happens, however, those female flowers become longer and skinnier. Then, the far end of each female flower becomes a male flower! These males may or may not produce fertile pollen. Sometimes, in-between the female and male flowers, a third, hermaphroditic, flower emerges. These neutral flowers do not produce pollen or fruit.  Banana flower (Ruestz) CC BY-SA 3.0 Bananas as food We are all familiar with the edible fruit of a banana, but, the banana flower is also edible in the same way that an artichoke flower is edible, except that they will stain your hands the way a beet can. Traditionally, the hands are rubbed with oil before handling these flowers. You need to remove the tough outer petals to reveal the tender heart. It is actually the bracts that are eaten. Bracts are modified leaves that surround the base of an individual flower. The outer petals look like giant pink Belgian endive leaves and make attractive food containers. Also, the leaves and petals are often used much like corn husks and grape leaves are used to wrap other foods for cooking.  Wild banana (Warut Roonguthai) CC BY-SA 3.0 Banana varieties Modern dessert bananas evolved from two wild seed-producing predecessors: Musa acuminata and Musa balbisiana. There are three major types of domestic banana:
From there, a genetic system of cultivar identification has been developed, but we won’t be heading down that rabbit hole. It is enough to know that there are dozens of cultivars, including:
[Note: there is no botanical distinction between plantains and bananas.] Because banana plants grow so quickly and look so nice, some people grow them simply for looks. This means you need to be on the lookout for ornamental varieties when shopping for a banana plant. Ornamental varieties include Ensete ventricosum, Musa ornata, and Musa sikkimensis ‘Red Tiger’. These will never produce fruit. How to grow a banana plant Being a tropical plant, bananas prefer heat, humidity, and sun. They generally do not handle wind or compacted soil very well, so be sure to select a site that is sheltered and has good drainage. You can improve a suitable site by digging in some aged compost ahead of time. [I just ordered my own banana plant and will keep you posted on its development.] Growing bananas in a container Because banana plants are actually rhizomes, it is easier than you might expect to grow one in a container. You will probably want to grow a dwarf variety. The container needs to be at least 24 inches deep. If you live in USDA Hardiness Zones 9 to 11, you will want to keep your containerized banana in the shade during summer afternoons, and bring it indoors over the winter, while the plant is young. Harvesting bananas Ripe bananas look different to certain animals. Some animals, such as zebra finch and reindeer, are able to see ultraviolet light. When they look at a ripe banana, it glows! If you have one of those handy dandy dollar bill checkers, you can see for yourself:
Commercially grown bananas are often picked green and shipped in giant plastic bags that have been sprayed with pesticides. Bananas produce a lot of ethylene gas, a ripening agent, when temperatures are warm enough, so they are kept cool to prevent ripening until they are closer to where they will be sold. The yellow color that we are all so familiar with is not exactly natural for the Cavendish banana, which is the primary cultivar found in stores. This particular banana is still green when ripe. Since shoppers prefer the yellow color, these bananas are placed in pressurized ripening rooms, where they are gassed with ethylene and held at specific temperatures to ensure uniform ripening. These high tech procedures and the economies of scale have made life difficult for small scale banana growers. Today, all banana growers are facing a very big threat.
Pests and diseases of bananas The popular Cavendish banana is facing extinction. Because most bananas are grown using monoculture and a single genome, it is very susceptible to a fusarium fungal disease called Panama disease. Panama disease fungi enter the plant from the soil and start reproducing. This fungal population explosion, in turn, clogs vascular tissue, causing the plant to wilt. This exposes unaffected parts of the plant to so much sunlight that the plant dies. This happened to ‘Gros Michel’ or ‘Big Mike’, the Cavendish predecessor. As early as the 1920s, banana shortages started to occur as a result of this fungal disease. The song, “Yes, We Have No Bananas” actually came out of those shortages! By1960, all ‘Big Mike’ banana plantations were threatened by this disease, so a decision was made to switch over to Cavendish. That worked well enough for the past 50+ years, but the Panama disease fungi has now caught up with Cavendish. Since all Cavendish plants are genetically identical, this could mean the end of the familiar banana. The same thing happened to the potato in 1845 Ireland. Growing large quantities of identical plants is a recipe for vulnerability. If that weren’t enough, there are other fungal diseases that can also infect banana plants, such as black sigatoka. Banana bunchy top is a viral disease that can attacks bananas, along with a bacterial wilt disease. So, before the banana, as you currently know it, disappears from grocery store shelves, you may want to start growing your own! Cation exchange capacity (CEC) is a measure of soil fertility. The chemistry and science behind how and why a soil’s cation exchange capacity works the way is does is fascinating (and a little too complex for this venue). To put it simply, cation exchange capacity (CEC) is a measurement of how many positively charged minerals can be held by the surface of a soil particle. To learn how this affects the plants in your garden, we will need to touch up on some basic chemistry. Don’t panic - you can do this! Basic chemistry Everything is made up of atoms and molecules that are either positively charged (cations), negatively charged (anions), or neutral. Organic materials and clay tend to be negatively charged. This means these anions attract and hold cations, such as potassium, calcium, and iron, which are important plant nutrients. Many anions, such as phosphorus, sulfur, and boron are held in the water that is found in the spaces between soil particles. Soils with high CEC ratings generally hold onto more water, as well as nutrients. Below, you can see the electrical charge for each plant nutrient.  Soil science Plant food exists as atoms and molecules of minerals. Minerals make up 45 to 49% of a soil sample. These mineral particles come in a range of sizes, with sand being the largest and clay being the smallest. Here in San Jose, California, we have clay. Chemically, sand is relatively unreactive and neutral. The spaces between particles (macropores and micropores) tend to be large. These spaces, and the lack of an electrical charge, make it more likely that plant nutrients will be leached out, or washed away. This is why sand has a low CEC rating. Clay, on the other hand, is made up of many negatively charged secondary minerals that love to attract and hold cations. Also, the smaller particle size of clay means that it has 100,000 times more surface area than sand, in the same size sample, so there are plenty of places for attachments to occur. Soil test results When I had my soil tested, it came back with a CEC rating of 20.6, but what does that mean? A CEC rating of 20.6 is considered relatively high. One way to look at a CEC rating is to think of it as a power strip - just how many cords can be plugged in? CEC is measured using mEq/100g. We won’t get into it, but it basically means how many parts of something there are in a certain volume of soil. Different soil types have very different CEC ratings: My soil’s CEC rating of 20.6 means it can hold onto a significant amount of plant nutrients. Another, related figure found on a soil test is called base saturation. Base saturation is the percentage of available connections being used. You will normally see separate figures of base saturation for calcium, magnesium, and potassium. [You can think of them as different sized electrical plugs.] Below, you can see my base saturation results with “values found” (left) and “optimal ranges” (right).  Soil test results CEC and pH Soil pH also plays a role in a soil’s ability to hold onto plant nutrients. This is because pH is a function of rogue hydrogen cations (H+) floating around in the soil. Soils with a higher, more alkaline pH, tend to have a higher CEC rating. Of course, too much of a good thing turns out to be a bad thing. If the soil becomes too alkaline, nothing can grow in it! This is true in other ways, as well. Too much ammonium (NH4+) in the soil can interfere with the uptake of potassium (K+), calcium (Ca2+), and magnesium (Mg2+). This is why soil tests are so important. Armed with the information they provide, you can look at fertilizer labels with a more informed idea of what your soil actually needs. Acidifying our local clay is one way to make more nutrients available to your plants. The opposite is true in areas with acidic soil. There is a happy medium, but soils with a higher CEC rating are more difficult to alter, when it comes to pH.  Effect of soil pH on cation-exchange capacity (Kyle MoJo & Kazem Zamanian) CC BY-SA 4.0 Bottom line, cation exchange capacity is a measure of your soil’s negative charge which, in turn, tells you just how many nutrients it can hold at any one time.
At exactly 8:28 AM, on December 21, 2017, the northern hemisphere of planet Earth was tilted as far away from our sun as it gets. [The Earth is actually as close to the sun as it gets between the 3rd and 5th of January, but we are tipped away, so we don’t notice.] So, how is your garden affected by winter solstice? What is winter solstice? Before we learn how shortening and lengthening days affect your garden and landscape plants, let’s take a moment to discuss what, exactly, is meant by winter solstice. The word solstice comes to us from the Latin words for sun (sol) and “to stand still” (sistere). Obviously, the sun and earth never really stop moving. It’s an illusion that refers to the two extremes of the Earth’s travels around the sun. We all know that the Earth has an equator around the middle and poles at either end, except those ends are not exactly up and down. The Earth is tilted 23.5° (23.44°, if you want to be really accurate). This means, for half of each trip around the sun, the northern hemisphere is closer to the sun, while the southern hemisphere is closer the other half of the year. You can see it easily if you hold one hand up at an angle and the other up as a fist. Your fist is the sun. Move the slanted, open hand around your fist, keeping the angle pointing in the same direction the whole time. Moving from one side to the other, you will see that different parts of your open hand are closer to your fist. When either hemisphere is at the farthest point from the sun, we call it the winter solstice. Six months later, when we are as close as we will get, we call it summer solstice. So what does this have to do with gardening? 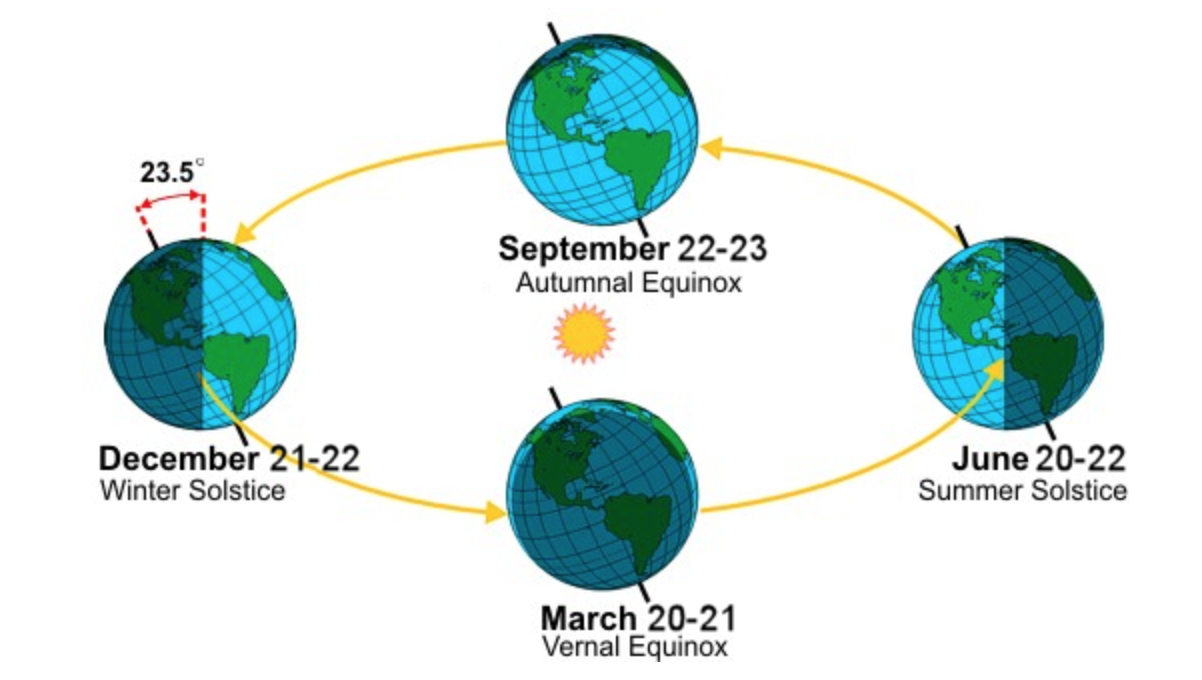 Earth’s rotation (NWS) Public Domain Why does it keep getting colder after the days start getting longer? Simple logic tells us that longer days should mean warmer temperatures. Experience has taught us otherwise. But, why? Even though the days are getting longer, we will not see our coldest temperatures until January and February. It ends up that our planet’s temperatures are largely controlled by its oceans. It takes a lot of time and sunlight to heat up an ocean. Dormancy and frost damage Most perennial plants go into some sort of dormancy as the number of daylight hours shorten and temperatures drop. Life process are slowed, new leaves and buds stay protected within buds, and many chemical changes occur that protect the plant from winter’s cold. You can protect your garden plants from frost damage during dormancy by adding a protective layer of aged compost, mulch, straw, or even a fabric covering around and over (but not touching) your plants. Keeping plants well irrigated, but not soggy will also protect against frost damage. Maintaining a more constant temperature can help your plants avoid falling prey to one warm day that might trigger budbreak, when the following days of cold and frost would simply kill those tender new buds and shoots.  Stonehenge (Andrew Dunn) CC BY-SA 2.0 Winter solstice in history
Rather than risking stress to your plants by working in and around them in the cold, use this day, as people have throughout history, as a truer new year, to look back on lessons learned and accomplishments reached, and then forward, to new and existing goals, both in the garden and in life. Did you know that Stonehenge was built to line up with sunset on winter solstice? Oxalic acid - you’ve heard the warnings, telling how rhubarb leaves and other plant parts that contain oxalic acid should not be eaten. But that’s not entirely accurate. Let’s learn the truth about oxalic acid in the garden
Oxalic acid in nature
Oxalic acid is found in a surprising number of food plants that we eat every day. The trick is in the concentration. In fact, oxalates can be toxic to plants, too, but plants bind those oxalates up in crystals that they then use as tiny spears to defend themselves against herbivores. These specialized cells are called idioblasts. Oxalic acid is formed when plants burn sugars and carbohydrates as fuel. Oxalates are also used to balance calcium levels within the plant by binding to calcium molecules. This is why some people say eating high levels of oxalic acid can interfere with healthy bones and teeth, but, again, you would have to eat an awful lot, over a long period of time, to cause any real problems. By the way, our bodies produce oxalic acid out of Vitamin C., on purpose. Also, cooking plants that contain oxalic acid has not been shown to reduce oxalate levels. Finally, armed with this information, I went out to my rhubarb plant and broke off a young leaf and ate it. The flavor was actually pretty nice, something akin to spinach, but lighter. And I lived to tell about it. Did you know that you can grow your own quinoa? Just don’t do what I did, which was to start it as summer temperatures were reaching 100°F! Let’s learn more about this high protein, ancient grain, so that you can add it to your foodscape. What is quinoa? Quinoa (Chenopodium quinoa) is a member of the amaranth family, along with beets and spinach. Quinoa is grown for its high protein seeds. Unlike most cereal grains, quinoa is not a grass plant, so its seeds are classified as a pseudocereal. People started farming quinoa 4,000 years ago in the Peruvian Andes, but it has been a food staple for as long as 7,000 years. One of the things that makes quinoa so special is that it contains all eight essential amino acids used by our bodies to make a complete protein molecule, plus it is gluten-free, for those suffering celiac disease.  Quinoa plant before flowering (Christian Guthier) CC BY 2.0 The quinoa plant Quinoa is a self-pollinating dicot, which means its seeds split in half and its flowers have petals that are in multiples of four or five. Unlike many other plants, quinoa flowers are green. Quinoa plants have deep taproots that make them drought resistant. Its leaves are broad, with tiny hairs (trichomes), and lobed. Plants can grow from 18 inches tall to over six feet. The central stem may be green, purple, or red, depending on the variety. Quinoa seeds can be black, tan, white, pink, red, or purple, depending on the cultivar. All quinoa seeds are coated with saponins, which taste bitter. This protects developing seeds from birds and other seed eaters, but the coating needs to be rinsed off before cooking and eating your quinoa. [In parts of Africa, those saponins are collected and used as a laundry detergent!] While young quinoa leaves are edible, they do contain high levels of oxalic acid, which can cause respiratory and kidney problems. But you’d have to eat an awful lot of quinoa leaves to have a problem. How to grow quinoa Quinoa plants are pretty rugged. They can be grown from sea level all the way up to the highest mountain tops (13,000 ft.), just give them plenty of sunlight. You will want to select a variety that is suited to your microclimate and elevation. Quinoa grows best in loose, sandy soil. If that's not what you have, you can either grow your quinoa in a raised bed, or you can incorporate a lot of aged compost into your quinoa bed before planting. This will provide nutrients and improve drainage. Do not try growing quinoa in containers - it needs more underground space than a container can provide. Quinoa prefers a soil pH of 6.0 to 8.5, so our alkaline soil isn’t a problem. Seeds should be planted 1/4 of an inch deep and watered very gently, to avoid washing seeds away before they get a chance to germinate. Quinoa plants prefer temperatures from 25°F to 95°F. This means you can start growing your quinoa in autumn. That way, your plants will be harvested long before the summer heat kicks in! Quinoa plants take 90 to 120 days to mature, so plant accordingly. Freezing temperatures will sterilize quinoa pollen, so frost that occurs during flowering can be problematic. These plants grow very slowly during their first two or three weeks, so snipping off weeds at ground level is the best way to reduce competition without disturbing the soil. Depending on the variety, plants only need 10 to 39 inches of water during the growing season. Quinoa plants should not be watered once they start going to seed. Quinoa pests and diseases While quinoa seeds protect themselves with saponins, many birds will still feast on your crop. You can use netting to reduce losses. Other pests include flea beetles, caterpillars, aphids, armyworms, and the recently discovered quinoa plant bug (Melanotrichus sp.). Bacillus thuringiensis can be used to control caterpillars. According to a report from Perdue University, there are no pesticides cleared for use on quinoa. Quinoa is prone to several fungal diseases, which is why good drainage is so important. Damping off disease, downy mildews, fusarium wilt, seed rot, leaf spot, and brown stalk rot can all affect your quinoa plants.  Quinoa field in Bolivia (Michael Hermann) CC BY-SA 3.0 Harvesting quinoa
You will know it is time to harvest your quinoa crop when the leaves turn yellow, red, or purple, and start to drop off. The difficult part about harvesting quinoa is separating the seed from the rest of the plant. Similar to harvesting stone pine nuts, this is a labor intense process. Start by snipping off as much non-seed containing plant material as possible, and allowing the seed head to dry completely. You will want to protect these seed heads from moisture, because seeds will begin to germinate within 24 hours of being exposed to water. You will know the seeds are completely dry when you cannot leave a dent in one with your fingernail. Once they are completely dry, you can gently rub the seed heads against a colander or strainer to knock the seeds loose. Even if you don’t harvest your quinoa, adding this plant to your garden or foodscape can increase biodiversity and, hey, it’s a strikingly beautiful edible plant! They will never jump through a hoop for you, but you can train your trees to be healthier and more productive.
Tree training helps fruit and nut trees stay healthy, produce larger crops, and avoid broken branches. Proper tree training also reduces the likelihood of pests and disease. Too much fruit and strong winds can result in broken branches. Proper training can prevent these problems. You may not want to go as far as pollarding or coppicing, but training your trees for good structure, air flow, and the retention of productive wood is always a good idea, except when it isn’t. Trees that are particularly large or unstable should never be trimmed or pruned by an amateur. It is too dangerous. When to train trees Most fruit and nut trees are deciduous. This means they go dormant and lose their leaves in winter. This is handy for several reasons. First, it allows you to remove leaves that may be carrying pests or diseases. Secondly, it allows you to see the true structure of your trees. This makes training them a lot easier. The only exceptions are cherry and apricot trees, which should only be pruned in summer, to avoid Eutypa dieback. Making a proper cut You may want to read up on pruning before you start training your trees. Put simply, you will want to make a smooth cut that is flush with, but does not cut into, the branch collar. There is no need to paint or treat these cuts. Your tree will develop a protective callus over the area, all on its own. Tree training basics To maintain a healthy fruit or nut tree in your backyard, you will probably want to keep it pruned to a manageable size. This is usually 6 feet tall and 6 feet wide. If it gets too large, you won’t be able to reach. Surprisingly, trees of this size can still produce a lot of fruit. As with any other pruning job, you will want to remove any dead, diseased, or damaged limbs. You will also want to eliminate one of any pair of crossed branches. These will tend to rub against each other, creating points of entry for pests and disease. As you prune, try to work from the inside out and avoid leaving stubs. You can orchestrate the direction new twigs will take by cutting just above buds that face in the direction you want the new twigs to grow. Do not use downward facing buds as these tend to be weak and break easily. Your overall goal should be to expose the tree’s interior to more sunlight, without risking extensive sunburn damage. The big picture Before cutting, take the time to really look at your tree’s structure and shape. Learn what is typical for that particular species, and think about what you want from your tree over the next several years. Consider issues such as wind exposure, shifting shade patterns, fruit and leaf litter, and tree maintenance. What is proper training for a tree in one location may be completely inappropriate in a different location. If you’re not sure, ask me. You can also look at this fruiting wood characteristics chart, from UC Davis, that can help you decide what to remove and what to leave for another year. Once you have really looked at your tree and prepared your tools, you will need to select the training style best suited to your tree species. The lowest branches are usually at knee height, regardless of the style chosen. Central leader The central leader training style is best suited to semi-dwarf and standard size trees. This style features a single main, vertical trunk. Competing upright shoots are removed and an alternating spiral of lateral branches is encouraged. This is your classic Christmas tree shape. Modified central leader The modified central leader style allows more sunlight into the center than a central leader system. To create this shape, a tree is first trained as a central leader, until it reaches the desired height. Then, the central trunk is topped, or removed, just above the most recent lateral growth. This causes the tree to develop more of an open center. This method is particularly good for cherries and pears. Open center The open center style seems to be the most popular for backyard orchards. In this style, three or four low-growing scaffold (main) branches are encouraged, with the center kept open, like a bowl. Lateral (horizontal) branches make up the sides of this bowl shape and are trimmed back to approximately 30 inches. Fruiting wood will grow from these branches. This method provides good sun exposure and air flow. Also known as vase-shaped training, it is a good method for almonds, Asian pears, and European plums. The “Y” system The “Y” system features two scaffolding branches, heading in opposite directions, creating a “Y” shape. Look at it as a two-dimensional open center style. This method is particularly good for peaches and nectarines. It can also be used for apples, plums, cherries, and pears. Espalier Espalier training is a trellising system used to create a two dimensional shape. This method works well alongside driveways, paths, buildings, and fences. If you end up removing smaller, new wood, you can save these and use them as scions, to create new trees or modify existing trees. They make good gifts for fellow gardeners, as well! Also, as you work closely with your tree, keep a look out for scale and other insect pests that may be overwintering in your tree’s bark.
There are spring and winter varieties of barley, depending on whether or not they need a period of cold to transition into their reproductive phase. In warmer regions, that generally means planting in either October or January. Barley’s reproductive phase is characterized by true stems, called culms, carrying flowering heads, also known as a spikes or ears, that emerge from the sheath, or boot. surrounding the uppermost leaf (called the flag leaf). Barley grows 2-1/2 to 3 feet tall. Barley hulls Barley seeds have tough coverings called hulls. Most varieties have hulls that are difficult to remove without losing or damaging some of the grain. These are also known as ‘covered’ barley. The barley you see in the store is usually hulled or pearled barley. Hulled barley is a whole grain, but pearled barley is not. Pearling removes several outer layers of the grain along with the hull. There are also hulless, or ‘naked’ barley varieties, but they aren’t really hulless. Instead, the hull is simply easier to separate from the grain. Barley hulls are often used to make pillows. Why grow barley? You may want to grow a small patch of barley, simply as a testament to our agricultural history, to know that you can. You may want to try making your own beer or whiskey. You may want to grow more of your own ingredients for a hearty winter soup. Barley can also be grown as a cover crop or green manure, to reduce erosion, improve soil structure, and suppress weeds. Barley is an excellent crop to install as your winter fava beans start ending their growing season. If you add a legume, such as peas or beans, and leave the plants in place, you can significantly improve nutrient cycling. Barley grown in winter has a deep, fibrous root system that can go down over 6 feet! Also, because barley grows so quickly, it absorbs surface water that would otherwise be used by weeds. Barley plants also shade out weeds and the plants emit allelopathic chemicals that suppress weed growth. Barley can also be used as a nurse crop. Nurse crops provide protection for slowing growing crops, such as beets. How to grow barley Barley seeds are planted using a method called drilling. Drilling is exactly what it sounds like: you drill a hole in the ground and drop a seed in. Commercial growers have heavy equipment that drills and plants seeds automatically. You probably don’t have one of those machines in your garage, so you will have to do it by hand. Barley seeds are planted deeply. By deeply, I mean 2 inches deep. When I first started growing things in my California concrete soil, I actually used a battery powered drill to plant seeds. After five years of composting, mulching, and top dressing, the drill is no longer needed. Now, I use a hand weeding tool to poke a hole in the ground. Barley does not like waterlogged soils, so allow the soil to dry out between waterings. Of course, if it’s a rainy winter, there isn’t anything you can do about it other than continuing to add organic material to the soil, to improve drainage. You can see a spreadsheet of various barley cultivars suitable for growing at home here. Barley pests and diseases As a cereal grain, barley is prone to fungal diseases, such as leaf scald, net blotch, stripe rust, leaf spot, and stem rust. Common pests include mites, armyworms, grasshoppers, crane flies, stinkbugs, wireworms, and aphids. Also, aphids may carry a viral disease called barley yellow dwarf. Some people claim that barley acts as a natural pesticide, but research has not shown this to be true.  My first barley crop! So, how about making a little room for a patch of barley? As a food crop, I expect that it will be much like endive, nasturtiums, lentils, and tomatoes - it will continue to turn up long after I have stopped planting it.
* What is malting? Malting is a method used to make grains more appropriate for beer, whiskey vinegar, shakes, and many other food products. Malting consists of soaking cereal grains in water, to stimulate germination, but then drying the seeds with hot air before germination actually occurs. This triggers certain enzymes into action that convert starches into sugars, and break down certain proteins that are later used by yeast as food. Malted grains ferment quickly and become slightly alcoholic on their own. As long as this blog has been running, almost three years now, you’d think I would have written a post about flowers already. Apparently not. Beautiful, fragrant, and occasionally edible, flowers are designed to attract pollinators. It’s really a case of “sex sells” - the flamboyant structures, bright colors, and heady aromas of flowers are all designed to propagate the species by attracting pollinators. Pollinators move pollen (male) to a place where it can reach the egg or ovule (female) and allow fertilization to occur.  Bee balm flowers Flowering plants Flowers are the reproductive organs of an entire group of plants called angiosperms. Angiosperms are the largest group of plants on Earth and they make up a huge portion of our food supply. Angiosperms use flowers to create seeds that are covered by a protective, often edible, outer covering. The fruit that we eat is nearly always the ovary of a flower. This includes cucumbers, melons, apples, peaches, avocados, squash, tomatoes, eggplants, and, well, really, the list is too long to include here, but you get the idea. So, what makes a flower a flower? Flower structure Some flowers are male, some flowers are female, and some flowers are both, though not always at the same time. Flower parts are either vegetative or reproductive. These parts are generally arranged in a whorl around a central stem. If a flower has parts (petals, stamens, or other parts) that are divisible by three, it is probably a monocot. If it has flower parts that are divisible by four or five, it has been, most likely, classified as a dicot. That classification system has recently gone through some changes, due to genetic research. Many dicots are now classified as eudicots. Looking at the base of a flower, you will see the vegetative perianth. The perianth is the outer part of a flower, made up of the green sepals (calyx) and colorful petals (corolla). The reproductive parts of a flower are divided by gender. The Greeks called them gynoecium (woman’s house) and androecium (man’s house). Woman’s house The female aspect of a flower is called the pistil. The pistil has three parts: the stigma, style, and ovary. The stigma has a sticky tip, which is where pollen is received. The style is a long, tubelike structure that leads to the ovary. The ovary contains egg cells called ovules. Some scientists call the pistil a carpel. I don’t know why. Man’s house The male aspect of a flower is called the stamen. Stamens are pollen producing anthers held on top of filaments.  (Anjubaba) CC BY-SA 4.0 Floral attachments and arrangements Most flowers grow at the end of a long stem, called a peduncle. When a single flower is made up of many tiny flowers, it is called an inflorescence, and the individual flower stems are called pedicels. Sunflowers and daisies are examples of inflorescence. Some flowers may be directly attached to the parent plant, with a very small or absent stalk. These flowers are called sessile. Crocus flowers are sessile. The place where stem meets flower is called the torus or receptacle. Flower symmetry Flowers are classified according to their symmetry. If you cut a flower in half, down the middle, you will either have a ‘regular’ (actinomorphic) flower, or an ‘irregular’ (zygomorphic) flower. Regular flowers will have identical halves, no matter how they are bisected. Roses are regular flowers. Irregular flowers will only look symmetrical along one cut. Orchids and snapdragons have irregular flowers. Regardless of their symmetry, flowers are all about reproduction and sharing genetic information through seed production. Sometimes, they even help with dispersal. Seed dispersal Some flowers have structures that aid in seed or spore dispersal. These structures are called diaspores, and you have already seen them. They are the helicopters (samara) of maple trees, the flying seeds (achenes) of dandelions, and the spikelets of foxtail grasses. Tumbleweeds are giant diaspores. Edible flowers As much as we love to eat the fruit of a flower’s labor, sometimes the flower itself is edible. Borage, nasturtiums, chive, basil, squash, dill, and cilantro flowers are all edible and they make nice colorful additions to salads. Of course, if you eat a squash flower, you won’t get the squash fruit. Also, not all flowers are edible. Some flowers can make you very sick, or worse. Always check before eating something new, and give it a rinse. There may be chemicals, pollutants, bug poop, or live insects hidden in a flower’s nooks and crannies. Also, some edibles flowers, such as dandelion, taste fine when young, but can get bitter as they mature.
Flower pests and diseases Flowers are susceptible to certain pests and diseases. Common flower pests include citrus bud mites, budworms, voles, thrips, Eriophyid mites, and, of course, aphids. Diseases that specifically attack flowers and buds are petal blight, aster yellows, gray mold (Botrytis), phytoplasmas, olive knot (Pseudomonas spp.), and blossom blight (brown rot). Bolting When a plant suddenly sends up a central stalk and flowers, it is called bolting. Bolting usually occurs in response to extreme heat or drought. You could say that it is a panic response to harsh conditions, but it is also a normal part of many plants' natural life cycle.. Rhubarb, lettuce, spinach, bok choy, and other cool season crops will often bolt if grown in the summer. Once a plant starts to bolt, much of the flavor is lost.
Deadheading
Removing spent flowers is called deadheading. By removing flowers just before they start to whither, you can trick plants into thinking they have failed to reproduce, so they will make more flowers. More deadheading, more flowers, more deadheading… you see where this is going. Growing flowers is an excellent way to attract pollinators to your garden or foodscape. They look lovely on the dinner table, too! Bronzing your baby's shoes is one thing; bronzing in the garden indicates a problem. What is bronzing? Bronzing refers to how some leaves or fruit turn purplish or bronze-colored due to mineral imbalances, pest feeding, chemicals, environmental conditions, or disease. Bronzed leaves are often smaller, and damaged areas cannot perform photosynthesis. Bronzing damage may look similar to sunburn damage, except that sunburned leaves tend to turn gray rather than bronze. Bronzed fruit has a dry, rough texture.  Blueberry bronze leaf curl (OPENi) CC BY 3.0 Mineral imbalances
Too much or too little of certain minerals can cause bronzing. Regularly adding organic material to your garden soil helps minimize mineral imbalances. But it’s still a good idea to know what to look for when scouting your foodscape:
[Did you know that rice farmers rate their plant varieties using leaf bronzing scores (LBS)? They rank rice varieties according to their ability to tolerate excessive iron in the soil.] Pest feeding As pests feed, leaf and fruit bronzing may occur. Most of these pests are sap-suckers:
Chemical damage Damage can occur when herbicides, pesticides, and fungicides are incorrectly applied. Also, the wind can carry herbicides and other chemicals from neighboring gardens and yards that may cause leaf bronzing. Bronzing, necrosis, interveinal chlorosis, desiccation, and distorted growth may indicate chemical misuse or overspray. Environmental conditions Air pollution often causes high ozone (O3) levels in the atmosphere. Ozone, combined with high temperatures and bright sunlight, can cause purple-brown discoloration, or bronzing, on the upper surface of leaves. Bean plants are especially vulnerable to air pollution. Disease Many plant diseases include bronzing as a symptom. These include spotted tomato wilt (carried by thrips), phomopsis stem canker in sunflowers, alfalfa mosaic, cotton root rot, and blueberry bronze leaf curl. Use bronzing as a clue when you walk through your garden. The brownish or purplish discoloration of bronzing is a clear sign that something is amiss. I always assumed that groundcherries grew underground. Having never eaten one or seen one, I decided to learn the truth about groundcherries. Also known as Inca berries, golden berries, and Cape gooseberries, groundcherries are not gooseberries at all. Like tomatoes, however, they are berries. Members of the nightshade family, groundcherries are cousin to tomatoes, potatoes, and eggplant, but most people say they taste more like strawberries or pineapple. 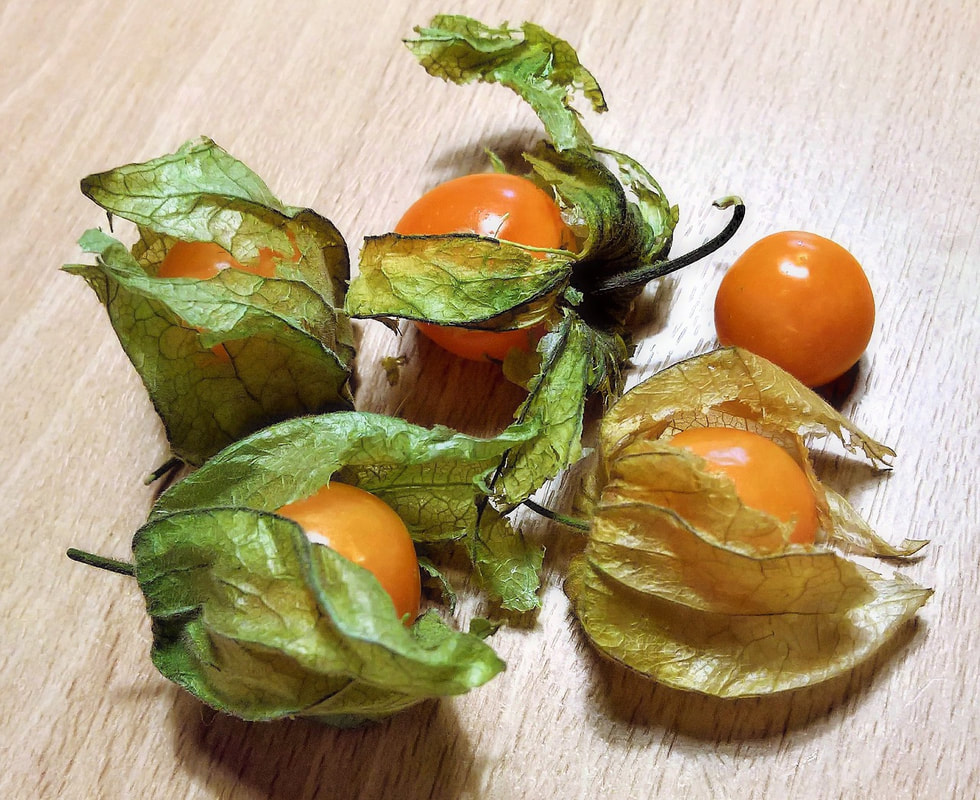 Cape gooseberries (monika1607) Needpix.com Groundcherries (Physalis) get their Latin name from the papery bladder that surrounds the fruit. This bladder is made from the calyx. [The calyx is the green sepals that form around the base of a flower.] The common name refers to the way fruits are harvested, once they fall to the ground. There are over 75 species, all of which are native to the tropical Americas, including tomatillo (P. philadelphica). There are both edible and inedible members of Physalis. Inedible ground cherries are considered weeds. 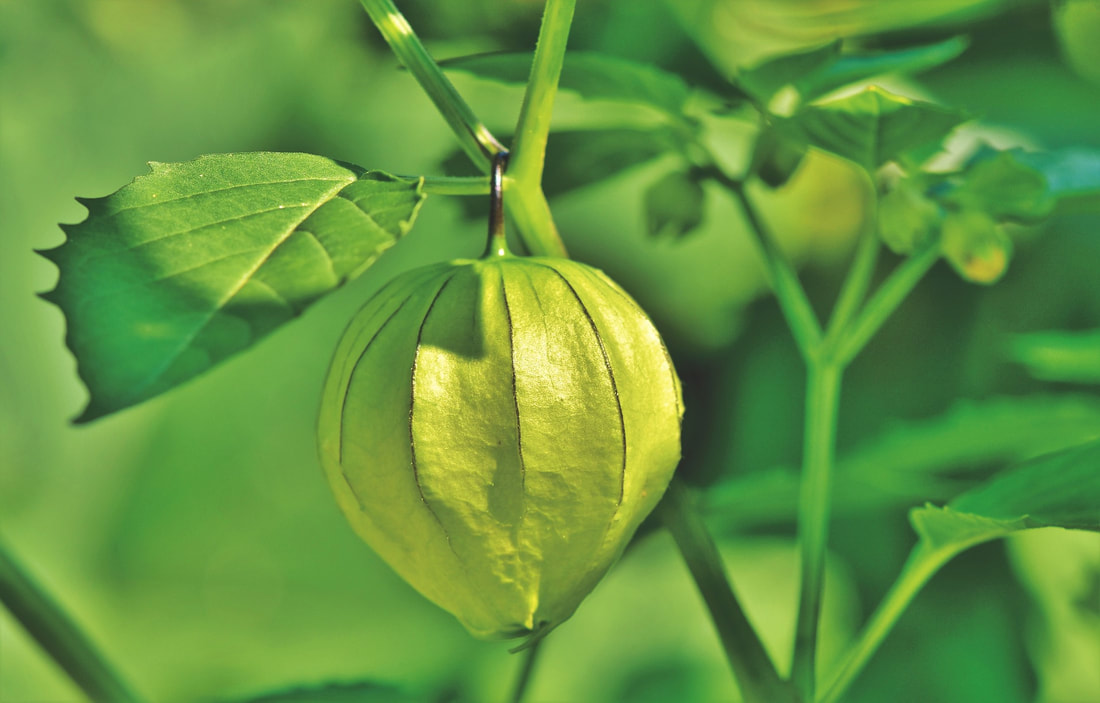 Bladder cherry flower (Capri23auto) Pixabay Groundcherry plants Groundcherry plants look very much like tomato plants, but the stems are sturdier. The leaves can be oval, triangular, or lance-shaped. Like other nightshade plants, the bell-shaped flowers have five petals, with yellow, green, white, or purple centers. These bushy plants are often grown as annuals, but can be perennial, under the right conditions. The fruit is the size of a cherry and can be orange, green, yellow, or purple, with a structure much like tomatoes. Groundcherry weeds Chinese lantern (Physalis alkekengi) is an ornamental, inedible groundcherry that can become invasive. There is some talk about certain groundcherry species being toxic, but research has not consistently shown this to be true. More research is being done, mostly because there is a lot of debate about the different groundcherry species. How to grow groundcherries If you can grow tomatoes, you can grow groundcherries. These plants like a lot of sunshine and hot temperatures, which makes them well suited to the South Bay Area. Also, it performs well in poor soil and can be grown in containers. Start seeds in small pots 6 to 8 weeks before the last frost date, planting them 1/4 inch deep. Keep the soil moist. Seeds should germinate in 7 to 10 days. Like tomatoes, groundcherries will sprout roots from their stems, so seedlings should be planted deep enough to bury the first or second stems, after plants have been hardened off. This will give your groundcherry plants a better root system. These plants get bushy, like tomatoes, so be sure to give each plant the room it is going to need. Plants should be at least two feet apart. Irrigate regularly and be sure to top dress around the plants with aged compost. Groundcherries are heavy feeders. Groundcherry pests and diseases Like their cousin, the tomato, groundcherries are susceptible to aphids, spider mites, whiteflies, hornworms, cabbage loopers, flea beetles, nematodes, cutworms, stinkbugs, and slugs. Many of these pests can be thwarted with row covers. Groundcherries are resistant to many diseases, but they may be affected by verticillium wilt, fusarium wilt, curly top, tobacco mosaic virus, and alternaria.  Groundcherries (Pen Waggener) CC BY 2.0 Harvesting groundcherries
Immature fruits are not edible. After the husks have dried and become papery, the fruit will drop to the ground. This is the fruit you should harvest. The husk is not edible and should be added to the compost pile. Groundcherries are commonly eaten fresh, or used to make jams, jellies, sauces, and pies. The fruit can also be dried like a raisin, or used in salads. Once you have grown groundcherries in your foodscape, it is not uncommon to find them growing on their own the next summer. Birds may eat a fruit, dropping the seeds where they will, complete with its own fertilizer packet. These tiny packets of sweet, fruity flavor are a delight! The carbon to nitrogen ratio (C:N) describes relative proportions of carbon and nitrogen in a substance. That substance can be soil, compost, or plants. Carbon is used as energy and a building material, much the way carbohydrates and sugars are used by us. Nitrogen is needed by to generate proteins, amino acids, and enzymes, making it the steak and salad portion of a garden diet. The energy contained in carbon can only be used if there is enough good health provided by the nitrogen. With the proper C:N ratio, plants can thrive, soil can support plant growth, and compost can decompose quickly. Improper C:N ratios can interfere with the soil microorganisms that make everything else in the garden possible. Soil microorganisms Soil microorganisms are responsible for the decomposition of dead plant and animal matter. They also break down minerals and chemicals found in the soil, turning them into plant food. Soil microorganisms prefer a C:N ratio of 24:1. This means they perform best in an environment that is 24 parts carbon and 1 part nitrogen. Since some carbons break down more slowly than others, the Golden Rule of C:N ratios is 30:1. Microorganisms have a C:N ratio of 8:1. When they consume carbon and nitrogen, 16 parts of the carbon is burned off as energy, while 8 parts are used for maintenance. If higher levels of carbon are available, such as right after applying straw as a mulch, the microorganisms will pull nitrogen from the soil to maintain the balance they need. This means there will be less nitrogen in the soil for your plants. This tying up of nitrogen is called immobilization because the nitrogen is unavailable until the microorganisms die and decompose. The latter half of this cycle is called mineralization, because minerals are returned to the soil. Materials added to the soil with a C:N ratio of less than 24:1 means there will be an abundance of nitrogen left over for your plants. What’s your soil’s C:N ratio? Complex lab tests are used to calculate C:N ratios for commercial agriculture. Since nitrogen doesn’t stick around for very long, you don’t need to go to the trouble or expense for an actual test. Instead, you can manipulate the C:N ratio with cover crops, crop rotation, mulch, and composting, If you have the correct C:N ratio, your plants will be able to eat and your compost will break down quickly, If the C:N ratio is out of whack, things won't be running as smoothly. Cover crops and C:N ratios Many cover crops, such as fava beans and other legumes, are grown to both protect the soil from erosion and compaction, and to add nutrients to the soil. You need to find a balance point between allowing the cover crop to grow, when to cut it, and what to replace it with as it decomposes in place. Cover crops are an excellent way to protect and feed the soil between regular crops. Depending on the plants used as a cover crop, you can ensure that your soil microorganisms and your plants have the nutrients they need.
Composting for a better C:N ratio As you add materials to your compost pile, keep in mind the ideal C:N ratio of 30:1. Now, not all materials break down at the same rate. Temperature, oxygen levels, and moisture content also play a role. This is not an exact science. To reach a point that is Perfect Enough, simply strive for 50% green and 50% brown. The ‘greens’ will all be higher in nitrogen, while the ‘browns’ will be higher in carbon. Also, stems contain more carbon, while leaves contain more nitrogen. For example, oat leaves have a C:N ratio of 12:1, while oat stems have a C:N ratio of 78:1. Below are some common materials and their C:N ratios:
If your compost has a C:N radio below 20:1, all of the carbon will be consumed, leaving nitrogen behind. This excess nitrogen is then converted into ammonia, which means it stinks and is lost to the atmosphere. If your compost pile smells bad, flip it, to add oxygen, and stir in more carbon.
Keep your garden healthy by maintaining a good ratio of carbon to nitrogen. The proper C:N ratio improves decomposition rates and nutrient cycling within the garden. Strive for a C:N ratio of 30:1 in your garden. Your soil microorganisms will thank you! If you ever get the chance to grow your own turmeric, you really ought to give it a try. It makes a lovely houseplant, as well as a nice addition to your spice collection. 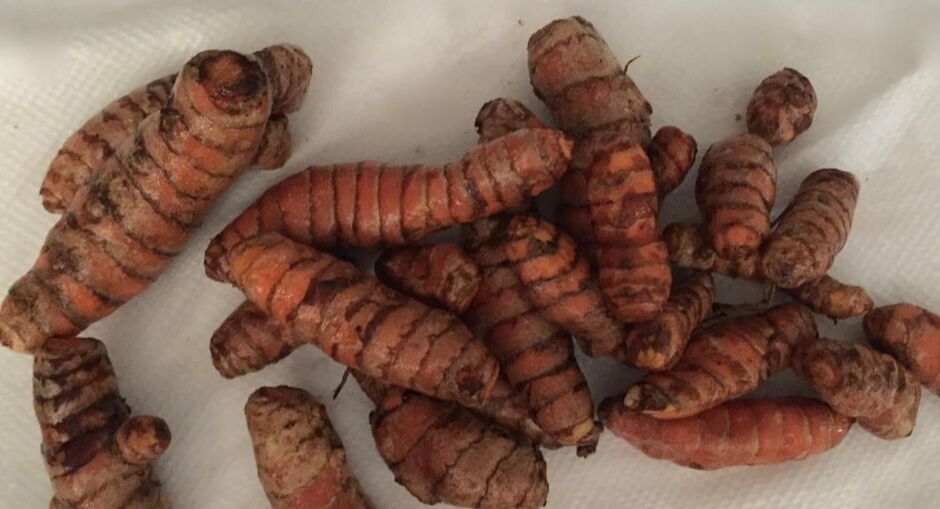 Turmeric rhizomes Before we learn how to grown our own, let’s clear up a couple of things: pronunciation and medication. Many people mispronounce the word ‘turmeric’ by leaving out that first ‘r’ to make it ‘tumeric”. The correct pronunciation is ter-mer-IC. As for medicinal properties, I’ve got some bad news—it doesn’t have any. Wild, far-reaching claims have been made about the medicinal qualities of turmeric, but the science has not been able to verify any of those claims. Studies are being conducted, and we may find that turmeric really does have some health benefits, but for now, let’s just enjoy it in our curry and let that be reason enough to grow it. Turmeric is a close cousin to ginger and is frequently used in Asian cooking. It is a major ingredient in curry powder. It’s bright yellowish-orange color have also made it useful as a fabric dye. The plant is a herbaceous perennial grown mostly for its nubby rhizomes that grow underground. The powdered turmeric you buy in the spice aisle is made from rhizomes that are boiled for 30 to 45 minutes, dried in an oven, and then ground into a powder. The turmeric plant Turmeric is a tropical plant. As such, it prefers moist, warm temperatures (85 to 95°F). If it isn’t warm enough, your turmeric rhizomes will rot, rather than sprout. Seedling heat mats can be used to keep your turmeric toasty warm. Mature plants can grow 3 feet tall and the large green leaves make it a lovely houseplant. Just be sure it gets plenty of sunlight and an occasional misting. Once your turmeric plant has become established, and if it is particularly well suited to its location, it may send up a greenish-white stalk and you may even get some stunning pink flowers! What you’re really growing, of course, is the lateral underground rhizomes. If you have a sunny protected spot, and you are in Zones 8 - 11, you can even grow turmeric outdoors.  Wild turmeric (John Hill) CC BY-SA 4.0 How to grow turmeric
If you take a close look at one turmeric rhizome, you will see little nubs. Those nubs are buds. You can break a larger chunk into smaller pieces, just make sure each chunk has 2 or 3 buds. For each chunk of root, fill a medium sized container with rich, loose organic soil and place the root 2 inches below the surface with the buds pointed up. [If a nub has two buds, pointing in opposite directions, lay it down so that the buds point to either side and let nature do the rest.] Water it well, the first time, making sure the container drains properly. After that, water only when the top inch or so of soil has dried. Your turmeric plant will take 7 to 10 months to reach a harvestable size. Harvesting turmeric Harvesting turmeric is a lot like harvesting potatoes. You really can do it at any time. The longer you wait, the bigger the bounty. Gently dig your fingers down into the soil, near the stem, and feel for the rhizomes. If they feel large enough, wriggle them loose and pull them up. Then, just take what you need and put the rest back in the soil for the next harvest! The rhizomes can be boiled and eaten like any other root vegetable. The leaves are often used as food wrappers for steaming, the same way corn husks are used to hold tamales. Add some turmeric to your windowsill garden today! Secondary plant nutrients are calcium (Ca), magnesium (Mg), and sulfur (S).
The nutrients plants use the most are called primary nutrients. Nitrogen, potassium, and phosphorus are primary nutrients. On the other hand, only tiny amounts of boron, copper, iron, chloride, manganese, molybdenum, and zinc are needed. These micronutrients used to be called trace elements. In the middle are the secondary nutrients. Secondary nutrients rarely need to be supplemented, but they are very important to plant health. Most soils already contain high enough levels of these secondary nutrients, but you don’t know for sure without a lab-based soil test. The effects of not enough or too much of any one nutrient can create a domino effect that is difficult to diagnose. Simply adding more fertilizer can often makes problems worse, rather than better. Why are these secondary nutrients important and what are some signs of toxicity or deficiency? Let’s find out! Calcium Plants use calcium to build strong cell walls, to move materials across cell membranes, to grow primary root systems, and to maintain the cation-anion balance. [Cations and anions are electrically charged atoms of minerals that plants use for food.] Optimal levels of calcium range from 1000 to 1500 parts per million (ppm). Calcium is relatively immobile inside a plant. It takes a lot of water to move a calcium molecule around inside a plant. That’s why blossom end rot is more of an irrigation problem than a calcium deficiency problem. Calcium deficiencies, whether caused by real lack or insufficient irrigation, are rare in nature. When they do occur, they can cause bitter pit in apples, cavity spot in carrots, and leaf tip burn in several different plants. Too much calcium is also rare, but it can interfere with the absorption of magnesium and potassium, causing deficiencies in those nutrients. Bottom line with calcium: irrigate adequately, regularly and consistently. Magnesium Magnesium is essential for plant health. Ideal levels of magnesium range from 50 to 120 ppm. Magnesium stabilizes cell membranes, making plants better able to withstand drought and sunburn. Magnesium is found in enzymes that plants use to metabolize carbohydrates. Most important, magnesium is contained in the chlorophyll molecules that convert the sun’s energy into food. This process, the Calvin Cycle, is what makes photosynthesis possible. Too much magnesium in the soil makes it difficult for plants to absorb calcium and other nutrients, which can lead to blossom end rot, bronzing, and many other problems. This is a common problem in areas with alkaline soil. The opposite is true in areas with acidic soil. Insufficient magnesium symptoms look like potassium toxicity symptoms. Older leaves, at the bottom of the plant, start turning brown, between and alongside the leaf veins, working upward through the plant. Magnesium deficiencies in stone fruits often start out as slightly brown areas along leaf edges (margins) that expand inward, causing cracking, necrosis, and leaf loss. Magnesium deficiency in California is extremely rare. Sulfur Plants use a surprising amount of sulfur. This secondary nutrient is used in making chlorophyll and certain proteins and enzymes. Sulfur is also part of the arrangement between legumes and rhizobia bacteria that allow them to make use of atmospheric nitrogen. Sulfur deficiency is seen first in new growth. Leaves are pale and growth is spindly. If sulfur levels become toxic, leaves will be smaller than normal and have scorched edges. Sulfur is commonly used as an organic fungicide and to acidify the soil. Do not use horticultural oil within 2-4 weeks of applying sulfur. Sulfur and horticultural oil are phytotoxic (poisonous to plants) when combined. Also, it is better to use fixed copper, rather than sulfur, on apricot trees. Your plants may not need as much of these secondary nutrients, but they are just as important to plant health. Get a lab-based soil test to find out what is in your soil. Cavity spot is not your worst prison nightmare. Instead, it is a fungal disease of carrots.
Cavity spot appears as depressed lesions on mature carrot taproots. These lessons can be elliptical or irregular in shape. They start out as sunken pinpoints that grow larger as the root grows. Lesions are usually less than 1/2 inch across but can get bigger. These lesions are commonly seen on the top one-third of the carrot, near where lateral roots emerge. This fungal disease is caused by Pythium sulcatum and P. violae spores found in the soil. These spores become active in cool, wet weather, which happens to be when your carrots are growing. Cavity spots occur most often when soil temperatures are near 58°F. In addition to carrots, cavity spot occurs on alfalfa, beets, black-eyed peas, celery, cucumber, wheat, and several weeds. Controlling cavity spot Harvesting carrots as soon as they are mature will reduce the likelihood of infection. And avoid over-watering. Too much moisture in the soil encourages several different fungal growths. A three-year crop rotation is the best way to prevent this disease or to interrupt the disease triangle in your garden. So, protect your carrot crop with good cultural practices and just the right amount of irrigation. There’s a lot more to wind than meets the eye. You may not see it, but gentle breezes and wailing typhoons carry insect pheromones, fungal spores, viruses, and bacteria. Gentle breezes help plants develop stronger stems, and gale-force winds can rip trees from the ground.  Wind (USA.gov) Public Domain Beneficial winds Seedling development is a function of sunlight, moisture, temperature, and wind. Being blown around stimulates the stem to be stronger. Botanists call this action thigmomorphogenesis. Plants grown in greenhouses, without any wind, are gently knocked around by a machine that helps prevent the plants from becoming too tall and spindly. Note: While most pollen is too sticky to be affected by wind, wind is the primary mechanism for pollination of corn plants. Pollen is too sticky to wipe or rub off your eyelashes, so don’t try. You can damage your cornea. Believe me. It takes soap and water. Wind damage Wind dries plants out. Plants exposed to a lot of wind need more water than their protected brethren. Wind can also speed up erosion. Ground covers and mulch reduce that erosion. During heavy winds, you may want to move containerized plants next to a fence or wall to prevent breakage. Protect tall plants against wind damage with stakes, tree supports, and tomato cages. Wind damage can be in the form of branches flailing around and tearing holes in leaves and branches rubbing together. Wind damage provides pathogens with a way in. And hot summer winds can lead to blossom drop and fruit set failure. Wind wounds Strong winds can rip heavily laden branches or overly large limbs from a tree, leaving jagged wounds. You can help these trees recover quickly by cutting the tear to make it a flat surface, close to the trunk, but not too close. Do not cut into the branch collar. And you do not need to paint the wound. Instead, allow the tree to protect itself. It will grow a callus over the area. You may, later on, need to provide the callus with sunburn protection. Diseases on the breezes Disease-causing pathogens are usually microscopic. As such, they can catch a free ride on every breeze that blows through. [I wonder if that would make it a case of phoresy…] In any case, several diseases can arrive in your garden in the wind. Gray mold (Botrytis cinerea) is always present. That is why rotting fruit gets that gray fuzz so quickly. It’s everywhere. Mummy berry spores blow into your garden on the wind. So do chemical oversprays. The chances of ringspot on Brussels sprout skyrockets after a windy day, and citrus blast often occurs right after periods of wind-driven rain. You can reduce the likelihood of citrus blast by providing citrus trees with some wind protection. Wind protection Wind protection can take many forms. It may be a fence, a hedge, or a row cover.. You can protect plants from wind by installing them close to your house. Pineapple guava, mature blueberry bushes, and many fruit and nut trees can provide a windbreak. Portable cold frames can protect smaller plants against cold winter winds. When spring comes around, wind can mess up a plant trying to get established in a new location (ecesis). The wind is one of the main reasons for taking the time to harden off plants started in protected areas. And when you start planting those tiny seeds, such as lettuce, you can often lose most of your crop to the wind. They simply blow away. [You may want to check your neighbor’s yard for all that lettuce and endive you planted last year…] And all those delicate seedlings that emerge can be protected from the wind with a moistened layer of vermiculite. Or, you can cover them with a plastic gallon jug (cloche) with the bottom cut out. Just be sure to bury the edges or weigh down the jug enough to prevent it from blowing away, too!  Floating row covers (Keith Evans) CC BY-SA 2.0 Finally, I wanted to share this with you. While researching wind and its impact on plants, I learned that there are three types of wind in the universe:
I never knew that our planet outgassed anything. So, now you know. Our planet farts into outer space. Stems - they hold flowers up, leaves on, and don’t seem particularly interesting, but they are! The word stem can refer to the trunk of a tree (aborescent), a bramble cane, a stalk, or a bine. [Bines are the stems of climbing plants, such as hops, that wrap themselves around external supports without the use of tendrils.] Stem basics Stems are the main aboveground stalk of a plant or shrub. [The roots are the below ground portion.] Stems can also be a limb that holds fruit, flowers, or leaves onto a larger limb. Stems perform four functions:
 Stem showing internode and nodes plus leaf petioles (Knulclunk) Public Domain Stem structure On the outside, stems are usually divided into nodes and internodes. Nodes are areas that hold leaves. Nodes are also where buds, petioles, and even roots can emerge. Internodes refer to the distance between nodes. These two pieces of information can often help in plant identification. On the inside, stems have three basic tissues: the outer skin, or dermal layer, ground tissue, and vascular tissue. You may already know that vascular tissue consists of the xylem and the phloem. Ground tissue, or parenchyma, is the “everything else” of plant soft tissue. There is no ground tissue in woody stems. Stems of annuals are usually herbaceous, which means green and flexible. Since they lack a cambium layer, they do not tend to get very big around. Woody perennials have a tough outer layer that gets wider each year.  Flax stem: Ep = epidermis; C = cortex; BF = bast fibers; P = phloem; X = xylem; Pi = pith (Curtis Clark) Dicots, eudicots, monocots, and gymnosperms
Most plants used to be classified as monocots (grasses), dicots (beans), or gymnosperms (pine trees). Recent genetic research has taught us that dicots are better described as a new new group, called eudicots. These different plant classifications have unique stem structures, when seen in cross section. Eudicot stems contain pith. Pith is the spongy material you see inside a sunflower stem. They also contain bast fibers. Bast fibers are what we harvest to make linen from the flax plant, and they protect the phloem. Vascular bundles form a ring near the outer edge of the stem. Monocot stems have vascular bundles scattered throughout the stem. Gymnosperms are similar to eudicots, except they use tracheids as part of their vascular system. Stem variety Most stems are pretty obvious, and some, like the sunflower, can be substantial. That is, of course, until you consider that a redwood tree trunk is also a stem; A monumental stem, weighing in at 50,000 pounds! The stems that hold up flowers are called peduncles. In flower clusters, or inflorescences, the stems are pedicels. Sometimes, plants have stems so short that it looks like the leaves grow right out of the ground - these are called acaulescent stems. Buds on twigs are also stems. Bulbs and corms are underground stems and leaves, but bulbs are more leaf than stem. Rhizomes are underground stems of many grasses, iris, and most ferns. [Most ferns don’t actually have an upright stem; instead, they have semi-rigid rhizomes.] Strawberry ‘runners’ are stolons, which are also stems. Potato plants also have stolons. Some stems grow in a tangled mess, or in low growing mats. This is called caespitose. Hostas, garlic, lilies, and iris have stems called scapes. Cacti and succulents have specialized leaves for holding a lot of water. Many of the “leaves” you see on these plants are actually flattened stems, called cladodes, that can perform photosynthesis. Stems in the garden Those melon and squash plants, the ones that send stems out along the ground, are called decumbent. You can remember that would because “dey come, bent up at de end.” [Hey, if it helps, why not?] Your shrubs have stems that are called fruticose. Flower stems As you have probably noticed, some flowers and fruit, such as sunflowers and raspberries, respectively, are actually made up of dozens, or hundreds of tiny florets. The single stem that holds up a sunflower head is called a peduncle, while each of the tiny stems that hold clusters of minuscule blooms are called pedicels. The thorns on your rose bush and the prickles on your blackberries are actually modified stems. So are tendrils. [Technically, rose thorns are not thorns at all. They are prickles, but I don't think we're going to change anyone's mind about that today.] Food from stems We get a large portion of our food from stems. Some may be familiar, but others may surprise you:
We also get things like camphor, quinine, and lumber (and all it’s related products) from the stems of plants. Many people assume that celery is a stem, but it isn’t. Celery is the stem that supports a leaf, making it a petiole, or leaf stalk. The stem of a celery plant is actually the round stubby base. Stem pests and diseases Stems are usually pretty well protected, but that isn’t always enough. Young stems infected with damping off disease are usually doomed from the start. Crown gall can cause lesions on stems. Other diseases that can appear on stems include peach leaf curl, blackleg, mummy berry, stem blight, anthracnose, Phytophthora tentaculata, black spot, and bacterial speck. Bagrada bugs, cutworms, eriophyid mites, katydids, crickets and grasshoppers, weevils, and harlequin bugs will feed on stems. Also, many pests use stems as hideouts and egg laying territory, so keep your eyes open! Peaches may be the last thing on your mind right now, but autumn is a good time of year to find room on your property for a peach tree. Even if you don’t have room in your yard, dwarf peach varieties can be grown in containers. Peach trees make a lovely addition to a foodscape. Fragrant spring blossoms give way to fruit that practically defines summer. Autumn leaf drop makes pruning easy and what winter would be complete without a surprise dessert of peach cobbler? A mature peach tree can produce up to 65 pounds of fruit each year. That’s over 200 peaches!  Autumn red peach (Jack Dykinga) Public Domain History of the peach Did you know that peach trees have been around for over 2.6 million years? Traditionally thought to be from Persia, genetic research shows that peaches actually originated in China. Also, it was thought that peach cultivation started some 6,000 years ago, until some ancient writings showed that certain kings and emperors, back in the 10th century B.C., favored a delectable peach now and then. So, if you love peaches, you are in good company. The peach tree Peaches and nectarines are the same fruit, like fraternal twins. The only difference is that peaches have fuzzy skin (trichomes) and nectarines are smooth skinned. This difference is due to a recessive gene, the same way blue eyes or red hair occurs. Peaches are in the rose family, members of the Prunus genus, all of which produce fruits called drupes. This makes them cousin to almonds, apricots, cherries, and plums. Peach trees are in a group of plants that use specialized cells for storage, manufacturing, and as weapons. These cells are called idioblasts. Standard peach trees can grow 25 to 33 feet tall and 25 feet wide, if you let them. For the best productivity and tree health, it is better to keep them pruned to 15 feet by 15 feet. Dwarfs can reach 8 to 10 feet. Most peach trees in Maine only live 7 years, while California peach trees live 12 to 20 years. Peach trees and chill hours Before you plant a peach tree, you need to understand chill hours. Each winter, peach trees enter a period of dormancy. Being deciduous, they lose all their leaves and enter a winter rest. During that rest, the number of hours spent between 32°F and 45°F are accumulated (don’t ask me how - I have no idea). These “chill hours” must reach a certain number for a tree to be able to blossom properly in the spring. Once enough chill hours are accumulated, the tree enters a different type of dormancy called quiescence. Depending on the variety, peach trees need 600 to 900 chill hours. Here in the Bay Area, we generally only get 450 chill hours. When selecting a peach tree variety, you want to take chill hours into account. There are several models used to calculate chill hours, and each one gives you different information. Below you can see the chill hour results for the South Bay Area. Go to my page on chilling hours to learn how to get your local information. There are hundreds of varieties to choose from. According to UC Davis, using the Dynamic Model, the following varieties have their chill hours noted alongside:
[Using the Dynamic Model, San Jose receives an average of 52 chill portions each year, so only two varieties would be a good choice.] You can see detailed list of different fruit trees at the UC Davis Home Orchard. Peach varieties Peach varieties are divided between cling and freestone. Those names refer to how easily the fruit comes away from the pit. Freestone peaches tend to have firmer fruit, while clingstone peaches are known for their sweeter taste. Clingstone varieties are harvested May through August, while the freestone harvest extends into October. There is also a hybrid cross between the two, called a semi-freestone, and flat varieties, called pan-tao. Not all peach tree varieties perform well in all regions or microclimates. Check with your local County Extension Office and be sure to verify your growing zone using the USDA Hardiness Zone Map. Growing a tree from a peach pit While you can eat a peach and then plant its seed, this doesn’t always work out the way you expect. Like apples and many other fruits, peach seeds do not necessarily produce offspring that taste as good or grow as well as the stock you buy at your local nursery. This is because most fruit and nut trees are grafted. Grafted trees have an aboveground part from one variety and a root stock from another variety. This is done to take advantage of one variety’s ability to develop strong roots, while other varieties may taste better or be more pest or disease resistant. Also, your pit grown peach tree will not produce fruit for a few years, and some will never produce fruit. If you want to give it a try, you can simply put your peach pit in the ground and let nature take its course, or you can refrigerate the pit until December or January. This method, called stratification, fools the pit into triggering winter processes (vernalization), in preparation for spring. Just soak your pits in water for a couple of hours, and then place them in a plastic bag, along with a little moist soil. This bag goes into the refrigerator, until you see signs of germination. This can take a few weeks or months, depending on the variety and other factors. Since peaches emit high levels of ethylene gas (a ripening agent), you should keep them away from other fruits and vegetables. Once it starts germinating, remove it from its cold environment and let the planting begin! But first, you need to select the best location for your peach tree. Peach tree site selection Peach trees need plenty of sunshine, but they will also benefit from a little protection at the extreme points of summer and winter, if possible. Being susceptible to several fungal diseases, peach trees also need good drainage. Peach trees prefer a soil pH of 6.5. Here, in the Bay Area, we tend to have more alkaline soil, so acidification may help your tree thrive. Of course, you won’t know what your soil is without a test from a reputable lab. Just sayin’… How to plant a peach tree Bare root trees are best planted in January and February. Your peach sapling should be planted right away, or soaked in water for 6 to 12 hours before planting. If you have a bare root tree, gently spread the roots out to see how much space they can use and dig a hole that will accommodate them. This is also a good time to clip off any dead, diseased, or damaged roots. Be sure to rough up the edges of your planting hole. If you don’t, the smooth clay left by your shovel can create a tough barrier for young roots. Containerized and balled trees should be given a hole slightly larger and the same depth as the container or root ball. It is very important that the soil level remains the same. Add soil around the roots and gently tamp it down. This removes air pockets that can dry roots out before they ever get a chance to grow. Mulch around your new tree and water it in well. Peach trees can also be started from twig cuttings called scions. Peach tree care Peaches are self-pollinating, which means that another tree is not needed to produce a crop. If you have room for more than one tree, be sure to space them 12 by 16 to 18 by 18 feet apart. Peaches perform best when trained with what’s called the “Y” system. The “Y” system features two scaffolding (main) branches, heading in opposite directions, creating a “Y” shape. You can picture it as a two-dimensional open center system, which also works with peaches. These tree training systems leave the trees open in the center, allowing lots of air and sunlight to reach the fruiting wood. Peaches can also be espaliered. Feeding and watering peaches Peach trees use a lot of nitrogen. You can use blood meal, ammonium sulfate, or commercial 10-10-10 fertilizer to feed your peach tree. Nitrogen deficiencies in peach appear as red areas on the leaves. Peaches are shallow-rooted, so they are susceptible to water stress during the summer. Too much stress can lead to a condition called bitter fruit that can mean the end of the useful production of your tree, so irrigate accordingly. Near the end of fruit development, deficit irrigation can be used to improve taste and sweetness. While you certainly want to avoid girdling your peach tree with the weedwacker, doing it on purpose, called cincturing, or scaffold girdling, can increase production and fruit quality. You just have to be really careful that you don’t kill your tree in the process. Peach pests and diseases Peaches are susceptible to these bacterial diseases: crown gall, bacterial blight, citrus blast, and bacterial spot. Fungal diseases include stem blight, peach leaf curl, shot hole disease, and brown rot. Armyworms, peach twig borers, earwigs, eugenia psyllid, Japanese beetles, mealybugs, San Jose scale, green fruit beetles, Mediterranean fruit flies, armored scale, eriophyid mites, katydids, and birds are the biggest pests. Luckily, beneficial insects, such as braconid wasps, mealybug destroyers, and tachinid flies love to eat peach twig borers! Pheromone traps can be used to monitor many of these pests and sticky barriers will prevent many pests from ever reaching tender buds, shoots, and fruit. Bordeaux mixture, fixed copper, and dormant oil can be used to prevent or treat some bacterial diseases, fungal diseases, and pest infestations. Kaolin clay can also be used to prevent some pest damage. Since fruiting occurs from pollination by honey bees, flies, and other pollinators, avoid using broad spectrum pesticides. When to harvest peaches Color and smell are good ripeness indicators, when it comes to peaches. Yellow skin, which may or may not have a red tinge, and that amazing sweet summer aroma of ripe peaches are reason enough to give one a try. Taste, ultimately, is the only true indicator of ripeness, but who can complain about conducting that test? If the fruit comes away from the stem easily, it is ripe.  Peach blossoms (Fan Wen) CC BY-SA 4.0 Too much of a good thing
Your peach tree will produce far more fruit than it can support. This leads to a low quality harvest and broken limbs (the tree’s - not yours). You can protect your tree and improve crop quality by thinning flowers and fruit partway through the growing season. First, when your tree is covered with blossoms, leave it alone and enjoy it. As the flowers start developing into tiny fruits, it is time to thin. The basic rule of thumb for thinning fruit is to leave one fruit per spur, with fruit 4-6” apart. Apricots, nectarines and peaches are normally thinned when the fruit is 1/2-3/4” in diameter. Make a place for a peach tree in your yard today for a decade of fresh summer peaches in your pantry! |
Welcome!You can grow a surprising amount of food in your own yard. Ask me how! To help The Daily Garden grow, you may see affiliate ads sprouting up in various places.
You can also get my book, Stop Wasting Your Yard!  Index
All
Archives
July 2024
|


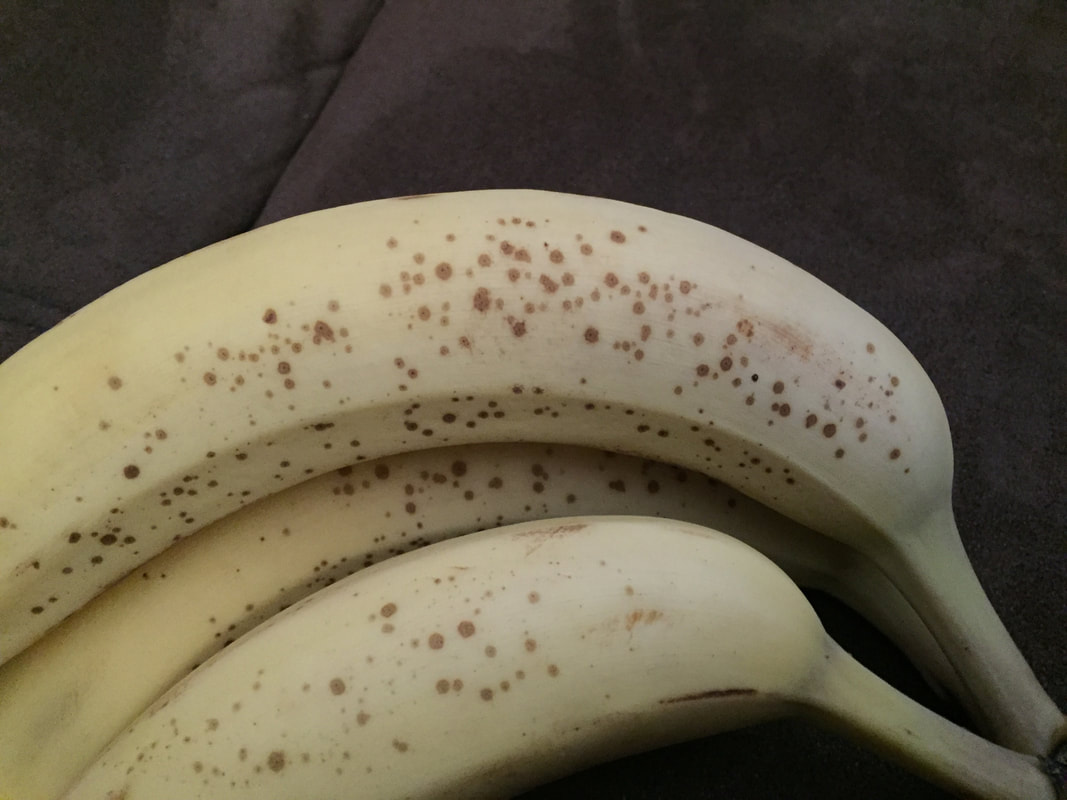
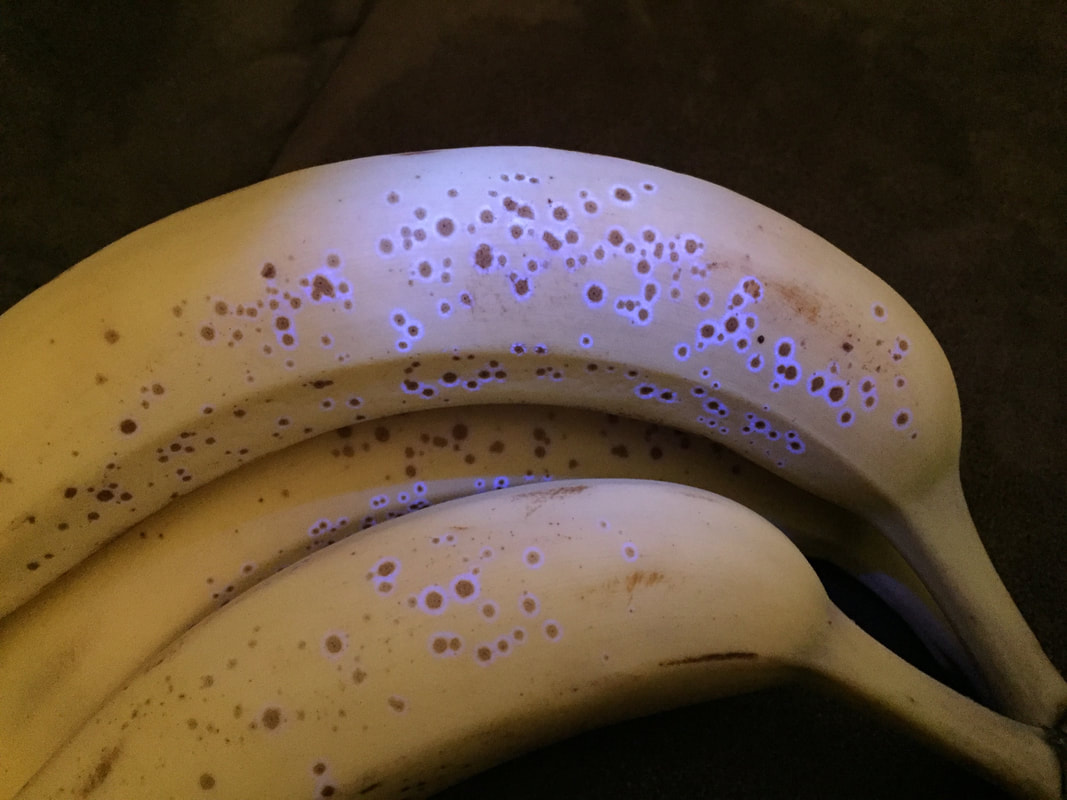
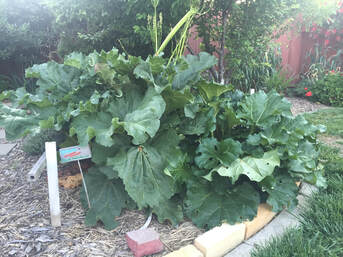
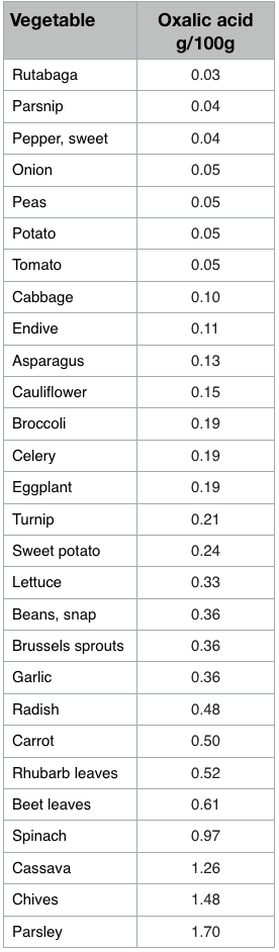


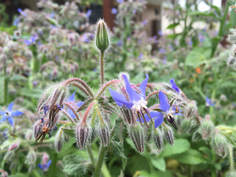
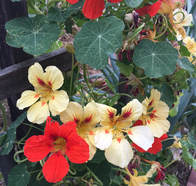
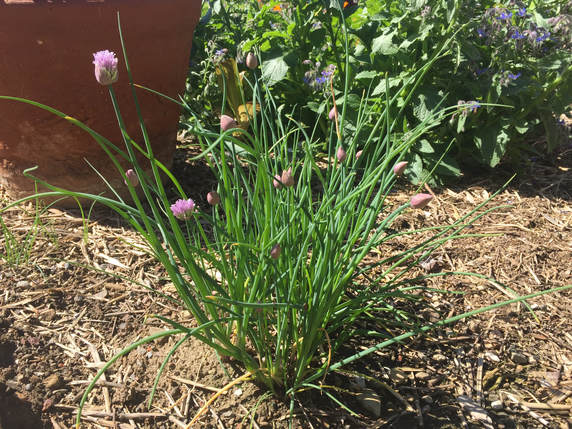
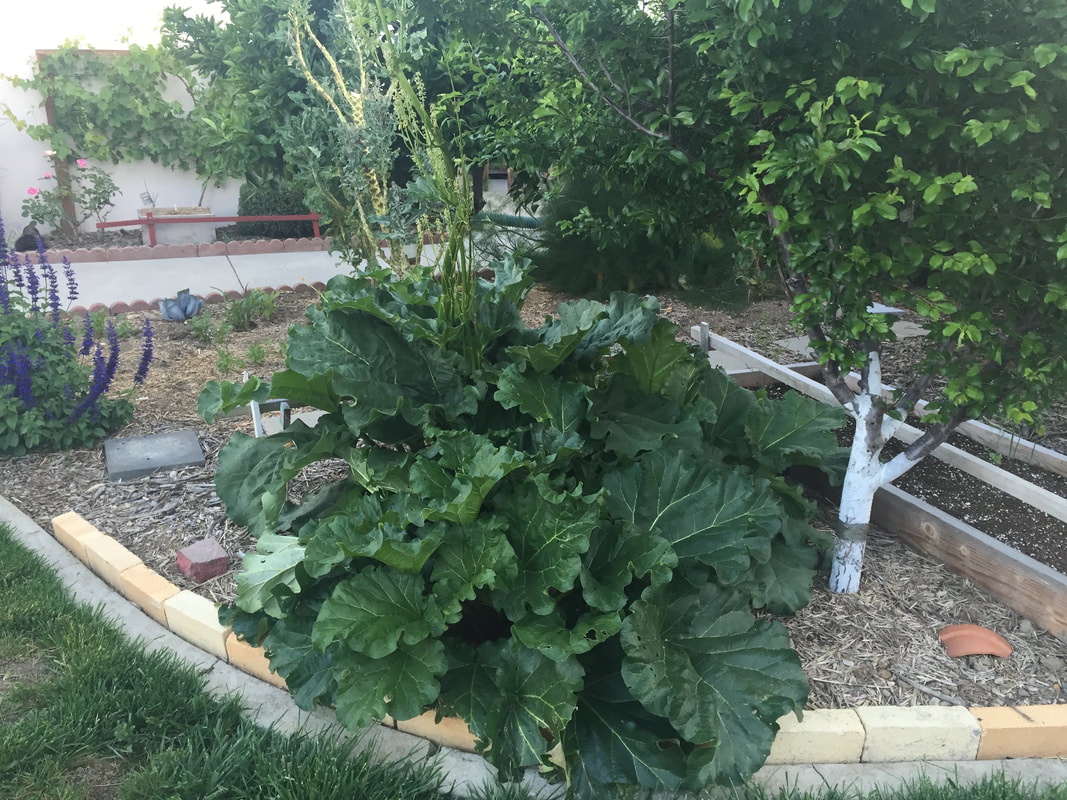

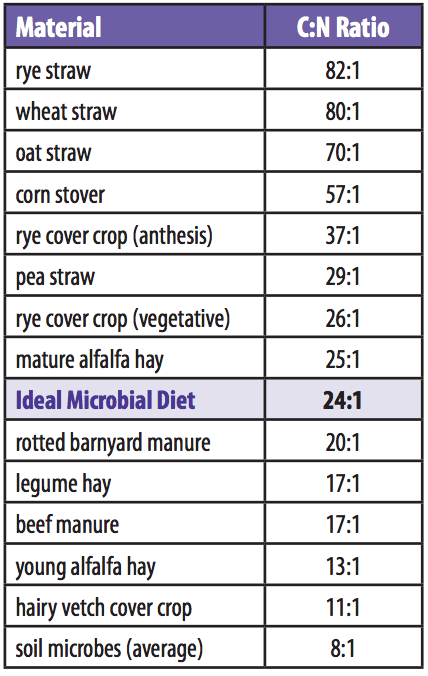

 RSS Feed