|
Budbreak occurs when new buds begin to open. These buds may open to become leaves, flowers, or twigs, but timing is everything when it comes to budbreak. Open too soon and tender shoots freeze. Open too late there isn’t enough time for flowers, fruit, or other new growth to mature. Very often, when to fertilize or treat for pests and diseases is determined by budbreak. 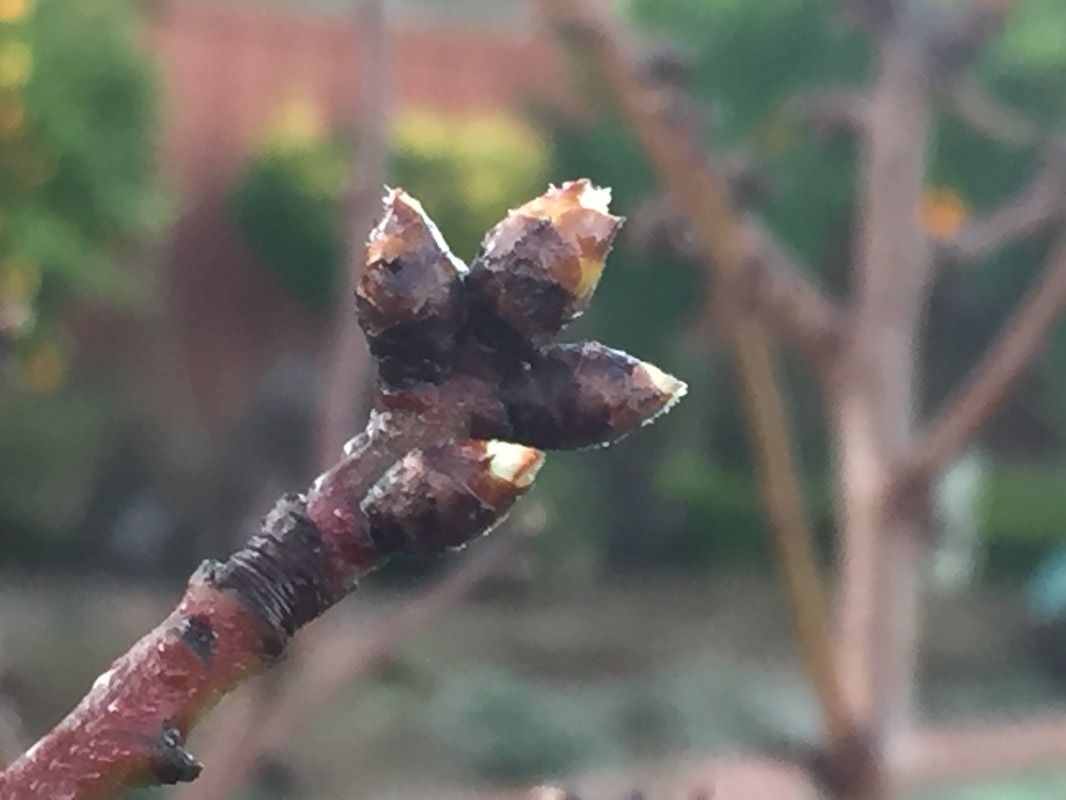 Almond budbreak What causes budbreak?
Budbreak (or bud break) occurs in response to a combination of factors. Lengthening days and warmer temperatures are the two main stimulants, but plant variety, genetics, age, and health are big factors, too. As soil temperatures rise, osmosis causes water to be drawn upward into the plant through the xylem. This water is carrying minerals, sugars, organic acids, and hormones from the roots. Those hormones stimulate the buds to ‘break’ open. Fertilizing & budbreak Many fertilizer instructions will say “apply fertilizer two weeks after budbreak”. This is because plants are using a lot of energy and nutrients in creating all this new plant tissue. Roots store the initial nutrients used, but young leaves may not be able to produce enough energy. Fertilizing in the early part of the process provides the nutrients needed for the best health and maximum production. Pruning & budbreak Most fruit and nut tree pruning is done while trees are dormant (apricot and cherry the only exceptions in San Jose, California, due to Eutypa Dieback). Pruning before budbreak makes a lot of sense. Bottom line: there’s no sense allowing plants to put effort into twigs and buds that are going to be pruned out anyway. Budbreak & disease analysis Erratic or reduced budbreak can indicate a number of different problems. Monitoring plants in mid- and late-winter and early spring can help you determine problem areas, such as:
Budbreak as a production indicator When and how budbreak occurs can give you a good idea of what’s ahead. Early budbreak normally indicates earlier flowering and fruiting. Reduced bud break means less fruit thinning later in the season. Uneven budbreak may cause the harvest to be spread out over a longer period. How to promote healthy budbreak Healthy plants are generally able to recover from temperature, water, pest, and disease stresses well enough to generate a good crop of buds each spring. Maintaining that good health requires proper pruning, irrigation, feeding, and regularly monitoring for pests and diseases. Commercially, substances are applied to stimulate simultaneous budbreak, for easier management. They also use fans and overhead sprinklers to protect against frost damage. This isn't realistic for the home orchardist. If your buds break too soon, as my almond tree did this year (in late January!), there isn't much you can do, except enjoy the shade this summer and hope for a better crop next year. The seeds from this tree may not be edible, but they are certainly a natural way to cut down on your laundry bill! This discovery started when I was looking for a laundry detergent that wouldn’t hurt my landscape. I have a large diameter vinyl hose attached to the back of my washing machine (in summer) and I use the water to irrigate my fruit and nut trees, lawn, and ornamentals. (This isn’t legal everywhere, and isn’t necessarily a good idea, depending upon your preferred brand of laundry soap.) In my search for living a less polluting (and more cost effective) life, I stumbled upon soapnuts, also known as soapberries. Believe it or not, I was delighted to discover that these tree fruits cleaned my laundry just as well as commercial soap! Not only that, but they have natural fabric softening properties.
What are soapnut trees?
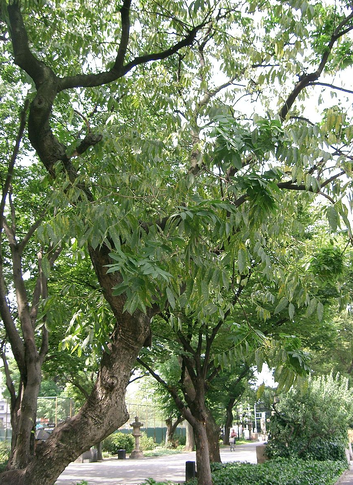
Soapnut trees are members of the Lychee family (Sapindus), which includes 5 to 12 different species of trees and shrubs (depending on who you ask) that all produce saponins. These saponins are found in the fruit, or drupes, of the soapnut tree (as well as in soapwort plants and sea cucumbers). Saponins are surfactants, chemicals that reduce the surface tension between molecules, allowing water to lift away grease, soil, and other impurities from your laundry. In fact, people have been using soapnuts as a sudsy cleaning agent for far longer than commercially made soaps and detergents. The soapnuts used to clean laundry, hair, and skin nowadays are mostly from the S. mukorossi variety. This particular tree also goes by the names Sapindus detergens, Indian soapberry, Chinese soapberry, Reetha, Areetha, Ritha, and Doda, just to name a few. [If you are feeling particularly nerdly today, you can see this plant’s genetic code here.] How soapnut trees grow Soapnut trees prefer temperate to tropical conditions. Some varieties are deciduous, while others are evergreen. The Indian soapberry tree, in particular, is a lovely deciduous tree that can tolerate poor soil. Trees will need the equivalent of 60 to 80 inches of rainfall each year. (San Jose, CA gets an average of 15 inches of rain, so some irrigation will be needed in the Bay Area.) Ultimately (and under ideal conditions), your soapnut tree can reach a height of 80 feet, with a girth of 15 feet. Most trees, however, end up significantly smaller than that (12 to 16 feet tall). The tree has smooth gray bark and a semi-umbrella shape. Small, greenish-white flowers emerge in summer and fruit appears in July and August. A mature soapnut tree can produce 60 or more pounds of soapberry fruit each year. How to grow a soap nut tree To grow your own soapnut tree, you will first have to find a seed. This has become easier in recent years, as more people discover just how effective soapnuts are. You can search online for seeds, or you can give soapnuts a try and hope to find a seed. The drupes (pictured) normally contain up to three seeds. The seeds need to be roughed up a little (scarified) before they can germinate. It is best to plant in spring. You can use a fine-grit sandpaper to score the outer hull, then soak the seeds in warm water for 24 hours. The most common way to keep the water warm is to place the seed and the warm water in a thermos. (My guess is that these prerequisites evolved out of the natural processes of seeds being eaten and then, well, you know.) Start each seed in a large container filled with high quality potting soil, planting them one inch deep. Keep the soil moist down to at least 2 inches, but not waterlogged, and provide plenty of sunlight. It may take a long time for your seeds to germinate. Once they do, they will grow quickly. After 3 or 4 months (or when frost isn’t expected any time soon), you can place your soapnut tree in the ground. Select a site that provides partial shade or dappled sunlight, if possible, and plenty of room to grow. Using homegrown soapnuts Once your soapnut tree produces fruit, you will want to collect the drupes in early winter, remove the seeds, and allow the fruit to dry out. A small muslin bag with tie strings can be used to hold 4 or 5 soapnuts and tossed in the laundry. The soapnuts do not have to be removed for the rinse cycle because the normally colder water of rinse cycles does not pull as much of the sudsing saponins as warm or hot wash water. The same bag of soapnuts can be used for up to 10 loads of wash. After that, toss them into the compost pile and reuse the bag! Other advantages of soapnuts Besides being disease-resistant plants, soapnuts also have gentle insecticidal properties that have been shown to interfere with mosquito and lice life cycles. Whether this means that washing your clothes with soapnuts will render them mosquito-proof has yet to be shown. Did you know that soapnuts are used to clean cardamom seeds, improving their color and flavor? If you use graywater from your washing machine, soapnuts are a far better option than soaps and detergents sold over-the-counter, and they’re free! Unfortunately, it may take your soapnut tree up to 10 years to begin producing fruit. (At least it’s faster that stone pines!) The nice thing is, soapnuts are lovely trees, long before they provide you and your family with a lifetime supply of environmentally safe laundry soap and shampoo! Springtails mostly go unnoticed, but these moisture-loving pests can suddenly appear in large numbers near swimming pools, sinks, around houseplants and in garden soil. Springtail identification These primitive creatures may look like insects, but springtails are actually members of a group called hexapods. Hexapods differ from insects because they have internal mouthparts. Springtails (Collembola) cannot fly, but they have a spring-like mechanism on the abdomen, called a furcula, that launches them several inches up in the air. Being only 1/16 of an inch long, springtails are sometimes confused with fleas, but they do not bite people or animals. Springtail eggs are whitish and laid in small clusters in the soil. Immature and adult springtails look identical except for size. They can be black, gray, or blue, or white.  Springtail (U. Burkhardt) CC BY-SA 3.0 Springtail habitat
Springtails are normally found in leaf litter, moss, and organic mulch. As temperatures rise and soil dries out, they often move indoors, being small enough to pass through window screens and under doors. The sheer number of insects can create a mess in your home or on the surface of a swimming pool. Springtail damage Springtails normally feed on decaying organic material, but they have also been known to feed on the roots and leaves of young seedlings. The damage looks like tiny, irregular holes on the leaves and little pitted areas on roots and leaves. Springtail control Since moisture is key for the survival of these tiny pests, their appearance can indicate a water leak, excessive watering, or poor drainage. Especially large springtail populations can be controlled by temporarily removing mulch. This will allow the soil to dry out a bit, without harming plants. Planter pot saucers should be emptied regularly, along with any other standing water. Some points of entry into the home can be blocked with caulk, weather stripping, and steel wool. Obviously, water leaks will need to be repaired. Pesticides are not effective. If you have a springtail problem, cut off their water supply. What kind of plant is that? Um, well… Has that ever happen to you? It happens to me a lot. I will plant seeds in what appears to be the ‘perfect spot’, confident that the location will trigger a memory of what I planted there, except that sometimes it doesn’t. Sometimes, I have no idea what it coming up. In those cases, I have to wait until the plant reaches a recognizable size. That’s fine when it turns out to be what I planted, but it’s a waste of soil, sun, and space when it turns out to be a pesky weed that has choked out the intended resident. Using plant markers is a handy way to remind yourself of what is planted and where. This can help you take better care of your plants, especially when it comes time for feeding, propagating, or transplanting. Plant markers can also be used as lovely yard art. Here are several ideas for free (or nearly free) plant markers for your garden.  Carrot plant marker Popsicle sticks If your family eats popsicles, have them save the sticks. This works best if you create a place for them to collect: a cup, box, planter pot - something convenient. These wooden sticks will not last forever, usually no more than a single growing season, but they are fabricated with the intention of touching food, so I assume they are relatively safe. Popsicle stick plant markers absorb gel pen and marker colors nicely, so you can make them look colorful and easy to read. These plant markers are an excellent choice for seed starting. When the begin to wear out, you can simply toss them into the compost pile. Rocks I used to own a private school, called Children’s Academy, in Virginia. We were on three acres and had a vegetable garden, a butterfly garden, and a wide variety of trees, shrubs, and other plants. I encouraged my students to go out and select a plant, conduct research, and identify it. Whoever identified it first was given the opportunity to select a large rock, paint the common and scientific names of the plant on the rock, and then place it near the plant. The kids seemed to enjoy it (they became a bit competitive about it, at times) and the rocks made beautiful reminders of what was growing around our school. You can do the same thing in your yard, especially for the perennials.
Wood wheels
If you have a log or decent sized branch laying around, and a saw, you can cut disks of wood that make lovely plant markers. This requires some effort if you do not have a power saw, but it is certainly do-able. The wood grain looks really nice, without standing out too much, and the edge can be sunk into the soil enough to make it stand up or you can lay them flat. Yard sales & garden markets Yard sales and Master Gardener events are excellent sources for low-cost garden tools, and plant markers are no exception. Flatware, old mugs, saucers, and many other durable materials can be had for practically nothing and then painted with plant names. Give yourself permission to be creative. Heck, go for flamboyant! You can add a touch of your personal creativity to the garden or landscape while making it easier to recall where all of your plants are! So what in the world is karnal bunt? And why do we care? Most people are not growing wheat. But you could if you wanted to. I urge you to try a small patch. If nothing else, you can tell people you have a wheat field - even if it is only a four-foot square! The other reason for learning about karnal bunt is to have a greater appreciation for those farmers who feed the world and a better understanding of what they are up against. And how many of your friends have ever heard of karnal bunt? For the record, the name karnal is not related to its character. Instead, it is from Karnal, India.  Wheat seed infected with karnal bunt (USDA) Public Domain Karnal bunt came to the U.S. from Mexico on infected grain in 1996. Karnal bunt is currently found in 18 midwest U.S. states, down from 23 states in 2015. This drop in infection rates is due to state and federal quarantines.
So what is karnal bunt? Karnal bunt is a smut fungus that attacks wheat, durum wheat, rye, and triticale (a cross between wheat and rye commonly fed to animals). The karnal bunt fungus (Tilletia indica) enters individual seeds (not the entire seed head) and consumes the endosperm. The frass they leave behind smells like rotten fish, leaving the kernels inedible. Despite the smell, U.S. regulations allow wheat for human consumption to contain up to 3% bunted kernels. This fungus can spread through physical contact with infected seeds, farming equipment, tools, and clothing. It can also spread by the wind. Fungicides sprayed on young leaves can help prevent the spread of this disease. Karnal bunt is not a threat to your garden. I just thought the name was too fun not to share. Imagine a world without cabbageworms, leafminers, or whiteflies… Or one without Sudden Oak Death, bacterial spot, or tomato yellow leaf curl… Such would be our gardens, had quarantines been in place and enforced sufficiently. Alas, it is not to be. Imported plants that are not adequately inspected, nursery stock that is sold in spite of being infected or infested, and the use of grocery store produce to start a garden are responsible for a profound amount of damage to the environment. According to The Nature Conservancy, invasive species cost the U.S. economy $120 billion each year. The U.S. Forest Service echoes those figures, adding that 81 million acres of American soil are at risk due to these pests and diseases, and that 42% of threatened or endangered species are being pushed out by these invasives. Scale those figures down to the size of your garden and decide for yourself if it is worth the risk.  What is a quarantine?
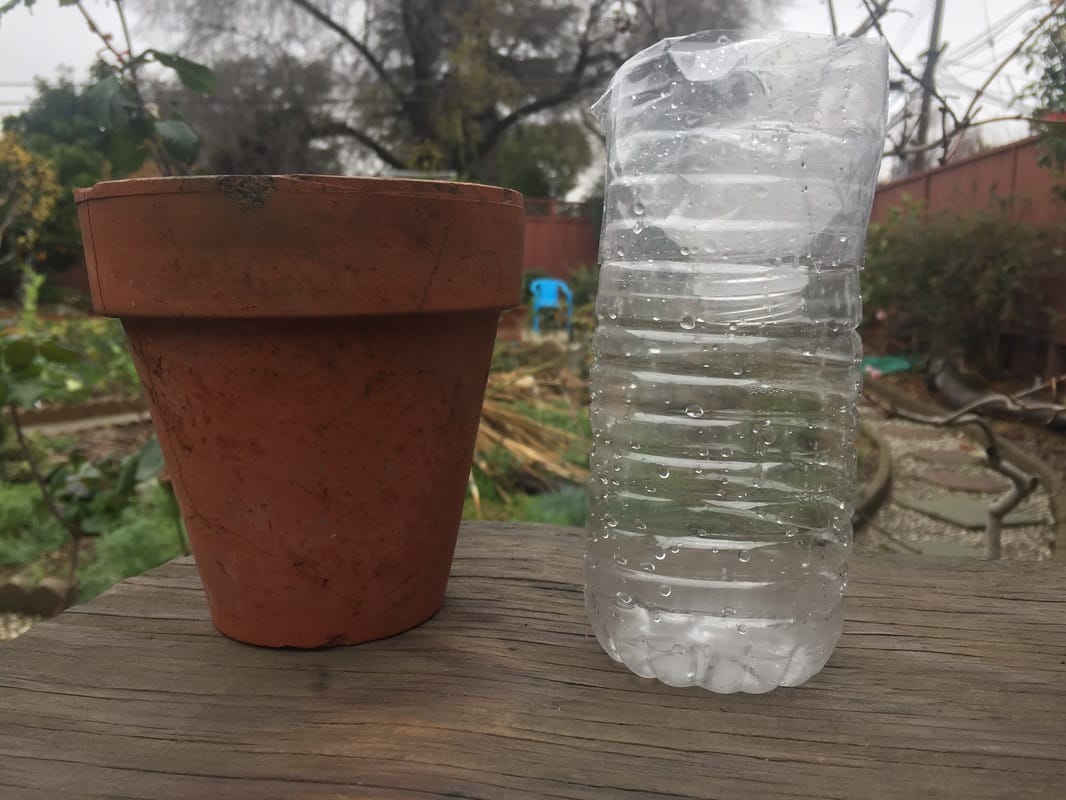
To quarantine something means to keep it away from everything else, for a period of time, to avoid the spread of disease. In the world of plants, quarantines are used to halt the spread of diseases, pests, and other plants (weeds). In Italian, quarantina means 40 days and that’s where we get the idea behind quarantine. By isolating plants for 40 days, you are more likely to see signs of pests, diseases, or weeds, before exposing all of your other plants. When to quarantine a plant? Plants that are new, infected, or infested should be quarantined whenever possible. The easiest case, and the most useful, is when you bring a new plant home. As much as you want to add it to the landscape, 40 days in quarantine can prevent a whole lot of work later on. Plants new to your property can never be guaranteed disease-, pest-, or weed-free. Blithely adding it to your landscape may work out fine, or it may introduce a devastating disease that can stay in the soil for decades, introduce pests that you will have to battle every year forever after, or add even more weeds to your To Pull list. To avoid these risks, you can place new plants in quarantine until they have shown themselves to be safe for your garden or landscape. Containerized plants that develop problems are pretty easy to quarantine. Established plants are a bit more difficult. How to quarantine Ideally, new plants should be kept separate from all others for 40 days. This is especially true for houseplants, because there aren’t very many natural predators in your livingroom. This can be done by placing the latest addition in a different room, across the room, or in a clear plastic bag. The bag method is the most effective because it creates a barrier that you can see through. Established plants, such as fruit trees, are difficult, if not impossible to quarantine. In cases such as Citrus Greening, trees must be destroyed. If you suspect an invasive pest or disease in one of your established plants, contact your local County Extension Office for help. Alternatives to quarantine Some of us can’t (or won’t) invest 40 days of waiting before adding a new plant to the garden. When this is the case, use these tips to reduce the likelihood of problems:
Government mandated quarantines In 1912, the Plant Quarantine Act was enacted, giving the U.S. government the right and responsibility of preventing the spread of pests and diseases through nursery stock and other plants. This act evolved into the Plant Protection Act of 2000. If you’ve ever driven across the California state line, you have seen the inspection stations and you may have been required to hand over an apple, a bag of green beans, or a butternut squash before being allowed in. From a visitor’s point of view, this Orwellian treatment may feel extreme, but it’s not. In fact, too many invasive pests and diseases are making their way around the globe because of too few precautions. Grocery store produce As tempting as it may be (I know, I’ve done it), do not use grocery store produce to seed your garden. Garlic, onions, and leeks look easy to start from your discards (and they are), but they can also carry fungal diseases that will never go away. Take a look at the current list of current quarantines in California to see some of the other vulnerable crops. To quarantine or not to quarantine? That is the question. The answer is up to you. As you think it over, consider the fact that many pests can generate a surprising number of offspring pretty quickly. For example, a single aphid can turn into 600 billion descendants in a single season, according to entomologist Stephen A. Marshall. Forty days of caution, or a lifetime of reactionary treatment. Ecesis (eh-SEE-sus) is the establishment of a plant in a new habitat.
According to some, ecesis refers to plants becoming newly established in areas that were barren or previously devastated. However you define it, a better understanding of ecesis you to help your plants thrive. Note: In the past, I have lived in duplexes whose tiny patch of soil was nothing more than a moonscape. Apparently barren, it didn’t take long to create a lush, edible landscape. Before you start, however, you need to know that each time you plant a seed, install a seedling, or transplant an established plant into a different container or location, ecesis is a factor. Established plants Once a plant is established, there is a whole lot more going on than meets the eye:
Moving this plant to a new location, or into a bigger container, is a shock that can slow or halt growth, temporarily or permanently. Soil microorganism must repopulate the area. Roots that are damaged or overly stressed during transplanting mean less water and minerals available to the aboveground portion of the plant. (Ever have a plant wilt on you after transplanting?) Below, you can read about the many factors of ecesis that may impact plants being added to your garden or landscape. Light and temperature Significant changes in light and temperature can be devastating, or they can be necessary to a plant’s development. Some plants won’t put out fruit without enough chilling hours. Some seeds won’t germinate without being exposed to fire or ice or other damage to the seed hull. Most plants need a period of acclimation, called hardening off, when moved from one environment to another. Too much sun all at once and tender seedlings can be scorched. For your plants to be the most successful, choose varieties suited to your microclimate, be it a balcony, a farm, or a suburban yard. Wind and other airs Plants added to an environment with more wind than they are used to are going to need more water. Wind dries plants out. Wind can also blow containers and tall plants over, risking breakage. Placing containers against walls or tying plants to stakes can help prevent these problems. Insufficient air flow, whether through plant structure and improper pruning, geography, other plants, or fencing can increase the chance of fungal diseases occurring. Problems with pavement Plants installed near sidewalks, driveways, and buildings face a unique set of potential problems. The pavement and concrete create a heat sink, exposing plants to much more heat than is good for them. Also, these structures are usually designed to move water away, which means plants may need extra irrigation. And even easier solution is to select plants that can handle a lot of heat and very little water. Container plants grown in dark colored pots face similar problems. The dark color absorbs heat and the limited amount of soil can mean frequent drying out. From whence they came Where a plant came from should always be taken into account when installing it someplace new: Containers If a container plant is being moved into a larger pot, it is a good idea to keep it in the exact same environment, or a slightly more protective version of the same place, until the roots have a chance to recover. Nurseries Plants grown in nurseries are accustomed to climate-controlled warmth and moisture; they are often infested with aphids and other pests; they may have been sprayed with pesticides, fungicides, or herbicides; they may be carrying diseases or weed seeds. It is a good idea to have a quarantine area for all new plants that reduces stress to them and the chance of infection to established plants. Soil Seeds started in potting mix and container plants that are used to loose soil will need some help when being transplanted into the ground. This is especially true in the Bay Area, where we mostly have heavy clay soil. If you dig a hole in the ground, be sure to rough up the sides of the hole. Smooth clay is almost as impenetrable as a ceramic pot. Just as we need a period of time to get used to a new home or job, plants need a little TLC when they are moved into a new environment. Providing this care ensures that the move will be a successful one! We've all heard the word, but how many of us really know what is going on inside our plants? What is chlorophyll and how does it convert light into energy? Chlorophyll is a collection of green pigments that makes plant (and algae) life possible. Pigments are materials that change the appearance of reflected light by absorbing specific wavelengths. As light strikes a leaf, first the blue wavelength and then the red wavelength are absorbed, and the green is reflected. That’s why, to us, most plants look green. 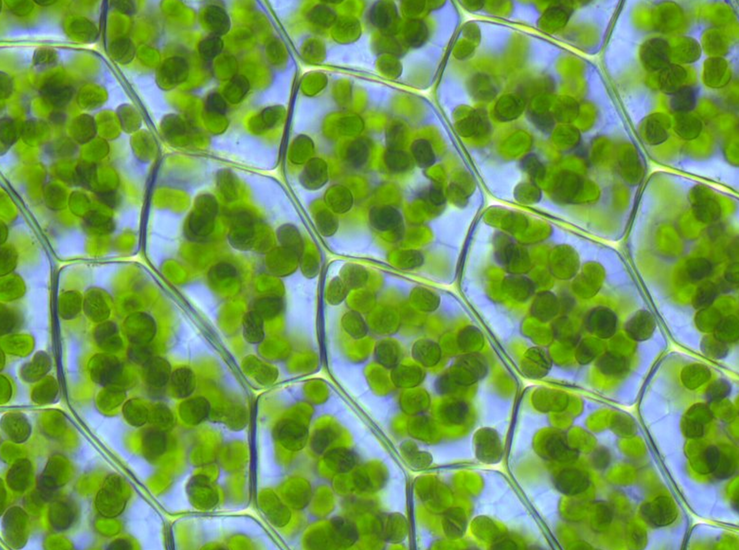 Chlorophyll is concentrated in chloroplasts, grouped inside plant cells. (Kristian Peters) CC BY-SA 3.0 Discovery of chlorophyll
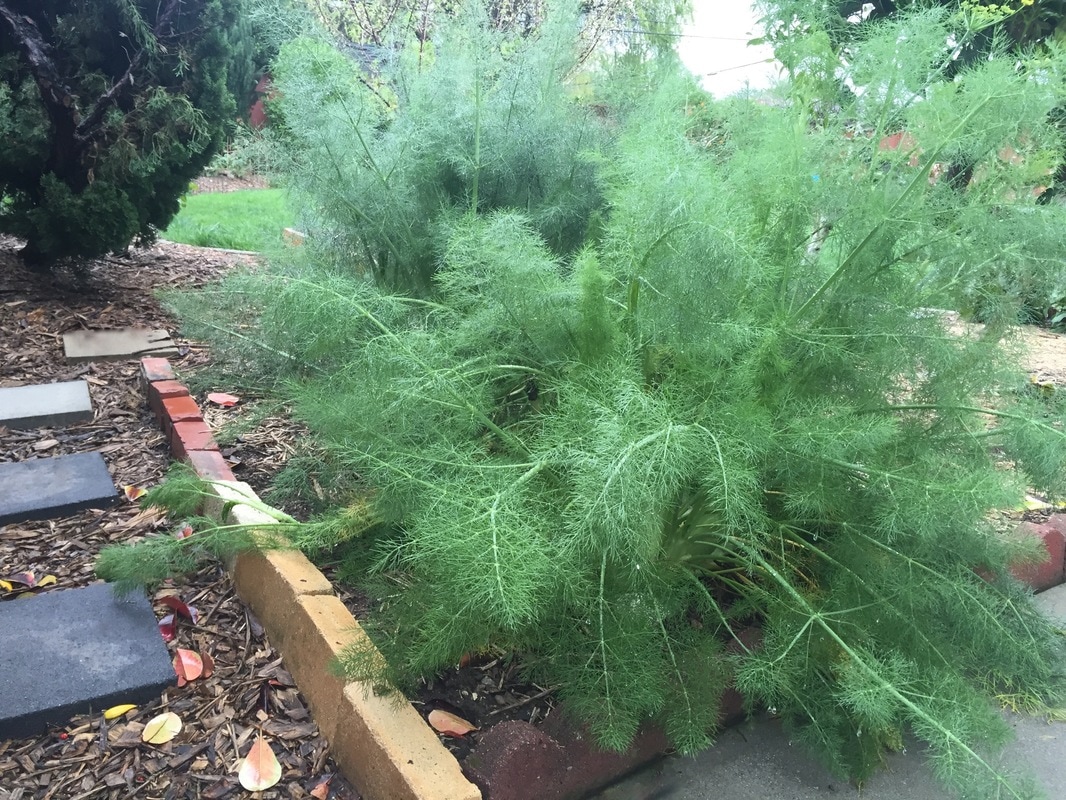
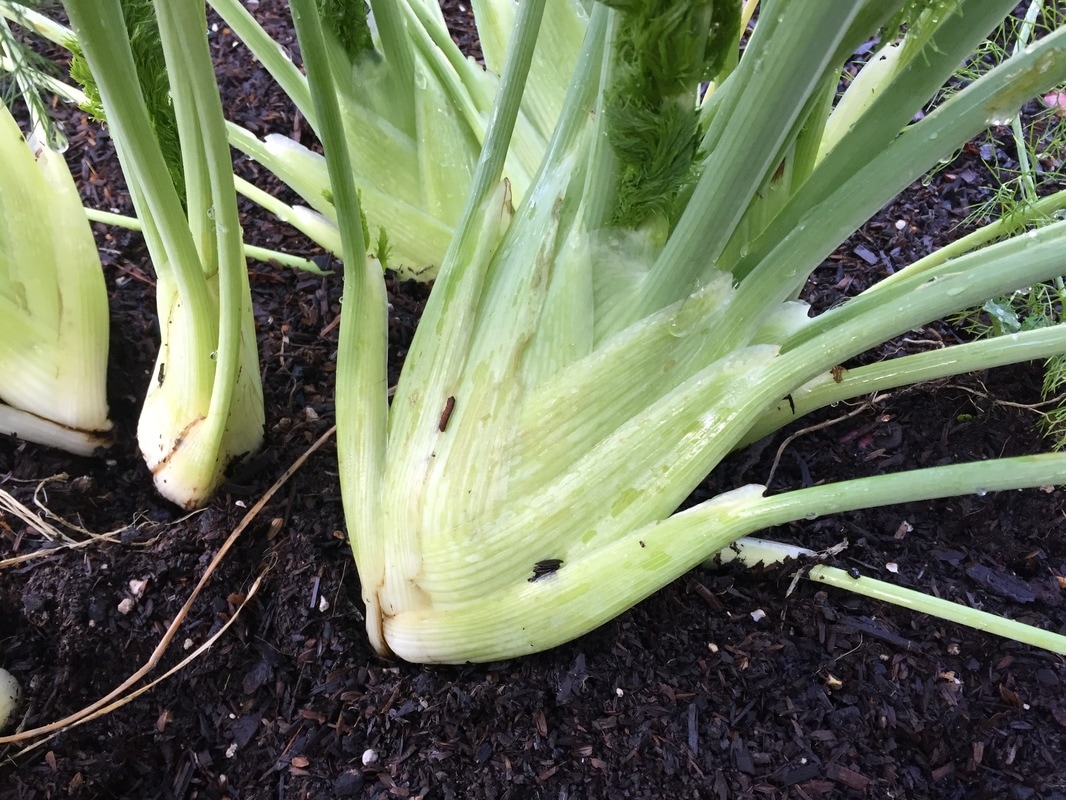
The word chlorophyll (you can spell it with one “l” if you prefer), comes from two Greek words that mean green (chloros) and leaf (phyllon). Chlorophyll is the reason photosynthesis works. This was first figured out in 1817 by two men, Pierre Joseph Pelletier and Joseph Bienaimé Caventou, ages 29 and 22, respectively. (Certainly not what I was doing in my 20’s…) Plant cell review Before we get into the amazing way that chlorophyll helps plants collect energy from the sun, let’s have a quick review of plant cells: Plant cells are very similar to animal cells in that they both have a nucleus that contains DNA, a storage vacuole, a mitochondria to keep everything functioning, a cell membrane that filters what goes in and out, and a jelly-like cytoplasm that holds all the parts. Plant cells are different from animal cells because they have rigid, rectangular cell walls and organelles called chloroplasts. Chloroplasts contain a lot of chlorophyll. This is where the really amazing stuff happens. Chloroplasts Chloroplasts have their own DNA and they are something like living solar panels within plant cells. According to Wikipedia, “Chloroplasts cannot be made by the plant cell and must be inherited by each daughter cell during cell division.” How crazy is that? I wonder if that makes them the oldest living thing? Photosynthesis and chlorophyll molecules You can learn a lot more about photosynthesis and chlorophyll molecules elsewhere, but the basic idea is that light energy is absorbed by chlorophyll molecules that are held along and in structures called photostems, in a process called resonance energy transfer. (Stay with me! We’re almost through the tough part!) The absorbed energy is handed over to an electron in something called charge separation. The energy is then oxidized (or rusted) off the electron and handed over to other molecules in an electron transport chain. The original electron is then grounded with the aid of a water molecule. It’s really mind-boggling, isn’t it? So what does this have to do with gardening? Chlorophyll in the garden If you understand how plants get their energy, you can help them stay healthy. For example, if your plants are dusty, the process of photosynthesis doesn’t work as well as it might because the chlorophyll can’t absorb light energy. (And spider mites will be more of a problem.) Or, if you are growing endive, celery, or fennel, you may want to block light from reaching the chlorophyll, for white, tender leaves, stalks, or bulbs. If chlorosis (or yellowing) is seen, you will know that something is causing a lack of chlorophyll. Chlorosis can indicate bacterial or fungal disease, physical injury, improper soil pH, iron or manganese deficiency (the former is very common in the Bay Area, the latter is not). Excessive levels of other nutrients, such as potassium, magnesium, and phosphorus can also cause chlorosis. The more we learn about the amazing processes that are going on in the garden, the better we can care for the plants in our gardens and landscapes. (And you'll be even better at Scrabble!) Once you plant this cousin to carrots, you will have a year-round food source. Fennel looks pretty in a landscape, too! Fennel description Large feathery fronds wave in the breeze, with yellow umbel-shaped flowers. The bulbous base looks like a rounded, closely packed celery. This perennial herb can grow quite large, up to 5 feet tall, depending on the variety. In colder climates, fennel is grown as a biennial.
Fennel as food
Milder than anise, all parts of the fennel plant are edible:
Fennel as medicine Fennel (Foeniculum vulgare) also has medicinal uses. Fennel seeds contain volatile oils that stimulate mucus production in the digestive tract, providing temporary relief from digestive upset, Crohn’s disease, ulcerative colitis, Celiac disease, and irritable bowel syndrome. Fennel also reduces nausea and is said to ward off the effects of hangover (though I’m not sure about that one). In Medieval times, fennel was eaten as an appetite suppressant. Fennel in the garden Fennel attracts a wide variety of beneficial insects, including hoverflies, ladybugs, lacewings, bees, and syrphid flies. If larger varieties of fennel are selected, they make a nice landscape anchor. How to grow fennel Fennel can be started in spring or fall. It prefers sunny locations and is often seen growing wild alongside freeways. Fennel grows so easily from seed that wild fennel has become invasive in many areas. Seedlings should be placed 8 to 12 inches apart, depending on the variety. Young fennel plants require regular watering in summer, but I generally wait to water mature plants until they start to wilt without any noticeable ill effects. As the bulbs grow, bank a little dirt around them. This keeps them white and helps them to stay tender. When your fennel bulbs reach tennis ball size, use a sharp knife to cut away the roots, leaving them in the soil for beneficial soil microorganisms. Fennel tends to bolt, or go to seed, when the roots are disturbed. This isn't necessarily a bad thing, as it will mean more new plants. If the roots are not overly disturbed, they will put out new bulbs. Viola! Perpetual food either way! Find a sunny spot in your yard or use a large container to add fennel to your edible landscape! Have you ever seen trees with knobby limbs, bare of all leaves and twigs? It’s called pollarding. Pollarding is a pruning method that limits the size of trees and shrubs. Unlike shearing, which trims everything past a certain point, pollarding cuts back all new growth. This stimulates regrowth that will bring it back to full size.  Shortly after pollarding... (Charles01) Public Domain Pollarding was first done by the Romans and we still use it today. The word pollarding comes from ‘poll’ which refers to the top of the head (as any horse enthusiast knows). To ‘poll’ someone was to cut their hair. [I wonder if polling at the voting booth came from the same root - asking what is inside someone’s head. It makes sense, but I digress.] Originally, trees were pollarded to provide food for livestock and fuel for winter fires. [Peasants were allotted a ration of firewood and other materials from the king’s trees in something called an ‘estover’. Pollarding stimulates vigorous upright growth, which turns into straight boards for boats and fence material. Thinner upright stems were also used to make baskets and garden bowers. Pretty smart for 2,000 years ago, eh?  …and two years later (Charles01) CC BY-SA 3.0 Which trees are pollarded? Pollarding is not recommended for all types of trees. Many conifers do not handle pruning very well. Their twigs tend to die back to the branch they grew out of, providing entry points for pests and disease. Yew are one exception. Trees that respond well to pollarding are those that tend to send out shoots quickly, a characteristic called ‘epicormic’, including:
When & how to pollard trees & shrubs
Pollarding is normally done annually in late winter. Maple trees are pollarded in summer to avoid bleeding sap. In most cases, each year’s pollard cuts should be just above the previous year’s cuts. Because pollarding large trees involves chainsaws and ladders, this is best left to the professionals. Small trees and shrubs can be pollarded with hand pruners and a tree saw. When evaluating a shrub for pollarding (or other pruning) keep in mind the future desired shape and size as you cut. Where each cut occurs, a mass of new stems will appear. Advantages of pollarding In addition to size maintenance, pollarding provides other benefits:
Disadvantages of pollarding Pollarding is stressful to trees and shrubs and it must be done every year or two, to avoid limb breakage. The sprouts that appear after pollarding are attached weakly to the ‘knob’ and may break off. Mature trees that have not previously been pollarded can be killed by the process if it is done incorrectly. Even healthy trees and shrubs are exposed to pests and diseases after pollarding is done. Whether you use pollarding or not, now you know what all those knobby looking trees are about! Also known as ripe rot, anthracnose causes a collection of fungal diseases that often appear in wet spring weather. Knowing more about it ahead of time can help you to prevent it in your garden and landscape.  Anthracnose of cucumber (Scot Nelson) Public Domain Host plants Anthracnose prefers berries, tomatoes, and other soft fruits, but it is also found on avocados, almonds, lettuce, citrus, cucurbits, spinach, turfgrass, and beans, as well as snapdragons, and deciduous and evergreen trees and shrubs. 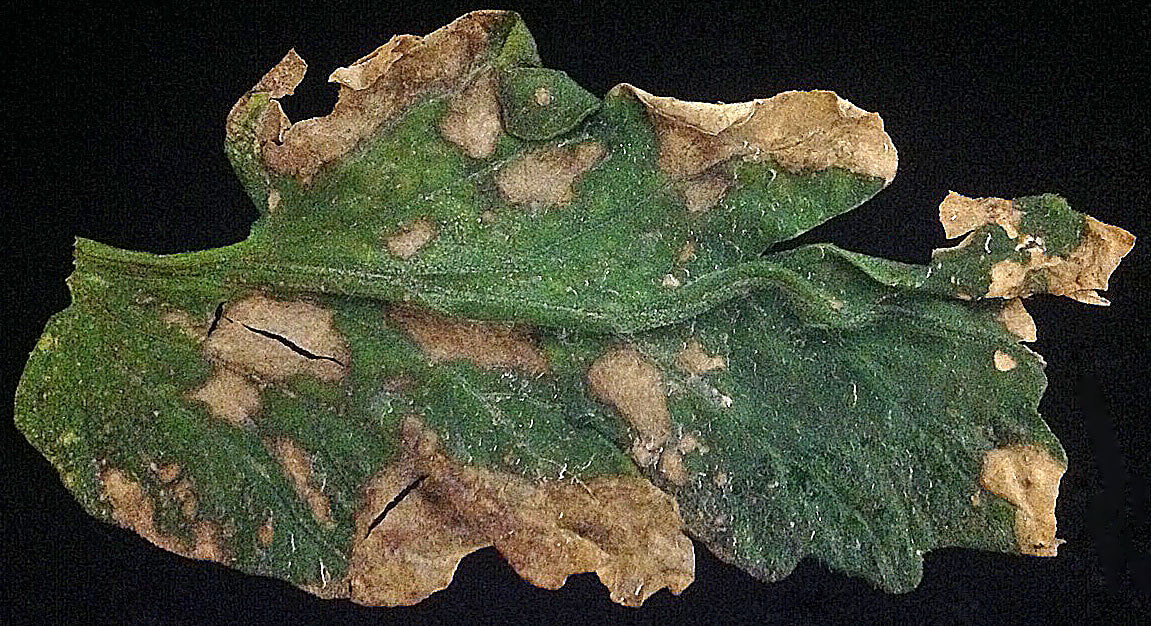 Anthracnose of tomato (Scot Nelson) Public Domain Symptoms of anthracnose
Anthracnose can be from one of several fungi. The disease is often called twig, leaf, shoot or stem blight, depending on the affected plant and the visible symptoms. Symptoms look a lot like leaf spot and usually appear after spring rains, especially in areas with poor drainage and inadequate airflow. Symptoms of anthracnose include:
Anthracnose lifecycle These fungi overwinter in infected twigs, canes, and leaf litter. In spring, spores get bounced onto plants by rain or sprinkler action. In their water vehicle, they attach themselves to a host and use the moisture for germination. Then they enter vulnerable new twigs and leaves and start reproducing like crazy until it gets too hot and dry. Anthracnose controls One of the easiest ways to avoid anthracnose in the landscape is to plant resistant varieties. Avoid overhead watering, and prune and place plants for good airflow. You can also improve drainage with compost and mulch. Remove and dispose of any infected plant material. Many weeds can host this pathogen, including chickweed, vetch, and fiddleneck, so remove them from areas prone to anthracnose. Pesticides advertised as able to prevent anthracnose have not been reliable in controlling the disease. Spores can survive in the soil without a host for up to 9 months, so crop rotation can also help reduce infestation. In extreme cases, soil fumigation, fungicide dips, and foliar fungicides may be used. So, protect your blackberries and raspberries, lima beans and pinto beans, Poinsettias, and those plump tomatoes with good airflow and by watering only at ground level. Rain gardens do not cultivate rain. They are not ponds or wetlands. Most of the time, a rain garden isn’t wet at all. So… What is a rain garden? A rain garden is a sunken area designed to redirect rain water away from buildings, driveways, lawns, and other landscape features that may have drainage problems, and to hold onto that water long enough to filter sediment and pollutants. Rain gardens typically use native plants that do not require additional irrigation. These plants help hold, filter, and slow the release of rainwater, reducing runoff and pollution, while allowing more water to be absorbed. This usually occurs within 48 hours, preventing mosquito breeding. According to The Groundwater Foundation, “Rain gardens are effective in removing up to 90% of nutrients and chemicals and up to 80% of sediments from the rainwater runoff. Compared to a conventional lawn, rain gardens allow for 30% more water to soak into the ground.” Now, industrial and commercial properties have high tech rain gardens that incorporate sand and filtering systems and all that, but we, as homeowners, don’t need to go quite that far to get similar benefits.  Rain garden infographic courtesy of Kkastner Why have a rain garden? If you live in California, you know that our occasional rains can be disruptive. The ground can be dry to the point of becoming hydrophobic, repelling water and causing flash floods. You may not have a flash flood in your yard, but the principles behind rain gardens can still help prevent the loss of topsoil and other problems associated with urban drool. Also, the majority of the water that comes off your roof and driveway contains a lot of pollutants that you probably don’t want in your edibles. Installing a rain garden also helps attract beneficial insects and other pollinators, increasing biodiversity. Rain gardens are very low maintenance once installed and they look nice!  Recently planted home rain garden (BrianAsh) CC BY-SA 4.0 How and where are rain gardens installed?
Since most of the water for your rain garden will probably come from rain gutter downspouts, you will need to select a location that allows for a path (read decorative trench) from those downspouts to a low area in your yard. Areas with full sun are preferred over shady areas. You will want to make sure that your rain garden site is at least 10 feet away from your home or other buildings and not over a septic field. Once you have a location, use these steps to create your rain garden:
This is a big project, but it is one that will improve soil and water quality in your area for a very long time. If you have the space, consider adding a rain garden to your landscape. (And be sure to share photos!) Lima beans have the ability to poison their attackers, and groups of lima bean plants work together to counteract threats caused by caterpillars. The world of plants never ceases to amaze me.  Lima beans (Howard F. Schwartz, Colorado State University, bugwood.org) CC BY 3.0 The lowly lima bean, hated by many, loved by some, is a legume. These particular legumes put out chemicals that attract parasitic wasps whenever caterpillars start chewing on their leaves. The wasps lay their eggs in the caterpillars, hatch, and devour their host. Lima beans also contain certain chemicals, stored in different parts of the plant, that become activated when the seeds are chewed, creating potentially fatal cyanide poisoning. Before the Lima Haters shout a resounding, “We told you so!”, it is important to note that cooking lima beans for at least 10 minutes eliminates those chemicals. So, in the case of lima beans, simply soaking isn’t good enough. You need to put them to the fire before eating. Why grow lima beans? Despite childhood trauma and potential poisoning, lima beans (Phaseolus lunatus) are actually a very sweet, high fiber source of protein, folic acid, iron, manganese, and potassium. Even better, they are easy to grow and excellent additions to balconies and windowsills, as well as standard gardens. You can select bush or pole varieties. (Sometimes the smaller bush varieties are called butter beans, if that makes them more palatable.) How to grow lima beans Lima bean plants will not put out pods in temperatures above 80°F or when it’s cold and wet, so spring and fall are the best times to grow lima beans. Seeds will take 60 to 90 days from planting, so plan accordingly. (Bush varieties take 60 to 80 days; pole varieties take 85 to 90 days). Lima beans prefer a soil pH of 6.0 to 6.8 and full sun, but they can handle partial shade, especially as summer temperatures rise. Surprisingly, too many nutrients in the soil will cause your lima bean plants to produce lots of vegetation, and not very many beans, so you can forego the aged compost. Also, too much water simply makes the beans split, so water sparingly. Plant seeds 1-1/2 to 2 inches deep. Bush beans can be planted 6 inches apart - the plants will actually help hold each other up. Pole beans should be planted 10 inches apart and be sure to provide them with a trellis, tomato cage, fence, or balcony to climb. Pole beans can reach 10 to 12 feet in height. If you need to thin your bean plants, simply cut them off at ground level. The roots have a symbiotic relationship with soil microbes that “fix” atmospheric nitrogen into the soil, feeding nearby plants. Lima bean pests and diseases Beans are commonly attacked by aphids, flea beetles, bean beetles, mites, and leafhoppers. Plus, those aphids can carry the bean mosaic virus. Other lima bean diseases include blight and anthracnose. Beans are also susceptible to many diseases found in the soil, so crop rotation is a good idea.  Dried, ripe lima bean pods California is responsible for 60 to 80% of the world’s lima bean crop. You can be responsible for 100% of your lima bean crop by growing your own!
Growing apples is highly rewarding, but don’t try starting one from seed.  Immature apples These particular fruit trees are known as extreme heterozygotes. In plain English, the offspring are nothing like their parents. Planting seeds from a Red Delicious apple will not produce apples that look or taste like that shiny red fruit. It may not taste good at all. Most modern apple trees today are propagated from cuttings grafted onto sturdy rootstock. [Did you know that apples are related to roses?] Apple history Apples (Malus pumila, aka Malus domestica) have a rich and varied history. They hold a place in nearly every culture and religion, being one of our earliest attempts at tree cultivation. But wild apple trees (Malus sieversii) bear little resemblance to their domesticated progeny. Wild apple trees, still found in central Asia, can grow 40 feet in height, and the fruit is smaller and more tart than most people find palatable. Most of the apples sold in grocery stores are crosses between Malus pumila and crab apples. There are currently more than 7,500 apple cultivars with various traits of skin color, texture, disease and pest resistance, juiciness, storage ability, and more. In 2010, the entire apple genome was mapped, with over 57,000 genes identified. [Humans are estimated to have up to 25,000 genes. I guess we must be just one big family then.]  Apples come in lots of colors, sizes, and shapes Bare root apples The best way to start growing apples is with bare rootstock. Some apple varieties require cross-pollination, while others are self-pollinating. If you only have room for one tree, you need a self-pollinating variety, or all you will get is summer shade. Plant your bare rootstock during late winter or early spring. Before you buy, however, you may want to conduct a soil test with a reputable lab. This inexpensive test is an excellent investment in a tree that will probably live and produce fruit for the next 100 years. Also, consider the size of your mature tree - it is far easier to pick apples and care for your tree if it is a dwarf or semi-dwarf variety. Chill hours Chill hours are the accumulated time spent between 32°F and 45°F each year. In this temperature range, the growth-inhibiting hormone responsible for dormancy begins to break down, allowing trees and shrubs to start producing the buds that become the leaves and flowers of spring. The flowers and buds do not form properly unless enough chill hours occur. The number of hours needed is species-specific, so you need to know how many chill hours occur, on average, in your yard before selecting a tree variety. Red apples generally need 1200 to 1500 chill hours to develop their color and flavor. Green apples need less. How to grow apples Apples grow best in well-drained, nutrient-rich soil with full sunlight. Apple trees need some space for good airflow. Full-sized trees will need a 20-foot circle of space, while dwarf varieties need only 10. Dwarf apple trees tend to overproduce, breaking branches, so you may need to do more pruning or provide tree support. You can grow dwarf apple trees in containers. Once your bare root tree arrives, dig a hole twice the diameter of the spread-out roots and as deep as the root ball. Failing to plant trees at the proper depth is the main cause of tree deaths. Remove any grass or weeds growing within two feet of this circle. Remove any dead, damaged, or diseased roots, and then soak the rootstock in a bucket of water for a couple of hours or overnight if they are dried out. Mix some aged compost with soil from the hole and spread it out in the bottom of the hole. Be sure there are no smooth edges in the hole. Heavy clay and other compacted soils can create impenetrable barriers to young roots. You can help your apple tree get a better start by roughing up and scoring the edges of the planting hole. Place the tree in the hole, ensuring that the graft union (where the rootstock joins the scion) is at least 2 inches above soil level to avoid crown rot and other fungal diseases. Resist the urge to tamp down the soil. To eliminate big air pockets, "mud in" your baby tree by watering heavily at planting time. Seasonal apple tree care Winter apple tree care includes pruning 15 to 20% of the previous year’s growth, allowing more light to reach the middle of the tree, removing dead or diseased branches, and spraying dormant oil to control San Jose scale, and aphid and mite eggs. In spring, treat apple trees with a fungicide to help prevent powdery mildew and apple scab. These treatments should occur when the twig tips first green, when the buds are pink, and then every ten days until the rainy season ends. Thin the tiny fruits to one every six inches for better growth and flavor. If apple maggots or codling moths have been a problem in previous years, bagging the fruit or coating it with kaolin clay are organic methods of protecting your valuable crop. Before you start irrigating a mature apple tree in spring, feed it with two pounds of urea or 40 pounds of aged manure. Summer chores include feeding young trees 20 pounds of aged manure or 8 ounces of urea every month and watering it in. (If you use drip emitters, be sure you do not use more than 1 ounce of urea per emitter per application.) Spray for codling moths from late spring to the end of summer, and monitor for aphids and mites. Irrigate trees every 2 to 3 weeks. As you pick ripe apples, watch for and remove any mummies you come across.  A nice apple harvest After harvesting, fertilize mature trees the same way you did in summer. Remove all leaves from around the tree and compost them to help prevent apple scab. Mulching around (but not touching) your apple trees will reduce weeds, stabilize temperatures, and provide the slow release of nutrients.
Apple pests and diseases Few pests or diseases will kill an apple tree outright, but it has many attackers. The use of sticky barriers around the trunk will halt some, such as ants, slugs and snails, and Fuller rose beetles, but most apple problems come in on the wind. Stem blight, crown gall, leaf spot, powdery mildew, fireblight, and other bacterial blights are common diseases of apple trees. Cedar apple rust can also occur if apples are grown near Eastern red cedar trees. Also, apples share a susceptibility to bacteria blast with lilacs and stone fruits. Common pests include codling moths, apple maggots, San Jose scale, redhumped caterpillars, armyworms, and Eriophyid mites. New to the apple scene is another pest, chili thrips. Also, any local fog can cause more russeting. Russeting is when the apple skin turns brown and rough. Find a spot in your landscape for one of these beauties because plucking an apple from your very own tree and taking a bite, well, it's just one of life's finer experiences. And we all want to keep that doctor away! Navel orangeworms attack far more than oranges and other citrus. They can seriously reduce your backyard apricot, almond, walnut, pomegranate, pistachio, date, fig, pear, apple, and stone fruit harvests. You can protect your fruit and nut crops by learning more about this orchard pest. Navel orangeworm moths (Amyelois transitella) can fly in, deposit eggs, and be on their way in a matter of minutes, so monitoring regularly can go a long way toward protecting your foodscape. Navel orangeworm description Navel orangeworm eggs start out white. In 4 to 23 days, depending on temperature, the eggs will turn orange just before they hatch. The larvae are off-white or pink grubs with a dark head. If you look closely, you may be able to see a couple of crescent-shaped marks on the second segment behind the head. Adult moths are just under 1/2 an inch long, grayish brown, with irregular silver and black wing markings, and a snout-like appendage on the face.  Female navel orangeworm moth (Simon Hinkley & Ken Walker, Museum Victoria) CC BY 3.0 au Navel orangeworm lifecycle Adult moths are generally present from spring through mid-autumn, and females begin laying eggs two nights after they emerge! Those eggs are laid on mummified fruits, newly forming fruits, and on freshly splitting almonds. The first instar burrows into a nut or fruit, where it, and future instars, will feed extensively. Next, the larva pupate in a webbed cocoon within the fruit or nut. Damage caused by navel orangeworms These orchard pests will devour an entire almond in the shell without ever being seen. If you examine an infested fruit or nut, you will see tiny entry holes and lots of frass and webbing. As they feed, navel orangeworms also provide entry points for fungal diseases and other pests. 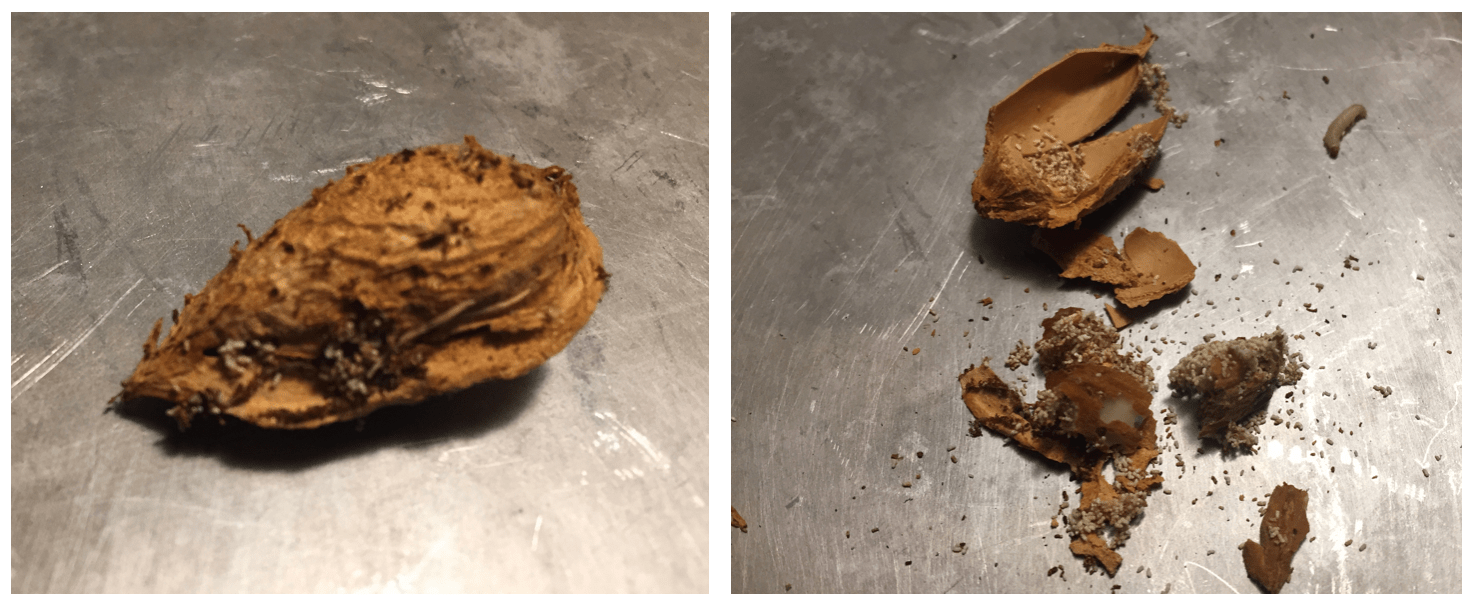 Exterior and interior of almond infested with navel orangeworm Orangeworm control
You can protect your crops from navel orangeworm infestation by irrigating trees throughout the summer and by harvesting early and frequently. As always, remove mummies immediately and completely, every time they are seen. I have learned that there is a parasitic wasp, Goniozus legneri, that is supposed to be effective and commercially available. As soon as I can track down a source, I will provide an update. Crop protection Once infested, citrus fruits are pretty disgusting, so you will probably want to toss them in the trash. After harvesting almonds, pistachios, or walnuts, navel orangeworm eggs can be killed by freezing the nuts for 48 hours. After that, nuts can be stored at room temperature in airtight containers. Your almond trees are under a new threat. 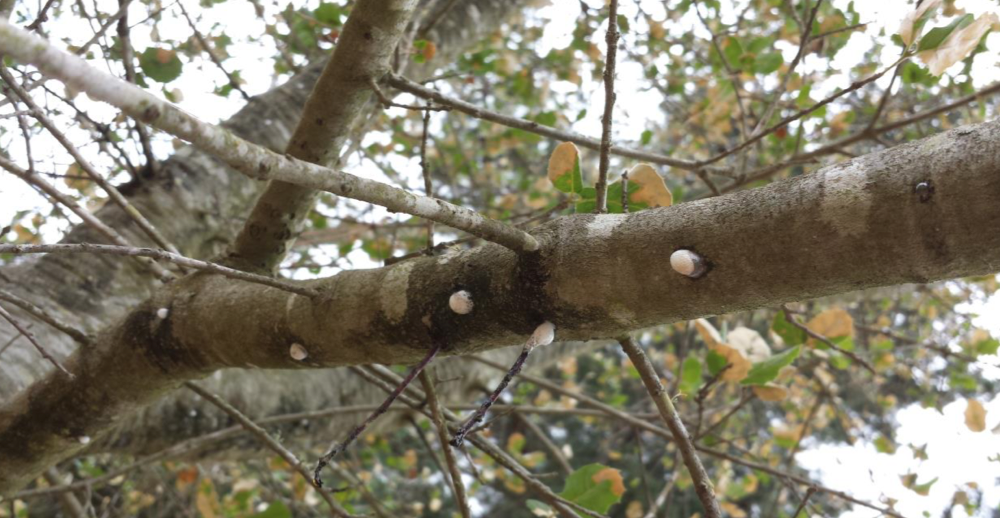 Branch infected with foamy bark canker (Photo courtesy of Akif Eskalen and Shannon Lynch, CFPC) In 2015, a new fungal disease of live oaks appeared in southern California. That disease is called foamy bark canker. The fungi responsible, Geosmithia pallida, are transmitted by western oak bark beetles (Pseudopityophthorus pubipennis). Drought- and water-stressed trees are susceptible to countless pests and diseases. Physical injuries and pest feeding all leave holes in the bark. Healthy trees can protect themselves, but weakened trees cannot. 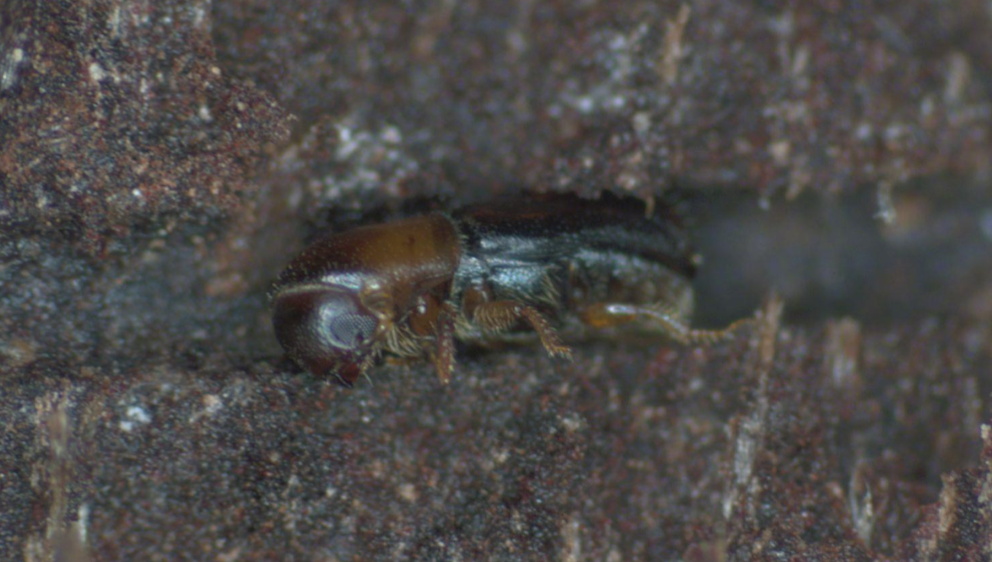 Western oak bark beetle (Photo courtesy of Akif Eskalen and Shannon Lynch, CFPC) Western oak bark beetle This small (2 mm) bark beetle is more of a pest than a threat most of the time. Bark beetles burrow under the bark. These burrows create a gallery of tunnels that cross the wood grain. Female beetles lay their eggs in tiny pockets perpendicular to these tunnels. The larva feed and tunnel their way to adulthood. These pests can certainly weaken a tree, but healthy trees can survive. However, just as elm bark beetles carry the devastating Dutch elm disease, which killed 75-90% of the global elm tree population, this fungal disease threatens almond trees and coastal live oaks. Symptoms of foamy bark canker Red, oozing discharges can be seen at beetle feeding sites along the trunk and from primary branches. As the disease progresses, that ooze becomes foamy and prolific. Drips may run down the trunk of an infected tree as much as two feet. If you peel back the bark, you will see that the phloem has died around the entry point. You may also see several entry holes with similar symptoms. Foamy bark canker is easily mistaken for fusarium wilt or shot hole borer, but the entry holes are smaller.
Management of foamy bark canker
Unfortunately, there are no cures for foamy bark canker. The best thing you can do is to keep trees healthy with proper selection, placement, irrigation, pruning, and feeding. Large trees are a long-term investment. They are difficult (and expensive) to replace. During drought, irrigate large trees to a depth of one foot, two or three times a month. If your tree develops symptoms, contact your local Cooperative Extension Office. With your help, they can document the spread of the disease. They can also provide helpful information. Those tiny clusters of juicy goodness that form raspberries and blackberries are called drupelets. Sometimes you will see drupelets that are white or tan. Those pale drupelets may be the result of radiation. 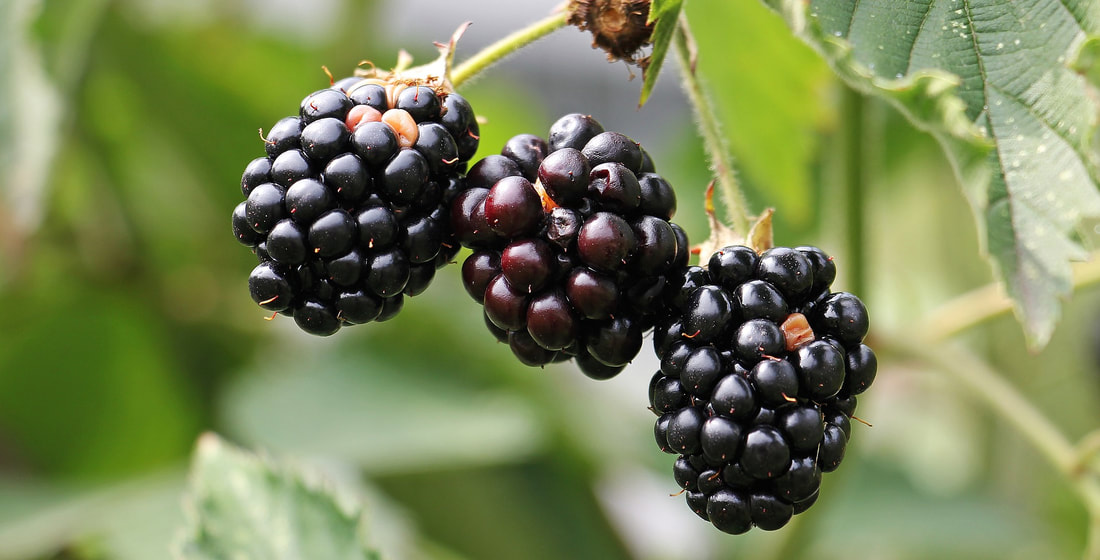 Blackberries with white drupelets (S. Hermann and F. Ritcher) Pixabay Radiation bleaching
Before you panic, we are not reviewing a 1950s horror movie. Instead, we are talking about ultraviolet (UV) radiation that occurs when temperatures suddenly rise and humidity drops. Humid air diffuses and scatters UV rays. Hot, dry air allows more UV rays to reach your cane fruit. If the change is sudden, say, a good breeze comes along, the plants and berries don’t always have enough time to prepare, and some of the drupelets become bleached. Some varietals are more susceptible to white drupelet than others. Kiowa and Apache blackberries and Caroline red raspberries are the least likely to be affected. Shading and overhead misting can stabilize temperatures and humidity in areas that frequently experience extreme temperatures. But the plants will still need time to dry out each afternoon to avoid fungal diseases. Irrigation problems The white or tan drupelets are perfectly safe to eat, but their presence may indicate an irrigation problem. If your raspberry or blackberry leaves exhibit signs of sunburn, you may need to provide plants with more water each day. Creating delicious fruit takes a lot of water. Insect feeding Feeding by stinkbugs and redberry mites can also cause white drupelets, but the damage will look different. Radiation damage will affect a generalized area, while pest damage will affect random berries and drupelets. ba Monitor raspberry and blackberry plants regularly to make it easier to determine the cause of white drupelets. Plus, it gives you the first pick of any ripe berries! Stone pines, or pinyon pines, are commonly used as live Christmas trees and they produce delicious (and expensive) pine nuts. As far as conifers go, the stone pine is my favorite, simply because of the pine nuts they produce. No pesto is the same without the sweet, nutty flavor of pine nuts. They make scrumptious pine nut bars, too! 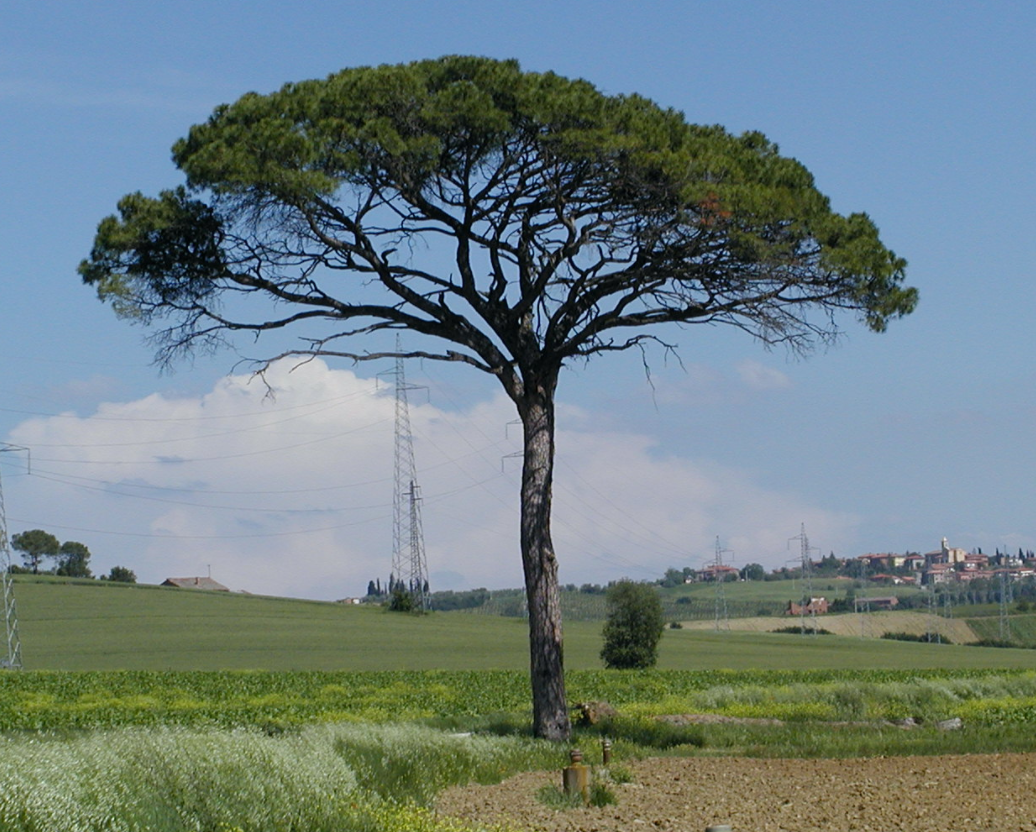 Mature stone pine in Italy with flatter crown (Kofler Jürgen) CC BY-SA 3.0 Stone pines (Pinus pinea) were originally from northern Africa and are now found in the Mediterranean. People have been enjoying pine nuts since, well, since there have been people! We have actively cultivated these high protein treats for over 6,000 years.
Like most conifers, stone pines grow from seeds found in a cone. This makes them gymnosperms. Stone pine seeds take 3 years to form - longer than any other pine. As juveniles, stone pines are bushy and round, with a bluish tint. The needles are short (3/4 to 1-1/2 inches long) and singular. As trees reach 4 or 5 years of age, mature needles begin to emerge. These older, darker needles are longer (7 to 8 inches long), and held in bundles of 2, 3 or 5. By the time the tree is 10 years old, all the needles will be the longer variety, unless the tree is responding to an injury. Mature trees have an umbrella shape, with a canopy that can reach over 25 feet. They are sometimes called umbrella trees for this reason. They are also known as Italian stone pines. Stone pines prefer full sun and well-drained soil. Once established, they rarely, if ever, need any irrigation, pruning, or fertilizer.
Stone pine pests & diseases The western conifer seed bug, aphids, pine shoot moths, bark beetles, Eriophyid mites, mealybugs, weevils, and adelgids (an aphid cousin) are common pests. Many of these pests feed on the sap, stealing valuable nutrients and moisture from the trees, causing distortion, susceptibility to other diseases, and even death to the tree. Honey fungus, or Armillaria root rot, Pine needle cast, canker diseases, Botrytis blight, needle blight, root rot, crown rot, and rusts are common pine diseases. Fair warning Before you jump to buy yourself a stone pine tree with visions of pine nuts dancing in your head, you need to understand that there is a reason why pine nuts cost about the same, per pound, as your finest cut of beef. Getting those nuts to the point where they are edible is very labor intensive. Also, your stone pine will not produce edible seeds until it is 10 to 12 years old. As green cones begin to open, you will need to smash the bejeezus out of them to get the cones to release the nuts. This is commonly done in burlap sacks with baseball bats. Then you get to hand sort through all that pine cone debris to find the dark paper-coated pine nuts. That dark paper is yet another layer that must be removed. This takes a lot of time and patience, and is why most of our $19 a pound pine nuts come from China, where cheap labor makes it financially feasible. Unfortunately, the variety of stone pine grown in China (Pinus armandii) has been shown to leave a metallic taste in your mouth that can last for a couple of days. So maybe all that time and effort is worth it after all… Every drop of rain that falls on your landscape ends up somewhere. Where that water falls and where it ends up is called a watershed. Rainwater may be absorbed by plants, sipped by local wildlife, or it may evaporate back into the atmosphere. Rainwater can also wash away valuable topsoil, carrying fertilizers and pollutants into our groundwater supplies, rivers, lakes, and oceans. In fact, the California Native Plant Society tells us that urban drool is the #1 source of ocean pollution. To prevent water waste, pollution, and runoff, a new approach to landscape design was created to protect our precious watersheds. Watershed approach to landscape design The watershed approach to landscaping uses garden design, installation, and maintenance methods that take advantage of natural processes to create spaces that are water efficient, while providing abundant plant growth, good habitat, and an enjoyable place to be. The watershed approach captures, cleans, and collects rainwater to slow, spread, and redirect its flow in ways that reduce the need for other irrigation. The benefits of using a watershed approach include:
How much rainfall do you get? Every yard is different, but your average 2700 sq. ft. roof in San Jose, California can collect more than 25,000 gallons of water each year! Your mileage may vary, but you can use the USGS rainfall calculator to determine how much rain water falls on your roof in any given storm, simply by entering your home’s footprint dimensions (length x width) and the amount of rainfall measured by you* or reported by your local news station. During a storm that drops one inch of rain onto a half-acre lot turns out to be nearly 14,000 gallons of water! Rain barrels, ponds, swales, and filtration tanks are all different ways you can collect rainwater.
Where does that water go?
All too often, rain water falls on buildings, roads, and concrete, where it collects pollutants and debris, and carries them to our groundwater. Our garden plants never have the opportunity to soak it up. On the other end of the spectrum, rain water either floods an area, carrying away valuable topsoil, or it gets stuck in one place, where soil, plants, and organisms begin to rot. Using the watershed approach removes those problems by studying where water comes from, where it goes, and taking actions that redirect water flow to be more efficient and environmentally sound. First flush and absorption areas First flush refers to the first 3/4 to 1 inch of rain that falls after a dry period. This rain water contains higher levels of pollutants and debris than the rain that follows. Can you filter those pollutants out or redirect this water to less vulnerable areas? After that water is dealt with, how much permeable soil is needed to absorb your expected rainfall? First, you will need to know how deeply your soil absorbs water. You can determine this by going outside after a few days of rain and digging in with your shovel. How far down did the rain actually go? This number can help you determine how big of an absorption area you will need for the expected rain. Example: You live in a 1,000 square foot house in San Jose, CA, where you receive an average of 15 inches of rain each year. Using the USGS rainfall calculator, you would discover that your house can collect 9,351 gallons of water in a year. To absorb all that water, you would need to divide the volume of water by 7.48 for a per foot absorption area. (There are 7.48 gallons of water in a one cubic foot of space.) This gives you 1250 square feet needed to absorb all that water, assuming that your soil absorbed water down to a depth of one foot. If it only went down 6 inches, the 1250 sq. ft. figure would have to be doubled. If you don’t have that much space, how can you prevent runoff? What if that’s not enough water? What are other sources of irrigation water? Be sure to check with your local municipality for laws regarding water collection (there have been countless wars started over water rights). You can collect water from your bath or shower, as it heats up, in a bucket. You may be able to redirect the outflow from your washing machine to irrigate ornamentals. Even the water left over from cooking pasta and vegetables makes useful water for the garden. How much water do you really need? There is no excuse for wastefulness when it comes to water. You might be surprised at how little water you and your garden actually need. Our household has reduced water consumption to only one-fourth of what it was three years ago and we get more production from the garden! This is possible by:
Other factors to consider when using the watershed approach:
Start using the watershed approach in your yard by asking yourself these questions:
What’s really nice about the watershed approach is that it takes advantage of natural processes that have evolved over thousands of years to work without any help on our part. Native plants and those suited to your microclimate require less care, which translates into less work, less expense, and a healthier environment. Activity: Inventory your landscape’s water needs
Every drop of water that you are able to use more efficiently protects the environment and your bank account. If you planted beans, you may notice a problem with leaves looking pale, splotchy, and generally unhealthy. Blotchy, puckered bean leaves may indicate a bean mosaic virus. 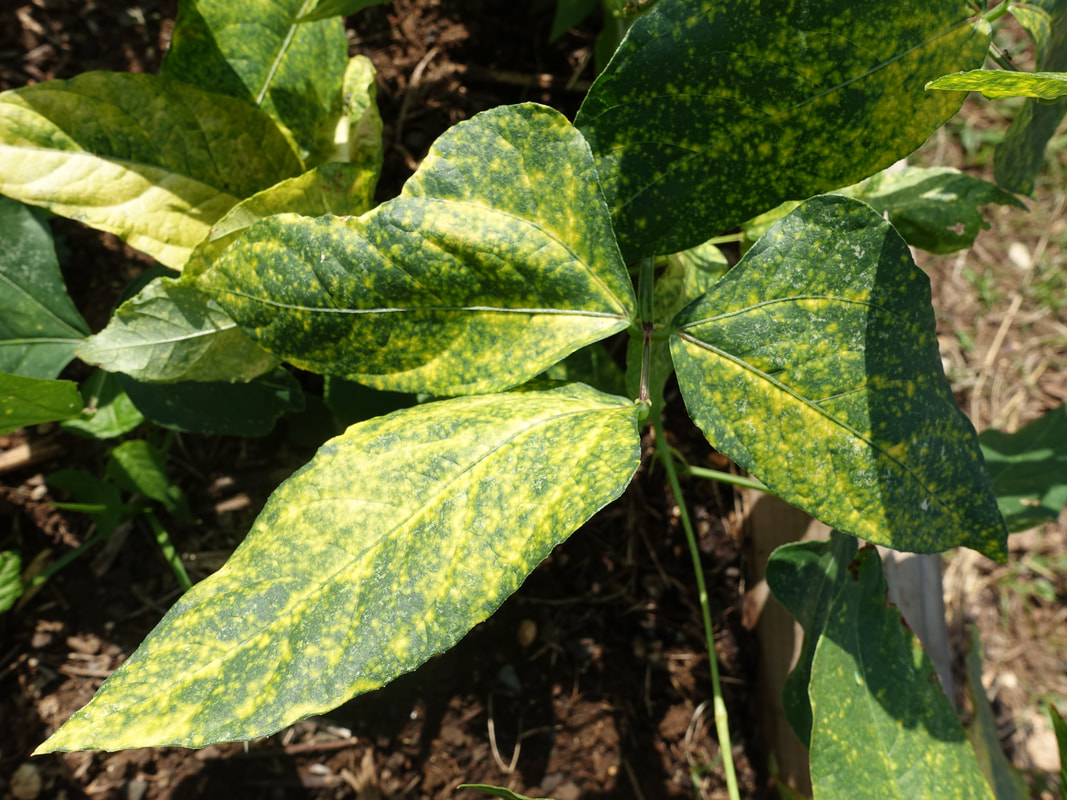 Bean leaf mosaic (Scot Nelson) Public Domain Several mosaic viruses attack beans. Here are the three most common ones:
Symptoms of bean mosaic Bean mosaic symptoms vary between types of beans, life stages, and specific viruses, but you will want to keep a lookout for these symptoms in your bean patch:
Vectors of infection Bean mosaic is spread by sap-sucking insects such as aphids, mealybugs, and leafhoppers. While it sounds convenient, research has shown that using insecticides is not practical because it kills the beneficial insects that feed on the pests. Once a plant is infected, remove it because it is a vector for disease. Do not add infected plants to the compost pile. Controlling bean mosaic Prevention is the best protection when it comes to bean mosaic. Use these handy tips to reduce the likelihood of future generations of beans becoming infected:
Bean mosaic is one of the reasons you should not use dried beans from the grocery store to plant in your garden. While they are perfectly safe to eat, there is no guarantee they are safe to sow. Invest in high-quality, guaranteed clean seeds from a reputable seller, and then save the best pods from your crop for replanting. Beans are easy to grow. They improve soil structure, provide excellent food crops, and can look lovely in a landscape. Perlite has a distinctive feel, lightweight and crispy, but what is it and how do we use it in the garden? (This one's for you, Jim!) 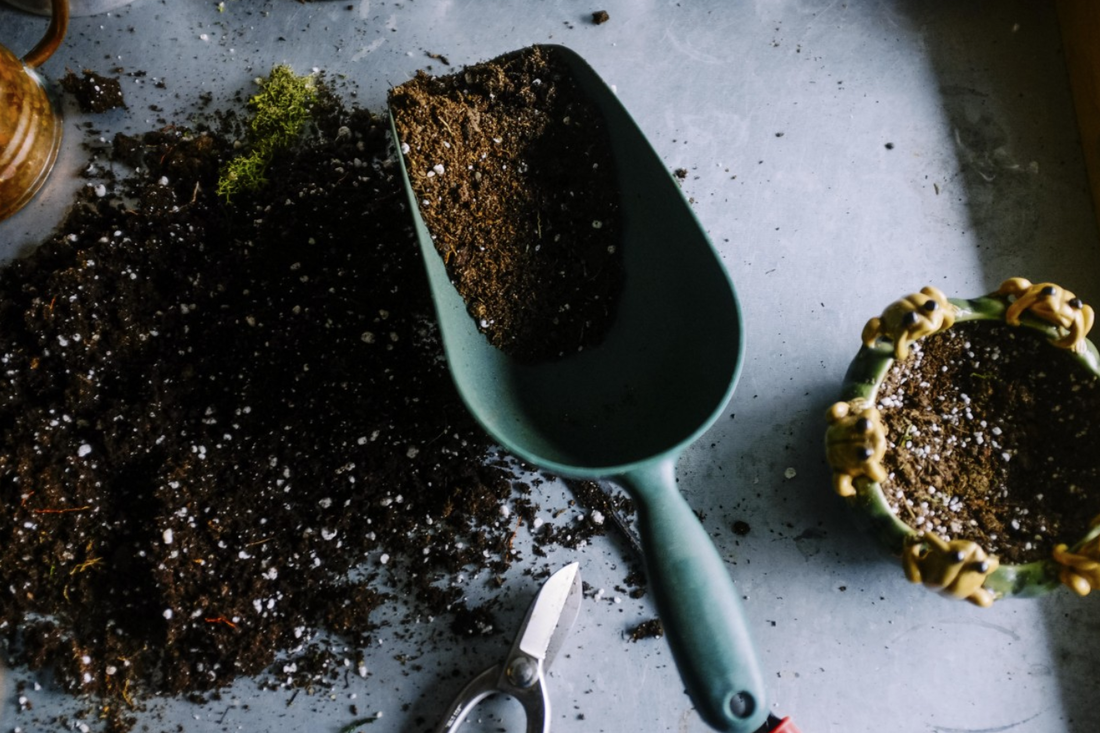 Perlite is the featherweight white stone found in potting soil. Public Domain What is perlite?
Perlite is actually a form of obsidian. Obsidian is a dark volcanic glass that forms when lava cools quickly. Obsidian is very brittle and extremely sharp. It was commonly used to make cutting and hunting tools by primitive peoples. [Back in the early 80’s, I had an archeology professor at Seattle Central Community College. He loved to tell us how, when he needed chest surgery, he found a surgeon who was willing to use obsidian tools. Being sharper than surgical scalpels, the obsidian left a scar that was practically invisible!] How perlite is made Coming out of a volcano, obsidian is less than 1% water. As it comes into contact with rain and groundwater, it starts to absorb moisture. This hydrated obsidian is mined and then baked in a 3,000°F oven where it pops like kernels of popcorn, growing to twenty times its original size! These glassy kernels look more like a froth of bubbles, but the outer bubbles are broken, leaving jagged edges. How perlite is used Perlite has many industrial uses, including insulation, mortar, plaster, and ceiling tiles. The broken glass bubbles of horticultural perlite are used to aerate soil, increasing porosity. Perlite does this by increasing the number of macropores and micropores that carry and hold air and water for plant roots. Perlite can hold 3 to 4 times its weight in water. Perlite is also used in hydroponic garden systems as a filtration medium. (Did you know that perlite is used to filter beer?) Perlite is also found in many planting mixes. You will see them as small white chunks. Sometimes these white particles are pumice, like the volcanic foot scrubbing stone you buy at the drugstore. Sometimes those white bits are styrofoam. Both perlite and pumice improve soil structure, but styrofoam does not. If you are going to use perlite to improve heavy clay soil, don’t just pour it on top. You will need to dig it in a bit, otherwise you will simply end up with a layer of perlite on top of your clay. Perlite is an excellent soil additive for roof gardens, balcony plants, and extra large planting containers, because it is so lightweight. Perlite is sterile, inert, and incombustible. Mold and mildew won’t grow on it and pests won’t eat it. Adding perlite to your soil can lighten heavy clay and it can help sandy soils retain more water and nutrients. |
Welcome!You can grow a surprising amount of food in your own yard. Ask me how! To help The Daily Garden grow, you may see affiliate ads sprouting up in various places.
You can also get my book, Stop Wasting Your Yard!  Index
All
Archives
July 2024
|


 RSS Feed