|
My recent post on plant spacing and an earlier post on rooting depth got me thinking about what I should plant in my two strawberry pots, now that I’m settling into my Seattle apartment. 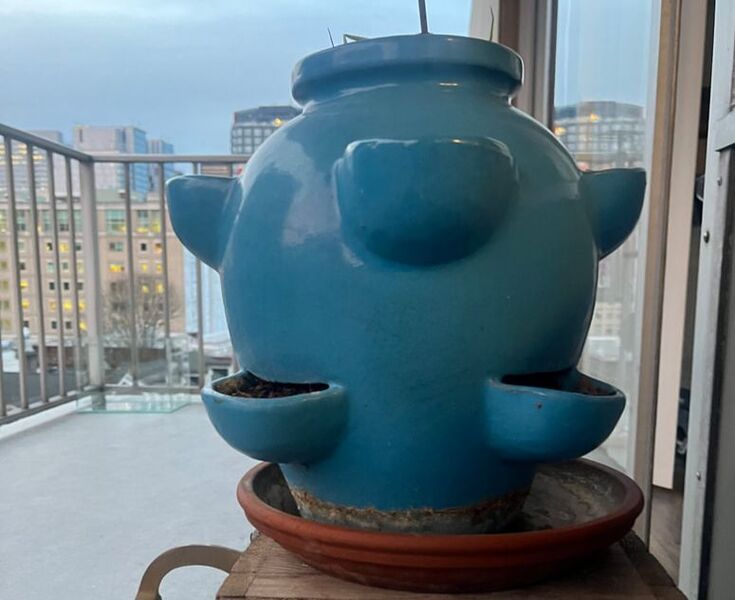 Glazed strawberry pots dry out more slowly (Kate Russell) What are strawberry pots? Also known as strawberry jars, these containers are usually upright, porous clay urns with cup-shaped pockets on the sides. You can also find strawberry pots made from plastic, resin, fiberglass, and cement. But I would avoid those last two for edible plants. Whatever material it’s made of, your strawberry pot must have a drainage hole. What grows in strawberry pots? Traditionally, strawberry pots are used to grow, well, strawberries. Each cup is given its own strawberry plant, and one goes in the opening on top. You can find countless online images of lush leafy growth and big red, juicy strawberries cascading from strawberry pots. The pots I have seen used for strawberries haven’t looked anything like that. Instead, they tended to be more spindly and less productive than the photos suggested. That may have just been the ones I saw, or it may have been the fact that strawberry roots, given the opportunity, can dig down as much as three feet. 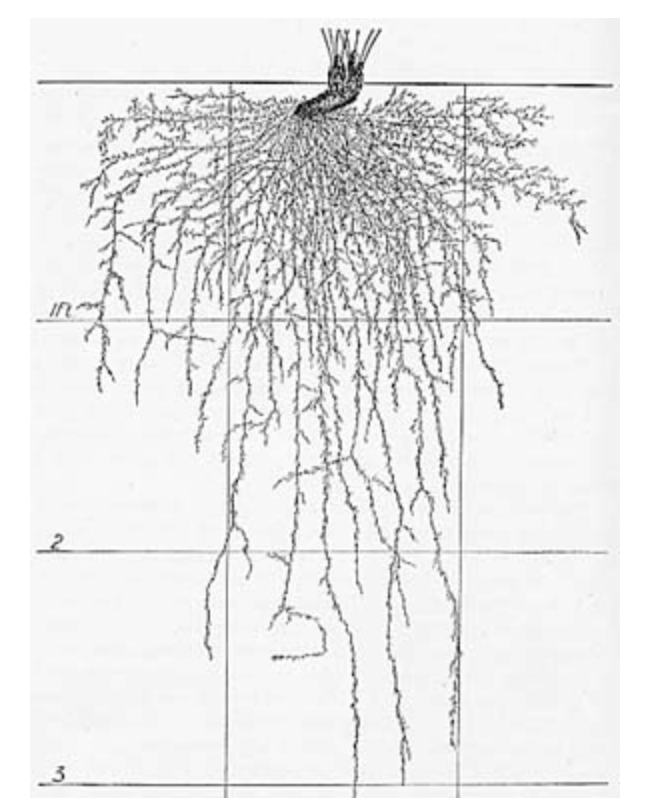 Underground parts of a 3-year-old Dunlap strawberry excavated in June after blossoming and fruiting. (“Root Development of Vegetable Crops, Weaver et al, 1927) Public Domain I have successfully grown basil, chives, cilantro, lettuces, oregano, parsley, saffron crocus, and summer savory in my strawberry pots, even though they aren’t very big. My pots are 14” high and 10” wide, and the other is only 10” high and 10” wide. If you want plants that look nice and require very little care for your strawberry pot, nothing beats succulents. They are colorful, durable, and can often survive winter temperatures with just a little protection, depending on where you live, of course. 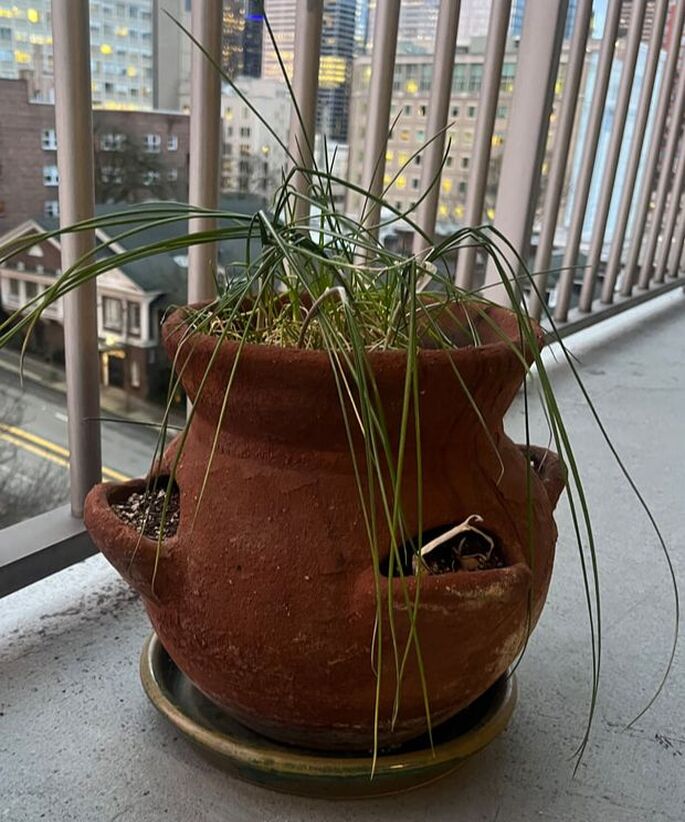 Strawberry pot with chives and saffron crocus (Kate Russell) Watering a strawberry pot
One of the downsides to strawberry pots is irrigation problems. Strawberry pots tend to dry out quickly. Also, their design makes it such that the plants at the top tend to get all the good water. The plants at the bottom often end up soggy, and the ones in the middle always seem to be on the verge of water stress. But I recently learned of an easy way to correct that problem, with a watering column. A watering column is a tube inserted down the middle of the pot. It has several holes in it, allowing water to disperse more evenly. To make your own watering column, get a piece of PVC pipe that is slightly shorter than your pot and drill a bunch of random ¼” holes in the pipe a couple of inches apart in it. After adding a few inches of potting mix to your pot, stand the pipe in the center. You might want to stuff a paper towel into the top of your watering column to keep the soil out while you continue adding soil. As you come to each side cup, add a plant of your choice and continue adding soil until the strawberry pot is full. Now, you can add water through the watering column. You may need to fill the watering column more than once, especially the first time, and all of the pot’s residents should get the water they need. What’s growing in your strawberry pot?
0 Comments
To grow optimally, most plants need plenty of room for roots to grow down, stalks to grow up, and stems to grow side-to-side. Being planted too close to a wall, fence, or other plants can reduce airflow and sun exposure and increase rubbing damage, insect spread, and disease transfer. Spacing plants properly is one of the easiest ways to ensure maximum growth and delicious harvests while reducing pest and disease problems. Too many plants growing too closely together makes it difficult for any of them to grow properly. It ranks right up there with seed planting depth when it comes to plant health. How much space does my plant need? How much space is needed depends on the type of plant. Pole bean seeds can be planted a hand’s distance apart and thrive as long as they have something to climb. If your cabbages are crammed too close together, you may never get decent heads. Seed packets are a great place to start for information on plant spacing, but there’s more to it than what meets the eye. What about the roots? It’s easy to see how big a mature plant is when you look at it, but what about the root system? How big is it? How much room does it need? How close can it be to its neighbors? You may already know that some root systems spread out while others have taproots that tend to go straight down, but the answers may surprise you. 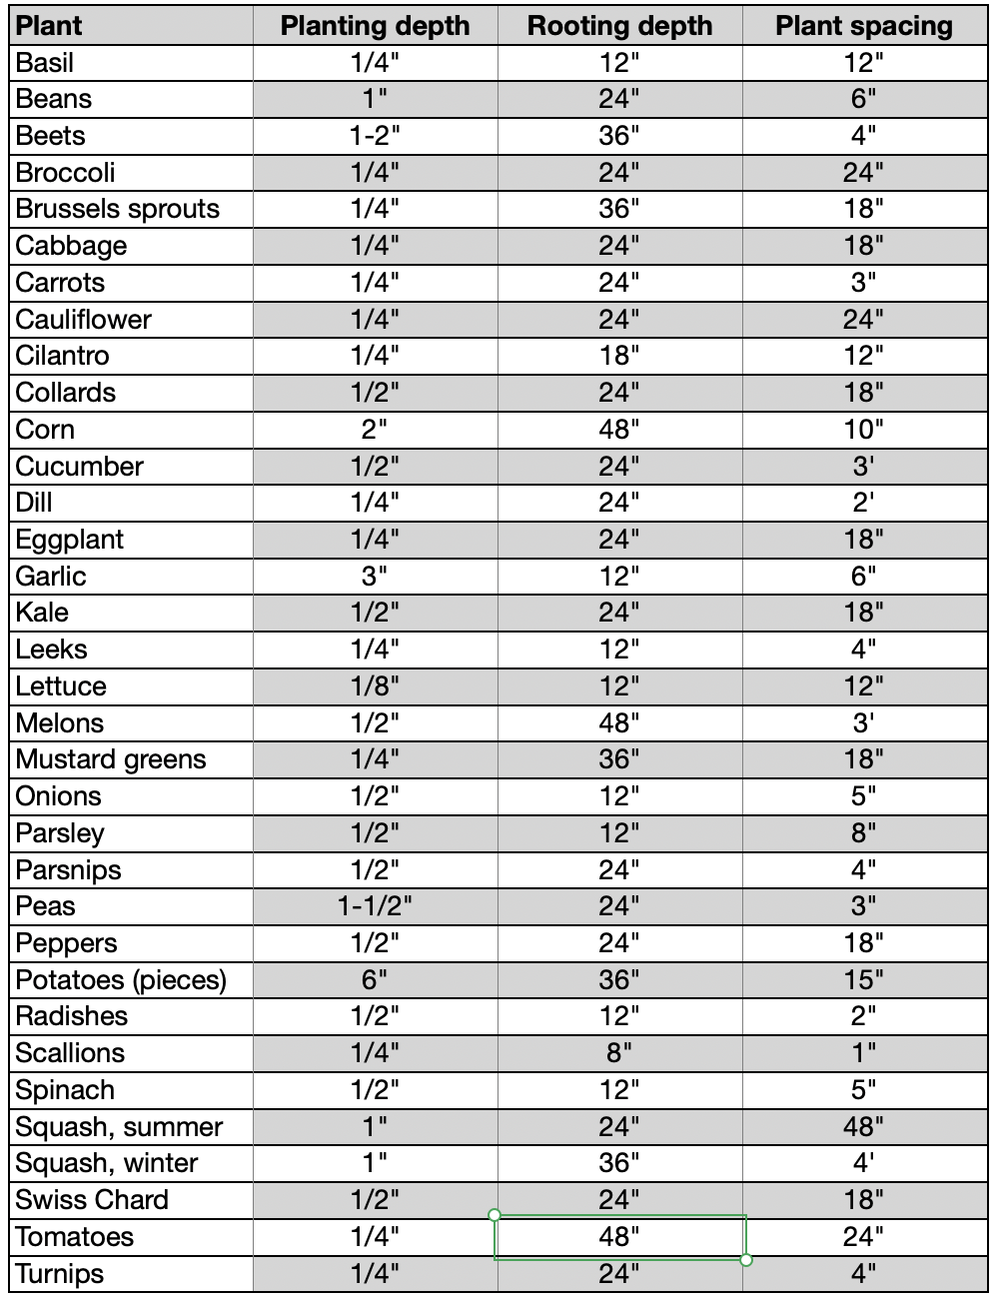 UPDATE: Thanks to information from Jim on pepper growing research, I have learned that peppers can actually be grown 10-12" apart, rather than the 18" listed above. Putting several shallow-rooted plants close to each other can reduce plant health and productivity. Mixing shallow-rooted plants with deeper-rooted plants makes the most of a space.
Intensive plantings have their place Intensive planting is also known as square foot, postage stamp, and biodynamic gardening. It refers to the following set of principles:
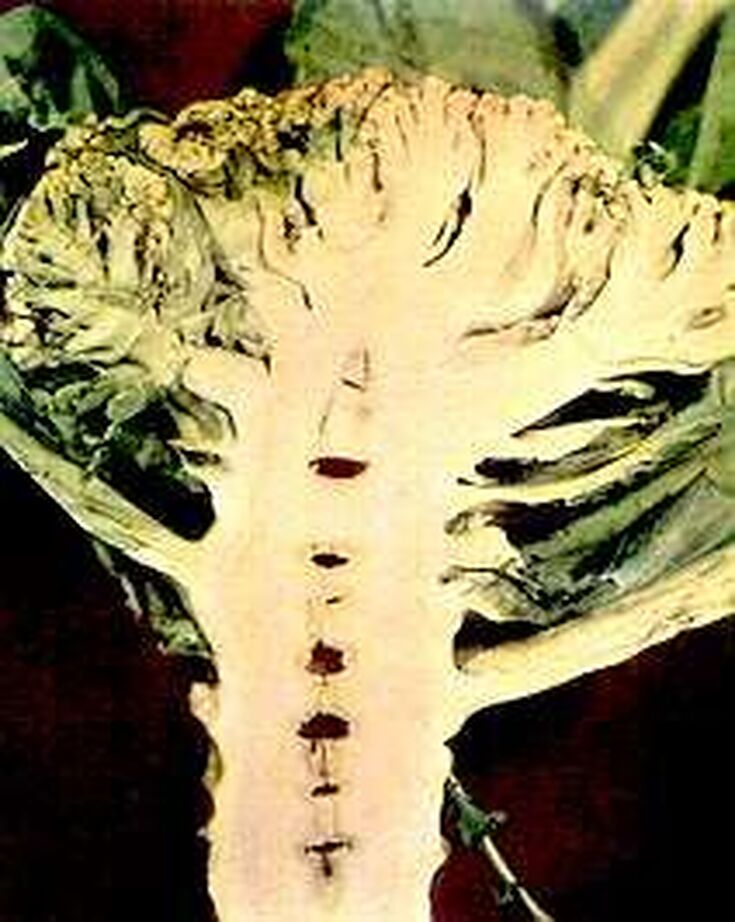
These guidelines are all good, and they do work. Problems occur when gardeners pick and choose which aspects of the intensive gardening program they actually use. In many cases, plants are installed too close together and gardeners still step on the beds. Intercropping Intercropping, the science-based version of companion planting, also puts plants closer together than is recommended on seed packets, but with good reason. Intercropping takes advantage of the benefits offered by different plants to make the most of garden space. The Three Sisters Method of growing corn, beans, and squash together is a good example of intercropping. Corn grows tall, pole beans climb the corn and provide nitrogen, and the broad, bristled leaves of squash plants shade the ground. You can replace the corn and squash with sunflowers and lettuces for similar results. You get the idea. Intercropping also puts trap crops, chemical warfare, and biodiversity to work for you, but that’s a different post. The art of thinning As seedlings grow, you may need to thin them out. Rather than pulling unwanted seedlings (or weeds) out, use scissors to snip them off at the soil level. This leaves the remaining plants with their roots undisturbed. It also protects the millions of beneficial soil microbes attached to the root systems. Those microbes will migrate to the remaining plants and help them grow. Bottom line, if you want to get the most from your garden, plant seeds at the proper depth and transplant them with mature sizes in mind. Spraing refers to brown lines that appear inside potatoes. Also known as corky ringspot disease (CRS), this condition interferes with potato storage. And, hey, it doesn’t look very appetizing either.  Brown marks from potato mop top disease (Owusu Domfeh) CC BY-SA 3.0 Those brown lines can be caused by one of two viral diseases: potato mop top or tobacco rattle. They can also be caused by irregular watering, mechanical injury, and calcium deficiencies. There are other causes of brown marks inside your potatoes, too. Potato mop top Potato mop top virus (PMTV) is spread by the powdery scab fungus (Spongospora subterranea). The two entities work together to support each other. This fungus can remain viable in the soil for up to 18 years, so proper drainage is critical. Leaves of infected plants have odd areas of bright yellow. 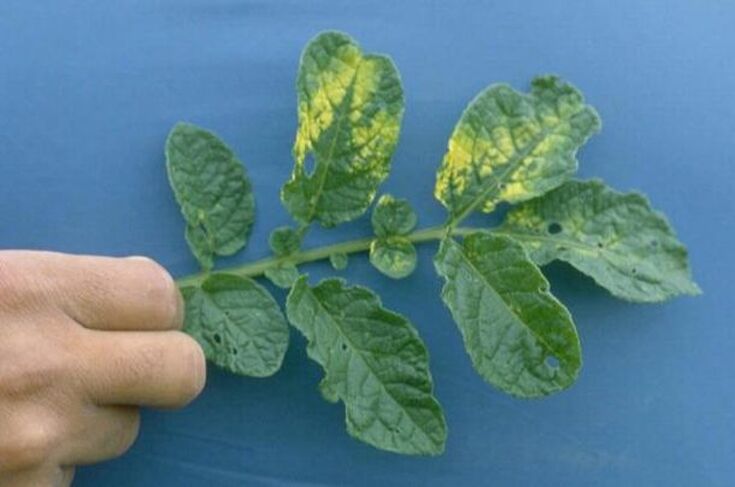 Potato leaves showing symptoms of potato mop top (William M. Brown Jr., Bugwood.org) CC BY 3.0 US Tobacco rattle Tobacco rattle virus (TRV) is spread by nematodes as they feed. Infected plants show no symptoms at first. Eventually, leaf mottling and distortion may be seen. Infected tubers exhibit necrotic arcs and lines both on the surface and inside. Leaves of plants infected with TRV may have localized yellow spots with green centers. Tobacco rattle is most common in sandy soils after it rains. This disease is best prevented by applying nematicides and planting resistant varieties. 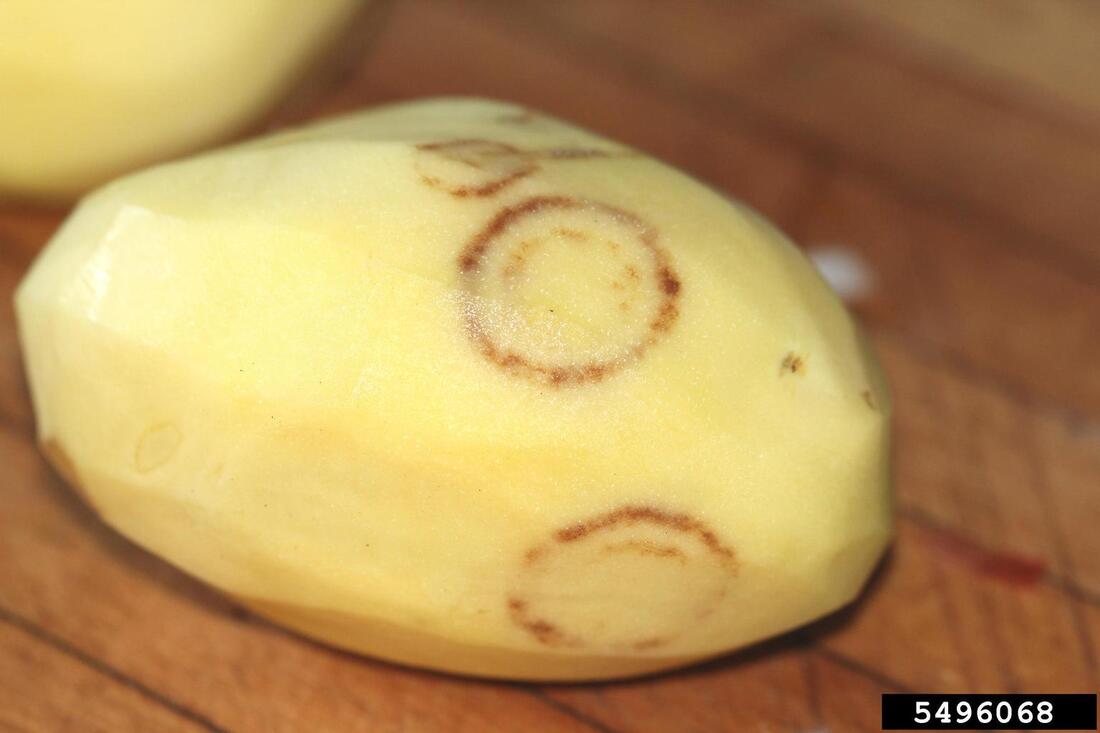 Potato infected with tobacco rattle (Whitney Cranshaw, Colorado State University, Bugwood.org) CC BY 3.0 US 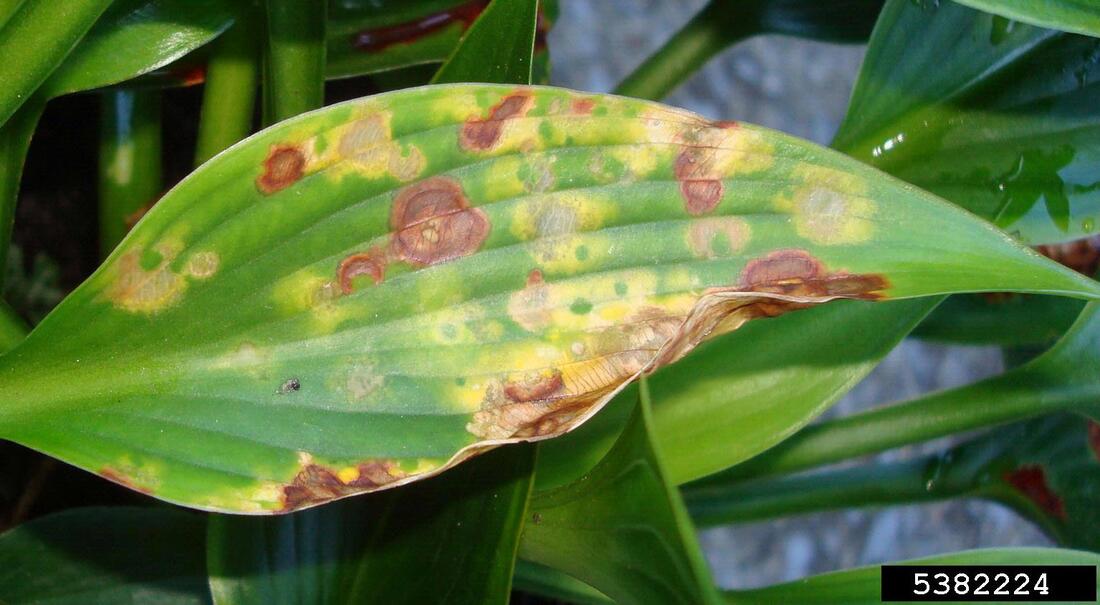 Hosta infected with both tomato spotted wilt and tobacco rattle (Alan Windham, University of Tennessee, Bugwood.org) CC BY 3.0 US Other causes of internal browning There are several other causes of browning on the inside of potatoes, but symptoms look a little different from spraing:
 Potato exhibiting necrotic ringspot (Chrisvis1) CC BY-SA 3.0  Calico symptoms on potato leaves (Howard F. Schwartz, CSU, Bugwood.org) CC BY 3.0 How to prevent spraing
Investing in certified pest- and disease-free seed potatoes is the best way to avoid those brown streaks. Since irregular watering can lead to several problems, including hollow heart, splitting, and spraing, water regularly. When a cauliflower plant fails to produce a head, the condition is called “blind” or “blind bud”. Everything else about the plant looks perfectly normal. There is simply no head.  Newly forming cauliflower head (artverau) Pixabay Since cauliflower plants take time, water, and real estate to grow, the lack of head production can be very disappointing. There are several causes of blindness in cauliflower, and many are preventable. How do cauliflower heads form? When a healthy cauliflower plant grows, it starts by producing significant numbers of large, broad leaves. In the center of all that lush growth is a nub of a bud. That bud (apical meristem) grows into the dense head of curd we know as cauliflower, except when it doesn’t. Bud blindness can result from bad seed, damage, or temperature extremes.
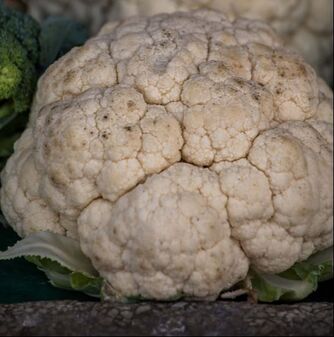
Damaged goods When animals, birds, diseases, insects, or human collisions damage the growing tip of a cauliflower plant, a head can fail to form. Common insect pests include aphids, flea beetles, leafhoppers, and slugs and snails. Animals and birds are often attracted to these tender buds. Once they have been chewed up (the buds, not the birds), it’s too late. Floating row covers can thwart some of these pests  Insect feeding can damage central cauliflower buds (Joievictor) CC BY-SA 4.0 Too hot (or cold) to handle Cauliflower heads form best when temperatures are in the 50°F to 60°F range. Temperature spikes in either direction beyond that range may damage the growing tip enough that heads cannot form properly. Providing shade or shelter, as needed, can protect those tender growing tips. You can also prevent blind bud by selecting varieties suitable to your USDA Hardiness Zone, starting plants at the proper time, and spacing plants with mature sizes in mind. 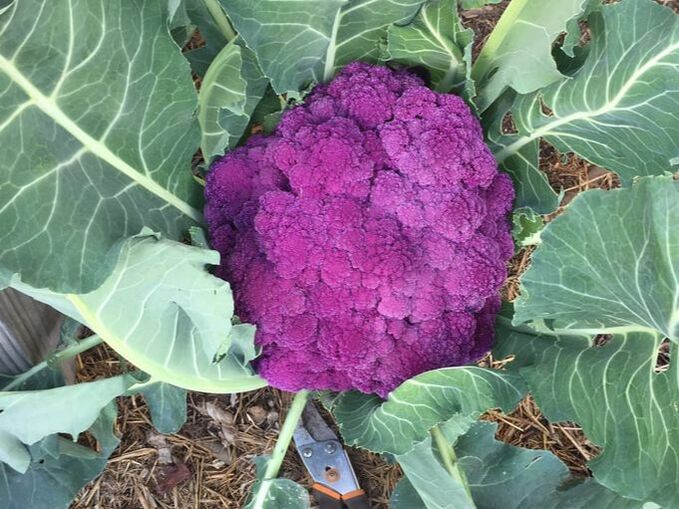 Sweet, delicious, homegrown purple cauliflower! (Kate Russell) There is simply nothing that compares with a homegrown cauliflower.
Browning is not something that takes place in a sauté pan. It is a symptom of boron deficiency in cauliflower characterized by hollow stems and curds that turn brown and bitter. 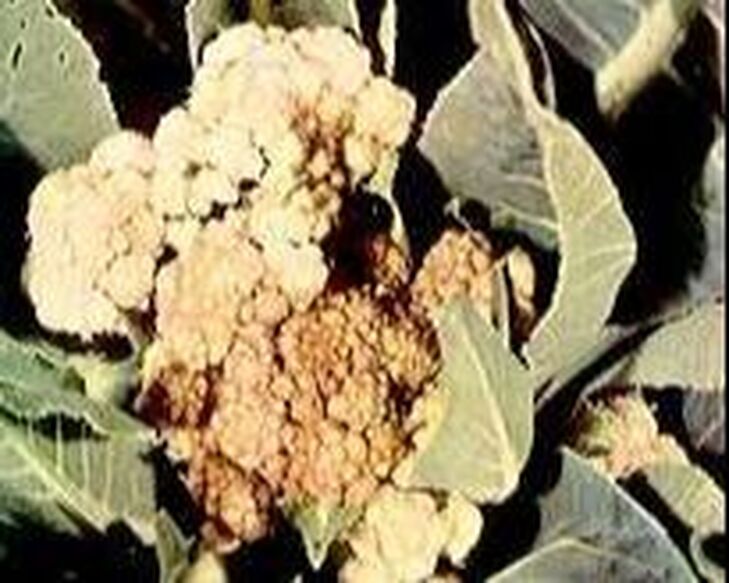 Cauliflower head browning (WikiGardener) Public Domain How do plants use boron?Plants need only the tiniest amount of each micronutrient, but they are critical to plant growth. Boron (B) is a micronutrient that helps maintain plant cell walls. It helps produce and transport sugars, seeds, pollen, and flowers. And it helps metabolize nitrogen. The optimal range for boron is 0.1-0.5 parts per million (ppm). An affordable lab-based soil test is the only way to know how much boron is in your soil. It’s the best investment you can make in your garden, next to mulching. Now back to browning.
Browning management Boron deficiencies are more common in areas with frequent rainfall and acidic soil. If a lab-based soil test indicates a boron deficiency, you can apply borax to your soil. How much your soil needs will depend on how much is already there. Too much can be just as bad as not enough. If you need help figuring it out, you can always contact me. Boron-deficient heads that otherwise look normal may be saved if they are protected from sun exposure. You can do this by simply pulling leaves up and around the curds and tying them in place with a string. If the deficiency is bad, the curd will still taste bitter. If you grow cauliflower, a soil test is a good investment. And if you happen to have better photos that I could use, please let me know. Thanks!
Whiptail is a disorder of broccoli and cauliflower. Growing cauliflower and broccoli takes time, space, and water. It can be frustrating to invest all that effort only to have the heads be inedible or nonexistent. Whiptail describes the way leaves of some plants become skinny. Heads may be small and ugly or not there at all. Luckily, whiptail is preventable.  Cauliflower leaves exhibiting whiptail next to healthy leaf (aaa) CC BY-SA 4.0 Whiptail symptoms Stunting and severe chlorosis of leaf edges (margins) in young plants is the first symptom of whiptail. Those leaves may ultimately turn white. As the condition worsens, leaf blades do not develop properly, even though the midrib grows as it usually would. This creates a thin, strap-like shape to the leaves. Leaves may also cup upwards. The outer leaves may look perfectly normal, while the rest look like they have lost their leafy minds. Instead of getting large, delicious heads, whiptail causes them to be smaller, malformed heads that taste less sweet. Or they may not grow at all. Whiptail symptoms are similar to manganese toxicity. Manganese toxicity appears as lightened leaves (interveinal chlorosis) with dark veins, leaf crinkling and puckering, dark spots on leaves, and stubby or absent buds. What causes whiptail? Whiptail is caused by molybdenum deficiencies in the soil. Molybdenum is a micronutrient used by specific enzymes. These enzymes have a laundry list of valuable jobs. Most importantly, they help make nitrogen and phosphorus available to plants. Legumes and the cabbage family use a lot of molybdenum, relatively speaking. When molybdenum is in short supply, those enzymes can’t do their jobs. Molybdenum deficiencies are common in acidic soils with a pH below 5.5. Managing whiptail Knowing what is in your soil is the first step toward preventing whiptail. The only way to really know is with an inexpensive lab-based soil test. Don’t be scared off by this. These tests cost about the same as a large bag of fertilizer, and the information they provide is invaluable. They will also tell you your soil’s pH. Once you know what’s in your soil, you can add any specific nutrients needed and work on getting rid of whatever may be present in excess. Regularly adding organic matter to your soil will help prevent whiptail by improving soil health and adding easily accessible nutrients. If needed, adjust your soil’s pH. If your soil is too acidic, apply lime to “sweeten” it. Ammonium molybdate is often recommended but can be highly toxic and cause chemical burns. Personally, I wouldn’t want it anywhere near my edible plants. That’s just me. 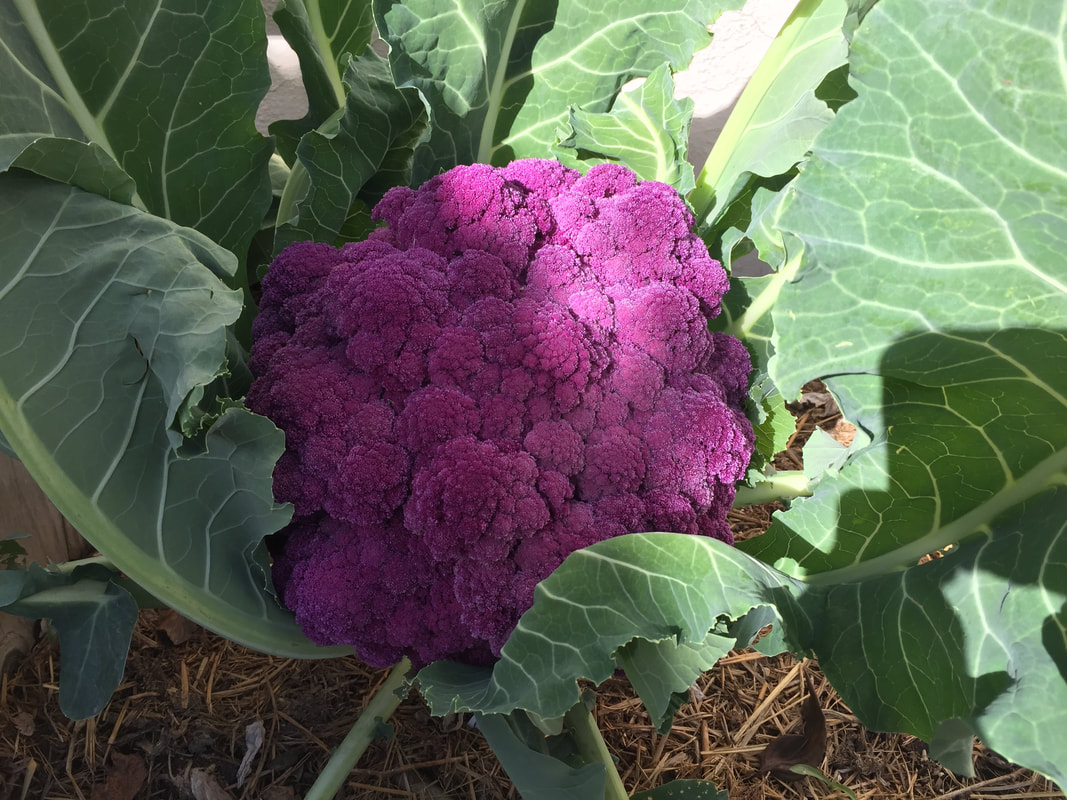 Healthy purple cauliflower (Kate Russell) If you see skinny leaves where they should be broad and abundant, take a closer look at what’s in your soil.
Silvering can be a symptom of disease, environmental stress, insect feeding, or mineral deficiencies, similar to bronzing.
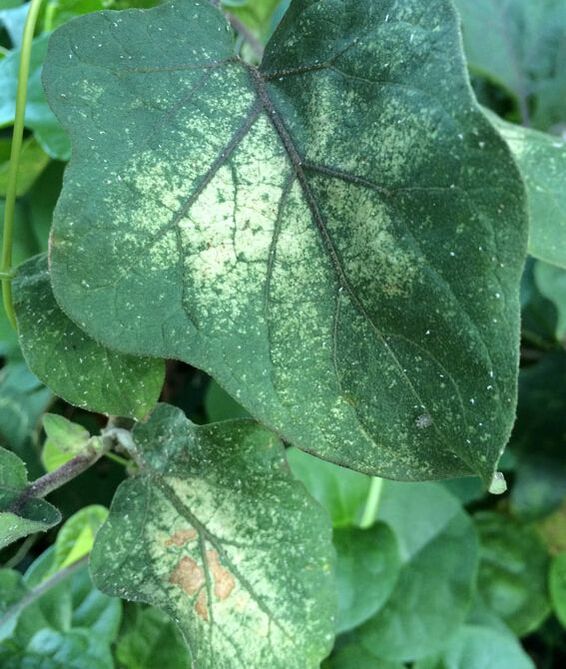
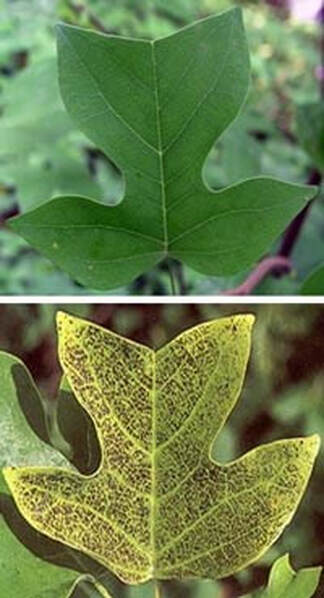
Silvering is not the same thing as chlorosis. Chlorosis refers to leaves becoming a paler green over time, usually due to insufficient nitrogen, eventually turning yellow. Chlorosis can ultimately lead to silvering, but silvering generally describes how some leaves become white rather than yellow. There are several causes for silvering. Diseases that cause silvering Silvering may occur in mosaics, a collection of viral diseases. Leaf silvering is also a symptom of, wait for it, silver leaf. Silver leaf is a fungal disease of apple, cherry, and pear. Fruit silvering refers to whitened areas under the skin of peppers or tomatoes. The Phytophthora oomycete causes fruit silvering, avocado root rot, buckeye rot, and potato blight. 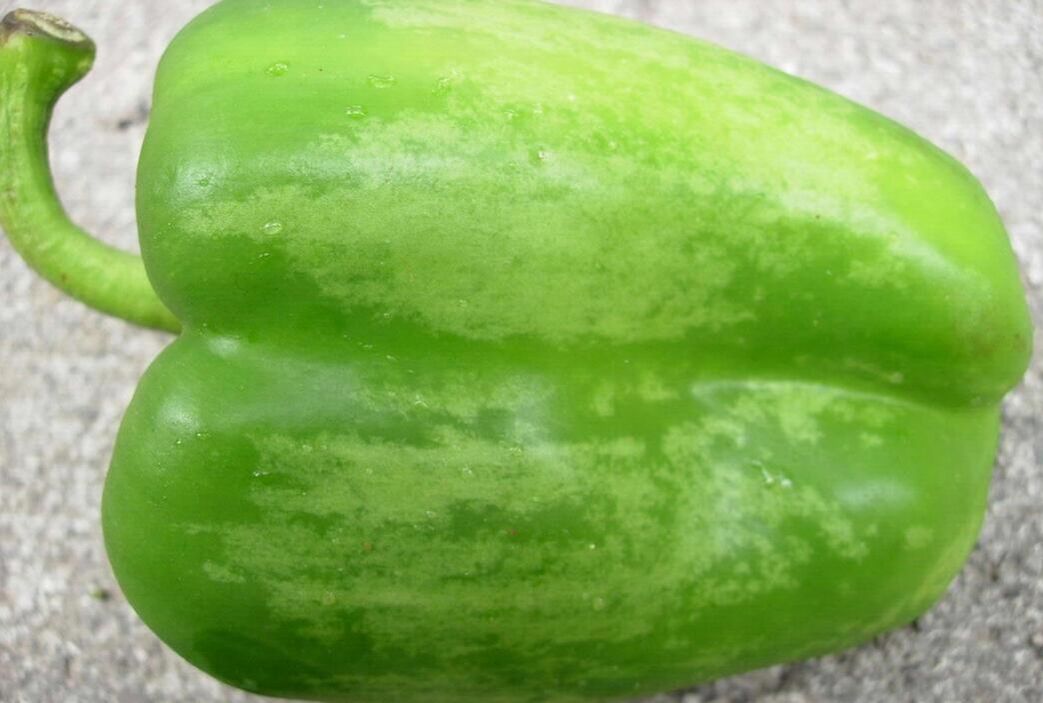 Fruit silvering of bell pepper (Elizabeth Bush, VPISU, Bugwood.org) CC BY 3.0 Environmental stresses that cause silvering Drought and temperature extremes can cause silvering. Chemical overspray and pollution can also cause leaves to turn silver, especially among tomatoes and peppers. Also known as chimera or head silvering, environmental stress can turn leaves grayish-green and small. You may also see blisters on the leaves and pale streaks on the stems. When this occurs, flowers are usually sterile. Any fruit that grows will have grayish-green streaking and be less flavorful. If you see white patches on fruit, it is probably sunscald. 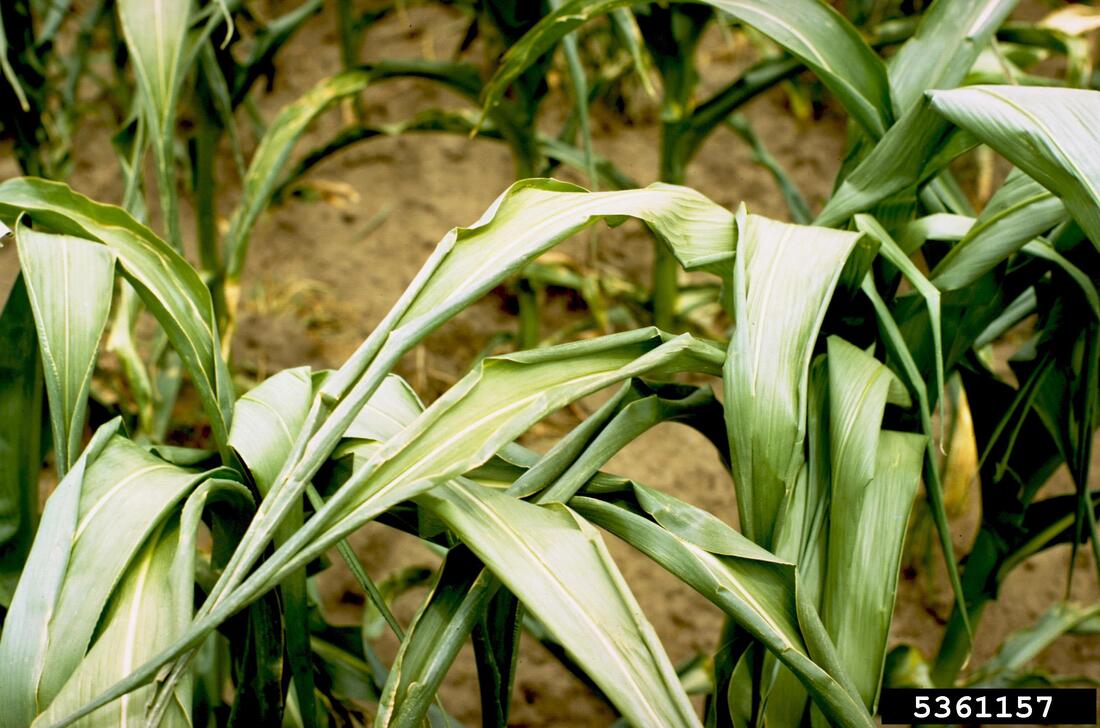 Drought damage to corn (R.L. Croissant, Bugwood.org) CC BY 3.0 Silvering due to insect feeding Sap-sucking insects can cause leaf silvering. The most common causes of leaf stippling or silvering include feeding by: 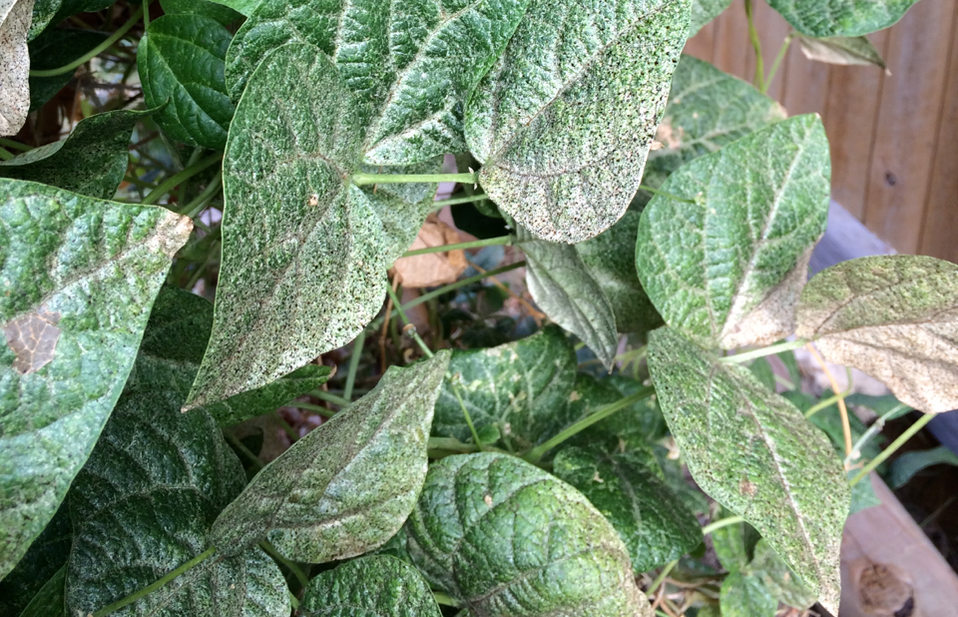 Thrips feeding damage to pole bean leaves (Scot Nelson) Public Domain Silvering due to nutrient deficiency Potassium deficiencies can cause leaf silvering. In this case, you will see upward leaf curling. Manganese deficiencies can cause leaf silvering, premature leaf drop, smaller-than-normal leaves and seeds, and weak roots and stems. An inexpensive lab-based soil test can help determine if this is the problem. 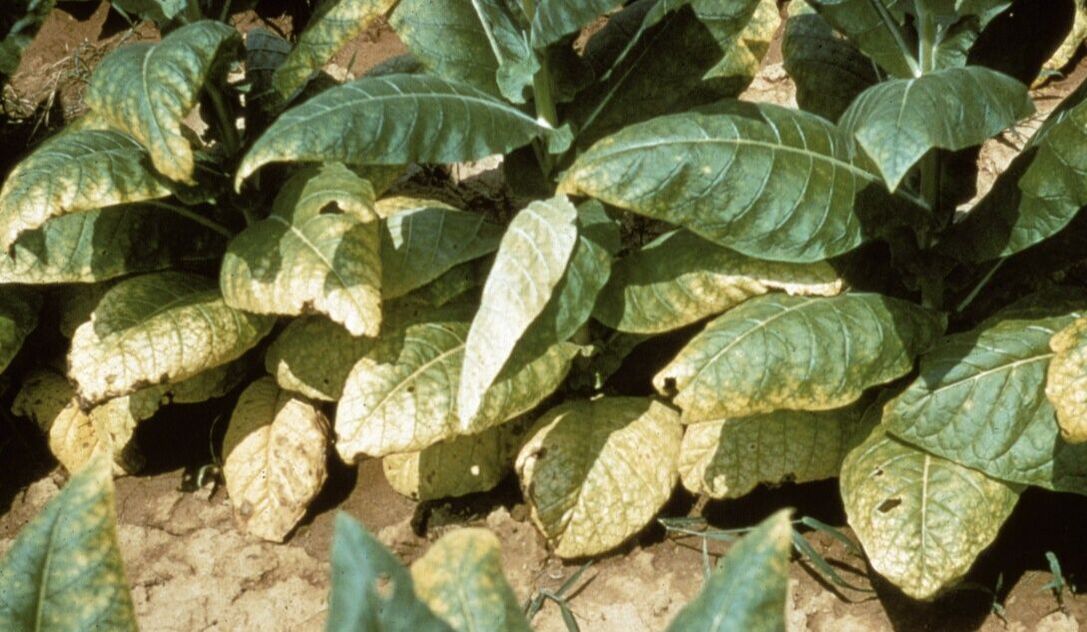 Potassium deficiency of tobacco (R.J. Reynolds Tobacco Company, Bugwood.org) CC BY 3.0 Silver plants Silver in the garden isn’t always a bad thing. Silver plants can add a nice color contrast to potted plants and landscapes. These plants usually prefer full sun. They often get their silver appearance from a coating of white trichomes that look like fur. Most white and silver plants are ornamentals, but there are some edible silver plants:
 Lamb's ears (David J. Stang) CC BY-SA 4.0 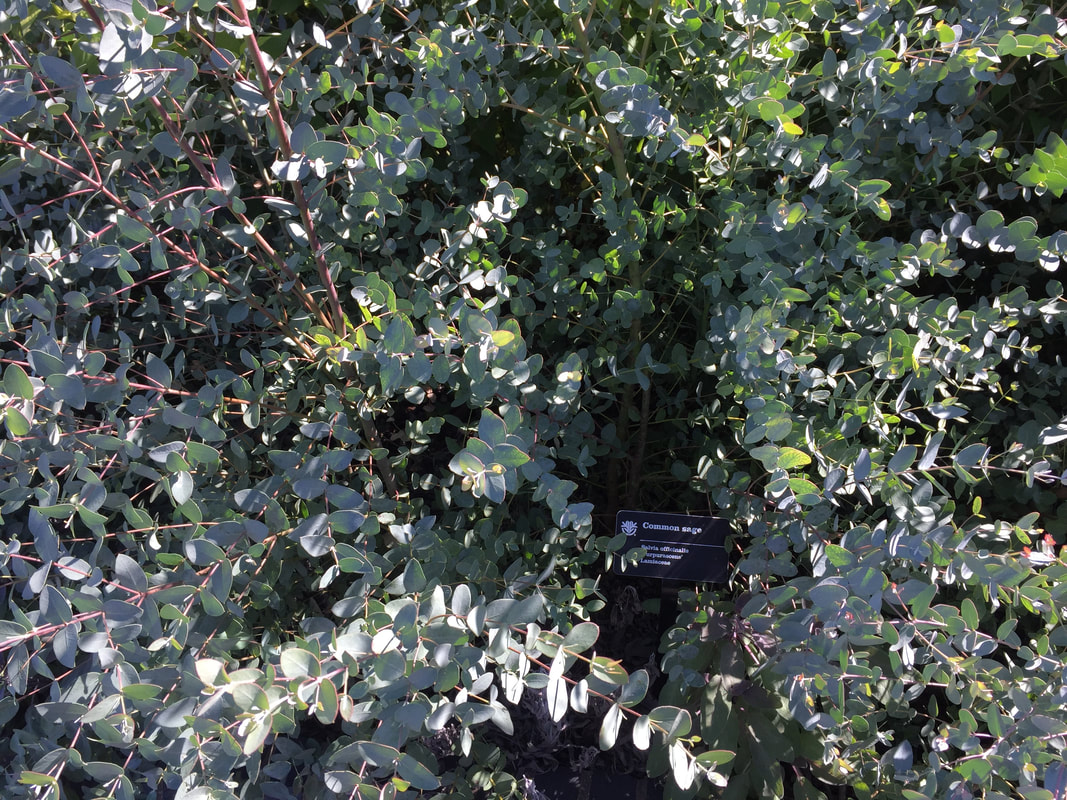 Common sage growing at the Missouri Botanical Garden (Kate Russell) Many of these plants make lovely additions to butterfly gardens and pollinator gardens. May all the silver in your garden be the good sort.
Radicchio is a type of leaf chicory (Cichorium intybus). Its white-veined red leaves make it a striking addition of flavor and complexity to salads and other dishes. You can always tame its bitterness by roasting or grilling.  Radicchio (moi-même) Public Domain A close cousin to Belgian endive and sugarloaf, radicchio is also known as Italian chicory. This cold weather plant is a popular ingredient in many Italian dishes, from risotto and strudel to soups and tapenades. It’s so popular, in fact, that each region of Italy has its own type of radicchio. Each varietal is protected legally, like Le Puy lentils, Bordeaux wine, and Champagne. The radicchio chicory we get in the U.S. is usually the Chioggia variety. Radicchio varieties Chioggia radicchio looks similar to red cabbage. It will store well in your refrigerator for weeks, though using it sooner is better than later. Treviso radicchio is more elongated with more white than red, and it looks similar to large endive.  Radicchio Treviso (Michel Chauvet) CC BY-SA 3.0 Tardivo is a curled-leaf version of Treviso coaxed into its unique shape through careful cutting, blanching, and regrowing methods similar to Belgian endive. Castelfranco radicchio has pale green leaves and red freckles. It is sweeter than other radicchios. Other varietals include Palla Rossa and Rossa di Verona. 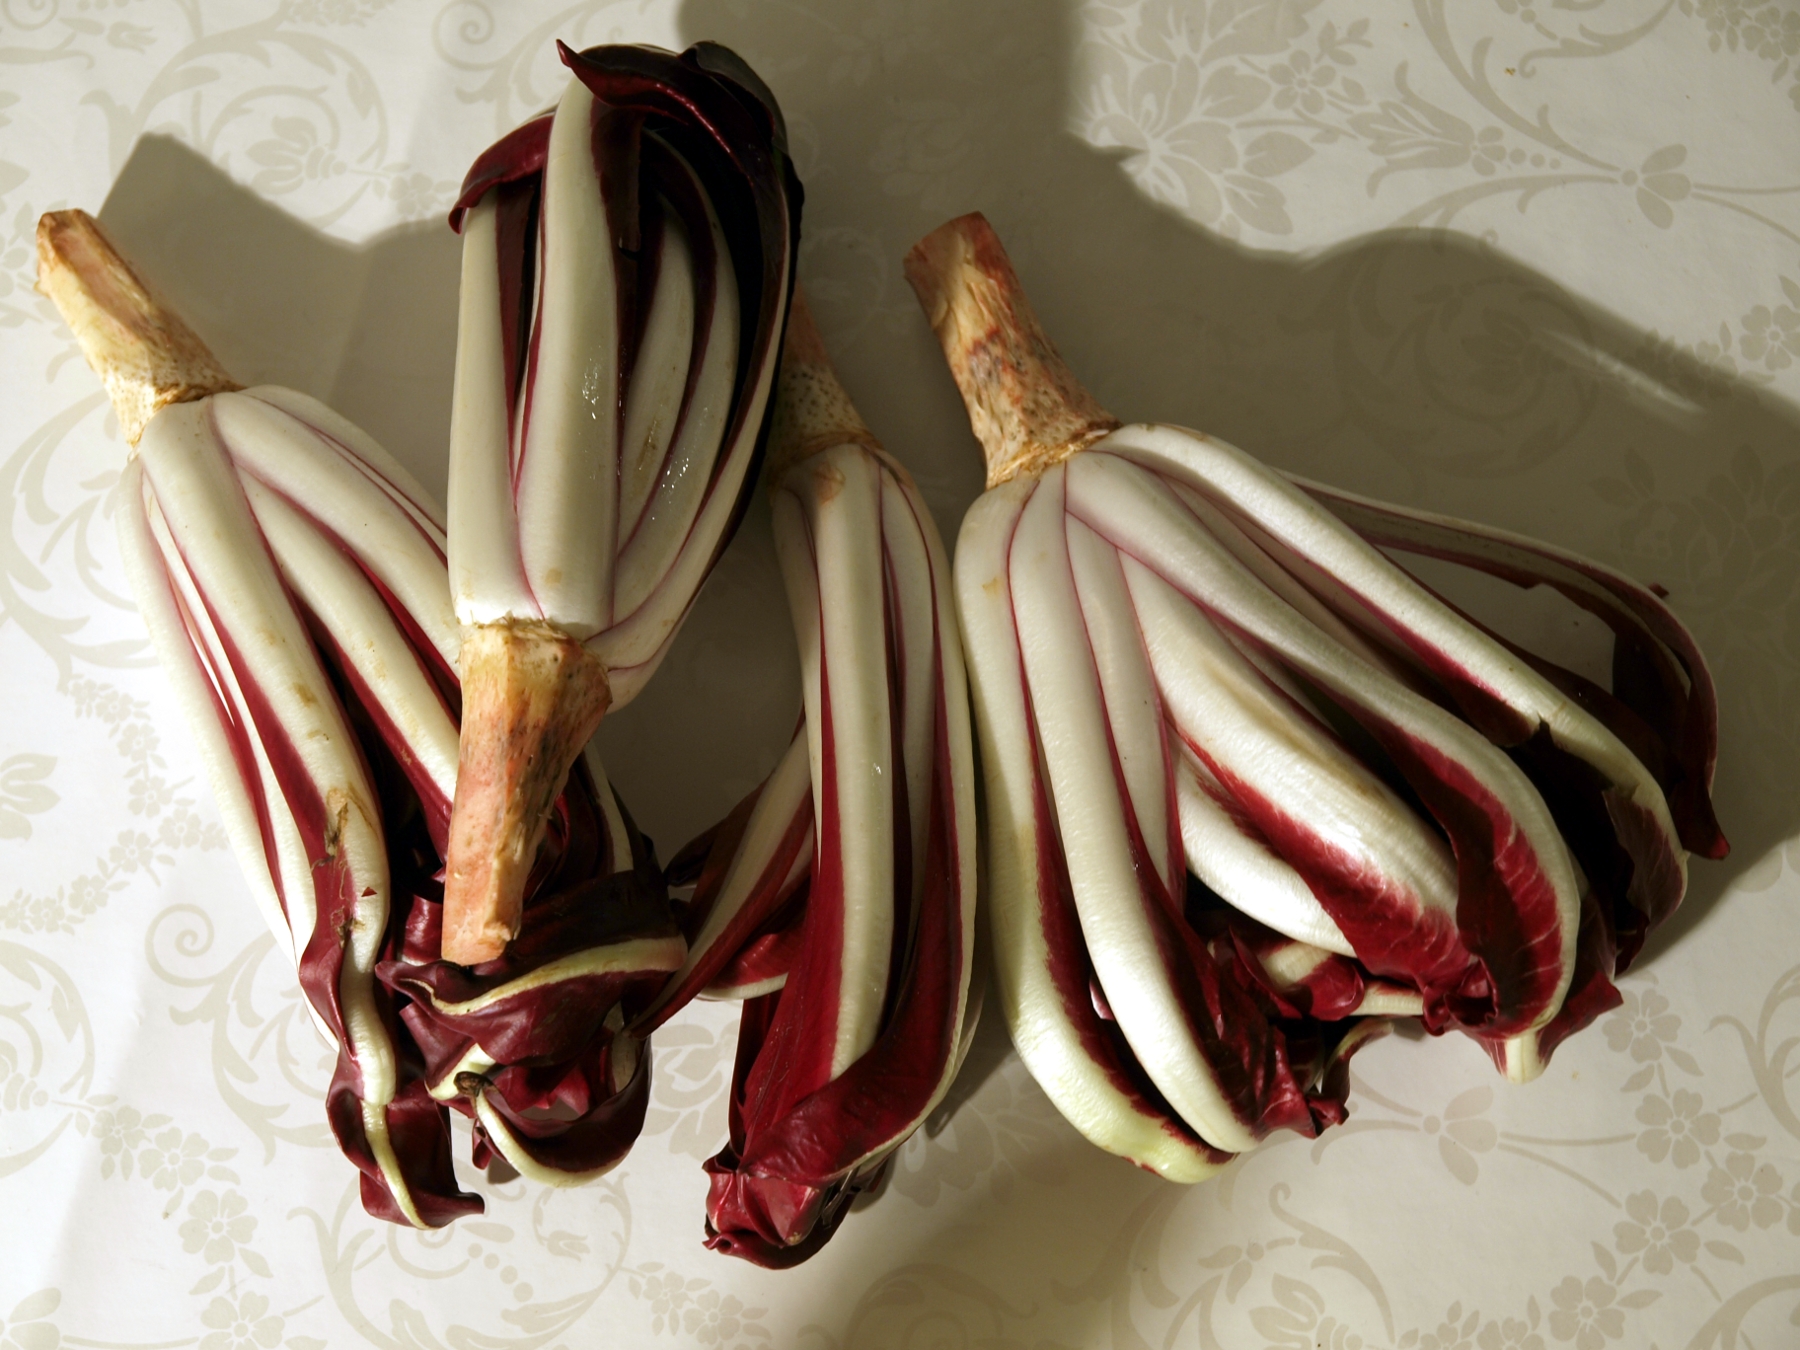 Tardivo radicchio (Marieke Kuijjer) CC BY-SA 2.0 How to grow radicchio Like other chicories, radicchio is a perennial plant. You can cut heads off the top indefinitely. The quality of the harvests is said to deteriorate over the years, so you may want to add new seeds every so often. You can also use succession planting for an ongoing harvest. Radicchio prefers loose, nutrient-rich soil with good drainage. Regular watering reduces bitterness. Radicchio can be grown in USDA Hardiness Zones 4-10, though it prefers zones 8 and above. Seeds should be planted ¼” deep and thinned to 12” apart. When you start your radicchio plants depends on where you live. In warmer climates, radicchio is a cool-season crop planted twice each year. Start one batch in January or February for an early summer crop. Plant again in July or August for an early winter crop. This gives the seeds time to get established before the weather turns too hot or cold. Chicory grown in areas with scorching summers tends to bolt, making the leaves taste more bitter. These plants can tolerate temperatures in the low 20s (°F). Light frost makes them sweeter. You can protect them from lower temperatures with row covers, cold frames, and hoophouses.  Chioggia radicchios (Goldlocki) CC BY-SA 3.0 Radicchio pests and diseases
Very few problems will occur for your radicchios, as long as they are well-fed and watered. All members of the chicory family are susceptible to the following: anthracnose, bacterial soft rot, bottom rot, damping-off disease, downy mildews, fusarium wilt, septoria blight, and white mold. Aphids, cabbage loopers, darkling beetles, flea beetles, leaf miners, thrips, and slugs and snails may feed on your radicchio plants. You’ll want to avoid overhead watering, as the leaves are prone to rotting. And brassica collars can thwart some of those pests. Toxic tales Ancient folklore warned that eating too much radicchio would lead to dimming vision. Science has not found cause for those claims. Eating radicchio and other chicories will help combat intestinal worms, however. If you are a farm animal, that is. Now you know. Winter squash isn’t something you grow in winter. Instead, the terms winter squash and summer squash refer to when these crops are eaten, not when they are grown. Thin-skinned summer squashes, such as zucchini and yellow crookneck, are best eaten fresh, while immature. Sturdy, thick-skinned winter squashes can be stored for several months. Their hard, protective rinds are generally removed before eating and their seeds are delicious when roasted with a little oil and salt. Acorn, butternut, Hubbard, and turban squashes are all winter varieties. So are pumpkins. 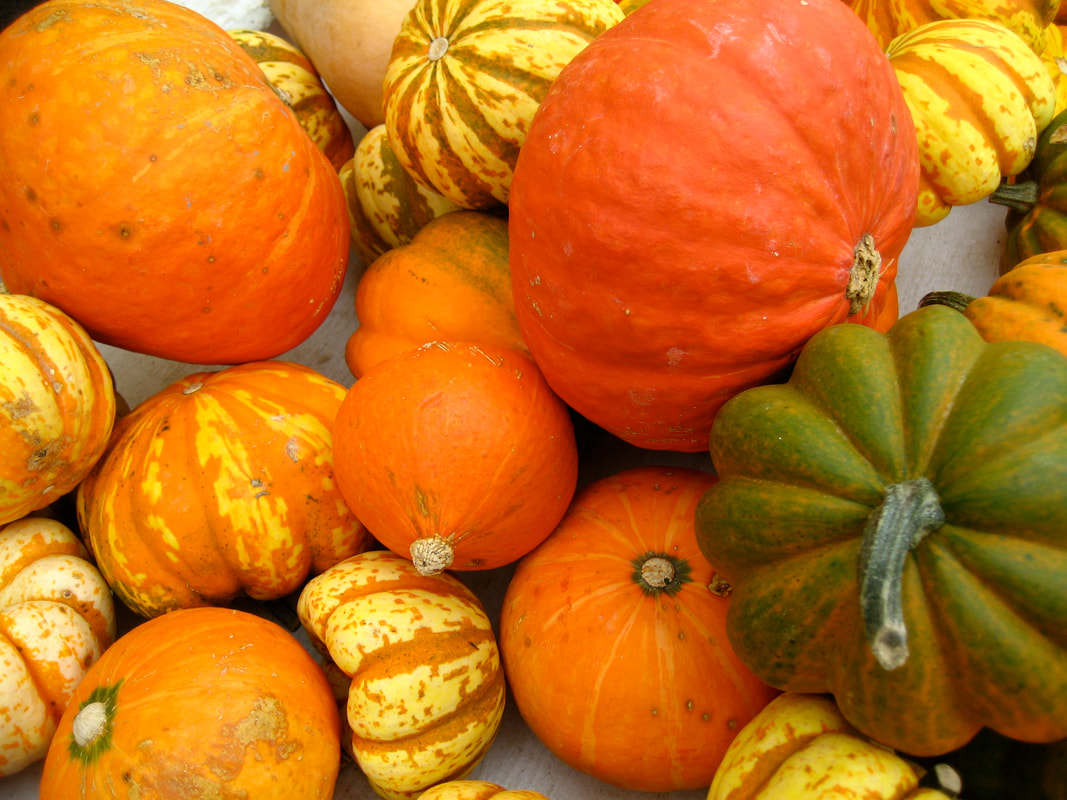 Winter squash (Rudi Riet) CC BY-SA 2.0 Did you know that most canned pumpkin puree is actually squash? Pumpkins and other winter squash share enough characteristics as to be indistinguishable according to the FDA. Huh. How about that? No matter. Growing pumpkins and other winter squash can be very rewarding and easier than you may think. How to grow winter squash Winter squash grows best in full sun, but it seems to perform just as well in partial shade in areas with especially hot summers. (I have successfully grown butternuts under a nectarine tree and they both seemed happy about it.) After temperatures have reached a steady 70°F, winter squash seeds are planted in hills. Each hill gets 4-5 seeds. If you have room for multiple hills, they should be spaced 4'-8' apart, depending on the type of squash being grown. After your seedlings are 2"-3" tall, select the best two or three for each hill and snip the rejects off at soil level. If you are growing winter squash in rows, seeds should be planted 6"-12" apart in rows that are 6'-10' apart, thinning seedlings to one plant every 18"-36". These plants can take up a lot of space, given the opportunity. You can also redirect them along walkways, lawns, or fences. Depending on the size of the fruit, you may need to provide hammocks as support. 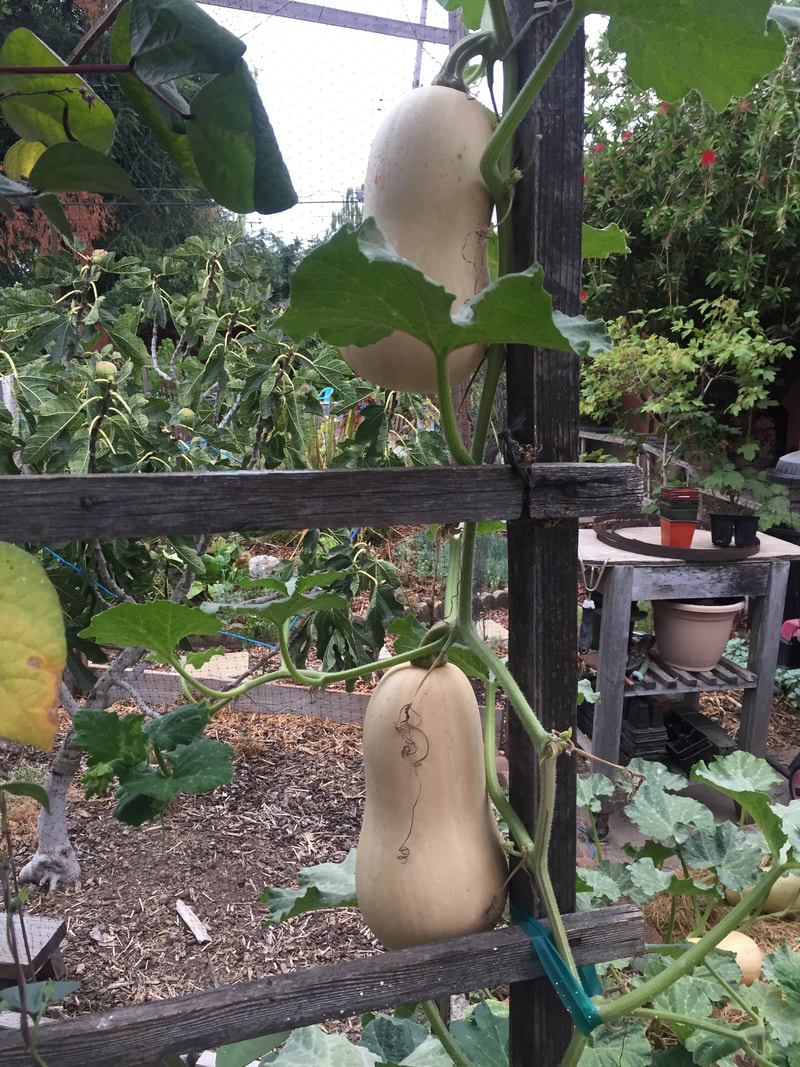 Butternut squash trained up a trellis (Kate Russell) It takes a lot of water to make a winter squash. During fruit set, each plant should receive approximately 1" of water per week. (One inch of water is equal to 0.623 gallons per square foot.) Since most winter squashes are shallow-rooted, it is not a good idea to disturb the soil. Butternut squashes are something of an exception, with deeper root systems that help them through scorching summers and drought. Keep your squash watered and mulched and you are sure to get an abundant crop. Winter squash problems Winter squashes are members of the melon family. Also known as cucurbits, all members of the melon family are susceptible to several diseases and disorders:
Many of these problems can be prevented by avoiding overhead watering and managing disease-carrying aphids. 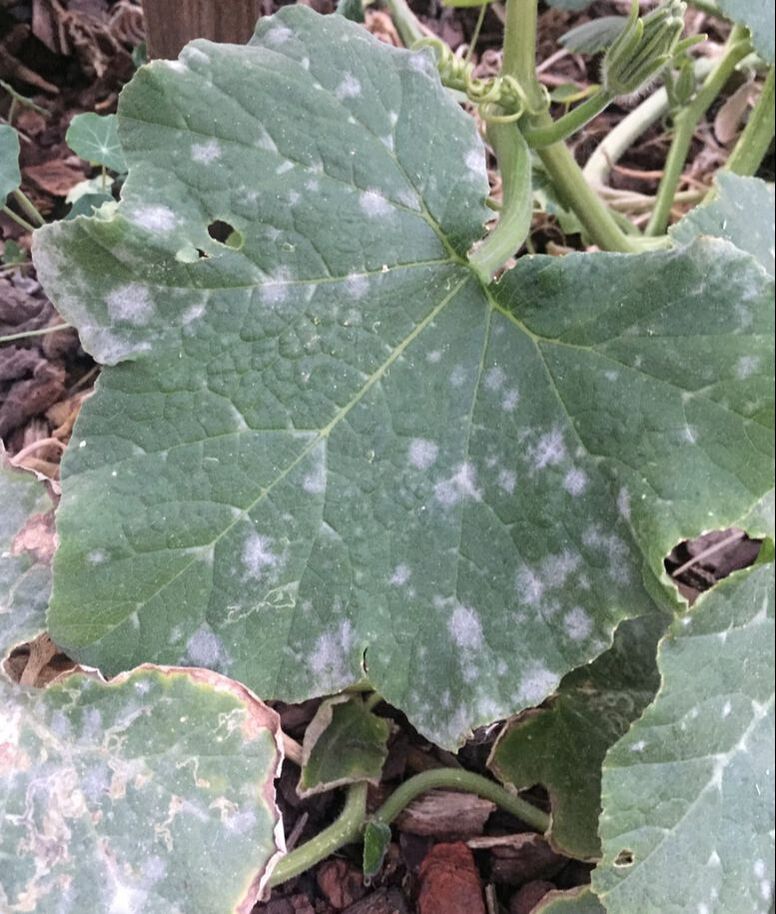 Powdery mildew on butternut squash leaves (Kate Russell) Along with aphids, the following pests may appear in your winter squash patch:
Winter squash plants need to be watered regularly to prevent blossom end rot, bitter fruit, and blossom drop. If all that weren’t enough, molybdenum deficiencies can cause a condition known as yellows. Yellows eliminates squash fruit set and generally kills the plant. Sporadic watering and insufficient calcium can also cause blossom end rot. Soil tests from a reputable lab are the best way to learn what’s in your soil. You might think, with all these threats to your winter squash crop, you might not get anything for all of your efforts. The truth is, winter squash plants are very productive, much like their summery cousin the zucchini plant. Despite all those potential problems, you will probably end up with plenty of winter squashes to share with friends and neighbors. 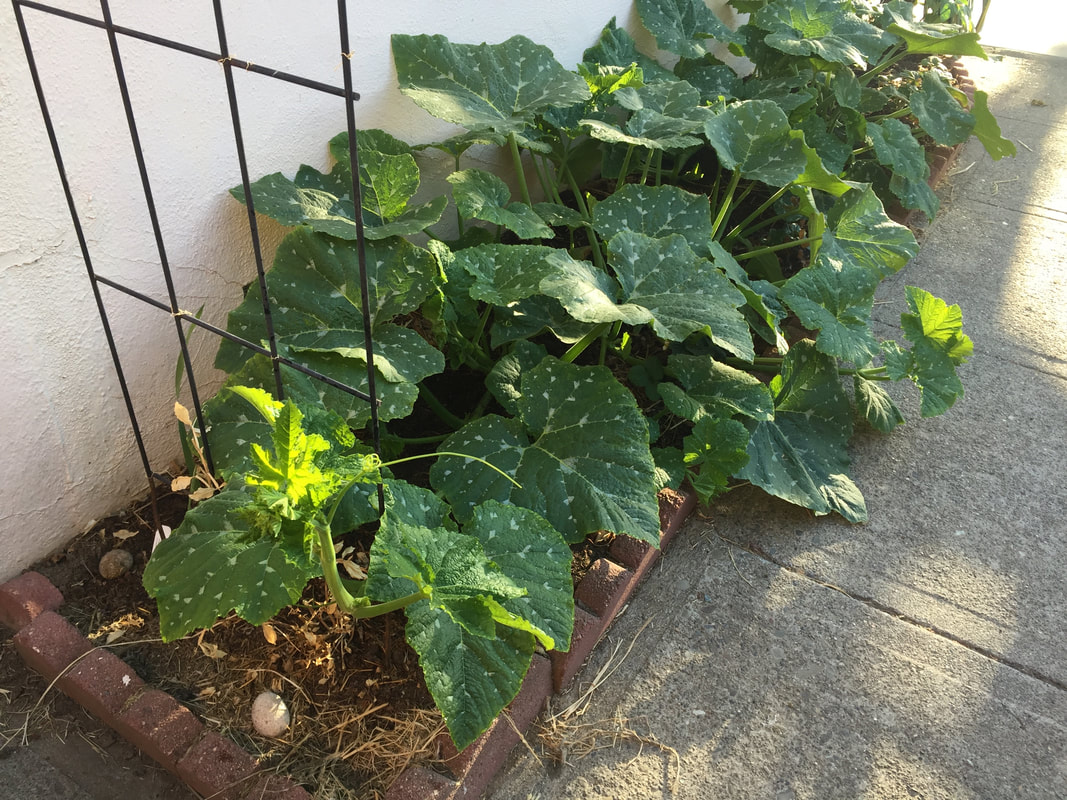 Fortuna white pumpkin plants (Kate Russell) 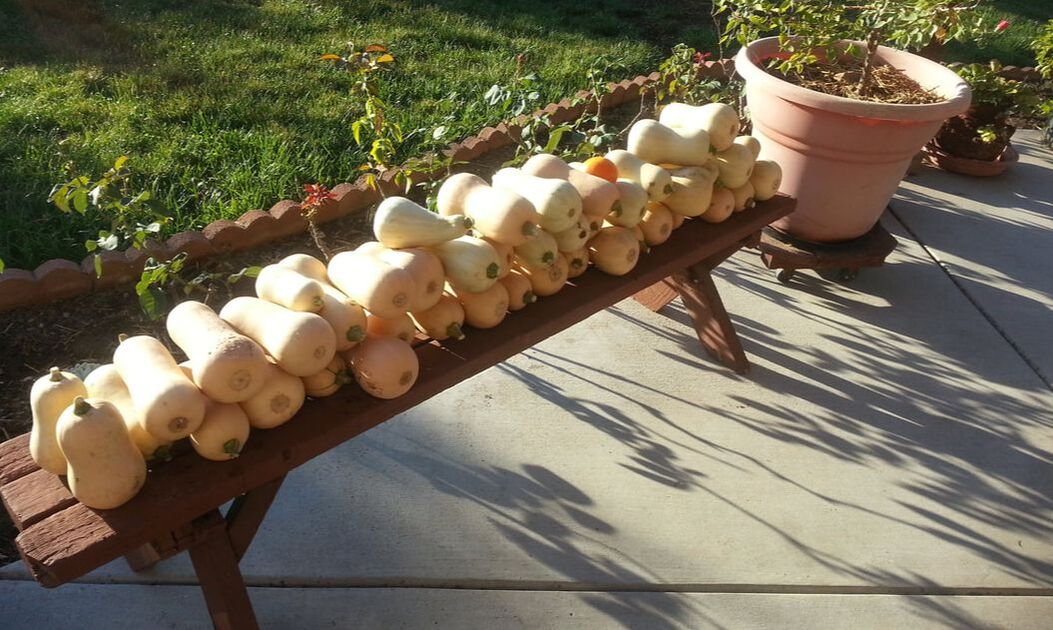 Butternut squash harvest from two plants (Kate Russell) Harvesting winter squash Winter squash are ready to harvest when the rind is firm and the stem is shriveled. You can leave them to cure on the vine or cut them off and store them in a cool, dry location with good airflow. Garages work nicely. After your winter squash has cured, it will remain edible for several months.
Most of us think of tidy, green walls when someone mentions hedges, but there’s a lot more to them than that.  Hedges add structure to a front yard (Kate Russell) What are hedges? Generally speaking, hedges are shrubs or trees grown very closely together. People started planting hedges some 6,000 years ago. Before long, they began weaving dead twigs and branches into hedges to create impenetrable barriers that kept livestock in and predators out. This practice is called pleaching. Some of the hedgerows in Ireland and the United Kingdom are more than 700 years old. I’m sorry to say, but hedges will not keep deer out of your garden.  Sometimes a hedge can protect your home from a drunk driver (Kate Russell) Hedges can be massive, unruly walls of living plants, neatly trimmed parterre perimeters, or anything in between. Hedgerows muffle sounds, prevent erosion, and reduce flooding. They can be ornamental or edible and shaped to your heart’s delight. This topiary is a popular attraction at many public gardens and amusement parks.  Topiary in India's Thiruvananthapuram Botanical Garden (Vijayanrajapuram) CC BY-SA 4.0 Hedges harbor hundreds of other living things Hedges may look static, but there’s a lot going on inside. According to one journal, a single hedge can host more than 2,000 different plant and animal species in a single year. Another study found that Belgium’s hedges held a greater variety of species than their forests. This biodiversity occurs because hedges create their own microclimates. Hedges block and redirect wind. They shade and keep the soil moist. That moisture provides for a variety of insects and fungi. Those, in turn, attract parasites, pollinators, predators, and prey. Birds are also attracted to hedges. Those birds often eat insect pests. One Berkley study found that farmers saved $4,000 a year in insecticide costs for every 1,000 feet of hedgerow installed. Imagine saving $400 a year because of a 100-foot hedge.  Birds often nest in hedges so be careful when pruning (tommileew) Pixabay Hedges provide food and shelter. They act as migratory corridors in a day and age when safe havens can be difficult to come by. Did you know that bats and moths use hedgerows as flight paths? I didn’t either. Some of the insects attracted to hedges, including braconid wasps, honey bees, ichneumon wasps, and predatory beetles, are beneficial. Others, such as brown stink bugs and thrips, are pests. Hedges can also create the perfect conditions for diseases, such as sooty blotch and flyspeck. Hedge maintenance Hedges require regular pruning to stay attractive. In most cases, that pruning is done by shearing. Shearing cuts everything into uniform lines. This practice can lead to dead zones inside your hedge that occasionally need to be removed. This can give your hedge a pockmarked appearance. You can prevent this problem by investing some time in hand-pruning your hedge from the inside out.  Massive hedge at Mission San Juan Capistrano in California (Billy Hathorn) CC BY-SA 3.0 Hedges also benefit from an occasional hosing-off. This cuts down on the amount of dust and debris that collect on all those leaves. A dusty hedge is an open invitation to wooly aphids, mealybugs, mites, and whiteflies.
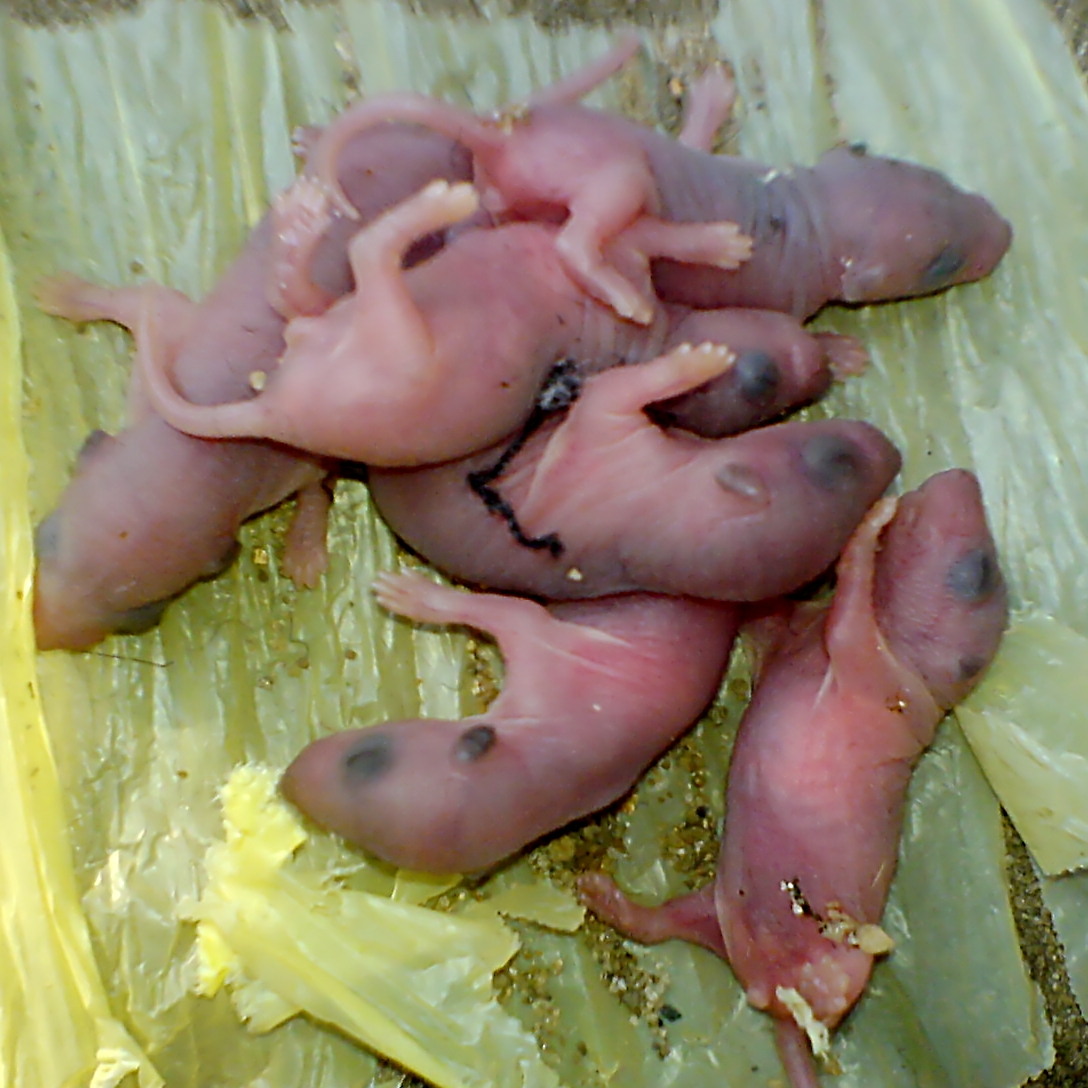
Choosing hedge plants Hedges can consist of a single plant species or many different species. Boxwood and privet are common hedge plants. They stay green year-round and respond relatively well to shearing. You can choose native plants for your hedge. Or, you can create a shorter, insectary hedgelike border with yarrow or sweet alyssum. Edible hedges are a little trickier. You can create a blueberry hedge, just be sure to select a variety that is evergreen. Raspberry and blackberry hedges are delicious, but you’ll have bare canes in winter. Rosemary makes a beautiful, fragrant edible hedge, though you’ll end up with more rosemary than you could use in fifteen lifetimes. The same is true for lavender, tarragon, and thyme. You can also create a hedge using espaliered fruit or nut trees. Citrus, hazelnuts, pineapple guava, and pomegranate are just a few of the edibles that lend themselves well to hedge-making. Hedges are important components of copycat gardens, fruit cocktail gardens, rain gardens, sensory gardens, soundscapes, and storybook gardens. Whatever your garden theme, it can probably benefit from a hedge. My apartment balcony is another story altogether. To some, mice are tiny, adorable creatures. To the rest of us, they are destructive, disease-carrying pests. 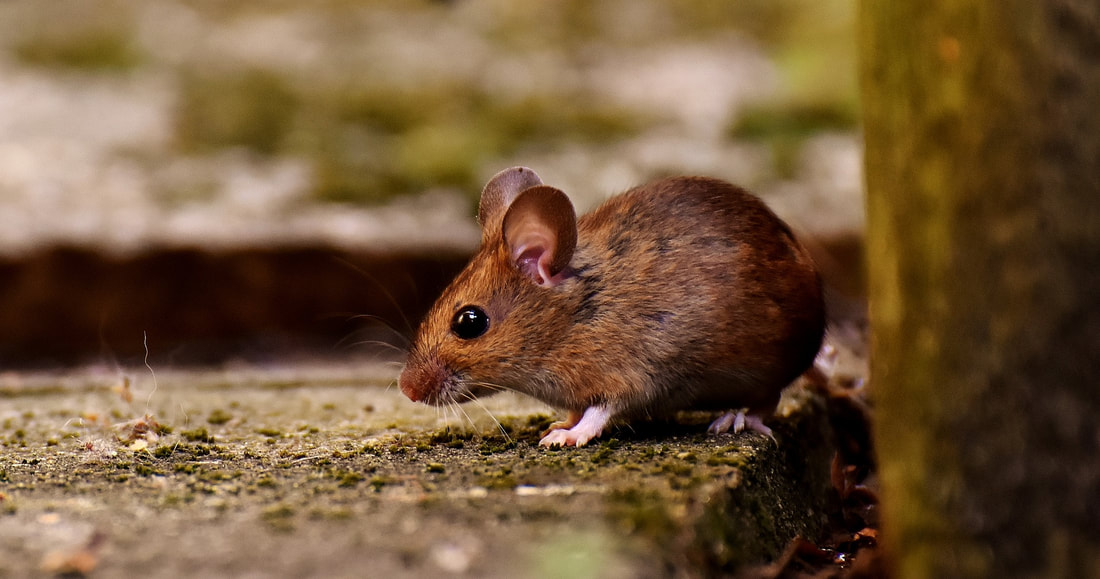 Mouse (Alexas_Fotos) Pixabay Mice are members of the Mus genus unless they happen to be deer or field mice (Peromyscus). There are several types of Mus mice, the most common being the house mouse. There are also white lab mice and mice sold as pets. Mice have followed us throughout history. We provide easy food sources and shelter, often against our will. Mice are intelligent, curious creatures. Mouse description Most of us recognize a mouse when we see one. Its pointed snout, cute little rounded ears, and naked tail are clear giveaways. Or are they? It ends up that the words mouse and rat are not taxonomically specific. In this case, size really does matter. In Ancient Roman times, rats and mice were differentiated by size, calling them mus maximus and mus minimus, respectively. Descended from an ancestor shared with lagomorphs (rabbits), these species went their separate ways several million years ago. All of them are highly prolific gnawers. Gnawers have some amazing teeth. The reason these animals keep gnawing on things is that their teeth grow continuously. In the photo below, you can see a single lower incisor tooth below the rabbit jaw from which it came. The tooth fits neatly into a tube in the jawbone, and it is always moving outward. 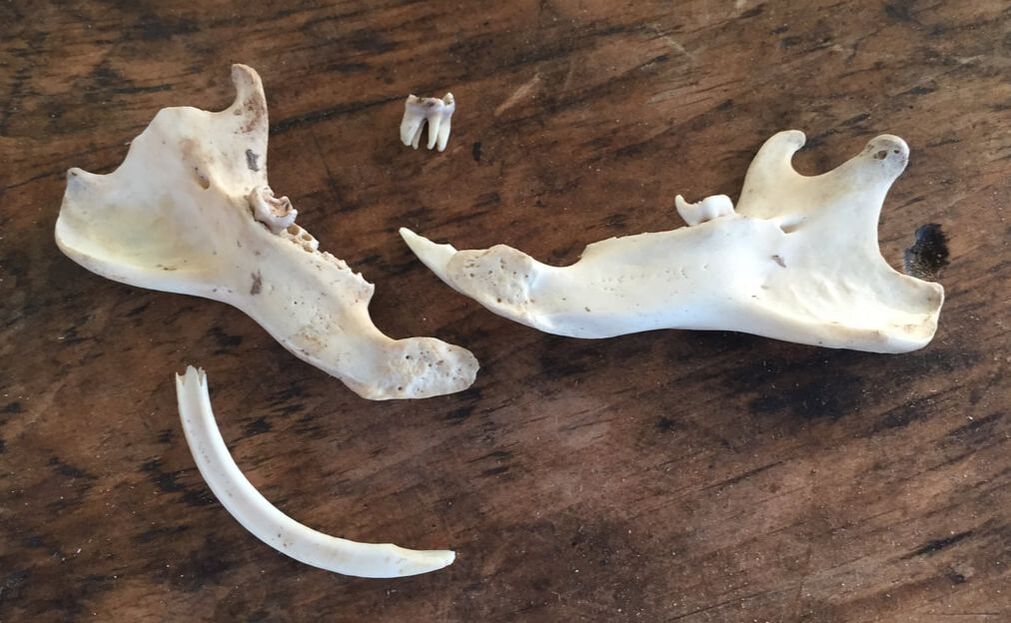 Rabbit jaw with one incisor removed (Kate Russell) Mouse or rat? One of the easiest ways to tell if you have a mouse or a rat today is to look at its nipples. Rats have six pairs of nipples. House mice have five. But who’s counting? Other differences include the larger ears and thinner tails of mice. Mice and rats are both excellent climbers and swimmers, but mice can jump surprisingly far, for their size. Mice and rats have poor eyesight but their senses of hearing and smell are excellent.
Mice build their nests in tiny pockets of darkness. Those pockets may be found in burrows or any number of neglected spaces in your yard or home. Mice may be small, but they can cause big problems. Problems caused by mice Mice may have impressive teeth, for their size, but those teeth are softer than a rat’s. Instead of chewing through concrete and aluminum, mice prefer softer materials, such as wires, irrigation bags, and plants. Mice chewing on electrical wires have been known to cause housefires. They can also create new openings in your ductwork and damage anything you have stored out of the way for safekeeping. It ends up “out of sight, out of mind” isn’t particularly safe for your treasured holiday decorations or mementos when mice are nearby. In the garden, these herbivores prefer fruits and grain for their food, but they will take whatever they find. Contrary to popular fiction, mice are not especially fond of cheese. [I imagine it gets stuck in their teeth.] Instead, they will strip your cereal grains, ravage your nectarines and persimmons, and make short work of your peas and beans. Look for tiny teeth marks on pods, fruits, and stems. They will also pull seedlings and small plants down from underneath to enjoy in relative safety, along with newly planted seeds. If your seeds and seedlings have been disappearing, mice may be the problem.  Field mouse on barley (Charlie Marshall) CC BY 2.0 Mice are also responsible for spreading diseases such as hantavirus. Hantavirus causes kidney damage and failure. The disease is spread through mouse urine and feces which are found everywhere mice go. No pun intended. Mouse management In my experience, a traditional mousetrap smeared with crunchy peanut butter is the best way to trap mice. You can add other nuts and seeds to the peanut butter mixture as an added attractant. One minute a mouse sees food. The next moment, its life is over. When your trap is successful, don some gloves and a mask, remove the mouse from the trap and place the mouse in a plastic bag before depositing it in the trash. 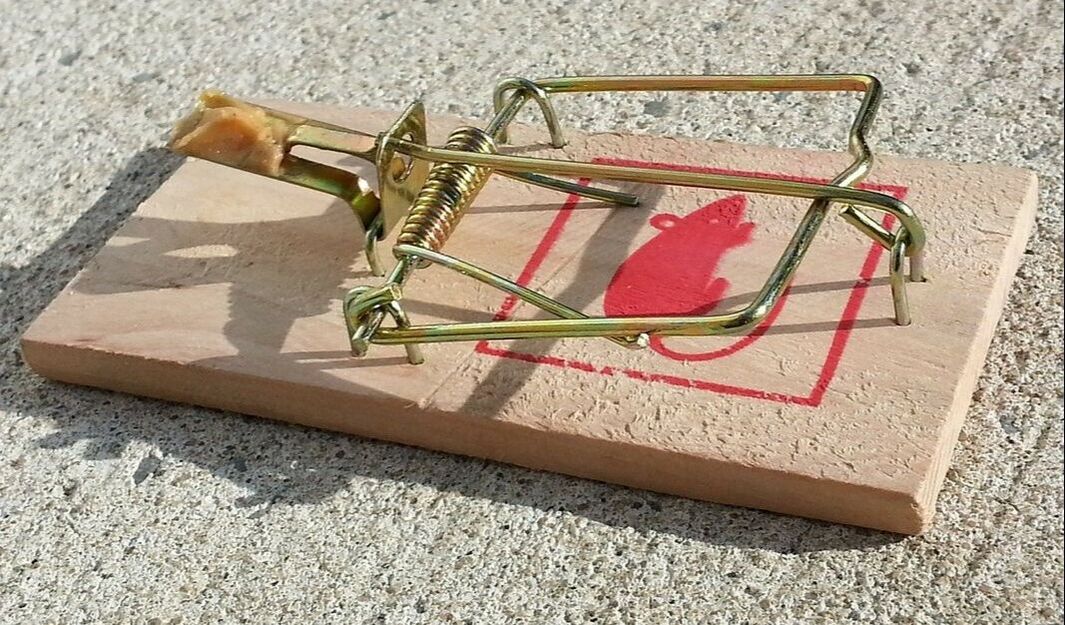 Mousetrap (PublicDomainPictures) Pixabay There are also electronic traps that electrocute its victims. Live capture traps can also be used, but those mice must be released somewhere else, potentially spreading disease into new areas and disrupting the delicate balances of life that exist there. As prolific as mice are, I opt for the kill trap method. Do not use poison or sticky traps. They are cruel. Sticky traps leave their victims to starve to death and poisons put pets, small children, birds of prey, and many other creatures at risk.
Small dogs and cats will go after mice, but only if they are left out all night, every night. In my opinion, the damage they may cause chasing a mouse outweighs the damage they prevent. Since cats tend to choose garden soil for their “business” and outdoor cats are more prone to injury and disease, I feel cats belong indoors. That’s just me. Tarantulas will also kill mice, but I don’t want one of those running around loose in my strawberry patch. How about you? Have you ever seen those big bags wrapped around the bases of young trees? They are irrigation bags. There are flattened versions used in garden beds, too. Those are called garden or watering mats. 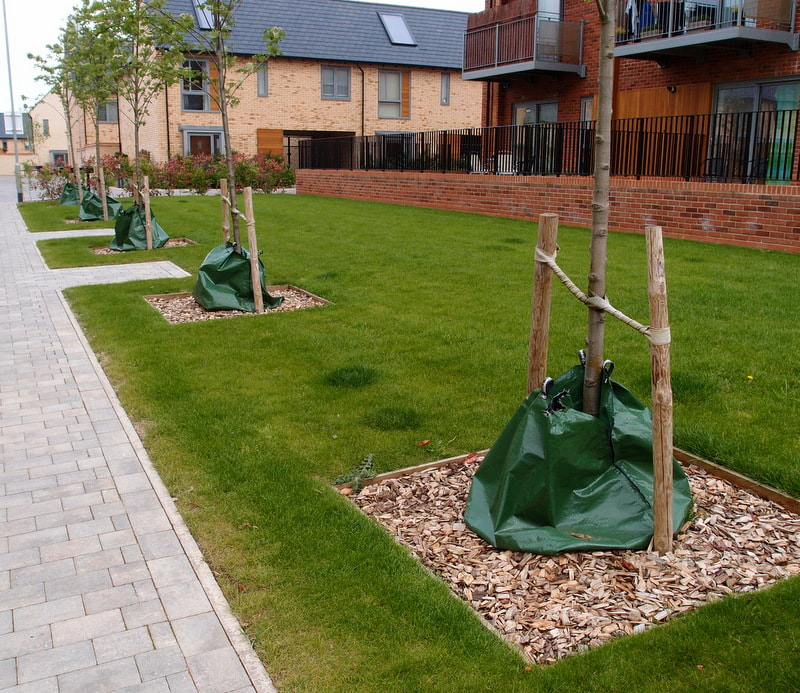 Tree watering bags help young trees get a good start on life (Michael Trolove) CC BY-SA 2.0 A steady supply of readily available water is critical for young trees and other plants to establish new root systems. Water stress can kill a plant. If there’s not enough water, they usually shrivel up and die. If there’s too much water, fungal diseases, such as damping off, set in. Or, they may simply drown. Irrigation bags help prevent these problems. How irrigation bags work Irrigation bags and garden mats store water and release it slowly. They are handy if you are going to be away or if drought conditions exist. Irrigation bags and garden mats are tough UV-stable, tear-resistant tarp material. Some irrigation bags stand up against and get strapped to the trunks of saplings. Others are donut-shaped. Garden mats lay flat and provide spaces for plants to grow through. You simply fill the bags with water using a garden hose. Some irrigation bags have adjustable drainage holes. Benefits of irrigation bags Irrigation bags provide several benefits. A steady supply of water is only one. Irrigation bags can also stabilize soil temperatures, benefitting soil-dwelling worms and microbes that support your plant’s root system. Irrigation bags reduce erosion in sloped areas where water and soil might roll away. Irrigation bags can also serve as a weed barrier. 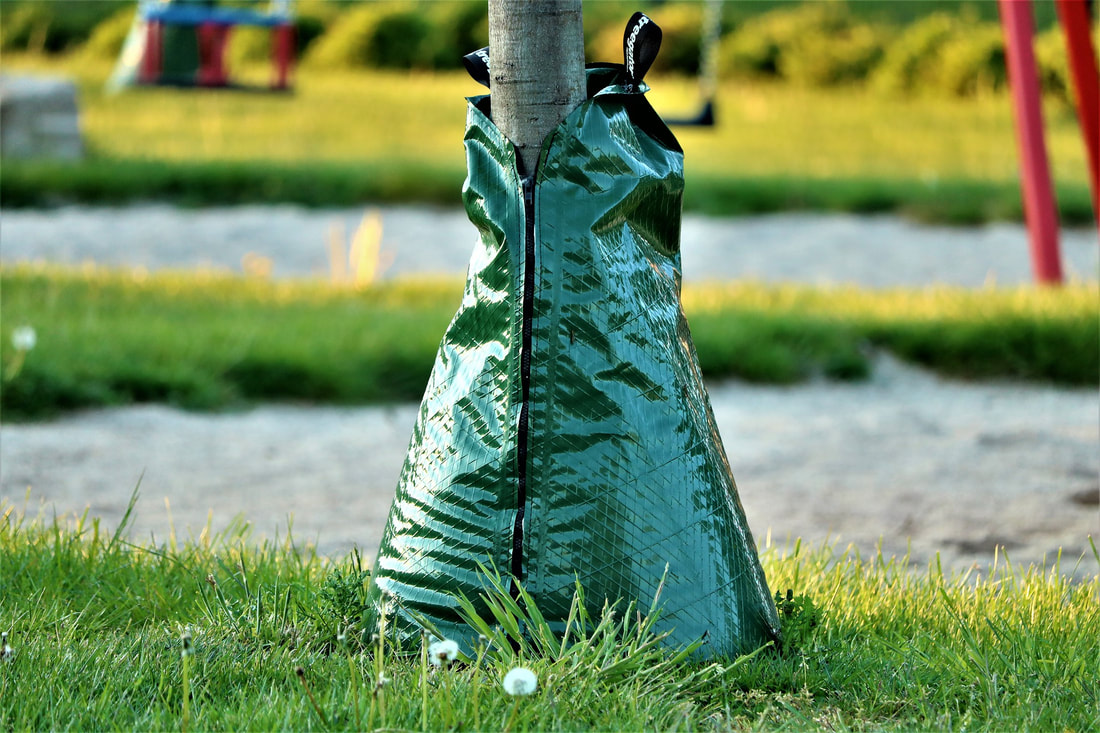 Zippered irrigation bag wraps around tree trunk (Caniceus) Pixabay Irrigation bags should be removed each winter and sanitized between uses.
The downside to irrigation bags Anything that comes into direct contact with a tree trunk or central plant stem for an extended period sets the stage for pest and disease problems. Insect pests, mice, and rats use irrigation bags and tree wraps as protection against predators and the elements. Here, they can gnaw, burrow, and procreate in relative safety, leading to bark breaches, infestation, and infection. As moisture stays close to a tree trunk or stem, fungal spores can take hold, leading to disease. If you use irrigation bags or something similar, be sure to check the integrity of your plant’s natural protections regularly. Irrigation bags are great for young trees, at first. For as long as all the roots are near the base, that’s where the water needs to be. As a tree grows, its root system extends out horizontally. [Picture a goblet on top of a dinner plate.] This provides stability as well as access to nutrients and water. If all the water stays at the base, the roots will be less likely to extend outward, making the tree more likely to fall over as it gets bigger. As a tree grows, irrigation rings at the drip line create a healthier environment and better stability. Soaker hoses do a pretty good job, too. Applying the same idea to other plants Irrigation bags and garden mats work much like self-watering planters. You fill them up and watering is done. These products aren’t particularly expensive, but there are some DIY on-the-cheap tricks you can do at home. You can use some of those plastic shipping bags or trash bags. Put them where you want them, fill them with water, being careful not to over-stress the material. Then start poking holes in the bottom until the desired flow rate is reached. These bags won’t hold nearly as much water, and I don’t know if there are any chemicals that might leach from those materials. I’ll leave that to you to research. Some people use layers of water-soaked towels. When roots grow upward into the towels, they become permanent parts of the landscape. You can also sacrifice a wheeled plastic trash can to act as a portable water source by poking a few holes in the bottom. Then wheel it to where water is needed, fill it with the hose, and close the lid. Watering done. There’s also the trick of filling a glass or plastic bottle with water, flipping it over, and inserting it into the soil. Easier said than done, in my experience, but it does work. Sometimes. Sometimes all the water flows out all at once, and sometimes it doesn’t. I don’t know why. The previous owner of my old house buried gallon milk jugs throughout the landscape for irrigating. She cut off the bottoms and buried them so that only the openings on top were exposed. It seemed very convenient at first. Then I realized that, unlike more durable pot irrigation, the plastic was degrading, and the space was filling up with soil, debris, and rocks, leaving very little room for water. I decided to remove them and fill the spaces with root-friendly, watering-storing soil. The plants seemed to like that plan. Irrigation bags and watering mats can save a lot of time, and provide plants with important water, but you can’t forget about them completely. Sun spiders are the stuff of legend, but they aren’t spiders. _1600.jpg) Male sun spider (JonRichfield) CC BY-SA 3.0 Also known as camel spiders, wind scorpions, and solifuges, these arachnids are kin to both spiders and scorpions, but they have their own order (Solifugae). There are more than 1,000 different sun spider species around the world. Large, fast, and secretive, many of these helpful predators prefer arid regions, but they are also found in scrub, grasslands, forests, and coastal areas. Their name comes to us from the Latin for “flees from the sun”, which is why these hunters are rarely seen. Sun spider description To hear people talk, you’d think that sun spiders were 12 feet long and ready to fill you with their venom. The truth is, they don’t have venom. What they do have are some monstrously large, curved pincer-like claws (chelicerae). And they move very quickly. Sun spider bodies can measure ½” to 3” long. If you add the legs, they can reach 6”. Okay, a 6” spider-like creature would freak me out, too. Most North American sun spiders are less than one inch long, legs included.  Arizona sun spider just over 3 inches long (Braboowi) CC BY-SA 3.0 Like other arachnids, sun spiders have eight legs, two body parts (a prosoma and an abdomen), and pedipalps at the mouth. They do not have fangs, venom, or spinnerets. They do not spin webs or have a distinct tube (pedicel) between the two major body parts.
Beneficial sun spiders Sun spiders are nocturnal or diurnal hunters. They capture many different insects and small animals, preferring termites, darkling beetles, and other ground-dwelling arthropods. Sun spiders have also been known to eat birds, rodents, small lizards, and snakes. After killing their prey, sun spiders cut their food into pieces, liquify it, and drink it. Generally speaking, these spiders are no danger to us, though they can inflict a painful bite. In a laboratory, one female sun spider ate more than 100 flies in an effort to fatten herself up before egg-laying began. I like that about her. Sun spiders live in relatively permanent burrows. Females lay 50-200 eggs each year and then guard those eggs until they hatch. Newborn sun spiders are translucent. As they mature, they become reddish-brown. Sun spider myths The size, speed, and scary appearance of sun spiders have given rise to many [false] legends:
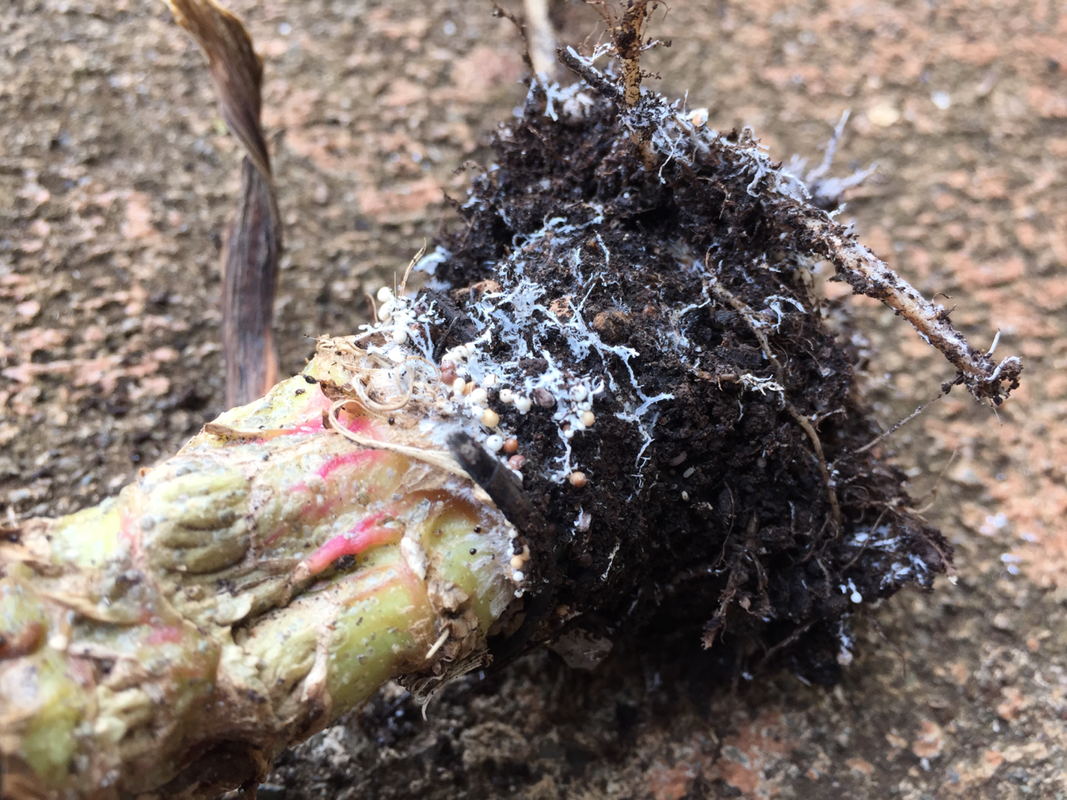
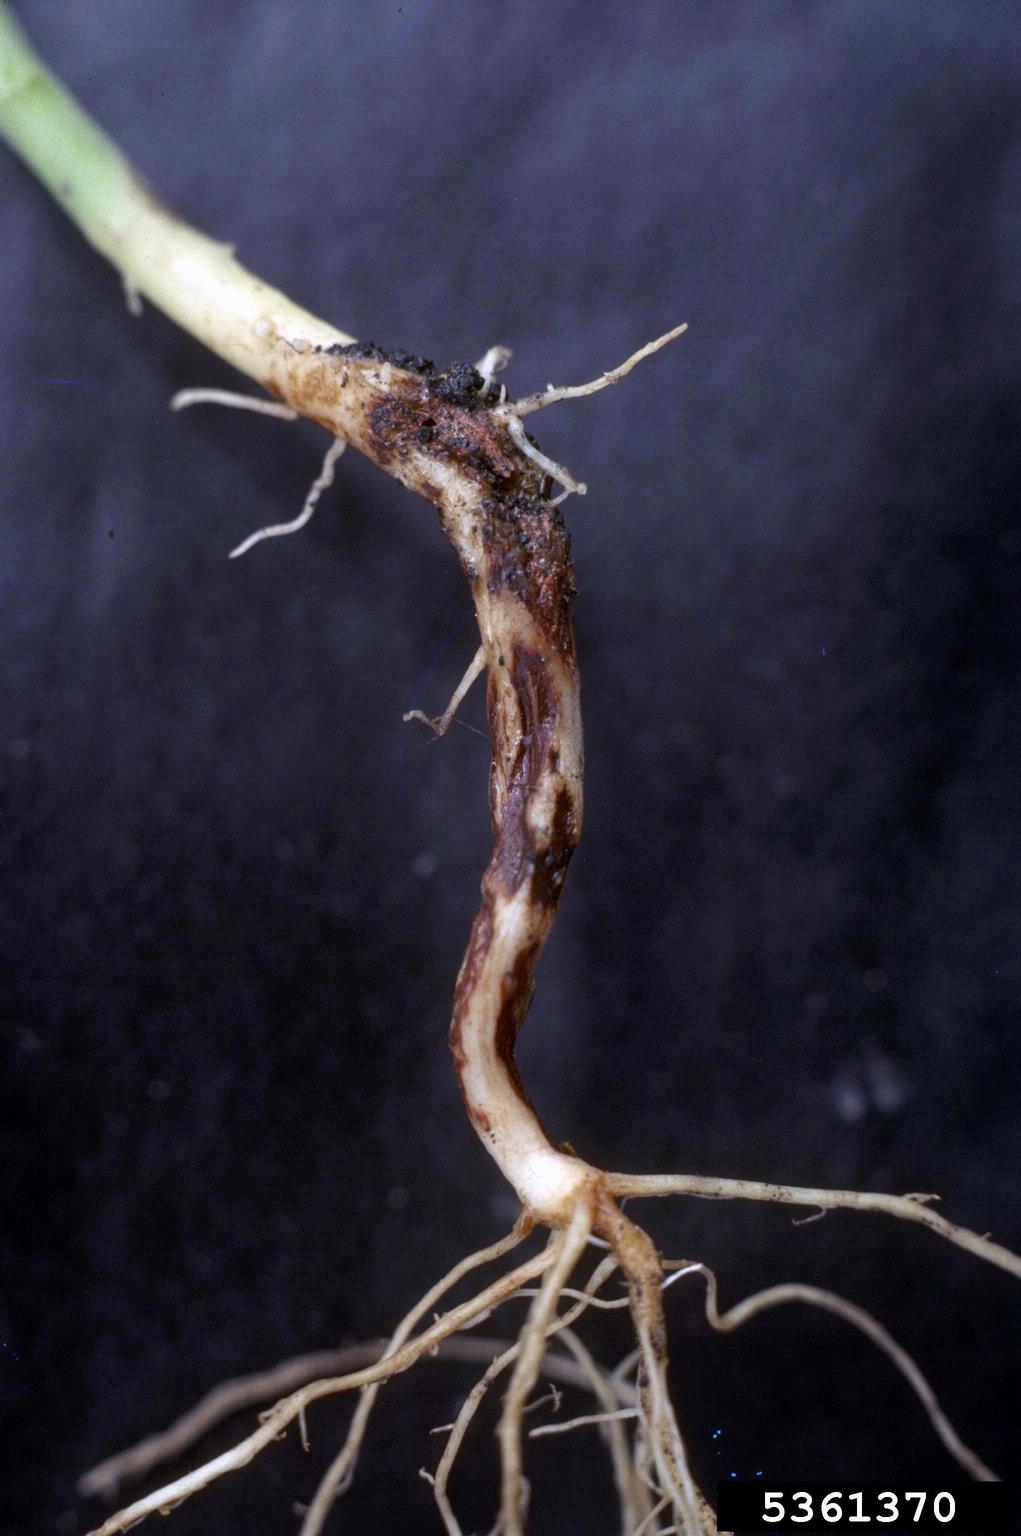
Myths aside, these hidden hunters are beneficial. Have you ever seen one in your garden? We’ve probably all lost seedlings to damping off disease. Nascent stems, healthy only the day before, suddenly appear pinched and broken, never to recover. When lesions appear further down the stem at the soil line, it is called collar rot.  Collar rot of apple tree (William M. Brown Jr., Bugwood.org) CC BY 3.0 Collar rot gets its name because of the lesions that form a collar around where the root system meets the stem. In embryonic plants, this area between the first root (radicle) and the first stem (hypocotyl) is called the collet. In more mature plants, this area is called the crown. Vulnerable stems and seedlings In the case of both damping off disease and collar rot, pathogens enter delicate new stems as they emerge from the earth, scratched by soil particles. These tiny wounds provide points of entry. Insect and herbivore feeding, garden tools, and rubbing due to overcrowding and improper pruning can also create these wounds. Wounds heal quickly, but sometimes pathogens get in. When they do, problems begin. 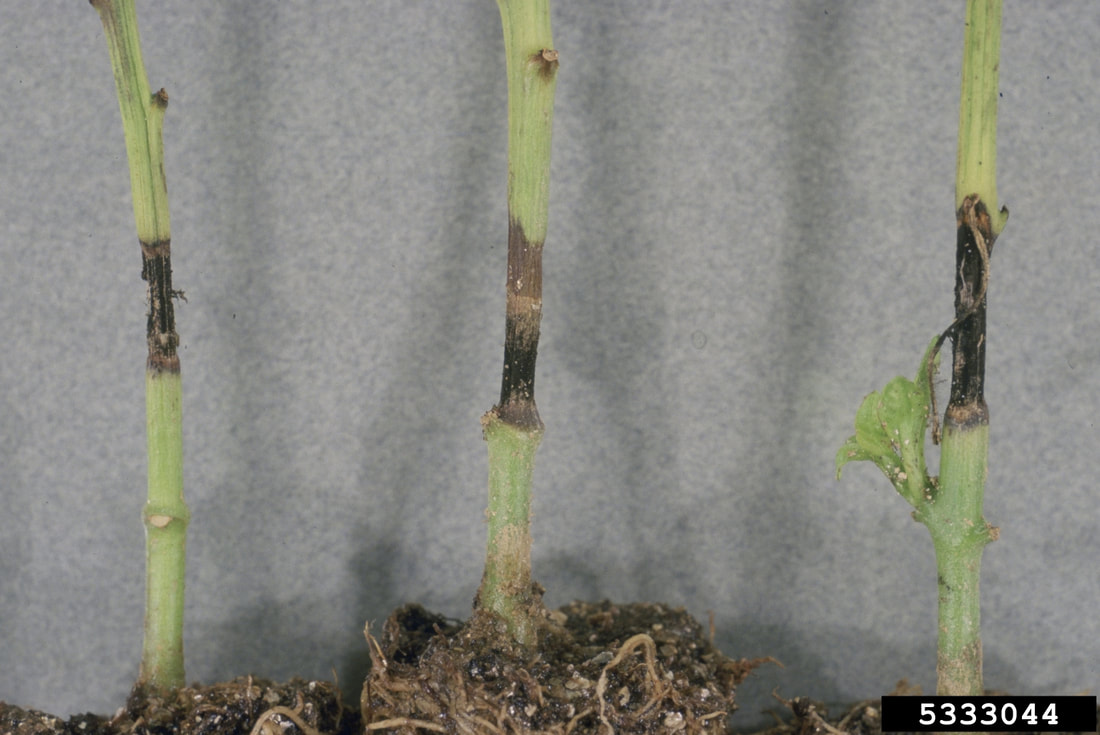 Alternaria black mold on pepper plants (Virginia Tech Learning Resources Center, VPISU, Bugwood.org) CC BY 3.0 Collar rot symptoms As fungi, bacteria, and other pathogens enter a plant, lesions start forming in a band, or collar, around the lower portion of the main stem. At the same time, vascular bundles become blocked and the disease-causing agents begin multiplying. Collar rot pathogens Collar rot looks similar to damping off disease because the same pathogen may be responsible. Collar rot can also be a symptom of several other infections. Trees infected with fireblight tend to be more susceptible to collar rot, but we don’t know why. As you can see, collar rot isn’t a specific disease. Instead, it is a symptom of attack by several different pathogens:
 Sclerotial blight of Swiss chard (Scot Nelson) Public Domain Collar rot prevention
Collar rot occurs in gardens and containers where the soil is infected. You can prevent the infections that cause collar rot with these tips:
I hope collar rot never occurs in your garden.
Abundant oxygen Oxygen is the third most abundant element in the universe. We now have a lot of it here on Earth, though the numbers can vary. Oxygen currently makes up more than 20% of our atmosphere. You may be surprised to learn, as I was, that oxygen, in the form of oxides, makes up nearly half of the Earth’s crust and nearly 90% of our oceans. Oxides are molecules made up of at least one oxygen atom which is bound to some other element.  Oxides, such as iron oxide or rust, form when oxygen combines with other elements (Paulnasca) CC BY 2.0 Binding is common in the world of oxygen (O). Two oxygen atoms tied together form the dioxygen (O2) found in our atmosphere. Add two hydrogen atoms to an oxygen atom and we get water (H20). Add two oxygen atoms to a carbon atom and you get carbon dioxide (CO2). But I digress. Plant respiration We’ve all heard how trees provide us with oxygen, but that’s not as true as we once believed. We now know that 50-80% of the oxygen we breathe comes from marine plants and plant-like organisms. So the majority of our oxygen comes from plankton. Also, plants only produce oxygen when they are performing photosynthesis. At night, plants are using rather than producing, oxygen. Plant respiration takes place through leaves, tree roots, outer stem cells, and root hairs. And respiration is more than just breathing. Respiration refers to any process within a living thing that uses a gas exchange to generate or release energy. When a plant is actively producing energy from light, carbon dioxide is inhaled and converted into sugar, and oxygen is exhaled. This is called the Krebs Cycle. Oxygen molecules are also used to break the sugars into usable bits. This is called oxidization. Some plants reduce the amount of oxygen available to neighboring plants using tannins in a type of chemical warfare known as allelopathy. Oxygen and decomposition If your compost pile doesn’t have enough oxygen present, it will turn into a stinky, rotten mess, or nothing will happen at all. The microorganisms responsible for decomposition breathe air and drink water just as we do. This is why it is important to flip and moisten your compost pile regularly for it to break down into usable bits for your plants. Oxygen in the soil Dissolved oxygen in the soil is critical for healthy plants. Soil that contains a lot of dissolved oxygen tends to produce plants with significantly larger root systems. Larger root systems mean healthier, more productive plants. Pumping oxygen into your garden soil probably isn’t on your to-do list. But there are two things you can do to increase the amount of oxygen and other helpful gases in your soil: improve drainage and reduce soil compaction. 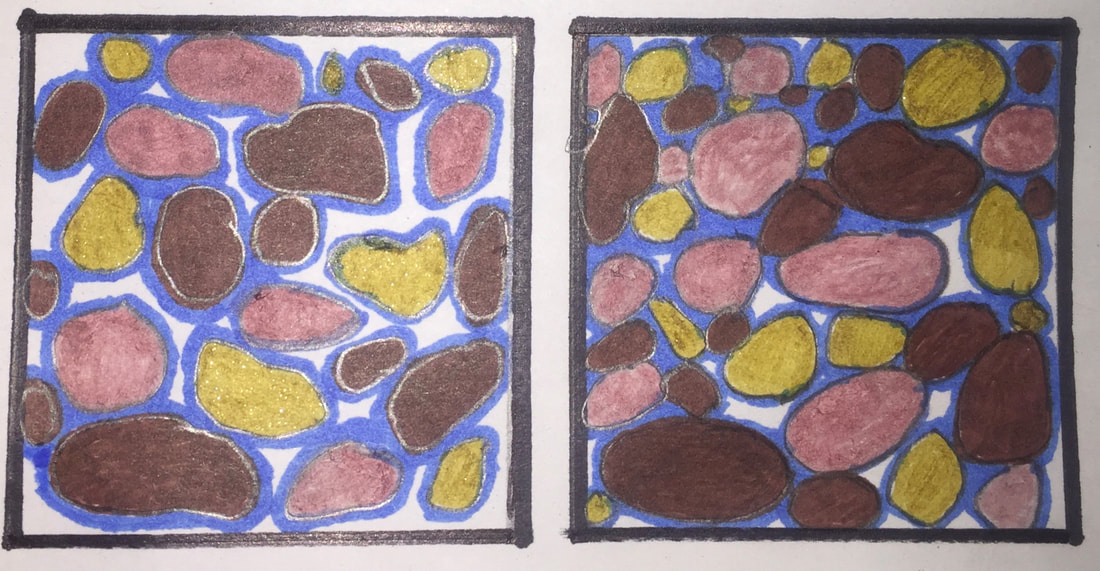 Compacted soil has less room for air and water (Kate Russell) I hope that you will breathe deeply and enjoy the changing scents of your garden as we move through the seasons. And remember to give that compost pile a turn.
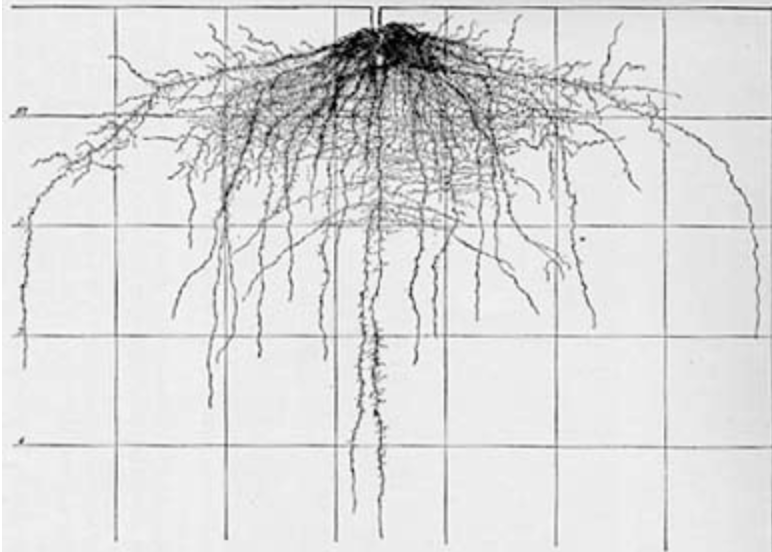
Underneath the cover of growing plants, leaf litter, and crawling insects is a layer of dark, nutrient-rich topsoil. Below that is something else entirely.  Flooding exposes lighter colored subsoil (USDAgov) CC BY 2.0 We are all familiar with the importance of topsoil and how it helps our plants grow, but the subsoil layer is also very important to plant health. Do you know what is in yours? What is in subsoil? Subsoil is mainly weathered rocks and clay. It contains little if any organic matter, so it is often lighter in color than the soil above it. But this doesn’t mean it has nothing to offer your plants. This is where gypsum, silica, and clay particles filter down and collect. The clay found in subsoil has been used throughout human history to make adobe. It is also the material of choice in wattle and daub fencing. But clay isn’t the only thing that collects in the subsoil. Aluminum, calcium, iron, magnesium, and other nutrients accumulate in the subsoil, as well. If there is a lot of iron present, the subsoil layer will have a more brown or reddish tint. Because these minerals are often moved by percolating or illuviated water, it is also called the illuvial horizon. The subsoil layer often has a distinct soil structure from the layers above and below.  Subsoil layer (David Brinicombe) CC BY-SA 2.0 How do plants use subsoil? All of a plant’s early growth takes place in the topsoil layer, where nutrients, helpful microorganisms, and water are in abundance in most cases. After that initial growth, many roots move into the subsoil. The subsoil provides anchorage, food, and water. Tucked into the spaces between the minerals and tiny rocks that make up subsoil are pockets of water and mineral nutrients. Water held in the subsoil is protected from evaporation. When topsoil is dry, water can still be found in subsoil. In the photos below, each block represents one square foot of soil.
Subsoil, erosion, and compaction
Rototilling, construction, and heavy traffic can strip away topsoil, exposing the subsoil. Because subsoil does not contain the same organic matter, microorganisms, and root systems that hold topsoil in place, erosion occurs at a much higher rate. Those actions can also lead to the creation of a hardpan layer that blocks air, water, and roots almost completely. Compacted soil interferes with plant growth, drainage, and overall soil health. It is often corrected by aeration and deep-rooted cover crops. Compacted subsoil can be detrimental to plant health for many years. One study found that a compacted subsoil layer affected plant growth for nearly 20 years after the compaction occurred. Correcting subsoil compaction is expensive and difficult. Unfortunately, it is also very common in gardens due to home construction. This is why we are all required to conduct perc tests when buying a home. If water can’t percolate down and away, your home might find itself down the river after a particularly bad rain. [In the past, contaminated soil was used to create an artificial subsoil layer for home construction. Luckily, those days are behind us.] You can protect your soil and plants by being judicious about rototilling, creating paths, and avoiding walking on wet soil. Subsoil can be converted to topsoil by adding substantial amounts of aged manure, compost, green manure, and time. What’s in your subsoil? If you have a soil sampling tool, you can use that to collect a sample of both the topsoil and subsoil layers. Or, you can use a trowel or shovel. You will need to dig down a foot or two. Look for changes in both color and texture. You can take a sample of subsoil and send it out to a lab for testing, or you can test its texture for yourself. You can also test your subsoil’s permeability at home. These home tests won’t tell you which nutrients are present, however. Take a look at your subsoil and tell us what you find in the comments. Extra points for fossils and treasures! Writing yesterday’s post on soil horizons, I ran across a couple of unfamiliar words. Marl was one of them. Here’s what I’ve learned about marl.  Marl (Tashkoskim) CC BY-SA 4.0 The word marl comes to us from the late 19th century. It is short for marbled. Rather than being as hard as your favorite cat’s eye or aggie marble, marl is a porous, relatively soft mudstone. And it contains many of the nutrients your plants love. The lower cliffs of Dover and much of New Jersey contain marl.  White Cliffs of Dover (Immanuel Giel) CC BY-SA 3.0 Marl formation Marl forms as carbonate-rich clay mud and silt are blended with algae that loves alkaline waters. The carbonate is from the dead shells of water-dwelling organisms and the calcified algae. Originally the term marl only referred to freshwater formations. We now know that marl occurs in saltwater too.  Coastal marl formation, southern Sicily (Carnby) CC BY 3.0 Types of marl Marl contains 65–35% carbonate and 35–65% clay, depending on the type. It can be blue, green, sand-colored, or red. Marl contains calcium, iron, phosphorus, potash, silicic acid, and sulfur. It also contains magnesium, but only a little. Magnesium deficiencies are common in fields treated with marl.
Soil is fundamental to the health and productivity of your plants. Healthy soil supports healthy plants. But there’s more to soil than meets the eye  Soil layers tend to get progressively lighter in color (Chris Yeates) CC BY-SA 2.0 You’ve heard a lot about topsoil and maybe some about bedrock, but what about the layers in between? The layers of soil under your feet have developed over eons of glaciation, erosion, flooding, and thousands of other circumstances of pedogenesis. Underneath it all is your soil’s foundation, or bedrock. Of course, if you go deep enough you’ll reach the molten core, but that only affects gardeners in places like Hawaii. For most of us, it is only the top few feet that dictate the health of our plants. There are several different layers and those layers are called horizons. There are different classes of thought on soil horizons. Some groups define these layers by the soil texture, while others prefer sorting them by use. Keep in mind that not all soils have all these layers. And some soils have astounding numbers of layers.  Soil horizons (Wilsonbiggs) CC BY-SA 4.0 Topsoil (O, A, and E horizons)
Topsoil refers to the uppermost 5-10” of soil. It has the highest concentration of organic matter and microorganisms. The majority of your plants’ roots can be found in topsoil. It is divided into three different layers. The organic surface layer, or O horizon, is where we find plant litter. In areas with waterlogged peat areas, we have the P horizon. Under that, we have the surface soil or A horizon. In some cases, leaching (or eluviation) can cause certain minerals to create a separate, lighter-colored layer between the topsoil and subsoil. This lighter layer is called the E horizon and it often contains a lot of silica. Subsoil (B horizon) While not as rich in organic matter as topsoil, the subsoil layer is where many minerals accumulate. This is especially true of aluminum, clay minerals, iron oxides, and some organic bits. The subsoil layer is commonly reddish-brown due to its iron content and it often has a distinctly different soil structure than the horizons above it. The subsoil layer is often overlooked, which is unfortunate since all garden plant roots make their way to this layer. When the topsoil and subsoil have gone through the same soil-forming conditions, the combined areas are called the solum. Substratum (C horizon) The substratum layer consists of partially weathered rocks that have not been affected by the conditions that created the layers above. It contains a lot of calcium carbonate and other soluble minerals and tends to be a lighter color than the layers above. This layer is often created by flooding and landslides. Bedrock (R horizon) Unlike horizon C’s rocks and boulders, which you can dig up, the bedrock layer is massive layers of rock that make up more of what we consider the earth’s crust. Other horizons Limnic soil (L horizon) occurs as a result of aquatic life. It contains the diatomaceous earth, sedimentary peat, and marl left behind when lakes and oceans dry up. You can also have a fluid or frozen water layer (W horizon) or man-made layers that block roots (M horizon). The next time you pass a construction site or look at an image of the Grand Canyon, take a closer look at all those layers and think about how they might affect plant roots. The closer you look, the more there is to see. How does fog affect your plants? Let’s find out.  Fog rolls into Seattle from the ocean (Patrick Rodriguez) CC BY-SA 3.0 First, what is fog? Fog is the low-flying equivalent of stratus clouds. It contains tiny droplets of water and ice crystals that have formed through condensation. This condensation occurs when the difference between air temperature and the dew point is less than 4.5°F (2.5°C). Dew point is the temperature that ambient air must reach to become saturated with water. When that point is reached, water particles start collecting around any dust, ice, pollen, or salt in the air. Unlike mist, which we can see through, fog tends to be harder to see through. Technically, fog reduces visibility to less than 0.62 miles, but who’s counting? There are several different types of fog, but I’ll leave that to you to explore. Let’s find out what all this moisture in the air does to our garden plants.  Foggy field (Shogun) Pixabay Time matters Fog diffuses sunlight, much the way smoke from fires does. [See Yellow Sky Days] Instead of simply shining downward, light particles get bounced around, allowing photosynthesis to occur in places where it normally might not. Of course, if there’s too much fog, photosynthesis is significantly reduced. Periods of fog often cause discoloration, stunting, and even wilting in crops such as wheat. These responses are temporary and they often disappear once the sky clears. Extended periods of moisture often increase the likelihood of disease. Bacterial head rot, black scurf, black spot, cucurbit scab, russeting, sooty blotch and flyspeck, and tomato gray wall are more likely in areas with frequent fog.
Foggy days are a good time to apply insecticidal soaps to manage cabbage aphids and other pests. And dormant oils are best applied just after a period of fog. Fog reduces topsoil drying, acts as a protective blanket during cold weather, and slows evapotranspiration, reducing the need for irrigation.
If you’ve never heard Eddie Izzard’s hysterical description of fog, check out his Dressed to Kill video. It cracks me up every time. With leaves falling from trees and swirling around our feet, today seemed like a good day to talk about leaf scars.  Horse chestnut stem showing seven bundle scars within a leaf scar (AnRo0002) Free Use When I say leaf scars, I am not referring to the ravages of battle or bad decisions. Instead, leaf scars occur naturally whenever a leaf falls from a tree. The information they ‘leave’ behind may surprise you. [Sorry, I couldn’t resist.] What are leaf scars? Leaf scars are the marks left behind on a twig after a leaf falls off. It is where the petiole, or leaf stem, was attached to the stem. As long as photosynthesis is taking place, the connection between leaf and stem is usually pretty strong. It has to be. Leaves flutter in the breeze, are battered by raindrops and send sugars produced through photosynthesis into the vascular bundle. But then things change. Scar formation At some point, a leaf becomes more of a burden than a sugar factory. In the world of plants, the process of getting rid of unwanted body parts is called abscission. Abscission can occur because of seasonal changes, or in response to conditions such as drought, shade tree decline, disease, or natural aging. That natural aging is called senescence. Whatever the cause, plants try to pull as many resources from leaves as possible before dropping them. This is why leaves change color in autumn. Once a leaf has been sucked dry, the petiole softens, and a protective barrier starts forming between the petiole and the twig. This area is called the abscission layer. After the leaf falls, the wound is covered by a protective corky material, leaving us with a leaf scar.  White ash leaf scar (Michael Ellis) CC BY 4.0 Other scars If you look closely at a leaf scar, you may see tiny holes arranged in a pattern. This area is called a bundle scar, and it is the torn vascular bundle. Buds often form just above leaf scars, and they leave scars of their own. They are called bud scars. 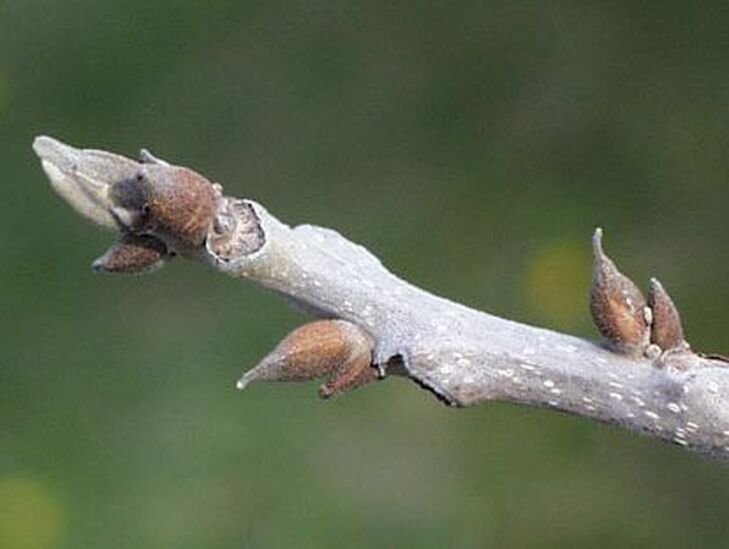 Leaf scars and buds on pecan stem (Paul Wray, Iowa State University, Bugwood.org) CC BY 3.0 Problems with leaf scars In some cases, diseases can take hold in leaf scars. Olive knot is one of several bacterial diseases that start this way. European apple canker is a fungal disease that can enter through leaf scars. Any time there is an opening, there is a risk of disease. That being said, you need to resist the urge to seal up plant wounds artificially. In most cases, this results in moisture being trapped against the wound. This slows the natural healing process and increases the risk of disease and rot.  Papaya leaf scar (Ameena104) CC BY 4.0 Botanists and plant aficionados use leaf scars to learn more about plants. Plants with small leaf scars tend to have small leaves. Plants with large, curved leaf scars tend to have bigger leaves. This is because a curved attachment can support more weight. Leaf scars can be brown, green, or red, depending on the species. They can be flat or rounded. In some cases, hairs can be seen around the leaf scar.
If you have a mystery tree, you may be able to use its leaf scars to help identify its family ties. |
Welcome!You can grow a surprising amount of food in your own yard. Ask me how! To help The Daily Garden grow, you may see affiliate ads sprouting up in various places.
You can also get my book, Stop Wasting Your Yard!  Index
All
Archives
April 2024
|


 RSS Feed